OWNER’S MANUAL
GUIDE DU PROPRIÉTAIRE
MANUAL DEL USUARIO
CAUTION:
Read and Follow All Safety Rules and
Operating Instructions Before First
Use of This Product.
ATTENTION :
Avant de faire fonctionner cette
machine, lisez et suivez toutes les
consignes de sécurité de ce guide en
premier lieu.
ADVERTENCIA:
Lea y Siga Todas las Indicaciones de
Seguridad y de Operación ANtes de
Utilizar Este Producto.
Table of Contents . . . . . . . . . . . . . . . . . . . . . 1
Table des matières . . . . . . . . . . . . . . . . . . . . 13
Índice . . . . . . . . . . . . . . . . . . . . . . . . . . . . . 25
Danby Products Limited, Guelph, Ontario Canada N1H 6Z9
Danby Products Inc., Findlay, Ohio USA 45840
Version 1.B.3/05
Model • Modèle •Modelo
DIM1524W
R

Important Safety Information
Safety Precautions 3
Grounding Instructions 4
Operating Instructions
Features of Your Ice Maker 5
The Controls of Your Ice Maker 6
Ice Making 7
Ice Size Selection 7
Delayed Start 7
Self-Clean Mode 8
Helpful Information
Draining Your Ice Maker 9
Care and Cleaning 10
If Something Goes Wrong
Before Your Call For Service 11
Warranty 12
3
5
9
11
1
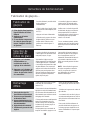
TABLE OF CONTENTS

2
WELCOME
NEED HELP?
Welcome to the
Danby family. We’re
proud of our quality
products and we
believe in dependable
service.
You’ll see it in this
easy-to-use manual
and you’ll hear it in the
friendly voices of our
consumer service
department.
Tel: 1-800-26-
Best of all, you’ll expe-
rience these values
each time you use
your ice maker. That’s
important, because
your new ice maker
will be part of your
family for a long
time.
Before you call for service,
there are a few things you
can do to help us serve
you better...
Read this manual
It contains instructions to
help you use and maintain
your ice maker properly.
If you received a
damaged appliance
Immediately contact the
dealer (or builder) that sold
you the ice maker.
Save time and money
Check the section titled “If
Something Goes wrong”
before calling. This section
helps you solve common
problems that might occur.
If you do need service, you
can relax knowing help is
only a phone call away.
Tel: 1-800-26-
Write down the model and serial
numbers here. They are on a label
located on the back of the ice
maker.
Model number ____________
Serial number ____________
Date purchased ____________
Staple your receipt to the inside
back cover of this manual. You will
need it to obtain service under
warranty.
Start Here!…Before using your Ice’N’Easy ice maker
R
R

READ ALL SAFETY INFORMATION BEFORE USING
3
IMPORTANT SAFETY INFORMATION
WARNING
SAFETY
PRECAUTIONS
To reduce the risk of fire, burns, electric shock, or injury to persons when using your appliance,
follow basic precautions, including the following sections.
• This appliance must be
grounded. Connect only to
a properly grounded outlet.
See “Grounding Instructions”
section on page 4.
• Do not operate this appli-
ance if it has a damaged
power cord or plug, if it is
not working properly, or if the
appliance has been damaged
or dropped.
• Do not use this product near
water-for example, in a wet
basement, near a swimming
pool or near a sink.
• Use this appliance only for
its intended use as described
in this manual. Do not use
corrosive chemicals or
vapors in this appliance.
• This appliance should be
serviced only by qualified
service personnel. Contact
nearest authorized service
facility for examination, repair
or adjustment.
• See door surface cleaning
instructions in the Care and
Cleaning section(s) of this
manual.
• Do not cover or block any
openings on the appliance.
• Do not store this appliance
outdoors.
• Keep power cord away from
heated surfaces.
• Do not immerse power cord
or plug in water.
• As with any appliance, close
supervision is necessary
when used by children.
SAVE THESE INSTRUCTIONS
WARNING: The internal holding compartment of this appliance for both stored ice cubes and
stored water is NOT a refrigerated compartment.
We recommend changing (replacing) any stored water that has not been used within a 12 hour
time period of the machine being operational.

4
This appliance must be
grounded. In the event of an
electrical short circuit, ground-
ing reduces the risk of electric
shock by providing an escape
wire for the electric current.
This appliance is equipped
with a power cord having a
grounding wire with a ground-
ing plug.
The plug must be plugged into
an outlet that is properly
installed and grounded.
Consult a qualified electrician
or service technician if the
grounding instructions are not
completely understood, or if
doubt exists as to whether the
appliance is properly ground-
ed.
If the outlet is a standard 2-
prong wall outlet, it is your per-
sonal responsibility and obliga-
tion to have it replaced with a
properly grounded 3-prong
wall outlet.
For best operation, plug this
appliance into its own electri-
cal outlet to prevent flickering
of lights, blowing of fuse or
tripping of circuit breaker.
Do not under any circum-
stances cut or remove the
third (ground) prong from the
power cord.
Do not use an adapter plug
with this appliance.
Do not use an extension
cord with this appliance. If the
power cord is too short, have
a qualified electrician or serv-
ice technician install an outlet
near the appliance.
GROUNDING
INSTRUCTIONS
IMPORTANT SAFETY INFORMATION
WARNING
Improper use of the
grounding plug can result
in a risk of electric shock.

5
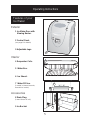
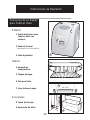
Operating Instructions
Features of your
Ice Maker
1 Ice Maker Door with
Viewing Barrier.
2 Control Panel.
(see page 6 for details)
3 Adjustable Legs.
4 Evaporator Coils.
5 Water Box.
6 Ice Shovel.
7 Water Fill line.
(Located in internal reservoir,
beneath ice bucket.)
8 Drain Plug.
(Lower left rear of unit)
9 Ice Bucket.
8
9
6
5
4
1
2
3
Exterior
Accessories
7
Interior

6
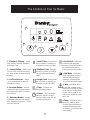
The Controls on Your Ice Maker
1. Electronic Display - shows
timer setting, selection indicators,
and status icons.
2. Power Button - used to turn
unit on or off, also used to cancel
the timer and/or currently running
program.
3. Ice Size Selector - Allows
you to select between three (3)
available ice sizes.
4. Increase Button - Used in
conjunction with the timer feature,
each depression adds .5 hours to
the set timer.
5. Decrease Button - Used in
conjunction with the timer feature,
each depression removes .5 hours
from the set timer.
•
Small Cube -Denotes that
the ice maker is currently set
to produces small size cubes.
• Medium Cube - Denotes
that the ice maker is currently
set to produce medium size
cubes.
• Large Cube - denotes that
the ice maker is currently set
to produce large size cubes.
• Timer - Displays the
delayed start set time.
• Power - This icon flashes
when the power is off and
becomes static when the unit
has been powered on.
• Bucket Full - Illuminates
to indicate that the water
bucket is full and will need to
be emptied before the ice
making process can resume.
• Add Water - Illuminates
when the internal reservoir
requires filling before pro-
ceeding or continuing with
the current selected program.
• Fault - displayed when
the unit has entered a fault
mode and is not able to begin
or resume the current mode.
Please refer to page 11 for
instructions should this situa-
tion occur.
• Pump - Illuminates when
the unit is pumping water
from the internal reservoir to
the water bucket during the
ice making cycle and the self
clean mode.
1
2
3
4
5

Operating Instructions
To immediately begin the ice
making process;
• Remove ice bucket and add
water to Fill line.
(approx. 3.5 L)
• Reinsert the ice bucket and
press the Power button.
• Select the desired ice cube
size
(See “Ice Size” below).
• The ice maker will automati-
cally begin approximately 15
seconds after the last button
is pressed.
Please note: The length of
the ice making process is
directly proportionate to the
current ice size setting and
batch completion time range
between 9 minutes and 15
minutes per cycle, depending
upon your ice size selection.
For optimal results, please
keep the ice maker door
closed during the ice making
process.
Ice Making
1 Add water to ‘fill line’.
2 Press the power button.
3 Change the ice size if you
don’twant medium cubes.
Delayed Start
• Remove ice bucket and add
water to Fill line.(approx. 3.5 L)
• With the power off. Press
the Increase/Decrease but-
tons once simultaneously to
enter the timer set mode.
• Each subsequent press of
the increase button will
increase the timer in 30
minute increments up to 12
hours. Alternatively to
subtract time from the timer,
press the decrease button to
decrease the timer by 30
minute increments.
• Reinsert the ice bucket and
select the ice size you
require.
• The ice maker timer will
automatically start 10 sec-
onds after the last button is
pressed.
To cancel the timer at any
time and begin the ice making
process immediately, simply
press the power button.
1 Add water to ‘fill line’.
2 Ensure the power is off.
3 Press the increase &
decrease arrows
simultaneously
4 Select timer length.
5 Select required ice size.
Ice Size
Selection
The ice size selection button
allows you to choose from
small, medium or large ice
cubes.
By default your ice maker is
configured to produce medi-
um size ice cubes. However
if you would like a different
size of cube, you need only
depress the ice size selection
button to cycle between the
three (3) available sizes
(small, medium and large.)
Ice size change is possible
during the running ice making
cycle, however it is recom-
mended to wait until the cur-
rent cycle is complete before
defining a new ice size.
NOTE: Unless there is a
power failure or power inter-
ruption to the unit. The ice
size selection you have made
will be retained as the default
ice size.
1 Press Power or
enter Delayed Start
mode (see below).
2 Depress the ice size
selection button on the
control pad.
7

8
Operating Instructions
Self-Clean Mode
The self-clean mode should be
put into operation before you
use your ice maker for the first
time and/or if there has been a
long period without use.
Stage 1
• Add equal parts of water and
vinegar (1:1) to the ice maker’s
reservoir.
• With the power off, press the
increase and decrease arrows
simultaneously two times to
activate the self-clean mode.
Please note, the self clean
mode with automatically initiate
approximately 10 seconds after
the last button depression.
• During the self clean mode,
the upper ice bucket is filled
and dumped multiple times and
the pump will remain in contin-
uous operation as it feeds
water to the bucket and evapo-
rator coils. This cycle contin-
ues for approximately five-and-
a-half minutes.
Upon completion, the unit auto-
matically powers down and is
now ready for stage 2.
Stage 2
• Drain the cleaning solution
from the internal reservoir by
removing the rear drain cap
and plug (see pg. 9).
• Add fresh water to the ‘Fill
line’ in the internal reservoir.
• With the power off, press the
increase and decrease arrows
simultaneously two times to
activate the self clean mode-
which will now act as a rinse.
Upon completion of this final
stage of the self clean process,
the unit automatically powers
down once again. Proceed to
drain the water from the inter-
nal reservoir and leave the lid
on the ice maker open to allow
it to air dry.
1 Add water & vinegar (1:1)
2 With the power off,
simultaneously depress
the increase & decrease
arrows twice.
3 Drain after program is
complete.
4 Add fresh water to fill line.
5 Repeat Step 2
6 Drain after program is
complete.

9
Helpful Information
In order to maintain a hygien-
ic environment within your ice
maker and prevent the poten-
tial formation of bacteria, it is
highly recommended that you
completely drain the ice
maker after each use (daily)
or if any water has been
stored within the internal
reservoir for in excess of
twelve (12) Hours.
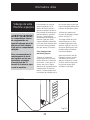
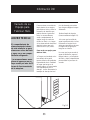
To drain your ice maker;
• Place a drip tray beneath
the right rear portion of the
cabinet. Depending on the
amount of water contained in
the internal reservoir, the
water may exit the drain rap-
idly. Tilt the drain pan slightly
towards the drain spout to
prevent water from projecting
away from the intended water
collection area.
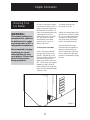
• Remove the drain cap
(as shown in fig. 9.1 ).
• When the exiting water flow
decreases to a ‘trickle’ slightly
tilt your ice maker backwards
to ensure all the water that
may have been stored inter-
nally is thoroughly drained.
Once the water has been
removed from the appliance,
wipe the internal reservoir
and ice bucket dry and leave
the ice maker lid in the open
position to expedite the drying
process.
Draining Your
Ice Maker
Fig 9.1
WARNING:
The internal holding com-
partment of this appliance
for both stored ice cubes
and stored water is NOT a
refrigerated compartment.
We recommend changing
(replacing) any stored
water that has not been
used within a 12 hour time
period of the machine
being operational.

10
Helpful Hints
Allow the ice maker door to
remain open for a few min-
utes after the ice making mak-
ing process is complete , run-
ning the self-clean mode or
manual cleaning, to air out and
dry the inside of the ice maker
cabinet.
NOTE: Be certain the
power is off before
cleaning any part of
this appliance.
How to clean
the inside
Please refer to the Self-Clean
Mode Section on pg. 8 for
proper system cleaning.
Walls, Floor of Reservoir,
Inside Window, and Plastic
Parts
Some water deposits and dust
can be removed with a paper
towel, others may require a
damp cloth.
Ice Bucket
To prevent breakage, do not
place the ice bucket into hot
water just after ice making.
Wash it carefully in warm,
sudsy water. The ice bucket
can be broken if dropped.
Remember, do not operate the
ice maker without the ice
bucket in place.
Do not use abrasive cleaners
or sharp utensils on any part of
your ice maker.
Care and Cleaning
How to Clean
the outside
Outer Case
Clean the outside of the appli-
ance with a sudsy cloth. Rinse
and then dry. Wipe the window
clean with a damp cloth.
Control Panel and
Door
Wipe with a damp cloth. Dry
thoroughly. Do not use clean-
ing sprays, large amounts of
soap and water, abrasive or
sharp objects on the panel-
they can damage it. Some
paper towels can also scratch
the control panel.
Door surface
It’s important to keep the area
clean where the door seals
against the cabinet. Use only
mild, non-abrasive detergents
applied with a clean sponge or
soft cloth. Rinse well.
Do not use cleaners con-
taining ammonia or alcohol
on the ice maker.
Ammonia or alcohol can
damage the appearance of
the appliance.
Never use any commercial
cleaners on any part of your
ice maker.

Before You Call For Service
If none of the above rectify the situation please contact our customer care department
at 1-800-26- (1-800-263-2629)
11
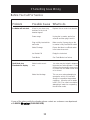
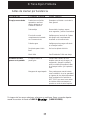
If Something Goes Wrong
Problem Possible Cause What to do
Ice Maker will not start. A fuse in your home may Replace fuse or reset circuit breaker.
be blown or the circuit
breaker tripped.
Power surge. Unplug the ice maker, wait a few
seconds and then plug it back in.
Plug not fully inserted into Make sure the 3-prong plug on the
wall outlet ice maker is fully inserted into outlet.
Water Shortage Ensure that there is sufficient water
in the internal reservoir.
Ice Bucket Full Empty the ice bucket.
Fault Mode See ‘Fault Mode Icon’ below.
Fault Mode Icon Water bucket cannot Ice cubes may be lodged in between
illuminated in display turn. the water box and evaporator. Power
off the unit and manually remove any
ice cubes from the water bucket and/
or ice shovel.
Water line blockage. This can occur when attempting to
operate the unit (or if it has been
stored) in low ambient temperature
conditions. Allow the unit to remain
in 68 F (20 C) for a few hours before
attempting to make ice or operating
the self-clean mode.
R

LIMITED PRODUCT WARRANTY
This quality product is warranted to be free from manufacturer’s defects in material and workmanship, provided that the unit is used under the normal operating
conditions intended by the manufacturer.
This warranty is available only to the person to whom the unit was originally sold by Danby or by an authorized distributor of Danby, and is non-transferable.
TERMS OF WARRANTY
Plastic parts (ie. evaporator door, door rails, covers and trays are warranted for thirty (30) days only from purchase date, with no extensions provided.
First Year
During the first year (1), any electrical part of this product found to be defective, including any sealed system units, will be repaired or
replaced, at warrantor’s option, at no charge to the ORIGINAL purchaser. Consumable parts (ie. light bulbs) are not warranted or guar-
anteed for any length of time.
To Obtain Service
It will be the customer’s responsibility to transport the appliance to the closest Authorized Service Depot at their own expense. Contact
your dealer from whom your unit was purchased, or contact your nearest authorized Danby service depot, where service must be per-
formed by a qualified service technician. If service is performed on the units by anyone other than an authorized service depot, or the
unit is used for commercial application, all obligations of Danby under this warranty shall be at an end.
Nothing within this warranty shall imply that Danby will be responsible or liable for any spoilage or damage to food or other contents of this appliance, whether
due to any defect of the appliance, or its use, whether proper or improper.
EXCLUSIONS
Save as herein provided, Danby Products Limited (Canada) or Danby Products Inc. (U.S.A.), there are no other warranties, conditions, representations or guaran-
tees, express or implied, made or intended by Danby Products Limited or its authorized distributors and all other warranties, conditions, representations or guar-
antees, including any warranties, conditions, representations or guarantees under any Sale of Goods Act or like legislation or statue is hereby expressly exclud-
ed. Save as herein provided, Danby Products Limited (Canada) or Danby Products Inc. (U.S.A), shall not be responsible for any damages to persons or property,
including the unit itself, howsoever caused or any consequential damages arising from the malfunction of the unit and by the purchase of the unit, the purchaser
does hereby agree to indemnify and save harmless Danby Products Limited from any claim for damages to persons or property caused by the unit.
GENERAL PROVISIONS
No warranty or insurance herein contained or set out shall apply when damage or repair is caused by any of the following:
1) Power Failure.
2) Damage in transit or when moving the appliance.
3) Improper power supply such as low voltage, defective house wiring or inadequate fuses.
4) Accident, alteration, abuse or misuse of the appliance such as inadequate air circulation in the room or abnormal operating conditions,
(extremely high or low room temperature).
5) Use for commercial or industrial purposes.
6) Fire, water damage, theft, war, riot, hostility, acts of God such as hurricanes, floods etc.
7) Service calls resulting in customer education.
Proof of purchase date will be required for warranty claims; so, please retain bills of sale. In the event warranty service is required, present this document to our
AUTHORIZED SERVICE DEPOT.
Danby Products Limited
PO Box 1778, 5070 Whitelaw Road,
Guelph, Ontario, Canada N1H 6Z9
Telephone: (519) 837-0920 FAX: (519) 837-0449
Danby Products Inc.
PO Box 669, 101 Bentley Court,
Findlay, Ohio, U.S.A. 45839-0669
Telephone: (419) 425-8627 FAX: (419) 425-8629

Informations de sécurité importantes
Précautions 15
Instructions de mise à la terre 16
Instructions de fonctionnement
Caractéristiques de votre machine à glaçons
17
Commandes de votre machine à glaçons 18
Fabrication de glaçons 19
Sélection de la grosseur des glaçons 19
Démarrage différé 19
Mode d’auto nettoyage 20
Informations utiles
Vidange de votre machine à glaçons 21
Soins et entretien 22
En cas de panne
Avant de placer un appel de service 23
Garantie 24
15
17
21
23
13
TABLE DES MATIÈRES

14
BIENVENUE
EN CAS DE BESOIN
D’ASSISTANCE
Bienvenue dans la famille
Danby. Nous sommes
fiers de nos produits de
qualité et croyons au bien
fondé de fournir une
assistance fiable à nos
clients.
Vous le découvrirez par
ce guide facile d’utilisation
et vous pourrez l’entendre
en provenance des voix
amicales de notre service
d’assistance à la clientèle.
Tél.: 1-800-26-
Mais, ce qui est encore
mieux, vous pourrez
bénéficier de ces valeurs
à chaque utilisation de
votre machine à glaçons.
Ceci est important parce
que votre nouvelle
machine à glaçons fera
partie de votre famille
pour longtemps.
Voici quelques contributions
que vous pouvez effectuer
avant de faire un appel de
service, pour nous aider à
mieux vous servir :
Lisez ce guide
Il comprend des instructions
pour vous assister à l’utilisa-
tion et l’entretien adéquats de
votre machine
à glaçons.
Si votre appareil neuf est
avarié
Communiquez immédiatement
avec le revendeur (ou le man-
ufacturier).
Épargnez temps et argents
Avant de faire un appel de
service, révisez le chapitre
intitulé “En cas de panne”. Ce
chapitre vous aidera à solu-
tionner des problèmes com-
muns qui pourraient survenir.
Si une réparation est requise,
vous pouvez avoir l’esprit tran-
quille parce que de l’aide ne
sera l’affaire que d’un appel
téléphonique.
Tél.: 1-800-26-
Enregistrez ici les numéros de modèle
et de série. Ces numéros se trouvent
sur l’étiquette au dos de la machine à
glaçons.
Numéro de modèle ____________
Numéro de série ____________
Date d’achat ____________
Agrafez votre reçu d’achat à l’intérieur
de la couverture arrière de de guide. Il
sera requis pour faire une réclamation
de la garantie.
Point de départ...AVANT d’utiliser votre machine à glaçons
“Ice’N’Easy”
R
R

LISEZ TOUTES LES INFORMATIONS DE SÉCURITÉ
AVANT DE FAIRE FONCTIONNER L’APPAREIL
15
INFORMATIONS DE SÉCURITÉ IMPORTANTES
AVERTISSEMENT
PRÉCAUTIONS
Pour minimiser le risque d’incendie, de brûlures, de chocs électriques ou de blessures,
suivez les chapitres suivants en plus d’appliquer les précautions de base.
• Cet appareil doit être mis à la
terre. Branchez le seulement dans
une prise correctement mise à la
terre. Référez-vous au chapitre
intitulé “Instructions de mise à la
terre” à la page 16.
• Ne faites pas fonctionner cet
appareil s’il a un cordon ou fiche
électrique endommagé, s’il ne
fonctionne pas correctement, ou
si l’ appareil a été endommagé
ou échappé.
• N’utilisez pas cet appareil près
de bassins d’eau, par exemple
dans un sous-sol détrempé, près
d’une piscine ou d’un évier.
• N’utilisez cet appareil que pour
les fins auxquelles il est conçu
comme indiqué dans ce guide.
N’utilisez pas de produits
chimiques ou vapeurs corrosives
dans/près de cet appareil.
• Cet appareil ne devrait être
réparé que par du personnel
qualifié. Pour tout examen,
réparation ou réglage, contactez
votre centre de service le plus
rapproché.
• Référez-vous aux instructions de
nettoyage du fini de la porte
se trouvant au chapitre de
Soins et entretien de ce guide.
• Ne recouvrez pas ou n’obstruez
aucune ouverture de l’appareil.
• N’entreposez pas cet appareil
à l’extérieur.
• Gardez le cordon électrique
éloigné des sources de chaleur.
• N’immersez pas le cordon
ou sa fiche dans aucun liquide.
• Lorsque opéré par un enfant,
une supervision s’avère
nécessaire comme c’est le cas
avec n’importe quel appareil
domestique.
SAUVE GARDEZ CES INSTRUCTIONS
Avertissement : Le compartiment interne de rangement de cet appareil ménager pour les glaçons
et l'eau remisés n'est pas un compartiment réfrigéré. Nous recommandons le remplacement de
toute eau remisée qui n'a pas été utilisée en dedans d'une période de 12 heures de la mise en
service de la machine.

16
Cet appareil doit être mis à la
terre. Dans l’éventualité d’un
court-circuit, la mise à la terre
procure un chemin direct de
contournement du courant
pour prévenir l’électrocution
des manipulateurs de l’ap-
pareil.
Cet appareil est muni d’un cor-
don comprenant une fiche et
fil de mise à la terre.
La fiche doit être branchée
dans une prise correctement
installée et mise à la terre.
Si les directives de mise à la
terre ne sont pas tout à fait
comprises ou en cas de tout
doute relatif à la mise à la
terre appropriée de l’appareil,
faites appel à un électricien ou
à un technicien qualifié.
Si la prise murale est une
prise à 2 branches, c’est votre
obligation, et la responsabilité
vous en incombe, de la faire
remplacer par une prise à trois
branches adéquatement mise
à la terre.
Pour un meilleur rendement et
pour éviter que les ampoules
d’éclairage de la résidence
soient affectées d’un affaisse-
ment de tension, ou que le
fusible ou disjoncteur du circuit
ne grille ou ne se déclenche,
dédiez un circuit individuel
d’alimentation à la machine à
glaçons (prise (double) unique
sur le circuit).
Sous aucun prétexte il est
permis de couper ou d’enlever
la troisième branche (mise à la
terre) de la fiche du cordon
électrique.
N’utilisez pas d’adaptateur
de fiche avec cet appareil.
N’utilisez pas de cordon de
rallonge avec cet appareil. Si
le cordon électrique de l’ap-
pareil ne rejoint pas la prise
murale, faites installer une
prise plus rapprochée par un
électricien ou un technicien
qualifié.
INSTRUCTIONS
DE MISE À LA
TERRE
INFORMATIONS DE SÉCURITÉ IMPORTANTES
AVERTISSEMENT
Une mauvaise utilisation
de la mise à la terre de la
fiche constitue un danger
d’électrocution.

17
Instructions de fonctionnement
Caractéristiques de votre
machine à glaçons
1 Porte de la machine à
glaçon avec visière.
2 Panneau de commande.
(pour plus de détails, référez-vous
à la page 18)
3 Pattes de mise à niveau
réglables.
4 Serpentins d’évaporation.
5 Contenant d’eau.
6 Pelle à glaçons
.
7 Ligne d’indication de
niveau pour l’eau.
8 Bouchon de vidange
.
9 Seau à glaçons.
8
9
6
5
4
1
2
3
Intérieur
Accessoires
7
Extérieur

18
Commandes de votre machine à glaçons
1. Affichage électronique - montre
le réglage de la minuterie, les indicateurs
de fonctions sélectionnées et les icônes
d’état de fonctionnement.
2. Bouton d’alimentation - pour
démarrer ou arrêter l’unité ou pour retirer
la minuterie et/ou annuler le programme
en cours.
3. Sélecteur de grosseur de
glaçons -
vous permet de choisir entre
trois (3) grosseurs de cubes de glace.
4. Bouton d’incrémentation -
utilisé
conjointement avec la minuterie. chaque
actionnement rajoute 0,5 heure à la durée
de la minuterie.
5. Bouton de décrémentation - util-
isé conjointement avec la minuterie.
chaque actionnement soustrait 0,5 heure
à la durée de la minuterie.
•
Icône de petit cube de glace
-
indique que la machine à glaçons
est actuellement réglée pour pro-
duire des petits cubes de glace.
• Icône de cube de glace
moyen - indique que la machine à
glaçons est actuellement réglée
pour produire des cubes de glace
moyens.
• Icône de gros cube de glace
- indique que la machine à glaçons
est actuellement réglée pour pro-
duire des gros cubes de glace.
• Minuterie - affiche l’heure de
démarrage différé.
• Icône d’alimentation - cet
icône clignote lorsque l’interrupteur
d’alimentation est ouvert et s’allume
en permanence lorsque l’unité est
alimenté.
• Icône de plein de glaçons -
s’éclaire pour indiquer que le seau
d’eau est plein et devra être vidé
pour poursuivre la formation de
glaçons.
• Ajouter de l’eau - s’éclaire
lorsque le réservoir interne a besoin
d’être rempli pour pouvoir terminer
la formation de glaçons selon le
programme présentement sélec-
tionné.
• Défaut - cette icône s’affiche
lorsque l’unité a détecté un prob-
lème et ne peut entamer ou termin-
er le procédé de formation de
glaçons. Si cette situation survient,
veuillez vour référer à la page 23
pour obtenir des instructions de
dépannage.
• Icône hélice - s’éclaire lorsque
l’unité pompe de l’eau du réservoir
interne l’amenant dans le seau
d’eau durant le cycle de formation
de glaçons et d’autonettoyage.
1
2
3
4
5

Instructions de fonctionnement
Pour faire débuter le procédé de fab-
rication de glaçons
immédiatement;
• Faites le plein d’eau jusqu’à la ligne
d’indication de niveau adéquat. (envi-
ron 3,5 l)
• Appuyez sur le bouton d’alimentation.
• Sélectionnez la grosseur de cubes
de glace désirée (référez-vous au
chapitre intitulé “Sélection de la
grosseur des cubes de glace” ci-
dessous)
• La machine à glaçons se mettra en
marche environ 15 secondes après
que le dernier bouton ait été actionné.
Veuillez noter : La durée du procédé
de fabrication de glaçons est directe-
ment proportionnelle à la sélection
de la grosseur des cubes de glace et
l’achèvement de lot peut prendre
entre 9 et 15 minutes.
Pour un rendement optimal, veuillez
garder la porte de la machine fermée
durant le processus de fabrication de
glaçons.
Fabrication de
glaçons
1 Faites le plein d’eau jusqu’à la
ligne d’indication de niveau
adéquat.
2 Appuyez sur le bouton
d’alimentation.
3 Si vous désirez une grosseur
de cubes de glace autre que
moyen, changez la sélection
de grosseur.
Fabrication de glaçons...
Démarrage
différé
• Faites le plein d’eau jusqu’à la ligne
d’indication de niveau adéquat.
(environ 3,5 l)
• Sans actioner le bouton d’alimentation,
appuyez une seule fois simultanément
sur les boutons d’iincrémentation et de
décrémentation pour accéder au mode
de réglage de la minuterie.
• Chaque actionnement subséquent du
bouton d’incrémentation fera aug-
menter la durée de la minuterie par
incrément de 30 minutes jusqu’à un
maximum de 12 heures.
Réciproquement, pour soustraire du
temps de la minuterie, appuyez sur le
bouton de décrémentation pour dimin-
uer la période par tranches de 30 min-
utes.
• Sélectionnez la grosseur de cubes de
glace désirée.
• La minuterie de la machine à glaçons
se mettra automatiquement en marche
après le dernier actionnement des bou-
tons fléchés.
Pour annuler le délai et démarrer le
procédé de fabrication de glaçons sur
le champ, appuyez simplement sur le
bouton d’alimentation à n’importe quel
moment.
1
Faites le plein d’eau jusqu’à la
ligne d’indication de niveau adéquat.
2 Assurez-vous que l’alimentation
est désactivée “Hors”.
3. Appuyez simultanément sur les
boutons fléchés d’incrémentation
et de décrémentation
4 Réglez la durée de la minuterie.
5 Sélectionnez la grosseur de cube
de glace.
Sélection de
grosseur de
cubes de glace
Le bouton de sélection de grosseur de
cubes de glace vous permet de choisir
entre petits, moyens, ou gros.
Votre machine à glaçons est par
défaut programmée pour fabriquer des
cubes de glace moyens. Cependant,
si vous désirez une grosseur de cubes
de glace différente, vous n’avez qu’à
appuyer sur le bouton de sélection de
grosseur pour pouvoir passer d’une
grosseur à l’autre et sélectionner une
des trois (3) grosseurs disponibles
(petits, moyens et gros).
Il est possible de changer la grosseur
des cubes de glace lors de la progres-
sion d’un programme, mais il est
néammoins recommandé de laisser le
cycle entamé se terminer avant de
définir une nouvelle grosseur de cubes
de glace.
NOTE : Votre sélection de grosseur
de cubes sera gardée en mémoire
sauf s’il ya a panne de courant ou
que l’alimentation de l’unité est
autrement interrompue.
1 Appuyez sur le bouton
d’alimentation ou
accédez au mode de
réglage de la minuterie.
2 Appuyez sur le bouton de
sélection de grosseur de
cubes de glace du clavier
de commande.
19
La page est en cours de chargement...
La page est en cours de chargement...
La page est en cours de chargement...
La page est en cours de chargement...
La page est en cours de chargement...
La page est en cours de chargement...
La page est en cours de chargement...
La page est en cours de chargement...
La page est en cours de chargement...
La page est en cours de chargement...
La page est en cours de chargement...
La page est en cours de chargement...
La page est en cours de chargement...
La page est en cours de chargement...
La page est en cours de chargement...
La page est en cours de chargement...
La page est en cours de chargement...
-
 1
1
-
 2
2
-
 3
3
-
 4
4
-
 5
5
-
 6
6
-
 7
7
-
 8
8
-
 9
9
-
 10
10
-
 11
11
-
 12
12
-
 13
13
-
 14
14
-
 15
15
-
 16
16
-
 17
17
-
 18
18
-
 19
19
-
 20
20
-
 21
21
-
 22
22
-
 23
23
-
 24
24
-
 25
25
-
 26
26
-
 27
27
-
 28
28
-
 29
29
-
 30
30
-
 31
31
-
 32
32
-
 33
33
-
 34
34
-
 35
35
-
 36
36
-
 37
37