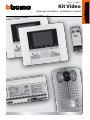
Bticino 368721 Mode d'emploi
- Catégorie
- Haut-parleurs de la barre de son
- Taper
- Mode d'emploi
Ce manuel convient également à
La page est en cours de chargement...
La page est en cours de chargement...
La page est en cours de chargement...

4
7
• La telecamera non deve essere installata di fronte a grandi sorgenti luminose, oppure in luoghi
dove il soggetto ripreso rimanga molto in controluce. Per risolvere i problemi precedentemente
descritti si consiglia di variare l’altezza di installazione della telecamera, solitamente 160 – 165
cm, ad un’altezza di 180 cm e di orientare l’obiettivo verso il basso in modo da migliorare la qua-
lità delle riprese.
Nota: Le telecamere con sensore CMOS a colori presentano, in condizioni di scarsa luminosità,
una sensibilità inferiore rispetto alle telecamere in bianco/nero. Si consiglia pertanto, in ambienti
poco illuminati di prevedere una fonte di illuminazione aggiuntiva.
• Die Kamera darf nicht vor starken Lichtquellen oder an Orten installiert werden, wo das Subjekt sich
im Gegenlicht befindet. Um die zuvor erwähnten Probleme zu lösen, empfehlen wir die Installations-
höhe der Kamera zu ändern, d.h. sie anstatt auf 160 – 165 cm Höhe, auf 180 cm Höhe zu installieren
und das Objektiv nach unten zu orientieren, um die Aufnahmequalität zu verbessern.
Bemerkung: Farbkameras mit CMOS-Aufnahmeelement besitzen bei schlechter Beleuchtung eine ge-
ringere Empfindlichkeit als Schwarz/Weiß Kameras. Wir empfehlen daher eine zusätzliche Beleuch-
tungsquelle vorzusehen.
• La télécaméra ne doit pas être installée en face de fortes sources lumineuses, ou bien dans des
endroits où le sujet pris reste très à contre-jour. Pour résoudre les problèmes précédemment dé-
crits, il est conseillé de porter la hauteur d’installation de la télécaméra, normalement 160 – 165
cm, à une hauteur de 180 cm et d’orienter l’objectif vers le bas de façon à améliorer la qualité des
prises de vue.
Nota: les télécaméras avec capteur CMOS couleurs présentent, dans des conditions de faible lu-
minosité, une sensibilité inférieure aux télécaméras noir/blanc. Il est donc conseillé, dans des mi-
lieux peu éclairés, de prévoir une source de lumière supplémentaire.
• The camera must not be installed in front of large light sources, or in places where the subject viewed
remains in deep shadow. To solve the problems described above change the height at which the cam-
era is installed, normally 160 to 165 cm, to a height of 180 cm, and face the lens downwards to improve
the quality of the views.
Note: in poor lighting conditions cameras with colour CMOS detector are less sensitive than black/
white cameras. An extra lighting source should be added in poorly lit rooms.
8
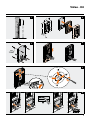
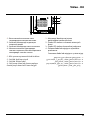
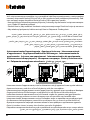
5 – 10 mm
❷ ❹
❶
❸
❺
❻
La page est en cours de chargement...
La page est en cours de chargement...
La page est en cours de chargement...
La page est en cours de chargement...
La page est en cours de chargement...
La page est en cours de chargement...
La page est en cours de chargement...

12
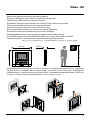
• Attenzione: il videocitofono deve rispettare le seguenti regole installative:
- deve essere installato solo in ambienti interni
- non deve essere esposto a stillicidio o a spruzzi d’acqua
- non ostruire le aperture di ventilazione
- deve essere usato unicamente su sistemi 2 fili SCS BTicino.
Ogni uso improprio dell’articolo puó comprometterne le caratteristiche di sicurezza.
• Achtung: die Video-Hausstation muss unter Beachtung folgender Regeln installiert werden:
- es darf nur im Inneren installiert werden
- es darf nicht Wassertropfen oder-spritzer ausgesetzt werden.
- Belüftungsschlitze nicht verstopfen
- Es darf nur mit “2-Draht-Bus-System” der SCS BTicino verwendet werden.
Jeder ungeeigneter Gebrauch des Geräts kann seine Sicherheitseigenschaften beeinträchtigen.
• Attention: le vidéophone doit respecter les règles d’installation suivantes:
- il doit être monté seulement à l’intérieur
- il ne doit pas être exposé à des suintements ou à des éclaboussures
- ne pas boucher les ouvertures d’aération
- il doit être utilisé uniquement sur des systèmes 2 fils SCS BTicino.
Tout usage impropre de la référence peut compromettre les caractéristiques de sécurité.
• Caution: the video internal unit must respect the following installation rules:
- it must only be installed indoors
- it must not be exposed to water drops or splashes
- do not block the ventilation openings
- it must be used only on SCS BTicino 2-wire systems.
An improper use of the item can compromise its safety features.
• Atención: el videointerfono debe respetar las siguientes normas de instalación:
- se debe instalar sólo al cubierto
- no debe estar expuesto a goteo o salpicones de agua
- no tape las aberturas de ventilacióN
- se debe utilizar exclusivamente en sistemas 2 hilos SCS BTicino.
Cualquier uso impropio del artículo puede comprometer sus características de seguridad.
• Let op: Bij de installatie van de huistelefoon moet men de volgende voorschriften in acht nemen:
- binnenshuis installeren
- niet aan waterdruppels en -stralen blootstellen
- de ventilatieopeningen niet versperren
- uitsluitend in 2-dradige SCS BTicino systemen installeren.
Leder oneigenlijk gebruik kan de veiligheid van het product schaden.
La page est en cours de chargement...
La page est en cours de chargement...
La page est en cours de chargement...

16
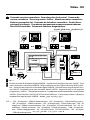
346250
346000
8 A cosφ = 1
4 A cosφ = 0,7
3 A cosφ = 0,4
24 Vdc; 24 Vac
24 Vac
24 Vac
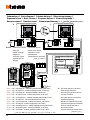
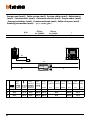
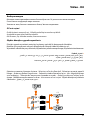
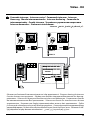
· Schema con serratura a relè · Diagram with relay door lock · Schéma avec serrure
à relais · Schema mit Schloss und Relais · Esquema con cerradura de relé · Schema
met slot met relais · Esquema do trinco com relè · Σχέδιο με κλειδαριά με ρελέ ·
Схема с релейным замком · Röleli kilitli şema · Schemat ze zamkiem na przekaźnik
·
A= • Pulsante apertura serratura
• Door lock pushbutton
• Poussoir d’ouverture serrure
• Schalter Türöner
• Pulsador apertura cerradura
• Drukknop opening
• Botão para abertura do trinco
• Πλήκτρο ανοίγματος κλειδαριάς
• Кнопка открытия замка
• kilit açma butonu
• Przycisk otwarcia zamka drzwi
•

Video - Kit
17
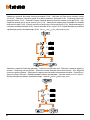
• Installare e collegare gli apparecchi come indicato nello schema. Assicurarsi che durante le ope-
razioni di montaggio degli apparecchi, l’alimentatore non sia collegato alla rete pubblica. L’ali-
mentatore non deve essere esposto a stillicidio o spruzzi d’acqua. Non ostruire le aperture di
ventilazione dell’alimentatore. Prima di alimentare l’impianto verificare l’esattezza del cablaggio
ed accertarsi che la tensione di rete sia compatibile con quella dell’alimentatore.
Posare i cavi seguendo lo schema riportato nelle pagine precedenti in cui è indicato il numero dei
cavi da predisporre e la dislocazione fisica degli apparecchi che compongono l’impianto.
Le tabelle della pagina seguente indicano la sezione minima dei cavi in funzione della distanza tra
posto esterno e posto interno e del numero di posti interni.
• Die Gerate laut Plan montieren und anschlieBen. Bei der Montage der Gerate darf das Netzgerat nicht
am Niederspannungsnetz angeschlossen sein. Das Speisegerat darf nicht Tropfwasser oder Wasser-
spritzer ausgesetzt werden. Beluftungsschlitze des Speisegerats nicht verstopfen. Bevor die Anlage mit
Strom versorgt wird, sollte kontrolliert werden, ob die Verkabeluna richtig vorgenommen wurde.
Frufen Sie bitte die Anschlusswerte des Netzgerates mit der Netzspannung. Bitte beachten Sie die
Nummerierung der Drahte auf beigefugtem Schaltplan.
In den Tabellen der nachfolgenden Seite ist der Mindestschnitt der Kabel je nach Abstand zwischen
Tür- und Hausstation und Anzahl der Hausstationen angegeben.
• Monter et brancher les appareils comme indiqué sur le schéma. S’assurer que pendant les opéra-
tions d’installation des appareils l’alimentation n’est pas raccordée au réseau public. L’alimenta-
tion ne doit etre exposée ni à stillation ou à pulvérisations d’eau. Ne pas boucher les ouvertures
d’aération de l’alimentation. Avant d’alimenter l’installation, vérifier que le cablage est correct et
s’assurer que la tension du réseau est compatible avec celle de l’alimentation.
Poser les câbles d’après le schéma qui se trouve dans les pages précédentes, sur lequel est indi-
qué le nombre de cables à placer et la localisation physique des appareils qui forment l’installa-
tion.
Les tableaux de la page suivante indiquent la section minimale des câbles en fonction de la dis-
tance entre poste extérieur et poste interne et du nombre de postes internes.
• Install and connect the devices as indicated in the diagram. Make sure that when the devices are
mounted the power supply is not connected to the public electric power line. The power supply must
not be exposed to dripping water or splashes. Do not block the power supply ventilation openings.
Before energizing the installation chech that cabling is correct and make sure that line voltage is com-
patible with power supply voltage.
Lay cables according to diagram shown in the previous pages, which indicates the number of cables
to be arranged and the layout of devices that make up the installation.
The tables on the following page indicate the minimum section of the wires as a function of the dis-
tance between entrance panel and audio handset and the number of audio handsets.
La page est en cours de chargement...
La page est en cours de chargement...
La page est en cours de chargement...
La page est en cours de chargement...
La page est en cours de chargement...
La page est en cours de chargement...
La page est en cours de chargement...

Video - Kit
25
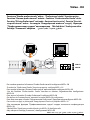
ON OFF
• Regolazione del volume
Se si manifestasse il disturbo del fischio, (effetto Larsen), ridurre prima la potenza del microfono
, agendo con un cacciavite sul potenziometro corrispondente, fino ad un livello accettabile.
Qualora il fenomeno persista, agire sul potenziometro dell’altoparlante
in modo da elimina-
re l’inconveniente. Se il volume è troppo basso, aumentare prima il volume dell’altoparlante ed
eventualmente anche quello del microfono, tenendo presente che è preferibile una trasmissione
chiara e priva di disturbi, che una al limite dell’innesco (Larsen).
•
Einstellung der Lautstärke:
Beim etwaigen Auftreten eines Pfeiftones (Larsen-Effekt), zuerst die Lautstärke des Mikrophones bis
auf einen annehmbaren Wert herabsetzen, indem man das entsprechende Potentiometer mit einem
Schraubendreher einstellt. Sollte die Störung weiterhin bestehen, dann das Potentiometer des Laut-
sprechers
bis zur Beseitigung des Pfeiftones einstellen. Ist die Lautstärke nun zu niedrig, dann zuerst
die des Lautsprechers und erst danach evtl. auch die des Mikrophones erhohen, wobei ein deutlicher
und störungsfreier Empfang einem an der Störungsgrenze liegendem (Larsen-Effekt) vorzuziehen ist.
•
Réglage du volume:
Lors de sifflement (effet de Larsen), reduire d’abord la puissance du micro , sur le potentiomètre
correspondant, à l’aide d’un tournevis, jusqu’à l’obtention d’un niveau satisfaisant. Si le sifflement
persiste, régler le potentiomètre du hautparleur
jusqu’à l’élimination de celui-ci. Si le volume
est trop bas, augmenter d’abord la puissance du haut-parleur et éventuellement celle du micro,
en considérant qu’une réception claire et sans parasite est préférable à une communication à la
limite de l’accrochage (effet de Larsen).
• Adjustment volume:
In case of a whistle (Larsen effect), first reduce the microphones power, adjusting the corresponding
potentiometers with a screw driver, until an acceptable level is reached. Should the whistle persist,
adjust the loudspeakers
volume in order to eliminate the trouble. If the volume is too low level then,
increase first the potentiometer of the loudspeaker and secondly the one for the microphone, bearing
in mind that a clear and noise free reception is preferable than one just before whistling (Larsen).
La page est en cours de chargement...
La page est en cours de chargement...

28
ON OFF
2
3
4
1
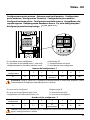
• 1 - Abilitazione/disabilitazione tono
conferma apertura serratura
2 - Led verde: indicazione porta aperta
3 - Led verde: comunicazione attiva
4 - Led lampeggiante Verde: chiamata
inoltrata; Led lampeggiante Rosso:
sistema occupato
• 1 - Habilitación/deshabilitación del tono de
confirmación de apertura de la cerradura
2 - Led verde: indicación puerta abierta
3 - Led verde: comunicación activada
4 - Led parpadenate Verde: llamada
enviada; Led parpadenate Rojo: sistema
ocupado
• 1 - Enabling/disabling of door lock opening
confirmation tone
2 - Green LED: door open indication
3 - Green LED: communication active
4 - Green flashing LED; call forwarded
Red flashing LED: system busy
• 1 - Activation/désactivation tonalité de
confirmation ouverture serrure
2 - Diode verte: indication porte ouverte
3 - Diode verte: communication active
4 - Témoin clignotant vert - appel passé
Témoin clignotant rouge: système
occupé
• 1 - Aktivierung/Deaktivierung des
Bestätigungssignals nach erfolgter
Türöffnung
2 - Grüne Led: Meldet offene Tür
3 - Grüne Led: Kommunikation aktiv
4 - Grüne blinkende Led: Ruf gesendet
Rote blinkende Led: System belegt
• 1 - Activering/desactivering toon bevestiging
opening slot
2 - Groene led: aanduiding open deur
3 - Groene led: communicatie actief
4 - Groene knipperende led: oproep
doorgestuurd;
Rode knipperende led: systeem bezet
• 1 - Activação/desactivação do sinal de
confirmação da abertura da fechadura
2 - Indicadores luminosos verde: indicação
de porta aberta
3 - Indicadores luminosos verde:
comunicação activa
4 - Indicador luminoso lampejante Verde:
chamada enviada; Indicador luminoso
lampejante Vermelho: sistema cupado
• 1 - Ενεργοποίηση/απενεργοποίηση τόνου
επιβεβαίωσης ανοίγματος κλειδαριάς
2 - Πράσινο led: ένδειξη ανοιχτής πόρτας
3 - Πράσινο led: επικοινωνία ενεργή
4 - Πράσινο led που αναβοσβήνει: μεταγωγή
κλήσης; Κόκκινο led που αναβοσβήνει:
σύστημα κατειλημμένο
La page est en cours de chargement...

30
• Selezione suoneria
La suoneria di chiamata del citofono è selezionabile tra 16 differenti tipi di melodie.
Si possono differenziare le seguenti tipologie di chiamata:
Chiamata al piano; Chiamata da posto esterno; Chiamata intercom.
• Bell selection
The door entry unit call bells can be selected from 16 different types of tune.
The following types of call can be differentiated:
Call to the floor; Call from entrance panel; Intercom Call.
• Sélection sonnerie
La sonnerie d’appel du phone peut être sélectionnée parmi 16 différents types de mélodies.
On peut différencier les typologies d’appel suivantes:
Appel à l’étage; Appel de poste extérieur; Appel intercom.
• Läutwerk wählen
Für das Läutwerk der Rufe des haustelefons stehen 16 verschiedene Melodien zur Verfügung.
Die Rufe können folgendermaßen differenziert werden:
Etagenruf; Ruf von der Türstation; Intercom Anruf.
• Selección del timbre
El timbre del llamada del interno fono se puede seleccionar entre 16 melodías diferentes.
Es posible diferenciar las siguientes tipologías de llamadas:
Llamada a la planta; llamada desde puesta exterior; Llamada interna.
• Beltoon kiezen
De oproepbeltoon van de telefoon biedt de keus uit 16 melodiën.
Het is mogelijk om de volgende types oproepen te kenmerken:
Oproep aan de verdieping; Oproep vanuit het deurstation; Intercom oproep.
• Selecção toques
Os toques de chamada do intercomunicador podem ser seleccionados em 16 tipos de melodias
diferentes.
Podem ser diferenciados os seguintes tipos de chamada:
Chamada ao piso; Chamada da unidade externa; Chamada Intercom.
• Επιλογή κουδουνιού
Το κουδούνι κλήσης του θυροτηλεφώνου είναι επιλέξιμο μεταξύ 16 διαφορετικών τύπων μελωδιών.
Μπορούν να διαφοροποιούνται οι ακόλουθες τυπολογίες κλήσης:
Κλήση στον όροφο. Κλήση από εξωτερικό σημείο. Κλήση intercom.
La page est en cours de chargement...
La page est en cours de chargement...
La page est en cours de chargement...

34
>3s
Led ON
Led ON
>3s
BEEP
BEEP
BEEP
EXIT
EXIT
>3s
Led ON
Led ON
>3s
BEEP
BEEP
BEEP
EXIT
EXIT
· Nota: nel caso di espansione del KIT, per ulteriori informazioni circa le modalità di configurazione disponibili,
fare riferimento al foglio istruzioni a corredo del videocitofono.
· Note: when expanding the KIT, for more information on the configuration modes available, refer to the instruction
sheet which comes with the video handset.
· Remarque: dans le cas d’extension du KIT, pour de plus amples informations sur les modalités de configura-
tion disponibles, se reporter au livret d’instructions livré avec le vidéophone.
· Bemerkung: Falls das Kit erweitert werden sollte, beziehen Sie sich bitte auf die mit dem Haustelefon gelieferten
Anweisungen für weitere Informationen bezüglich den möglichen Konfigurationsmodalitäten.
· Nota: en caso de expansión del KIT, para más información sobre los modos de configuración disponibles, se
remite a la hoja de instrucciones suministrada junto con el videointerfono.
· Opmerking: in geval van expansie van de KIT, kan men voor bijkomende inlichtingen m.b.t. de beschikbare moda-
liteiten van configuratie beroep doen op het instructieblad in dotatie bij de beeld-huistelefoon.
· Nota: caso o KIT for expandido, para ulteriores informações sobre as modalidades de configuração disponí-
veis, consulte a folha de instruções fornecida com o intercomunicador vídeo.
· Σημείωση: σε περίπτωση επέκτασης του KIT, για περισσότερες πληροφορίες σχετικά με τους διαθέσιμους τρόπους
διαρρύθμισης, αναφέρεστε στο στάνταρ φύλλο οδηγιών της θυροτηλεόρασης.
· Примечание: в случае расширения комплекта для получения дополнительной информации об имею-
щихся способах конфигурации следует обращаться к листу с инструкциями, предоставляемому вместе
с видеодомофоном.
· Not: KİT’in genişletilmesi halinde, mevcut konfigürasyon modları hakkında detaylı bilgiler için dahili ünitenin
beraberindeki talimat kağıdını referans olarak alın.
· Uwaga: w przypadku rozbudowy zestawu, odnieść się do dodatkowych informacji na temat konfiguracji
podanych w instrukcji dla wideodomofonu.
·
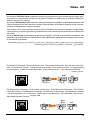
• Per disattivare la funzione • To deactivate the function • Pour désactiver la fonction • Zum Deaktivie-
ren der Funktion • Para desactivar la función • Om de functie te deactiveren • Para desactivar a fun-
ção • Για απενεργοποίηση της λειτουργίας • Чтобы вылючить функцию • İşlevi devreden çıkarmak
için • Aby dezaktywować funkcję •
• Per attivare la funzione • To activate the function • Pour activer la fonction • Zum Aktivieren der Funktion
· Para activar la función • Om de functie te activeren • Para activar a função • Για ενεργοποίηση της
λειτουργίας • Чтобы включить функцию • İşlevi etkin kılmak için • Aby aktywować funkcję •
•
•
La page est en cours de chargement...

36
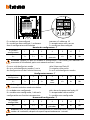
P
N MOD
6 0
3501/6
6 0
3501/0
• La funzione Mani Libere attiva automaticamente microfono ed altoparlante in caso di chiamata,
evitando di dover premere il tasto Connessione per rispondere (la connessione si stabilisce im-
mediatamente al momento della chiamata).
• The Hands Free function automatically activates the microphone and loudspeaker when there is a
call, avoiding having to press the Connection key to answer (the connection is established immedi-
ately the call is made).
• La fonction Mains Libres active automatiquement micro et haut-parleur en cas d’appel, évitant
ainsi de devoir appuyer sur la touche Connexion pour répondre (la connexion est immédiate-
ment établie au moment de l’appel).
• Die Funktion Freie Hände aktiviert automatisch Mikrofon und Lautsprecher wenn ein Ruf eintrifft, so
dass man die Verbindungstaste nicht mehr drücken muss, um den Ruf zu beantworten (die Verbin-
dung stellt sich sofort beim Eintreffen des Rufes her).
• La función Manos Libres activa automáticamente el micrófono y el altavoz en caso de llamada,
evitándole tener que presionar la tecla de conexión para contestar (la conexión se establece in-
mediatamente al momento de la llamada)
• De functie Handsfree activeert automatisch microfoon en luidspreker in geval van een oproep, en ver-
mijdt dat je de toets Aansluiting moet indrukken om te antwoorden (de aansluiting komt onmiddellijk
tot stand op het ogenblik van de oproep).
• A função Mãos Livres activa automaticamente o microfone e o altifalante em caso de chamada
evitando-lhe ter de pressionar a tecla Conexão para atender (a conexão se estabelece imediata-
mente no momento da chamada).
· Funzione Mani Libere · Hands Free function · Fonction Mains Libres · Funktion
Freie Hände · Función Manos Libres · Handsfreefunctie · Função Mãos Livres ·
Λειτουργία Ελεύθερα Χέρια · Функция “Свободные Руки” (Free Hand) · Eller
Serbest işlevi · Funkcja Wolne Ręce ·
• Per rendere operativa la funzione “Mani Libere” configurare MOD=60;
• To make the “Hands Free” function operative, configure MOD = 60;
• Pour rendre la fonction “Mains Libres” opérationnelle, configurer MOD=60
• Um die Funktion “Freie Hände” benutzen zu können, folgendermaßen konfigurieren: MOD=60;
• Para activar la función “Manos Libres” configure MOD=60;
• Om de functie “Handsfree” operatief te maken MOD=60 configureren;
• Para fazer com que a função “Mãos Livres” fique operativa configurar MOD=60;
• Για να κάνετε ενεργή τη λειτουργία “Ελεύθερα Χέρια” ρυθμίστε MOD=60;
• Чтобы “Свободные Руки”, сконфигурировать MOD=60;
• “Eller Serbest” fonksiyonunu etkin kılmak için MOD=60 konfigüre edin;
• Aby uaktywnić funkcję „Wolne Ręce”, skonfigurować MOD=60;
•
·

Video - Kit
37
>3s
>3s
BEEP
EXIT
EXIT
BEEP
BEEP
>3s
>3s
BEEP
EXIT
EXIT
BEEP
BEEP
• Η λειτουργία Ελεύθερα Χέρια ενεργοποιεί αυτομάτως μικρόφωνο κι ηχείο σε περίπτωση κλήσης, απο-
φεύγοντας το υπο-χρεωτικό πάτημα του πλήκτρου Σύνδεσης για απάντηση (η σύνδεση καθορίζεται
αμέσως τη στιγμή της κλήσης).
• Функция “Свободные Руки” автоматически активирует микрофон и громкоговорители при
поступлении вызова без нажатия кнопки Подключения для ответа (подключение устанав-
ливается немедленно в момент вызова)
• Eller Serbest işlevi, arama halinde, cevap vermek için Bağlantı tuşuna basma gereğini ortadan kaldı-
rarak (bağlantı, aramanın gerçekleştiği anda derhal kurulur) otomatik olarak mikrofonu ve hoparlörü
etkin kılar.
• Funkcja Wolne Ręce automatycznie aktywuje mikrofon i głośnik w przypadku wywołania, bez
potrzeby naciskania klawisza Połączenie w celu odpowiedzi (połączenie następuje natychmiast
w momencie wywołania).
•
• Per disattivare la funzione • To deactivate the function • Pour désactiver la fonction • Zum Deakti-
vieren der Funktion • Para desactivar la función • Om de functie te deactiveren • Para desactivar a função
• Για απενεργοποίηση της λειτουργίας • Чтобы вылючить функцию • İşlevi devreden çıkarmak için •
Aby dezaktywować funkcję •
• Per attivare la funzione • To activate the function • Pour activer la fonction • Zum Aktivieren der Funk-
tion • Para activar la función • Om de functie te activeren • Para activar a função • Για ενεργοποίηση
της λειτουργίας • Чтобы включить функцию • İşlevi etkin kılmak için • Aby aktywować funkcję •
•
•
La page est en cours de chargement...
La page est en cours de chargement...
La page est en cours de chargement...
La page est en cours de chargement...
La page est en cours de chargement...
La page est en cours de chargement...

44
25
-3
5
c
m
4
0
c
m
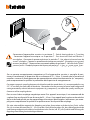
• Per un corretto accoppiamento magnetico tra PI ed apparecchio acustico si consiglia di posi-
zionarsi frontalmente al dispositivo ad una distanza di 25 – 35cm. Si ricorda che la presenza di
metallo e rumore di fondo generato da apparecchiature elettriche/elettroniche (es. computer),
può compromettere la qualità e le perfomace del dispositivo di accoppiamento.
• For proper magnetic coupling between the Handset and the sound device, it is recommended to stay
25 – 35 cm from the front side of the device. Remember that the presence of metal and background
noise generated by electric/electronic equipment (e.g. computers), can affect the quality and the per-
formance of the coupling device.
• Pour assurer le bon couplage magnétique entre PI et appareil acoustique, il est recommandé de
se placer face au dispositif à une distance de 25 – 35 cm. Il est rappelé que la présence de métal et
de bruit de fond généré par des appareillages électriques/électroniques (ordinateurs par exem-
ple) peut compromettre la qualité et les performances du dispositif de couplage.
• Für eine einwandfreie magnetische Kopplung zwischen Hausstation und akustisches Gerät, stellen
Sie sich in einem Abstand von 25 – 35 cm vor das Gerät. Bitte beachten Sie, dass Metallgegenstände
und Hintergrundgeräusche elektrischer/elektronischer Geräte (z.B. PC), die Qualität und Leistung der
Kopplungsvorrichtung beeinträchtigen können.
• Commutare l’apparecchio acustico in posizione T • Switch hearing device in T position
• Commuter l’appareil acoustique sur la position T • Das akustische Gerät auf Position T
umschalten • Conmute el aparato acústico a la posición T • Het akoestisch toestel naar de
stand T schakelen • Comutar o aparelho acústico para a posição T • Μεταγάγετε την ηχητική
συσκευή στη θέση T • Переключить звуковой прибор в позицию Т • Akustik cihazı T pozis-
yonuna çevirin • Przełączyć aparat akustyczny na pozycję T •
•
La page est en cours de chargement...
La page est en cours de chargement...
La page est en cours de chargement...
La page est en cours de chargement...
-
 1
1
-
 2
2
-
 3
3
-
 4
4
-
 5
5
-
 6
6
-
 7
7
-
 8
8
-
 9
9
-
 10
10
-
 11
11
-
 12
12
-
 13
13
-
 14
14
-
 15
15
-
 16
16
-
 17
17
-
 18
18
-
 19
19
-
 20
20
-
 21
21
-
 22
22
-
 23
23
-
 24
24
-
 25
25
-
 26
26
-
 27
27
-
 28
28
-
 29
29
-
 30
30
-
 31
31
-
 32
32
-
 33
33
-
 34
34
-
 35
35
-
 36
36
-
 37
37
-
 38
38
-
 39
39
-
 40
40
-
 41
41
-
 42
42
-
 43
43
-
 44
44
-
 45
45
-
 46
46
-
 47
47
-
 48
48


Bticino 368721 Mode d'emploi
- Catégorie
- Haut-parleurs de la barre de son
- Taper
- Mode d'emploi
- Ce manuel convient également à
dans d''autres langues
- italiano: Bticino 368721 Istruzioni per l'uso
- English: Bticino 368721 Operating instructions
- español: Bticino 368721 Instrucciones de operación
- Nederlands: Bticino 368721 Handleiding
- português: Bticino 368721 Instruções de operação
- polski: Bticino 368721 Instrukcja obsługi
- Türkçe: Bticino 368721 Kullanma talimatları
- română: Bticino 368721 Instrucțiuni de utilizare