LG L330-DP Le manuel du propriétaire
- Catégorie
- Équipement musical supplémentaire
- Taper
- Le manuel du propriétaire

OWNER'S MANUAL
Color Video Camera
Please read this manual carefully before operating
your set and retain it for future reference.
P/NO : MFL67260105(A)
MODEL
L330-DN
L330-DP
L330 Series
Important Safety Instructions
1. Read these instructions.
2. Keep these instructions.
3. Heed all warnings.
4. Follow all instructions.
5. Do not use this apparatus near water.
6. Clean only with dry cloth.
7. Do not block any ventilation openings. Install in accordance with the
manufacturer’s instructions.
8. Do not install near any heat sources such as radiators, heat registers,
stoves, or other apparatus (including amplifiers) that produce heat.
9. Do not defeat the safety purpose of the polarized or grounding-type plug.
A polarized plug has two blades with one wider than the other. A ground-
ing type plug has two blades and a third grounding prong. The wide blade
or the third prong are provided for your safety. If the provided plug does
not fit into your outlet, consult an electrician for replacement of the obso-
lete outlet.
10. Protect the power cord from being walked on or pinched particularly at
plugs, convenience receptacles, and the point where they exit from the
apparatus.
11. Only use attachments/accessories specified by the manufacturer.
12. Use only with the cart, stand, tripod, bracket, or table specified by the
manufacturer, or sold with the apparatus. When a cart is used, use caution
when moving the cart/apparatus combination to avoid injury from tip-
over.
13. Unplug this apparatus during lightning storms or when unused for long
periods of time.
14. Refer all servicing to qualified service personnel. Servicing is required
when the apparatus has been damaged in any way, such as power-supply
cord or plug is damaged, liquid has been spilled or objects have fallen into
the apparatus, the apparatus has been exposed to rain or moisture, does
not operate normally, or has been dropped.
Power Supply
This camera must always be operated a DC 12 V Certified/Listed, class 2 power
supply only.
Handling of the unit
Be careful not to spill water or other liquids on the unit. Be cautious not to get
combustible or metallic material inside the body. If used with foreign matter
inside, the camera is liable to fail or to get cause of fire or electric shock.
Remove dust or dirt on the surface of the lens with a blower.•
Use a dry soft cloth to clean the body. If it is very dirty, use a cloth damp-•
ened with a small quantity of neutral detergent then wipe dry.
Avoid the use of volatile solvents such as thinners, alcohol, benzene and •
insecticides.
They may damage the surface finish and/or impair the operation of the
camera.
Operating and storage location
Avoid viewing a very bright object (such as light fittings) during an extended
period. Avoid operating or storing the unit in the following locations.
Extremely hot or cold places (operating temperature •
-10 °C to 50 °C, however, we recommend that the unit be used within a
temperature range of 0 °C to 45 °C)
Damp or dust place•
Places exposed to rain•
Places subject to strong vibration•
Close to generators of powerful electromagnetic •
radiation such as radio or TV transmitters.
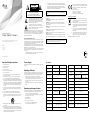
Specication
ITEM L330-DP L330-DN
Signal System PAL NTSC
Total Pixels No./
Effective Pixels No.
610 000 Pixels / 570 000
Pixels
520 000 Pixels / 480 000
Pixels
Image Device
6 mm CCD
Signal Process Sony Effio-E
Lens CS Mount (C Mount using adaptor ring)
IRIS Control ALC / ELC
Sync. System Internal
Scanning Frequency
(H/V)
15.625 kHz / 50 Hz 15.734 kHz / 59.94 Hz
Horizontal Resolution
650 TV Lines
S/N Ratio 50 dB
Minimum Illumination 0.1 lx (F1.2, 30 IRE)
Video Output Signal 1 Vp-p Composite (75 Ω)
Day & Night
Digital (Auto / Day / Night)
ITEM L330-DP L330-DN
Backlight OFF / BLC / HLC
DNR 2D-DNR
Electronic Shutter
Speed
1/50 to 1/10 000 1/60 to 1/10 000
White Balance
ATW / PUSH / USER1 / USER2 / ANTI CR / MANUAL
/ PUSH LOCK
Power Source DC 12 V
Power Consumption
140 mA
Operation Temp. -10 ºC to 50 ºC
Storage Temp. -20 ºC to 60 ºC
Operation Humidity 0 % RH to 80 % RH
Storage Humidity 0 % RH to 85 % RH
Weight
305 g
Dimension (H x V x D) 61.5 mm x 67.54 mm x 134 mm
CAUTION
RISK OF ELECTRIC SHOCK
DO NOT OPEN
CAUTION: TO REDUCE THE RISK OF ELECTRIC SHOCK
DO NOT REMOVE COVER (OR BACK)
NO USER-SERVICEABLE PARTS INSIDE
REFER SERVICING TO QUALIFIED SERVICE PERSONNEL.
This lightning flash with arrowhead symbol within an equi-
lateral triangle is intended to alert the user to the presence
of uninsulated dangerous voltage within the product’s
enclosure that may be of sufficient magnitude to constitute
a risk of electric shock to persons.
The exclamation point within an equilateral triangle is
intended to alert the user to the presence of important
operating and maintenance (servicing) instructions in the
literature accompanying the product.
FCC WARNING: This equipment may generate or use radio frequency energy.
Changes or modifications to this equipment may cause harmful interference
unless the modifications are expressly approved in the instruction manual. The
user could lose the authority to operate this equipment if an unauthorized
change or modification is made.
REGULATORY INFORMATION: FCC Part 15
This equipment has been tested and found to comply with the limits for a Class
A digital device, pursuant to Part 15 of the FCC Rules. These limits are designed
to provide reasonable protection against harmful interference when the equip-
ment is operated in a commercial environment.
This equipment generates, uses, and can radiate radio frequency energy and,
if not installed and used in accordance with the instruction manual, may cause
harmful interference to radio communications.
Operation of this equipment in a residential area is likely to cause harmful inter-
ference in which case the user will be required to correct the interference at his
own expense.
A suitable conduit entries, knock-outs or glands shall be provided in the •
cable entries of this product in the end user.
Caution: Danger of explosion if battery is incorrectly replaced. Replaced •
only with the same or equivalent type recommended by the manufacturer.
Dispose of used batteries according to the manufacturer’s instructions.
Holes in metal, through which insulated wires pass, shall have smooth well •
rounded surfaces or shall be provided with brushings.
This Class A digital apparatus complies with Canadian ICES-003.
Cet appareil numérique de la classe A est conforme à la norme NMB-003 du
Canada.
Warning: Do not install this equipment in a confined space such as a bookcase
or similar unit.
Warning: Wiring methods shall be in accordance with the National Electric
Code, ANSI/NFPA 70.
Warning: This is a class A product. In a domestic environment this product
may cause radio interference in which case the user may be required to take
adequate measures.
Warning: To reduce a risk of fire or electric shock, do not expose this product to
rain or moisture.
Caution: This installation should be made by a qualified service person and
should conform to all local codes.
Caution: To avoid electrical shock, do not open the cabinet. Refer servicing to
qualified personnel only.
Caution: The apparatus shall not be exposed to water (dripping or splashing)
and no objects filled with liquids, such as vases, shall be placed on the appara-
tus.
To disconnect power from mains, pull out the mains cord plug. When install-
ing the product, ensure that the plug is easily accessible.
LG Electronics hereby declares that this/these product(s) is/
are in compliance with the essential requirements and other
relevant provisions of Directive 2004/108/EC, 2006/95/EC,
and 2009/125/EC.
European representative :
LG Electronics Service Europe B.V.
Veluwezoom 15, 1327 AE Almere,
The Netherlands (Tel : +31-(0)36-547-8888)
Disposal of your old appliance
1. When this crossed-out wheeled bin symbol is attached to
a product it means the product is covered by the European
Directive 2002/96/EC.
2. All electrical and electronic products should be disposed of
separately from the municipal waste stream via designated
collection facilities appointed by the government or the
local authorities.
3. The correct disposal of your old appliance will help prevent
potential negative consequences for the environment and
human health.
4. For more detailed information about disposal of your old
appliance, please contact your city office, waste disposal
service or the shop where you purchased the product.
EEE Compliance with Directive. (for Turkey only)

a
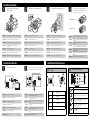
Install the camera and mounting
bracket securely.
<FRANÇAIS> Installez solidement la caméra et le support de montage.
<ITALIANO> Montare la videocamera alla staffa in maniera sicura.
<ČEŠTINA> Připevněte řádně kameru a mechanismus pro uchycení.
<POLSKI>
Zamontować dokładnie kamerę oraz wspornik
montażowy.
<ESPAÑOL> Monte la cámara y el soporte.
<NEDERLANDS>
Zet de camera en de montagebeugel stevig vast.
<PORTUGUÊS> Instale a câmera e o suporte de montagem firmemente.
b
Install the C or CS mount type lens.
C mount type
CS mount type
<FRANÇAIS> Installez l’objectif à monture C ou CS.
<ITALIANO> Installare un obiettivo di tipo C o CS.
<ČEŠTINA> Nainstalujte připevňovací čočky typu C nebo CS.
<POLSKI> Mailować obiektyw typu C lub CS.
<ESPAÑOL> Instale un objetivo C o CS.
<NEDERLANDS>
Monteer een C-mount- of CS-mount-objectief (‘lens’).
<PORTUGUÊS> Instale as lentes de montagem do tipo C ou CS.
c
Install the camera and mounting arm.
<FRANÇAIS> Installez la caméra et le bras de montage.
<ITALIANO> Montare la videocamera al braccio.
<ČEŠTINA> Připevněte kameru a připevňovací rameno.
<POLSKI> Zamontować kamerę oraz ramię montażowe.
<ESPAÑOL> Monte la cámara y el brazo de soporte.
<NEDERLANDS>
Monteer de camera en de montagearm.
<PORTUGUÊS> Instale a câmera e o braço de montagem.
d
Loosen the flange-back fixing screws.
Use the flange-back adjusting ring to
obtain a focused point.
<To loosen the screws>
<To adjust the focus>
<FRANÇAIS>
Desserrez les vis de fixation de la face d’appui. Utilisez la bague
d’ajustement de la face d’appui pour obtenir un point ciblé.
<ITALIANO>
Allentare le viti di fissaggio posteriori della flangia. Usare l’anello
di regolazione posteriore della flangia per ottenere un punto di
messa a fuoco.
<ČEŠTINA>
Povolte šrouby zajišťující flange-back (vzdálenost objektivu a
snímače). K zaostření použijte kroužek pro úpravu vzdálenosti
flange-back.
<POLSKI>
Poluzować śruby mocowania kołnierza. Aby uzyskać punkt ogni-
skowania należy użyć pierścienia regulacyjnego kołnierza.
<ESPAÑOL>
Afloje los tornillos de fijación de fijación de distancia focal.
Utilice el anillo de ajuste de distancia focal para obtener un
punto enfocado.
<NEDERLANDS>
Draai de flange-back bevestigingsschroeven los. Gebruik
de flange-back instelring om op een bepaald punt scherp
te stellen.
<PORTUGUÊS>
Solte os parafusos de fixação da flange. Use a flange aju-
stando o anel para obter um ponto focado.
Installation Guide
a
Connect the display device.
<FRANÇAIS> Branchez l’écran de visualisation.
<ITALIANO> Collegare il dispositivo del display.
<ČEŠTINA> Připojte zobrazovací zařízení.
<POLSKI> Podłącz wyświetlacz.
<ESPAÑOL> Conecte el dispositivo de visualización
<NEDERLANDS>
Sluit het weergave-apparaat aan.
<PORTUGUÊS> Ligue o visor.
b
Connect to the 12 V DC UL Listed, Class
2 Power Supply only on the camera.
<FRANÇAIS>
Branchez exclusivement à l’alimentation électrique de
l’unité CC 12 V certifiée UL, classe 2.
<ITALIANO>
Collegare ad alimentazione di energia a CC 12 V UL indi-
cata, Classe 2 solo sull’unità.
<ČEŠTINA>
Připojte pouze ke schválenému zdroji napájení DC 12 V
UL, Třída 2.
<POLSKI>
Podłącz do zasilania DC 12 V UL Listed, klasy 2 jedynie z
urządzenia.
<ESPAÑOL>
Conecte a la alimentación eléctrica de 12 VCD en lista UL,
de Clase 2 sólo en la unidad.
<NEDERLANDS>
Sluit de camera alleen aan op 12 V gelijkstroom UL listed,
klasse 2.
<PORTUGUÊS>
Ligue ao DC 12 V UL listado, fornecimento de energia
Classe 2 apenas na unidade.
Pin layout for the lens iris output
connector.
No. DC type lenses
A Damping -
B Damping +
C Drive +
D Drive -
OSD Menu control buttons
BUTTON Description
UP
Used to move upper direction on the menu screen. Use
this button to select an item or adjust the parameters.
DOWN
Used to move lower direction on the menu screen. Use
this button to select an item or adjust the parameters.
RIGHT
Moves the cursor to the right. Used to increment the
value selected in the menu. The parameter changes
each time this button is pressed.
LEFT
Moves the cursor to the left. Used to decrement the
value selected in the menu. The parameter changes
each time this button is pressed.
SET
Executes selections and displays a submenu for an item
with the
mark.
Connection Guide Additional Information
-
 1
1
-
 2
2


LG L330-DP Le manuel du propriétaire
- Catégorie
- Équipement musical supplémentaire
- Taper
- Le manuel du propriétaire
dans d''autres langues
- English: LG L330-DP Owner's manual
Documents connexes
Autres documents
-
Samsung SCC-B5369SP Manuel utilisateur
-
-
-
-
Samsung SCC-B2335 Manuel utilisateur
-
-
-