Fleurco AURA VA21105 Installation and User Manual
- Taper
- Installation and User Manual

01-201801-2018 4
S’IL EST NÉCESSAIRE DE PERCER LA SURFACE DE LA TUILE,
UTILISER UNE MÈCHE ADAPTÉE POUR LA CÉRAMIQUE.
IF DRILLING TILE SURFACE IS NECESSARY, USE A PROPER
BIT FOR CERAMIC.
Percer puis insérer les chevilles dans le mur.
Utiliser un maillet si nécessaire.
Drill then insert wall plugs into the wall.
Use a mallet if necessary.
Visser à travers le trou de la face avant avec une mèche
ou un tournevis de 6’’ de long. Protéger la tablette avec du
ruban adhésif si nécessaire.
Screw trough the front slot with a 6’’ long bit or screwdriver.
Protect the shelf with masking tape if necessary.
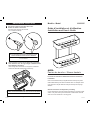
INSTALLATION / INSTALLATION
A
B
1
Lire toutes les instructions attentivement avant de commencer
l’installation.
Il est recommandé de nettoyer régulièrement la surface pour qu’elle
reste brillante. Nettoyer et sécher seulement avec un nettoyant neutre
et un tissu doux. Ne pas utiliser de nettoyant chimique ou d’éponge
abrasive.
Read all instructions carefully before proceeding.
It is recommended to clean the surface periodically to maintain a bright
surface. Only clean and dry the surface with a mild-cleanser and soft
cloth. Do not use chemicals or scouring pads.
Guide d’installation et d’utilisation
Installation and User’s Guide
VA21105
AURA
Paniers de douche • Shower baskets
Modèle • Model
UTILISER LES FENTES ASYMÉTRIQUES POUR AJUSTER SI NÉCESSAIRE.
USE ASYMMETRIC SLOTS TO ADJUST AND LEVEL IF NECESSARY.

01-201801-2018
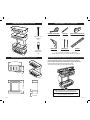
LISTE DES PIÈCES / PARTS LISTING
3
LUNETTES DE SÉCURITÉ
SAFETY GLASSES
* Use a ¼" drill bit when drilling into ceramic tiles
* Utiliser une mèche de ¼" pour percer des tuiles en céramique.
Placer la tablette contre le mur et ajuster avec un niveau.
Puis marquer l’emplacement des trous au milieu des fentes.
Place the shelf on the wall and adjust with a level.
Then mark hole positions at the middle of the slots.
OUTILS REQUIS / TOOLS REQUIRED
PRÉPARER L’INSTALLATION / PREPARE INSTALLATION
PERÇEUSE
DRILL
MÈCHE 1/4"
1/4" DRILL BIT
*
RUBAN À MESURER
TAPE MEASURE
CRAYON
PENCIL
NIVEAU
LEVEL
2
CARACTÉRISTIQUES / SPECIFICATIONS
CHEVILLE
WALL PLUG
(x4)
VIS #8 x 1-1/4''
SCREW
(x4)
11
3
8
" [290mm]
2
1
8
" [55mm]
11
3
8
" [288mm]
4
7
8
" [125mm]
CHOISIR UN EMPLACEMENT, S’ASSURER QU’IL N’Y AI
PAS DE TUYAUX OU DE CABLES DANS LE MUR.
SELECT A SUITABLE LOCATION, ENSURE THERE ARE
NO PIPES OR WIRES IN THE WALL.
-
 1
1
-
 2
2


Fleurco AURA VA21105 Installation and User Manual
- Taper
- Installation and User Manual
dans d''autres langues
- English: Fleurco AURA VA21105
Autres documents
-
MAAX 105672-000-129 Daylight Guide d'installation
-
-
American Standard P2712LHO.371 Mode d'emploi
-
-
-
-
-
Kohler K-702207-L-ABV Guide d'installation