Blueair DustMagnet 5410i Air Purifier Manuel utilisateur
- Catégorie
- Purificateurs d'air
- Taper
- Manuel utilisateur

DustMagnetTM
User Manual
Manuel utilisateur
Manual del usuario
Manuale per l'utente
Bedienungsanleitung
Gebruikshandleiding
Podręcznik użytkownika
Korisničko uputstvo
Kullanım Kılavuzu
Bruksanvisning
Brukerhåndbok
Käyttöohje
Brugervejledning
Panduan Pengguna


3
EN
DustMagnet 4
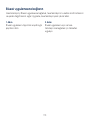
Safety instructions 6
Get started 8
Controls and indicators 11
Filters 14
Care and maintenance 18
Disposal and recycling 20
Help and support 20
Warranty information 20
Specification 21
Contents
Please read this user manual carefully and keep it for future reference.
The latest version of this user manual can be found on www.blueair.com
Note: There may be local variations of these models.
Hereby, Blueair AB, declares that the radio equipment types in the above table is in compliance with
Directive 2014/53/EU. The full text of the EU declaration of conformity is available at the following
internet address: www.blueair.com/customer-support
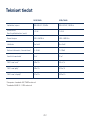
Product name: Model number:
5210i 5231111000
5240i 5231112000
5410i 5431111000
5440i 5431112000
TM

4
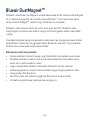
Blueair DustMagnetTM
Blueair DustMagnetTM air purifiers are available in four models. All models are Wi-Fi enabled,
have two pre-filters and two HEPASilentTM main filters to purify air. All DustMagnetTM models
have control functions and a built-in sensor.
The air purifier is mainly composed of a motor, a fan and filters. The air purifier removes
contaminants from the air in a room to improve indoor air quality.
You can change the air purifier settings at any time, using the control panel on the air purifier
or remotely, using the Blueair app. Additional functions are available for all models through
the Blueair app.
Recommendations for best performance
• Use the air purifier in a room that does not exceed the room size recommendation.
• Place the air purifier in a location where air can circulate freely in, out and around the air
purifier.
• Do not place the air purifier closer than 10cm to another object.
• During operation, keep doors and windows in the room with the air purifier closed.
• Only use original Blueair filters.
• Change the main filter when the filter replacement indicator appears on the control
panel.
• Follow the maintenance instructions in this user manual.

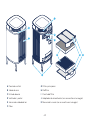
5
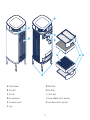
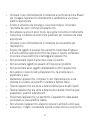
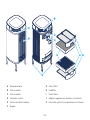
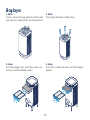
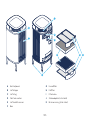
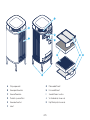
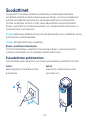
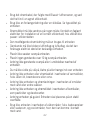
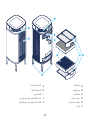
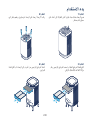
A
B
E
D
C
I
F
G
H
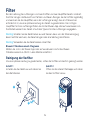
A Control panel G Main filters
B Air outlet H Pre-filters
C Air inlet I Filter hatch
D Fan and motor J Power adapter (not in picture)
E Air quality sensor K User Manual (not in picture)
F Legs

6
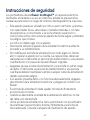
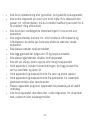
Safety instructions
Blueair DustMagnetTM air purifiers are electrical appliances for indoor
use only, take the necessary precautions to reduce the risk of fire,
electric shock or injury.
• This appliance can be used by children aged from 8 years and
above and persons with reduced physical, sensory or mental
capabilities or lack of experience and knowledge if they have been
given supervision or instruction concerning use of the appliance in
a safe way and understand the hazards involved.
• Children shall not play with the appliance.
• Cleaning and maintenance shall not be made by children without
supervision.
• Always disconnect the appliance from the power supply before
maintenance.
• Do not attempt to open or service the appliance yourself. Service
must be done by the manufacturer, service agent or similarly
qualified personnel using only original Blueair spare parts.
• Ensure that the power cable and the power plug are not at risk of
getting damaged. To avoid hazard, a damaged power cable must
always be replaced by the manufacturer, service agent or similarly
qualified person.
• If the appliance is damaged or is malfunctioning, turn it o,
disconnect it from the power supply and contact Blueair.
• The power plug must be firmly inserted in the power socket.
• When disconnecting the unit from the power supply, do not pull
the power cord, pull the power plug.

7
• Use the power cable provided with your Blueair air purifier to plug
directly and firmly into an appropriate, electrical outlet.
• Do not use an extension cord or a power strip. Refer to the rating
label on your appliance.
• Do not alter the power plug in any way. If the plug does not fit into
the outlet, contact qualified personnel to install the proper outlet.
• Do not use the included power cord for anything else but the
appliance.
• Do not allow objects to enter or block the air inlets and air outlets
as this can cause electric shock or damage the appliance.
• Do not place any liquids on top of the product.
• Do not put any objects heavier than 10kg on top of the product.
• Do not put any objects directly against the appliance.
• Do not sit on, stand, climb onto or hang from the appliance.
• Keep the appliance, including the power cable, at a safe distance
from heated surfaces and open fire.
• Keep the appliance and power plug away from water and other
liquids.
• Keep the appliance and power plug away from chemicals such as
pesticides and deodorants.
• Place the appliance on the floor. The appliance must be placed on
a stable surface.
• Do not use the appliance outdoors or in wet environments such as
bathrooms, laundry rooms or pool areas.

8
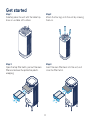
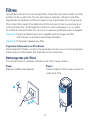
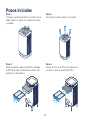
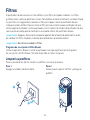
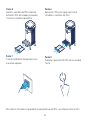
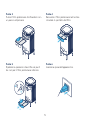
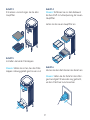
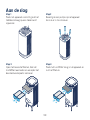
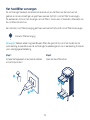
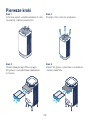
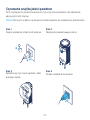
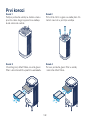
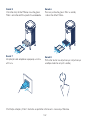
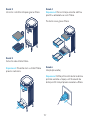
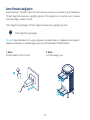
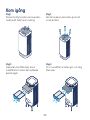
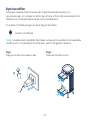
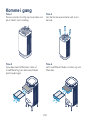
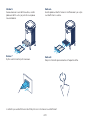
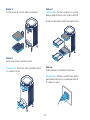
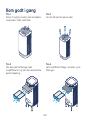
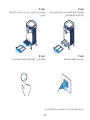
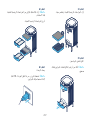
Get started
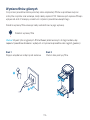
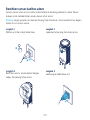
Step 3
Open the top filter hatch, pull out the main
filter and remove the protective plastic
wrapping.
Step 1
Carefully place the unit with the table top
down on a stable soft surface.
Step 4
Insert the main filter back into the unit, and
close the filter hatch.
Step 2
Attach the four legs onto the unit by screwing
them on.
1
2
2
1

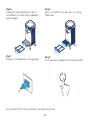
9
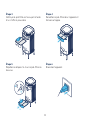
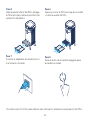
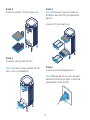
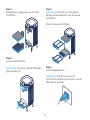
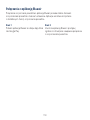
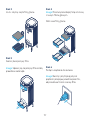
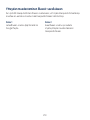
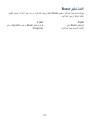
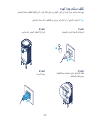
Step 5
Open the bottom filter hatch, pull out
the main filter and remove the protective
plastic wrapping.
Step 6
Place the main filter back into the unit, and
close the filter hatch.
Step 7
Plug the power adapter into a wall outlet. Step 8
Press the On/O button to turn the unit on.
See section Filters for more information regarding filter handling.
1
2
2
1

10
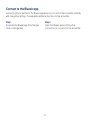
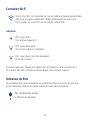
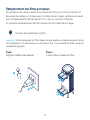
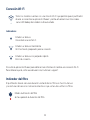
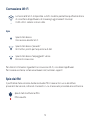
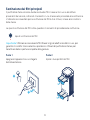
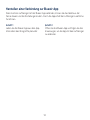
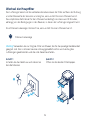
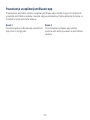
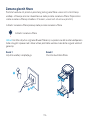
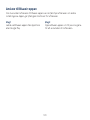
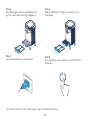
Connect to the Blueair app
Step 1
Download the Blueair app from the App
store or Google play.
Step 2
Open the Blueair app and follow the
instructions to connect it to the air purifier.
Connecting the air purifier to the Blueair app allows you to control the air purifier remotely
and change the settings. The app adds additional functions to the air purifier.

11
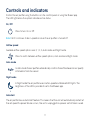
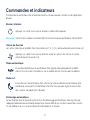
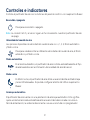
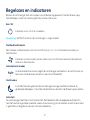
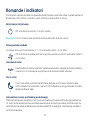
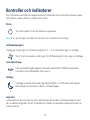
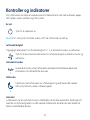
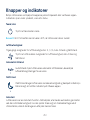
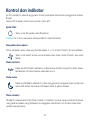
Controls and indicators
Control the air purifier using the buttons on the control panel or using the Blueair app.
The LED light below the symbol indicates active status.
On/O
Press to turn On or O.
Note! Wi-Fi continues to be in operation when the air purifier is turned o.
In Auto mode the air purifier automatically controls the airflow based on air quality
information from the sensor.
Auto mode
Airflow speed
Night mode
Available airflow speed options are: 0, 1, 2, 3, Auto mode and Night mode.
In Night mode the air purifier uses low fan speed and dimmed LED lights. The
brightness of the LED is possible to set in the Blueair app.
Press to switch between airflow speed options, Auto mode and Night mode.
The air purifier has an Autostart feature. This means that the unit will automatically restart at
the set speed if a power failure occurs, the unit is unplugged or a power switch timer is used.
Autostart

12
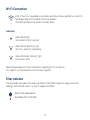
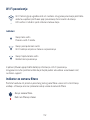
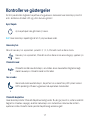
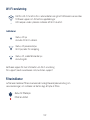
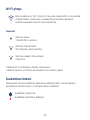
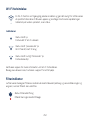
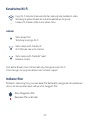
Wi-Fi Connection
Indicators
Status White light
Connected to Wi-Fi network.
Status White fast “blinking” light
Connection error.
Status White “pulsating” light
Wi-Fi On, ready for onboarding.
See the Blueair app for further information regarding Wi-Fi connection.
For support, visit www.blueair.com/customer-support
Status Filter replacement
No lifetime left of the filter.
Filter indicator
The air purifier calculates the remaining lifetime of the filters based on usage and sensor
readings, and indicates when it is time to replace the filters.
A Wi-Fi function is available on all models and allows the air purifier to connect to
the Blueair app and to receive functional updates.
The LED light below the symbol indicates status.

13
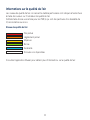
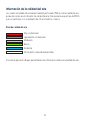
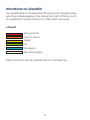
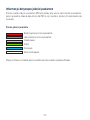
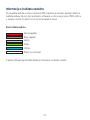
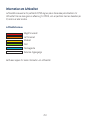
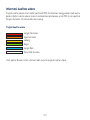
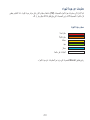
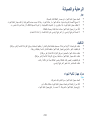
Air quality information
The air quality levels for particulate matter (PM) are indicated using a color scale on the air
quality indicator. This scale gives a reading for PM2.5, which are particles with a diameter of
2.5 micrometers or less.
See the Blueair app for further information regarding air quality.
Air quality level
Very Polluted
Good
Moderate
Slightly Polluted
Excellent
Data not available

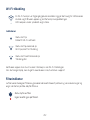
14
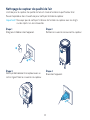
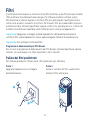
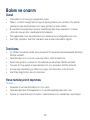
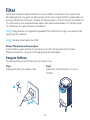
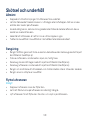
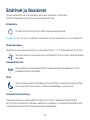
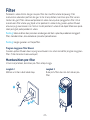
Clean the pre-filters
For best performance, clean the pre-filters weekly.
Filters
The air purifier is delivered with two pre-filters and two main filters installed. The filters purify
the air from particles and gases. For best performance, clean the pre-filters regularly and
change the main filters when the air purifier indicates filter change. To find the right main filter
for your air purifier, use the Blueair app or visit www.blueair.com. The model number of your
air purifier can be found on the rating label on the air purifier.
2
1
Blueair filter subscription program
Use the Blueair app or visit www.blueair.com to sign up for the Blueair filter subscription
program. (Not available in all markets)
Important! Always turn o and disconnect the appliance from the power supply before
changing filters, cleaning or carrying out maintenance procedures.
Important! Do not use the unit without filters.
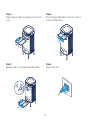
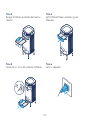
Step 1
Turn the unit o and unplug it. Step 2
Open the top filter hatch and pull out the
pre-filter.

15
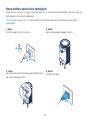
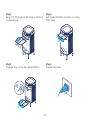
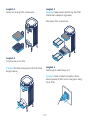
3
2
1
4
Step 5
Repeat step 1-4 on the bottom pre-filter.
Step 3
Clean the pre-filter by wiping it with a dust
cloth.
Step 6
Plug in the unit.
Step 4
Place the pre-filter back into the unit and
close the filter hatch.

16
Change the main filters
The air purifier calculates the remaining lifetime of the filters based on usage and sensor
readings, and indicates when it is time to change filter. The recommended time for filter
change is between 6-12 months depending on the indoor conditions.
A filter replacement indicator indicates when it is time to change the filters.
Filter replacement indicator
Important! Use only original Blueair filters suitable for the model to ensure proper function
and performance of the air purifier, and to qualify for full warranty coverage.
2
1
Step 1
Turn the unit o and unplug it. Step 2
Open the two filter hatches.

17
Step 5
Close the two filter hatches.
Note! Make sure that the filter hatches are
closed correctly.
Step 3
Remove and dispose of the old main filters.
Step 6
Plug in the unit.
Note! Press the airflow speed button for 15s
to reset the filter timer.
Step 4
Note! Remove the protective plastic from the
new main filters before use.
Insert the new main filters.

18
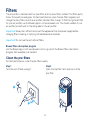
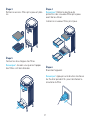
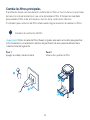
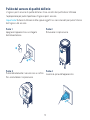
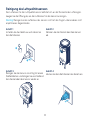
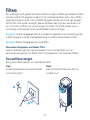
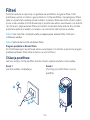
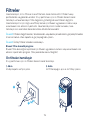
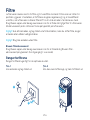
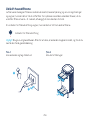
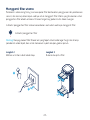
Moving the air purifier
Important!
• Unplug the air purifier before moving it.
• Make sure that the filter hatches on the air purifier are securely closed.
• Lift the air purifier to move it. Do not drag or push the air purifier.
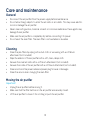
Care and maintenance
General
• Disconnect the air purifier from the power supply before maintenance.
• Do not allow foreign objects to enter the air inlets or air outlets. This may cause electric
shock or damage the air purifier.
• Never clean with gasoline, chemical solvents or corrosive materials as these agents may
damage the air purifier.
• Make sure the air purifier is completely dry before connecting it to power.
• Do not wash the main filter. The main filter is not washable or reusable.
Cleaning
• Clean the pre-filters by wiping with a dust cloth or vacuuming with a soft brush
attachment (not included).
• Wipe the exterior of the air purifier with a soft, clean, damp cloth.
• Vacuum the small air inlets with a soft brush attachment (not included).
• Vacuum the inside of the air purifier with a soft brush attachment (not included).
• Clean and check the power cable and power plug for wear or damages.
• Clean the sensor when changing the main filter.

19
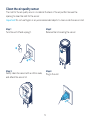
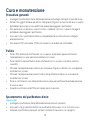
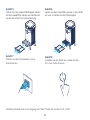
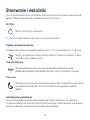
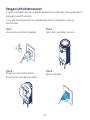
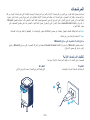
Clean the air quality sensor
The inlet for the air quality sensor is located at the back of the air purifier. Vacuum the
opening to clean the inlet for the sensor.
Important! Do not use fingers or any unrecommended objects to clean inside the sensor inlet.
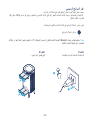
Step 3
Gently clean the sensor with a cotton swab,
and attach the sensor lid.
Step 1
Turn the unit o and unplug it.
Step 4
Plug in the unit.
Step 2
Remove the lid covering the sensor.
2
1

20
Warranty information
The Blueair Limited Warranty applies only if the air purifier is installed, used and maintained
according to the instructions in this manual.
For warranty conditions, please visit www.blueair.com/warranty
Warranty and returns
If you purchased the air purifier at one of our authorized retailers, please contact the same
store to request assistance.
Help and support
If you have questions about your product, please visit www.blueair.com or contact your local
Blueair retailer.
To contact Blueair for personalized support, please visit www.blueair.com/customer-support
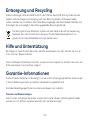
This air purifier should be disposed or recycled as electrical waste and the filter may be
recycled as plastic. If you have questions regarding the disposal and recycling of this air
purifier, please contact your local recycling facility for availability or Blueair dealer and ask for
the correct method of recycling.
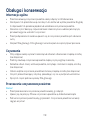
Disposal and recycling
The crossed-out waste bin symbol on the appliance or on its packaging means that
at the end of its useful lifespan, the product must be disposed of separately from
ordinary household wastes.
La page est en cours de chargement...
La page est en cours de chargement...
La page est en cours de chargement...
La page est en cours de chargement...
La page est en cours de chargement...
La page est en cours de chargement...
La page est en cours de chargement...
La page est en cours de chargement...
La page est en cours de chargement...
La page est en cours de chargement...
La page est en cours de chargement...
La page est en cours de chargement...
La page est en cours de chargement...
La page est en cours de chargement...
La page est en cours de chargement...
La page est en cours de chargement...
La page est en cours de chargement...
La page est en cours de chargement...
La page est en cours de chargement...
La page est en cours de chargement...
La page est en cours de chargement...
La page est en cours de chargement...
La page est en cours de chargement...
La page est en cours de chargement...
La page est en cours de chargement...
La page est en cours de chargement...
La page est en cours de chargement...
La page est en cours de chargement...
La page est en cours de chargement...
La page est en cours de chargement...
La page est en cours de chargement...
La page est en cours de chargement...
La page est en cours de chargement...
La page est en cours de chargement...
La page est en cours de chargement...
La page est en cours de chargement...
La page est en cours de chargement...
La page est en cours de chargement...
La page est en cours de chargement...
La page est en cours de chargement...
La page est en cours de chargement...
La page est en cours de chargement...
La page est en cours de chargement...
La page est en cours de chargement...
La page est en cours de chargement...
La page est en cours de chargement...
La page est en cours de chargement...
La page est en cours de chargement...
La page est en cours de chargement...
La page est en cours de chargement...
La page est en cours de chargement...
La page est en cours de chargement...
La page est en cours de chargement...
La page est en cours de chargement...
La page est en cours de chargement...
La page est en cours de chargement...
La page est en cours de chargement...
La page est en cours de chargement...
La page est en cours de chargement...
La page est en cours de chargement...
La page est en cours de chargement...
La page est en cours de chargement...
La page est en cours de chargement...
La page est en cours de chargement...
La page est en cours de chargement...
La page est en cours de chargement...
La page est en cours de chargement...
La page est en cours de chargement...
La page est en cours de chargement...
La page est en cours de chargement...
La page est en cours de chargement...
La page est en cours de chargement...
La page est en cours de chargement...
La page est en cours de chargement...
La page est en cours de chargement...
La page est en cours de chargement...
La page est en cours de chargement...
La page est en cours de chargement...
La page est en cours de chargement...
La page est en cours de chargement...
La page est en cours de chargement...
La page est en cours de chargement...
La page est en cours de chargement...
La page est en cours de chargement...
La page est en cours de chargement...
La page est en cours de chargement...
La page est en cours de chargement...
La page est en cours de chargement...
La page est en cours de chargement...
La page est en cours de chargement...
La page est en cours de chargement...
La page est en cours de chargement...
La page est en cours de chargement...
La page est en cours de chargement...
La page est en cours de chargement...
La page est en cours de chargement...
La page est en cours de chargement...
La page est en cours de chargement...
La page est en cours de chargement...
La page est en cours de chargement...
La page est en cours de chargement...
La page est en cours de chargement...
La page est en cours de chargement...
La page est en cours de chargement...
La page est en cours de chargement...
La page est en cours de chargement...
La page est en cours de chargement...
La page est en cours de chargement...
La page est en cours de chargement...
La page est en cours de chargement...
La page est en cours de chargement...
La page est en cours de chargement...
La page est en cours de chargement...
La page est en cours de chargement...
La page est en cours de chargement...
La page est en cours de chargement...
La page est en cours de chargement...
La page est en cours de chargement...
La page est en cours de chargement...
La page est en cours de chargement...
La page est en cours de chargement...
La page est en cours de chargement...
La page est en cours de chargement...
La page est en cours de chargement...
La page est en cours de chargement...
La page est en cours de chargement...
La page est en cours de chargement...
La page est en cours de chargement...
La page est en cours de chargement...
La page est en cours de chargement...
La page est en cours de chargement...
La page est en cours de chargement...
La page est en cours de chargement...
La page est en cours de chargement...
La page est en cours de chargement...
La page est en cours de chargement...
La page est en cours de chargement...
La page est en cours de chargement...
La page est en cours de chargement...
La page est en cours de chargement...
La page est en cours de chargement...
La page est en cours de chargement...
La page est en cours de chargement...
La page est en cours de chargement...
La page est en cours de chargement...
La page est en cours de chargement...
La page est en cours de chargement...
La page est en cours de chargement...
La page est en cours de chargement...
La page est en cours de chargement...
La page est en cours de chargement...
La page est en cours de chargement...
La page est en cours de chargement...
La page est en cours de chargement...
La page est en cours de chargement...
La page est en cours de chargement...
La page est en cours de chargement...
La page est en cours de chargement...
La page est en cours de chargement...
La page est en cours de chargement...
La page est en cours de chargement...
La page est en cours de chargement...
La page est en cours de chargement...
La page est en cours de chargement...
La page est en cours de chargement...
La page est en cours de chargement...
La page est en cours de chargement...
La page est en cours de chargement...
La page est en cours de chargement...
La page est en cours de chargement...
La page est en cours de chargement...
La page est en cours de chargement...
La page est en cours de chargement...
La page est en cours de chargement...
La page est en cours de chargement...
La page est en cours de chargement...
La page est en cours de chargement...
La page est en cours de chargement...
La page est en cours de chargement...
La page est en cours de chargement...
La page est en cours de chargement...
La page est en cours de chargement...
La page est en cours de chargement...
La page est en cours de chargement...
La page est en cours de chargement...
La page est en cours de chargement...
La page est en cours de chargement...
La page est en cours de chargement...
La page est en cours de chargement...
La page est en cours de chargement...
La page est en cours de chargement...
La page est en cours de chargement...
La page est en cours de chargement...
La page est en cours de chargement...
La page est en cours de chargement...
La page est en cours de chargement...
La page est en cours de chargement...
La page est en cours de chargement...
La page est en cours de chargement...
La page est en cours de chargement...
La page est en cours de chargement...
La page est en cours de chargement...
La page est en cours de chargement...
La page est en cours de chargement...
La page est en cours de chargement...
La page est en cours de chargement...
La page est en cours de chargement...
La page est en cours de chargement...
La page est en cours de chargement...
La page est en cours de chargement...
La page est en cours de chargement...
La page est en cours de chargement...
La page est en cours de chargement...
La page est en cours de chargement...
La page est en cours de chargement...
La page est en cours de chargement...
La page est en cours de chargement...
La page est en cours de chargement...
La page est en cours de chargement...
La page est en cours de chargement...
La page est en cours de chargement...
La page est en cours de chargement...
La page est en cours de chargement...
La page est en cours de chargement...
La page est en cours de chargement...
La page est en cours de chargement...
La page est en cours de chargement...
La page est en cours de chargement...
La page est en cours de chargement...
La page est en cours de chargement...
La page est en cours de chargement...
La page est en cours de chargement...
La page est en cours de chargement...
La page est en cours de chargement...
La page est en cours de chargement...
La page est en cours de chargement...
La page est en cours de chargement...
La page est en cours de chargement...
La page est en cours de chargement...
La page est en cours de chargement...
La page est en cours de chargement...
La page est en cours de chargement...
La page est en cours de chargement...
La page est en cours de chargement...
La page est en cours de chargement...
La page est en cours de chargement...
La page est en cours de chargement...
La page est en cours de chargement...
La page est en cours de chargement...
La page est en cours de chargement...
La page est en cours de chargement...
La page est en cours de chargement...
La page est en cours de chargement...
La page est en cours de chargement...
La page est en cours de chargement...
La page est en cours de chargement...
La page est en cours de chargement...
La page est en cours de chargement...
La page est en cours de chargement...
La page est en cours de chargement...
La page est en cours de chargement...
La page est en cours de chargement...
La page est en cours de chargement...
La page est en cours de chargement...
La page est en cours de chargement...
La page est en cours de chargement...
La page est en cours de chargement...
La page est en cours de chargement...
La page est en cours de chargement...
La page est en cours de chargement...
La page est en cours de chargement...
La page est en cours de chargement...
La page est en cours de chargement...
La page est en cours de chargement...
La page est en cours de chargement...
La page est en cours de chargement...
La page est en cours de chargement...
La page est en cours de chargement...
La page est en cours de chargement...
La page est en cours de chargement...
La page est en cours de chargement...
La page est en cours de chargement...
La page est en cours de chargement...
La page est en cours de chargement...
-
 1
1
-
 2
2
-
 3
3
-
 4
4
-
 5
5
-
 6
6
-
 7
7
-
 8
8
-
 9
9
-
 10
10
-
 11
11
-
 12
12
-
 13
13
-
 14
14
-
 15
15
-
 16
16
-
 17
17
-
 18
18
-
 19
19
-
 20
20
-
 21
21
-
 22
22
-
 23
23
-
 24
24
-
 25
25
-
 26
26
-
 27
27
-
 28
28
-
 29
29
-
 30
30
-
 31
31
-
 32
32
-
 33
33
-
 34
34
-
 35
35
-
 36
36
-
 37
37
-
 38
38
-
 39
39
-
 40
40
-
 41
41
-
 42
42
-
 43
43
-
 44
44
-
 45
45
-
 46
46
-
 47
47
-
 48
48
-
 49
49
-
 50
50
-
 51
51
-
 52
52
-
 53
53
-
 54
54
-
 55
55
-
 56
56
-
 57
57
-
 58
58
-
 59
59
-
 60
60
-
 61
61
-
 62
62
-
 63
63
-
 64
64
-
 65
65
-
 66
66
-
 67
67
-
 68
68
-
 69
69
-
 70
70
-
 71
71
-
 72
72
-
 73
73
-
 74
74
-
 75
75
-
 76
76
-
 77
77
-
 78
78
-
 79
79
-
 80
80
-
 81
81
-
 82
82
-
 83
83
-
 84
84
-
 85
85
-
 86
86
-
 87
87
-
 88
88
-
 89
89
-
 90
90
-
 91
91
-
 92
92
-
 93
93
-
 94
94
-
 95
95
-
 96
96
-
 97
97
-
 98
98
-
 99
99
-
 100
100
-
 101
101
-
 102
102
-
 103
103
-
 104
104
-
 105
105
-
 106
106
-
 107
107
-
 108
108
-
 109
109
-
 110
110
-
 111
111
-
 112
112
-
 113
113
-
 114
114
-
 115
115
-
 116
116
-
 117
117
-
 118
118
-
 119
119
-
 120
120
-
 121
121
-
 122
122
-
 123
123
-
 124
124
-
 125
125
-
 126
126
-
 127
127
-
 128
128
-
 129
129
-
 130
130
-
 131
131
-
 132
132
-
 133
133
-
 134
134
-
 135
135
-
 136
136
-
 137
137
-
 138
138
-
 139
139
-
 140
140
-
 141
141
-
 142
142
-
 143
143
-
 144
144
-
 145
145
-
 146
146
-
 147
147
-
 148
148
-
 149
149
-
 150
150
-
 151
151
-
 152
152
-
 153
153
-
 154
154
-
 155
155
-
 156
156
-
 157
157
-
 158
158
-
 159
159
-
 160
160
-
 161
161
-
 162
162
-
 163
163
-
 164
164
-
 165
165
-
 166
166
-
 167
167
-
 168
168
-
 169
169
-
 170
170
-
 171
171
-
 172
172
-
 173
173
-
 174
174
-
 175
175
-
 176
176
-
 177
177
-
 178
178
-
 179
179
-
 180
180
-
 181
181
-
 182
182
-
 183
183
-
 184
184
-
 185
185
-
 186
186
-
 187
187
-
 188
188
-
 189
189
-
 190
190
-
 191
191
-
 192
192
-
 193
193
-
 194
194
-
 195
195
-
 196
196
-
 197
197
-
 198
198
-
 199
199
-
 200
200
-
 201
201
-
 202
202
-
 203
203
-
 204
204
-
 205
205
-
 206
206
-
 207
207
-
 208
208
-
 209
209
-
 210
210
-
 211
211
-
 212
212
-
 213
213
-
 214
214
-
 215
215
-
 216
216
-
 217
217
-
 218
218
-
 219
219
-
 220
220
-
 221
221
-
 222
222
-
 223
223
-
 224
224
-
 225
225
-
 226
226
-
 227
227
-
 228
228
-
 229
229
-
 230
230
-
 231
231
-
 232
232
-
 233
233
-
 234
234
-
 235
235
-
 236
236
-
 237
237
-
 238
238
-
 239
239
-
 240
240
-
 241
241
-
 242
242
-
 243
243
-
 244
244
-
 245
245
-
 246
246
-
 247
247
-
 248
248
-
 249
249
-
 250
250
-
 251
251
-
 252
252
-
 253
253
-
 254
254
-
 255
255
-
 256
256
-
 257
257
-
 258
258
-
 259
259
-
 260
260
-
 261
261
-
 262
262
-
 263
263
-
 264
264
-
 265
265
-
 266
266
-
 267
267
-
 268
268
-
 269
269
-
 270
270
-
 271
271
-
 272
272
-
 273
273
-
 274
274
-
 275
275
-
 276
276
-
 277
277
-
 278
278
-
 279
279
-
 280
280
-
 281
281
-
 282
282
-
 283
283
-
 284
284
-
 285
285
-
 286
286
-
 287
287
-
 288
288
-
 289
289
-
 290
290
-
 291
291
-
 292
292
-
 293
293
-
 294
294
-
 295
295
-
 296
296
-
 297
297
-
 298
298
-
 299
299
-
 300
300
-
 301
301
-
 302
302
-
 303
303
-
 304
304


Blueair DustMagnet 5410i Air Purifier Manuel utilisateur
- Catégorie
- Purificateurs d'air
- Taper
- Manuel utilisateur
dans d''autres langues
- italiano: Blueair DustMagnet 5410i Air Purifier Manuale utente
- English: Blueair DustMagnet 5410i Air Purifier User manual
- español: Blueair DustMagnet 5410i Air Purifier Manual de usuario
- Deutsch: Blueair DustMagnet 5410i Air Purifier Benutzerhandbuch
- Nederlands: Blueair DustMagnet 5410i Air Purifier Handleiding
- dansk: Blueair DustMagnet 5410i Air Purifier Brugermanual
- polski: Blueair DustMagnet 5410i Air Purifier Instrukcja obsługi
- svenska: Blueair DustMagnet 5410i Air Purifier Användarmanual
- Türkçe: Blueair DustMagnet 5410i Air Purifier Kullanım kılavuzu
- suomi: Blueair DustMagnet 5410i Air Purifier Ohjekirja