Trendnet TV-IP121WN Quick Installation Guide
- Catégorie
- Des caméras de sécurité
- Taper
- Quick Installation Guide

TV-IP121WN
1.01
Anleitung zur Schnellinstallation

Table of Contents
Deutsch 1
Troubleshooting 8
Wireless Tips 9
1. Bevor Sie anfangen 1
2. Installation der Hardware 2
3. 3Konfiguration der IP-Kamera
Version 02.22.2011

Ÿ
ŸCD-ROM-Laufwerk
ŸVGA-Auflösung: 800 x 600 oder höhe
ŸWebbrowser: Internet Explorer (6.0 oder höher)
ŸDrahtloser Router (z.B. TEW-691GR) oder Drahtloser Access Point
(z.B. TEW-690AP)
ŸEin verfügbarer DHCP-Server (in Routern ist normalerweise ein DHCP-Server
integriert)
Computer mit korrekt installiertem verdrahtetem Netzwerkadapter
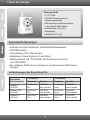
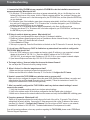
1. Bevor Sie anfangen
Packungsinhalt
Systemanforderungen
Ÿ
ŸCD-ROM (Dienstprogramm &
Bedienungsanleitung)
ŸMehrsprachige Installationsanleitung
Ÿ1 abnehmbare 2dBi-Antenne
Ÿ
ŸMontagesatz
ŸNetzteil (5V DC, 2.5A)
TV-IP121WN
Netzwerkkabel (1.5m / 5ft)
1
Unterstützte
Betriebssysteme
Prozessor
1-8 Kameras
ProzessorSpeicher Speicher
9-32 Kameras
Windows 7
(32/64-bit)
Windows Vista
(32/64-bit)
Windows XP
(32/64-bit)
Intel Core2
Duo
Intel Core2
Quad
4GB RAM
oder schneller
Intel Core2
Duo
Intel Core2
Quad
4GB RAM
oder schneller
Intel Core2
Duo
Intel Core2
Quad
4GB RAM
oder schneller
2GB RAM
oder schneller
2GB RAM
oder schneller
2GB RAM
oder schneller
Anforderungen der SecurView Pro

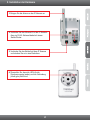
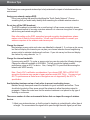
2. Installation der Hardware
1. Bringen Sie die Antenn an der IP-Kamera an.
2. Verbinden Sie den Ethernet-Port der IP-Kamera
über ein RJ-45- Netzwerkkabel mit einem
Switch/Router.
3. Verbinden Sie das Netzteil mit dem IP Kamera
und stecken Sie es in eine Steckdose.
2
4. Überprüfen Sie, dass die LEDs für die
Stromversorgung (amber) und die Verbindung
(blinkt grün) aktiv sind.

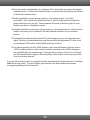
3. Konfiguration der IP-Kamera
Hinweis:
1. Es ist zu empfehlen, die IP-Kamera von einem verdrahteten Computer aus zu
konfigurieren.
2. Wenn Sie SecurView Pro verwenden möchten, installieren Sie die Software bitte,
indem Sie im Autorun-Fenster auf SecurView Pro klicken. Weitere Informationen
finden Sie in der Bedienungsanleitung auf der CD.
1. Legen Sie die Dienstprogramm-CD in das
CD-ROM-Laufwerk Ihres Computers ein
4. Folgen Sie den Anweisungen des
Installationsassistenten und klicken Sie dann
auf “Close” (Schließen).
5. Klicken Sie auf Start-Symbol von Windows.
Klicken Sie auf Programme Ž TRENDnet Ž
IP-Setup und dort erneut auf IP-Setup.
3
2. Klicken Sie auf Run autorun.exe
(setup.exe ausführen)(nur Windows 7/Vista).
3. Klicken Sie auf IP Setup.

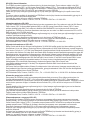
Hinweis:
Standardmäßig sind die IP-Einstellungen der TV-IP121WN als DHCP konfiguriert.
Springen Sie bitte zu Schritt 10. Wenn Sie der TV-IP121WN eine statische IP-Adresse
zuweisen möchten, fahren Sie bitte mit Schritt 6 fort.
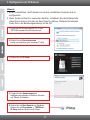
6. Wählen Sie die gewünschte IP Kamera aus
und klicken Sie auf Change IP.
7. Konfigurieren Sie die IP-Adresse so, dass sie
im Subnetz Ihres Netzwerks liegt, geben Sie
die Administrator-ID und das Kennwort ein
und klicken Sie dann auf Change (Ändern).
Standardeinstellung:
ID: admin
Kennwort: admin
8. Klicken Sie auf OK und warten Sie 30 Sekunden.
9. Klicken Sie auf OK.
4
8. Klicken Sie auf OK und warten Sie 30 Sekunden.

10. Doppelklicken Sie auf die Internetkamera, um
die Browserkonfiguration aufzurufen.
11. Geben Sie User name (Benutzername) und
Password (Kennwort) ein und klicken Sie auf
OK.
User name: admin
Password: admin
12. Klicken Sie mit der rechten Maustaste auf
den gelben Balken und klicken Sie dort auf
“Install This Add-on for All Users on This
Computer (Internet Explorer 8)” (Dieses
Add-On für alle Benutzer des Computers
installieren) bzw. auf “Install ActiveX Control
(Internet Explorer 6/7)” (ActiveX-
Steuerelement installieren).
13. Klicken Sie auf Install (Installieren)
(Internet Explorer 6/7/8).
14. Klicken Sie auf “Setup”(Einrichten) und dann
auf “Wireless” (Drahtlos).
5

16. Lösen Sie das RJ-45-Kabel und das
Stromkabel. Stecken Sie das Stromkabel
dann wieder ein.
17. Überprüfen Sie, dass die LEDs für die
Stromversorgung (amber) und die Verbindung
(blinkt grün) aktiv sind.
Hinweis:
Die TV-IP121WN funktioniert nur dann drahtlos, wenn Sie das Ethernet-Kabel von der
Kamera trennen.
15. Klicken Sie auf “Site Survey” (Standort-
Übersicht). Wählen Sie eine ESSID aus. Die
ESSID ist der Name Ihres drahtlosen
Netzwerks (z.B. des drahtlosen Routers oder
Access Points). Markieren Sie bei aktivierter
Verschlüsselung den entsprechenden
Authentifizierungs- und Verschlüsselungstyp,
geben Sie den vorinstallierten Schlüssel ein
und klicken Sie dann auf “Apply”
(Übernehmen). (im Beispiel: WPA2-PSK.
Markieren Sie “Open” (Offenes System) oder
“Shared” (Freigegebener Schlüssel), wenn Ihr
drahtloses Netzwerk WPA nicht unterstützt.
Weitere Informationen erhalten Sie von Ihrem
Netzwerkadministrator).
6

7
Die Konfiguration ist jetzt abgeschlossen.
Registrieren Sie Ihr Produkt
Nehmen Sie sich bitte einen Moment Zeit und registrieren Sie Ihr Produkt online, so dass Sie
unsere umfassenden Support- und Kundendienstleistungen in Anspruch nehmen können:
www.trendnet.com/register Vielen Dank für den Kauf eines TRENDnet-Produkts.
Weitere Informationen zu den Konfigurations- und erweiterten Einstellungen des TV-IP121WN
finden Sie im Abschnitt “Problembehandlung” der Bedienungsanleitung auf der beiliegenden
CD-ROM oder auf der Website von TRENDnet unter http://www.trendnet.com.
18. Klicken Sie auf “Live View” (Live-Ansicht).
Jetzt werden die Live-Videobilder angezeigt.

8
Troubleshooting
1. I inserted the Utility CD-ROM into my computer's CD-ROM Drive but the installation menu does not
appear automatically. What should I do?
1. For Windows 7, if the installation menu does not appear automatically, click on the Windows Icon on the
bottom left hand corner of the screen, click the “Search programs and files” box, and type D:\autorun.exe,
where “D” in “D:\autorun.exe” is the letter assigned to your CD-ROM Drive, and then press the ENTER key
on your keyboard .
2.For Windows Vista, if the installation menu does not appear automatically, click Start, click the Start Search
box, and type D:\autorun.exe where "D" in "D:\autorun.exe" is the letter assigned to your CD-ROM Drive,
and then press the ENTER key on your keyboard.
3. For Windows XP, if the window does not appear automatically, click Start, click Run and type
D:\autorun.exe where “D” in “D:\autorun.exe” is the letter assigned to your CD-ROM Drive, and then press
the ENTER key on your keyboard.
2. IP Setup is unable to detect my camera. What should I do?
1. Verify that you have followed all the steps in Section 2: Hardware Installation.
2. Disable any software firewall programs such as ZoneAlarm or Norton Internet Security. If you are using
Windows 7, Vista or XP disable the built in firewall.
3. Click on Search in IPSetup.
4. Take a pin or paper clip. Press the Reset button on the back on the IP Camera for 10 seconds, then let go.
3. I do not have a DHCP server or DHCP is disabled on my network and I am unable to configure the
TV-IP121WN. What should I do?
1. Go to the TCP/IP settings on your computer and assign a static IP address on your computer's network
adapter in the subnet of 192.168.10.x. Since the default IP address of the TV-IP121WN is
192.168.10.30, do not assign a static IP address of 192.168.10.30 on your computer's network adapter.
2. Open Internet Explorer and enter http://192.168.10.30 into the address bar.
The Image is blurry. How can I adjust the focus on the Internet Camera?
You can adjust the IP Camera's focus by rotating the lens.
5. When I click on Live View the image does not load?
1. Make sure that you are using a browser that supports ActiveX.
2. Make sure that ActiveX is installed. See step 12-13 in Section 3: Configure the IP Camera.
6. How do I connect the TV-IP121WN to my wireless router or access point?
Make sure that you configure the camera to have the same SSID (Wireless Network Name), encryption and
authentication type and Pre-shared (Encryption) key (if enabled). Follow the instructions in section 2 to
configure the camera with the SSID and encryption key.
7. After I successfully configured the TV-IP121WN to match my wireless network settings, I cannot
connect to the camera.
1. Verify that the wireless settings match your wireless network settings.
2. Verify in the wireless section of the browser configuration that the Enable option is checked.
3. Make sure to disconnect the network cable from the camera and verify that the LINK LED is blinking green.
8. I forgot my password. What should I do?
Take a pin or paperclip and press the reset button on the back of the unit for 15 seconds. This will return
settings back to factory defaults. Open up the IP Setup program to find out the IP address of the camera
(see step 10 in Section 3: Configure the IP Camera. If you do not have a DHCP server on your network,
the default IP address is 192.168.10.30. The default administrator ID and password is admin.
If you still encounter problems or have any questions regarding the TV-IP121WN, please contact TRENDnet's
Technical Support Department.
4.

9
The following are some general wireless tips to help minimize the impact of interference within an
environment.
Assign your network a unique SSID
Do not use anything that would be identifying like “Smith Family Network”. Choose
something that you would easily identify when searching for available wireless networks.
Do not turn off the SSID broadcast
The SSID broadcast is intended to be on and turning it off can cause connectivity issues.
The preferred method of securing a wireless network is to choose a strong form of encryption
with a strong and varied encryption key.
Change the channel
Most wireless access points and routers are defaulted to channel 6. If you have a site survey
tool that will display the channels you can plan your channel selection around neighboring
access points to minimize interference from them. If your site survey tool does not display
the channel try using channels 1 or 11.
Change the channel bandwidth
If you are using an 802.11n router or access point you can also make the following changes.
Change the channel bandwidth to 20/40MHz. This will provide the highest possible
performance using an 802.11n device. Also, if using 802.11n you should be securing the
network with WPA2 security.
Avoid stacking hardware on top of each other to prevent overheating issues
Maintain enough free space around the hardware for good ventilation and airflow. There
should also be plenty of free space around the antennas to allow the wireless signal to
propagate. Please also make sure that the wireless hardware is not placed in any type of
shelving or enclosures.
There are a number of other environmental factors that can impact the range of wireless
devices.
1. Adjust your wireless devices so that the signal is traveling in a straight path, rather than at
an angle. The more material the signal has to pass through the more signal you will lose.
Note: after setting up the SSID, encryption type and encryption key/passphrase, please
make a note of them for future reference. You will need this information to connect your
wireless computers to the wireless router/access point.
Note: Due to Wi-Fi certification considerations if you choose WEP, WPA or WPA2-TKIP
encryption this device may operate in legacy wireless mode (802.11b/g). You may not get
802.11n performance as these forms of encryption are not supported by the 802.11n
specification.
Wireless Tips

10
2. Keep the number of obstructions to a minimum. Each obstruction can reduce the range of
a wireless device. Position the wireless devices in a manner that will minimize the amount
of obstructions between them.
3. Building materials can have a large impact on your wireless signal. In an indoor
environment, try to position the wireless devices so that the signal passes through less
dense material such as dry wall. Dense materials like metal, solid wood, glass or even
furniture may block or degrade the signal.
4. Antenna orientation can also have a large impact on your wireless signal. Use the wireless
adapter's site survey tool to determine the best antenna orientation for your wireless
devices.
5. Interference from devices that produce RF (radio frequency) noise can also impact your
signal. Position your wireless devices away from anything that generates RF noise, such
as microwaves, HAM radios, Walkie-Talkies and baby monitors.
6. Any device operating on the 2.4GHz frequency will cause interference. Devices such as
2.4GHz cordless phones or other wireless remotes operating on the 2.4GHz frequency
can potentially drop the wireless signal. Although the phone may not be in use, the base
can still transmit wireless signals. Move the phone's base station as far away as possible
from your wireless devices.
If you are still experiencing low or no signal consider repositioning the wireless devices or installing
additional access points. The use of higher gain antennas may also provide the necessary
coverage depending on the environment.

GPL/LGPL General Information
This TRENDnet product includes free software written by third party developers. These codes are subject to the GNU
General Public License ("GPL") or GNU Lesser General Public License ("LGPL"). These codes are distributed WITHOUT
WARRANTY and are subject to the copyrights of the developers. TRENDnet does not provide technical support for these
codes. The details of the GNU GPL and LGPL are included in the product CD-ROM.
Please also go to (http://www.gnu.org/licenses/gpl.txt) or (http://www.gnu.org/licenses/lgpl.txt) for specific terms of each
license.
The source codes are available for download from TRENDnet's web site (http://trendnet.com/downloads/list_gpl.asp) for at
least three years from the product shipping date.
You could also request the source codes by contacting TRENDnet.
20675 Manhattan Place, Torrance, CA 90501, USA. Tel: +1-310-961-5500 Fax: +1-310-961-5511
Informations générales GPL/LGPL
Ce produit TRENDnet comprend un logiciel libre écrit par des programmeurs tiers. Ces codes sont sujet à la GNU General
Public License ("GPL" Licence publique générale GNU) ou à la GNU Lesser General Public License ("LGPL" Licence
publique générale limitée GNU). Ces codes sont distribués SANS GARANTIE et sont sujets aux droits d'auteurs des
programmeurs. TRENDnet ne fournit pas d'assistance technique pour ces codes. Les détails concernant les GPL et LGPL
GNU sont repris sur le CD-ROM du produit.
Veuillez également vous rendre en (http://www.gnu.org/licenses/gpl.txt) ou en (http://www.gnu.org/licenses/lgpl.txt) pour les
conditions spécifiques de chaque licence.
Les codes source sont disponibles au téléchargement sur le site Internet de TRENDnet web site
(http://trendnet.com/downloads/list_gpl.asp) durant au moins 3 ans à partir de la date d'expédition du produit.
Vous pouvez également demander les codes source en contactant TRENDnet.
20675 Manhattan Place, Torrance, CA 90501, USA. Tel: +1-310-961-5500 Fax: +1-310-961-5511
Allgemeine Informationen zu GPL/LGPL
Dieses Produkt enthält die freie Software "netfilter/iptables" (© 2000-2004 netfilter project http://www.netfilter.org) und die
freie Software „Linux „mtd“ (Memory Technology Devices) Implementation (© 2000 David Woodhouse), erstmals integriert in
Linux Version 2.4.0-test 3 v. 10.07.2000 (http://www.kernel.org/pub/linux/kernel/v2.4/old-test-kernels/linux-2.4.0-test3.tar.bz2),
sowie weitere freie Software. Sie haben durch den Erwerb dieses Produktes keinerlei Gewährleistungsansprüche gegen die
Berechtigten an der oben genannten Software erworben; weil diese die Software kostenfrei lizenzieren gewähren sie keine
Haftung gemäß unten abgedruckten Lizenzbedingungen. Die Software darf von jedermann im Quell-und Objektcode unter
Beachtung der Lizenzbedingungen der GNU General Public License Version 2, und GNU Lesser General Public License
(LGPL) vervielfältigt, verbreitet und verarbeitet werden. Die Lizenz ist unten im englischsprachigen Originalwortlaut
wiedergegeben. Eine nichtoffizielle Übersetzung in die deutsche Sprache finden Sie im Internet unter
(http://www.gnu.de/documents/gpl-2.0.de.html). Eine allgemeine öffentliche GNU Lizenz befindet sich auch auf der
mitgelieferten CD-ROM.
Sie können Quell-und Objektcode der Software für mindestens drei Jahre auf unserer Homepage www.trendnet.com im
Downloadbereich (http://trendnet.com/langen/downloads/list_gpl.asp) downloadend. Sofern Sie nicht über die Möglichkeit
des Downloads verfügen können Sie bei TRENDnet.
20675 Manhattan Place, Torrance, CA 90501 -U.S.A -, Tel.: +1-310-961-5500, Fax: +1-310-961-5511 die Software anfordern.
Información general sobre la GPL/LGPL
Este producto de TRENDnet incluye un programa gratuito desarrollado por terceros. Estos códigos están sujetos a la
Licencia pública general de GNU (“GPL”) o la Licencia pública general limitada de GNU (“LGPL”). Estos códigos son
distribuidos SIN GARANTÍA y están sujetos a las leyes de propiedad intelectual de sus desarrolladores. TRENDnet no ofrece
servicio técnico para estos códigos. Los detalles sobre las licencias GPL y LGPL de GNU se incluyen en el CD-ROM del
producto.
Consulte también el (http://www.gnu.org/licenses/gpl.txt) ó el (http://www.gnu.org/licenses/lgpl.txt) para ver las cláusulas
específicas de cada licencia.
Los códigos fuentes están disponibles para ser descargados del sitio Web de TRENDnet
(http://trendnet.com/downloads/list_gpl.asp) durante por lo menos tres años a partir de la fecha de envío del producto.
También puede solicitar el código fuente llamando a TRENDnet.
20675 Manhattan Place, Torrance, CA 90501, USA. Tel: +1-310-961-5500 Fax: +1-310-961-5511
Общая информация о лицензиях GPL/LGPL
В состав данного продукта TRENDnet входит бесплатное программное обеспечение, написанное сторонними
разработчиками. Это ПО распространяется на условиях лицензий GNU General Public License ("GPL") или GNU
Lesser General Public License ("LGPL"). Программы распространяются БЕЗ ГАРАНТИИ и охраняются авторскими
правами разработчиков. TRENDnet не оказывает техническую поддержку этого программного обеспечения.
Подробное описание лицензий GNU GPL и LGPL можно найти на компакт-диске, прилагаемом к продукту.
В пунктах (http://www.gnu.org/licenses/gpl.txt) и (http://www.gnu.org/licenses/lgpl.txt) изложены конкретные условия
каждой из лицензий.
Исходный код программ доступен для загрузки с веб-сайта TRENDnet (http://trendnet.com/downloads/list_gpl.asp) в
течение, как минимум, трех лет со дня поставки продукта.
Кроме того, исходный код можно запросить по адресу TRENDnet.
20675 Manhattan Place, Torrance, CA 90501, USA. Tel: +1-310-961-5500 Fax: +1-310-961-5511

GPL/LGPL üldinformatsioon
See TRENDneti toode sisaldab vaba tarkvara, mis on kirjutatud kolmanda osapoole poolt. Koodid on allutatud GNU (General
Public License) Üldise Avaliku Litsentsi (GPL) või GNU (Lesser General Public License) ("LGPL") Vähem Üldine Avalik
Litsentsiga. Koode vahendatakse ILMA GARANTIITA ja need on allutatud arendajate poolt. TRENDnet ei anna koodidele
tehnilist tuge. Detailsemat infot GNU GPL ja LGPL kohta leiate toote CD-ROMil. Infot mõlema litsentsi spetsiifiliste terminite
kohta leiate (http://www.gnu.org/licenses/gpl.txt) või (http://www.gnu.org/licenses/lgpl.txt).
Infot mõlema litsentsi spetsiifiliste terminite kohta leiate (http://www.gnu.org/licenses/gpl.txt) või
(http://www.gnu.org/licenses/lgpl.txt). Lähtekoodi on võimalik alla laadida TRENDneti kodulehelt
(http://trendnet.com/langen/downloads/list_gpl.asp) kolme aasta jooksul alates toote kättesaamise kuupäevast.
Samuti võite lähtekoodi paluda TRENDneti'lt, 20675 Manhattan Place, Torrance, CA 90501, USA. Tel: +1-310-961-5500,
Fax: +1-310-961-5511.
GPL/LGPL informações Gerais
Este produto TRENDnet inclui software gratuito desenvolvido por terceiros. Estes códigos estão sujeitos ao GPL (GNU
General Public License) ou ao LGPL (GNU Lesser General Public License). Estes códigos são distribuídos SEM GARANTIA
e estão sujeitos aos direitos autorais dos desenvolvedores. TRENDnet não presta suporte técnico a estes códigos. Os
detalhes do GNU GPL e do LGPL estão no CD-ROM do produto.
Favor acessar http://www.gnu.org/licenses/gpl.txt ou http://www.gnu.org/licenses/lgpl.txt para os termos específicos de cada
licença.
Os códigos fonte estão disponíveis para download no site da TRENDnet (http://trendnet.com/langen/downloads/list_gpl.asp)
por pelo menos três anos da data de embarque do produto.
Você também pode solicitar os códigos fonte contactando TRENDnet, 20675 Manhattan Place, Torrance, CA 90501,
USA.Tel: +1-310-961-5500, Fax: +1-310-961-5511.


Copyright ©2011, All Rights Reserved. TRENDnet.
-
 1
1
-
 2
2
-
 3
3
-
 4
4
-
 5
5
-
 6
6
-
 7
7
-
 8
8
-
 9
9
-
 10
10
-
 11
11
-
 12
12
-
 13
13
-
 14
14
-
 15
15
-
 16
16


Trendnet TV-IP121WN Quick Installation Guide
- Catégorie
- Des caméras de sécurité
- Taper
- Quick Installation Guide
dans d''autres langues
- English: Trendnet TV-IP121WN
- Deutsch: Trendnet TV-IP121WN
Documents connexes
-
Trendnet RB-TV-IP110WN Quick Installation Guide
-
Trendnet TV-IP312WN Le manuel du propriétaire
-
Trendnet TV-IP121WN Quick Installation Guide
-
-
Trendnet TEW-690AP Quick Installation Guide
-
-
Trendnet TV-IP522P Le manuel du propriétaire
-
Trendnet TEW-650AP Quick Installation Guide
-
-