La page charge ...

If you have a problem, we can help. Please do NOT return this product to the store!
Your answer is on the web. Visit our award-winning web support site www.iomega.com.
Select your region, then select Support.
Si vous avez un problème, nous pouvons vous aider. NE RENVOYEZ PAS ce produit au
magasin !
Votre réponse est sur le Web. Site Web d’assistance primé www.iomega.com.
Sélectionnez votre région, puis sélectionnez Support.
Si tiene algún problema, podemos ayudar. ¡Por favor, NO devuelva este producto a la
tienda!
Su respuesta está en la web. Destacado sitio Web de atención al cliente
www.iomega.com. Elija su región y luego seleccione Asistencia técnica.
Se você tiver um problema, nós podemos ajudar. NÃO devolva esse produto à loja!
A resposta para você está na web. Site da web vencedor de prêmios www.iomega.com.
Selecione a sua região e, então, Suporte.
Wenn Sie ein Problem haben, können wir Ihnen helfen. Bringen Sie dieses Produkt
NICHT zu Ihrem Händler zurück!
Ihre Antwort steht im Netz. Preisgekrönte Support-Website www.iomega.com. Wählen
Sie Ihre Region aus und anschließend Support.
ハードウエアを接続する前に、ソフトウエアのインストールを開始してくだ
さい。問題がある場合は、弊社がお手伝いいたします。
回答は Web 上に掲載されています。Web サポート サイト www.iomega.com。地
域を選択し、次に「サポート」を選択します。
如果遇到问题, 我们可以帮助您。切勿将产品退回商店!
您可以在网上找到答案。饮誉四方的支持网站 www.iomega.com。请选择您所在的
地区,然后选择“支持”。
문제가 발생하는 경우 도움을 받으실 수 있습니다. 제품을 대리점으로 반송하지 마
십시오!
웹 사이트에서 해결책을 찾으실 수 있습니다. 수상 경력이 있는 웹 지원 사이트
www.iomega.com. 지역을 선택한 후 “지원”을 선택합니다.

Contents • Matières • Inhaltsverzeichnis • Contenido • Conteúdo
• 目録 • 目录 • 목차
Mounting the Expansion Chassis . . . . . . . . . . . . . . . . . . . . . . . . . . . . . 4
Montage du châssis d’extension . . . . . . . . . . . . . . . . . . . . . . . . . . . . . 4
Laden des Erweiterungschassis . . . . . . . . . . . . . . . . . . . . . . . . . . . . . 5
Montaje del chasis de expansión . . . . . . . . . . . . . . . . . . . . . . . . . . . . . 5
Montagem do chassi de expansão . . . . . . . . . . . . . . . . . . . . . . . . . . . . 4
拡張シャーシのマウント . . . . . . . . . . . . . . . . . . . . . . . . . . . . . . . . 4
安装扩展底盘 . . . . . . . . . . . . . . . . . . . . . . . . . . . . . . . . . . . . . . . 5
확장 새시 장착 . . . . . . . . . . . . . . . . . . . . . . . . . . . . . . . . . . . . . . . 5
Connect the StorCenter Pro . . . . . . . . . . . . . . . . . . . . . . . . . . . . . . . . 6
Connexion de StorCenter Pro . . . . . . . . . . . . . . . . . . . . . . . . . . . . . . . 6
Anschließen des Geräts . . . . . . . . . . . . . . . . . . . . . . . . . . . . . . . . . . 7
Conectar StorCenter Pro . . . . . . . . . . . . . . . . . . . . . . . . . . . . . . . . . . 7
Conexão do StorCenter Pro . . . . . . . . . . . . . . . . . . . . . . . . . . . . . . . 10
StorCenter Pro の接続 . . . . . . . . . . . . . . . . . . . . . . . . . . . . . . . . . . 10
连接 StorCenter Pro . . . . . . . . . . . . . . . . . . . . . . . . . . . . . . . . . . . 11
StorCenter Pro를 연결합니다 . . . . . . . . . . . . . . . . . . . . . . . . . . . . . . 11
Troubleshooting . . . . . . . . . . . . . . . . . . . . . . . . . . . . . . . . . . . . . 14
Dépannage . . . . . . . . . . . . . . . . . . . . . . . . . . . . . . . . . . . . . . . . 14
Fehlerbehebung . . . . . . . . . . . . . . . . . . . . . . . . . . . . . . . . . . . . . 14
Solución de problemas . . . . . . . . . . . . . . . . . . . . . . . . . . . . . . . . . 14
Solução de problemas . . . . . . . . . . . . . . . . . . . . . . . . . . . . . . . . . . 15
トラブルシューティング . . . . . . . . . . . . . . . . . . . . . . . . . . . . . . . 15
故障排除 . . . . . . . . . . . . . . . . . . . . . . . . . . . . . . . . . . . . . . . . . 15
문제 해결 . . . . . . . . . . . . . . . . . . . . . . . . . . . . . . . . . . . . . . . . . 15
Customer Support . . . . . . . . . . . . . . . . . . . . . . . . . . . . . . . . . . . . 16
Assistance clientèle . . . . . . . . . . . . . . . . . . . . . . . . . . . . . . . . . . . 16
Kundenunterstützung . . . . . . . . . . . . . . . . . . . . . . . . . . . . . . . . . . 16
Asistencia técnica . . . . . . . . . . . . . . . . . . . . . . . . . . . . . . . . . . . . 16
Assistência ao cliente . . . . . . . . . . . . . . . . . . . . . . . . . . . . . . . . . . 16
カスタマ サポート . . . . . . . . . . . . . . . . . . . . . . . . . . . . . . . . . . . 16
客户支持 . . . . . . . . . . . . . . . . . . . . . . . . . . . . . . . . . . . . . . . . . 16
고객 지원 . . . . . . . . . . . . . . . . . . . . . . . . . . . . . . . . . . . . . . . . . 16

4
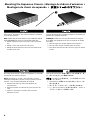
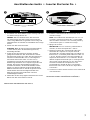
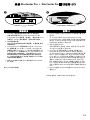
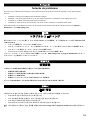
Mounting the Expansion Chassis • Montage du châssis d’extension •
Montagem do chassi de expansão • 拡張シャーシのマウント •
The Iomega
®
StorCenter
™
Pro can be stacked or mounted
in most rack systems.
NOTE:
Make sure the StorCenter Pro has sufficient airflow
(6" or 127 mm) both in front of and behind the unit.
1. Attach a bracket to each front corner of the StorCenter
Pro.
2. Attach a rail to each of the rear rack posts.
3. Attach the StorCenter Pro to the rails. Secure the front
brackets to the rack.
Iomega StorCenter Pro peut être empilé ou monté dans la
plupart des systèmes de baies.
REMARQUE :
Faites-en sorte que StorCenter Pro dispose
d’un débit d’air suffisant (127 mm) à l’avant et à l’arrière
de l’unité.
1. Fixez un support à chaque angle de StorCenter Pro.
2. Fixez un rail à chaque montant arrière de la baie.
3. Fixez StorCenter Pro aux rails. Fixez les supports avant à
la baie.
O Iomega StorCenter Pro pode ser empilhado ou montado
na maioria dos sistemas de rack.
NOTA: Certifique-se de que o StorCenter Pro possua
ventilação adequada (127 mm ou 6 pol.) tanto na parte
traseira, como na parte dianteira da unidade.
1. Encaixe uma haste em cada canto dianteiro do
StorCenter Pro.
2. Encaixe um trilho em cada um dos pinos traseiros do
rack.
3. Encaixe o StorCenter nos trilhos. Fixe as hastes
dianteiras ao rack.
Iomega StorCenter Pro は縦に積むことができます。ま
た、ほとんどのラックに搭載できます。
注記:StorCenter Pro の前後には、十分な空間 (127 mm)
を確保してください。
1. StorCenter Pro
前面のそれぞれの角にブラケットを
取り付けます。
2.
各リア ラック ポストにレールを取り付けます。
3.
レールに
StorCenter Pro
を取り付けます。フロント
ブラケットをラックに固定します。
La page charge ...

6
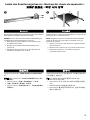
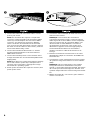
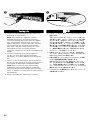
1. Install the software from the Solution CD on your
Iomega server.
NOTE: This drive is intended for use with an Iomega
StorCenter Pro or Iomega NAS 400r server. The
Solution CD contains patches and drivers for Iomega
servers only.
2. Power down the server.
CAUTION! Failure to power down may damage the
server, the expansion chassis, or both.
3. Set the StorCenter Pro to an appropriate SCSI ID. The
StorCenter Pro requires a set of 4 IDs. The StorCenter
Pro comes preconfigured to use SCSI IDs 0–3. You
can also set it to IDs 8–11 or 12–15. You can connect
up to three StorCenter Pro expansion units to your
computer. You can use any set of SCSI IDs that does
not contain an ID that is already in use by another
device. See your SCSI card’s utility or drive properties
for information on the IDs of connected devices.
4. Connect the 68-pin wide connector on the SCSI cable
to the StorCenter Pro.
INSTRUCTIONS CONTINUE ON PAGE 8
1. Installez le logiciel à partir du CD Solution sur votre
serveur Iomega.
REMARQUE : Ce lecteur est prévu pour être utilisé
avec un serveur Iomega StorCenter Pro ou Iomega
NAS 400r. Le CD Solution comprend des correctifs et
des pilotes pour les serveurs Iomega uniquement.
2. Mettez le serveur hors tension.
ATTENTION !
Un échec de la mise hors tension peut
endommager le serveur, le châssis d’extension ou les deux.
3. Définissez une identification SCSI appropriée
pour le StorCenter Pro. Le StorCenter Pro requiert
un ensemble de 4 identifications. Le StorCenter
Pro est livré pré-configuré pour l’utilisation des
identifications SCSI 0–3. Vous pouvez également
le configurer avec les identifications 8–11 ou
12–15. Vous pouvez connecter jusqu’à trois unités
d’extension StorCenter Pro à votre ordinateur. Vous
pouvez utiliser tout ensemble d’identifications SCSI
qui ne comporte pas une identification déjà utilisée
par un autre périphérique. Consultez votre utilitaire
de carte SCSI ou les propriétés du lecteur pour
obtenir des informations sur les identifications des
périphériques connectés.
4. Raccordez le connecteur large à 68 broches du câble
SCSI au StorCenter Pro.
SUITE DES INSTRUCTIONS PAGE 8
Connect the StorCenter Pro • Connexion de StorCenter Pro •
S
t
a
rt
U
p
M
i
s
e
e
n
r
ou
t
e
S
t
ar
t
I
n
i
c
i
o
I
n
i
c
i
a
li
z
aç
ã
o
I
n
st
a
la
c
i
ón
3
1
3
8
7
2
0
0
w
w
w.
i
o
m
e
g
a
.
co
m
C
o
p
y
r
i
g
h
t
©
2
0
0
4
I
o
m
e
g
a
C
o
r
p
o
r
a
t
i
o
n
.
A
l
l
r
i
g
h
t
s
r
e
se
r
v
e
d
.
W
i
n
do
ws
M
a
c
A
v
v
i
o
La page charge ...

8
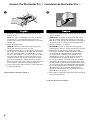
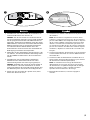
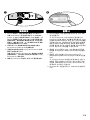
5. Connect the other end of the SCSI cable to a SCSI
port on your server.
NOTE: The StorCenter Pro requires a 68-pin wide
connector. Iomega provides a 68-pin wide to VHDCI
cable. If your SCSI adapter does not have a VHDCI
connector, you will need to purchase a different
cable. Consult the documentation that came with
your server to find the appropriate connector type for
the other end of the cable. For best results, purchase
a SCSI cable with locking screws.
6. Connect the included SCSI terminator or another
properly terminated device to the StorCenter Pro
VHDCI SCSI connector.
7. Connect the included power cord to the back of the
Iomega StorCenter Pro and an Uninterruptible Power
Supply (UPS).
NOTE: Never plug your Iomega StorCenter Pro directly
into a wall socket or power strip. Unexpected loss
of power may corrupt data or damage the Iomega
StorCenter Pro operating system.
8. Power up the StorCenter Pro expansion chassis, then
power up the server.
5. Connectez l’autre extrémité du câble SCSI à un port
SCSI sur votre serveur.
REMARQUE : Le StorCenter Pro nécessite un
connecteur large à 68 broches. Iomega fournit un
câble large à 68 broches VHDCI. Si votre adaptateur
SCSI ne comporte pas de connecteur VHDCI, vous
devrez acheter un câble différent. Consultez la
documentation fournie avec votre serveur pour
déterminer le type de connecteur approprié pour
l’autre extrémité du câble. Pour de meilleurs
résultats, achetez un câble SCSI muni de vis de
blocage.
6. Branchez la terminaison SCSI fournie ou un autre
périphérique adapté au connecteur SCSI VHDCI du
StorCenter Pro.
7. Connectez le cordon d’alimentation fourni à l’arrière
du système Iomega StorCenter Pro et à un onduleur
(UPS).
REMARQUE : Ne raccordez jamais votre systéme
Iomega StorCenter Pro directement à une prise
murale ou à une fiche électrique multiple. Une panne
de courant pourrait endommager les données ou le
système d’exploitation du serveur Iomega StorCenter
Pro.
8. Mettez StorCenter Pro sous tension, puis mettez le
serveur sous tension.
La page charge ...
La page charge ...
La page charge ...
La page charge ...
La page charge ...

14
Troubleshooting
Most SCSI installation and performance problems can be resolved by following these four basic steps:
• Make sure your drive has power.
• Check the SCSI cable to make sure it is connected properly and the cable has no bent pins.
• Ensure the SCSI chain is properly terminated.
• Ensure the StorCenter Pro SCSI IDs are not being used by any other SCSI device.
For help with problems that are not covered in this Quick Start Guide, please visit the Support & Download area of
www.iomega.com.
Dépannage
La plupart des problémes d’installation et de performances SCSI peuvent être résolus à l’aide des quatre étapes de base
suivantes :
• Assurez-vous que le lecteur est sous tension.
• Vérifiez le câble SCSI et assurez-vous qu’il est connecté correctement et qu’aucune broche n’est pliée.
• Assurez-vous que la chaîne SCSI est correctement “terminée”.
• Assurez-vous que l’identification SCSI du StorCenter Pro n’est pas utilisée par un autre périphérique SCSI.
Pour obtenir de l’aide concernant les problémes non cités dans ce manuel, visitez la section Support et Téléchargements
du site www.iomega.com.
Fehlerbehebung
Die meisten Probleme bei der Installation und mit der Leistung von SCSI-Geräten können durch folgende vier Schritte
behoben werden:
• Stellen Sie sicher, dass das Laufwerk mit Strom versorgt wird.
• Überprüfen Sie das SCSI-Kabel, um sicherzustellen, dass es korrekt angeschlossen ist und keine verbogenen Stifte
aufweist.
• Stellen Sie sicher, dass die SCSI-Kette korrekt terminiert ist.
• Stellen Sie sicher, dass die StorCenter Pro SCSI-IDs nicht von einem anderen SCSI-Gerät verwendet werden.
Wenn Sie Hilfe zu Problemen benötigen, die hier nicht aufgeführt sind, besuchen Sie den Bereich Support & Download
der Webseite www.iomega.com.
Solución de problemas
La mayoría de los problemas de rendimiento e instalación de SCSI pueden resolverse siguiendo estos cuatro pasos básicos:
• Compruebe que la unidad recibe alimentación.
• Compruebe el cable SCSI para asegurarse de que está conectado correctamente y que no tiene ninguna patilla
doblada.
• Asegúrese de que la cadena SCSI está correctamente terminada.
• Asegúrese de que ningún otro dispositivo SCSI está utilizando los ID de SCSI de StorCenter Pro.
Si desea recibir ayuda con relación a problemas no tratados en este manual, visite el área de asistencia y descargas del
sitio www.iomega.com.
La page charge ...
La page charge ...
-
 1
1
-
 2
2
-
 3
3
-
 4
4
-
 5
5
-
 6
6
-
 7
7
-
 8
8
-
 9
9
-
 10
10
-
 11
11
-
 12
12
-
 13
13
-
 14
14
-
 15
15
-
 16
16


dans d''autres langues
- English: Iomega 33409 Datasheet
- español: Iomega 33409 Ficha de datos
- Deutsch: Iomega 33409 Datenblatt
- português: Iomega 33409 Ficha de dados
- 日本語: Iomega 33409 データシート
Documents connexes
-
Iomega REV 35GO SCSI EXTERNE Le manuel du propriétaire
-
-
-
-
Iomega STORCENTER PRO NAS 200R 1TB MICROSOFT WINDOWS STORAGE SERVER 2003 R2 Le manuel du propriétaire
-
Iomega STORCENTER IX12-300R Le manuel du propriétaire
-