Alpine HCE-C107D Manuel utilisateur
- Catégorie
- Des caméras de sécurité
- Taper
- Manuel utilisateur

R
ALPINE ELECTRONICS MARKETING, INC.
1-1-8 Nishi Gotanda,
Shinagawa-ku,
Tokyo 141-0031, Japan
Phone 03-5496-8231
ALPINE ELECTRONICS OF AMERICA, INC.
19145 Gramercy Place, Torrance,
California 90501, U.S.A.
Phone 1-800-ALPINE-1 (1-800-257-4631)
ALPINE ELECTRONICS OF CANADA, INC.
777 Supertest Road, Toronto,
Ontario M3J 2M9, Canada
Phone 1-800-ALPINE-1 (1-800-257-4631)
ALPINE ITALIA S.p.A.
Viale C. Colombo 8, 20090 Trezzano
Sul Naviglio (MI), Italy
Phone 02-484781
ALPINE ELECTRONICS DE ESPAÑA, S.A.
Portal de Gamarra 36, Pabellón, 32
01013 Vitoria (Alava)-APDO 133, Spain
Phone 945-283588
ALPINE ELECTRONICS (BENELUX) GmbH
Leuvensesteenweg 510-B6,
1930 Zaventem, Belgium
Phone 02-725-13 15
ALPINE ELECTRONICS OF AUSTRALIA PTY. LTD.
161-165 Princes Highway, Hallam
Victoria 3803, Australia
Phone 03-8787-1200
ALPINE ELECTRONICS GmbH
Frankfurter Ring 117, 80807 München, Germany
Phone 089-32 42 640
ALPINE ELECTRONICS OF U.K. LTD.
Alpine House
Fletchamstead Highway, Coventry CV4 9TW, U.K.
Phone 0870-33 33 763
ALPINE ELECTRONICS FRANCE S.A.R.L.
(RCS PONTOISE B 338 101 280)
98, Rue de la Belle Etoile, Z.I. Paris Nord Il,
B.P. 50016, 95945 Roissy Charles de Gaulle
Cedex, France
Phone 01-48638989
HCE-C107D
• OWNER’S MANUAL
Please read before using this equipment.
• MODE D’EMPLOI
Veuillez lire avant d’utiliser cet appareil.
• MANUAL DE OPERACIÓN
Léalo antes de utilizar este equipo.
Direct Connection Rearview Camera
Designed by ALPINE Japan
Printed in China (Y)
68-10872Z79-A
M3514404010
Qingdao Dongli Xinhaiyuan Printing Co., Ltd.
No.17, jiushuidong road, Qingdao China
Operating Instructions
English
WARNING
This symbol means important
instructions. Failure to heed them can
result in serious injury or death.
WHEN REVERSING THE CAR, CHECKING BEHIND AND
AROUND THE CAR MUST BE DONE VISUALLY BY THE
DRIVER.
The rearview camera assists the driver in checking behind
by sending images to the screen showing conditions behind
the car. The camera uses a wide-angle lens, therefore, there
is a difference in distance perspective between what is
normally seen and what appears on the screen. Also, the
images shown by the camera are reversed, so as to appear
the same as what is seen through the rearview mirror.
DO NOT DISASSEMBLE OR ALTER.
Doing so may result in an accident, fire or electric shock.
KEEP SMALL OBJECTS SUCH AS SCREWS OUT OF THE
REACH OF CHILDREN.
Swallowing them may result in serious injury. If swallowed,
consult a physician immediately.
USE ONLY IN CARS WITH A 12 VOLT NEGATIVE GROUND.
(Check with your dealer if you are not sure.) Failure to do
so may result in fire, etc.
BEFORE WIRING, DISCONNECT THE CABLE FROM THE
NEGATIVE BATTERY TERMINAL.
Failure to do so may result in electric shock or injury due to
electrical shorts.
DO NOT USE BOLTS OR NUTS IN THE BRAKE OR STEERING
SYSTEMS TO MAKE GROUND CONNECTIONS.
Bolts or nuts used for the brake or steering systems (or any
other safety-related system), or tanks should NEVER be
used for installations or ground connections. Using such
parts could disable control of the vehicle and cause fire etc.
DO NOT DAMAGE PIPE OR WIRING WHEN DRILLING
HOLES.
When drilling holes in the chassis for installation, take
precautions so as not to contact, damage or obstruct pipes,
fuel lines, tanks or electrical wiring. Failure to take such
precautions may result in fire.
MAKE THE CORRECT CONNECTIONS.
Failure to make the proper connections may result in fire or
product damage.
HALT USE IMMEDIATELY IF A PROBLEM APPEARS.
Failure to do so may cause personal injury or damage to the
product. Return it to your authorized Alpine dealer or the
nearest Alpine Service Center for repairing.
EXCEPT FOR THE REARVIEW CAMERA ITSELF, DO NOT
ATTACH ANY PARTS TO AREAS WHICH WILL GET WET, OR
WHERE THERE IS A LOT OF HUMIDITY OR DUST.
Failure to do so may result in fire or damage.
DO NOT ATTACH THE CAMERA MOUNTING BRACKET TO
FLUOROCARBON RESIN FINISHED CAR BODIES OR
GLASS.
Doing so could cause the strength of the camera mounting
bracket to weaken, which could cause it to fall of and cause
accidents, injury, or damage to the car body.
DO NOT ATTACH THE CAMERA MOUNTING BRACKET TO
ANY SURFACE WHERE THE ENTIRE ADHESIVE SURFACE
CANNOT BE APPLIED.
Doing so could cause the strength of the camera mounting
bracket to weaken, which could cause it to fall of and cause
accidents, injury, or damage to the car body.
PRECAUTIONS
• Do not assert any excess pressure to the camera or the mounting,
as this could cause the camera direction to shift, or the camera
mounting bracket to come off.
•To prevent the camera lens, mounting and cords from changing
color or shape, or from deteriorating, wipe with a chemical-free,
damp cloth.
• When washing the car, do not using an automatic car washer, or
high-pressure washer. Doing so could cause the camera to come
off, damage to the camera cord, or may allow water to enter the
camera or the inside of the car.
• Be sure to disconnect the cable from the (–) battery post before
installing your HCE-C107D. This will reduce any chance of
damage to the unit in case of a short-circuit.
• Be sure to connect the color coded leads according to the
diagram. Incorrect connections may cause the unit to malfunction
or damage to the vehicle's electrical system.
• In some cases, to attach the camera, a hole must be drilled in the
car body, requiring use of touch-up paint (retail product) for rust-
prevention, and should be prepared beforehand.
Mode d'emploi
Français
AVERTISSEMENT
Ce symbole désigne des instructions importantes.
Le non-respect de ces instructions peut entraîner
de graves blessures, voire la mort.
LORSQUE LE CONDUCTEUR FAIT MARCHE ARRIÈRE, IL
DOIT FAIRE ATTENTION À CE QUI SE PASSE DERRIÈRE ET
SUR LES CÔTÉS.
La caméra arrière aide le conducteur à contrôler ce qui se passe
derrière le véhicule en transmettant sur l’écran une vue de
l’arrière. La caméra utilise un objectif grand-angulaire et par
conséquent, la distance perçue par le conducteur est différente
de la perspective qui s’affiche à l’écran. De plus, les images
captées par la caméra sont inversées afin qu’elles reproduisent
exactement la vue du rétroviseur.
NE PAS DESASSEMBLER NI MODIFIER L’APPAREIL.
Il y a risque d’accident, d’incendie ou de choc électrique.
GARDER LES PETITS OBJETS COMME LES VIS HORS DE
PORTEE DES ENFANTS.
L’ingestion de tels objets peut entraîner de graves blessures. En
cas d’ingestion, consulter immédiatement un médecin.
A UTILISER UNIQUEMENT SUR DES VOITURES A MASSE
NEGATIVE DE 12 VOLTS.
(Vérifiez auprès de votre concessionnaire si vous n’en êtes pas
certain.) Il y a risque d’incendie, etc.
AVANT TOUTE CONNEXION, DEBRANCHER LE CABLE DE LA
BORNE NEGATIVE DE LA BATTERIE.
Il y a risque de choc électrique ou de blessure par courts-circuits.
NE PAS UTILISER DES ECROUS NI DES BOULONS DU
CIRCUIT DE FREINAGE OU DE DIRECTION POUR LES
CONNEXIONS DE MASSE.
Les boulons et les écrous utilisés pour les circuits de freinage et
de direction (ou de tout autre système de sécurité) ou les
réservoirs ne peuvent JAMAIS être utilisés pour l’installation
ou la liaison à la masse. L’utilisation de ces organes peut
désactiver le système de contrôle du véhicule et causer un
incendie, etc.
NE PAS ENDOMMAGER DE CONDUITES NI DE CABLES
LORS DU FORAGE DES TROUS.
Lors du forage de trous dans le châssis en vue de l’installation,
veiller à ne pas entrer en contact, endommager ni obstruer de
conduites, de tuyaux à carburant ou de fils électriques. Le non-
respect de cette précaution peut entraîner un incendie.
EFFECTUER CORRECTEMENT LES CONNEXIONS.
Il y a risque de blessures ou de dommages à l’appareil.
INTERROMPRE TOUTE UTILISATION EN CAS DE PROBLEME.
Le non-respect de cette précaution peut entraîner des blessures
ou endommager l’appareil. Retourner l’appareil auprès du
distributeur Alpine agréé ou un centre de service après-vente
Alpine en vue de la réparation.
OUTRE LA CAMÉRA ARRIÈRE, NE FIXEZ AUCUN OBJET DANS
UN ENDROIT EXPOSÉ À L’HUMIDITÉ OU À LA POUSSIÈRE.
Faute de quoi, vous pourriez endommager votre véhicule ou
provoquer un incendie.
NE FIXEZ PAS LE SUPPORT DE
FIXATION
SUR DES
REVÊTEMENTS EN RÉSINE FLUOROCARBONÉE OU EN VERRE.
Cela risquerait de diminuer la résistance du support de fixation,
celui-ci pourrait tomber et provoquer un accident et des
blessures ou endommager le revêtement du véhicule.
ÉVITEZ TOUT EMPLACEMENT DONT LA SURFACE N’EST PAS
ASSEZ LARGE POUR FIXER LE SUPPORT DE
FIXATION
.
Cela risquerait de diminuer la résistance du support de fixation,
celui-ci pourrait tomber et provoquer un accident et des
blessures ou endommager le revêtement du véhicule.
PRÉCAUTIONS
• N’exercez aucune pression excessive sur la caméra ou sur le
support ; la caméra pourrait se déplacer et le support pourrait se
détacher.
• Pour éviter que l’objectif change de couleur, que le support se
déforme ou que les câbles se détériorent, nettoyez-les avec un
chiffon humide en fibres naturelles.
• Lorsque vous nettoyez votre véhicule, n’utilisez pas les stations
de lavage automatique ou les laveurs à haute pression. La caméra
pourrait se détacher, endommager le câble et de l’eau risquerait
de pénétrer à l’intérieur du véhicule et de la caméra.
• S’assurer de déconnecter le câble du pôle (–) de la batterie avant
l’installation du HCE-C107D. Ceci reduit les risques
d’endommager l’unité en cas de court-circuit.
• S’assurer de connecter les conducteurs codés en couleur se
conformant au schéma. Des cot ühions incorrectes peuvent
occasionner le manuvais fonctionnement de l’unité ou le dégât du
système électrique du véhicule.
• Dans certains cas, il est nécessaire de percer un trou dans la
carrosserie pour installer la caméra ; dans ce cas, prévoyez une
retouche avec une peinture spéciale (vendue dans le commerce)
afin de protéger le véhicule contre la rouille.
Manual de instrucciones
Español
ADVERTENCIA
Este símbolo indica que las
instrucciones son importantes. De no
tenerse en cuenta, podría
ocasionarse heridas graves o muerte.
DURANTE LA MARCHA ATRÁS DEL VEHÍCULO, EL
CONDUCTOR DEBE CONTROLAR VISUALMENTE LAS
VISTAS LATERAL Y POSTERIOR DEL COCHE.
La cámara trasera ayuda al conductor a comprobar el
estado de la vista posterior enviando imágenes a la pantalla.
La cámara utiliza lentes de gran ángulo, por lo que existen
diferencias de perspectiva de distancia entre lo que se ve
por la pantalla y lo que hay en realidad. Asimismo, las
imágenes que muestra la cámara están invertidas y se
visualizan del mismo modo que si se viesen a través del
espejo retrovisor.
NO DESMONTE NI ALTERE LA UNIDAD.
Si lo hace, podrá ocasionar un accidente, un incendio o una
descarga eléctrica.
MANTENGA LOS OBJETOS PEQUEÑOS, COMO LOS
TORNILLOS, FUERA DEL ALCANCE DE LOS NIÑOS.
La ingestión de estos objetos puede provocar lesiones
graves. Si esto ocurre, consulte con un médico
inmediatamente.
UTILICE LA UNIDAD SOLAMENTE EN VEHÍCULOS QUE
TENGAN 12 VOLTIOS CON NEGATIVO A MASA.
(Consulte a su distribuidor en caso de duda.) De no ser así,
podría ocasionar un incendio, etc.
ANTES DE EFECTUAR EL CABLEADO, DESCONECTE EL
CABLE DEL TERMINAL NEGATIVO DE LA BATERÍA.
De no hacerlo así, podría ocasionar una descarga eléctrica o
heridas debido a cortocircuitos eléctricos.
NO UTILICE TUERCAS O PERNOS EN EL SISTEMA DE
FRENOS O DE DIRECCIÓN PARA REALIZAR LAS
CONEXIONES A MASA.
Los pernos o tuercas empleados en los sistemas de freno o
de dirección (o en cualquier otro sistema relacionado con la
seguridad del vehículo), o los depósitos, NUNCA deben
utilizarse para instalaciones de cableado o conexión a masa.
Si utiliza tales partes podrá incapacitar el control del
vehículo y provocar un incendio, etc.
PRUDENCIA
Este símbolo indica que las
instrucciones son importantes. De no
tenerse en cuenta, podría
ocasionarse heridas graves o daños
materiales.
CONFÍE EL CABLEADO Y LA INSTALACIÓN A
PROFESIONALES.
El cableado y la instalación de este equipo requieren una
competencia y experiencia técnica confirmada. Para
garantizar la seguridad, póngase siempre en contacto con el
distribuidor al que ha comprado el equipo para confiarle
estas tareas.
DISPONGA EL CABLEADO DE FORMA QUE LOS CABLES NO
SE DOBLEN, NO SE CONTRAIGAN NI ROCEN UN BORDE
METÁLICO AFILADO.
Aleje los cables y el cableado de piezas móviles (como los
raíles de los asientos) o de bordes puntiagudos o afilados.
De esta forma evitará dobleces y daños en el cableado. Si
los cables se introducen por un orificio de metal, utilice una
arandela de goma para evitar que el borde metálico del
orificio corte el aislamiento del cable.
UTILICE LOS ACCESORIOS ESPECIFICADOS E INSTÁLELOS
CORRECTAMENTE.
Asegúrese de utilizar los accesorios especificados
solamente. La utilización de otras piezas no designadas
puede ser la causa de daños en el interior de la unidad o de
una instalación incorrecta. Las piezas pueden aflojarse, lo
que, además de ser peligroso, puede provocar averías.
DEJE DE USAR LA UNIDAD INMEDIATAMENTE SI APARECE
ALGÚN PROBLEMA.
Su uso en estas condiciones podría ocasionar lesiones
personales o daños al producto. Lleve la unidad a un
distribuidor Alpine autorizado o al Centro de servicio
Alpine más próximo para repararla.
SALVO LA PROPIA CÁMARA TRASERA, NO COLOQUE
NINGUNA OTRA PIEZA EN ÁREAS EN LAS QUE PUDIERAN
MOJARSE O DONDE SE ACUMULE MUCHA HUMEDAD Y
POLVO.
De lo contrario, podría provocar un incendio o una avería.
CHECK THAT THE CAMERA MOUNTING BRACKET IS
ATTACHED SECURELY, AND THAT THE SCREWS ARE TIGHT
BEFORE DRIVING.
Failure to do so may result in an accident.
WHEN INSTALLING THE CAMERA, OR WHEN CHECKING IT
IS INSTALLED SECURELY, DO SO AFTER PARKING THE CAR
IN A LEVEL, SAFE PLACE, TURNING OFF THE ENGINE, AND
APPLYING THE HAND BRAKE.
Failure to do so may result in an accident.
WHEN USING A DRILL TO MAKE A HOLE, TAKE
PRECAUTIONS SUCH AS WEARING GOGGLES SO
FRAGMENTS DO NOT GET INTO THE EYES.
Failure to do so may result in injury.
CAUTION
This symbol means important
instructions. Failure to heed them can
result in injury or material property
damage.
HAVE THE WIRING AND INSTALLATION DONE BY EXPERTS.
The wiring and installation of this unit requires special
technical skill and experience. To ensure safety, always
contact the dealer where you purchased this product to have
the work done.
ARRANGE THE WIRING SO IT IS NOT CRIMPED OR
PINCHED BY A SHARP METAL EDGE.
Route the cables and wiring away from moving parts (like
the seat rails) or sharp or pointed edges. This will prevent
crimping and damage to the wiring. If wiring passes
through a hole in metal, use a rubber grommet to prevent
the wire’s insulation from being cut by the metal edge of
the hole.
USE SPECIFIED ACCESSORY PARTS AND INSTALL THEM
SECURELY.
Be sure to use only the specified accessory parts. Use of
other than designated parts may damage this unit internally
or may not securely install the unit in place. This may cause
parts to become loose resulting in hazards or product
failure.
AVANT LA CONDUITE, VÉRIFIEZ QUE LE SUPPORT DE
FIXATION EST CORRECTEMENT FIXÉ ET QUE LES VIS SONT
BIEN SERRÉES.
Faute de quoi, vous pourriez avoir un accident.
POUR INSTALLER LA CAMÉRA OU POUR VÉRIFIER QU’ELLE
EST CORRECTEMENT INSTALLÉE, GAREZ VOTRE VÉHICULE
DANS UN LIEU SÛR ET SUR UNE SURFACE PLANE, COUPEZ
LE MOTEUR ET METTEZ LE FREIN À MAIN.
Faute de quoi, vous pourriez avoir un accident.
SI VOUS UTILISEZ UNE PERCEUSE POUR FAIRE UN TROU,
VEILLEZ À BIEN VOUS PROTÉGER AVEC DES LUNETTES
SPÉCIALES AFIN QU’AUCUN DÉBRIS NE PÉNÈTRE DANS
VOS YEUX.
Faute de quoi, vous pourriez vous blesser.
ATTENTION
Ce symbole désigne des instructions importantes.
Le non-respect de ces instructions peut entraîner
des blessures ou des dommages matériels.
FAIRE INSTALLER LE CABLAGE ET L’APPAREIL PAR DES
EXPERTS.
Le câblage et l’installation de cet appareil requiert des
compétences techniques et de l’expérience. Pour garantir la
sécurité, faire procéder à l’installation de cet appareil par le
distributeur qui vous l’a vendu.
FAIRE CHEMINER LE CABLAGE DE MANIERE A NE PAS LE
COINCER CONTRE UNE ARETE METALLIQUE.
Faire cheminer les câbles à l’écart des pièces mobiles (comme
les rails d’un siège) et des arêtes acérées ou pointues. Cela
évitera ainsi de coincer et d’endommager les câbles. Si un câble
passe dans un orifice métallique, utiliser un passe-cloison en
caoutchouc pour éviter que la gaine isolante du câble ne soit
endommagée par le rebord métallique de l’orifice.
UTILISER LES ACCESSOIRES SPECIFIES ET LES
INSTALLER CORRECTEMENT.
Utiliser uniquement les accessoires spécifiés. L’utilisation
d’autres composants que les composants spécifiés peut causer
des dommages internes à cet appareil ou son installation risque
de ne pas être effectuée correctement. Les pièces utilisées
risquent de se desserrer et de provoquer des dommages ou une
défaillance de l’appareil.
EVITE DAÑAR LOS TUBOS Y EL CABLEADO CUANDO
TALADRE AGUJEROS.
Si taladra agujeros en el chasis durante la instalación, tome
las precauciones necesarias para no rozar, dañar u obstruir
los tubos, las tuberías de combustible, los depósitos o el
cableado eléctrico. De lo contrario, podría provocar un
incendio.
REALICE LAS CONEXIONES CORRECTAMENTE.
Una conexión incorrecta puede producir un incendio o
dañar el equipo.
ANTES DE INICIAR LA MARCHA, VERIFIQUE QUE EL
SOPORTE DE LA CÁMARA SE HA FIJADO CORRECTAMENTE
Y QUE LOS TORNILLOS ESTÁN BIEN APRETADOS.
De lo contrario, podría tener un accidente.
AL INSTALAR LA CÁMARA, O DURANTE LA
COMPROBACIÓN DE SU INSTALACIÓN, LLEVE A CABO LA
VERIFICACIÓN CON EL VEHÍCULO APARCADO EN UN
LUGAR SEGURO Y NIVELADO, CON EL MOTOR APAGADO Y
CON EL FRENO DE MANO PUESTO.
De lo contrario, podría tener un accidente.
SI UTILIZA UN TALADRO PARA HACER LOS AGUJEROS,
PROTÉJASE ADECUADAMENTE CON GAFAS PROTECTORAS
PARA EVITAR QUE LOS POSIBLES FRAGMENTOS LE
ALCANCEN LOS OJOS.
De lo contrario, podría hacerse daño.
NO COLOQUE EL SOPORTE DE LA CÁMARA SOBRE
ELEMENTOS DEL VEHÍCULO CON ACABADO DE RESINA DE
FLUOROCARBONO NI SOBRE ELEMENTOS DE VIDRIO.
Si lo hace, podría reducir la resistencia del soporte de la
cámara y hacer que se caiga, provocando un accidente,
daños o averías en la carrocería.
NO COLOQUE EL SOPORTE DE LA CÁMARA EN NINGUNA
SUPERFICIE EN LA QUE NO SE PUEDA FIJAR LA
SUPERFICIE ADHESIVA POR COMPLETO.
Si lo hace, podría reducir la resistencia del soporte de la
cámara y hacer que se caiga, provocando un accidente,
daños o averías en la carrocería.
PRECAUCIONES
• No aplique ninguna presión adicional a la cámara o a su soporte,
ya que podría alterar la dirección de la cámara o desprender el
soporte.
•Para evitar que cambie la forma y el color de la lente, el soporte o
los cables de la cámara y para impedir que se deterioren, realice la
limpieza con un paño húmedo y sin productos químicos.
• Cuando lave el coche, no lo haga en túneles de lavado ni con
máquinas de limpieza a presión. Si lo hace, la cámara podría
desprenderse, el cable podría dañarse o podría introducirse agua
en la cámara o en el interior del vehículo.
• Asegúrese de desconectar el cable del polo (–) de la batería antes
de instalar su HCE-C107D. Esto reducirá las posibilidades de
averiar la unidad en caso de cortocircuito.
• Asegúrese de conectar los conductores con clave de colores
según el diagrama. Unas conexiones incorrectas pueden
ocasionar un mal funcionamiento de la unidad o pueden dañar el
sistema eléctrico del vehículo.
• En algunos casos, es preciso taladrar un agujero en la carrocería
del vehículo para colocar la cámara, por lo que deberá utilizar
pintura para retocar la carrocería y evitar la oxidación. Esto debe
estar preparado antes de llevar a cabo la instalación.
LIMITED WARRANTY
ALPINE ELECTRONICS OF AMERICA, INC. AND ALPINE OF CANADA INC. ("Alpine"), are dedicated to quality craftsmanship and are pleased to
offer this Warranty. We suggest that you read it thoroughly. Should you have any questions, please contact your Dealer or contact Alpine at one of the
telephone numbers listed below.
[PRODUCTS COVERED:
This Warranty covers Car Audio Products and Related Accessories
("the product"). Products purchased in the Canada are covered only in
the Canada. Products purchased in the U.S.A. are covered only in the
U.S.A.
[LENGTH OF WARRANTY:
This Warranty is in effect for one year from the date of the first
consumer purchase.
[WHO IS COVERED:
This Warranty only covers the original purchaser of the product, who
must reside in the United States, Puerto Rico or Canada.
[WHAT IS COVERED:
This Warranty covers defects in materials or workmanship (parts and
labor) in the product.
[WHAT IS NOT COVERED:
This Warranty does not cover the following:
1 Damage occurring during shipment of the product to Alpine for
repair (claims must be presented to the carrier).
2 Damage caused by accident or abuse, including burned voice coils
caused by over-driving the speaker (amplifier level is turned up and
driven into distortion or clipping). Speaker mechanical failure (e.g.
punctures, tears or rips). Cracked or damaged LCD panels.
Dropped or damaged hard drives.
3 Damage caused by negligence, misuse, improper operation or
failure to follow instructions contained in the Owner's manual.
4 Damage caused by act of God, including without limitation,
earthquake, fire, flood, storms or other acts of nature.
Any cost or expense related to the removal or reinstallation of the
product.
5 Service performed by an unauthorized person, company or
association.
6 Any product which has the serial number defaced, altered or
removed.
7 Any product which has been adjusted, altered or modified without
Alpine's consent.
8 Any product not distributed by Alpine within the United States,
Puerto Rico or Canada.
9 Any product not purchased from an Authorized Alpine Dealer.
[HOW TO OBTAIN WARRANTY SERVICE:
1 You are responsible for delivery of the product to an Authorized
Alpine Service Center or Alpine for repair and for payment of any
initial shipping charges. Alpine will, at its option, repair or replace
the product with a new or reconditioned product without charge. If
the repairs are covered by the warranty, and if the product was
shipped to an Authorized Alpine Service Center or Alpine, Alpine
will pay the return shipping charges.
2 You should provide a detailed description of the problem(s) for
which service is required.
3 You must supply proof of your purchase of the product.
4 You must package the product securely to avoid damage during
shipment. To prevent lost packages it is recommended to use a
carrier that provides a tracking service.
[HOW WE LIMIT IMPLIED WARRANTIES:
ANY IMPLIED WARRANTIES INCLUDING FITNESS FOR USE AND
MERCHANTABILITY ARE LIMITED IN DURATION TO THE PERIOD
OF THE EXPRESS WARRANTY SET FORTH ABOVE AND NO
PERSON IS AUTHORIZED TO ASSUME FOR ALPINE ANY OTHER
LIABILITY IN CONNECTION WITH THE SALE OF THE PRODUCT.
[HOW WE EXCLUDE CERTAIN DAMAGES:
ALPINE EXPRESSLY DISCLAIMS LIABILITY FOR INCIDENTAL AND
CONSEQUENTIAL DAMAGES CAUSED BY THE PRODUCT. THE
TERM "INCIDENTAL DAMAGES" REFERS TO EXPENSES OF
TRANSPORTING THE PRODUCT TO THE ALPINE SERVICE
CENTER, LOSS OF THE ORIGINAL PURCHASER'S TIME, LOSS OF
THE USE OF THE PRODUCT, BUS FARES, CAR RENTALS OR
OTHERS COSTS RELATING TO THE CARE AND CUSTODY OF THE
PRODUCT. THE TERM "CONSEQUENTIAL DAMAGES" REFERS TO
THE COST OF REPAIRING OR REPLACING OTHER PROPERTY
WHICH IS DAMAGED WHEN THIS PRODUCT DOES NOT WORK
PROPERLY. THE REMEDIES PROVIDED UNDER THIS WARRANTY
ARE EXCLUSIVE AND IN LIEU OF ALL OTHERS.
[HOW STATE/PROVINCIAL LAW RELATES TO THE
WARRANTY:
This Warranty gives you specific legal rights, and you may also have
other rights which vary from state to state and province to province. In
addition, some states/provinces do not allow limitations on how long an
implied warranty lasts, and some do not allow the exclusion or limitation
of incidental or consequential damages. Accordingly, limitations as to
these matters contained herein may not apply to you.
[IN CANADA ONLY:
This Warranty is not valid unless your Alpine car audio product has been
installed in your vehicle by an Authorized Installation Center, and this
warranty stamped upon installation by the installation center.
[HOW TO CONTACT CUSTOMER SERVICE:
Should the product require service, please call the following number for
your nearest Authorized Alpine Service Center.
CAR AUDIO 1-800-ALPINE-1 (1-800-257-4631)
NAVIGATION
1-888-NAV-HELP (1-888-628-4357)
Or visit our website at; http://www.alpine-usa.com
R
ALPINE ELECTRONICS OF AMERICA, INC., 19145 Gramercy Place, Torrance, California 90501, U.S.A.
ALPINE ELECTRONICS OF CANADA, INC., 777 Supertest Road, Toronto, Ontario M3J 2M9, Canada
Do not send products to these addresses.
Call the toll free telephone number or visit the website to locate a service center.
GARANTIE LIMITÉE
Fidèles à leur engagement de ne fournir que des produits de qualité, ALPINE ÉLECTRONIQUE DE L'AMÉRIQUE, INC. et ALPINE ÉLECTRONIQUE DU
CANADA, INC. (Alpine) sont heureuses de vous offrir cette garantie. Nous vous suggérons de le lire attentivement et en entier. Si vous avez la moindre
question, veuillez contacter l'un de nos concessionnaires ou appeler directement Alpine aux numéros listés ci-dessous.
2 Vous devez donner une description détaillée des problèmes qui sont à
l'origine de votre demande de réparation.
3 Vous devez joindre la preuve de votre achat du produit.
4 Vous devez emballer soigneusement le produit pour éviter tout
dommage durant son transport.
Pour éviter la perte de l’envoi, il est
conseillé de choisir un transporteur qui propose un service de suivi
des envois.
[LIMITATION DES GARANTIES TACITES
LA DURÉE DE TOUTES LES GARANTIES TACITES, Y COMPRIS LA
GARANTIE D'ADAPTATION À L'UTILISATION ET LA GARANTIE DE
QUALITÉ LOYALE ET MARCHANDE, EST LIMITÉE À CELLE DE LA
GARANTIE EXPRESSE DÉTERMINÉE CI-DESSUS. PERSONNE N'EST
AUTORISÉ À ENGAGER AUTREMENT LA RESPONSABILITÉ D'ALPINE
EN VERTU DE LA VENTE D'UN PRODUIT.
[EXCLUSIONS DE LA GARANTIE
ALPINE STIPULE EXPRESSÉMENT QU'ELLE N'EST PAS
RESPONSABLE DES DOMMAGES-INTÉRÊTS ET DOMMAGES
INDIRECTS PROVOQUÉS PAR LE PRODUIT. LES DOMMAGES-
INTÉRÊTS SONT LES FRAIS DE TRANSPORT DU PRODUIT VERS UN
CENTRE DE SERVICE ALPINE, LA PERTE DE TEMPS DE L'ACHETEUR
ORIGINAL, LA PERTE D'UTILISATION DU PRODUIT, LES BILLETS
D'AUTOBUS, LA LOCATION DE VOITURES ET TOUS LES AUTRES
FRAIS LIÉS À LA GARDE DU PRODUIT.
LES DOMMAGES INDIRECTS SONT LES FRAIS DE RÉPARATION OU
DE REMPLACEMENT D'AUTRES BIENS ENDOMMAGÉS SUITE AU
MAUVAIS FONCTIONNEMENT DU PRODUIT.
LES RECOURS PRÉVUS PAR LES PRÉSENTES EXCLUENT ET
REMPLACENT TOUTE AUTRE FORME DE RECOURS.
[LIEN ENTRE LA GARANTIE ET LA LOI
La garantie vous donne des droits spécifiques, mais vous pouvez aussi
jouir d'autres droits, qui varient d'un état ou d'une province à l'autre. En
outre, certains états et certaines provinces interdisent de limiter la durée
des garanties tacites ou d'exclure les dommages accessoires ou indirects.
Dans ce cas, les limites et les exclusions de la garantie peuvent ne pas
s'appliquer à vous.
[CLAUSE APPLICABLE AU CANADA SEULEMENT
Pour que la garantie soit valable, il faut qu'un centre d'installation autorisé
ait installé le système audio pour l'auto dans votre véhicule et qu'il ait
ensuite apposé son cachet sur la garantie.
[NUMÉROS D'APPEL DU SERVICE À LA CLIENTÈLE
Si vous avez besoin de nos services, veuillez appeler Alpine aux numéros
ci-dessous pour le centre de service autorisé Alpine le plus proche.
AUDIO DE VOITURE 1-800-ALPINE-1 (1-800-257-4631)
NAVIGATION 1-888-NAV-HELP (1-888-628-4357)
Ou visitez notre site Web à l’adresse http://www.alpine-usa.com
[PRODUITS COUVERTS PAR LA GARANTIE
Cette garantie couvre les produits audio de voiture et les accessoires
connexes ("le produit"). Elle ne couvre les produits que dans le pays où
ils ont été achetés.
[DURÉE DE LA GARANTIE
Cette garantie est en vigueur pendant un an à partir de la date du
premier achat du client.
[PERSONNES PROTÉGÉES PAR LA GARANTIE
Seul l'acheteur original du produit, s'il résisde aux États-Unis, à Porto
Rico ou au Canada, peut se prévaloir de la garantie.
[CE QUI EST COUVERT
Cette garantie couvre tous les défauts de matériaux et de fabrication
(pièces et main d'œuvre) du produit.
[CE QUI N'EST PAS COUVERT
Cette garantie ne couvre pas ce qui suit:
1 Les dommages survenus durant le transport des produits renvoyés à
Alpine pour être réparés (les réclamations doivent être adressées au
transporteur);
2 Les dégâts provoqués par un accident ou une mauvaise utilisation, y
compris des bobines acoustiques grillées suite à une surexcitation
des enceintes (augmentation du niveau de l’amplificateur jusqu’à
atteindre un effet de distorsion ou d’écrêtage), une défaillance
mécanique des enceintes (perforations, déchirures ou fentes),
panneaux LCD fissurés ou endommagés, disques durs
endommagés ou ayant subi une chute.
3 Tout dégât provoqué par négligence, usage inapproprié, mauvaise
utilisation ou par le non-respect des instructions indiquées dans le
manuel de l’utilisateur.
4 Les dommages dus à la force majeure, notamment aux
tremblements de terre, au feu, aux inondations, aux tempêtes ou aux
autres cataclysmes naturels;
Les frais ou les dépenses relatifs à l'enlèvement ou à la réinstallation
du produit;
5 Les services rendus par une personne, physique ou morale non
autorisée;
6 Les produits dont le numéro de série a été effacé, modifié ou retiré;
7 Les produits qui ont été adaptés ou modifiés sans le consentement
d'Alpine;
8 Les produits qui ne sont pas distribués par Alpine aux Etats-Unis, à
Porto Rico ou au Canada;
9 Les produits qui n'ont pas été achetés par l'entremise d'un
concessionnaire Alpine autorisé;
[COMMENT SE PRÉVALOIR DE LA GARANTIE
1 Il vous faut remettre le produit nécessitant des réparations à un centre
de service autorisé Alpine ou à Alpine même et en assumer les frais
de transport. Alpine a le choix entre réparer le produit ou le remplacer
par un produit neuf ou révisé, le tout sans frais pour vous. Si les
réparations sont couvertes par la garantie et si le produit a été envoyé
à un centre de service Alpine ou à Alpine, le paiement des frais de
réexpédition du produit incombe Alpine.
R
ALPINE ÉLECTRONIQUE DE L'AMÉRIQUE, INC., 19145 Gramercy Place, Torrance, California 90501, U.S.A.
ALPINE ÉLECTRONIQUE DU CANADA, INC., 777 Supertest Road, Toronto, Ontario M3J 2M9, Canada
N’envoyez aucun produit à ces adresses.
Appelez notre numéro gratuit ou visitez notre site Web si vous recherchez un centre de service.

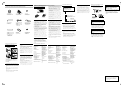
Installation/Installation/Instalación
Check Accessory Parts/Vérifiez les accessoires/Compruebe los accesorios
1 Rearview Camera
1 Caméra de recul
1 Cámara de marcha atrás
2 Camera mounting bracket
2 Support de fixation
2 Soporte de la cámara
3 Hex screw
3 Vis hexagonale
3 Tornillo hexagonal
4 Hexagonal wrench
4 Clé 6 pans
4 Llave hexagonal
6 Waterproofing pad
6 Protège câble étanche
6 Dispositivo protector
resistente al agua
7 Waterproofing pad adhesive
sheet
7 Adhésif pour protège câble
étanche
7 Hoja adhesiva para el
dispositivo protector
resistente al agua
8 Wire clamp
8 Attache fils
8 Fijador de cables
9 Self-tapping screw
9 Vis autotaraudeuse
9 Tornillo macho
roscador
Installation Location/Emplacement de l’installation/Ubicación de la instalación
Install the Camera on the Rear Bumper/Installez la
caméra sur la carrosserie arrière/Instalación en el
acabado trasero
Fig.1/Schéma 1/Fig.1 Fig.2/Schéma 2/Fig.2
English
1 Attach the camera to the camera mounting bracket
2. Pull the camera cable through to the camera
mounting bracket 2 , and secure with the hex
screws 3 (see Fig. 1).
2 Loosen the camera mounting bracket 2 and angle
adjustment screw. Determine the attachment angle,
and carefully tighten the angle adjustment screw.
3 Make a 13 mm hole in the rear bumper camera
mounting bracket (see Fig. 2).
4 Pull the camera cable inside the car through the
hole made in step 3.
5Peel off the adhesive seal from the camera mounting
bracket and attach the camera mounting bracket on
the chassis of the vehicle. If required, fix the camera
mounting bracket using self-tapping screws.
• Attach the camera in a position where it does not touch
the number plate.
• Use retail touch-up paint to paint the surface and
surrounding area when a hole has been made in a metal
surface.
• Make sure water cannot enter the hole made for the
camera cable. Use commercially available waterproof
tape or sealant.
• If necessary, use a self-tapping screw 9 to fix the camera
mounting bracket (In the case of a plastic mount area).
Français
1 Fixez la caméra sur le support 2. Passez le câble
de la caméra dans le support 2, puis fixez-le à
l’aide des vis hexagonaux 3 (schéma 1).
2 Déserrez le support de fixation 2 et insérez en
angle la vis de réglage. Choisissez l’angle de
fixation, puis reserrez délicatement la vis dans cet
angle.
3Faites un trou de 13 mm dans la carrosserie arrière
pour fixer le support de la caméra (schéma 2).
4Faites passer le câble de la caméra à l’intérieur du
véhicule par le trou fait à l’étape 3.
5 Retirez le film protecteur du support de fixation,
puis fixez ce dernier sur le châssis du véhicule. Le
cas échéant, fixez le support à l’aide des vis
autotaraudeuses.
•Fixez la caméra de façon à ce qu’elle ne touche pas la
plaque d’immatriculation.
• Si vous avez percé un trou dans une surface métallique,
une retouche est nécessaire sur et autour de la surface
avec une peinture spéciale.
• Le trou permettant de faire passer le câble de la caméra
doit être imperméable. Utilisez pour cela du ruban
adhésif imperméable ou un produit d’étanchéité vendu
dans le commerce.
• Si besoin est, utilisez une vis autotaraudeuse 9 pour
fixer le support de fixation (notamment si la surface de
montage est en plastique).
Español
1 Coloque la cámara en el soporte de la cámara 2.
Tire del cable de la cámara a través del soporte de
la cámara 2 y fíjelo con los tornillos hexagonales
3 (véase la figura 1).
2 Afloje el soporte de la cámara 2 e inserte en
ángulo el tornillo de ajuste. Calcule el ángulo de
fijación y, con cuidado, apriete el tornillo en dicho
ángulo.
3 Realice un agujero de 13 mm en el soporte de la
cámara del acabado trasero (véase la figura 2).
4 Tire del cable de la cámara desde el interior del
coche a través el agujero del paso 3.
5 Retire el sello adhesivo del soporte de la cámara y
fíjelo en el chasis del vehículo. Si fuera necesario,
fije el soporte de la cámera con ayuda de los
tornillos embriados suministrados.
• Coloque la cámara en una posición en la que no toque la
matrícula.
• Utilice pintura para retocar la superficie y el área que
rodea el agujero realizado en la superficie de metal.
• Es importante que no entre agua en el orificio del cable
de la cámara. Utilice cinta adhesiva resistente al agua o
un sellador.
• Si es necesario, utilice un tornillo macho roscador 9
para fijar el soporte de la cámara (en caso de que el
área de instalación sea de plástico).
Adjusting the Camera Angle/Réglage de l’angle de la
caméra/Ajuste del ángulo de la cámara
English
Caution
When adjusting the camera angle, do so after turning
off the engine and applying the hand brake to avoid
an accident.
1 Put the gear shift into reverse (R), and check the
image from the camera on the display.
2 Loosen the camera mounting bracket 2 and angle
adjustment screw. Determine the camera angle,
and carefully tighten the angle adjustment screw.
Français
Attention
Veillez à couper le moteur et à mettre le frein à main
avant de régler l’angle de la caméra afin d’éviter tout
accident.
1 Mettez le levier de vitesse en marche arrière (R),
puis vérifiez l’image de la caméra affichée à l’écran.
2 Déserrez le support de fixation 2 et insérez en
angle la vis de réglage. Choisissez l’angle de la
caméra, puis reserrez délicatement la vis dans
l’angle.
Securing the Camera Cable/Fixation du câble de la
caméra/Fijación del cable de la cámara
Fig. 4/Schéma 4/Fig. 4
English
1 Secure the camera cable while referring to Fig. 4.
Attach the waterproof pad 6 with the waterproof
pad adhesive sheet 7, and secure any slack cable
around the waterproof pad 6 using the wire clamp
8.
• Ensure the cable does not get caught in the trunk, rear
door(s) or any hinges.
• The cable should go on the outside of car hinges and
harness covers.
• After completing wiring, open and close the trunk and
the rear doors several times to confirm the cable is not
getting caught or rubbing anywhere.
Español
Precaución
Cuando ajuste el ángulo de la cámara, apague
primero el motor y ponga el freno de mano para
evitar posibles accidentes.
1Ponga la palanca de marchas en marcha atrás (R)
y compruebe la imagen de la cámara que se
muestra en la pantalla.
2 Afloje el soporte de la cámara 2 e inserte en
ángulo el tornillo de ajuste. Calcule el ángulo de la
cámara y, con cuidado, apriete el tornillo en dicho
ángulo.
x 5
x 4
2.5
13
30
21
138°
(A) Rearview camera/Caméra arrière/Cámera trasera
(B) To HCE-C107D-compatible product/Vers le produit compatible avec
HCE-C107D/Al producto compatible con el HCE-C107D
(C) Clamper/Attache-fils/Fijador
(D) Waterproofing pad/Protège-câbles imperméable/Dispositivo protector
resistente al agua
x 2
5 Camera extension cable
(10.5m)
5 Rallonge câble caméra
(10,5m)
5 Cable de extensión de la
cámera (10,5m)
C
D
B
A
105°
Specifications/Spécifications/Especificaciones
English
Power Requirements ..................................... 6.0V DC (5.5 to 6.5V allowable)
Ground Type ................................................... Negative ground type
Max Power Consumption .............................. 0.9W
Output Image .................................................. Mirror image, VBCS (NTSC
Color signal system)
Image Output .................................................. 1 Vp-p (75 ohms)
Image Sensor ................................................. 1/4 type color CCD image
sensor, aspect ratio 4 : 3
Effective Number of Pixels ............................ 510 (horizontal) x 492 (vertical)
approximately 250,000 pixels
Lens Section .................................................. Focal length: f=1.28mm,
brightness: F=2.8
Angle of field .................................................. Horizontal: Approx 138˚,
Vertical: Approx 105˚
Automatic Image Adjusting Function .......... Automatic metering
adjustment, Automatic white
balance adjustment
Synchro-System ............................................. Internal synchronization
S/N ratio .......................................................... 40dB or more
Resolution (horizontal,center area) ............. 300 TV lines
Illumination Range ......................................... Approx. 1.5 lx to 100,000 lx
Operating Temperature Range
• Camera section ........................................ –30˚C to +70˚C
Storage Temperature Range
• Camera section ........................................ –40˚C to +85˚C
External Dimensions (W x H x D)
• Camera section (except projection on the rear)
................................................................... 59/64" x 59/64" x 31/32"
(23.4mm x 23.4mm x 24.6mm)
Weight
• Camera section (including cable) ........... 1-1/8 oz.
(37g)
Français
Puissance requise ......................................... 6,0 V CC
(5,5 à 6,5 V admissibles)
Type de masse ............................................... Masse négative
Puissance de sortie maximale ...................... 0.9 W
Image reproduite ............................................ Image miroir, VBCS (système
de signaux couleur NTSC)
Sortie image ................................................... 1 Vp-p (75 ohms)
CCD ................................................................. Capteur d’image CCD couleur
1/4″, format d’image 4 : 3
Nombre effectif de pixels ..............................
510 (horizontal) x 492 (vertical),
environ
250.000 pixels
Section de l’objectif ....................................... Focale: f = 1,28 mm,
luminosité: F = 2,8
Angle de champ ............................................. Horizontal : environ 138°,
Vertical : environ 105°
Fonction de réglage automatique de l’image
......................................................................... Réglage automatique de la
mesure, Réglage automatique
de la balance des blancs
Système de synchronisation ........................ Synchronisation interne
Rapport signal sur bruit ................................ 40 dB ou plus
Résolution (horizontale,zone centrale) ........ 300 lignes TV
Plage d’illumination ....................................... environ 1,5 à 100.000 lx
Plage de températures de fonctionnement
•Section de la caméra ............................... –30 à +70 °C
Plage de température de stockage
•Section de la caméra ............................... de –40 °C à +85 °C
Dimensions externes (l x H x P)
•Section de la caméra (partie saillante arrière non comprise)
................................................................... 59/64" x 59/64" x 31/32"
(23,4 x 23,4 x 24,6 mm)
Poids
•Section de la caméra (câble compris) .......... 1-1/8 oz.
(37g)
Español
Requisitos de alimentación .......................... 6,0V CC
(se permite desde 5,5 a 6,5 V)
Tipo de toma de tierra ................................... Tipo toma de tierra negativa
Salida de potencia máxima ........................... 0,9 W
Imagen de salida ............................................
Imagen en espejo, VBCS
(sistema de señal a color NTSC)
Salida de imagen ........................................... 1 Vp-p (75 ohmios)
Sensor de imagen .......................................... Sensor de imagen CCD de 1/4
pulg., relación de aspecto 4 : 3
Número efectivo de píxeles… ....................... 510 (horizontal) x 492
(vertical), aproximadamente
250.000 píxeles
Sección de la lente ........................................ Longitud focal: f = 1,28 mm,
brillo: F = 2,8
Ángulo de campo ........................................... Horizontal: Aprox 138°,
Vertical: Aprox 105°
Función de ajuste de imagen automático
...................................................................... Ajuste de medición
automático, ajuste automático
del balance de blancos
Sistema de sincronización ............................ Sincronización interna
Relación señal-ruido ..................................... Como mínimo 40 dB
Resolución (horizontal, área central) ........... 300 líneas de televisor
Alcance de la iluminación ............................. aprox. de 1,5 a 100.000 lx
Intervalo de temperatura de funcionamiento
• Sección de cámara ................................... entre –30 y +70°C
Intervalo de temperatura de almacenamiento
• Sección de cámara ................................... entre –40 y +85°C
Dimensiones externas (ancho x alto x largo)
• Sección de cámara (excepto proyección trasera)
................................................................... 59/64" x 59/64" x 31/32"
(23,4 x 23,4 x 24,6 mm)
Peso
• Sección de cámara (incluido cable) ............... 1-1/8 oz.
(37g)
HCE-C107D-compatible Alpine AV
Head Unit*/
Unité principale AV Alpine compatible
avec HCE-C107*/
Unidad principal AV de Alpine
compatible con el HCE-C107D*
Camera extension cable (supplied)/
Rallonge câble caméra (fournie)/
Cable de extensión de la cámera (suministrada)
English
•For details on connection, refer to the installation
manual of the HCE-C107D-compatible product. Connect
the rear camera input connector only.
* This product can only connect to Alpine Mobile Media
Stations with the dedicated Alpine camera input. For
information on HCE-C107D-compatible products,
contact your local authorized Alpine dealer or visit the
Alpine America home page (http://www.alpine-usa.com).
Français
•Pour plus de détails sur la connexion, consultez le guide
d’installation du produit compatible avec HCE-C107D.
Raccordez uniquement la borne d’entrée de la caméra
arrière.
* Cet appareil ne peut être raccordé qu’à une station
multimédia portable Alpine via la borne d’entrée de la
caméra Alpine. Pour plus d’informations sur les produits
compatibles avec HCE-C107D, contactez votre
revendeur Alpine ou visitez la page d’accueil du site Web
Alpine America (http://www.alpine-usa.com).
Français
1 Fixez le câble de la caméra en vous reportant au
schéma 4.
Fixez le protège-câbles 6 sur son ruban adhésif
7, puis fixez et tendez le câble sortant du protège-
câbles 6 à l’aide de l’attache-fils 8.
• Assurez-vous que le câble n’est pas coincé dans la malle,
dans les portes arrières ou dans une charnière.
• Le câble doit être hors des protections des charnières et
des harnais.
• Une fois le câblage terminé, ouvrez et refermez plusieurs
fois la malle arrière et les portes arrières afin de vous
assurez que le câble n’est pas coincé et qu’il ne subit
aucun frottement.
Español
1 Fije el cable de la cámara siguiendo el diagrama de
la figura 4.
Coloque el dispositivo protector resistente al agua
6 con la hoja adhesiva correspondiente 7 y fije
cualquier cable que sobresalga alrededor del
dispositivo resistente al agua 6 con ayuda del
fijador de cables 8.
•Verifique que el cable no queda atrapado en el maletero,
las puertas traseras o en cualquier bisagra.
• El cable debe estar fuera de las protecciones de las
bisagras y arneses del vehículo.
• Una vez finalizado el cableado, abra y cierre el maletero
y las puertas traseras varias veces para comprobar que
el cable no queda atrapado ni plegado en ningún sitio.
Fig.3/Schéma 3/Fig.3
Connections/Raccordements/Conexiones
This device complies with part 15 of the FCC Rules.
Operation is subject to the following two conditions.
(1)This device may not cause harmful interference,
and (2)this device must accept any interference
received, including interference that may cause
undesired operation.
Español
•Para obtener más información acerca de la conexión,
consulte el manual de instalación del producto
compatible con el HCE-C107D. Conecte únicamente el
conector de entrada de la cámara de visión trasera.
* Este producto sólo puede conectarse a equipos Mobile
Media de Alpine con una entrada exclusiva de cámara de
Alpine. Para obtener más información acerca de los
productos compatibles con el HCE-C107D, póngase en
contacto con su distribuidor Alpine autorizado o visite la
página principal de Alpine America (http://www.alpine-
usa.com).
Rearview Camera/
Caméra de recul/
Cámara de marcha atrás
-
 1
1
-
 2
2


Alpine HCE-C107D Manuel utilisateur
- Catégorie
- Des caméras de sécurité
- Taper
- Manuel utilisateur
dans d''autres langues
- English: Alpine HCE-C107D User manual
- español: Alpine HCE-C107D Manual de usuario
Documents connexes
-
Alpine HCE-C107D Le manuel du propriétaire
-
Alpine HCE-C105 - Rear View Camera System Manuel utilisateur
-
Alpine HCE-C RD HDR Front View Camera Mode d'emploi
-
-
-
-
Alpine HCE-C210RD Le manuel du propriétaire
-
-
Alpine HCE-C127D Le manuel du propriétaire
-