Shelly Smart Wi-Fi Humidity and Temperature Sensor Mode d'emploi
- Taper
- Mode d'emploi

EN
USER AND SAFETY GUIDE
Shelly H&T
Smart Wi-Fi humidity and
temperature sensor
Read before use
This document contains important technical and safety
information about the device, its safety use and instal-
lation.
⚠CAUTION! Before beginning the installation, please
read carefully and entirely this guide and any other doc-
uments accompanying the device. Failure to follow the
installation procedures could lead to malfunction, danger
to your health and life, violation of law or refusal of legal
and/or commercial guarantee (if any). Allterco Robotics
EOOD is not responsible for any loss or damage in case of
incorrect installation or improper operation of this device
due to failure of following the user and safety instructions
in this guide.
Shelly® devices are delivered with factory-installed rm-
ware. If rmware updates are necessary to keep the de-
vices in conformity, including security updates, Allterco
Robotics EOOD will provide the updates free of charge
through the device Embedded Web Interface or the Shelly
mobile application, where the information about the cur-
rent rmware version is available. The choice to install or
not the device rmware updates is the user’s sole respon-
sibility. Allterco Robotics EOOD shall not be liable for any
lack of conformity of the device caused by failure of the
user to install the provided updates in a timely manner.
Product Introduction
Shelly H&T (the Device) is a compact smart humidity and
temperature sensor. It can measure the air humidity and
temperature in a room and act as an action trigger to oth-
er smart devices in your home automation.
Installation Instructions
⚠CAUTION! Do not use if the device has been damaged!
⚠CAUTION! Do not attempt to service or repair the de-
vice yourself!
⚠CAUTION! Keep device away from liquids and mois-
ture. The device should not be used in places with extreme-
ly high humidity.
Inserting the battery
Remove the Shelly H&T bottom shell by turning it counter-
clockwise as shown on g. 2.
Insert the battery as shown on g. 3.
⚠CAUTION! Pay attention to the battery polarity!
⚠CAUTION! Use only 3 V CR123A compatible batteries!
Some rechargeable batteries have higher voltage and may
damage the Device.
The LED indication should start ashing slowly, indicating
the Device is awake and in AP (Access Point) mode.
Attach the bottom shell to Shelly H&T by turning it clock-
wise as shown on g.4.
Shelly H&T can be also power supplied through a USB
power adapter. Shelly H&T USB adapter is available for
purchase separately at:
https://shelly.link/HT-adapter
Connecting to the device
If the LED indication has stopped ashing, wake the De-
vice up by pressing briey the control button.
Connect your mobile device or PC to the AP (Access
Point) of Shelly H&T (shellyht-xxxxxx). Once connected to
the Device AP, you can setup it up by visiting the universal
for all Shelly devices address to access the Web Inter-
face: http://192.168.33.1.
In the Web Interface you can connect the Device to your
home Wi-Fi network (making the Device enter STA (Cli-
ent/Station mode)) by clicking Internet & Security and
selecting WIFI MODE - CLIENT. Once you’ve checked Con-
nect the Shelly device to an existing WiFi network and en-
tered the name and password, click SAVE. After that, you
can easily nd the Device IP in the network using this tool:
DE
BENUTZER- UND SICHERHEITSHANDBUCH
Shelly H&T
Smarter WLAN-Feuchtigkeits- und
Temperatursensor
Bitte vor Gebrauch durchlesen
Dieses Dokument enthält wichtige technische und si-
cherheitstechnische Informationen über das Gerät und
seine sichere Verwendung und Installation.
⚠ACHTUNG! Bevor Sie mit der Installation beginnen,
lesen Sie bitte die Begleitdokumentation sorgfältig und
vollständig durch. Die Nichtbeachtung der empfohlenen
Verfahren kann zu Fehlfunktionen, Lebensgefahr oder
Gesetzesverstößen führen. Allterco Robotics EOOD haftet
nicht für Verluste oder Schäden im Falle einer falschen Ins-
tallation oder Bedienung dieses Geräts.
Shelly® Geräte werden mit werkseitig installierter Firm-
ware ausgeliefert. Um die Geräte konform zu halten, stellt
Allterco Robotics EOOD die notwendigen Firmware-Up-
dates, einschließlich der Sicherheitsupdates, kostenlos
über die im Gerät eingebettete Web-Schnittstelle sowie
über die Shelly-App zur Verfügung. Die Entscheidung, die
Firmware-Updates des Geräts zu installieren oder nicht,
obliegt der alleinigen Verantwortung des Benutzers. All-
terco Robotics EOOD haftet nicht für Konformitätsmän-
gel des Geräts, die darauf zurückzuführen sind, dass der
Benutzer die bereitgestellten Updates nicht rechtzeitig
installiert hat.
Produktvorstellung
Shelly H&T (das Gerät) ist ein kompakter smarter Feuch-
tigkeits- und Temperatursensor. Er kann die Luftfeuch-
tigkeit und Temperatur in einem Raum messen und als
Aktionsauslöser für andere smarte Geräte in Ihrer Haus-
automatisierung dienen.
Installationsanleitung
⚠VORSICHT! Verwenden Sie das Gerät nicht, wenn es
beschädigt ist!
⚠VORSICHT! Versuchen Sie nicht, das Gerät selbst zu
warten oder reparieren!
⚠VORSICHT! Halten Sie das Gerät von Flüssigkeit und
Feuchtigkeit fern. Das Gerät sollte nicht in Umgebung mit
hoher Feuchtigkeit verwendet werden.
Einlegen der Batterie
Entfernen Sie die Unterschale des Shelly H&T, indem Sie
sie gegen den Uhrzeigersinn drehen, wie in Abb. 2 gezeigt.
Legen Sie die Batterie wie in Abb. 3 gezeigt ein.
⚠CAUTION! Achten Sie auf die Polarität der Batterie!
⚠ACHTUNG! Verwenden Sie nur 3 V CR123A kompatible
Batterien! Einige wiederauadbare Batterien haben eine
höhere Spannung und können das Gerät beschädigen.
Die LED-Anzeige sollte langsam zu blinken beginnen, was
anzeigt, dass das Gerät aktiv ist und sich im AP-Modus
(Access Point) bendet.
Befestigen Sie die Unterschale am Shelly H&T, indem Sie
es im Uhrzeigersinn drehen, wie in Abb. 4 gezeigt.
Shelly H&T kann auch über einen USB-Netzadapter mit
Strom versorgt werden. Der Shelly H&T USB-Adapter ist
separat erhältlich bei:
https://shelly.link/HT-adapter
Verbinden mit dem Gerät
Wenn die LED-Anzeige nicht mehr blinkt, wecken Sie das
Gerät durch kurzes Drücken der Bedientaste auf.
Verbinden Sie ein mobiles Gerät oder PC mit dem AP
(Access Point) des Shelly H&T (shellyht-xxxxxx). Sobald
Sie mit dem AP des Geräts verbunden sind, können Sie
es einrichten, indem Sie die universelle Adresse für alle
Shelly-Geräte aufrufen, um auf die Webschnittstelle zuzu-
greifen: http://192.168.33.1.
In der Weboberäche können Sie das Gerät mit Ihrem hei-
mischen WLAN-Netzwerk verbinden (wodurch das Gerät
in den STA (Client/Station-Modus) wechselt), indem Sie
auf Internet & Security klicken und WIFI-MODUS - CLIENT
auswählen. Nachdem Sie das Häkchen bei Connect the
Shelly device to an existing WiFi network gesetzt und den
Namen und das Passwort eingegeben haben, klicken Sie
auf SAVE. Danach können Sie die Geräte-IP im Netzwerk
mit diesem Tool leicht nden:
https://shelly.cloud/documents/device_finders/Shel-
lyFinderWindows.zip (für Windows) und https://shelly.
cloud/documents/device_nders/ShellyFinderOSX.zip
(für MAC OSX).
IT
GUIDA ALL’USO E ALLA SICUREZZA
Shelly H&T
Sensore di umidità e temperatura Wi-Fi
intelligente
Leggere prima dell’uso
Questo documento contiene importanti informazioni
tecniche e di sicurezza sul dispositivo e sul suo uso e
installazione in sicurezza.
⚠ATTENZIONE! Prima di iniziare l’installazione leggere
attentamente e completamente la documentazione alle-
gata. La mancata osservanza delle procedure consigliate
potrebbe portare a malfunzionamenti, pericolo per la vita
o violazione della legge. Allterco Robotics EOOD non è re-
sponsabile per eventuali perdite o danni in caso di installa-
zione o funzionamento errati di questo dispositivo.
I dispositivi Shelly® vengono consegnati con un rmware
installato in fabbrica. Se sono necessari aggiornamenti
del rmware per mantenere i dispositivi in conformità,
compresi gli aggiornamenti di sicurezza, Allterco Ro-
botics EOOD fornirà gli aggiornamenti gratuitamente
attraverso l’interfaccia web incorporata del dispositivo o
l’applicazione mobile Shelly, dove sono disponibili le in-
formazioni sulla versione corrente del rmware. La scelta
di installare o meno gli aggiornamenti del rmware del di-
spositivo è di esclusiva responsabilità dell’utente. Allterco
Robotics EOOD non è responsabile per qualsiasi mancan-
za di conformità del dispositivo causata dalla mancata
installazione degli aggiornamenti forniti dall’utente in
modo tempestivo.
Introduzione al prodotto
Shelly H&T (il Dispositivo) è un sensore di umidità e tem-
peratura compatto e intelligente. Può misurare l’umidità
dell’aria e la temperatura in una stanza e fungere da
trigger di azione per altri dispositivi intelligenti nella tua
automazione domestica.
Istruzioni per l’installazione
⚠ATTENZIONE! Non utilizzare se il dispositivo è stato
danneggiato!
⚠ATTENZIONE! Non tentare di riparare o riparare il di-
spositivo da soli!
⚠ATTENZIONE! Pericolo di folgorazione. Tenere il dispo-
sitivo lontano da liquidi e umidità. Il dispositivo non deve
essere utilizzato in luoghi con elevata umidità.
Inserimento della batteria
Rimuovere il guscio inferiore Shelly H&T ruotandolo in
senso antiorario come mostrato in g. 2.
Inserire la batteria come mostrato in g. 3.
⚠ATTENZIONE! Prestare attenzione alla polarità della
batteria!
⚠ATTENZIONE! Utilizzare solo batterie compatibili da 3
V CR123A! Alcune batterie ricaricabili hanno una tensione
più elevata e possono danneggiare il dispositivo.
L’indicazione LED dovrebbe iniziare a lampeggiare lenta-
mente, indicando che il dispositivo è attivo e in modalità
AP (punto di accesso).
Fissare il guscio inferiore a Shelly H&T ruotandolo in sen-
so orario come mostrato in g.4.
Shelly H&T può anche essere alimentato tramite un adat-
tatore di alimentazione USB. L’adattatore USB Shelly H&T
è disponibile per l’acquisto separatamente presso:
https://shelly.link/HT-adapter
Collegamento al dispositivo
Se l’indicazione LED ha smesso di lampeggiare, riatti-
vare il dispositivo premendo brevemente il pulsante di
controllo.
Collega il tuo dispositivo mobile o PC all’AP (Access
Point) di Shelly H&T (shellyht-xxxxxx). Una volta connes-
so all’AP del dispositivo, puoi congurarlo visitando l’indi-
rizzo universale per tutti i dispositivi Shelly per accedere
all’interfaccia Web: http://192.168.33.1.
Nell’interfaccia Web è possibile connettere il dispositivo
alla rete Wi-Fi domestica (facendo entrare il dispositivo in
STA (modalità client/stazione)) facendo clic su Internet e
sicurezza e selezionando MODALITÀ WIFI - CLIENT. Dopo
aver selezionato Connetti il dispositivo Shelly a una rete
WiFi esistente e inserito il nome e la password, fai clic su
SALVA. Successivamente, puoi facilmente trovare l’IP del
dispositivo nella rete utilizzando questo strumento:
https://shelly.cloud/documents/device_nders/Shelly-
FinderWindows.zip (per Windows) e https://shelly.cloud/
https://shelly.cloud/documents/device_nders/Shelly-
FinderWindows.zip (for Windows) and https://shelly.
cloud/documents/device_nders/ShellyFinderOSX.zip
(for MAC OSX).
Connecting to a local network will disable the Device AP
mode. If you need it, you can enable it by pressing and
holding the control button for 5 seconds. This, in turn,
will disable the STA mode and will disconnect the Device
from the local network.
In the Web Interface you can also create Webhooks to
control other compatible smart devices.
Learn more about the Device web interface at:
https://kb.shelly.cloud/knowledge-base/shelly-h-t-web-
interface-guide
Initial Inclusion
If you choose to use the Device with the Shelly Cloud
mobile application and Shelly Cloud service, instructions
on how to connect the Device to the Cloud and control it
through the Shelly App can be found in the “App Guide”.
https://shelly.link/app
The Shelly mobile application and Shelly Cloud service
are not conditions for the Device to function properly.
This Device can be used standalone or with various other
home automation platforms and protocols.
LED indication
• Flashing slowly: AP Mode
• Flashing quickly: STA Mode (not connected to the
Cloud) or rmware update, while connected to the
Cloud
• Constant light: Connected to Cloud
Control button
• Press briey to wake the Device up when it in sleep
mode, or put it to sleep mode if it is awake.
• Press and hold for 5 sec to activate Device AP.
• Press and hold for 10 sec to factory reset.
Specications
• Dimensions: 46x46x36 mm / 1.8x1.8х1.4 in
• Weight with battery: 33 g / 1.15 oz
• Working temperature: -10°C to 50°C
• Humidity 20 % to 90 % RH
• Power supply: 1x 3 V CR123A battery (not included)
• Battery life: up to 18 months
• RF band: 2401 - 2495 MHz
• Max. RF power: < 20 dBm
• Wi-Fi protocol: 802.11 b/g/n
• Wi-Fi operational range (depending on local condi-
tions):
-up to 50 m / 160 ft outdoors
-up to 30 m / 100 ft indoors
• CPU: ESP8266
• Flash: 2 MB
• Webhooks (URL actions): 5 with 5 URLs per hook
• MQTT: Yes
• CoIoT: Yes
Declaration of conformity
Hereby, Allterco Robotics EOOD declares that the radio
equipment type Shelly H&T in compliance with Directive
2014/53/EU, 2014/35/EU, 2014/30/EU, 2011/65/EU. The
full text of the EU declaration of conformity is available at
the following internet address:
https://shelly.link/ht_DoC
Manufacturer: Allterco Robotics EOOD
Address: 103 Cherni vrah Blvd., 1407 Soa, Bulgaria
Tel.: +359 2 988 7435
E-mail: support@shelly.cloud
Ocial website: https://www.shelly.cloud
Changes in the contact information data are published by
the Manufacturer on the ocial website.
https://www.shelly.cloud
All rights to the trademark Shelly® and other intellectual
rights associated with this Device belong to Allterco Ro-
botics EOOD.
Wenn Sie das Gerät mit einem lokalen Netzwerk verbin-
den, wird der AP-Modus des Geräts deaktiviert. Wenn Sie
ihn benötigen, können Sie ihn aktivieren, indem Sie die
Steuertaste 5 Sekunden lang gedrückt halten. Dadurch
wird der STA-Modus deaktiviert und die Verbindung des
Geräts mit dem lokalen Netzwerk getrennt.
In der Weboberäche können Sie auch Webhooks erstel-
len, um andere kompatible intelligente Geräte zu steuern.
Weitere Informationen über die Webschnittstelle des Ge-
räts nden Sie hier:
https://kb.shelly.cloud/knowledge-base/shelly-h-t-web-
interface-guide
Erstmalige Einbindung
Wenn Sie sich dafür entscheiden, das Gerät mit der Shelly
Cloud App und dem Shelly Cloud Service zu verwenden,
nden Sie Anweisungen zur Verbindung des Geräts mit
der Cloud und zur Steuerung über die Shelly App im “App
Guide”. https://shelly.link/app Die Shelly Mobile App und
der Shelly Cloud Service sind keine Voraussetzung für
das ordnungsgemäße Funktionieren des Geräts. Dieses
Gerät kann alleine, sowie mit verschiedenen anderen
Hausautomatisierungsdiensten und -anwendungen ver-
wendet werden.
LED-Anzeigering
• Blinkt langsam: AP-Modus
• Blinkt schnell: STA-Modus (nicht mit der Cloud ver-
bunden) oder Firmware-Update, während mit der Cloud
verbunden
• Konstantes Licht: Verbunden mit der Cloud
Bedientaste
• Kurz drücken, um das Gerät aufzuwecken, wenn es sich
im Schlafmodus bendet, oder es in den Schlafmodus
zu versetzen, wenn es wach ist.
• 5 Sekunden lang gedrückt halten, um den AP des Ge-
rätes zu aktivieren.
• 10 Sekunden lang gedrückt halten, um auf Werksein-
stellungen zurückzusetzen.
Technische Daten
• Abmessungen:46x46x36 mm / 1.8x1.8х1.4 in
• Gewicht mit Batterie: 33 g / 1.15 oz
• Arbeitstemperatur: -10°C bis 50°C
• Luftfeuchtigkeit: 20 % bis 90 % RH
• Stromversorgung: 1x 3 V CR123A-Batterie (nicht
enthalten)
• Lebensdauer der Batterie: Bis zu 18 Monate
• Frequenzband: 2401 - 2495 MHz
• Max. Sendeleistung in Frequenzband: <20 dBm
• WLAN-Protokoll: 802.11 b/g/n
• WLAN-Reichweite (abhängig von den örtlichen Gege-
benheiten):
-bis zu 50 m / 160 ft im Freien
-bis zu 30 m / 100 ft in Innenräumen
• CPU: ESP8266
• Flash: 2 MB
• WebHooks (URL-Aktionen): 5 mit 5 URLs pro WebHook
• MQTT: Ja
• CoIoT: Ja
Konformitätserklärung
Hiermit erklärt Allterco Robotics EOOD, dass die Funkan-
lage Typ Shelly H&T der Richtlinie 2014/53/EU, 2014/35/
EU, 2014/30/EU, 2011/65/EU entspricht. Den vollständi-
gen Text der EU-Konformitätserklärung nden Sie unter
folgender Internetadresse: https://shelly.link/ht_DoC
Hersteller: Allterco Robotics EOOD
Adresse: 103 Cherni vrah Blvd., 1407 Soa, Bulgarien
Tel.: +359 2 988 7435
E-Mail: support@shelly.cloud
Ozielle Website: https://www.shelly.cloud
Änderungen der Kontaktdaten werden vom Hersteller auf
dessen oziellen Website veröffentlicht
https://www.shelly.cloud
Alle Rechte an der Marke Shelly® und anderen geistigen
Eigentumsrechten im Zusammenhang mit diesem Gerät
gehören Allterco Robotics EOOD.
documents/device_nders/ShellyFinderOSX.zip (per
MAC OSX).
La connessione a una rete locale disabiliterà la modali-
tà AP del dispositivo. Se ne hai bisogno, puoi abilitarlo
tenendo premuto il pulsante di controllo per 5 secondi.
Questi, a loro volta, disabiliteranno la modalità STA e di-
sconnetteranno il Dispositivo dalla rete locale.
Nell’interfaccia web puoi anche creare webhook per con-
trollare altri dispositivi smart compatibili.
Ulteriori informazioni sull’interfaccia Web del dispositivo
all’indirizzo:
https://kb.shelly.cloud/knowledge-base/shel-
ly-h-t-web-interface-guide
Inclusione iniziale
Se si sceglie di utilizzare il dispositivo con l’applicazione
mobile Shelly Cloud e il servizio Shelly Cloud, le istruzioni
su come collegare il dispositivo al Cloud e controllarlo at-
traverso l’App Shelly si trovano nella “Guida App”.
https://shelly.link/app
L’applicazione mobile Shelly e il servizio Shelly Cloud non
sono condizioni per il corretto funzionamento del Disposi-
tivo. Questo Dispositivo può essere utilizzato con vari altri
servizi e applicazioni di automazione domestica.
Indicazione dei LED
• Lampeggio lento: modalità AP
• Lampeggiamento veloce: modalità STA (non connesso
al cloud) o aggiornamento del rmware, durante la con-
nessione al cloud
• Luce costante: connesso al cloud
Pulsante utente
• Premere brevemente per riattivare il dispositivo quando
è in modalità di sospensione o per metterlo in modalità
di sospensione se è attivo.
• Tenere premuto per 5 secondi per attivare l’AP del di-
spositivo.
• Tieni premuto per 10 secondi per ripristinare le impo-
stazioni di fabbrica.
Speciche
• Dimensioni: 46x46x36 mm / 1.8x1.8х1.4 in
• Peso con batteria: 33 g / 1.15 oz
• Temperatura di lavoro -10°C no a 50°C
• Umidità Dal 20 % al 90 % di umidità relativa
• Alimentazione: 1 batteria CR123A da 3 V (non inclusa)
• Durata della batteria: no a 18 mesi
• Bande di radiofrequenza: 2401 - 2495 MHz
• Massima potenza a radiofrequenza: <20 dBm
• Protocollo Wi-Fi: 802.11 b/g/n
• Intervallo operativo Wi-Fi (a seconda delle condizioni
locali):
• no a 50 m / 160 ft all’aperto
• no a 30 m / 100 ft all’interno
• CPU: ESP8266
• Flash: 2 MB
• Webhook (azioni URL): 5 con 5 URL per ogni hook
• MQTT: Sì
• CoIoT: Sì
Dichiarazione di conformità
Con la presente, Allterco Robotics EOOD dichiara che
il tipo di apparecchiatura radio Shelly H&T è conforme
alla Direttiva 2014/53/UE, 2014/35/UE, 2014/30/EU,
2011/65/EU. Il testo completo della dichiarazione di con-
formità UE è disponibile al seguente indirizzo internet:
https://shelly.link/ht_DoC
Produttore: Allterco Robotics EOOD
Indirizzo: Bulgaria, Soa, 1407, 103 Cherni vrah Blvd.
Tel.: +359 2 988 7435
E-mail: support@shelly.cloud
Sito web uciale: https://www.shelly.cloud
Le modiche ai dati di contatto sono pubblicate dal Pro-
duttore sul sito Web uciale. https://www.shelly.cloud
Tutti i diritti sul marchio Shelly® e altri diritti intellettuali
associati a questo dispositivo appartengono a Allterco
Robotics EOOD.
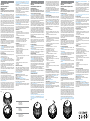
EN
A: Bottom shell
B: Control button
C: LED indication
DE
A: Unterteil
B: Bedientaste
C: LED-Anzeige
IT
A: Guscio inferiore
B: Pulsante di controllo
C: indicazione LED
B
A
C
CR123A
g. 1
g. 2 g. 3 g. 4
09/2023

ES
MANUAL DE USO Y SEGURIDAD
Shelly H&T
Sensor inteligente de humedad y
temperatura Wi-Fi
Lea antes de utilizar
Este documento contiene información técnica y de se-
guridad importante sobre el aparato, su uso y su insta-
lación segura.
⚠¡ATENCIÓN! Antes de comenzar la instalación, lea
atentamente y por completo la documentación adjunta.
El incumplimiento de los procedimientos recomendados
puede provocar un mal funcionamiento, un peligro para su
vida o una violación de la ley. Allterco Robotics no se hace
responsable de cualquier pérdida o daño debido a una ins-
talación o uso inadecuado de este dispositivo.
Los dispositivos Shelly® vienen con el rmware instalado
de fábrica. Si es necesario actualizar el rmware para que
los dispositivos sigan cumpliendo la normativa, incluidas
las actualizaciones de seguridad, Allterco Robotics EOOD
proporcionará las actualizaciones de forma gratuita a tra-
vés de la interfaz web integrada en el dispositivo o la apli-
cación móvil Shelly, donde está disponible la información
de la versión actual del rmware. La decisión de instalar
o no las actualizaciones del rmware del dispositivo es
responsabilidad exclusiva del usuario. Allterco Robotics
EOOD no se hace responsable de la falta de conformidad
del Dispositivo causada por el hecho de que el Usuario
no instale oportunamente las actualizaciones previstas.
Resumen del producto
Shelly H&T (el Dispositivo) es un sensor inteligente com-
pacto de humedad y temperatura. Puede medir la hume-
dad del aire y la temperatura en una habitación y actuar
como un disparador de acción para otros dispositivos
inteligentes en la automatización de su hogar.
Instrucciones de instalación
⚠¡ATENCIÓN! ¡No utilice el aparato si está dañado!
⚠¡ATENCIÓN! ¡No intente arreglar o reparar el aparato
usted mismo!
⚠¡ATENCIÓN! Peligro de electrocución. Mantenga el apa-
rato alejado de los líquidos y la humedad. El aparato no
debe utilizarse en lugares con mucha humedad.
Inserción de la batería
Retire la carcasa inferior Shelly H&T girándola en el sen-
tido contrario a las agujas del reloj, como se muestra en
la imagen 2.
Inserte la batería como se muestra en la imagen 3.
⚠¡ATENCIÓN! ¡Preste atención a la polaridad de las ba-
terías!
⚠¡ATENCIÓN! ¡Utilice sólo pilas compatibles CR123A de
3 V! Algunas baterías recargables tienen un voltaje más
alto y pueden dañar el Dispositivo.
El LED debe empezar a parpadear lentamente, lo que indi-
ca que el Dispositivo está activado y en modo AP (Access
Point).
Fije la carcasa inferior en el Shelly H&T girándola en el
sentido de las agujas del reloj, como se muestra en la
imagen 4.
Shelly H&T también puede alimentarse a través de un
adaptador de corriente USB. El adaptador USB de Shelly
H&T puede adquirirse por separado en:
https://shelly.link/HT-adapter
Conexión al aparato
Si el indicador LED ha dejado de parpadear, active el Dis-
positivo presionando brevemente el botón de control.
Conecte su dispositivo móvil o PC al AP (Punto de Acce-
so) de Shelly H&T (shellyht-xxxxxx). Una vez conectado
al AP del Dispositivo, puede congurarlo visitando la di-
rección universal para todos los dispositivos Shelly para
acceder a la Interfaz Web: http://192.168.33.1.
En la Interfaz Web puede conectar el Dispositivo a su red
Wi-Fi doméstica (haciendo que el Dispositivo entre en
STA (modo Cliente/Estación)) haciendo clic en Internet &
PT
GUIA DO UTILIZADOR E DE SEGURANÇA
Shelly H&T
Sensor inteligente de umidade e
temperatura Wi-Fi
Leia antes de utilizar
Este documento contém importante informação técnica
e de segurança relativa ao dispositivo, sua utilização se-
gura e instalação.
⚠ATENÇÃO! Antes de iniciar a instalação, por favor leia
atentamente e na íntegra a documentação incluída. O in-
cumprimento dos procedimentos recomendados poderão
dar origem a avarias, perigo à sua vida ou violação da lei.
A Allterco Robotics EOOD não se responsabiliza por quais-
quer perdas ou danos em caso de uma incorreta instala-
ção ou incorreta utilização deste dispositivo.
Os dispositivos Shelly® são distribuidos com rmware
instalado em fábrica. Se forem necessárias atualizações
ao rmware de forma a manter os dispositivos em con-
formidade, incluindo atualizações de segurança, Allterco
Robotics EOOD fornecerá as atualizações gratuitamente
através do Interface Web embutido ou da Aplicação Mó-
vel Shelly, onde a informação sobre a versão de rmware
atual se encontra acessível. A escolha em instalar ou não
instalar as atualizações de rmware do Dispositivo é res-
ponsabilidade única do utilizador. Allterco Robotics EOOD
não se responsabiliza por qualquer falha na conformida-
de do Dispositivo causada pela não instalação das atuali-
zações disponíveis em tempo útil, por parte do Utilizador.
Apresentação do produto
Shelly H&T (o dispositivo) é um sensor compacto e inte-
ligente de umidade e temperatura. Ele pode medir a umi-
dade e a temperatura do ar em uma sala e atuar como um
gatilho de ação para outros dispositivos inteligentes em
sua automação residencial.
Instruções de Instalação
⚠ATENÇÃO! Não utilize o dispositivo se este se encon-
trar danicado.
⚠ATENÇÃO! Não tente você mesmo fazer manutenção
ou reparar o dispositivo!
⚠ATENÇÃO! Perigo de eletrocussão. Mantenha o dispo-
sitivo longe de líquidos e humidade. O dispositivo não deve
ser utilizado em áreas com demasiada humidade.
Inserindo a bateria
Remova a tampa inferior da Shelly H&T rodando-a contra
o sentido do relógio, tal como ilustrado na g. 2.
Insira a bateria como mostrado na g. 3.
⚠CUIDADO! Preste atenção à polaridade da bateria!
⚠CUIDADO! Use apenas baterias compatíveis com 3 V
CR123A! Algumas baterias recarregáveis têm voltagem
mais alta e podem danicar o dispositivo.
A indicação do LED deve começar a piscar lentamente,
indicando que o dispositivo está ativo e no modo AP
(ponto de acesso).
Conecte a tampa inferior na Shelly H&T rodando-o no sen-
tido do relógio, tal como ilustrado na g. 4.
Shelly H&T também pode ser alimentado através de um
adaptador de energia USB. O adaptador USB Shelly H&T
está disponível para compra separadamente em:
https://shelly.link/HT-adapter
Conectando ao dispositivo
Se a indicação do LED parou de piscar, desperte o dis-
positivo pressionando brevemente o botão de controle.
Ligue o seu dispositivo móvel ou PC ao AP (ponto de
acesso) da Shelly H&T (shellyht-xxxxxx). Uma vez conec-
tado ao dispositivo, você pode congurá-lo visitando o
endereço universal para todos os dispositivos Shelly para
acessar a interface da Web: http://192.168.33.1.
Na interface da Web, você pode conectar o dispositivo
à sua rede Wi-Fi doméstica (fazendo com que o dispo-
sitivo entre em STA (modo cliente/estação) clicando em
Internet & Security e selecionando WIFI MODE - CLIENT.
Depois de marcar Connect the Shelly device to an exis-
ting WiFi network e inserir o nome e a senha, clique em
SAVE. Depois disso, você pode encontrar facilmente o IP
do dispositivo na rede usando esta ferramenta:
https://shelly.cloud/documents/device_finders/
ShellyFinderWindows.zip (para Windows) ou
https://shelly.cloud/documents/device_finders/
ShellyFinderOSX.zip (para MAC OSX).
Conectar-se a uma rede local desativará o modo AP do
FR
NOTICE D’UTILISATION ET CONSIGNES DE
SÉCURITÉ
Shelly H&T
Capteur d’humidité et de température
connecté Wi-Fi
À lire avant utilisation
Ce document contient des informations techniques et
des consignes de sécurité importantes concernant le
dispositif, son utilisation et son installation.
⚠ATTENTION ! Avant de commencer l’installation,
veuillez lire attentivement et entièrement cette notice d’util-
isation. Le non-respect des procédures recommandées
peut entraîner un dysfonctionnement, représenter un
danger ou être une violation de la loi. Allterco Robotics
EOOD n’est pas responsable des pertes ou des dommages
causés lors d’une installation ou utilisation inadéquate de
ce dispositif.
Les dispositifs Shelly® sont livrés avec un micrologiciel
(rmwar) pré-installé. Si des mises à jour du sont néces-
saires pour maintenir les dispositifs conformes ainsi que
mettre à jour les consignes de sécurité, Allterco Robotics
EOOD les fournira gratuitement depuis l’interface Web in-
tégrée au dispositif ou depuis l’application Shelly, où les
informations sur la version actuelle du micrologiciel sont
disponibles. Le choix d’installer ou non les mises à jour
du micrologiciel du dispositif relève de la seule respons-
abilité de l’utilisateur. Allterco Robotics EOOD n’est aucu-
nement responsable de tout manque de la conformité du
dispositif causé par le fait que l’utilisateur n’a pas installé
les mises à jour fournies en temps voulu.
Présentation du produit
Shelly H&T (le Dispositif) est un capteur d’humidité et de
température de petit format et connecté. Il peut mesurer
l’humidité et la température d’une pièce et servir de dé-
clencheur d’action pour d’autres appareils intelligents de
votre système domotique.
Instructions d’installation
⚠ATTENTION ! Ne pas utiliser si le dispositif a été en-
dommagé !
⚠ATTENTION ! N’essayez pas d’entretenir ou de réparer
le dispositif vous-même !
⚠ATTENTION ! Danger d’électrocution. Gardez le dis-
positif à l’écart des liquides et de l’humidité. Le dispositif
ne doit pas être utilisé dans des endroits très humides.
Insertion de la batterie
Retirez la coque inférieure du Shelly H&T en la tournant
dans le sens inverse des aiguilles d’une montre, comme
illustré sur l’image 2.
Insérez la pile, comme indiqué sur l’image 3.
⚠ATTENTION ! Respectez la polarité de la pile !
⚠ATTENTION ! Utilisez uniquement des piles compati-
bles CR123A de 3 V ! Certaines piles rechargeables ont une
tension plus élevée et peuvent endommager le Dispositif.
Lorsque l’indicateur LED commence à clignoter lente-
ment, cela indique que le Dispositif est actif et en mode
AP (point d’accès sans l).
Assemblez la coque inférieure au Shelly H&T en le tour-
nant dans le sens des aiguilles d’une montre, comme
illustré sur l’image 4.
Shelly H&T peut aussi être alimenté par un adaptateur
secteur USB. Vous pouvez acheter celui-ci séparément à
l’adresse suivante :
https://shelly.link/HT-adapter
Connexion au dispositif
Si l’indicateur LED cesse de clignoter, réveillez le Disposi-
tif en appuyant brièvement sur le bouton de commande.
Connectez votre téléphone portable ou votre PC à l’AP
(point d’accès sans l) du Shelly H&T (shellyht-xxxxxx).
Une fois connecté à l’AP du Dispositif, vous pouvez le
congurer en vous rendant à l’adresse universelle pour
accéder à l’interface Web disponible pour tous les dis-
positifs Shelly : http://192.168.33.1.
Sur l’interface web, vous pouvez connecter le Dispositif à
votre Wi-Fi (ce qui fait passer le Dispositif en mode STA
(client/station)) en cliquant sur Internet & Security et en
sélectionnant WI-FI MODE - CLIENT. Après avoir coché la
case Connect the Shelly device to an existing WiFi net-
work et saisi le nom et le mot de passe, cliquez sur SAVE.
Ensuite, vous pouvez trouver l’IP du Dispositif sur le ré-
Security y seleccionando WIFI MODE - CLIENT. Una vez
que haya marcado Connect the Shelly device to an exis-
ting WiFi network e introducido el nombre y la contrase-
ña, haga clic en SAVE. Después de eso, puede encontrar
fácilmente la IP del Dispositivo en la red utilizando esta
herramienta:
https://shelly.cloud/documents/device_finders/
ShellyFinderWindows.zip (para Windows) y https://shelly.
cloud/documents/device_nders/ShellyFinderOSX.zip
(para MAC OSX).
Conectarse a una red local deshabilitará el modo AP del
Dispositivo. Si lo necesita, puede activarlo manteniendo
presionado el botón de control durante 5 segundos. Esto,
a su vez, deshabilitará el modo STA y desconectará el Dis-
positivo de la red local.
En la interfaz web también puede crear Webhooks para
controlar otros dispositivos inteligentes compatibles.
Más información sobre la interfaz web del Dispositivo en:
https://kb.shelly.cloud/knowledge-base/shelly-h-t-web-
interface-guide
Inclusión inicial
Si decide utilizar el Dispositivo con la aplicación móvil
Shelly Cloud y el servicio Shelly Cloud, las instrucciones
para conectar el Dispositivo a la nube y controlarlo a
través de la App Shelly se encuentran en la “Guía de la
App”. https://shelly.link/app La aplicación móvil Shelly y
el servicio Shelly Cloud no son condiciones para el buen
funcionamiento del Dispositivo. Este dispositivo puede
utilizarse con otros servicios y aplicaciones de domótica.
Indicador LED
• Parpadea lentamente: Modo AP
• Parpadeo rápido: Modo STA (no conectado a la Nube)
o actualización de rmware, mientras está conectado
a la Nube.
• Luz constante: Conectado a la Nube
Botón de control
• Presione brevemente para activar el Dispositivo cuan-
do esté en modo de reposo, o ponerlo en modo de re-
poso si está activo.
• Mantenga presionado durante 5 segundos para activar
la AP del dispositivo.
• Mantenga pulsado durante 10 segundos para restable-
cer la conguración de fábrica.
Especicaciones técnicas
• Dimensiones: 46x46x36 mm / 1.8x1.8х1.4 in
• Peso con batería: 33 g / 1.15 oz
• Temperatura de funcionamiento -10°C a 50°C
• Humedad 20 % a 90 % HR
• Fuente de alimentación: 1 batería CR123A de 3 V (no
incluida)
• Duración de la batería: hasta 18 meses
• Banda de radiofrecuencia: 2401 - 2495 MHz
• Potencia máxima de radiofrecuencia: <20 dBm
• Protocolo Wi-Fi: 802.11 b/g/n
• Alcance operativo de Wi-Fi (dependiendo de las condi-
ciones locales):
-hasta 50 m / 160 ft en exteriores
-hasta 30 m / 100 ft en interiores
• CPU: ESP8266
• Flash: 2 MB
• Webhooks (acciones URL): 5 con 5 URLs por hook
• MQTT: Sí
• CoIoT: Sí
Declaración de conformidad
Allterco Robotics EOOD declara por medio de la presente
que el equipo de radio tipo Shelly H&T cumple con la Di-
rectiva 2014/53/UE, 2014/35/UE, 2014/30/EU, 2011/65/
UE. El texto completo de la declaración de conformidad
de la UE está disponible en la siguiente dirección web:
https://shelly.link/ht_DoC
Fabricante: Allterco Robotics EOOD
Dirección: Bulgaria, Soa, 1407, 103 Cherni vrah Blvd.
Tel: +359 2 988 7435
Correo electrónico: support@shelly.cloud
Sitio web ocial: https://www.shelly.cloud
Los cambios en la información de contacto son publica-
dos por el fabricante en el sitio web ocial.
https://www.shelly.cloud
Todos los derechos de las marcas Shelly®, y otros dere-
chos de propiedad intelectual asociados a este dispositi-
vo pertenecen a Allterco Robotics EOOD.
dispositivo. Se precisar, você pode ativá-lo pressionando
e segurando o botão de controle por 5 segundos. Isso,
por sua vez, desabilitará o modo STA e desconectará o
Dispositivo da rede local.
Na Interface da Web, você também pode criar Webhooks
para controlar outros dispositivos inteligentes compatí-
veis.
Saiba mais sobre a interface da Web do dispositivo em:
https://kb.shelly.cloud/knowledge-base/shelly-h-t-web-
interface-guide
Inclusão Inicial
Se escolher usar o Dispositivo com a aplicação móvel
Shelly Cloud e o serviço Shelly Cloud, instruções em
como conectar o Dispositivo à Cloud e como controlá-lo
através da App Shelly, podem ser encontradas no „Guia
da App“. https://shelly.link/app A Shelly Mobile Applica-
tion e o serviço Shelly Cloud não são condições únicas
para o funcionamento adequado do dispositivo. Este
Dispositivo pode ser utilizado com variadas aplicações e
serviços de domótica.
Indicadores LED
• Piscando lentamente: Modo AP
• Piscando rapidamente: Modo STA (não conectado à
nuvem) ou atualização de rmware, enquanto conec-
tado à nuvem
• Luz constante: conectado à nuvem
Botão do utilizador
• Pressione brevemente para ativar o dispositivo quando
estiver no modo de suspensão ou colocá-lo no modo
de suspensão se estiver ativado.
• Pressione durante 5 seg para activar o Dispositivo AP.
• Pressione durante 10 seg para voltar à conguração
de fábrica.
Especicações
• Dimensões: 46x46x36 mm / 1.8x1.8х1.4 in
• Peso com bateria: 33 g / 1.15 oz
• Temperatura de funcionamento -10°C a 50°C
• Umidade 20% a 90% RH
• Fonte de alimentação: 1 bateria CR123A de 3 V (não
incluída)
• Duração da bateria: até 18 meses
• Banda de radiofrequências: 2401 - 2495 MHz
• Potência máxima de radiofrequências: <20 dBm
• Protocolo Wi-Fi: 802.11 b/g/n
• Alcance de operação de Wi-Fi (dependendo das con-
dições locais):
-até 50 m / 160 ft no exterior
-até 30 m / 100 ft no interior
• CPU: ESP8266
• Flash: 2 MB
• Webhooks (ações URL): 5 com 5 URLs por cada „hook“
• MQTT: Sim
• CoIoT: Sim
Declaração de conformidade
A Allterco Robotics EOOD declara por este meio que o
equipamento rádio Shelly H&T opera conforme a Diretriz
2014/53/EU, 2014/35/EU, 2014/30/EU, 2011/65/EU. O
texto completo da declaração da UE sobre a conformi-
dade está disponível no seguinte endereço de internet:
https://shelly.link/ht_DoC
Fabricante: Allterco Robotics EOOD
Endereço: 1407, 103 Cherni vrah Blvd. Soa, Bulgária
Tel.: +359 2 988 7435
E-mail: support@shelly.cloud
Site ocial: https://www.shelly.cloud
Alterações nos endereços de contato são publicados
pelo Fabricante no website ocial.
https://www.shelly.cloud
Todos os direitos sobre a marca registada Shelly® e ou-
tros direitos de propriedade intelectual associados a este
Dispositivo pertencem a Allterco Robotics EOOD.
seau à l’aide de cet outil :
https://shelly.cloud/documents/device_finders/
ShellyFinderWindows.zip (pour Windows) et
https://shelly.cloud/documents/device_finders/
ShellyFinderOSX.zip (pour MAC OSX).
La connexion à un réseau local désactive le mode AP du
Dispositif. Si vous en avez besoin, vous pouvez l’activer
en appuyant sur le bouton de commande et en le main-
tenant appuyé pendant 5 secondes. Cela va désactiver le
mode STA et déconnecter le Dispositif du réseau local.
Sur l’interface web, vous pouvez aussi créer des web-
hooks pour contrôler d’autres dispositifs connectés et
compatibles.
Pour plus d’informations sur l’interface web du Dispositif,
cliquez ici :
https://kb.shelly.cloud/knowledge-base/shelly-h-t-web-
interface-guide
Intégration initiale
Si vous choisissez d’utiliser le Dispositif avec l’applica-
tion Shelly Cloud et le service Shelly Cloud, les instruc-
tions pour connecter le Dispositif au Cloud et le contrôler
depuis l’application Shelly se trouvent dans le « Guide de
l’App ». L’application Shelly et le service Shelly Cloud ne
sont pas des conditions au bon fonctionnement du Dis-
positif. Ce Dispositif peut être utilisé avec d’autres ser-
vices et applications domotiques.
Éclairage LED
• Clignotement lent : mode AP
• Clignotement rapide : mode STA (non connecté au
Cloud) ou mise à jour du rmware lorsqu’il est con-
necté au Cloud.
• Voyant constant : connecté au Cloud
Bouton de commande
• Appuyez brièvement pour réveiller le Dispositif lorsqu’il
est en mode veille ou le mettre en mode veille s’il est
éveillé.
• Appuyez et maintenez le bouton de commande enfon-
cé pendant 5 secondes pour activer l’AP du Dispositif.
• Appuyez et maintenez le bouton de commande enfon-
cé pendant 10 secondes pour réinitialiser le Dispositif.
Caractéristiques techniques
• Dimensions : 46x46x36 mm / 1.8x1.8х1.4 in
• Poids avec pile : 33 g / 1.15 oz
• Température de fonctionnement : -10°C à 50°C
• Humidité : 20 % à 90 %
• Alimentation : 1 pile CR123A de 3 V (non incluse)
• Autonomie de la pile : jusqu’à 18 mois
• Bande de radiofréquences : 2401 - 2495 MHz
• Puissance de radiofréquence maximale : < 20 dBm
• Norme Wi-Fi : 802.11 b/g/n
• Portée du Wi-Fi (en fonction des collectivités locales) :
-jusqu’à 50 m à l’extérieur
-jusqu’à 30 m à l’intérieur”
• CPU : ESP8266
• Flash : 2 MB
• Webhooks (actions URL) : 5 avec 5 URLs par hook
• MQTT: Oui
• CoIoT: Oui
Déclaration de conformité
Par la présente, Allterco Robotics EOOD déclare que l’équi-
pement radio de type Shelly H&T est conforme à la direc-
tive 2014/53/UE, 2014/35/UE, 2014/30/UE, 2011/65/UE.
Le texte complet de la déclaration de conformité de l’UE
est disponible à l’adresse Internet suivante:
https://shelly.link/ht_DoC
Fabricant : Allterco Robotics EOOD
Adresse : 103, Boulevard “Cherni vrah”, 1407 Soa, Bul-
garie
Tél : +359 2 988 7435
Email : support@shelly.cloud
Site ociel : https://www.shelly.cloud
Les modications des coordonnées, faites par le fabri-
cant, sont publiées sur le site ociel.
https://www.shelly.cloud
Tous les droits de la marque Shelly® et autres droits de
propriété intellectuelle associés à ce Dispositif appartien-
nent à Allterco Robotics EOOD.
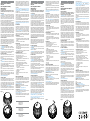
ES
A: Carcasa inferior
B: Botón de control
C: Indicador LED
PT
A: Invólucro inferior
B: Botão de controle
C: Indicação de LED
FR
A : Coque inférieure
B : Bouton de commande
C : Indicateur LED
B
A
C
CR123A
imagen 1
imagen 2 imagen 3 imagen 4
09/2023
-
 1
1
-
 2
2


Shelly Smart Wi-Fi Humidity and Temperature Sensor Mode d'emploi
- Taper
- Mode d'emploi
dans d''autres langues
- italiano: Shelly Smart Wi-Fi Humidity and Temperature Sensor Guida utente
- español: Shelly Smart Wi-Fi Humidity and Temperature Sensor Guía del usuario
- Deutsch: Shelly Smart Wi-Fi Humidity and Temperature Sensor Benutzerhandbuch
- português: Shelly Smart Wi-Fi Humidity and Temperature Sensor Guia de usuario
Documents connexes
-
Shelly ALT-18793 Mode d'emploi
-
Shelly Plus Plug S Mode d'emploi
-
Shelly DW2 Wi-Fi Door-Window Sensor Mode d'emploi
-
Shelly WiFi Operated Manuel utilisateur
-
Shelly Plus I4DC Mode d'emploi
-
Shelly Pro 3EM Mode d'emploi
-
Shelly Plus H&T WiFi Humidity and Temperature Sensor Mode d'emploi
-
Shelly 2 Circuit WiFi Relay Switch Mode d'emploi
-
Shelly Pro 4PM Mode d'emploi
-
Shelly Plus Smoke Smart Smoke Alarm Mode d'emploi