Ingo Maurer MOODMOON White Mode d'emploi
- Taper
- Mode d'emploi

approx. 190 cm
floor
MOODMOON White Instructions
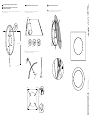
Quadratischer Schirm/ square shade
Papier ausrollen und Stäbe einfädeln./ Unroll the
paper and thread in the rods.
Leuchtenelement Quadratischer Schirm &
Runder Schirm/ Luminaire element square
shade & Round shade
Runder Schirm/ round shade
Runden Papierschirm von oben nach unten einhaken./
Hook round paper shade from top to bottom.
F
1.
2.
3.
4.
AB C
①②③④⑤⑥⑦⑧⑨⑩
Leuchtelement am „Schlüsselloch“ aufhängen. / Unroll the paper and
thread in the rods.
①②
Bügel einschieben und Papier einhaken./ Push in the
bracket and hook in the paper.
③
Left Right
D
E
❷
L R
Versionen MOODMOON
(Stand 12.2020)
MM SQ105
(Papierformat 105x105cm)
MM R60
(Papierformat DM 60cm)
MM R85
(Papierformat DM 85cm)
MM White R60
(Papierformat DM 60cm)
MM SQ75
(Papierformat 75x75cm)
MM White SQ 75
(Papierformat 75x75cm)
Versionen MOODMOON
(Stand 12.2020)
MM SQ105
(Papierformat 105x105cm)
MM R60
(Papierformat DM 60cm)
MM R85
(Papierformat DM 85cm)
MM White R60
(Papierformat DM 60cm)
MM SQ75
(Papierformat 75x75cm)
MM White SQ 75
(Papierformat 75x75cm)

Bitte nehmen Sie die Leuchte vorsichtig aus der Verpackung. Entfernen Sie
die Kabelbinder und wickeln Sie das Kabel vollständig ab.
Achtung: Schließen Sie die Lampe erst nach dem Aufstellen an das
Netz an!
Wichtig: Achten Sie unbedingt auf den Verlauf von Elektroleitungen,
damit auf keinen Fall ein Kabel angebohrt wird.
Das Papier dieser Lampe ist ein unbehandeltes Naturprodukt:
Kleinere Einschlüsse und Verdickungen sind produktionstechnisch
bedingt.
Montage Leuchtelement
Die Schraube in 190 cm Höhe in der Wand befestigen. Leuchtenele-
ment am „Schlüsselloch“ aufhängen. Bei einer Montage an der Decke,
zusätzlich die beiden unteren Löcher
verwenden.
Quadratischer Schirm
Den Papierbogen vorsichtig ausrollen. Die Eingänge der beiden
Taschen mit einem spitzen Stift weiten (A), um das Einführen des
Alurohrs und Stabs zu erleichtern. Das Rohr in die obere Kante des
Papierquadrats einführen (B). Der schwerere Vollstab, gehört als
Gewicht nach unten (C).
Die Bügel mit dem geraden Ende voran, durch die seitlichen
Löcher am Leuchtkörper schieben. Alle vier Bügel bis zum Anschlag
einstecken. Bitte achten Sie darauf, dass die gebogen Enden der Bügel
oben und unten zueinander schauen (Rechts/Links). Die beiden
oberen Bügelenden von außen in das Rohr, in die oberen Segeltasche
einschieben (D).
Die beiden unteren schmiegen sich von hinten an das Papier an (E).
Runder Schirm
Zwei der Halter des runden Papierschirms, nacheinander in die
beiden oberen Tüllen des Leuchtenelements stecken. Anschließend
die unteren Bügel vorsichtig über den LED-Streifen heben (F) und in
die verbleibenden Tüllen stecken.
Pege
Reinigen Sie die Leuchte mit einem trockenen Mikrofasertuch.
Der Papierschirm darf nicht mit Feuchtigkeit in Berührung kommen.
Verwenden Sie auch für das Leuchtenelement, KEINE lösungsmittel-
oder chlorhaltigen Reinigungsmittel.
Technische Daten
100-240Volt~, 50- 60Hz., cosᵩ 0,6
Sekundär 24 V, LED, max. 44 W, 2800 K, CRI >90
Schnurschalter und Funkfernbedienung, dimmbar
Die LEDs haben eine Lebensdauer von 50.000 Stunden
(Herstellerangabe).
Die Leuchte enthält LED Leuchtmittel der Energieklasse A+.
Die LED Leuchtmittel können nicht vom Nutzer ausgetauscht werden.
Eine defektes Leuchte muss als Elektroschrott entsorgt werden
und darf nicht in den Hausmüll gelangen.
Eventuell notwendige Reparaturen dürfen nur von einer Elektrofachkraft
durchgeführt werden. Die äußere Leitung darf bei Beschädigung nur von
der Ingo Maurer GmbH ausgetauscht werden. Bei Schäden, die durch
Nichtbeachten dieser Bedienungsanleitung, unsachgemäßer Inbetriebnahme
und/oder baulicher Veränderung z. B. durch Fremdbauteile, Handhabung
oder Fremdeingriff verursacht werden, erlischt der Garantieanspruch.
Ingo Maurer GmbH Kaiserstrasse 47 80801 München Germany T +49 (0)89 381 606 0 F +49 (0)89 381 606 20 info@ingo-maurer.com www.ingo-maurer.com
Stand April 2021 Made in Germany
Deutsch English Français Italiano
Please take the lamp carefully out of the packaging. Remove the cable ties
and unwind the cables completely.
Caution: Do not connect the lamp to the power supply before
completing the assembly!
Important: Be sure to pay attention to the course of electrical cables,
to ensure that no cable is drilled into.
The paper used in this lamp is a natural, untreated product. Minor
surface aws are a result of the manufacturing process.
Installation of the lighting element
Fix the screw in the wall at a height of 190 cm. Hang the luminaire
element on the „keyhole“. If mounting on the ceiling, also use the two
lower holes.
Square shade
Carefully unroll the sheet of paper. Widen the entrances of the two
pockets with a sharp pencil (A) to facilitate the insertion of the
aluminium tube and rod. Insert the tube into the upper edge of the
paper square (B). The heavier solid stick belongs at the bottom as a
weight (C).
Push the brackets, straight end rst, through the holes in the side of
the lamp. Insert all four brackets as far as possible. Please make sure
that the bent ends of the brackets face each other at the top and
bottom (Right/Left). Push the two upper bracket ends into the tube
from the outside, in the upper canvas pocket (D).
The two lower ones nestle against the paper from behind (E).
Round shade
Insert two of the holders of the round paper shade, one after the
other, into the two upper grommets of the luminaire element.Then
carefully lift the lower brackets over the LED strip (F) and insert
them into the remaining grommets.
Cleaning
The lamp can be cleaned with a dry microber cloth.
The paper shade must not come into contact with moisture.
Also for the light element DO NOT use cleaning agents containing
solvents or chlorine.
Technical specication
100-240Volt~, 50- 60Hz., cosᵩ 0,6
Secondary 24 V, LED, max. 44W, 2800 K, CRI >90
On-off switch on the cable and remote control, dimmable
According to the manufacturer, the LEDs have an average-life of 50.000
hours.
The luminaire contains LED lamps of energy class A+.
The built-in LEDs cannot be replaced by the user.
A defective lamp must be disposed as electronic scrap, it must
not get into domestic waste.
Any repairs that may become necessary must be carried out by a
professional electrician. In the event of damage to the external power
cord, replacements may only be tted by Ingo Maurer GmbH. The legal
and contractual warranty for defects and product liability will be void,
Should the installation instructions not be duly followed or non-original
components be employed.
Veuillez sortir la lampe soigneusement de son emballage. Retirez les
attaches de câble et déroulez complètement les câbles.
Attention: Ne brancher la lampe au courant qu‘après l‘avoir installée!
Important : Veillez de faire attention au parcours des câbles
électriques dans le mur, an qu‘aucun câble ne soit percé.
Le papier de cette lampe est un produit naturel non-traité; de
petites imperfections ou épaississements sont dus au procédé technique.
Installation de l‘élément d‘éclairage
Fixez la vis au mur à une hauteur de 190 cm. Accrochez l‘élément
d‘éclairage sur le „trou de serrure“. Pour le montage au plafond,
utilisez également les deux trous inférieurs.
Abat-jour carré
Déroulez soigneusement la feuille de papier. Élargissez les entrées
des deux poches avec un crayon pointu (A) pour faciliter l‘insertion
du tube et de la tige en aluminium. Insérez le tube dans le bord
supérieur du carré de papier (B). La barre pleine la plus lourde est
pour le bas en tant que contrepoids (C).
Poussez les supports, l‘extrémité droite en premier, à travers les
trous sur le côté de la lampe. Insérez les quatre supports aussi loin
que possible. Veillez à ce que les extrémités coudées des supports
soient en face l‘une de l‘autre en haut et en bas (droite/gauche).
Poussez les deux extrémités supérieures des supports dans le tube
par l‘extérieur, dans la poche supérieure en toile (D).
Les deux inférieurs s‘emboîtent contre le papier par l‘arrière (E).
Abat-jour rond
Insérez deux des supports de l‘abat-jour en papier rond, l‘un après
l‘autre, dans les deux oeillets supérieurs de l‘élément de luminaire,
puis soulevez avec précaution les supports inférieurs au-dessus de la
bande de LED (F) et insérez-les dans les autres oeillets.
Entretien
Nettoyer la lampe avec un chiffon à microbre sec. Ne pas utiliser de
solvants ou de détergents à base de chlore!
Données techniques
100-240Volt~, 50- 60Hz., cosᵩ 0,6
Secondaire 24 V, LED, max. 44W, 2800 K, CRI >90
interrupteur et télécommande, dimmable
Les LEDs ont une durée de vie 50.000 heures (données du fabricant).
Le luminaire contient des luminaires à LED de classe énergétique A+.
L‘ampoule ne peut pas être changée par l‘utilisateur.
Un lampe défectueux devra être jeté avec des déchets
électroniques, ne pas les jeter avec vos ordures ménagères.
Des réparations éventuellement nécessaires ne sont à effectuer que par
un spécialiste. En cas d’endommagement du câble électrique externe,
celui-ci ne doit être échangé que par la société Ingo Maurer GmbH. La
garantie légale et contractuelle pour les défauts et la responsabilité pour
les dommages causés par des produits défectueux, expireront en cas de
dommages ou de ré- clamations résultant du non-respect des instructions
d‘installation et/ou des modications Structurelles, en particulier si des
composants non originaux sont utilisés.
Con entrambe le mani estrarre cautamente la lampada dall’imballaggio.
Rimuovere le fascette per cavi e svolgere completamente i cavi.
Attenzione: Effettuare il collegamento alla rete soltanto dopo avere
collocato la lampada!
Importante: Fare attenzione al percorso dei cavi elettrici,
in modo che nessun cavo venga forato.
La carta di questa lampada è un prodotto naturale non trattato;
piccole imperfezioni e ispessimenti sono dovuti alla tecnica di
lavorazione.
Installazione dell‘elemento di illuminazione
Fissare la vite al muro ad un‘altezza di 190 cm. Appendere
l‘elemento di illuminazione sul „buco della serratura“. Per il
montaggio a soffitto, utilizzare anche i due fori inferiori.
Fori.
Paralume quadrato
Srotolare con cura il foglio di carta. Allargare le entrate delle due
tasche con una matita appuntita (A) per facilitare l‘inserimento del
tubo di alluminio e dell‘asta. Inserire il tubo nel bordo superiore del
quadrato di carta (B). Il bastoncino solido più pesante sta in basso
come peso (C).
Spingere le staffe, prima l‘estremità diritta, attraverso i fori sul lato
della lampada. Inserire tutte e quattro le staffe il più possibile. Si
assicuri che le estremità piegate delle staffe siano rivolte l‘una verso
l‘altra in alto e in basso (destra/sinistra). Spingere le due estremità
superiori delle staffe nel tubo dall‘esterno, nella tasca superiore della
tela (D).
I due inferiori si appoggiano contro la carta da dietro (E).
Paralume rotondo
Inserire due dei supporti del paralume rotondo di carta, uno dopo
l‘altro, nei due gommini superiori dell‘elemento d‘illuminazione,
quindi sollevare con attenzione i supporti inferiori sopra la striscia
LED (F) e inserirli nei restanti gommini.
Cura
Pulire la lampada con un panno asciutto in microbra. Non usare
solventi o prodotti contenenti cloro.
Dati tecnici
100-240Volt~, 50- 60Hz., cosᵩ 0,6
Secondario 24 V, LED, max. 44W, 2800 K, CRI >90
Interruttore on-off a cavo e comando, dimmerabile
I LED hanno una durata di vita di 50.000 ore(dichiarazione delcostruttore).
L‘apparecchio contiene illuminanti LED della classe energetica A+. Il
modulo a LED non può essere sostituito dall‘utente.
Un lampada difettoso è da considerarsi un riuto elettrici e
non deve essere smaltito con i ri uti domestici.
Eventuali riparazioni possono essere eseguite esclusivamente da un
elettricista specializzato. Il cavo esterno, se danneggiato, può essere
sostituito soltanto dalla Ingo Maurer GmbH. In caso di danni causati
dall‘inosservanza delle presenti istruzioni d‘uso, da una messa in servizio
e/o da una modica costruttiva non corretta, ad es. a causa di componenti
estranei, manipolazione o interferenze esterne, Il diritto alla garanzia
decade.
Design by Sebastian Hepting 2020
①
②
③
①
②
③
❷ ❷
①
②
③
❷
①
②
③
❷

MOODMOON White Remote Control Instructions
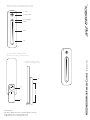
Bedienfeld Funktionen / Operating panel functions / Fonctions
du panneau de commande / Funzioni del pannello di controllo
Wechseln der Batterie / Changing the battery /
Remplacement de la batterie / Cambiare la batteria
CR2032
54 mm
CR2032
54 mm
CR2032
54 mm
CR2032
54 mm
Wandhalterung / Wall mounting /
montage mural / montaggio a parete
(1) LED
(2) ON / OFF
100%
(3) DIMMER
50%
1%
(4)
(5)
(6)
Stand April 2021
Ingo Maurer GmbH Kaiserstrasse 47 80801 München Germany
T +49 (0)89 381 606 0 F +49 (0)89 381 606 20
info@ingo-maurer.com www.ingo-maurer.com

Entfernen Sie vor der erster Benutzung die Kunststoffsicherung im Batteriefach (5).
Die Fernbedienung ist ab Werk bereits mit Ihrer Leuchte gekoppelt.
Bedienfeld Funktionen
(1) Funktions-LED, (2) An/Aus Schalter, (3) Helligkeitsregler, stufenlos dimmen durch
Berührung (1-100%).
Koppeln/Entkoppelt weiterer Leuchten
Sie können mehrer MOODMOON white Leuchten koppeln. Zusätzliche Leuchte am
Schnurschalter aus- und wieder anschalten. Auf der Fernbedienung, unmittelbar danach,
drei mal An/Aus (2) drücken. LED (1) blinkt bei erfolgreicher Kopplung drei mal. Zum
Entkoppeln, am Schnurschalter aus- und anschalten und auf der Fernbedienung fünf mal
An/Aus (2) drücken. LED (1) blinkt bei erfolgreicher Entkopplung fünf mal.
Wechseln der Batterie
Klappe (4) am Batteriefach öffnen und Batterie (5) ersetzen. Polung beachten! Siehe
Zeichnung (5), + Pol sichtbar.
Möglichkeiten zur Wandhalterung
Die Fernbedienung haftet an magnetischen Oberflächen. Die Wand- halterung (6)
kann mit den beiliegenden Schrauben oder Klebeband befestigt werden.
Sicherheitshinweise
Nur für den Gebrauch in Innenräumen; vor Nässe schützen. Gehen Sie vorsichtig
mit dem Produkt um. Durch Stöße, Schläge oder Fall bereits aus geringer Höhe wird
es beschädigt. Von Kleinkindern fernhalten. Entfernen Sie die Batterie, bei längerem
Nichtgebrauch, aus der Fernbedienung. Auslaufende oder beschädigte Batterien
können bei Hautkontakt Säureverätzungen hervorrufen. Beim Umgang mit defekten
Batterien sollten Sie daher Schutzhandschuhe tragen.
Technische Daten
3V DC, <5mA, Reichweite 30m, CR2032 Battery, IP20
Achten Sie darauf, dass Sie Ihre alten Batterien/Akkus, so wie es der
Gesetzgeber vorschreibt, an einer kommunalen Sammelstelle oder im
Handel vor Ort abgeben.
Batterien und Akkus dürfen in vielen Staaten nicht im Hausmüll entsorgt werden.
Der Nutzer ist zur Rückgabe gebrauchter Batterien und Akkus gesetzlich verpichtet.
Altbatterien können Schadstoffe enthalten, die bei nicht sachgemäßer Lagerung oder
Entsorgung die Umwelt oder Ihre Gesundheit schädigen können.
Batterien enthalten aber auch wichtige Rohstoffe wie z.B. Eisen, Zink, Mangan oder
Nickel und werden wieder verwertet. Die Abgabe ist für Sie kostenlos.
Gerne können Sie auch, die bei uns erworbenen Batterien/Akkus nach dem
Gebrauch an uns unentgeltlich zurückgeben.
Rücksendungen von Batterien/Akkus richten Sie bitte an die angegebene Anschrift.
Deutsch
Before using the remote control for the first time, remove the plastic protection in the
battery compartment (5). The remote control is already paired with your lamp at the
factory.
Operating panel functions
(1) Function LED, (2) On/Off switch, (3) Brightness control, infinitely variable dimming
by touch (1-100%).
Coupling/uncoupling additional luminaires
You can couple several MOODMOON white luminaires. Switch the additional lumi-
naire off and on again at the cord switch. Immediately afterwards, press On/Off (2)
three times on the remote control. LED (1) flashes three times when pairing is success-
ful. To uncouple, switch off and on the cord switch and press On/Off (2) five times on
the remote control. LED (1) flashes five times if uncoupling is successful.
Changing the battery
Changing the battery
Open the flap (4) on the battery compartment and replace the battery (5). Note the
polarity! See drawing (5), + pole visible.
Wall mounting options
The underside of the remote control adheres to magnetic surfaces. The wall bracket
(6) can be fixed with the enclosed screws or adhesive tape.
Safety instructions
For indoor use only; protect from moisture. Handle the product with care. It will be
damaged by bumps, knocks or falling even from a small height. Keep away from small
children. Remove the battery from the remote control if it will not be used for a long
time. Leaking or damaged batteries can cause acid burns if they come into contact
with the skin. You should therefore wear protective gloves when handling defective
batteries.
Technical data
3V DC, <5mA, Range 30m, CR2032 battery, IP20
Please make sure that you return your old batteries/rechargeable,
according to the legal regulations valid in your areas.
In many countries, batteries and rechargeable batteries may not be disposed of
in household waste. You might be legally obliged to return used batteries and
rechargeable batteries. Used batteries can contain harmful substances that can harm
the environment or your health if not stored or disposed of properly. Batteries also
contain important raw materials such as iron, zinc, manganese or nickel and are
recycled. In many countries, the disposal is free of charge for you. If you are based
in the European Union, you are also welcome to return the batteries/rechargeable
batteries purchased from us free of charge after use. Please return batteries/
rechargeable batteries to the address given below.
English
Retirez la protection en plastique du compartiment des piles (5) avant la première
utilisation. La télécommande est déjà appariée à votre lampe par réglage d‘usine.
Fonctions du panneau de commande
(1) LED de fonction, (2) Interrupteur marche/arrêt, (3) Contrôle de la luminosité,
gradation progressive par touche (1-100%).
Couplage/découplage d‘autres luminaires
Vous pouvez coupler plusieurs luminaires MOODMOON white. Éteignez et rallumez
le luminaire supplémentaire à l‘aide de l‘interrupteur du cordon. Appuyez trois fois sur
la touche On/Off (2) de la télécommande immédiatement après. La LED (1) clignote
trois fois si le jumelage est réussi. Pour désaccoupler, éteignez et allumez l‘interrupteur
du cordon et appuyez cinq fois sur la touche On/Off (2) de la télécommande. La LED
(1) clignote cinq fois si le désacouplage est réussi.
Remplacement de la batterie
Ouvrez le clapet (4) du compartiment de la batterie et remplacez la batterie (5).
Respectez la polarité ! Voir dessin (5), pôle + visible.
Options de montage mural
La télécommande adhère aux surfaces magnétiques. Le support mural (6) peut être
fixé à l‘aide des vis ou du ruban adhésif fournis.
Consignes de sécurité
A utiliser à l‘intérieur uniquement ; à protéger de l‘humidité. Manipulez le produit
avec précaution. Il sera endommagé par des chocs, des coups ou une chute, même
de faible hauteur. Tenir hors de portée des jeunes enfants. Retirez la pile de la
télécommande si elle n‘est pas utilisée pendant une longue période. Les batteries
qui fuient ou sont endommagées peuvent provoquer des brûlures par acide si elles
entrent en contact avec la peau. Vous devez donc porter des gants de protection
lorsque vous manipulez des piles défectueuses.
Données techniques
3V DC, <5mA, portée 30m, pile CR2032, IP20
Veillez à vous débarrasser de vos vieilles piles/batteries rechargeables
dans un point de collecte municipal ou dans un magasin local, comme le
prévoit la loi.
Les piles et les batteries rechargeables ne peuvent pas être jetées dans les ordures
ménagères, mais vous êtes légalement tenu de rapporter les piles et les batteries
rechargeables usagées. Les piles usagées peuvent contenir des substances nocives qui
peuvent nuire à l‘environnement ou à votre santé si elles ne sont pas stockées ou
éliminées correctement.Mais les piles contiennent également des matières premières
importantes comme le fer, le zinc, le manganèse ou le nickel et sont recyclées. La
mise à disposition est gratuite pour vous. Vous pouvez également nous retourner
gratuitement les piles achetées chez nous après utilisation. Veuillez renvoyer les piles/
batteries rechargeables à l‘adresse indiquée.
Français
Rimuovere la protezione in plastica nel vano batterie (5) prima del primo utilizzo.
Il telecomando è già abbinato alla tua lampada come impostazione di fabbrica.
Funzioni del pannello di controllo
(1) LED di funzione, (2) interruttore On/Off, (3) controllo della luminosità, dimmer
continuo a tocco (1-100%).
Accoppiamento/disaccoppiamento di altri apparecchi
È possibile accoppiare diversi apparecchi MOODMOON white. Spegnere e riaccen-
dere l‘apparecchio supplementare con l‘interruttore del cavo. Premi tre volte On/Off
(2) sul telecomando subito dopo. Il LED (1) lampeggia tre volte se l‘accoppiamento
è riuscito. Per disaccoppiare, spegnere e accendere l‘interruttore del cavo e premere
cinque volte On/Off (2) sul telecomando. Il LED (1) lampeggia cinque volte se il disac-
coppiamento è riuscito.
Cambiare la batteria
Aprire lo sportello (4) del vano batteria e sostituire la batteria (5). Prestare
attenzione alla polarità! Vedi disegno (5), polo + visibile.
Opzioni di montaggio a parete
Il telecomando aderisce alle superfici magnetiche. La staffa a muro (6) può essere
fissata usando le viti o il nastro adesivo forniti.
Idicazionii di sicurezza
Solo per uso interno; proteggere dall‘umidità. Maneggiare il prodotto con cura.
Verrebbe danneggiato da urti, colpi o cadute anche da altezze ridotte. Tenere lontano
dai bambini piccoli. Rimuovere la batteria dal telecomando se non viene utilizzato per
un lungo periodo. Le batterie che perdono liquido o danneggiate possono causare
ustioni da acido se entrano in contatto con la pelle. Dovreste quindi indossare guanti
protettivi quando maneggiate batterie difettose.
Dati tecnici
3V DC, <5mA, portata 30m, batteria CR2032, IP20
Assicuratevi di smaltire le vostre vecchie batterie/batterie ricaricabili in
un punto di raccolta comunale o in un negozio locale, come prescritto
dalla legge.
Le batterie e le batterie ricaricabili non possono essere smaltite nei riuti domestici,
ma si è obbligati per legge a restituire le batterie usate e le batterie ricaricabili.
Le batterie usate possono contenere sostanze nocive che possono danneggiare
l‘ambiente o la salute se non vengono conservate o smaltite correttamente.Ma le
batterie contengono anche importanti materie prime come ferro, zinco, manganese
o nichel e sono riciclate. Lo smaltimento è gratuito per voi. Siete inoltre invitati a
restituire gratuitamente le batterie acquistate da noi dopo l‘uso. Si prega di restituire
le batterie/batterie ricaricabili all‘indirizzo indicato.
Italiano
-
 1
1
-
 2
2
-
 3
3
-
 4
4


Ingo Maurer MOODMOON White Mode d'emploi
- Taper
- Mode d'emploi
dans d''autres langues
Documents connexes
-
Ingo Maurer Kokoro Mode d'emploi
-
-
-
-
-
-
-
-
-