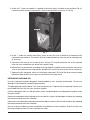
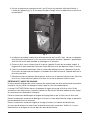
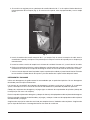
Hobart LXGePR(R) Glasswasher Le manuel du propriétaire
- Taper
- Le manuel du propriétaire

701 S. RIDGE AVENUE
TROY, OHIO 45374-0001
937 332-3000
www.hobartcorp.com
INS
TRUCCIONE
S
M
ODE
D’E
M
P
LOI
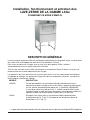
LXGe SERIES GLASSWASHER
LAVE-VERRE DE LA GAMME LXGe
LAVAVAJILLAS DE LA SERIE LXGe
MODELS
MODÈLES
MODELOS
LXGePR ML-130255
ML-130256
LXGeR ML-130257
ML-130258
FORM 47526 Rev. A (January 2015)
LXGe SERIES
GLASSWASHER
LAVE-VERRE
DE LA GAMME LXGe
LAVAVAJILLAS DE
LA SERIE LXGe

– 2 –
© HOBART CORPORATION, 2015

– 3 –
TABLE OF CONTENTS
GENERAL .........................................................................................................................................6
INSTALLATION .................................................................................................................................7
Unpacking ................................................................................................................................... 7
Location ......................................................................................................................................7
Leveling .......................................................................................................................................7
Water Requirements ...................................................................................................................7
Plumbing Connections ................................................................................................................ 8
Before First Use .........................................................................................................................8
Electrical Connection ..................................................................................................................9
Electrical Data .............................................................................................................................9
Connection Method ..................................................................................................................10
Detergent and Rinse Aid ...........................................................................................................11
Chemical Sanitizer (LXGePR) ...................................................................................................12
Checking Sanitizer Concentration ............................................................................................12
Deliming Solution ......................................................................................................................12
Priming Chemical Pumps .......................................................................................................... 13
Installation Diagram (LXGePR, short) ........................................................................................14
Installation Diagram (LXGePR, tall)............................................................................................15
Installation Diagram (LXGeR, short) ..........................................................................................16
Installation Diagram (LXGeR, tall) ..............................................................................................17
PROGRAMMING.............................................................................................................................18
Manager Mode Programming ...................................................................................................18
Programming Instructions .........................................................................................................18
Menu Display Prompts ..............................................................................................................18
LXGe advansys Manager Mode Programming Card .................................................................19
Parameters Menu Table ............................................................................................................21
OPERATION ....................................................................................................................................23
Operating the LXGeR Glasswasher ...........................................................................................23
Diagnostic/Error Messages .......................................................................................................24
Wash/Rinse Cycle Times (LXGePR and LXGeR) .......................................................................25
Preparation ..............................................................................................................................25
Do's and Don'ts For Your New Hobart Glasswasher ................................................................26
CLEANING ...................................................................................................................................... 27
MAINTENANCE ..............................................................................................................................28
Deliming ....................................................................................................................................28
Lubrication ................................................................................................................................28
TROUBLESHOOTING .....................................................................................................................29

– 4 –
TABLE DES MATIÈRES
DESCRIPTION GÉNÉRALE ............................................................................................................. 31
INSTALLATION ...............................................................................................................................32
Déballage ..................................................................................................................................32
Emplacement ............................................................................................................................32
Mise de niveau ..........................................................................................................................32
Besoins en eau ..........................................................................................................................32
Raccordements de plomberie ................................................................................................... 33
Avant la première utilisation ......................................................................................................34
Connexions électriques .............................................................................................................34
Données électriques .................................................................................................................34
Méthode de connexion .............................................................................................................35
Doseurs à détergent et aide au rinçage ....................................................................................36
Assainissement chimique (LXGePR) .........................................................................................37
Concentration de l’assainisseur chimique .................................................................................37
Solution de détartrage ..............................................................................................................37
Amorçage des doseurs chimiques ............................................................................................ 38
Schéma d’installation (LXGePR, petit) ......................................................................................39
Schéma d'installation (LXGePR, grand) ....................................................................................40
Schéma d’installation (LXGeR, petit) .........................................................................................41
Schéma d'installation (LXGeR, grand) .......................................................................................42
PROGRAMMATION ........................................................................................................................43
Programmation du mode de gestion .........................................................................................43
Instructions de programmation .................................................................................................43
Touches de navigation ..............................................................................................................43
Carte de programmation du mode de gestion du modèle LXGe Advansys ..............................44
Grille du menu des paramètres .................................................................................................46
UTILISATION ..................................................................................................................................48
Faire fonctionner le lave-verre LXGeR .......................................................................................48
Messages de diagnostics et d’erreurs ......................................................................................49
Durée des cycles de lavage/rinçage (LXGePR et LXGeR) .........................................................50
Préparation ...............................................................................................................................50
Choses À FAIRE et NE PAS FAIRE avec votre nouveau lave-verre Hobart ............................... 51
NETTOYAGE ...................................................................................................................................52
ENTRETIEN .....................................................................................................................................53
Détartrage .................................................................................................................................53
Lubrication ..............................................................................................................................53
DÉPANNAGE ..................................................................................................................................54

– 5 –
ÍNDICE
GENERAL .......................................................................................................................................56
INSTALACIÓN.................................................................................................................................57
Desempaque ............................................................................................................................. 57
Ubicación .................................................................................................................................. 57
Nivelación .................................................................................................................................57
Requisitos de agua ...................................................................................................................57
Conexiones de plomería ...........................................................................................................58
Antes del primer uso .................................................................................................................59
Conexión eléctrica ....................................................................................................................59
Datos eléctricos ........................................................................................................................59
Método de conexión .................................................................................................................60
Detergente y enjuague ..............................................................................................................61
Desinfectante químico (LXGePR) .............................................................................................62
Revisión de la concentración del desinfectante ....................................................................... 62
Solución para descalcicar .......................................................................................................62
Llenado de las bombas de químicos ........................................................................................63
Diagrama de instalación (LXGePR, pequeño) ...........................................................................64
Diagrama de instalación (LXGePR, grande) .............................................................................65
Diagrama de instalación (LXGeR, pequeño) ..............................................................................66
Diagrama de instalación (LXGeR, grande) .................................................................................67
PROGRAMACIÓN ...........................................................................................................................68
Programación en modo de Administrador ................................................................................68
Instrucciones de programación .................................................................................................68
Indicaciones en la pantalla del menú ........................................................................................68
Tarjeta de programación, modo de Administrador advansys LXGe ..........................................69
Tabla del menú de parámetros .................................................................................................. 71
OPERACIÓN ...................................................................................................................................73
Operación del lavavajillas LXGeR ..............................................................................................73
Mensajes de error/diagnóstico ..................................................................................................74
Tiempos del ciclo de lavado/enjuague (LXGePR y LXGeR) .......................................................75
Preparación ..............................................................................................................................75
Qué hacer y qué no hacer con su nuevo lavavajillas Hobart .....................................................76
LIMPIEZA ........................................................................................................................................77
MANTENIMIENTO ...........................................................................................................................78
Descalcicación ........................................................................................................................78
Lubricación ...............................................................................................................................78
SOLUCIÓN DE PROBLEMAS .........................................................................................................79

– 6 –
Installation, Operation and Care of
LXGe SERIES GLASSWASHERS
SAVE THESE INSTRUCTIONS
GENERAL
The LXGe Series glasswashers are fully automatic and front-loading. The LXGe series glasswashers
are capable of doing 24 to 38 racks per hour, depending on model.
All LXGe Series glasswashers shut down automatically 4 hours after last use to conserve energy.
The LXGeR glasswashers include Sense-A-Temp™ to insure proper hot water temperature during rinse.
Standard equipment includes one glass/wine rack, electronic controls, drain pump, rinse pump, chemical
pumps, ll hose, and drain hose.
MODEL DESCRIPTION
LXGePR Fresh water rinse; low-temperature, chemical-sanitizing models for use
with 6% sodium hypochlorite solution (bleach) as the sanitizing agent*.
Note: If 8.40% bleach is to be used, contact Hobart Service or your
chemical supplier to change the sanitizer pump settings. (Charges may
apply)
LXGeR Fresh water rinse with an internal energy recovery unit and a built-in 70°F
rise booster heater. Recommended incoming water temperature 55°F to
80°F.
* - Sanitizing agent must be used in accordance with the EPA-registered label use instructions.

– 7 –
INSTALLATION
UNPACKING
Immediately after unpacking the glasswasher, check for possible shipping damage. If this machine
is found to be damaged, save packaging material and contact the carrier within 15 days of delivery.
LOCATION
Prior to installation, verify that the electrical supply agrees with the specications on the machine data
plate, which is located on the top of the door.
Steam generated from normal operation may escape from the door. Wood, laminates, veneers, etc. are
unsuitable materials for use in areas exposed to glasswasher steam and detergents. Stainless steel
or other moisture-resistant shields are recommended for surfaces adjacent to LXGe sides and top.
LEVELING
The machine must be level to operate properly. Place the glasswasher in its operating location. Level
the machine before any connections are made. Using a carpenter's level placed diagonally on the
rack tracks, level the machine front to back and side to side by threading the adjustable feet in or out.
WATER REQUIREMENTS
Proper water quality can improve glass washing performance by reducing spotting, enhancing
effectiveness of labor and extending equipment life. Water conditions vary from one location to another.
The recommended proper water treatment for effective and efcient use of this equipment will also
vary depending on the local water conditions. Ask your municipal water supplier for details about your
local water conditions prior to installation.
Recommended water hardness is 3 grains of hardness per gallon or less. Higher hardness may cause
excessive formation of lime scale. Water hardness above 3 grains per gallon requires water treatment.
Water treatment has been shown to reduce costs associated with machine cleaning, reduce deliming
of the glasswasher, and reduce detergent usage in the glasswasher.
High iron levels in the water supply can cause staining and may require an iron lter. High
chloride levels in the water supply can cause pitting and may require a chloride removal system. Contact
your local water treatment professional for proper water treatment.
Sediment may require a particulate lter. Dissolved solids may require water treatment such as a water
softener, reverse osmosis system, etc. Contact your local water treatment professional for proper water
treatment.
If an inspection of the glasswasher or booster heater reveals lime buildup after the equipment has been
in service, water treatment is recommended. If a water softener is already in place, ensure there is a
sufcient level of salt. Contact your local Hobart Service ofce for specic recommendations.

– 8 –
A water hammer arrestor (meeting ASSE-1010 Standard or equivalent) should be installed (supplied
by others) in the common water supply line at the service connection.
The plumber connecting this machine is responsible for making certain that water lines are THOROUGHLY
FLUSHED OUT BEFORE connecting to the glasswasher. This "ush-out" is necessary to remove all
foreign matter, such as chips (resulting from cutting or threading of pipes) pipe joint compound from the
lines; or, if soldered ttings are used, bits of solder or cuttings from the tubing. Debris, if not removed,
may lodge in the glasswasher's plumbing components and render them inoperative. Manual valves
or solenoid valves fouled by foreign matter and any expenses resulting from this fouling are NOT the
responsibility of the manufacturer and associated repair costs are not covered under warranty.
Water supply requirements are as follows:
MODEL TEMPERATURE
LXGePR 120°F Minimum
LXGeR 55°F Minimum, 85°F Maximum
NOTE: On LXGeR installations, if cold water supply temperature is consistently above 80°F or if excessive
water vapor or steam is entering the room after the condensing cycle is complete, contact Hobart Service
to increase condensing time.
Required owing water pressure to the glasswasher is 15-65 PSIG. If pressures higher than 65 PSIG are
present, a pressure regulating valve must be installed in the water line to the glasswasher (by others).
If owing pressure is less than 15 psi, improper machine operation may result. All LXGe glasswashers
are equipped with a pumped rinse system; therefore, a water pressure gauge is not required and is
not supplied with the machine.
The water pressure regulator must have a relief bypass. Failure to use the proper type
of pressure regulator may result in damage to the unit.
A manual shutoff valve (not supplied) should be installed upstream of the ll hose to accommodate
servicing the machine.
It is recommended that a line strainer (not supplied) be installed in the supply line between the manual
shutoff valve (not supplied) and the connection point on the machine. Make plumbing connections with
1⁄2" minimum copper piping OD (3⁄4" recommended), with a 3⁄4" male garden hose tting (not supplied).
See installation diagrams, pages 14-17.
PLUMBING CONNECTIONS
Plumbing connections must comply with applicable sanitary, safety, and plumbing
codes.
Drain
A drain hose, 5⁄8" inside diameter and 6' long, is provided. This should be securely plumbed into a
drain. Use care not to kink hose. See installation diagrams, pages 14-17. Drain must have a minimum
ow capacity of 5 gallons per minute.
BEFORE FIRST USE
This machine must be cleaned after installation and before being put into operation. (See Cleaning)

– 9 –
ELECTRICAL CONNECTION
Electrical and grounding connections must comply with the applicable portions of
the National Electrical Code and/or other local electrical codes.
Disconnect the electrical power to the machine and follow lockout/tagout procedures.
ELECTRICAL DATA
Complied in accordance with the National Electrical Code NFPA-70, latest addition.
For supply connections, use copper wire only rated at 90°C minimum.
*The (3W) systems require three power wires that include a current carrying neutral. An additional
fourth wire must be provided for machine ground.
Refer to the top of the door of the machine and the electrical label on the back side of the lower front
panel for proper selection.
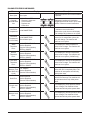
ledoM esahP/ztreH/stloV tiucriCylppuSmuminiM
yticapmArotcudnoC
evitcetorPmumixaM
yticapmAeciveD
LXGePR 1/06/021
LXGeR
20 20
40 40120/208-240(3W)/60/1*

– 10 –
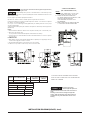
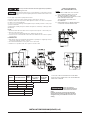
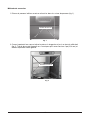
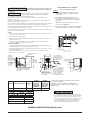
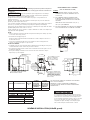
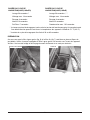
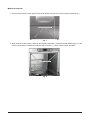
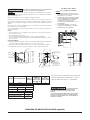
Connection Method
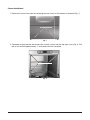
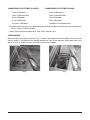
1. Remove the lower front panel by removing the two screws at the bottom of the panel (Fig. 1).
Fig. 1
2. Open door of glasswasher and remove the two left screws and the top right screw (Fig. 2). Pull
top of unit forward approximately 1” and remove the left side panel.
Fig. 2
REMOVE TWO SCREWS
REMOVE THREE SCREWS

– 11 –
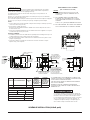
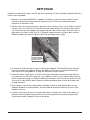
3. A hole for 1” trade size conduit is supplied at the lower right in the back of the machine (Fig. 3).
If necessary due to space requirements, remove the knockout and use a 45° tting.
Fig. 3
4. Install 1” trade size conduit and tting. Leave at least four feet of electrical line between wall
connection and machine. This allows machine to be pulled away from the wall for cleaning and/
or servicing.
5. Feed wires thru base of unit to front of unit. At least 24” and not more than 28” of the required
wire size must extend from the end of the conduit tting.
6. Make electrical connections according to wiring diagram supplied with the machine and secure
wires to the machine service connection. Keep excess wire in the base of the unit to a minimum.
7. Replace the left side panel, top of unit, and lower front panel. Re-install the three screws located
behind the door and the two screws at the bottom of the front panel.
DETERGENT AND RINSE AID
Use only commercial-grade detergents recommended by your chemical professional. Do not use
detergents formulated for residential glasswashers.
The detergent and rinse aid pump "ON" times are factory-set. If adjustments are required, contact your
local Hobart Service Ofce or your chemical supplier.
Place the detergent and rinse aid containers (which are obtained from an independent supplier) under
the glasswasher.
Remove the detergent bottle cap and put the red delivery tube in the detergent container by snapping
the bottle connector onto the container.
Remove the rinse aid bottle cap and place the blue delivery tube in the rinse aid container by snapping
the bottle connector onto the container.
Be sure to push the delivery tubes completely to the bottom of each container. Check to make sure
there are no obstructions or kinks in the delivery tubes.
KNOCKOUT

– 12 –
CHEMICAL SANITIZER (LXGePR)
Items such as pewter, aluminum and silver will be attacked by sodium hypochlorite
(bleach). Therefore, chemical-sanitizing glasswashers should not be used to wash such items.
The LXGePR chemical sanitizer pump is factory-set for use with 6% sodium hypochlorite solution.
If 8.40% sodium hypochlorite solution is to be used, contact your local Hobart Service Ofce.
On LXGePR models, place a sanitizer approved for potable water rinse machines under the glasswasher
no higher than 10 inches off the oor. Do not pre-mix sanitizing solution with water or any other liquid.
Never premix a wetting agent with the sanitizing solution. Mixing may cause
hazardous gas to form.
Remove the sanitizer bottle cap and place the white delivery tube in the sanitizer container by snapping
the bottle connector onto the container. Be sure to push the delivery tube completely to the bottom of the
container. Check to make sure there are no obstructions or kinks in the delivery tube.
Frequently check your sanitizer bottle to make sure there is a sufcient chemical supply.
CHECKING SANITIZER CONCENTRATION
Verify there is sufcient chemical supply in the sanitizer bottle and that the delivery tube standpipe is
inserted completely to the bottom of the chemical container. Place a glass rack, with glasses, in the
machine.
On LXGePR models, the PuriRinse feature must be deactivated to properly check the sanitizer concentration.
To deactivate PuriRinse, press and hold the WASH key for ve seconds until wash cycle starts.
Follow the directions precisely that are on the litmus paper vial and test the water on the surface of the
bottom of the glasses. Concentration should be 50 p.p.m. minimum to 100 p.p.m. maximum.
If reading is incorrect, contact your local Hobart Service Ofce or chemical provider for adjustments.
DELIMING SOLUTION
All LXGePR and LXGeR models are equipped with an automatic deliming system. At installation, a
qualied Hobart Service technician or your chemical supplier must adjust the total water hardness
setting to properly set the delime intervals.
Remove the deliming agent bottle cap and put the black delivery tube in the container by snapping the
bottle connector onto the container.
Be sure to push the delivery tube completely to the bottom of the container. Check to make sure there
are no obstructions or kinks in the delivery tube.

– 13 –
PRIMING CHEMICAL PUMPS
When a chemical becomes empty, the priming operation starts automatically the next time the machine
is turned on or a wash cycle is started. Note that the initial prime time for all pumps (Detergent, Rinse
Agent, and Sanitizer) is 60 seconds. If the chemical is not sensed within 60 seconds, the add chemical
indicator will ash. After the chemical is sensed, the indicator in the display turns off; and the pump
continues to prime for 10 seconds to allow the chemicals to reach the machine. If all chemicals are
empty, the sanitizer will prime rst followed by detergent. Only one chemical pump will run at a time.
If chemicals are not sensed after three consecutive priming operations, the add chemical indicator will
ash and priming is cancelled. The next time a wash cycle is started, the add chemical indicator will
continue to ash. Verify that the chemical bottles are not empty and that the delivery tubes are inserted
completely to the bottom of the containers.
The priming operation can be reset by turning the glasswasher off, then back on.
If the chemical bottles are not empty and the delivery tubes are inserted correctly, then the chemical
sensor or pumps may have malfunctioned; contact your local Hobart Service Ofce.

– 14 –
Do not pre-mix other chemicals and sodium hypochlorite (liquid bleach).
Mixing may cause hazardous gas to form.
Required owing water pressure to the dishmachine is 15-65 PSIG. If pressures
higher than 65 PSIG are present, a pressure regulating valve must be installed in the water line to the
dishmachine (by others).
Pressure guage not provided on pumped rinse machines.
Important: The chemical containers should be placed no higher than 16" above oor.
If chemical containers are to be placed in cabinet adjacent to machine, a 1/2" dia. hole is required in
the cabinet to run chemical supply line.
Use only 6% or 8.4% sodium hypochlorite (liquid bleach) as sanitizing chemical to insure proper
operation of dishmachine.
Certain materials including silver plate, aluminum and pewter are attacked by sodium hypochlorite
(liquid bleach).
NOTES:
1. All vertical machine dimensions taken from oor may be increased by .875" or decreased by .375".
2. Moist air escapes from the door.
Use only moisture resistant materials adjacent to dishmachine sides and top.
3. A vent hood is not recommended above the undercounter dishmachine since it does not produce
excessive vapors.
PLUMBING NOTES:
1. Water hammer arrestor (meeting ASSE-1010 standard or equivalent) to be supplied (by others) in
common water supply line at service connection.
2. Recommended water hardness to be 3 grains or less for best results.
3. If drain hose is looped above a sink, the loop must not exceed 44" AFF.
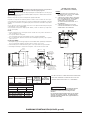
CONNECTION INFORMATION
(AFF = ABOVE FINISHED FLOOR)
LEGEND
E1 ELECTRICAL CONNECTION: 1-3/8" DIA. HOLE
FOR 1" TRADE SIZE CONDUIT; 10-5/8" AFF.
P1 SINGLE FILL AND RINSE CONNECTION:
3/4" FEMALE GARDEN HOSE FITTING ON 6' LONG
HOSE SUPPLIED WITH MACHINE;
120°F WATER MIN. FOR LXGePR, 140°F
RECOMMENDED.
P2 DRAIN CONNECTION: 5/8" BARB FITTING WITH
6' LONG HOSE SUPPLIED WITH MACHINE.
MODEL VOLTS/HERTZ/PHASE RATED
AMPS
MIN SUPPLY
CKT CONDUCT
AMPACITY
MAX
PROTECTIVE
DEVICES
LXGePR 120/60/1 15.4 20 20
HEAT OUTPUT, BTU/HR
MODEL LATENT SENSIBLE
LXGePR 1900 800
SHIPPING WEIGHTS LXGePR
NET WEIGHT OF MACHINE 150 LBS
DOMESTIC SHIPPING WEIGHT 170 LBS
ACCESSORY CORD KITS AVAILABLE FOR ALL MACHINES
NOTE: FOR SUPPLY CONNECTIONS, USE COPPER WIRE ONLY
RATED AT 90°C MINIMUM.
Electrical and grounding
connections must comply with the applicable portions of
the National Electrical Code and/or other local electrical
codes.
Plumbing connections must comply with applicable
sanitary, safety and plumbing codes. Drain and ll line
congurations vary, some methods are shown on this
drawing.
INSTALLATION DIAGRAM (LXGePR, short)

– 15 –
Do not pre-mix other chemicals and sodium hypochlorite (liquid bleach).
Mixing may cause hazardous gas to form.
Required owing water pressure to the dishmachine is 15-65 PSIG. If pressures
higher than 65 PSIG are present, a pressure regulating valve must be installed in the water line to the
dishmachine (by others).
Pressure guage not provided on pumped rinse machines.
Important: The chemical containers should be placed no higher than 24" above oor.
If chemical containers are to be placed in cabinet adjacent to machine, a 1/2" dia. hole is required in
the cabinet to run chemical supply line.
Use only 6% or 8.4% sodium hypochlorite (liquid bleach) as sanitizing chemical to insure proper
operation of dishmachine.
Certain materials including silver plate, aluminum and pewter are attacked by sodium hypochlorite
(liquid bleach).
NOTES:
1. All vertical machine dimensions taken from oor may be increased by .875" or decreased by .375".
2. Moist air escapes from the door.
Use only moisture resistant materials adjacent to dishmachine sides and top.
3. A vent hood is not recommended above the undercounter dishmachine since it does not produce
excessive vapors.
PLUMBING NOTES:
1. Water hammer arrestor (meeting ASSE-1010 standard or equivalent) to be supplied (by others) in
common water supply line at service connection.
2. Recommended water hardness to be 3 grains or less for best results.
3. If drain hose is looped above a sink, the loop must not exceed 51" AFF.
CONNECTION INFORMATION
(AFF = ABOVE FINISHED FLOOR)
LEGEND
E1 ELECTRICAL CONNECTION: 1-3/8" DIA. HOLE
FOR 1" TRADE SIZE CONDUIT; 18-1/8" AFF.
P1 SINGLE FILL AND RINSE CONNECTION:
3/4" FEMALE GARDEN HOSE FITTING ON 6' LONG
HOSE SUPPLIED WITH MACHINE;
120°F WATER MIN. FOR LXGePR, 140°F
RECOMMENDED.
P2 DRAIN CONNECTION: 5/8" BARB FITTING WITH
6' LONG HOSE SUPPLIED WITH MACHINE.
MODEL VOLTS/HERTZ/PHASE RATED
AMPS
MIN SUPPLY
CKT CONDUCT
AMPACITY
MAX
PROTECTIVE
DEVICES
LXGePR 120/60/1 15.4 20 20
HEAT OUTPUT, BTU/HR
MODEL LATENT SENSIBLE
LXGePR 1900 800
SHIPPING WEIGHTS LXGePR
NET WEIGHT OF MACHINE 150 LBS
DOMESTIC SHIPPING WEIGHT 170 LBS
ACCESSORY CORD KITS AVAILABLE FOR ALL MACHINES
NOTE: FOR SUPPLY CONNECTIONS, USE COPPER WIRE ONLY
RATED AT 90°C MINIMUM.
Electrical and grounding
connections must comply with the applicable portions of
the National Electrical Code and/or other local electrical
codes.
Plumbing connections must comply with applicable
sanitary, safety and plumbing codes. Drain and ll line
congurations vary, some methods are shown on this
drawing.
INSTALLATION DIAGRAM (LXGePR, tall)

– 16 –
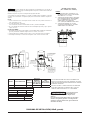
Required owing water pressure to the dishmachine is 15-65 PSIG. If pressures
higher than 65 PSIG are present, a pressure regulating valve must be installed in the water line to the
dishmachine (by others).
Pressure gauge not provided on pumped rinse machines.
If chemical containers are to be placed in cabinet adjacent to machine, a 1/2" dia. hole is required in
the cabinet to run chemical supply line.
NOTES:
1. All vertical machine dimensions taken from oor may be increased by .875" or decreased by .375".
2. Moist air escapes from the door.
Use only moisture resistant materials adjacent to dishmachine sides and top.
3. A vent hood is not recommended above the undercounter dishmachine since it does not produce
excessive vapors.
PLUMBING NOTES:
1. Water hammer arrestor (meeting ASSE-1010 standard or equivalent) to be supplied (by others) in
common water supply line at service connection.
2. Recommended water hardness to be 3 grains or less for best results.
3. If drain hose is looped above a sink, the loop must not exceed 44" AFF.
CONNECTION INFORMATION
(AFF = ABOVE FINISHED FLOOR)
LEGEND
E1 ELECTRICAL CONNECTION: 1-3/8" DIA. HOLE
FOR 1" TRADE SIZE CONDUIT; 10-5/8" AFF.
P1 SINGLE FILL AND RINSE CONNECTION:
3/4" FEMALE GARDEN HOSE FITTING ON 6' LONG
HOSE SUPPLIED WITH MACHINE;
55-85°F (COLD) RECOMMENDED FOR LXGeR.
P2 DRAIN CONNECTION: 5/8" BARB FITTING WITH
6' LONG HOSE SUPPLIED WITH MACHINE.
MODEL VOLTS/HERTZ/PHASE RATED
AMPS
MIN SUPPLY
CKT CONDUCT
AMPACITY
MAX
PROTECTIVE
DEVICES
LXGeR 120/208-240(3W)/60/1* 30.5 40 40
HEAT OUTPUT, BTU/HR
MODEL LATENT SENSIBLE
LXGeR 1100 2000
SHIPPING WEIGHTS LXGeR
NET WEIGHT OF MACHINE 165 LBS
DOMESTIC SHIPPING WEIGHT 185 LBS
* THIS SYSTEM REQUIRES THREE POWER WIRES WHICH INCLUDES
A CURRENT CARRYING NEUTRAL, AN ADDITIONAL FOURTH WIRE
MUST BE PROVIDED FOR MACHINE GROUND.
ACCESSORY CORD KITS AVAILABLE FOR ALL MACHINES
NOTE: FOR SUPPLY CONNECTIONS, USE COPPER WIRE ONLY
RATED AT 90°C MINIMUM.
Electrical and grounding
connections must comply with the applicable portions of
the National Electrical Code and/or other local electrical
codes.
Plumbing connections must comply with applicable
sanitary, safety and plumbing codes. Drain and ll line
congurations vary, some methods are shown on this
drawing.
INSTALLATION DIAGRAM (LXGeR, short)

– 17 –
Required owing water pressure to the dishmachine is 15-65 PSIG. If pressures
higher than 65 PSIG are present, a pressure regulating valve must be installed in the water line to the
dishmachine (by others).
Pressure gauge not provided on pumped rinse machines.
If chemical containers are to be placed in cabinet adjacent to machine, a 1/2" dia. hole is required in
the cabinet to run chemical supply line.
NOTES:
1. All vertical machine dimensions taken from oor may be increased by .875" or decreased by .375".
2. Moist air escapes from the door.
Use only moisture resistant materials adjacent to dishmachine sides and top.
3. A vent hood is not recommended above the undercounter dishmachine since it does not produce
excessive vapors.
PLUMBING NOTES:
1. Water hammer arrestor (meeting ASSE-1010 standard or equivalent) to be supplied (by others) in
common water supply line at service connection.
2. Recommended water hardness to be 3 grains or less for best results.
3. If drain hose is looped above a sink, the loop must not exceed 51" AFF.
CONNECTION INFORMATION
(AFF = ABOVE FINISHED FLOOR)
LEGEND
E1 ELECTRICAL CONNECTION: 1-3/8" DIA. HOLE
FOR 1" TRADE SIZE CONDUIT; 18-1/8" AFF.
P1 SINGLE FILL AND RINSE CONNECTION:
3/4" FEMALE GARDEN HOSE FITTING ON 6' LONG
HOSE SUPPLIED WITH MACHINE;
55-85°F (COLD) RECOMMENDED FOR LXGeR.
P2 DRAIN CONNECTION: 5/8" BARB FITTING WITH
6' LONG HOSE SUPPLIED WITH MACHINE.
MODEL VOLTS/HERTZ/PHASE RATED
AMPS
MIN SUPPLY
CKT CONDUCT
AMPACITY
MAX
PROTECTIVE
DEVICES
LXGeR 120/208-240(3W)/60/1* 30.5 40 40
HEAT OUTPUT, BTU/HR
MODEL LATENT SENSIBLE
LXGeR 1100 2000
SHIPPING WEIGHTS LXGeR
NET WEIGHT OF MACHINE 165 LBS
DOMESTIC SHIPPING WEIGHT 185 LBS
* THIS SYSTEM REQUIRES THREE POWER WIRES WHICH INCLUDES
A CURRENT CARRYING NEUTRAL, AN ADDITIONAL FOURTH WIRE
MUST BE PROVIDED FOR MACHINE GROUND.
ACCESSORY CORD KITS AVAILABLE FOR ALL MACHINES
NOTE: FOR SUPPLY CONNECTIONS, USE COPPER WIRE ONLY
RATED AT 90°C MINIMUM.
Electrical and grounding
connections must comply with the applicable portions of
the National Electrical Code and/or other local electrical
codes.
Plumbing connections must comply with applicable
sanitary, safety and plumbing codes. Drain and ll line
congurations vary, some methods are shown on this
drawing.
INSTALLATION DIAGRAM (LXGeR, tall)

– 18 –
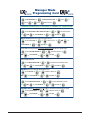
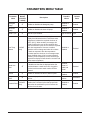
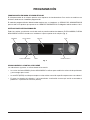
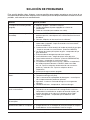
PROGRAMMING
MANAGER MODE PROGRAMMING
The LXGe series glasswasher’s microprocessor allows customization options for machine operation.
To activate or change these features, the programming edit mode must be entered.
The manager programming mode requires a MANAGER CODE to be entered to access the options
listed in the PARAMETERS MENU. The manager code is 1001.
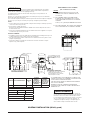
PROGRAMMING INSTRUCTIONS
All customization is performed through the on-screen menu using the UP Arrow, MENU/DOWN Arrow,
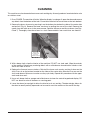
and the ENT keys located on the keypad at the top of the machine (Fig. 4).
Fig. 4
MENU DISPLAY PROMPTS
The following prompts are used inside the menus:
• The UP arrow and MENU/DOWN arrow keys are used to change parameter values and to navigate
the menu.
• The ENT key is used to accept a value, to perform a specied action, or to enter a submenu.
• The text just to the right of the '>' symbol on the display screen shows what action or command
will occur if the ENT key is pressed.

– 19 –
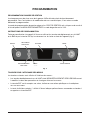
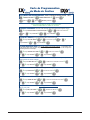
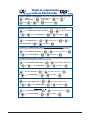
Manager Mode
Programming Card
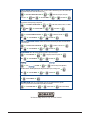
CHANGING PARAMETERS ENTER MANAGER SECURITY CODE: 1001
➜ MANAGER MENU ➜ ➜ ENTER SECURITY CODE ➜ (for 1) ➜
(for 0)
➜ (for 1) Edit Parameters
CHANGING PARAMETERS IS REQUIRED TO CHANGE ALL CODES BELOW
CHEMICAL PUMP enable or disable the detergent pump or rinse aid pump.
➜ until DETERGENT PUMP or RINSE AID PUMP ➜ ➜ to enable or disable
➜ OR ➜ until EXIT MENU ➜ ➜ until EXIT ➜
WASH CYCLE allows the customization of total run time.
➜until CYCLE TIME ➜ ➜ to choose cycle,
➜OR ➜
until EXIT MENU ➜ ➜ until EXIT ➜
LOW TEMP ALARMS for hot machines only: (parameter) enables or disables alert indicating
that the final rinse temperature has been below the minimum temperature for a period of time.
➜ until LOW TEMP ALARMS ➜ ➜ to enable or disable ➜
OR ➜ until EXIT MENU ➜ ➜ until EXIT ➜
WASH ARM ALARM enables or disables an alarm that alerts the operator that the wash arms
may be clogged or blocked.
➜ until WASH ARM ALARM ➜ ➜ to disable, Visual, or Audio & Visual
➜ OR ➜ until EXIT MENU ➜ ➜ until EXIT ➜
DELIME enables or disables the delime reminder alert.
➜ until DELIME ➜ ➜ to enable or disable ➜
OR ➜ until EXIT MENU ➜ ➜ until EXIT ➜
TEMPERATURE UNITS allows the choice of Fahrenheit or Celsius.
➜ until TEMPERATURE UNITS ➜ ➜ to choose Fahrenheit or Celsius
➜ OR ➜ until EXIT MENU ➜ ➜ until EXIT ➜
POTABLE RINSE for cold machines only enables or disables the potable water rinse option.
➜ until POTABLE RINSE ➜ ➜ to enable or disable ➜
OR ➜ until EXIT MENU ➜ ➜ until EXIT ➜
UNDERCOUNTER

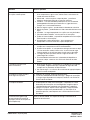
– 20 –
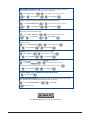
DIRTY WATER INDICATOR disables or gives a choice of how many cycles the machine will
run between dirty water alert and refresh cycles.
➜ until DIRTY WATER INDICATOR ➜ ➜ to Disable, 20 cycles, 40 cycles,
or 60 cycles ➜ OR ➜ until EXIT MENU ➜ ➜ until EXIT ➜
ENERGY SAVER MODE disables or gives choice of how many hours before the unit will
stay on before entering energy saving mode.
➜ until ENERGY SAVING MODE ➜ ➜ to Disabled, 1 Hour, 2 Hours, or 3 Hours
➜ OR ➜ until EXIT MENU ➜ ➜ until EXIT ➜
ADD CHEMICAL ALERT enable or disable the audio alert of missing chemicals.
➜ until ADD CHEM AUDIO ALERT ➜ ➜ to enable or disable ➜
OR ➜ until EXIT MENU ➜ ➜ until EXIT ➜
END CYCLE AUDIO ALERT enable or disable the unit creating an audio alert at the end of
each wash cycle.
➜ until END CYCLE AUDIO ALERT ➜ ➜ to enable or disable ➜
OR ➜ until EXIT MENU ➜ ➜ until EXIT ➜
LANGUAGE allows the choice of English, French or Spanish language.
➜ until LANGUAGE ➜ ➜ to English, French or Spanish
➜
OR ➜ until EXIT MENU ➜ ➜ until EXIT ➜
BUTTON allows the customization of the button to be used for a variety
of options.
➜ until BUTTON ➜ ➜ to: Clean Sump, One Light Wash,
One Normal Wash, One Heavy Wash (LXe only), Run Delime Cycle, or Energy Saver
until EXIT MENU ➜ ➜ until EXIT ➜
EXIT MENU TO MAIN MANAGER MENU
➜ until EXIT MENU ➜
DELIME NOW allows for a single delime cycle to be run from the menu at anytime.
Note: this operation takes 20-45 minutes depending on conditions.
➜ until DELIME NOW ➜ ➜ to YES or NO ➜ (this will exit menu)
➜
OR ➜
701 South Ridge Avenue, Troy, OH 45374-0001
La page charge ...
La page charge ...
La page charge ...
La page charge ...
La page charge ...
La page charge ...
La page charge ...
La page charge ...
La page charge ...
La page charge ...
La page charge ...
La page charge ...
La page charge ...
La page charge ...
La page charge ...
La page charge ...
La page charge ...
La page charge ...
La page charge ...
La page charge ...
La page charge ...
La page charge ...
La page charge ...
La page charge ...
La page charge ...
La page charge ...
La page charge ...
La page charge ...
La page charge ...
La page charge ...
La page charge ...
La page charge ...
La page charge ...
La page charge ...
La page charge ...
La page charge ...
La page charge ...
La page charge ...
La page charge ...
La page charge ...
La page charge ...
La page charge ...
La page charge ...
La page charge ...
La page charge ...
La page charge ...
La page charge ...
La page charge ...
La page charge ...
La page charge ...
La page charge ...
La page charge ...
La page charge ...
La page charge ...
La page charge ...
La page charge ...
La page charge ...
La page charge ...
La page charge ...
La page charge ...
-
 1
1
-
 2
2
-
 3
3
-
 4
4
-
 5
5
-
 6
6
-
 7
7
-
 8
8
-
 9
9
-
 10
10
-
 11
11
-
 12
12
-
 13
13
-
 14
14
-
 15
15
-
 16
16
-
 17
17
-
 18
18
-
 19
19
-
 20
20
-
 21
21
-
 22
22
-
 23
23
-
 24
24
-
 25
25
-
 26
26
-
 27
27
-
 28
28
-
 29
29
-
 30
30
-
 31
31
-
 32
32
-
 33
33
-
 34
34
-
 35
35
-
 36
36
-
 37
37
-
 38
38
-
 39
39
-
 40
40
-
 41
41
-
 42
42
-
 43
43
-
 44
44
-
 45
45
-
 46
46
-
 47
47
-
 48
48
-
 49
49
-
 50
50
-
 51
51
-
 52
52
-
 53
53
-
 54
54
-
 55
55
-
 56
56
-
 57
57
-
 58
58
-
 59
59
-
 60
60
-
 61
61
-
 62
62
-
 63
63
-
 64
64
-
 65
65
-
 66
66
-
 67
67
-
 68
68
-
 69
69
-
 70
70
-
 71
71
-
 72
72
-
 73
73
-
 74
74
-
 75
75
-
 76
76
-
 77
77
-
 78
78
-
 79
79
-
 80
80


Hobart LXGePR(R) Glasswasher Le manuel du propriétaire
- Taper
- Le manuel du propriétaire
dans d''autres langues
Documents connexes
Autres documents
-
Casselin CLV40PV Manuel utilisateur
-
-
-
-
-
-
-
-
Sammic SV-21 Manuel utilisateur
-
Hatco S, C, MC Series Le manuel du propriétaire