AEG LTX7E7221EM Manuel utilisateur
- Catégorie
- Machines à laver
- Taper
- Manuel utilisateur


CONTENTS
1. SAFETY INFORMATION......................................................................................3
2. SAFETY INSTRUCTIONS.................................................................................... 4
3. PRODUCT DESCRIPTION...................................................................................6
4. TECHNICAL DATA............................................................................................... 7
5. INSTALLATION.....................................................................................................8
6. CONTROL PANEL..............................................................................................11
7. PROGRAMME CHART.......................................................................................13
8. OPTIONS............................................................................................................17
9. SETTINGS.......................................................................................................... 19
10. BEFORE FIRST USE........................................................................................20
11. DAILY USE....................................................................................................... 20
12. HINTS AND TIPS..............................................................................................24
13. CARE AND CLEANING.................................................................................... 26
14. TROUBLESHOOTING......................................................................................29
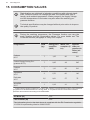
15. CONSUMPTION VALUES................................................................................32
16. QUICK GUIDE.................................................................................................. 33
FOR PERFECT RESULTS
Thank you for choosing this AEG product. We have created it to give you
impeccable performance for many years, with innovative technologies that help
make life simpler – features you might not find on ordinary appliances. Please
spend a few minutes reading to get the very best from it.
Visit our website to:
Get usage advice, brochures, trouble shooter, service and repair information:
www.aeg.com/support
Register your product for better service:
www.registeraeg.com
Buy Accessories, Consumables and Original spare parts for your appliance:
www.aeg.com/shop
CUSTOMER CARE AND SERVICE
Always use original spare parts.
When contacting our Authorised Service Centre, ensure that you have the
following data available: Model, PNC, Serial Number.
The information can be found on the rating plate.
Warning / Caution-Safety information
General information and tips
Environmental information
Subject to change without notice.
www.aeg.com2

1. SAFETY INFORMATION
Before the installation and use of the appliance, carefully
read the supplied instructions. The manufacturer is not
responsible for any injuries or damage that are the result
of incorrect installation or usage. Always keep the
instructions in a safe and accessible location for future
reference.
1.1 Children and vulnerable people safety
• This appliance can be used by children aged from 8
years and above and persons with reduced physical,
sensory or mental capabilities or lack of experience
and knowledge if they have been given supervision or
instruction concerning the use of the appliance in a
safe way and understand the hazards involved.
• Children between 3 and 8 years of age and persons
with very extensive and complex disabilities shall be
kept away from the appliance unless continuously
supervised.
• Children of less than 3 years of age should be kept
away from the appliance unless continuously
supervised.
• Children should be supervised to ensure that they do
not play with the appliance.
• Keep all packaging away from children and dispose of
it appropriately.
• Keep detergents away from children.
• Keep children and pets away from the appliance when
the door is open.
• Children shall not carry out cleaning and user
maintenance of the appliance without supervision.
1.2 General Safety
• Do not change the specification of this appliance.
• This appliance is intended to be used in household
and similar applications such as:
ENGLISH 3

– staff kitchen areas in shops, offices and other
working environments;
– by clients in hotels, motels, bed & breakfast and
other residential type environments;
– areas for communal use in blocks of flats or in
launderettes.
• The appliance maximum load is 7 kg. Do not exceed
the maximum load of each programme (refer to the
“Programmes” chapter).
• The operating water pressure at the water entry point
from the outlet connection must be between 0.5 bar
(0.05 MPa) and 8 bar (0.8 MPa).
• The ventilation opening in the base must not be
covered by a carpet, mat, or any floor covering.
• The appliance must be connected to the water mains
using the new supplied hose sets, or other new hose
sets supplied by the Authorised Service Centre.
• Old hose sets must not be reused.
• If the mains power supply cable is damaged, it must
be replaced by the manufacturer, its Authorised
Service Centre or similarly qualified persons to avoid
an electrical hazard.
• Before any maintenance operation, deactivate the
appliance and disconnect the mains plug from the
socket.
• Do not use high pressure water sprays and/or steam
to clean the appliance.
• Clean the appliance with a moist cloth. Use only
neutral detergents. Do not use abrasive products,
abrasive cleaning pads, solvents or metal objects.
2. SAFETY INSTRUCTIONS
2.1 Installation
The installation must comply
with relevant national
regulations.
• Remove all the packaging and the
transit bolts including rubber bush
with plastic spacer.
• Keep the transit bolts in a safe place.
If the appliance is to be moved in the
future they must be reattached to lock
the drum to prevent an internal
damage.
• Always take care when moving the
appliance as it is heavy. Always use
safety gloves and enclosed footwear.
www.aeg.com4

• Follow the installation instructions
supplied with the appliance.
• Do not install or use a damaged
appliance.
• Do not install or use the appliance
where the temperature can be less
than 0°C or where it is exposed to the
weather.
• The floor area on which the appliance
is to be installed must be flat, stable,
heat resistant and clean.
• Make sure that there is air circulation
between the appliance and the floor.
• When the appliance is in its
permanent position, check if it is
levelled correctly with the aid of a
spirit level. If it is not, adjust the feet
accordingly.
• Do not install the appliance directly
above a floor drain.
• Do not spray water on the appliance
and do not expose it to excessive
humidity.
• Do not install the appliance where the
appliance lid cannot be fully opened.
• Do not put a closed container to
collect possible water leakage under
the appliance. Contact the Authorised
Service Centre to ensure which
accessories can be used.
2.2 Electrical connection
WARNING!
Risk of fire and electric
shock.
• The appliance must be earthed.
• Always use a correctly installed
shockproof socket.
• Make sure that the parameters on the
rating plate are compatible with the
electrical ratings of the mains power
supply.
• Do not use multi-plug adapters and
extension cables.
• Make sure not to cause damage to
the mains plug and to the mains
cable. Should the mains cable need to
be replaced, this must be carried out
by our Authorised Service Centre.
• Connect the mains plug to the mains
socket only at the end of the
installation. Make sure that there is
access to the mains plug after the
installation.
• Do not touch the mains cable or the
mains plug with wet hands.
• Do not pull the mains cable to
disconnect the appliance. Always pull
the mains plug.
2.3 Water connection
• Do not cause damage to the water
hoses.
• Before connection to new pipes, pipes
not used for a long time, where repair
work has been carried out or new
devices fitted (water meters, etc.), let
the water flow until it is clean and
clear.
• Ensure that there are no visible water
leaks during and after the first use of
the appliance.
• Do not use an extension hose if the
inlet hose is too short. Contact the
Authorised Service Centre for the
replacement of the inlet hose.
• When unpacking the appliance, It is
possible to see water flowing from the
drain hose. This is due to the testing
of the appliance with the use of water
in the factory.
• You can extend the drain hose to
maximum 400 cm. Contact the
Authorised Service Centre for the
other drain hose and the extension.
• Make sure that there is access to the
tap after the installation.
2.4 Use
WARNING!
Risk of injury, electric shock,
fire, burns or damage to the
appliance.
• Follow the safety instructions on the
detergent packaging.
• Do not put flammable products or
items that are wet with flammable
products in, near or on the appliance.
• Do not wash fabrics which are heavily
soiled with oil, grease or other greasy
substances. It can damage rubber
parts of the washing machine.
Prewash such fabrics by hand before
loading them into the washing
machine.
• Make sure that all metal objects are
removed from the laundry.
ENGLISH 5

2.5 Internal lighting
WARNING!
Risk of injury.
• Concerning the lamp(s) inside this
product and spare part lamps sold
separately: These lamps are intended
to withstand extreme physical
conditions in household appliances,
such as temperature, vibration,
humidity, or are intended to signal
information about the operational
status of the appliance. They are not
intended to be used in other
applications and are not suitable for
household room illumination.
• To replace the internal lighting,
contact the Authorised Service
Centre.
2.6 Service
• To repair the appliance contact the
Authorised Service Centre. Use
original spare parts only.
• Please note that self-repair or non-
professional repair can have safety
consequences and might void the
guarantee.
2.7 Disposal
WARNING!
Risk of injury or suffocation.
• Disconnect the appliance from the
mains electrical and water supplies.
• Cut off the mains electrical cable
close to the appliance and dispose of
it.
• Remove the door catch to prevent
children or pets from becoming
trapped in the drum.
• Dispose of the appliance in
accordance with local requirements
for the disposal of Waste Electrical
and Electronic Equipment (WEEE).
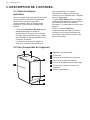
3. PRODUCT DESCRIPTION
3.1 Special features
Your new washing machine meets all
modern requirements for an effective
treatment of laundry with low water,
energy and detergent consumption and
proper care of fabric.
• The ProSense System adjusts
automatically the programme duration
to the laundry in the drum to achieve
perfect washing results in the
minimum possible time.
• The steam has a quick and easy way
to refresh the clothes. The gentle
steam programmes remove odours
and reduce creases in dry fabrics so
they need little ironing.
The Plus Steam option, finishes
every cycle with gentle steam that
relaxes the fibres and reduces fabric
creasing. Ironing will be easier!
• Thanks to the Soft Plus option, the
fabric softener is uniformly spread out
in the laundry and deeply penetrates
the fabric fibres favouring a perfect
softness.
www.aeg.com6

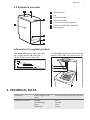
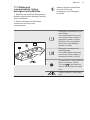
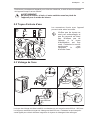
3.2 Appliance overview
21
4
6
7
5
3
1
Control panel
2
Lid
3
Lid push handle
4
Drain pump filter
5
Lever to move the appliance
6
Feet for levelling the appliance
7
Rating plate
Information for register product.
The rating plate reports the model name
(A) , product number (B), electrical
ratings (C) and serial number (D).
00000000
00A
Mod.
xxxxxxxxx
000V ~ 00Hz 0000 W
910000000
00
A
B
C
Prod.No.
D
The info label reports the model name (A),
product number (B ) and serial number (C).
A
B
C
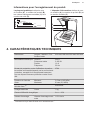
4. TECHNICAL DATA
Dimension Width/ Height/ Total
depth
400 mm/ 890 mm/ 600 mm/ 600 mm
Electrical connection Voltage
Overall power
Fuse
Frequency
230 V
2200 W
10 A
50 Hz
ENGLISH 7

Level of protection against ingress of solid particles
and moisture ensured by the protective cover, ex‐
cept where the low voltage equipment has no pro‐
tection against moisture
IPX4
Water supply pressure Minimum
Maximum
0.5 bar (0.05 MPa)
8 bar (0.8 MPa)
Water supply
1)
Cold water
Maximum Load Cotton 7 kg
Energy Efficiency Class A+++ -10%
Spin Speed Maximum spin speed 1151 rpm
1)
Connect the water inlet hose to a water tap with a 3/4'' thread.
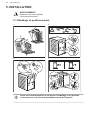
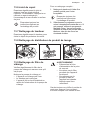
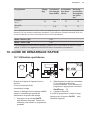
5. INSTALLATION
WARNING!
Refer to Safety chapters.
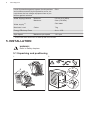
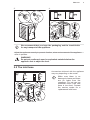
5.1 Unpacking and positioning
1.
2
1
2.
1
2
1
2
www.aeg.com8

3. 4.
We recommend that you keep the packaging and the transit bolts
for any transport of the appliance.
Adjust the appliance correctly to prevent vibration, noise and movement of the appliance
when it operates.
WARNING!
Do not put cardboard, wood or equivalent materials below the
appliance feet to adjust the level.
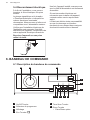
5.2 The inlet hose
90
O
90
O
3/4”
3/4”
1/2”
3/4”
0.3-10 bar
FI
DK
SE
NO
Accessories delivered with the appliance
may vary depending on the model.
Make sure there is no
damage to hoses and there
are no leaks from the
couplings. Do not use an
extension hose if the inlet
hose is too short. Contact
the service centre for a
replacement inlet hose.
ENGLISH 9

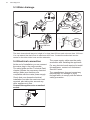
5.3 Water drainage
min.600 mm
max.1000 mm
The drain hose should stay at a height of no less than 600 mm and not more than 1000 mm.
You can extend the drain hose to maximum 4000 mm. Contact the authorised service
centre for the other drain hose and the extension.
5.4 Electrical connection
At the end of installation you can connect
the mains plug to the mains socket.
The rating plate and the 'Technical Data'
chapter indicate the necessary electrical
ratings. Make sure that they are
compatible with the mains power supply.
Check that your domestic electrical
installation can take the maximum load
required, also taking into account any
other appliances in use.
Connect the appliance to an earthed
socket.
The power supply cable must be easily
accessible after installing the appliance.
For any electrical work required to install
this appliance, contact our Authorised
Service Centre.
The manufacturer does not accept any
responsibility for damage or injury
through failure to comply with the above
safety precaution.
www.aeg.com10

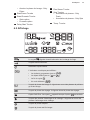
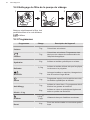
6. CONTROL PANEL
6.1 Control panel description
9
81012 11
1 2 3 4
5
7
6
1
On/Off push button
2
Programme dial
3
Display
4
Eco touch button
5
Time Save touch button
6
Rinse touch button
• Extra Rinse option
• Skipping wash phase - Only
Rinse
7
Start/Pause touch button
8
Stain/Prewash touch button
• Stain option
• Prewash option
9
Delay Start touch button
10
Plus Steam touch button
11
Spin touch button
• Skipping phases - Only Drain
• Skipping phases - Only Spin
12
Temp. touch button
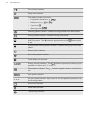
6.2 Display
The indicator flashes during the laundry load estimation.
ENGLISH 11

Door locked indicator.
Delay start indicator.
The digital indicator can show:
• Programme duration (e. g. ).
• Delay time (e. g. or ).
• Cycle end (
).
• Warning code ( ).
Washing phase indicator. It flashes during prewash and wash phase.
Rinsing phase indicator. It flashes during rinse phase.
Soft Plus option. The indicator appears above the when option
is set .
Spinning and draining phase indicator. It flashes during spin and drain
phase.
Steam phase indicator.
Anti-crease phase indicator.
Child safety lock indicator.
Energy saving indicators. The indicator appears by selecting a pro‐
gramme for cotton at 40 °C or 60 °C.
Temperature indicator. The indicator appears when a cold wash is
set.
Spin speed indicator.
No spin speed indicator. Spin phase is off, the appliance performs only
the draining phase.
Rinse hold indicator.
Extra silent indicator.
Time saving indicator.
www.aeg.com12

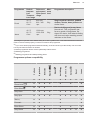
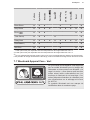
7. PROGRAMME CHART
Washing programmes
Programme Default
tempera‐
ture
Tempera‐
ture range
Reference
spin speed
Spin speed
range
Maxi‐
mum
load
Programme description
Cottons
40 °C
95 °C -
Cold
1200 rpm
1200-400
rpm
7 kg
White and coloured cotton heavily
and normally soiled cotton items.
Cotton Energy saving programme.
This programme at 60°C with a load
of 7 kg and Eco option is the refer‐
ence programme for the data entered
in the energy label, in compliance
with EU Commission Directive
95/12/EC and measured according to
EN 60456/2005.
Synthetics
40 °C
60 °C -
Cold
1200 rpm
1200- 400
rpm
3 kg
Synthetic items or mixed fabric
items. Normally soiled items.
Delicates
30 °C
40 °C -
Cold
1200 rpm
1200 - 400
rpm
2,5 kg
Delicate fabrics such as acrylics,
viscose and mixed fabrics requir‐
ing gentler washing. Normally and
lightly soiled items.
Wool/Silk
40 °C
40 °C -
Cold
1200 rpm
1200- 400
rpm
1 kg
Machine washable wool, hand
washable wool and other fabrics
with «hand washing» care symbol
1)
.
Steam
- - 1 kg
Steam programme for cotton and
synthetic items. Steam can be used
for dried
2)
, washed or worn once
laundry. This programme reduce
creases and odours
3)
and relaxes the
fibres. When the programme is com‐
pleted, quickly remove the laundry
from the drum. After a steam pro‐
gramme, ironing becomes effortless.
Do not use any detergent. If necessa‐
ry, remove stains by washing or using
localized stain removal. Steam pro‐
grammes do not perform any hygien‐
ic cycle. Do not set a Steam pro‐
gramme with these types of items:
• Items that are not suitable for tum‐
ble drying.
• All items with plastic, metal, wood‐
en parts or alike.
ENGLISH 13

Programme Default
tempera‐
ture
Tempera‐
ture range
Reference
spin speed
Spin speed
range
Maxi‐
mum
load
Programme description
Anti-Allergy
60 °C
1200 rpm
1200 - 400
rpm
7 kg
White cotton items. This pro‐
gramme removes micro-organisms
thanks to a washing phase with the
temperature maintained above 60°C
for several minutes. This helps re‐
move germs, bacteria, micro-organ‐
ism and particles. An additional rins‐
ing phase ensures a proper removal
of detergent residues and pollens/
allergenic items. In this way the wash
is more effective.
20 min. - 3 kg
30 °C
40 °C -
30 °C
1200 rpm
1200 - 400
rpm
3 kg
Cotton and synthetic items lightly
soiled or once worn.
Outdoor
30 °C
40 °C -
Cold
1200 rpm
1200 - 400
rpm
2,5 kg
4)
1 kg
5)
Do not us fabric soft‐
ener and make sure
there is no softener
residue in the deter‐
gent dispenser.
Outdoor clothing, technical, sport
fabrics, waterproof and breathable
jackets, shell jackets with a remov‐
able fleece or inner insulation.The
recommended laundry load is 2,5 kg.
This programme can also be used as
water-repellent restoring cycle, spe‐
cifically tailored for treating clothes
with a hydrophobic coating. To per‐
form the water-repellent restoring cy‐
cle, proceed as follows:
• Pour the washing detergent in the
compartment
.
• Pour a special water-repellent re‐
storer for fabric in the drawer com‐
partment for fabric softener .
• Reduce the laundry load to 1 kg.
To further improve the water repellen‐
cy restoring action, dry the laundry in
a tumble dryer by setting the Outdoor
drying programme (if available and if
the garment care label permits tum‐
ble drying).
www.aeg.com14

Programme Default
tempera‐
ture
Tempera‐
ture range
Reference
spin speed
Spin speed
range
Maxi‐
mum
load
Programme description
Duvet
40 °C
60 °C -
Cold
800 rpm
800 - 400
rpm
2 kg
Single synthetic blanket, padded
clothes, duvets, down jackets and
similar items.
Jeans
40 °C
60 °C -
Cold
1200 rpm
1200- 400
rpm
3 kg
Denim clothing and jersey items.
Normal soil. This programme per‐
forms a gentle rinsing phase, de‐
signed for denim, that reduces fading
and does not cause washing powder
residues on the fibres.
1)
During this cycle the drum rotates slowly to ensure a gentle wash. It can seem that the drum doesn't
rotate or doesn't rotate properly, but this is normal for this programme.
2)
If you set a Steam programme with dried laundry, at the end of the cycle the laundry can be humid.
Line dry the items for about 10 minutes.
3)
Steam programme doesn't remove particularly intense odour.
4)
Washing programme.
5)
Washing programme and waterproofing phase.
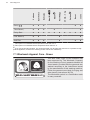
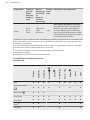
Programme options compatibility
Cottons
Synthetics
Delicates
Wool/Silk
Steam
Anti-Allergy
20 min. - 3 kg
Outdoor
Duvet
Jeans
Spin ■ ■ ■ ■ ■ ■ ■ ■ ■
Rinse Hold
■ ■ ■ ■ ■ ■ ■
Extra Silent
■ ■ ■
Only Drain
■ ■ ■ ■ ■ ■ ■ ■ ■
Only Spin
■ ■ ■ ■ ■ ■ ■ ■ ■
Stain
1)
■ ■ ■ ■
Prewash ■ ■ ■ ■
Extra Rinse ■ ■ ■ ■ ■ ■
Only Rinse
■ ■ ■ ■ ■ ■ ■ ■ ■
ENGLISH 15

Cottons
Synthetics
Delicates
Wool/Silk
Steam
Anti-Allergy
20 min. - 3 kg
Outdoor
Duvet
Jeans
Eco
2)
■ ■ ■ ■ ■
Time Save
3)
■ ■ ■ ■ ■
Delay Start ■ ■ ■ ■ ■ ■ ■ ■ ■ ■
Plus Steam
1)
■ ■ ■ ■
Soft Plus ■ ■ ■ ■ ■ ■
1)
This option is not available with temperature lower than 40 °C.
2)
This option is not available with a temperature lower than 30 °C.
3)
If you set the shortest duration, we recommend that you decrease the load size. It is possible to fully
load the appliance, however the washing results can be less satisfactory.
7.1 Woolmark Apparel Care - Green
The wool wash cycle of this machine has
been approved by The Woolmark Company
for the washing of wool garments labelled as
«hand wash» provided that the garments are
washed according to the instructions issued
by the manufacturer of this washing machine.
Follow the garment care label for drying and
other laundry instructions. M1734
The Woolmark symbol is a Certification mark
in many countries.
www.aeg.com16

8. OPTIONS
8.1 Introduction
The options/functions are
not selectable with all
washing programmes.
Check the compatibility
between options/functions
and washing programmes in
the "Programme Chart". An
option/function can exclude
another one, in this case the
appliance doesn't allow you
to set the incompatible
options/functions together.
Make sure the screen and
touch buttons are always
clean and dry.
8.2 On/Off
Pressing this button for a few seconds
allows to activate or deactivate the
appliance. Two different tunes sound
while switching the appliance on or off.
As the Stand-by function automatically
deactivates the appliance to decrease
the energy consumption in a few cases,
you may need to activate the appliance
again.
For more details, refer to Stand-by
paragraph in Daily Use chapter.
8.3 Eco
The option reduces the energy
consumption and maintaining good
washing results.
Set this option for slightly or normally
soiled items washed at 30°C or higher
temperatures.
Water and energy consumption may
depend on different causes, such as
water pressure, its hardness and
temperature, ambient temperature, type
and quantity of laundry, the set options,
spin speed and voltage fluctuations in
the electricity network. The display
shows the indicator
.
If you select the Cotton
programme at 40°C or 60°C
and no other options are set,
the display shows the
indicator ; these are
the standard cotton
programmes, the most
efficient programmes in
terms of combined energy
and water consumption.
8.4 Time Save
With this option you can decrease the
programme duration.
• If your laundry is normally or lightly
soiled, it may be advisable to shorten
the washing programme. Touch this
button once to decrease the duration.
• In case of smaller load, touch this
button twice to set an extra quick
programme.
The display shows the indicator
.
This option can also be used
to shorten the Steam
programme duration.
8.5 Temp.
When you select a washing programme,
the appliance automatically proposes a
default temperature.
Set this option to change the default
temperature.
The indicator
= cold water of the set
temperature comes on (the appliance
does not heat the water).
8.6 Spin
When you set a programme, the
appliance automatically selects the
maximum spin speed. The display shows
only the spin speeds available for the set
programme.
Touch this button repeatedly to:
• Decrease the spin speed.
• Activate the Rinse Hold option .
ENGLISH 17

The water of the last rinse is not
drained out to prevent the fabrics from
creasing. The washing programme
ends with water in the drum and the
final spin phase is not performed.
The display shows the indicator .
The lid stays locked. The drum turns
regularly to reduce creasing. You
must drain the water to unlock the lid.
Touch Start/Pause button: the
appliance performs the spinning
phase and drains the water.
• Activate the Extra Silent option.
All spinning phases (intermediate spin
and final spin) are suppressed and
the programme ends with water in the
drum. This helps to reduce creasing.
As the programme is very quiet, it is
suitable for use at night time when
cheaper electricity tariffs are
available. In some programmes the
rinses are performed with more water.
The display shows the indicator .
The lid stays locked. The drum turns
regularly to reduce creasing. You
must drain the water to unlock the lid.
Touch the Start/Pause button: the
appliance performs only the draining
phase.
The appliance empties
the water out
automatically after
approximately 18 hours.
• Activate the Only Drain option
(Skipping the wash, rinse and spin
phases) .
The appliance performs the only
draining phase of the selected
washing programme.
The display shows the indicator
(cold), and the indicator (no
spin) and the indicator .
• Activate the Only Spin option
(Skipping the wash and rinse
phases) .
The appliance performs only the
spinning phase of the selected
washing programme.
The display shows the indicator
(cold), the phase indicator the spin
speed.
If it is necessary to
reduce the spin speed,
select a programme with
a lower spin speed as
default.
8.7 Stain/Prewash
Press this button repeatedly to activate
one of the two options.
• Stain
Select this option to add an anti-stain
phase to a programme in order to
treat heavily soiled or stained laundry
with stain remover.
Pour the stain remover into
compartment . The stain remover
will be added in the appropriate phase
of the washing programme.
This option can increase
the programme duration
and is not available with a
temperature lower than
40 °C.
• Prewash
Use this option to add a prewash
phase at 30 °C before the washing
phase.
This option is recommended for
heavily soiled laundry, especially if
containing sand, dust , mud and other
solid particles.
This option can increase
the programme duration.
The corresponding indicator above
the touch button illuminates.
8.8 Rinse
With this button you can select one of the
following options:
• Extra Rinse option
This option adds a few rinses
according to the selected washing
programme.
Use this option for persons allergic to
detergent residues and in areas
where the water is soft.
This option increases
slightly the programme
duration.
www.aeg.com18

• Skipping wash phase - Only Rinse
option
The appliance performs only the
rinsing phase, the spinning and the
draining phases of the selected
programme.
The corresponding indicator above the
touch button illuminates.
8.9 Plus Steam
This option adds a steam phase followed
by a short anti-crease phase at the end
of the washing programme.
The steam phase reduces fabric
creasing and facilitates the fabric ironing.
The indicator
flashes on the display
during steam phase.
This option can increase the
programme duration.
When the programme stops the display
shows a zero , the indicator is
steady on and the indicator starts
flashing. The drum performs smooth
movements for about 30 minutes to keep
the steam benefit. By touching any
button the anti-crease movements stop
and the lid unlocks.
A small laundry load helps to
reach better results.
8.10 Delay Start
With this option you can delay the start of
a programme in a more convenient time.
Touch the button repeatedly to set the
required delay. The time increases by
steps of 30 minutes up to 90' and from 2
hours up to 20 h.
After touching the Start/Pause button,
the display shows the indicator and
the selected delay time and the
appliance begins the countdown.
8.11 Start/Pause
Touch the Start/Pause button to start,
pause the appliance or interrupt a
running programme.
9. SETTINGS
9.1 Acoustic signals
To deactivate the acoustic signals when
the programme is completed touch the
Delay Start and the Stain/Prewash
buttons simultaneously for about 3
seconds.
The acoustic signals, they
continue operate when the
appliance has a malfunction.
9.2 Child Lock
With this option you can prevent that the
children play with the control panel.
• To activate/deactivate this option,
touch the Spin and the Stain/Prewash
buttons simultaneously until the
indicator
comes on/goes off on
the display.
You can activate this option:
• After you touch the Start/Pause
button: all the buttons and the
programme dial are deactivated
(except On/Off button ).
• Before you touch the Start/Pause
button: the appliance cannot start.
The appliance keeps the selection of this
option after you switch it off.
9.3 Soft Plus
Set the Soft Plus option to optimise the
fabric softener distribution and improve
the fabric softness.
It is suggested when you use the fabric
softener.
This option increases slightly
the programme duration.
To activate/deactivate this option touch
the Temp. button and the Spin button
simultaneously until the indicator
comes on/goes off above the
indicator.
ENGLISH 19

9.4 Permanent Extra Rinse
With this option you can permanently
have an extra rinse when you set a new
programme.
• To activate/deactivate this option
touch the Stain/Prewash button and
the Rinse button simultaneously until
the indicator of the Extra Rinse button
comes on/goes off.
10. BEFORE FIRST USE
During installation or before
first use you may observe
some water in the appliance.
This is residual water left in
the appliance after a full
functional test in the factory
to ensure the appliance is
delivered to customers in
perfect working order and is
no cause for concern.
1. Connect the mains plug to the mains
socket.
2. Open the water tap.
3. Put a small quantity of detergent in
the compartment for washing phase.
4. Set and start a programme for cotton
at the highest temperature without
laundry.
This removes all possible dirt from the
drum and the tub.
11. DAILY USE
WARNING!
Refer to Safety chapters.
11.1 Activating the appliance
1. Connect the mains plug to the mains
socket.
2. Open the water tap.
3. Press button On/Off to activate the
appliance.
A short tune sounds.
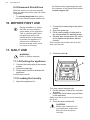
11.2 Loading the laundry
1. Open the appliance lid.
2. Push the button A.
A
The drum opens automatically.
3. Put the laundry in the drum, one item
at a time.
4. Shake the items before you put them
in the appliance.
Make sure not to put too much laundry in
the drum.
5. Close the drum and the lid.
CAUTION!
Before you close the lid of
your appliance, make sure
that you close the drum
correctly.
www.aeg.com20
La page est en cours de chargement...
La page est en cours de chargement...
La page est en cours de chargement...
La page est en cours de chargement...
La page est en cours de chargement...
La page est en cours de chargement...
La page est en cours de chargement...
La page est en cours de chargement...
La page est en cours de chargement...
La page est en cours de chargement...
La page est en cours de chargement...
La page est en cours de chargement...
La page est en cours de chargement...
La page est en cours de chargement...
La page est en cours de chargement...
La page est en cours de chargement...
La page est en cours de chargement...
La page est en cours de chargement...
La page est en cours de chargement...
La page est en cours de chargement...
La page est en cours de chargement...
La page est en cours de chargement...
La page est en cours de chargement...
La page est en cours de chargement...
La page est en cours de chargement...
La page est en cours de chargement...
La page est en cours de chargement...
La page est en cours de chargement...
La page est en cours de chargement...
La page est en cours de chargement...
La page est en cours de chargement...
La page est en cours de chargement...
La page est en cours de chargement...
La page est en cours de chargement...
La page est en cours de chargement...
La page est en cours de chargement...
La page est en cours de chargement...
La page est en cours de chargement...
La page est en cours de chargement...
La page est en cours de chargement...
La page est en cours de chargement...
La page est en cours de chargement...
La page est en cours de chargement...
La page est en cours de chargement...
La page est en cours de chargement...
La page est en cours de chargement...
La page est en cours de chargement...
La page est en cours de chargement...
La page est en cours de chargement...
La page est en cours de chargement...
La page est en cours de chargement...
La page est en cours de chargement...
-
 1
1
-
 2
2
-
 3
3
-
 4
4
-
 5
5
-
 6
6
-
 7
7
-
 8
8
-
 9
9
-
 10
10
-
 11
11
-
 12
12
-
 13
13
-
 14
14
-
 15
15
-
 16
16
-
 17
17
-
 18
18
-
 19
19
-
 20
20
-
 21
21
-
 22
22
-
 23
23
-
 24
24
-
 25
25
-
 26
26
-
 27
27
-
 28
28
-
 29
29
-
 30
30
-
 31
31
-
 32
32
-
 33
33
-
 34
34
-
 35
35
-
 36
36
-
 37
37
-
 38
38
-
 39
39
-
 40
40
-
 41
41
-
 42
42
-
 43
43
-
 44
44
-
 45
45
-
 46
46
-
 47
47
-
 48
48
-
 49
49
-
 50
50
-
 51
51
-
 52
52
-
 53
53
-
 54
54
-
 55
55
-
 56
56
-
 57
57
-
 58
58
-
 59
59
-
 60
60
-
 61
61
-
 62
62
-
 63
63
-
 64
64
-
 65
65
-
 66
66
-
 67
67
-
 68
68
-
 69
69
-
 70
70
-
 71
71
-
 72
72


AEG LTX7E7221EM Manuel utilisateur
- Catégorie
- Machines à laver
- Taper
- Manuel utilisateur
dans d''autres langues
- English: AEG LTX7E7221EM User manual
Documents connexes
-
AEG L74272TL1 Manuel utilisateur
-
AEG L71260TL1 Manuel utilisateur
-
-
-
-
AEG L6FE7441GM Manuel utilisateur
-
-
-
-