Jenn-Air JCB2581WES00 Le manuel du propriétaire
- Catégorie
- Frigos
- Taper
- Le manuel du propriétaire

THANK YOU for purchasing this high-quality product. If you should experience a problem not covered in TROUBLESHOOTING,
please visit our website at www.jennair.com for additional information. If you still need assistance, call us at 1-800-688-1100. In
Canada, visit our website at www.jennair.ca or call us at 1-800-807-6777.
You will need your model and serial number, located on the inside wall of the refrigerator compartment.
Para obtener acceso a "lnstrucciones parael usuario del refrigerador" en espa_ol, o para obtener informaci6n adicional acerca de
su producto, visite: www.jennair.com.
Necesitara su nQmerode modelo y de serie, ubicado en el interior del compartimiento del refrigerador.
TableofContents/Tabledes mati6res
REFRIGERATOR SAFETY ..................................................................... 1
REFRIGERATOR USE ........................................................................... 2
REFRIGERATOR CARE ......................................................................... 4
TROUBLESHOOTING ............................................................................ 5
ACCESSORIES ...................................................................................... 6
WATER FILTER CERTIFICATIONS ...................................................... 7
PERFORMANCE DATA SHEETS .......................................................... 8
WAR RAN TY .......................................................................................... 12
SI_CURITI_ DU RI_FRIGI_RATEUR ..................................................... 13
UTILISATION DU RI_FRIGI_RATEUR ................................................. 14
ENTRETIEN DU RI_FRIGI_RATEUR ................................................... 17
DI_PANNAGE ........................................................................................ 18
ACCESSOIRES .................................................................................... 19
FEUlLLES DE DONNI_ES SUR LA PERFORMANCE ........................ 20
GARANTIE ............................................................................................ 24
REFRIGERATORSAFETY
Your safety and the safety of others are very important.
We have provided many important safety messages in this manual and on your appliance. Always read and obey all safety
messages.
This is the safety alert symbol.
This symbol alerts you to potential hazards that can kill or hurt you and others.
All safety messages will follow the safety alert symbol and either the word "DANGER" or "WARNING."
These words mean:
You can be killed or seriously injured if you don't immediately
follow instructions.
You can be killed or seriously injured if you don't follow
instructions.
All safety messages will tell you what the potential hazard is, tell you how to reduce the chance of injury, and tell you what can
happen if the instructions are not followed.
W10168304A

IMPORTANT SAFETY INSTRUCTIONS
WARNING: To reduce the risk of fire, electric shock, or injury when using your refrigerator, follow these basic precautions:
• Plug into a grounded 3 prong outlet.
• Do not remove ground prong.
• Do not use an adapter.
• Do not use an extension cord.
• Disconnect power before servicing.
• Replace all parts and panels before operating.
• Remove doors from your old refrigerator.
• Use nonflammable cleaner.
• Keep flammable materials and vapors, such as gasoline,
away from refrigerator.
• Use two or more people to move and install refrigerator.
• Disconnect power before installing ice maker (on ice maker
kit ready models only).
• Use a sturdy glass when dispensing ice (on some models).
SAVE THESE INSTRUCTIONS
Proper Disposal of Your Old Refrigerator
Suffocation Hazard
Remove doors from your old refrigerator.
Failure to do so can result in death or brain damage.
IMPORTANT: Child entrapment and suffocation are not problems
of the past. Junked or abandoned refrigerators are still dangerous
- even if they will sit for "just a few days." Ifyou are getting rid of
your old refrigerator, please follow these instructions to help
prevent accidents.
Before You Throw Away Your Old Refrigerator or Freezer:
• Takeoff the doors.
• Leave the shelves in place so that children may not easily
climb inside.
REFRIGERATORUSE
Electrical Shock Hazard
Plug into a grounded 3 prong outlet.
Do not remove ground prong.
Do not use an adapter.
Do not use an extension cord.
Failure to follow these instructions can result in death,
fire, or electrical shock.
NOTE: Make sure the refrigerator is plugged into a grounded
3 prong outlet.
For your convenience, your refrigerator controls are preset at the
factory. When you first install your refrigerator, make sure that the
controls are still preset to the mid-settings as shown.
O°F .18oC
D
RECOMMENDED
FROZEN FOOD FRESHFOOD
37°F 3°C
Fq
Fq
IM PORTANT:
• The refrigerator control adjusts the refrigerator compartment
temperature. The freezer control adjusts the freezer
compartment temperature.
The displays normally show the actual temperatures inside the
refrigerator and freezer compartments. Sometimes,
temperatures may vary slightly in different areas of each
compartment. For example, frequently opening the door
allows air from the room to enter the compartment, exposing
door bins to room-temperature air. When reading the display,
keep in mind that it shows an average temperature for the
entire compartment. If you want to view the temperature you
set for the compartment rather than the actual temperature,
see "Viewing Set Points."
2

Wait 24 hours before you put food into the refrigerator. If you
add food before the refrigerator has cooled completely, your
food may spoil.
NOTE: Adjusting the refrigerator and freezer controls to a
lower (colder) setting will not cool the compartments any
faster.
Turning Refrigerator On
• If the refrigerator is off, press ON/OFF to turn the cooling on.
• Toturn your refrigerator off, press ON/OFF. Your refrigerator
will not cool when the control is set to Off.
NOTE: Pressing the On/Off button does not disconnect power
to the refrigerator. The interior lights will turn off if either
compartment door is open for more than 10 minutes. Simply
close and open the door to turn on the interior lights.
I On/Off I
Viewing Set Points
The factory recommended set points are 0°F (-18°C) for the
freezer and 37°F (3°C) for the refrigerator.
Set point range for the freezer: -6 ° to 6°F (-21 °C to -14°C)
Set point range for the refrigerator: 32° to 46°F (0°C to 8°C)
Toview the set point temperatures, press either the up or down
button for the refrigerator or freezer temperature. The display will
become brighter to indicate that you are viewing the set points.
Five seconds after an adjustment is made, the display lights will
dim and return to the actual temperature.
NOTE: During automatic defrost cycles, the actual temperature
displayed may be higher than the set point. This is normal. The
actual temperatures should return to the set points within a few
hours following completion of the defrost cycle.
Adjusting Controls
The mid-settings indicated in the previous section should be
correct for normal household refrigerator usage. The controls are
set correctly when milk or juice is as cold as you like and when ice
cream is firm.
If the temperature is too warm or too cold in the refrigerator or
freezer, first check the air vents to be sure they are not blocked.
If you need to adjust temperatures, use the settings listed in the
chart below as a guide. Wait at least 24 hours between
adjustments.
CONDITION/REASON: ADJUSTMENT:
REFRIGERATOR too warm REFRIGERATOR Control
1olower
FREEZER too warm/too little ice FREEZER Control
1olower
REFRIGERATOR too cold REFRIGERATOR Control
1ohigher
FREEZER too cold FREEZER Control
1ohigher
Max Cold
Use Max Cold to speed cooling when large grocery loads are
added. Max Cold sets the refrigerator temperature to 34°F (1°C)
and the freezer temperature to -6°F (-21 °C) for 24 hours.
NOTE: While Max Cold is on, the display shows the Max Cold
temperature set points. After 24 hours or when Max Cold is
manually turned off, the set points will be returned to their
previous setting.
• Press MAX COLD to select this mode. Max Cold will stay on
for 24 hours or until it is manually turned off.
I MaxCold I
Sabbath Mode
Sabbath Mode is designed for the traveler who wishes to save
additional energy or for those whose religious observances
require turning off the lights and ice maker. In Sabbath Mode, the
temperature set points remain unchanged, the ice maker and
dispenser levers are disabled, and the interior lights turn off.
• Press SABBATH MODE to turn on the Sabbath Mode feature.
This feature will remain on until the Sabbath Mode key is
pressed again.
Sabbath ModeI
The control can be adjusted to properly chill meats or vegetables.
The air inside the pan is cooled to avoid "spot" freezing and can
be set to keep meats at the National Livestock and Meat Board
recommended storage temperatures of 28° to 32°F (-2° to 0°C).
The convertible drawer temperature control is preset to the
PRODUCE setting.
To Store Meat:
Set the control to one of the three MEAT settings to store meat at
its optimal storage temperature.
To Store Vegetables:
Set the control to PRODUCE to store vegetables at their optimal
storage temperatures.
NOTE: If food starts to freeze, move the control to the left (less
cold). Remember to wait 24 hours between adjustments.
(o_some modes
You can control the amount of humidity in the moisture-sealed
crisper. Adjust the control to any setting between LOW and HIGH.
LOW (open) for best storage of fruits and vegetables with skins.
HIGH (closed) for best storage of fresh, leafy vegetables.
The door air control is located on the left-hand side of the
refrigerator compartment.
Additional Control Panel Features
Temp Mode
• Press the °C button to select either Celsius or Fahrenheit
temperature displays.
m
D
A'--
A. Door air control

Slide the door air control to the left to reduce the flow of cold
air to the bin or can rack and make it less cold.
Slide the door air control to the right to increase the flow of
cold air to the bin or can rack and make it colder.
Turning the Ice Maker On/Off
The On/Oft switch is located on the top right-hand side of the
freezer compartment.
Toturn on the ice maker, slide the control to the ON (left) position.
To manually turn off the ice maker, slide the control to the OFF
(right) position.
NOTE: Your ice maker has an automatic shutoff. The ice maker
sensors will automatically stop ice production, but the control will
remain in the ON (left) position.
REMEMBER:
• Allow 24 hours to produce the first batch of ice. Discard the
first three batches of ice produced.
The quality of your ice will be only as good as the quality of the
water supplied to your ice maker. Avoid connecting the ice
maker to a softened water supply. Water softener chemicals
(such as salt) can damage parts of the ice maker and lead to
poor quality ice. If asoftened water supply cannot be avoided,
make sure the water softener is operating properly and is well
maintained.
Do not use anything sharp to break up the ice in the storage
bin. This can cause damage to the ice container and the
dispenser mechanism.
Do not store anything on top of or in the ice maker or storage
bin.
Removing and Replacing Ice Storage Bin
1=
Hold the base of the storage bin with both hands and press
the release button to lift the storage bin up and out.
NOTE: It is not necessary to turn the ice maker control to the
OFF (right) position when removing the storage bin. The
sensor cover ("flipper door") on the left wall of the freezer
stops the ice maker from producing ice if the door is open or
the storage bin is removed.
2. Replace the storage bin on the door and push down to make
sure it is securely in place.
,.,, Fffc4on System
Do not use with water that is microbiologically unsafe or of
unknown quality without adequate disinfection before or
after the system.
Water Filter Status Display (on some models)
The filter status display will help you know when to change your
water filter. When the display reads 10%, order a new filter. It is
recommended that you replace the filter when the display reads
0% OR when water flow to your water dispenser or ice maker
decreases noticeably. The filter should be replaced at least every
6 months depending on your water quality and usage.
After changing the filter, reset the display by pressing the button.
The display will read 99% when the system is reset.
Non-Indicator Water Filter (on some models)
If your refrigerator does not have the water filter status light, you
should change the water filter cartridge at least every 6 months
depending on your water quality and usage. If the water flow to
the water dispenser or ice maker decreases noticeably before
6 months have passed, replace the water filter more often.
Changing the Water Filter
1. Press the eject button to release the filter from the base grille.
2. Pull the filter straight out.
3. Turn the cap counterclockwise to remove it from the filter.
IMPORTANT: Do not discard the cap. It is part of your
refrigerator. Keep the cap to use with the replacement filter.
4. Align the ridge on the cap with the arrow on the new filter and
turn the cap until it snaps into place.
NOTE: You can run the ice maker without a filter. Your water
will not be filtered. Simply insert the cap all of the way into the
base grille and rotate the cap until it is firmly in place.
5. Remove the covers from the O-rings. Be sure the O-rings are
still in place after the covers are removed.
6. Push the filter into the base grille. The eject button will pop
back out when the filter is fully engaged.
REFRIGERATORCARE
Explosion Hazard
Use nonflammable cleaner.
Failure to do so can result in death, explosion, or fire.
Both the refrigerator and freezer sections defrost automatically.
However, clean both sections about once a month to avoid
buildup of odors. Wipe up spills immediately.

IMPORTANT:Becauseaircirculatesbetweenbothsections,any
odorsformedinonesectionwilltransfertotheother.Youmust
thoroughlycleanbothsectionstoeliminateodors.Toavoidodor
transferanddryingoutoffood,wraporcoverfoodstightly.
ToCleanYourRefrigerator:
NOTE:Donotuseabrasiveorharshcleanerssuchaswindow
sprays,scouringcleansers,flammablefluids,cleaningwaxes,
concentrateddetergents,bleachesorcleanserscontaining
petroleumproductsonplasticparts,interioranddoorlinersor
gaskets.Donotusepapertowels,scouringpads,orotherharsh
cleaningtools.
1. Unplugrefrigeratorordisconnectpower.
2. Handwash,rinse,anddryremovablepartsandinterior
surfacesthoroughly.Useacleanspongeorsoftclothanda
milddetergentinwarmwater.
3. Washstainlesssteelandpaintedmetalexteriorswithaclean
spongeorsoftclothandamilddetergentinwarmwater.
4. Thereisnoneedforroutinecondensercleaninginnormal
homeoperatingenvironments.Iftheenvironmentis
particularlygreasyordusty,orthereissignificantpettrafficin
thehome,thecondensershouldbecleanedevery2to
3monthstoensuremaximumefficiency.
5.
If you need to clean the condenser:
• Remove the base grille.
• Use a vacuum cleaner with asoft brush to clean the grille,
the open areas behind the grille and the front surface area
of the condenser.
• Replace the base grille when finished.
Plug in refrigerator or reconnect power.
NOTE: Not all bulbs will fit your refrigerator. Be sure to replace the
bulb with one of the same size, shape and wattage. On some
models, the dispenser light requires a heavy duty 1O-watt bulb. All
other lights require a 40-watt bulb. Replacement bulbs are
available from your dealer.
1. Unplug refrigerator or disconnect power.
2. Remove light shield when applicable.
NOTE: To clean the light shield, wash it with warm water and
liquid detergent. Rinse and dry the shield well.
3. Remove light bulb and replace with one of the same size,
shape and wattage.
4. Replace light shield when applicable.
5. Plug in refrigerator or reconnect power.
TROUBLESHOOTING
First try the solutions suggested here or visit our website and reference FAQs (Frequently Asked Questions)
to possibly avoid the cost of a service call.
In the U.S.A., www.jennair.com In Canada, www.jennair.ca
The refrigerator will not operate
Electrical Shock Hazard
Plug into a grounded 3 prong outlet.
Do not remove ground prong.
Do not use an adapter.
Do not use an extension cord.
Failure to follow these instructions can result in death,
fire, or electrical shock.
Power cord unplugged? Plug into a grounded 3 prong outlet.
Is outlet working? Plug in a lamp to see if the outlet is
working.
Household fuse blown or circuit breaker tripped? Replace
the fuse or reset the circuit breaker. If the problem continues,
call an electrician.
Control(s) on? Make sure the refrigerator control is on. See
"Using the Control(s)."
New installation? Allow 24 hours following installation for the
refrigerator to cool completely.
NOTE: Adjusting the temperature control(s) to coldest setting
will not cool the refrigerator more quickly.
The motor seems to run too much
Your new refrigerator may run longer than your old one due to its
high-efficiency compressor and fans. The unit may run even
longer if the room is warm, a large food load is added, the door is
opened often, or if the door has been left open.
The refrigerator seems noisy
Refrigerator noise has been reduced over the years. Due to this
reduction, you may hear intermittent noises from your new
refrigerator that you did not notice from your old model. Below are
listed some normal sounds with explanations.
• Pulsating - fans/compressor adjusting to optimize
performance.
• Hissing/Rattling - flow of refrigerant, movement of water
lines, or from items placed on top of the refrigerator.
• Popping - contraction/expansion of inside walls, especially
during initial cool-down.
• Water running/dripping - may be heard when ice melts
during defrosting and water runs into the drain pan.

The door will not close completely
• Door blocked open? Move food packages away from door.
• Bin or shelf in the way? Push bin or shelf back in the correct
position.
• Crisper cover in the way? Make sure the crisper cover is fully
pushed in, so that the back rests on the supports.
The door is difficult to open
Explosion Hazard
Use nonflammable cleaner.
Failure to do so can result in death, explosion, or fire.
• Gaskets dirty or sticky? Clean gaskets and contact surfaces
with mild soap and warm water. Rinse and dry with soft cloth.
Temperature is too warm
New installation? Allow 24 hours following installation for the
refrigerator to cool completely.
Door opened often or left open? Allows warm air to enter
refrigerator. Minimize door openings and keep door fully
closed.
Large load of food added? Allow several hours for
refrigerator to return to normal temperature.
Control(s) set correctly for the surrounding conditions?
Adjust the control(s) a setting colder. Check temperature in
24 hours. See "Using the Control(s)."
There is interior moisture buildup
NOTE: Some moisture buildup is normal.
• Humid room? Contributes to moisture buildup.
• Door opened often or left open? Allows humid air to enter
refrigerator. Minimize door openings and keep door fully
closed.
The ice maker is not producing ice or not enough ice
• Refrigerator connected to a water supply and the supply
shutoff valve turned on? Connect refrigerator to water
supply and turn water shutoff valve fully open.
• Kink in the water source line? A kink in the line can reduce
water flow. Straighten the water source line.
• Ice maker turned on? Make sure wire shutoff arm or switch
(depending on model) is in the ON position.
• New installation? Wait 24 hours after ice maker installation
for ice production to begin. Wait 72 hours for full ice
production.
• Large amount of ice recently removed? Allow 24 hours for
ice maker to produce more ice.
• Ice cube jammed in the ice maker ejector arm?
Remove ice from the ejector arm with a plastic utensil.
• Reverse osmosis water filtration system connected to
your cold water supply? This can decrease water pressure.
See "Water Supply Requirements."
The ice cubes are hollow or small
NOTE: This is an indication of low water pressure.
• Water shutoff valve not fully open? Turn the water shutoff
valve fully open.
Kink in the water source line? A kink in the line can reduce
water flow. Straighten the water source line.
Reverse osmosis water filtration system connected to
your cold water supply? This can decrease water pressure.
See "Water Supply Requirements."
Questions remain regarding water pressure? Call a
licensed, qualified plumber.
Off-taste, odor or gray color in the ice
New plumbing connections? New plumbing connections
can cause discolored or off-flavored ice.
Ice stored too long? Discard ice. Wash ice bin. Allow
24 hours for ice maker to make new ice.
Odor transfer from food? Use airtight, moisture proof
packaging to store food.
Are there minerals (such as sulfur) in the water? A water
filter may need to be installed to remove the minerals.
ACCESSORIES
To order replacement filters, call 1-800-442-9991 and ask for the
part number listed below or contact your authorized Jenn-Air
dealer. In Canada, call 1-800-807-6777.
Stainless Steel Cleaner and Polish:
Order Part #4396095
Standard Base Filter Cartridge:
Order Part #4396841 (T2RFWG2 and P2RFWG2)
6

WATERFILTERCERTIFICATIONS
State of California
Department of Health Services
Water Treatment Device
Certificate Number
05 - 1703
Date Issued: AprlI 6, 2(X)5
Date Revised: September 7, 2005
Trademark/Model Designation
Whirlpool Deluxe T2WG2
Manufacturefl
to Section
Rated Service CapaciD,: 2(Xtgals RatedServiceFlo_: 085gpm
Con ditions of Certification:
Do not use with water that is microbiologicalIy unsal_ or of unknown quality, without adequate disinfection before or
after tbe system
TrademarldModel Designation
Whirlpool Deluxe T1WG2
Whirlpool DeluxeT
Stale of California
I)epartment of Health Services
Water Treatment Device
Certificate Number
05 - 1702
Date Issued: April 6, 2005
Date Revised: September 7, 2005
Manufacturer:
116830oftl
Node
RatedServiceCapacit_: 200gals Rated Service Flow: (t5gpm
Conditions of Certification:
Do not use with water that is _Ylicrobiologically unsall: or ol unknown quali_y, without adeqtlme disinli_ction beRire or
after the system
State of California
Department of Public I {eatth
Water Treatment Device
Certificate Number
08- 1896
Date Issued: March 24, 2008
Trademark/Model I)esi_nation
2w-G2 ............
P2WG2L
Manufacturer: Wl{_rtp_N rp :, ....
Rated Service Capacity: 200 ga] ]Ra_e_ S_rvitx •_iow: 085 gpm
Co nditi6ns of Certification!
Do no{ use with water lhat is microbioh)gically unsalE or of unknown quality, withotll adequate disinfection belore or
after the system
State of Calilim_ia
Department of Public Health
Water Treatment Device
Certificate Number
08- 1895
Date Issued: March 24, 2008
Trademark/Model Designation Replacement Elements
P t W G2 P2RFWG2
P 1 WG2L P2RFWG2
Manulilcturer: Whirlpool ('orp
The water treatmen_ device(s) li_ted_on this certificate have met the testing tequireme_s pursuanl to Section
1168311 of the Health and SM'e_ Code for _ho following health relatod l_ntaminan_:
Microbiological Contaminants and Turbidit_
None
Orffanic Cnntanlinants
BenT_ene
O-dichlorobenzene
Toxa_hene
Rafod Service Capacity: 200gaI RatedServiceFIov,: 05gpm
Conditions of Certification:
Do not use with walcr that Is mlcmblologicall 3 unsafe or of unknown quahty, Wltholl| adequa|c dlsinl_zCllOn before o_
dim Ihe _y_mn-

PERFORMANCEDATA SHEETS
Base Grille Water Filtration System
Model T2WG2L/T2RFWG2 Capacity 200 Gallons (757 Liters)
Model T2WG2/T2RFWG2 Capacity 200 Gallons (757 Liters)
System tested and certified by NSF International against NSF/ANSI
Standard 42 for the reduction of Chlorine Taste and Odor, Particulate
Class I1";and against NSF/ANSI Standard 53 for the reduction of Mercury,
Benzene, Toxaphene, O-dichlorobenzene, and Carbofuran.
This system has been tested according to NSF/ANSI Standards 42 and 53 for the reduction of the substances listed below. The
concentration of the indicated substances in water entering the system was reduced to a concentration less than or equal to the
permissible limit for water leaving the system, as specified in NSF/ANSI Standards 42 and 53.
Substance Reduction
Aesthetic Effects
Chlorine Taste/Odor
Particulate Class I1"
Contaminant
Reduction
Lead: @ pH 6.5***
Lead: @ pH 8.5***
Mercury: @ pH 6.5
Mercury: @ pH 8.5
Benzene
O-Dichlorobenzene
Toxaphene
Carbofuran
NSF Reduction
Requirements
50% reduction
85% reduction
NSF Reduction
Requirements
0.010 mg/L
0.010 mg/L
0.002 mg/L
0.002 mg/L
0.005 mg/L
0.6 mg/L
0.003 mg/L
0.04 mg/L
Average Influent Challenge Maximum Average Minimum %
Influent Concentration Effluent Effluent Reduction
2.0182 mg/L 2.0 mg/L + 10% 0.06 mg/L ** 0.0536 mg/L 97.03
1333333 #/mL At east 10,000 part c es/mL 6600 #/mL 2325 #/mL 99.51
Average
Influent
0.1533 mg/L
0.1400 mg/L
0.0058 mg/L
0.0059 mg/L
0.0154 mg/L
1.7571 mg/L
0.015 mg/L
0.0819 mg/L
Influent Challenge
Concentration
0.15 mg/L_+ 10%
0.15 mg/L_+ 10%
0.006 mg/L _+10%
0.006 mg/L _+10%
0.015 mg/L _+10%
1.8 mg/L _+10%
0.015 mg/L _+10%
0.08 mg/L _+10%
Maximum
Effluent
0.0005 mg/L
0.0007 mg/L
0.0002 mg/L
0.0005 mg/L
0.0012 mg/L
0.0250 mg/L
0.001 mg/L
0.0400 mg/L
Average
Effluent
0.0005 mg/L
0.0006 mg/L
0.0002 mg/L
0.0003 mg/L
0.0006 mg/L
0.0066 mg/L
0.001 mg/L
0.0213 mg/L
Minimum %
Reduction
99.67
99.50
96.54
91.57
92.22
98.58
93.33
51.13
Test Parameters: pH = 7.5 _+0.5 unless otherwise noted. Flow = 0.85 gpm (3.2 Lpm). Pressure = 60 psig (413.7 kPa).
Temp. = 68°F to 71.6°F (2O°C to 22°C). Rated service capacity = 200 gallons (757 liters).
• It is essential that operational, maintenance, and filter
replacement requirements be carried out for the product to
perform as advertised.
• Use replacement filter T2RFWG2, part #4396841.
2008 suggested retail price of $39.99 U.S.A./S54.95 Canada.
Prices are subject to change without notice.
Model T2WG2L: Style 1 - When the filter indicator reads 10%,
order a new filter. When the indicator reads 0%, it is
recommended that you replace the filter.
Style 2 - When the filter indicator changes from green to yellow,
order a new filter. When the indicator changes from yellow to red,
it is recommended that you replace the filter.
Style 3 - When the water filter status display changes from
"GOOD" to "ORDER," order a new filter. When the filter indicator
reads "REPLACE," it is recommended that you replace the filter.
Style 4 - Press FILTER to check the status of your water filter. If
the filter indicator light is yellow, order a new filter. If the filter
indicator light is red, it is recommended that you replace the filter.
Model T2WG2: Change the water filter cartridge every 6 months.
If the water flow to the water dispenser or ice maker decreases
noticeably before 6 months have passed, replace the water filter
cartridge more often.
• These contaminants are not necessarily in your water supply.
While testing was performed under standard laboratory
conditions, actual performance may vary.
Average %
Reduction
97.34
99.83
Average %
Reduction
99.67
99.57
96.54
94.92
96.34
99.63
93.33
74.00
• The product is for cold water use only.
• Do not use with water that is microbiologically unsafe or of
unknown quality without adequate disinfection before or after the
system.
• Refer to the "Warranty" section for the Manufacturer's name,
address and telephone number.
• Refer to the "Warranty" section for the Manufacturer's limited
warranty.
Application Guidelines/Water Supply Parameters
Water Supply City or Well
Water Pressure 30 - 120 psi (207 - 827 kPa)
Water Temperature 33° - 100°F (0.6° - 37.8°C)
Service Flow Rate 0.85 gpm (3.2 Lpm) @ 60 psi
*Class II particle size: 1 um to <5 um
**Test requirement is at least 100,000 particles/mL of AC Fine Test Dust.
***Compliant for Lead reduction requirements under NSF/ANSl Standard 53 as tested by Pace Analytical Services, Inc.
® NSF is a registered trademark of NSF International.
8

Base Grille Water Filtration System
Model TIWG2L/T2RFWG2 Capacity 200 Gallons (757 Liters)
Model TIWG2/T2RFWG2 Capacity 200 Gallons (757 Liters)
System tested and certified by NSF International against NSF/ANSI
Standard 42 for the reduction of Chlorine Taste and Odor, Particulate
Class I1"; and against NSF/ANSI Standard 53 for the reduction of
Mercury, Benzene, Toxaphene, O-dichlorobenzene, and Carbofuran.
This system has been tested according to NSF/ANSI 42/53 for the reduction of the substances listed below. The concentration of the
indicated substances in water entering the system was reduced to a concentration less than or equal to the permissible limit for water
leaving the system, as specified in NSF/ANSI 42/53.
Substance Reduction
Aesthetic Effects
Chlorine Taste/Odor
Particulate Class I1"
Contaminant
Reduction
Lead: @ pH 6.5***
Lead: @ pH 8.5***
Mercury: @ pH 6.5
Mercury: @ pH 8.5
Benzene
O-Dichlorobenzene
Toxaphene
Carbofuran
NSF Reduction
Requirements
50% reduction
85% reduction
NSF Reduction
Requirements
0.010 mg/L
0.010 mg/L
0.002 mg/L
0.002 mg/L
0.005 mg/L
0.6 mg/L
0.003 mg/L
0.04 mg/L
Average Influent Challenge Maximum
Influent Concentration Effluent
2.0182 mg/L 2.0 mg/L + 10% 0.06 mg/L **
1333333 #/m L At east 10,000 part c es/mL 6600 #/mL
Average
Influent
0.1533 mg/L
0.1400 mg/L
0.0058 mg/L
0.0059 mg/L
0.0154 mg/L
1.7571 mg/L
0.015 mg/L
0.0819 mg/L
Influent Challenge
Concentration
0.15 mg/L_+ 10%
0.15 mg/L_+ 10%
0.006 mg/L _+10%
0.006 mg/L _+10%
0.015 mg/L _+10%
1.8 mg/L _+10%
0.015 mg/L _+10%
0.08 mg/L _+10%
Maximum
Effluent
0.0005 mg/L
0.0007 mg/L
0.0002 mg/L
0.0005 mg/L
0.0012 mg/L
0.0250 mg/L
0.001 mg/L
0.0400 mg/L
Average Minimum %
Effluent Reduction
0.0536 mg/L 97.03
2325 #/mL 99.51
Average
Effluent
0.0005 mg/L
0.0006 mg/L
0.0002 mg/L
0.0003 mg/L
0.0006 mg/L
0.0066 mg/L
0.001 mg/L
0.0213 mg/L
Minimum %
Reduction
99.67
99.50
96.54
91.57
92.22
98.58
93.33
51.13
Test Parameters: pH = 7.5 _+0.5 unless otherwise noted. Flow = 0.5 gpm (1.9 Lpm). Pressure = 60 psig (413.7 kPa).
Temp. = 68°F to 71.6°F (2O°C to 22°C). Rated service capacity = 200 gallons (757 liters).
• It is essential that operational, maintenance, and filter
replacement requirements be carried out for the product to
perform as advertised.
• Use replacement filter T2RFWG2, part #4396841.
2008 suggested retail price of $39.99 U.S.A./S54.95 Canada.
Prices are subject to change without notice.
Model TlWG2L: Style 1 - When the filter indicator reads 10%,
order a new filter. When the indicator reads 0%, it is
recommended that you replace the filter.
Style 2 - When the filter indicator changes from green to yellow,
order a new filter. When the indicator changes from yellow to red,
it is recommended that you replace the filter.
Style 3 - When the water filter status display changes from
"GOOD" to "ORDER," order a new filter. When the filter indicator
reads "REPLACE," it is recommended that you replace the filter.
Style 4 - Press FILTER to check the status of your water filter. If
the filter indicator light is yellow, order a new filter. If the filter
indicator light is red, it is recommended that you replace the filter.
Model TlWG2: Change the water filter cartridge every 6 months.
If the water flow to the water dispenser or ice maker decreases
noticeably before 6 months have passed, replace the water filter
cartridge more often.
• These contaminants are not necessarily in your water supply.
While testing was performed under standard laboratory
conditions, actual performance may vary.
Average %
Reduction
97.34
99.83
Average %
Reduction
99.67
99.57
96.54
94.92
96.34
99.63
93.33
74.00
• The product is for cold water use only.
• Do not use with water that is microbiologically unsafe or of
unknown quality without adequate disinfection before or after the
system.
• Refer to the "Warranty" section for the Manufacturer's name,
address and telephone number.
• Refer to the "Warranty" section for the Manufacturer's limited
warranty.
Application Guidelines/Water Supply Parameters
City or Well
30 - 120 psi (207 - 827 kPa)
33° - 100°F (0.6° - 37.8°C)
0.5 gpm (1.9 Lpm) @60 psi
Water Supply
Water Pressure
Water Temperature
Service Flow Rate
*Class II particle size: 1 um to <5 um
**Test requirement is at least 100,000 particles/mL of AC Fine Test Dust.
***Compliant for Lead reduction requirements under NSF/ANSl Standard 53 as tested by Pace Analytical Services, Inc.
® NSF is a registered trademark of NSF International.

Base Grille Water Filtration System
Model P2WG2L/P2RFWG2 Capacity 200 Gallons (757 Liters)
Model P2WG2/P2RFWG2 Capacity 200 Gallons (757 Liters)
System tested and certified by NSF International against NSF/ANSI
Standard 42 for the reduction of Chlorine Taste and Odor, Particulate
Class I*; and against NSF/ANSI Standard 53 for the reduction of Lead,
Mercury, Benzene, Toxaphene, and O-dichlorobenzene.
This system has been tested according to NSF/ANSI Standards 42 and 53 for the reduction of the substances listed below. The
concentration of the indicated substances in water entering the system was reduced to a concentration less than or equal to the
permissible limit for water leaving the system, as specified in NSF/ANSI Standards 42 and 53.
Substance Reduction
Aesthetic Effects
Chlorine Taste/Odor
Particulate Class I*
Contaminant
Reduction
Lead: @ pH 6.5
Lead: @ pH 8.5
Mercury: @ pH 6.5
Mercury: @ pH 8.5
Benzene
O-Dichlorobenzene
Toxaphene
NSF Reduction Average Influent Challenge
Requirements Influent Concentration
50% reduction 1.909 mg/L 2.0 mg/L + 10%
85% reduction 9700000 #/mL At east 1O,OOOpart c es/mL
NSF Reduction Average Influent Challenge
Requirements Influent Concentration
0.010 mg/L 143.33 ug/L 0.15 mg/L + 10%
0.010 mg/L 140 ug/L 0.15 mg/L _+10%
0.002 mg/L 0.0058 mg/L 0.006 mg/L + 10%
0.002 mg/L 0.00646 mg/L 0.006 mg/L_+ 10%
0.005 mg/L 0.015 mg/L 0.015 mg/L _+10%
0.6 mg/L 1.83333 mg/L 1.8 mg/L _+10%
0.003 mg/L 0.016 mg/L 0.015 mg/L _+10%
Maximum Average Minimum %
Effluent Effluent Reduction
9.05 mg/L ** <9.95 mg/L >97.4
2600 #/mL 62000 #/mL >97.6
Maximum Average
Effluent Effluent
1.0 ug/L 1.0 ug/L
1.0 ug/L 1.0 ug/L
0.3 ug/L 0.0002 mg/L
1.4 ug/L 0.0004 mg/L
0.5 ug/L 0.0005 mg/L
4.8 ug/L 0.014 mg/L
1 ug/L 0.001 mg/L
Average %
Reduction
>97.4
>99.4
Minimum % Average %
Reduction Reduction
>99.3 >99.3
>99.3 99.3
>96.5 96.5
76.3 88.1
>96.5 >96.5
99.7 99.9
>93.2 >93.2
Test Parameters: pH = 7.5 + 0.5 unless otherwise noted. Flow = 0.85 gpm (3.2 Lpm). Pressure = 60 psig (413.7 kPa).
Temp. = 68°F to 71.6°F (20°C to 22°C). Rated service capacity = 200 gallons (757 liters).
• It is essential that operational, maintenance, and filter
replacement requirements be carried out for the product to
perform as advertised.
• Use replacement filter P2RFWG2, part #4396841.
2008 suggested retail price of $39.99 U.S.A./S54.95 Canada.
Prices are subject to change without notice.
Model P2WG2L/P2WG2: Style 1 - When the filter indicator
reads 10%, order a new filter. When the indicator reads 0%, it is
recommended that you replace the filter.
Style 2 - When the filter indicator changes from green to yellow,
order a new filter. When the indicator changes from yellow to red,
it is recommended that you replace the filter.
Style 3 - When the water filter status display changes from
"GOOD" to "ORDER," order a new filter. When the filter indicator
reads "REPLACE," it is recommended that you replace the filter.
Style 4 - Press FILTER to check the status of your water filter. If
the filter indicator light is yellow, order a new filter. If the filter
indicator light is red, it is recommended that you replace the filter.
Change the water filter cartridge every 6 months. If the water
flow to the water dispenser or ice maker decreases noticeably
before 6 months have passed, replace the water filter cartridge
more often.
• These contaminants are not necessarily in your water supply.
While testing was performed under standard laboratory
conditions, actual performance may vary.
• The product is for cold water use only.
• Do not use with water that is microbiologically unsafe or of
unknown quality without adequate disinfection before or after the
system.
• Refer to the "Warranty" section for the Manufacturer's name,
address and telephone number.
• Refer to the "Warranty" section for the Manufacturer's limited
warranty.
Application Guidelines/Water Supply Parameters
Water Supply City or Well
Water Pressure 30 - 120 psi (207 - 827 kPa)
Water Temperature 33° - 100°F (0.6° - 37.8°C)
Service Flow Rate 0.85 gpm (3.2 Lpm) @ 60 psi
*Class I particle size: >0.5 um to <1 um
**Test requirement is at least 100,OOOparticles/mL of AC Fine Test Dust.
® NSF is a registered trademark of NSF International.
10

Base Grille Water Filtration System
Model PIWG2L/P2RFWG2 Capacity 200 Gallons (757 Liters)
Model PIWG2/P2RFWG2 Capacity 200 Gallons (757 Liters)
System tested and certified by NSF International against NSF/ANSI
Standard 42 for the reduction of Chlorine Taste and Odor, Particulate
Class I*; and against NSF/ANSI Standard 53 for the reduction of Lead,
Mercury, Benzene, Toxaphene, and O-dichlorobenzene.
This system has been tested according to NSF/ANSI Standards 42 and 53 for the reduction of the substances listed below. The
concentration of the indicated substances in water entering the system was reduced to a concentration less than or equal to the
permissible limit for water leaving the system, as specified in NSF/ANSI Standards 42 and 53.
Substance Reduction
Aesthetic Effects
Chlorine Taste/Odor
Particulate Class I*
Contaminant
Reduction
Lead: @ pH 6.5
Lead: @ pH 8.5
Mercury: @ pH 6.5
Mercury: @ pH 8.5
Benzene
O-Dichlorobenzene
Toxaphene
NSF Reduction Average Influent Challenge
Requirements Influent Concentration
50% reduction 1.909 mg/L 2.0 mg/L + 10%
85% reduction 5166666 #/mL At east 10,000 part c es/mL
NSF Reduction Average Influent Challenge
Requirements Influent Concentration
0.010 mg/L 143.33 ug/L 0.15 mg/L + 10%
0.010 mg/L 150 ug/L 0.15 mg/L _+10%
0.002 mg/L 0.0058 mg/L 0.006 mg/L + 10%
0.002 mg/L 0.00646 mg/L 0.006 mg/L_+ 10%
0.005 mg/L 0.015 mg/L 0.015 mg/L _+10%
0.6 mg/L 1.83333 mg/L 1.8 mg/L _+10%
0.003 mg/L 0.016 mg/L 0.015 mg/L _+10%
Maximum Average Minimum %
Effluent Effluent Reduction
0.05 mg/L ** <0.05 mg/L >97.4
4200 #/mL 1900 #/mL >99.9
Maximum Average
Effluent Effluent
1.0 ug/L 1.0 ug/L
1.0 ug/L 1.0 ug/L
0.3 ug/L 0.0002 mg/L
0.8 ug/L 0.0004 mg/L
0.5 ug/L 0.0005 mg/L
160 ug/L 0.005 mg/L
1 ug/L 0.001 mg/L
Average %
Reduction
>97.4
>99.9
Minimum % Average %
Reduction Reduction
>99.3 >99.3
>99.3 99.3
94.8 96.4
88.5 94.9
>96.7 >96.7
91.1 96.5
>93.8 >93.8
Test Parameters: pH = 7.5 + 0.5 unless otherwise noted. Flow = 0.5 gpm (1.9 Lpm). Pressure = 60 psig (413.7 kPa).
Temp. = 68°F to 71.6°F (20°C to 22°C). Rated service capacity = 200 gallons (757 liters).
• It is essential that operational, maintenance, and filter
replacement requirements be carried out for the product to
perform as advertised.
• Use replacement filter P2RFWG2, part #4396841.
2008 suggested retail price of $39.99 U.S.A./S54.95 Canada.
Prices are subject to change without notice.
Model PlWG2L/PlWG2: Style 1 - When the filter indicator
reads 10%, order a new filter. When the indicator reads 0%, it is
recommended that you replace the filter.
Style 2 - When the filter indicator changes from green to yellow,
order a new filter. When the indicator changes from yellow to red,
it is recommended that you replace the filter.
Style 3 - When the water filter status display changes from
"GOOD" to "ORDER," order a new filter. When the filter indicator
reads "REPLACE," it is recommended that you replace the filter.
Style 4 - Press FILTER to check the status of your water filter. If
the filter indicator light is yellow, order a new filter. If the filter
indicator light is red, it is recommended that you replace the filter.
Change the water filter cartridge every 6 months. If the water
flow to the water dispenser or ice maker decreases noticeably
before 6 months have passed, replace the water filter cartridge
more often.
• These contaminants are not necessarily in your water supply.
While testing was performed under standard laboratory
conditions, actual performance may vary.
• The product is for cold water use only.
• Do not use with water that is microbiologically unsafe or of
unknown quality without adequate disinfection before or after the
system.
• Refer to the "Warranty" section for the Manufacturer's name,
address and telephone number.
• Refer to the "Warranty" section for the Manufacturer's limited
warranty.
Application Guidelines/Water Supply Parameters
Water Supply City or Well
Water Pressure 30 - 120 psi (207 - 827 kPa)
Water Temperature 33° - 100°F (0.6° - 37.8°C)
Service Flow Rate 0.5 gpm (1.9 Lpm) @60 psi
*Class I particle size: >0.5 um to <1 um
**Test requirement is at least 100,OOOparticles/mL of AC Fine Test Dust.
® NSF is a registered trademark of NSF International.
11

JENN-AII REFRIGERATORWARRANTY
LIMITED WARRANTY
For one year from the date of purchase, when this major appliance is operated and maintained according to instructions attached to or furnished with
the product, Jenn-Air brand of Whirlpool Corporation or Whirlpool Canada LP (hereafter "Jenn-Air") will pay for factory specified parts and repair labor
to correct defects in materials or workmanship that existed when this major appliance was purchased. Service must be provided by a Jenn-Air
designated service company. YOUR SOLE AND EXCLUSIVE REMEDY UNDER THIS LIMITED WARRANTY SHALL BE PRODUCT REPAIR AS
PROVIDED HEREIN. This limited warranty is valid only in the United States or Canada and applies only when the major appliance is used in the
country in which it was purchased. Proof of original purchase date is required to obtain service under this limited warranty.
On models with a water filter: 30 day limited warranty on water filter. For 30 days from the date of purchase, when this filter is operated and
maintained according to instructions attached to or furnished with the product, Jenn-Air will pay for a replacement water filter to correct defects in
materials and workmanship.
SECOND THROUGH FIFTH YEAR LIMITED WARRANTY ON CAVITY LINER AND SEALED REFRIGERATION SYSTEM
In the second through fifth years from the date of purchase, when this major appliance is operated and maintained according to instructions attached
to or furnished with the product, Jenn-Air will pay for replacement or repair of the refrigerator/freezer cavity liner (including labor costs) if the part
cracks due to defective materials or workmanship. Also, in the second through fifth year from the date of purchase, when this major appliance is
operated and maintained according to instructions attached to or furnished with the product, Jenn-Air will pay for factory specified parts and repair
labor for the following components to correct defects in materials or workmanship in the sealed refrigeration system that existed when this major
appliance was purchased: compressor, evaporator, condenser, dryer, and connecting tubing.
ITEMS EXCLUDED FROM WARRANTY
This limited warranty does not cover:
1. Replacement parts or repair labor if this major appliance is used for other than normal, single-family household use or when it is used in a manner
that is inconsistent to published user or operator instructions and/or installation instructions.
2. Service calls to correct the installation of your major appliance, to instruct you on how to use your major appliance, to replace or repair house
fuses, or to correct house wiring or plumbing.
3. Service calls to repair or replace appliance light bulbs, air filters or water filters. Consumable parts are excluded from warranty coverage.
4. Damage resulting from accident, alteration, misuse, abuse, fire, flood, acts of God, improper installation, installation not in accordance with
electrical or plumbing codes, or use of products not approved by Jenn-Air.
5. Cosmetic damage, including scratches, dents, chips or other damage to the finish of your major appliance, unless such damage results from
defects in materials or workmanship and is reported to Jenn-Air within 30 days from the date of purchase.
6. Any food or medicine loss due to refrigerator or freezer product failures.
7. Pickup and delivery. This major appliance is intended to be repaired in your home.
8. Repairs to parts or systems resulting from unauthorized modifications made to the appliance.
9. Expenses for travel and transportation for product service if your major appliance is located in a remote area where service by an authorized
Jenn-Air servicer is not available.
10. The removal and reinstallation of your major appliance if it is installed in an inaccessible location or is not installed in accordance with Jenn-Air's
published installation instructions.
11. Replacement parts or repair labor on major appliances with original model/serial numbers that have been removed, altered or cannot be easily
determined.
DISCLAIMER OF IMPLIED WARRANTIES
IMPLIED WARRANTIES, INCLUDING ANY IMPLIED WARRANTY OF MERCHANTABILITY OR IMPLIED WARRANTY OF FITNESS FOR A
PARTICULAR PURPOSE, ARE LIMITED TO ONE YEAR OR THE SHORTEST PERIOD ALLOWED BY LAW. Some states and provinces do not allow
limitations on the duration of implied warranties of merchantability or fitness, so this limitation may not apply to you. This warranty gives you specific
legal rights, and you also may have other rights that vary from state to state or province to province.
LIMITATION OF REMEDIES; EXCLUSION OF INCIDENTAL AND CONSEQUENTIAL DAMAGES
YOUR SOLE AND EXCLUSIVE REMEDY UNDER THIS LIMITED WARRANTY SHALL BE PRODUCT REPAIR AS PROVIDED HEREIN. JENN-AIR
SHALL NOT BE LIABLE FOR INCIDENTAL OR CONSEQUENTIAL DAMAGES. Some states and provinces do not allow the exclusion or limitation of
incidental or consequential damages, so these limitations and exclusions may not apply to you. This warranty gives you specific legal rights, and you
also may have other rights that vary from state to state or province to province.
If outside the 50 United States and Canada, contact your authorized Jenn-Air dealer to determine if another warranty applies. 6/08
For additional product information, in the U.S.A., visit www.jennair.com
In Canada, visit www.jennair.ca
If you do not have access to the Internet and you need assistance using your product or you would like to schedule service, you may contact
Jenn-Air at the number below.
Have your complete model number ready. You can find your model number and serial number on the label, located on the inside wall of the
refrigerator compartment.
For assistance or service in the U.S.A., call 1-800-688-1100. In Canada, call 1-800-807-6777.
If you need further assistance, you can write to Jenn-Air with any questions or concerns at the address below:
In the U.S.A.: In Canada:
Jenn-Air Brand Home Appliances Jenn-Air Brand Home Appliances
Customer eXperience Center Customer eXperience Centre
553 Benson Road 1901 Minnesota Court
Benton Harbor, MI 49022-2692 Mississauga, Ontario L5N 3A7
Please include a daytime phone number in your correspondence.
Please keep this User Instructions and model number information for future reference.
12

NousvousREMERCIONSd'avoiracheteceproduitdehautequalite.Sivousrencontrezunproblemenonmentionne
danslasectionDI_PANNAGE,veuillezvisiternotresiteWebwww.jennair.compourdesinformationssupplementaires.Si
vousaveztoujoursbesoind'assistance,veuilleznoustel6phonerau1-800-688-1100.AuCanada,visiteznotresiteWeb
www.jennair.caoutel6phonez-nousau1-800-807-6777.
Vousaurezbesoindevosnum@osdemodeleetdes@iesituessurlaparoiinterneducompartimentderefrig@ation.
SECURITEDU REFRIGERATEUR
Votre securite et celle des autres est tres importante.
Nous donnons de nombreux messages de s_curit_ importants dans ce manuel et sur votre appareil m_nager. Assurez-vous de
toujours lire tous les messages de s_curit_ et de vous y conformer.
Voici le symbole d'alerte de s_curit_.
Ce symbole d'alerte de s_curit_ vous signale les dangers potentiels de d_c_s et de blessures graves a vous
eta d'autres.
Tous les messages de s_curit_ suivront le symbole d'alerte de s_curit_ et le mot "DANGER" ou
"AVERTISSEMENT". Ces mots signifient •
Risque possible de d_cbs ou de blessure grave si vous ne
suivez pas imm_diatement les instructions.
Risque possible de d_cbs ou de blessure grave si vous
ne suivez pas les instructions.
Tous les messages de s_curit_ vous diront quel est le danger potentiel et vous disent comment r_duire le risque de blessure et
ce qui peut se produire en cas de non-respect des instructions.
IMPORTANTES INSTRUCTIONS DE SI_CURITI_
AVERTISSEMENT : Pour reduire les risques d'incendie, de choc electrique ou des blessures Iors de I'utilisation du
refrig6rateur, prendre quelques precautions fondamentales, y compris les suivantes •
• Brancher I'appareil sur une prise & 3 alveoles reliee a la terre.
• Ne pas enlever la broche de liaison & la terre.
• Ne pas utiliser un adaptateur.
• Ne pas utiliser un c&ble de rallonge.
• Debrancher la source de courant electrique avant I'entretien.
• Replacer pieces et panneaux avant de faire la remise en marche.
• Enlever les portes de votre vieux r6frigerateur.
• Utiliser un produit de nettoyage ininflammable.
• Garder les materiaux et les vapeurs inflammables, telle
que I'essence, loin du r6frigerateur.
• Utiliser deux ou plus de personnes pour deplacer et
installer le refrig6rateur.
• Debrancher le refrig6rateur avant I'installation de la
machine & glagons (seulement pour modeles pr_ts
recevoir une machine & glagons).
• Utiliser un verre robuste pour prendre des glagons (sur
certains modeles).
CONSERVEZ CES INSTRUCTIONS
13

Mise au rebut de votre vieux r( frig( rateur
Risque de suffoquer
Enlever les portes de votre vieux r_frig_rateur.
Le non=respect de cette instruction peut causer
un d_c_s ou des I_sions c_r_brales.
IMPORTANT : L'emprisonnement et I'etouffement des enfants ne
sont pas un probleme du passe. Les refrigerateurs jetes ou
abandonnes sont encore dangereux, m_me s'ils sont laisses
abandonnes pendant "quelques jours seulement". Si vous vous
debarrassez de votre vieux refrigerateur, veuillez suivre les
instructions suivantes pour aider &eviter les accidents.
Avant de jeter votre vieux r_frig_rateur ou cong_lateur :
• Enlever les portes.
• Laisser les tablettes en place de sorte que les enfants ne
puissent pas y penetrer facilement.
.--JL
UTILISATIONDU REFRIGERATEUR
Risque de choc _lectrique
Brancher sur une prise a 3 alv_oles reli_e a la terre.
Ne pas enlever la broche de liaison a la terre.
Ne pas utiliser un adaptateur.
Ne pas utiliser un cable de rallonge.
Le non=respect de ces instructions peut causer
un d_c_s, un incendie ou un choc _lectrique.
L'afficheur indique normalement les temperatures reelles dans
les compartiments de refrigeration et de congelation. Parfois,
les temperatures peuvent varier legerement dans differentes
zones de chaque compartiment. Par exemple, le fait d'ouvrir
frequemment la porte laisse I'air de la piece penetrer dans le
compartiment, exposant ainsi les balconnets de porte a de
I'air a temperature ambiante. Au moment de la lecture de
I'afficheur, garder a I'esprit qu'il indique une temperature
moyenne pour I'ensemble du compartiment. Pour voir la
temperature reglee pour le compartiment plut6t que la
temperature reelle, voir "Afficher les valeurs de reglage".
Attendre 24 heures avant d'ajouter des aliments dans le
refrigerateur. Si on ajoute des aliments avant que le
refrigerateur n'ait completement refroidi, les aliments risquent
de s'aMmer.
REMARQUE :Tourner les commandes du refrigerateur et du
congelateur & un reglage plus bas (plus froid) que le reglage
recommande ne refroidira pas les compartiments plus
rapidement.
REMARQUE : S'assurer que le refrigerateur est branche sur une
prise de courant &trois alveoles reliee & la terre.
Pour votre commodite, les commandes du refrigerateur sont
prereglees & I'usine. Lors de I'installation initiale du refrigerateur,
s'assurer que les commandes sont encore prereglees aux
reglages moyens tel qu'illustr&
O°F -18°C RECOMMENDED 37°F 3°C
FROZEN FOOD FRESHFOOD
Fq
E]
IMPORTANT :
• La commande du refrigerateur regle la temperature du
compartiment de refrigeration. La commande du congelateur
regle la temperature du compartiment de congelation.
Mise en marche du r_frig_rateur
• Si lerefrigerateur n'est pas allume, appuyer sur ON/OFF
(marche/arr_t) pour mettre en marche le refroidissement.
• Pour eteindre votre refrigerateur, appuyer sur ON/OFE Votre
refrigerateur ne se refroidira pas si la commande est sur OFF
(arr_t).
REMARQUE : Appuyer sur le bouton On/Off ne deconnecte
pas le refrigerateur de la source de courant electrique. Les
lampes interieures s'eteignent si I'une des portes des
compartiments est maintenue ouverte pendant plus de
10 minutes. Fermer simplement et ouvrir la porte pour allumer
les lampes interieures.
I On/Off I
14

Affichage des valeurs de r_glage
Les points de reglage recommandes par I'usine sont 0°F (-18°C)
pour le congelateur et 37°F (3°C) pour le refrig6rateur.
Moyenne de point de reglage pour le congelateur :
-6° a 6°F (-21o a -14°C)
Moyenne de point de reglage pour le refrig6rateur :
32° a 46°F (0° a 8°C)
Pour visualiser les valeurs de reglage des temperatures, appuyer
sur le bouton du haut ou du bas pour la temperature du
refrig6rateur ou celle du congelateur. L'affichage deviendra plus
vif pour indiquer que I'on visualise les valeurs de reglage. Cinq
secondes apr_s I'ajustement, les temoins lumineux seront plus
faibles et afficheront & nouveau la temperature reelle.
REMARQUE : Pendant les programmes de degivrage
automatique, la temperature reelle affichee peut etre plus elevee
que les valeurs de reglage. Ceci est normal. Les temperatures
reelles devraient revenir aux valeurs de reglage au bout de
quelques heures apr_s I'arret du programme de degivrage.
Ajustement des r_glages de commande
Les reglages moyens indiques & la section precedente devraient
etre corrects pour I'utilisation normale du refrigerateur
domestique. Les reglages sont faits correctement Iorsque le lait
ou le jus est aussi froid que vous I'aimez et Iorsque la creme
glacee est ferme.
Si la temperature est trop tiede ou trop froide dans le refrigerateur
ou le congelateur, verifier d'abord les events pour vous assurer
qu'ils ne sont pas bloques.
S'il est necessaire d'ajuster les temperatures, utiliser les reglages
indiques au tableau ci-dessous comme guide. Attendre au moins
24 heures entre les ajustements.
CONDITION/RAISON : AJUSTEMENT:
REFRIGERATEUR trop tiede Regler la commande du
REFRIGI2RATEUR
un degre plus bas
CONG¢:LATEUR trop tiede/ Regler !acommande du
trop peu de glagons CONGELATEUR
un degre plus bas
RI2FRIGI2RATEUR trop froid Regler la commande du
REFRIGI2RATEUR
un degre plus haut
CONGI2LATEUR trop froid Regler !a commande du
CONGELATEUR
un degre plus haut
Autres caract_ristiques du tableau de commande
Mode temperature
• Appuyersur °Cpourselectionner I'affichagede latemperature
en Celsius ou en Fahrenheit.
I
Fq
Max Cold (refroidissement maximum)
Utiliser la fonction Max Cold pour accelerer le refroidissement de
charges importantes d'aliments. La fonction de refroidissement
maximum r_gle la temperature du refrigerateur a 34°F (1°C) et
celle du congelateur a -6°F (-21°C) pendant 24 heures.
REMARQUE • Lorsque la fonction Max Cold est activee,
I'affichage indique les valeurs de reglage de temperature de la
fonction Max Cold. Apr_s 24 heures ou Iorsque la fonction Max
Cold est manuellement desactivee, les valeurs de reglage
reviendront a leur reglage anterieur.
• Appuyer sur MAX COLD pour selectionner ce mode. La
fonction Max Cold restera active pendant 24 heures ou
jusqu'& ce qu'elle soit manuellement desactivee.
I MaxCold I
Sabbath Mode (mode sabbat)
La caracteristique Sabbath Mode est con(_ue pour le voyageur qui
desire economiser plus d'energie ou pour les personnes dont les
observances religieuses exigent que la machine a glagons et les
lampes soient eteintes. En mode sabbat, les points de reglage de
temperature restent inchanges, la machine a glagons et les leviers
du distributeur sont desactives et les lampes interieures
s'eteignent.
• Appuyer sur SABBATH MODE pour activer le mode sabbat.
Cette caracteristique demeure activee jusqu'& ce que I'on
appuie de nouveau sur la touche Sabbath Mode.
SabbathModeI
_.,0 "IVy:c>"IDa)"
Le tiroir convertible peut etre ajuste pour refroidir correctement les
viandes ou legumes. L'air a I'interieur du contenant est refroidi
pour eviter les "pelts espaces" de congelation et peut etre regle
pour garder les viandes aux temperatures de conservation de 28°
32°F (de -2 °a 0°C) recommandees par I'Office national du betail
et des viandes. La temperature du tiroir convertible est prereglee
au reglage PRODUCE.
Pour entreposer des viandes :
Regler la commande a I'un des trois reglages MEAT (viandes) pour
conserver les viandes aux temperatures optimales d'entreposage.
Pour entreposer des I_gumes :
Regler la commande _ PRODUCE pour conserver les legumes
aux temperatures optimales d'entreposage.
REMARQUE • Si les aliments commencent a geler, deplacer le
reglage vers la gauche (moins froid). Se rappeler d'attendre
24 heures entre les ajustements.
15

I 1/ _ _C_t _'
/ #
On peut contr61er le degr@d'humidit@ dans le bac _ I@gumes
@tanche. La commande peut 8tre ajust@e_ n'importe quel r@glage
entre ROW et HIGH.
LOW/bas (ouvert) pour une meilleure conservation des fruits et
legumes &pelures.
HIGH/haut (ferm@)pour une meilleure conservation des legumes
&feuilles frais.
ka commande d'air de la porte se situe sur le c6t@gauche avant
du compartiment refrigerateur.
A--
• Ne pas utiliser un objet pointu pour briser les gla(}ons dans le
bac. Cette action peut endommager le bac et le m@canisme
du distributeur.
• Ne pas garder quoi que ce soit sur le dessus ou dans la
machine & glagons ou dans le bac & glagons.
Pour retirer et r_installer le bac & glagons
1.
2=
Tenir la base du bac & gla(}ons &deux mains et appuyer sur le
bouton de d@verrouillage pour pouvoir soulever et retirer le
bac.
REMARQUE : IIn'est pas n@cessaire de pousser le
commutateur de la machine & gla(}ons vers la position OFF
(vers la droite) Iorsqu'on enl@vele bac. Le couvercle du
d@tecteur ("porte &clapet"), sur la paroi gauche du
cong@lateur, interrompt la production de glagons Iorsque la
porte est ouverte ou que le bac n'est pas en place.
Remettre le bac sur la porte et appuyer vers le bas pour le
remettre bien en place.
A. Commande d'air de la porte
Glisser le bouton de commande d'air vers la gauche pour
r@duireI'arriv@ed'air froid dans le compartiment ou porte-
cannette et le rendre moins froid.
Glisser le bouton de commande d'air vers la droite pour
augmenter I'arriv@e d'air froid dans le compartiment ou porte-
cannette et le rendre plus froid.
Mc c @g cu{)o ss®t bc c
Mise en marche/arr6t de la machine & glagons
Le commutateur On/Off se trouve en haut, & droite du
compartiment de cong@lation.
Pour mettre en marche la machine & glagons, glisser le
commutateur vers la position ON (vers la gauche).
Pour arr@ter manuellement la machine & gla(}ons, glisser le
commutateur vers la position OFF (vers la droite).
REMARQUE : La machine &glagons comporte un syst@me
d'arr@t automatique. Le d@tecteur de la machine & glagons
arr@teraautomatiquement la production de glagons mais le
commutateur restera en position ON (vers la gauche).
A NOTER :
• Accorder 24 heures pour produire la premiere quantit@ de
gla(}ons. Jeter les trois premieres quantit@s de glagons
produites.
La qualit@de vos gla(}ons depend de la qualit@de I'eau fournie
&votre machine &glagons. Eviter de brancher la machine &
gla(}ons & un approvisionnement d'eau adoucie. Les produits
chimiques adoucisseurs d'eau (tels que le sel) peuvent
endommager des pieces de la machine &gla(}ons et causer
une pi@trequalit@ des gla(}ons. Si une alimentation d'eau
adoucie ne peut pas @tre@vit@e,s'assurer que I'adoucisseur
d'eau fonctionne bien et qu'il est bien entretenu.
de f ce @c£
Ne pas utiliser pour le filtrage d'une eau
microbiologiquement pollu@eou de qualit@ inconnue en
I'absence d'un dispositif de d@sinfection ad@quat avant
ou apr_s le syst_me.
T_moin lumineux de I'_tat du filtre _ eau
(sur certains modules)
Le t@moin lumineux de I'@tatdu filtre & eau vous aidera &savoir
quand changer la cartouche du filtre & eau. Lorsque I'afficheur
affiche 10 %, il est temps de commander un filtre de
remplacement. II est recommand@ de remplacer le filtre & eau
Iorsque 0 % apparait sur I'afficheur OU Iorsque le debit du
distributeur d'eau ou de glagons diminue notablement. Le filtre
doit @treremplac@ au moins tousles 6 mois selon la qualit@ de
I'eau et I'utilisation.
Apr@s avoir change le filtre & eau, remettre I'afficheur &0 en
appuyant sur le bouton. L'afficheur indique 99 % Iorsque le
syst@me est de nouveau r@gl@.
Filtre _ eau sans indicateur lumineux
(sur certains modules)
Si votre r@frig@rateurn'est pas muni du t@moin lumineux de filtre &
eau, vous devez changer la cartouche du filtre a eau au moins
tousles 6 mois selon la qualit@ de I'eau et I'utilisation. Si le debit
d'eau au distributeur ou & la machine & glagons diminue de fa(}on
marquee avant que 6 mois ne se soient @coul@s,remplacer le filtre
&eau plus souvent.
16

4=
Changer le filtre & eau
1. Appuyer sur le bouton d'ejection pour degager le filtre de la
grille de la base.
2. Tirer le filtre.
3=
Tourner le bouchon dans le sens inverse des aiguilles d'une 5.
montre pour le retirer du filtre.
IMPORTANT • Ne pas jeter le bouchon. IIfait partie du
refrigerateur. Le conserver pour I'utiliser avec le filtre de 6.
rechange.
Aligner I'ar_te sur le bouchon avec la fleche sur le filtre neuf et
tourner le bouchon jusqu'& ce qu'il s'enclenche.
REMARQUE •On peut faire fonctionner la machine &gla(;ons
sans filtre. L'eau ne sera pas filtree. Inserer simplement le
bouchon completement dans la grille de la base et faire
tourner le bouchon jusqu'& ce qu'il soit bien en place.
Retirer les pellicules des anneaux d'etancheit& S'assurer que
les anneaux d'etancheite sont toujours en place une fois que
les couvercles sont retires.
Enfoncer le filtre dans la grille de la base. Le bouton d'ejection
ressortira Iorsque le filtre sera completement engage.
ENTRETIENDU REFRIGERATEUR
Risque d'explosion
Utiliser un produit de nettoyage ininflammable.
Le non=respect de cette instruction peut causer un d_c_s,
une explosion ou un incendie.
Les sections de refrigeration et de congelation se degivrent
automatiquement. Toutefois, nettoyer les deux sections environ
une fois par mois pour eviter une accumulation d'odeurs. Essuyer
les renversements immediatement.
IMPORTANT : Comme I'air circule entre les deux sections, toutes
les odeurs formees dans une section seront transferees &I'autre.
Vous devez nettoyer &fond les deux sections pour eliminer les
odeurs. Pour eviter le transfert d'odeurs et I'assechement des
aliments, envelopper ou recouvrir hermetiquement les aliments.
Nettoyage de votre r_frig_rateur :
REMARQUE : Ne pas utiliser des nettoyants abrasifs ou
puissants tels que les nettoyants & vitre en atomiseurs, nettoyants
&recurer, liquides inflammables, cires nettoyantes, detergents
concentres, eau de Javel ou nettoyants contenant du petrole sur
les pieces en plastique, les garnitures interieures et de portes ou
les joints de portes. Ne pas utiliser d'essuie-tout, tampons &
recurer ou autres outils de nettoyage abrasifs.
1. Debrancher le refrigerateur ou deconnecter la source de
courant electrique.
2. Laver & la main, rincer et secher les pieces amovibles et les
surfaces internes & fond. Utiliser une eponge propre ou un
linge doux et un detergent doux dans de I'eau tiede.
3=
4=
5=
Laver les surfaces exterieures en acier inoxydable ou en metal
peint avec une eponge propre ou un linge doux et un
detergent doux dans de I'eau tiede.
Le condenseur n'a pas besoin d'etre nettoye souvent dans
des conditions de fonctionnement normales. Si
I'environnement est particulierement graisseux, poussiereux,
ou s'il y a des animaux domestiques dans la maison, le
condenseur devrait _tre nettoye tousles deux ou trois mois
pour assurer une efficacite maximum.
Si vous avez besoin de nettoyer le condenseur :
• Retirer la grille de la base.
• Utiliser un aspirateur & brosse douce pour nettoyer la
grille, les endroits ouverts derriere la grille et la surface
I'avant du condenseur.
• Replacer la grille de la base Iorsqu'on a termin&
Brancher le refrigerateur ou reconnecter la source de courant
electrique.
REMARQUE :Toutes les ampoules ne conviendront pas & votre
refrigerateur. S'assurer de faire le remplacement par une ampoule
de grosseur, de forme et de puissance semblables. Sur certains
modeles, la lampe du distributeur demande une ampoule pour
service intense de 10 watts. Toutes les autres lampes demandent
une ampoule de 40 watts. Les ampoules de remplacement sont
disponibles chez votre marchand.
1. Debrancher le refrigerateur ou deconnecter la source de
courant electrique.
2. Enlever le protecteur d'ampoule s'il y a lieu.
REMARQUE : Pour nettoyer le protecteur d'ampoule, le laver
&I'eau tiede et avec un detergent liquide. Bien rincer et secher
le protecteur d'ampoule.
3. Enlever I'ampoule d'eclairage et la remplacer par une de
m_me taille, forme et puissance.
4. Replacer le protecteur d'ampoule s'il y a lieu.
5. Brancher le refrigerateur ou reconnecter la source de courant
electrique.
17

DI PANNAGE
Essayer d'abord les solutions sugg_r_es ici ou visiter notre site Internet et la FAQ (foire aux questions)
pour _viter le co_t d'un appel de service.
Aux I_.-U.,www.jennair.com Au Canada, www.jennair.ca
Le r_frig_rateur ne fonctionne pas Le r_frig_rateur semble bruyant
Risque de choc _lectrique
Brancher sur une prise a 3 alv_oles reli_e a Jaterre.
Ne pas enlever la broche de liaison a la terre.
Ne pas utiliser un adaptateur.
Ne pas utiliser un cable de rallonge.
Le non=respect de ces instructions peut causer
un d_c_s, un incendie ou un choc _lectrique.
Le cordon d'alimentation _lectrique est-il d_branch_?
Brancher sur une prise a3 alveoles reliee a la terre.
La prise _lectrique fonctionne-t-elle? Brancher une lampe
pour voir si la prise fonctionne.
Un fusible est-il grill_ ou un disjoncteur s'est-il ouvert?
Remplacer le fusible ou reenclencher le disjoncteur. Si le
probleme persiste, appeler un electricien.
La(les) commande(s) est(sont)-elle(s) en marche?
S'assurer que la commande du refrigerateur est bien en
marche. Voir "Utilisation de la(des) commande(s)".
S'agit-il d'une nouvelle installation? Accorder 24 heures
apres I'installation pour que le refrigerateur se refroidisse
completement.
REMARQUE : Regler la(les) commande(s) de temperature sur
la position la plus froide ne fera pas refroidir le refrigerateur
plus rapidement.
Le moteur semble trop tourner
IIse peut que votre nouveau refrigerateur fonctionne plus
Iongtemps que I'ancien gr&ce & son compresseur a haute
efficacite et ses ventilateurs. L'appareil peut fonctionner plus
Iongtemps encore si la temperature de la piece est chaude, si une
importante quantite de nourriture y est ajoutee, si la porte est
frequemment ouverte ou si elle a ete laissee ouverte.
Le bruit des refrigerateurs a ete reduit au cours des annees. Du
fait de cette reduction, il est possible d'entendre des bruits
intermittents venant de votre nouveau refrigerateur qui n'avaient
pas ete deceles avec votre ancien modele. Voici une liste des
sons normaux accompagnes d'explications.
• Pulsation - les ventilateurs/le compresseur se reglent afin
d'optimiser la performance.
• Sifflement/cliquetis - ecoulement de liquide refrigerant,
mouvement des conduites d'eau ou d'objets poses sur le
dessus du refrigerateur.
• Bruit d'_clatement- contraction/expansion des parois
internes, particulierement Iors du refroidissement initial.
• Bruit d'_coulement d'eau - peut _tre entendu Iorsque la
glace fond Iors du programme de degivrage et que I'eau
s'ecoule dans le plateau de degivrage.
La porte ne se ferme pas compl_tement
La porte est-elle bloqu_e en position ouverte? Deplacer les
emballages d'aliments pour liberer la porte.
Un compartiment ou une tablette bloquent-ils le passage?
Replacer le compartiment ou la tablette en position correcte.
Le couvercle du bac a I_gumes fait-il obstruction? Verifier
que le couvercle du bac & legumes est enfonce completement
de sorte que I'arriere repose sur les supports.
La porte est difficile _ ouvrir
Risque d'explosion
Utiliser un produit de nettoyage ininflammable.
Le non=respect de cette instruction peut causer un d_c_s,
une explosion ou un incendie.
Les joints d'_tanch_it_ sont-ils sales ou collants? Nettoyer
les joints et les surfaces de contact au savon doux et & I'eau
tiede. Rincer et secher avec un linge doux.
18

La temperature est trop _lev_e
• S'agit-il d'une nouvelle installation? Accorder 24 heures
apres I'installation pour que le refrig6rateur se refroidisse
completement.
La porte est-elle ouverte fr_quemment ou a-t-elle _t_
laiss_e ouverte? Ceci permet a I'air chaud de pen6trer dans
le refrig6rateur. Reduire le nombre d'ouvertures de la porte et
la maintenir completement fermee.
Une importante quantit_ d'aliments a-t-elle _t_ ajout_e?
Accorder quelques heures pour que le refrig6rateur revienne
sa temperature normale.
La(Les) commande(s) est(sont)-elle(s) correcte(s) pour les
conditions existantes? Ajuster la(les) commande(s) & un
reglage plus froid. Verifier la temperature au bout de
24 heures. Voir "Utilisation de la(des) commande(s)".
II y a une accumulation d'humidit_ & I'int_rieur
REMARQUE : Une certaine accumulation d'humidite est normale.
• La piece est-elle humide? Ceci contribue &I'accumulation
de I'humidit&
La porte est ouverte fr_quemment ou a _t_ laiss_e
ouverte? Ceci permet &I'air humide de pen6trer dans le
refrig6rateur. Reduire le nombre d'ouvertures de la porte et la
maintenir completement fermee.
La machine & glagons ne produit pas ou pas
suffisamment de glagons
Le r_frig_rateur est-il connect_ a I'alimentation en eau et
le robinet d'arr6t d'eau est-il ouvert? Brancher le
refrigerateur & I'alimentation en eau et ouvrir le robinet d'arr_t
d'eau completement.
La canalisation de la source d'eau du domicile comporte-
t-elle une d_formation? Une deformation dans la
canalisation peut reduire I'ecoulement d'eau. Redresser la
canalisation d'eau.
La machine a gla£ons est-elle allum_e? S'assurer que le
bras de commande en broche ou I'interrupteur (selon le
modele) est en position ON.
S'agit-il d'une nouvelle installation? Attendre 24 heures
apres I'installation pour la production de gla£;ons. Attendre
72 heures pour le commencement de la production complete
de gla£;ons.
Une grande quantit_ de gla£ons vient-elle d'6tre enlev_e?
Attendre 24 heures pour que la machine a gla£;ons produise
plus de gla£;ons.
Un gla£on est-il coinc_ dans le bras _jecteur? Enlever le
gla£;on du bras ejecteur avec un ustensile en plastique.
Un syst_me de filtration de I'eau a osmose inverse est-il
connect_ a votre canalisation d'eau froide? Ceci peut
diminuer la pression de I'eau. Voir "Specifications de
I'alimentation en eau".
Les gla£ons sont creux ou petits
REMARQUE : Cela indique une faible pression de I'eau.
• La valve de la canalisation d'eau n'est-elle pas
compl_tement ouverte? Ouvrir la valve d'eau completement.
La canalisation de la source d'eau du domicile comporte-
t-elle une d_formation? Une deformation dans la
canalisation peut reduire I'ecoulement d'eau. Redresser la
canalisation d'eau.
Un syst_me de filtration de I'eau a osmose inverse est-il
connect_ a votre canalisation d'eau froide? Ceci peut
diminuer la pression de I'eau. Voir "Specifications de
I'alimentation en eau".
• Reste-t-il des questions concernant la pression de I'eau?
Appeler un plombier agree et qualifi&
Go_t, odeur ou couleur grise des gla£ons
• Les raccords de plomberie sont-ils neufs? Des raccords de
plomberie neufs peuvent causer une decoloration et un
mauvais goQt des gla£;ons.
Les gla£ons ont-ils _t_ gard_s trop Iongtemps? Jeter les
gla(}ons. Laver le compartiment & gla£;ons. Accorder
24 heures pour la fabrication de nouveaux gla£;ons.
Y a-t-il un transfert d'odeurs de nourriture? Utiliser des
emballages etanches & I'air et & I'humidite pour conserver les
aliments.
• L'eau contient-elle des min_raux (tels que le soufre)?
L'installation d'un filtre peut _tre requise afin d'enlever les
mineraux.
ACCESSOIRES
Pour commander des filtres de rechange, composer le
1-800-442-9991 et demander le numero de piece indiqu_
ci-dessous ou contacter votre marchand autorise Jenn-Air.
Au Canada, composer le 1-800-807-6777.
Nettoyant et poli pour acier inoxydable :
Commander la piece N° 4396095
Cartouche du filtre de la base standard :
Commander la piece N° 4396841 (T2RFWG2 et P2RFWG2)
19

FEUILLESDEDONNEESSURLA PERFORMANCE
Syst me de filtration d'eau de la grille de la base
Modble T2WG2L/T2RFWG2 Capacite 200 gallons (757 litres)
Modble T2WG2/T2RFWG2 Capacite 200 gallons (757 litres)
Produit teste et certifie par NSF International en vertu de la norme
NSF/ANSI 42 (reduction du goQt et de I'odeur du chlore, et particules de
classe I1") et en vertu de la norme NSF/ANSI 53 (reduction de mercure,
benzene, toxaphene, O-dichlorobenzene et carbofurane).
Ce produit a et6 teste selon les normes NSF/ANSI 42 et 53 pour la reduction des substances 6num@ees ci-dessous. La concentration des
substances indiquees dans I'eau entrant dans le systeme a et6 reduite & une concentration moindre ou egale & la limite permissible pour
I'eau qui quitte le systeme, tel que specifi6 dans les normes NSF/ANSI 42 et 53.
Red. de substances Criteres de Affluent Concentration dans I'eau Effluent Effluent % de red. % de red.
Effets esthetiques reduction NSF moyen a traiter maximal moyen minimale moyenne
Chlore goQt/odeur r6duction de 50 % 2,0182 mg/L 2,0 mg/L _+10 % 0,06 mg/L ** 0,0536 mg/L 97,03 97,34
Particules (classe I1") r6duct on de 85 % 1333333 #/mL Au moins 10000 particules/mL 6600 #/mL 2325 #/mL 99,51 99,83
Reduction des Criteres de Affluent Concentration dans I'eau Effluent Effluent % de red. % de red.
contaminants reduction NSF moyen a traiter maximal moyen minimale moyenne
Plomb : & pH 6,5*** 0,010 mg/L 0,1533 mg/L 0,15 mg/L + 10 % 0,0005 mg/L 0,0005 mg/L 99,67 99,67
Plomb : & pH 8,5*** 0,010 mg/L 0,1400 mg/L 0,15 mg/L _+10 % 0,0007 mg/L 0,0006 mg/L 99,50 99,57
Mercure : & pH 6,5 0,002 mg/L 0,0058 mg/L 0,006 mg/L + 10 % 0,0002 mg/L 0,0002 mg/L 96,54 96,54
Mercure : & pH 8,5 0,002 mg/L 0,0059 mg/L 0,006 mg/L _+10 % 0,0005 mg/L 0,0003 mg/L 91,57 94,92
Benzene 0,005 mg/L 0,0154 mg/L 0,015 mg/L _+10 % 0,0012 mg/L 0,0006 mg/L 92,22 96,34
O-Dichlorobenzene 0,6 mg/L 1,7571 mg/L 1,8 mg/L _+10 % 0,0250 mg/L 0,0066 mg/L 98,58 99,63
Toxaphene 0,003 mg/L 0,015 mg/L 0,015 mg/L _+10 % 0,001 mg/L 0,001 mg/L 93,33 93,33
Carbofurane 0,04 mg/L 0,0819 mg/L 0,08 mg/L _+10 % 0,0400 mg/L 0,0213 mg/L 51,13 74,00
Parametres de test : pH = 7,5 _+0,5 &
Temp. = 68°F & 71,6°F (20°C & 22°C).
• II est essentiel que les exigences de fonctionnement, d'entretien
et de remplacement de filtre soient respectees pour que ce
produit donne le rendement annonc&
• Utiliser la cartouche de remplacement T2RFWG2, piece
n° 4396841. Prix au detail sugg6re en 2008 de 39,99 $US/
54,95 SCAN. Les prix sont sujets & modification sans preavis.
Mod_le T2WG2L : Style 1 - Lorsque le temoin du filtre indique
10 %, commander un nouveau filtre. Lorsque le temoin indique
0 %, il est recommande de remplacer le filtre.
Style 2 - Lorsque le temoin du filtre passe du vert au jaune,
commander un nouveau filtre. Lorsque le temoin passe du jaune
au rouge, il est recommande de remplacer le filtre.
Style 3 - Lorsque I'ecran d'affichage de I'etat du filtre & eau
passe de "GOOD" (bon) & "ORDER" (commander), commander
un nouveau filtre. Lorsque le temoin indique "REPLACE"
(remplacer), il est recommande de remplacer le filtre.
Style 4 - Appuyer sur FILTER (filtre) pour v@ifier I'etat du filtre &
eau. Lorsque le temoin lumineux du filtre est jaune, commander
un nouveau filtre. Si le temoin lumineux du filtre est rouge, il est
recommande de remplacer le filtre.
ModUle T2WG2 : Changer la cartouche du filtre & eau tousles
6 mois. Si le debit d'eau au distributeur ou & la machine &
glagons diminue de fagon marquee avant que 6 mois ne se
soient ecoul6s, remplacer la cartouche du filtre & eau plus
souvent.
• Ces contaminants ne sont pas necessairement presents dans
votre approvisionnement d'eau. M_me si le test a et6 effectue
dans des conditions de laboratoires standard, le rendement reel
peut varier.
moins d'indications contraires. Debit = 0,85 gpm (3,2 Lpm). Pression = 60 Ib/po 2(413,7 kPa).
Capacite de service nominale = 200 gallons (757 litres).
• Le produit doit _tre utilise pour I'eau froide seulement.
• Ne pas utiliser pour le filtrage d'une eau microbiologiquement
polluee ou de qualite inconnue en I'absence d'un dispositif de
desinfection adequat avant ou apres le systeme.
• Consulter la section "Garantie" pour obtenir le nom, I'adresse et
le num@o de telephone du fabricant.
• Consulter la section "Garantie" pour voir la garantie limitee du
fabricant.
Directives d'application/
Parambtres d'approvisionnement en eau
Source d'eau Collectivite ou puits
Pression de I'eau 30 - 120 Ib/po 2 (207 - 827 kPa)
Temperature de I'eau 33 ° - 100°F (0,6 ° - 37,8°C)
Debit nominal 0,85 gpm (3,2 L/min) a 60 Ib/po 2
*Classe II - taille des particules : 1 um& <5 um
**Exigence de test : au moins 100 000 particules/mL (poussiere de test fine AC).
***Conforme aux exigences de reduction du plomb de la norme NSF/ANSI 53 (test6 par Pace Analytical Services, Inc.)
® NSF est une marque deposee de NSF International.
20
La page est en cours de chargement...
La page est en cours de chargement...
La page est en cours de chargement...
La page est en cours de chargement...
-
 1
1
-
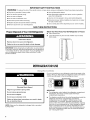 2
2
-
 3
3
-
 4
4
-
 5
5
-
 6
6
-
 7
7
-
 8
8
-
 9
9
-
 10
10
-
 11
11
-
 12
12
-
 13
13
-
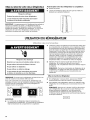 14
14
-
 15
15
-
 16
16
-
 17
17
-
 18
18
-
 19
19
-
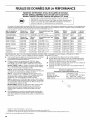 20
20
-
 21
21
-
 22
22
-
 23
23
-
 24
24


Jenn-Air JCB2581WES00 Le manuel du propriétaire
- Catégorie
- Frigos
- Taper
- Le manuel du propriétaire
dans d''autres langues
- English: Jenn-Air JCB2581WES00 Owner's manual