IC Intracom 500449 Guide d'installation
- Catégorie
- Antennes réseau
- Taper
- Guide d'installation
Ce manuel convient également à

INT-502313/500449-QIG-ML1-0810-01-0
DEUTSCH
Direktionale Hochleistungs-Panel-Antenne
1 Platzieren Sie einen der beiliegenden “U”-Gewindebolzen an einem Mast (35mm Durchmesser empfohlen) und
zwar dort, wo Sie den oberen Teil der Antenne befestigen möchten.
2 Platzieren Sie eine der beiliegenden Klammern auf dem Bolzen.
3 Führen Sie den Bolzen durch die oberen Löcher der Antenne.
4 Fixieren Sie die Antenne mit den vier beiliegenden Muttern. Wiederholen Sie die Schritte 1-4 für den unteren Teil
der Antenne.
5 Zur Wandmontage: Verwenden Sie die beiliegenden Schrauben (und Dübel, falls nötig), um die Antenne an einer
soliden Oberfläche zu befestigen.
6 Verwenden Sie das beiliegende Kabel, um die Antenne an einen Router oder Access Point Ihres Netzwerks
anzuschließen. HINWEIS: Vermeiden Sie die Installation hinter Schränken oder anderer Ausstattung.
Das Datenblatt mit einer vollständigen Liste aller Eigenschaften und Spezifikationen finden Sie unter
www.intellinet-network.com.
FRANÇAIS
Panneau Antenne Directionnelle à Gain Elevé
1 Positionnez un des deux boulons “U” inclus sur un support (diamètre
de 35mm recommandé) où vous voudriez placer la partie supérieure de
l’antenne.
2 Placez une des deux gâches sur les bouts du boulon.
3 Alignez les trous et mettez la partie supérieure de l’antenne sur le
boulon.
4 Fixez l’antenne en utilisant deux des quatre écrous inclus. Répétez les
étapes 1-4 pour la partie inférieure de l’antenne.
5 Pour la fixation au mur: Attachez l’antenne par les vis incluses (et
goujons, si nécessaire) à une surface solide.
6 Utilisez le câble inclus afin de connecter l’antenne au routeur ou point
d’accès de votre réseau. NOTE: Évitez l’installation derrière une armoire
ou d’autre équipement.
Pour la feuille de données avec une liste de fonctions et spécifications
complète, visitez www.intellinet-network.com.
ESPAÑOL
Antena Direccional de Alta Ganancia Tipo Panel
1 Coloque una de las dos abrazaderas “U” incluidas en el poste (35 mm de diámetro recomendado) donde fijara la parte
superior de la antena.
2 Coloque uno de los dos bloques de sujeción en los extremos de la abrazadera.
3 Alinee los agujeros y fije la parte superior de la antena sobre el perno.
4 Fije la antena en su lugar con 2 de las 4 tuercas incluidas. Repita los pasos 1-4 en la parte inferior de la antena.
5 Para Montaje en Pared: Use los tornillos incluidos (y anclas, si es necesario) para sujetar la antena a una superficie
sólida.
6 Utilice el cable incluido para conectar la antena al router de su red o AP. NOTA: Evite colocar la antena detras de
gabinetes u otro equipo.
Para ver una ficha tecnica con una lista completa de caracteristicas y especificaciones, visite www.intellinet-network.com.
POLSKI
Antena kierunkowa panelowa o dużym zysku
1 Na maszcie, na którym zamierzasz przymocować antenę, umieść
uchwyty w kształcie litery „U” (zaleca się, aby maszt miał średnicę
35 mm).
2 Na końce uchwytów załóż bloki zaciskowe.
3 Dopasuj odstęp między uchwytami tak, aby pasowały do otworów w
antenie, a następnie na uchwyty nałóż antenę.
4 Używając dołączonych nakrętek przykręć antenę do uchwytów.
5 Montaż na ścianie: Użyj dołączonych kołków i wkrętów, aby
przymocować antenę do twardej, płaskiej powierzchni (jeśli zachodzi
taka potrzeba, należy użyć dodatkowych wkrętów).
6 Użyj dołączonego kabla, aby podłączyć antenę do bezprzewodowego
routera lub Access Pointa. UWAGA: Nie należy umiejscawiać sprzętu za
szafami rackowymi oraz innymi urządzeniami.
Aby uzyskać pełną specyfikację techniczną, zapoznaj się z kartą produktu
dostępną na stronie www.intellinet-network.com.
ITALIANO
Antenna Direzionale High-Gain con Pannello
1 Posizionare uno dei due ganci a “U” inclusi sul supporto (35mm come
diametro consigliato) dove desiderate posizionare l’antenna.
2 Posizionare uno dei due morsetti di bloccaggio nelle parti terminali del
gancio.
3 Allineare i fori e fissare la parte alta dell’antenna sul gancio.
4 Assicurare l’antenna usando due dei quattro dadi inclusi. Ripetere i
passaggi dall’1 al 4 per la parte bassa dell’antenna.
5 Per montaggio a muro: Usare le viti incluse (e i tasselli, se
necessario) per attaccare l’antenna ad una superficie solida.
6 Usare il cavo incluso per collegare l’antenna al vostro router di rete o al
punto di accesso. NOTA: Evitare di collocare l’antenna dietro cabinet o
altri apparati.
Per prendere visione di una scheda tecnica con la lista completa delle
caratteristiche e delle specifiche, visitate il sito www.intellinet-network.com.
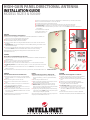
1 Position one of the two included “U” bolts on the pole (35mm diameter recommended) where you want the top of the antenna.
2 Place one of the two included clamp blocks over the ends of the bolt.
3 Line up the holes and set the top of the antenna on the bolt.
4 Secure the antenna in place using two of the four included nuts. Repeat Steps 1-4 for the bottom of the antenna.
5 For wall mounting: Use the included screws (and anchors, if needed) to attach the antenna to a solid surface.
6 Use the included cable to connect the antenna to your network’s router or access point. NOTE: Avoid placement behind cabinets or
other equipment.
To view a datasheet with a complete list
of features and specifications, go to
www.intellinet-network.com.
1
2
4
1
2
4
5
3
3
6
Shown: Model 502313
HigH-gain Panel Directional antenna
inStallation gUiDe
MODELS 502313 & 500449
La page est en cours de chargement...
-
 1
1
-
 2
2


IC Intracom 500449 Guide d'installation
- Catégorie
- Antennes réseau
- Taper
- Guide d'installation
- Ce manuel convient également à
dans d''autres langues
- English: IC Intracom 500449 Installation guide
- español: IC Intracom 500449 Guía de instalación
Documents connexes
Autres documents
-
Intellinet High-Gain Panel Directional Antenna Quick Install Guide
-
-
-
-
-
-
-
-