
WAC Lighting retains the right to modify the design of our products at any time as part of the company's continuous improvement program. JAN, 2022 1
waclighting.com
Phone (800) 526.2588
Fax (800) 526.2585
Headquarters/Eastern Distribution Center
44 Harbor Park Drive
Port Washington, NY 11050
Central Distribution Center
1600 Distribution Ct
Lithia Springs, GA 30122
Western Distribution Center
1750 Archibald Avenue
Ontario, CA 91760
SAFETY INSTRUCTION
• Read all instructions before installing.
•
• Place the wall switch in the“OFF” position.
• Go to the main fuse box, or circuit breaker. Unscrew the fuse(s) or switch ”OFF” the circuit breaker switch(es) that control the power to the
space that you are working on.
CAUTION:
All parts must be used as indicated in these instructions. Do not substitute any parts, leave parts out, or use any parts that are worn out
AVERTISSEMENT
IMPORTANT : COUPEZ L’ÉLECTRICITÉ AVANT TOUTE MANIPULATION.
• Lisez toutes les instructions avant d’installer.
•
• Placez l’interrupteur mural en position d’arrêt (« OFF »).
• Accédez au panneau central de disjoncteurs ou de fusibles de votre demeure et placez l’interrupteur principal en position d’arrêt (« OFF »).
MISE EN GARDE
Toutes les pièces doivent être utilisées tel qu’il est indiqué dans ces instructions. Ne remplacez pas les pièces, n’en laissez pas de côté et ne les
utilisez pas si elles sont usées ou brisées. Le non-respect de ces instructions peut annuler l’homologation ETL/cETL du luminaire.
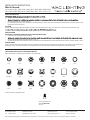
THIS INSTRUCTIONS APPLY TO THE MODELS BELOW:
Fixture Accessory (included in box)
Outdoor Rated Wire Nut
Model: 9020-WNT-BK
Qty: 2pcs
1021 1061
1051
1011 2011
2021/2031 2041 2061
INSTALLATION INSTRUCTION
Mini In-Ground
1011/ 1021/ 1031/ 1041/ 1051/ 1061/ 2011/ 2012/ 2021/ 2022/ 2031
2041/ 2051/ 2052/ 2061/ 2071/ 2081/ 2091/ 2101/ 2111/ 2121/ 2131
*Note: Transformer is required to power the fixture. (sold separately)
2051
2012 2022 2052
2071 2081 2091
2101 2111 2121 2131
1041
1031

WAC Lighting retains the right to modify the design of our products at any time as part of the company's continuous improvement program. JAN, 2022 2
waclighting.com
Phone (800) 526.2588
Fax (800) 526.2585
Headquarters/Eastern Distribution Center
44 Harbor Park Drive
Port Washington, NY 11050
Central Distribution Center
1600 Distribution Ct
Lithia Springs, GA 30122
Western Distribution Center
1750 Archibald Avenue
Ontario, CA 91760
SOFTSCAPE INSTALLATION
*Note: Transformer is required to power the fixture. (sold separately)
HARDSCAPE INSTALLATION
*Note: Transformer is required to power the fixture. (sold separately)
1.
2. Dig a hole at the point of application. Make sure the hole
measures roughly ØA* in diameter and 4 inches in depth.
(Fig.1)
3. Place a layer of pea gravel at the base of the hole to help
with drainage.
4.
the transformer using the outdoor rated direct burial wire
nuts provided
5.
1.
2. Prepare a hole large enough (B*
schedule 80 pipe (not included). (Fig.2)
3. Install the pipe into the hole
4.
the transformer using the outdoor rated direct burial wire
nuts provided.
5. Smear some plumbers’ silicone (not included) on the O-rings
6.
with the mounting surface.
Installation Surface
Schedule 80 PVC Pipe
(not included)
Soil
From Transformer
To Next Fixture
Pea Gravel
4”
ØA*
For model # 1021/1031/1041/1051/1061: B* = Ø1.315 in.
For model # 2021/2022/2041/2051/ 2052/
2061/2071/2081/2091/2101/
2111/2121/2131:
B* = Ø2.375 in.
For model # 1011/1021/1031/1041/1051/1061: A* = Ø1 in.
For model # 2011/2012/2021/2022/2041/2051/
2052/2061/2071/2081/2091/2101/
2111/2121/2131:
A* = Ø2 in.
Fig.1
Fig.2
ØB*
INSTALLATION INSTRUCTION
Mini In-Ground
1011/ 1021/ 1031/ 1041/ 1051/ 1061/ 2011/ 2012/ 2021/ 2022/ 2031
2041/ 2051/ 2052/ 2061/ 2071/ 2081/ 2091/ 2101/ 2111/ 2121/ 2131

WAC Lighting retains the right to modify the design of our products at any time as part of the company's continuous improvement program. JAN, 2022 3
waclighting.com
Phone (800) 526.2588
Fax (800) 526.2585
Headquarters/Eastern Distribution Center
44 Harbor Park Drive
Port Washington, NY 11050
Central Distribution Center
1600 Distribution Ct
Lithia Springs, GA 30122
Western Distribution Center
1750 Archibald Avenue
Ontario, CA 91760
OUTDOOR WALL INSTALLATION
*Note: Transformer is required to power the fixture. (sold separately)
UL listed for outdoor use only
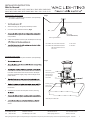
FOUNTAIN INSTALLATION
*Note: Transformer is required to power the fixture. (sold separately)
1.
2. Attach the spring clip using the provided clip screws.
3. Cut a hole at the installation location. (Fig.3)
4.
the transformer using the outdoor rated direct burial wire
nuts provided.
5. Smear some plumbers’ silicone (not included) on the O-rings
6.
with the mounting surface
1.
2.
the provided screws.
3.
anchors for No. 6 screws, use a hammer drill with a masonry
bit to drill out two holes at the screw locations. The depth
of the hole should be slightly longer than the length of the
plastic anchor.
4.
hole, using the back of a screwdriver to gently hammer it in.
5.
in the desired position. Make sure to line up the slots with
the anchors.
6. Screw the No. 6 screws into the plastic anchors, securing
7.
your transformer using the provided outdoor rated wire nuts.
8.
facing the desired direction. Refasten the thumbscrew to
secure.
For model # 1021/1031/1041/1051/1061: C* = Ø1.375 in.
For model # 2021/2022/2041/2051/2052
2061/2071/2091/2101/2111/
2121/2131:
C* = Ø2.25 in.
Note: Only for model # 2031
Fig.3
Fig.4
Mini In-ground Fixture
Thumb Screw
Fountain Canopy
(Sold separately)
No.6 Mounting Screw
Fixture Wires
Mounting Surface
Plastic Anchor
(Not included)
Spring Clip
(Model: 2000-CLIP-SS)
ØC*
INSTALLATION INSTRUCTION
Mini In-Ground
1011/ 1021/ 1031/ 1041/ 1051/ 1061/ 2011/ 2012/ 2021/ 2022/ 2031
2041/ 2051/ 2052/ 2061/ 2071/ 2081/ 2091/ 2101/ 2111/ 2121/ 2131

WAC Lighting retains the right to modify the design of our products at any time as part of the company's continuous improvement program. JAN, 2022 4
waclighting.com
Phone (800) 526.2588
Fax (800) 526.2585
Headquarters/Eastern Distribution Center
44 Harbor Park Drive
Port Washington, NY 11050
Central Distribution Center
1600 Distribution Ct
Lithia Springs, GA 30122
Western Distribution Center
1750 Archibald Avenue
Ontario, CA 91760
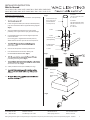
CONCRETE POUR INSTALLATION
*Note: Transformer is required to power the fixture. (sold separately)
1.
2. Install wiring and conduit (use ½” NPT) at desired position,
plug all un-used holes. Refer to applicable wiring diagram.
(Fig.5)
3. Secure 4” weatherproof junction box to the ground,
preferably over a layer of sand or pea gravel for drainage.
4. Cut Schedule 80 PVC Pipe in excess length for planned
concrete thickness.
(An 18” long pipe is supplied with concrete pour kit)
*Make sure the cut end is put into the concrete pour kit
5.
lock it with screws
6. Secure concrete pour kit onto the 4” junction box.
7. Pour desired amount of concrete, making sure
NO CONCRETE ENTERS THE BOX. (Fig.6)
8.
protruding from the ground. (Fig.7)
9.
direct burial wire nuts. (Fig.8)
10. Smear plumbers’ silicone (not included) to O-rings.
11.
concrete.
12.
Fig.9)
Fig.5
Fig.6 Fig.7
Fig.8
Fig.9
Schedule 80 PVC Pipe
(An 18” long pipe is
provided with the
concrete pour kit)
Screws
Screws
Concrete pour kit
(Sold Separately)
4” Weatherproof
Junction Box
1/2” NPT
LED Fixture
O-Ring
Waterproof Wire
Nuts
For model #
1021/1031/1041/1051/1061:
D* = Ø1.32 in.
For model #
2021/2022/2041/2051/2052/
2061/2071/2091/2101/2111/
2121/2131:
D* = Ø2.38 in.
ØD*
INSTALLATION INSTRUCTION
Mini In-Ground
1011/ 1021/ 1031/ 1041/ 1051/ 1061/ 2011/ 2012/ 2021/ 2022/ 2031
2041/ 2051/ 2052/ 2061/ 2071/ 2081/ 2091/ 2101/ 2111/ 2121/ 2131
-
 1
1
-
 2
2
-
 3
3
-
 4
4


dans d''autres langues
Documents connexes
-
WAC Lighting 3911 Mode d'emploi
-
-
-
-
-
-
-
-
-
