EINHELL TE-CL 18-2000 LiAC Manuel utilisateur
- Taper
- Manuel utilisateur

TE-CL 18/2000 LiAC
Art.-Nr.: 45.141.14 I.-Nr.: 11018
13
D Originalbetriebsanleitung
Akku-Lampe
GB Original operating instructions
Battery-Powered Lamp
F Instructions d’origine
Lampe sans fi l
I Istruzioni per l’uso originali
Spia batteria
DK/ Original betjeningsvejledning
N Akku-lygte
S Original-bruksanvisning
Laddningsbar lampa
CZ Originální návod k obsluze
Akumulátorová svítilna
SK Originálny návod na obsluhu
Akumulátorová lampa
NL Originele handleiding
Acculamp
E Manual de instrucciones original
Linterna inalambrica
FIN Alkuperäiskäyttöohje
Akkukäyttöinen lamppu
SLO Originalna navodila za uporabo
Baterijska svetilka
H Eredeti használati utasítás
Akkus-lámpa
RO Instrucţiuni de utilizare originale
Lampă cu acumulator
GR Πρωτότυπες Οδηγίες χρήσης
Λαμπα μπαταριας
P Manual de instruções original
Lanterna sem fi o
HR/ Originalne upute za uporabu
BIH Baterijska svjetiljka
RS Originalna uputstva za upotrebu
Baterijska lampa
PL Instrukcją oryginalną
Latarka akumulatorowa
TR Orijinal Kullanma Talimatı
Şarjli lamba
Anl_TE_CL_18_2000_LiAC_SPK13.indb 1Anl_TE_CL_18_2000_LiAC_SPK13.indb 1 06.07.2022 10:21:3406.07.2022 10:21:34

- 2 -
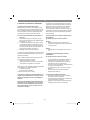
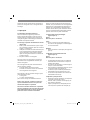
1
2
9b 9a
13
2 10
3
67 8
14 4
1 6
14
12
35
Anl_TE_CL_18_2000_LiAC_SPK13.indb 2Anl_TE_CL_18_2000_LiAC_SPK13.indb 2 06.07.2022 10:21:3606.07.2022 10:21:36

- 3 -
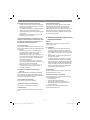
4 5
6 7
8 9
12
14
16
8
10
11
10
15
17
Anl_TE_CL_18_2000_LiAC_SPK13.indb 3Anl_TE_CL_18_2000_LiAC_SPK13.indb 3 06.07.2022 10:21:4006.07.2022 10:21:40

- 4 -
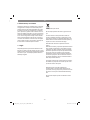
10
b
a
11 1
23
Anl_TE_CL_18_2000_LiAC_SPK13.indb 4Anl_TE_CL_18_2000_LiAC_SPK13.indb 4 06.07.2022 10:21:4306.07.2022 10:21:43

D
- 5 -
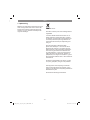
Gefahr!
Beim Benutzen von Geräten müssen einige Si-
cherheitsvorkehrungen eingehalten werden, um
Verletzungen und Schäden zu verhindern. Lesen
Sie diese Bedienungsanleitung / Sicherheitshin-
weise deshalb sorgfältig durch. Bewahren Sie die-
se gut auf, damit Ihnen die Informationen jederzeit
zur Verfügung stehen. Falls Sie das Gerät an an-
dere Personen übergeben sollten, händigen Sie
diese Bedienungsanleitung / Sicherheitshinweise
bitte mit aus. Wir übernehmen keine Haftung für
Unfälle oder Schäden, die durch Nichtbeachten
dieser Anleitung und den Sicherheitshinweisen
entstehen.
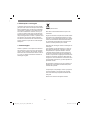
Erklärung der verwendeten Symbole
(siehe Bild 11)
1. Gefahr! - Zur Verringerung des Verletzungsri-
sikos Bedienungsanleitung lesen.
2. Vorsicht! Nicht in den Lichtstrahl blicken.
3. Warnung vor heißen Teilen!
1. Sicherheitshinweise
Gefahr!
Lesen Sie alle Sicherheitshinweise und An-
weisungen. Versäumnisse bei der Einhaltung der
Sicherheitshinweise und Anweisungen können
elektrischen Schlag, Brand und/oder schwere
Verletzungen verursachen. Bewahren Sie alle
Sicherheitshinweise und Anweisungen für
die Zukunft auf.
2. Gerätebeschreibung und
Lieferumfang
2.1 Gerätebeschreibung (Bild 1)
1. Tragegriff
2. Lampenkopf
3. Ein-/Ausschalter
4. Leuchtstärkenregler
5. Leuchtstärkenanzeige
6. Fixierungsschraube
7. Netzanschluss
8. Akkuaufnahme
9. Netzteil
10. Akku
11. Rasttaste
12. Ladegerät
13. Standfuss
14. Haken
15. Sägezahnung
16. Aufhängeöse
17. Gewindebuchsen ¼ Zoll und ⅝ Zoll
2.2 Lieferumfang
• Öffnen Sie die Verpackung und nehmen Sie
das Gerät vorsichtig aus der Verpackung.
• Entfernen Sie das Verpackungsmaterial so-
wie Verpackungs-/ und Transportsicherungen
(falls vorhanden).
• Überprüfen Sie, ob der Lieferumfang vollstän-
dig ist.
• Kontrollieren Sie das Gerät und die Zubehör-
teile auf Transportschäden.
• Bewahren Sie die Verpackung nach Möglich-
keit bis zum Ablauf der Garantiezeit auf.
Gefahr!
Gerät und Verpackungsmaterial sind kein
Kinderspielzeug! Kinder dürfen nicht mit
Kunststoff beuteln, Folien und Kleinteilen
spielen! Es besteht Verschluckungs- und Er-
stickungsgefahr!
• Akku-Lampe
• Originalbetriebsanleitung
3. Technische Daten
Spannungsversorgung
Netz: ...................................100-240 V~ 50-60 Hz
Spannungsversorgung Akku: ..................18 V d.c.
Anzahl LED´s: .................................................. 20
Lichtstrom: ...............................................2000 lm
Gewicht: ...................................................... 1,3 kg
Achtung!
Das Gerät wird ohne Akkus und ohne Ladegerät
geliefert und darf nur mit den Li-Ion Akkus der
Power X-Change Serie verwendet werden!
Die Li-Ion Akkus der Power X-Change Serie
dürfen nur mit dem Power X-Charger geladen
werden.
Anl_TE_CL_18_2000_LiAC_SPK13.indb 5Anl_TE_CL_18_2000_LiAC_SPK13.indb 5 06.07.2022 10:21:4406.07.2022 10:21:44

D
- 6 -
4. Bedienung
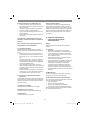
4.1 Montage des Akkus (Bild 4)
Drücken Sie wie in Bild 4 zu sehen die Rasttaste
des Akkus und schieben Sie den Akku in die
dafür vorgesehene Akkuaufnahme. Dabei auf
Einrasten der Rasttaste achten! Der Ausbau des
Akkus erfolgt in umgekehrter Reihenfolge!
4.2 Laden des Li-Akku-Packs (Bild 4/5)
1. Akku-Pack (10) aus der Akkuaufnahme (8)
heraus ziehen, dabei die Rasttaste (11) nach
unten drücken.
2. Vergleichen, ob die auf dem Typenschild
angegebene Netzspannung mit der vorhan-
denen Netzspannung übereinstimmt. Stecken
Sie den Netzstecker des Ladegeräts in die
Steckdose. Die grüne LED beginnt zu blinken.
3. Schieben Sie den Akku auf das Ladegerät.
Unter Punkt 8 (Anzeige Ladegerät) fi nden Sie
eine Tabelle mit den Bedeutungen der LED Anzei-
ge am Ladegerät.
Sollte das Laden des Akku-Packs nicht möglich
sein, überprüfen Sie bitte
• ob an der Steckdose die Netzspannung vor-
handen ist.
• ob ein einwandfreier Kontakt an den Lade-
kontakten des Ladegerätes vorhanden ist.
Sollte das Laden des Akku-Packs immer noch
nicht möglich sein, bitten wir Sie,
• das Ladegerät
• und den Akku-Pack
an unseren Kundendienst zu senden.
Für einen fachgerechten Versand kontaktie-
ren Sie bitte unseren Kundendienst oder die
Verkaufsstelle, bei der das Gerät erworben
wurde.
Beachten Sie beim Versand oder Entsorgung
von Akkus bzw. Akkugerät, dass diese ein-
zeln in Kunststoff beutel verpackt werden, um
Kurzschlüsse und Brand zu vermeiden!
Im Interesse einer langen Lebensdauer des Akku-
Packs sollten Sie für eine rechtzeitige Wiederauf-
ladung des Akku-Packs sorgen. Dies ist auf jeden
Fall notwendig, wenn Sie feststellen, dass die
Leistung des Geräts nachlässt. Entladen Sie den
Akku-Pack nie vollständig. Dies führt zu einem
Defekt des Akku-Packs!
4.3 Ein-/Ausschalter (Bild 3/Pos. 3)
Warnung!
Nicht in den Lichtstrahl blicken!
Einschalten:
• Drücken Sie den Ein-/Ausschalter (3).
• Die Lampe schaltet dabei aus Sicherheits-
gründen in der niedrigsten Stufe ein.
Ausschalten:
• Drücken Sie erneut auf den Ein-/Ausschalter
(3)
4.4 Leuchtstärke einstellen (Bild 3/Pos. 4)
Warnung!
Nicht in den Lichtstrahl blicken!
• Die Leuchtstärke kann in drei Stufen individu-
ell an die jeweilige Arbeitssituation angepasst
werden.
• Aus Sicherheitsgründen schaltet die Lampe
immer in der niedrigsten Stufe ein.
• Um die Leuchtstärke zu erhöhen, drücken Sie
auf die Leuchstärkenregulierung (4).
• Die Leuchtstärke wird mit jedem drücken um
eine Stufe erhöht.
• Die aktuelle Leuchtstufe wird von der Leucht-
stärkenanzeige (5) dargestellt.
4.5 Leuchtposition einstellen
• Durch Drehen des Lampenkopfes kann eine
beliebige Leuchtposition eingestellt werden.
• Lösen Sie hierfür die Fixierungsschraube (6)
auf der rechten Seite des Geräts.
• Stellen Sie nun die für Sie passende Leucht-
position ein und ziehen Sie Fixierungsschrau-
be (6) wieder fest.
4.6 Betrieb mit Netzteil (9)
• Die Lampe kann mit dem beiliegenden Netz-
teil (9) auch auf herkömmliche Art am Strom-
netz betrieben werden.
• Vergleichen Sie die Spannung auf dem
Typenschild mit der vorhandenen Netzspan-
nung.
• Stecken Sie den Netzstecker (9a) des Netz-
teils in die Steckdose.
• Stecken Sie dann den Stecker (9b) in den
Stromanschluss (7) der Lampe.
Hinweis! Der Akku muss beim Betrieb mit
dem Netzteil nicht aus der Lampe entfernt
werden.
Hinweis! Der Akku wird beim Betrieb mit dem
Netzteil nicht geladen!
Anl_TE_CL_18_2000_LiAC_SPK13.indb 6Anl_TE_CL_18_2000_LiAC_SPK13.indb 6 06.07.2022 10:21:4406.07.2022 10:21:44

D
- 7 -
4.7 Befestigung der Lampe
Die Lampe kann über die verschiedenen Ausspa-
rungen am Boden des Fußes schnell und vielsei-
tig befestigt werden.
• Haken (Bild 6/Pos. 14): Mit dem Haken kann
die Lampe schnell und sicher z.B. an einem
Geländer oder Gerüst befestigt werden.
• Sägezahnung (Bild 7/Pos. 15): Mit der Sä-
gezahnung kann die Lampe an einem Nagel
oder ähnlichem aufgehängt werden. Über die
feine Rasterung kann die Lampe ideal austa-
riert werden.
• Befestigungsöse (Bild 8/Pos. 16): Mit der
Befestigungsöse kann die Lampe mit einer
passenden Linsenkopfschraube an der Wand
montiert werden.
• Gewindebuchsen ¼ Zoll und ⅝ Zoll (Bild 9/
Pos. 17): Mit den Gewindebuchsen kann die
Lampe auf einem Stativ montiert werden.
4.8 Akkukapazitätsanzeige (Bild 10)
Drücken Sie auf den Schalter für Akku-
Kapazitätsanzeige (a). Die Akku-Kapazitätsan-
zeige (b) signalisiert ihnen den Ladezustand des
Akkus anhand von 3 LED`s.
Alle 3 LEDs leuchten:
Der Akku ist voll aufgeladen.
2 oder 1 LED(‘s) leuchten
Der Akku verfügt über ausreichende Restladung.
1 LED blinkt:
Der Akku ist leer, laden Sie den Akku auf.
Alle LEDs blinken:
Die Temperatur des Akkus ist überschritten. Ent-
fernen Sie den Akku vom Gerät und lassen Sie
den Akku einen Tag bei Raumtemperatur liegen.
Tritt der Fehler wieder auf, so wurde der Akku tie-
fentladen und ist defekt. Entfernen Sie den Akku
vom Gerät. Ein defekter Akku darf nicht mehr ver-
wendet bzw. geladen werden.
5. Reinigung, Wartung und
Ersatzteilbestellung
Gefahr!
Ziehen Sie vor allen Reinigungsarbeiten den
Akku heraus.
5.1 Reinigung
• Halten Sie Schutzvorrichtungen, Luftschlitze
und Motorengehäuse so staub- und schmutz-
frei wie möglich. Reiben Sie das Gerät mit
einem sauberen Tuch ab oder blasen Sie es
mit Druckluft bei niedrigem Druck aus.
• Wir empfehlen, dass Sie das Gerät direkt
nach jeder Benutzung reinigen.
• Reinigen Sie das Gerät regelmäßig mit einem
feuchten Tuch und etwas Schmierseife. Ver-
wenden Sie keine Reinigungs- oder Lösungs-
mittel; diese könnten die Kunststoffteile des
Gerätes angreifen. Achten Sie darauf, dass
kein Wasser in das Geräteinnere gelangen
kann. Das Eindringen von Wasser in ein Elek-
trogerät erhöht das Risiko eines elektrischen
Schlages.
5.2 Wartung
Im Geräteinneren befi nden sich keine weiteren zu
wartenden Teile.
5.3 Ersatzteilbestellung:
Bei der Ersatzteilbestellung sollten folgende An-
gaben gemacht werden:
• Typ des Gerätes
• Artikelnummer des Gerätes
• Ident-Nummer des Gerätes
• Ersatzteilnummer des erforderlichen Ersatz-
teils
Aktuelle Preise und Infos fi nden Sie unter
www.Einhell-Service.com
Anl_TE_CL_18_2000_LiAC_SPK13.indb 7Anl_TE_CL_18_2000_LiAC_SPK13.indb 7 06.07.2022 10:21:4506.07.2022 10:21:45

D
- 8 -
6. Entsorgung und
Wiederverwertung
Das Gerät befi ndet sich in einer Verpackung
um Transportschäden zu verhindern. Diese
Verpackung ist Rohstoff und ist somit wieder
verwendbar oder kann dem Rohstoff kreislauf
zurückgeführt werden. Das Gerät und dessen
Zubehör bestehen aus verschiedenen
Materialien, wie z.B. Metall und Kunststoff e.
Defekte Geräte gehören nicht in den Hausmüll.
Zur fachgerechten Entsorgung sollte das Gerät
an einer geeigneten Sammelstellen abgegeben
werden. Wenn Ihnen keine Sammelstelle bekannt
ist, sollten Sie bei der Gemeindeverwaltung
nachfragen.
7. Lagerung
Lagern Sie das Gerät und dessen Zubehör an
einem dunklen, trockenen und frostfreiem sowie
für Kinder unzugänglichem Ort. Die optimale
Lagertemperatur liegt zwischen 5 und 30 ˚C.
Bewahren Sie das Elektrowerkzeug in der Origi-
nalverpackung auf.
Nur für EU-Länder
Werfen Sie Elektrowerkzeuge nicht in den Haus-
müll!
Gemäß europäischer Richtlinie 2012/19/EU über
Elektro- und Elektronik-Altgeräte und Umsetzung
in nationales Recht müssen verbrauchte Elektro-
werkzeuge getrennt gesammelt werden und einer
umweltgerechten Wiederverwertung zugeführt
werden.
Recycling-Alternative zur Rücksendeauff orde-
rung:
Der Eigentümer des Elektrogerätes ist alternativ
anstelle Rücksendung zur Mitwirkung bei der
sachgerechten Verwertung im Falle der Eigen-
tumsaufgabe verpfl ichtet. Das Altgerät kann
hierfür auch einer Rücknahmestelle überlassen
werden, die eine Beseitigung im Sinne der nati-
onalen Kreislaufwirtschafts- und Abfallgesetze
durchführt. Nicht betroff en sind den Altgeräten
beigefügte Zubehörteile und Hilfsmittel ohne
Elektrobestandteile.
Bitte beachten Sie bei der Entsorgung, dass Ak-
kus und Leuchtmittel (z. B. Glühbirne) dem Gerät
entnommen werden.
Der Nachdruck oder sonstige Vervielfältigung von
Dokumentation und Begleitpapieren der Produk-
te, auch auszugsweise, ist nur mit ausdrücklicher
Zustimmung der Einhell Germany AG zulässig.
Technische Änderungen vorbehalten
Anl_TE_CL_18_2000_LiAC_SPK13.indb 8Anl_TE_CL_18_2000_LiAC_SPK13.indb 8 06.07.2022 10:21:4506.07.2022 10:21:45

D
- 9 -
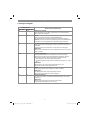
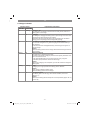
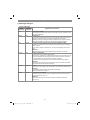
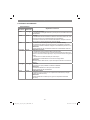
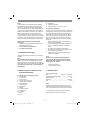
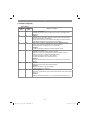
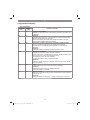
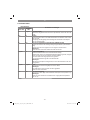
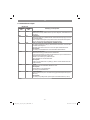
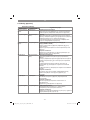
8. Anzeige Ladegerät
Anzeigestatus Bedeutung und Maßnahme
Rote LED Grüne LED
Aus Blinkt Betriebsbereitschaft
Das Ladegerät ist an das Netz angeschlossen und betriebsbereit,
Akku ist nicht im Ladegerät
An Aus Laden
Das Ladegerät lädt den Akku im Schnellladebetrieb.
Die entsprechenden Ladezeiten fi nden Sie direkt am Ladegerät.
Hinweis! Je nach vorhandener Akkuladung können die tatsächlichen
Ladezeiten von den angegebenen Ladezeiten etwas abweichen.
Aus An Der Akku ist aufgeladen und einsatzbereit. (READY TO GO)
Danach wird bis zur vollständigen Ladung auf eine Schonladung um-
geschaltet.
Lassen Sie hierzu den Akku etwa 15 min. länger am Ladegerät.
Maßnahme:
Entnehmen Sie den Akku aus dem Ladegerät. Trennen Sie das Lade-
gerät vom Netz.
Blinkt Aus Anpassungsladung
Das Ladegerät befi ndet sich im Modus für schonende Ladung.
Hierbei wird der Akku aus Sicherheitsgründen langsamer geladen
und benötigt mehr Zeit. Dies kann folgende Ursachen haben:
- Akku wurde sehr lange Zeit nicht mehr geladen.
- Die Akkutemperatur liegt nicht im Idealbereich zwischen 10° C und
45° C.
Maßnahme:
Warten Sie bis der Ladevorgang abgeschlossen ist, der
Akku kann trotzdem weiter geladen werden.
Blinkt Blinkt Fehler
Ladevorgang ist nicht mehr möglich. Der Akku ist defekt.
Maßnahme:
Ein defekter Akku darf nicht mehr geladen werden.
Entnehmen Sie den Akku aus dem Ladegerät.
An An Temperaturstörung
Der Akku ist zu heiß (z. B. direkte Sonnenbestrahlung) oder zu kalt
(unter 0° C)
Maßnahme:
Entnehmen Sie den Akku und bewahren Sie diesen
1 Tag bei Raumtemperatur (ca. 20° C) auf.
Anl_TE_CL_18_2000_LiAC_SPK13.indb 9Anl_TE_CL_18_2000_LiAC_SPK13.indb 9 06.07.2022 10:21:4506.07.2022 10:21:45

D
- 10 -
Garantieurkunde
Sehr geehrte Kundin, sehr geehrter Kunde,
unsere Produkte unterliegen einer strengen Qualitätskontrolle. Sollte dieses Gerät dennoch einmal nicht
einwandfrei funktionieren, bedauern wir dies sehr und bitten Sie, sich an unseren Servicedienst unter
der auf dieser Garantiekarte angegebenen Adresse zu wenden. Gerne stehen wir Ihnen auch telefo-
nisch über die angegebene Servicerufnummer zur Verfügung. Für die Geltendmachung von Garantiean-
sprüchen gilt folgendes:
1. Diese Garantiebedingungen richten sich ausschließlich an Verbraucher, d. h. natürliche Personen,
die dieses Produkt weder im Rahmen ihrer gewerblichen noch anderen selbständigen Tätigkeit
nutzen wollen. Diese Garantiebedingungen regeln zusätzliche Garantieleistungen, die der u. g.
Hersteller zusätzlich zur gesetzlichen Gewährleistung Käufern seiner Neugeräte verspricht. Ihre
gesetzlichen Gewährleistungsansprüche werden von dieser Garantie nicht berührt. Unsere Garan-
tieleistung ist für Sie kostenlos.
2. Die Garantieleistung erstreckt sich ausschließlich auf Mängel an einem von Ihnen erworbenen neu-
en Gerät des u. g. Herstellers, die auf einem Material- oder Herstellungsfehler beruhen und ist nach
unserer Wahl auf die Behebung solcher Mängel am Gerät oder den Austausch des Gerätes be-
schränkt. Bitte beachten Sie, dass unsere Geräte bestimmungsgemäß nicht für den gewerblichen,
handwerklichen oder berufl ichen Einsatz konstruiert wurden. Ein Garantievertrag kommt daher nicht
zustande, wenn das Gerät innerhalb der Garantiezeit in Gewerbe-, Handwerks- oder Industriebe-
trieben verwendet wurde oder einer gleichzusetzenden Beanspruchung ausgesetzt war.
3. Von unserer Garantie ausgenommen sind:
- Schäden am Gerät, die durch Nichtbeachtung der Montageanleitung oder aufgrund nicht fach-
gerechter Installation, Nichtbeachtung der Gebrauchsanleitung (wie durch z.B. Anschluss an eine
falsche Netzspannung oder Stromart) oder Nichtbeachtung der Wartungs- und Sicherheitsbestim-
mungen oder durch Aussetzen des Geräts an anomale Umweltbedingungen oder durch mangelnde
Pfl ege und Wartung entstanden sind.
- Schäden am Gerät, die durch missbräuchliche oder unsachgemäße Anwendungen (wie z.B. Über-
lastung des Gerätes oder Verwendung von nicht zugelassenen Einsatzwerkzeugen oder Zubehör),
Eindringen von Fremdkörpern in das Gerät (wie z.B. Sand, Steine oder Staub, Transportschäden),
Gewaltanwendung oder Fremdeinwirkungen (wie z. B. Schäden durch Herunterfallen) entstanden
sind.
- Schäden am Gerät oder an Teilen des Geräts, die auf einen gebrauchsgemäßen, üblichen oder
sonstigen natürlichen Verschleiß zurückzuführen sind.
4. Die Garantiezeit beträgt 24 Monate und beginnt mit dem Kaufdatum des Gerätes. Garantieansprü-
che sind vor Ablauf der Garantiezeit innerhalb von zwei Wochen, nachdem Sie den Defekt erkannt
haben, geltend zu machen. Die Geltendmachung von Garantieansprüchen nach Ablauf der Ga-
rantiezeit ist ausgeschlossen. Die Reparatur oder der Austausch des Gerätes führt weder zu einer
Verlängerung der Garantiezeit noch wird eine neue Garantiezeit durch diese Leistung für das Gerät
oder für etwaige eingebaute Ersatzteile in Gang gesetzt. Dies gilt auch bei Einsatz eines Vor-Ort-
Services.
5. Für die Geltendmachung Ihres Garantieanspruches melden Sie bitte das defekte Gerät an unter:
www.Einhell-Service.com. Halten Sie bitte den Kaufbeleg oder andere Nachweise Ihres Kaufs des
Neugeräts bereit. Geräte, die ohne entsprechende Nachweise oder ohne Typenschild eingesendet
werden, sind von der Garantieleistung aufgrund mangelnder Zuordnungsmöglichkeit ausgeschlos-
sen. Ist der Defekt des Gerätes von unserer Garantieleistung erfasst, erhalten Sie umgehend ein
repariertes oder neues Gerät zurück.
Selbstverständlich beheben wir gegen Erstattung der Kosten auch gerne Defekte am Gerät, die vom
Garantieumfang nicht oder nicht mehr erfasst sind. Dazu senden Sie das Gerät bitte an unsere Service-
adresse.
Für Verschleiß-, Verbrauchs- und Fehlteile verweisen wir auf die Einschränkungen dieser Garantie ge-
mäß den Service-Informationen dieser Bedienungsanleitung.
Einhell Service · Eschenstraße 6 · 94405 Landau/Isar (Deutschland)
Anl_TE_CL_18_2000_LiAC_SPK13.indb 10Anl_TE_CL_18_2000_LiAC_SPK13.indb 10 06.07.2022 10:21:4606.07.2022 10:21:46

D
- 11 -
wir haben das Ziel, alles dafür zu tun, damit Sie mit Einhell all Ihre Projekte möglich machen können. Aus diesem
Grund ist Service bei uns gelebter Anspruch: mit über 20 Jahren Erfahrung und mehr als 120 kompetenten und
persönlichen Ansprechpartnern hat es sich der Einhell Service auf die Fahnen geschrieben, Sie bei allen Fragen
zu Ihrem Produkt zu unterstützen. Dazu gehört ein beratendes Technikerteam, bis zu 10 Jahre Ersatzteilverfüg-
barkeit, 24 Stunden Versandservice, eine leistungsfähige Reparatur-Organisation und ein fl ächendeckendes
Service-Partnernetz.
Über unser Onlineportal www.Einhell-Service.com sind viele unserer verfügbaren Services jetzt noch
schneller und einfacher für Sie erreichbar – rund um die Uhr, sieben Tage die Woche.
Einhell Service
Eschenstraße 6
94405 Landau an der Isar
Telefon: 09951 - 959 2000
Telefax: 09951 - 959 1700
Sehr geehrte Kundin,
sehr geehrter Kunde,
LIEBE MÖGLICHMACHER,
Einhell-Service.com
>>>
ERSATZTEILE
PREIS-
INFORMATIONEN VERFÜGBARKEITEN
PRODUKT-
INFORMATIONEN
TRACK & TRACE
REPARATUR-
SERVICE SERVICE-STELLEN
VOR ORT
GARANTIEVER-
LÄNGERUNGEN
ZUBEHÖR
Anl_TE_CL_18_2000_LiAC_SPK13.indb 11Anl_TE_CL_18_2000_LiAC_SPK13.indb 11 06.07.2022 10:21:4606.07.2022 10:21:46

GB
- 12 -
Danger!
When using the equipment, a few safety pre-
cautions must be observed to avoid injuries and
damage. Please read the complete operating
instructions and safety regulations with due care.
Keep this manual in a safe place, so that the in-
formation is available at all times. If you give the
equipment to any other person, hand over these
operating instructions and safety regulations as
well. We cannot accept any liability for damage
or accidents which arise due to a failure to follow
these instructions and the safety instructions.
Explanation of the symbols used (see Fig. 11)
1. Danger! - Read the operating instructions to
reduce the risk of injury.
2. Caution: Do not look into the light beam.
3. Beware of hot parts!
1. Safety regulations
The corresponding safety information can be
found in the enclosed booklet.
Danger!
Read all safety regulations and instructions.
Any errors made in following the safety regula-
tions and instructions may result in an electric
shock, fi re and/or serious injury.
Keep all safety regulations and instructions
in a safe place for future use.
2. Layout and items supplied
2.1 Layout (Fig. 1)
1. Carry handle
2. Lamp head
3. ON/OFF switch
4. Brightness control
5. Brightness indicator
6. Fixing screw
7. Mains connection:
8. Battery mount
9. Power supply unit
10. Battery pack
11. Push/lock button
12. Charger
13. Base
14. Hook
15. Sawtooth cutout
16. Fastening eyelet
17. Threaded bushes, ¼“ and ⅝“
2.2 Items supplied
Please check that the article is complete as
specifi ed in the scope of delivery. If parts are
missing, please contact our service center or the
sales outlet where you made your purchase at
the latest within 5 working days after purchasing
the product and upon presentation of a valid bill
of purchase. Also, refer to the warranty table in
the service information at the end of the operating
instructions.
• Open the packaging and take out the equip-
ment with care.
• Remove the packaging material and any
packaging and/or transportation braces (if
available).
• Check to see if all items are supplied.
• Inspect the equipment and accessories for
transport damage.
• If possible, please keep the packaging until
the end of the guarantee period.
Danger!
The equipment and packaging material are
not toys. Do not let children play with plastic
bags, foils or small parts. There is a danger of
swallowing or suff ocating!
• Cordless lamp
• Original operating instructions
3. Technical data
Power supply
Mains supply: .....................100-240 V~ 50-60 Hz
Battery power supply: ............................. 18 V DC
Number of LEDs: ............................................. 20
Luminous fl ux: .........................................2000 lm
Weight: .......................................................1.3 kg
Caution
The equipment is supplied without batteries and
without a charger. It must only be used with the li-
thium-ion batteries in the Power X-Change series.
The lithium-ion batteries of the Power X-Change
series must only be charged only with the Power
X-charger.
Anl_TE_CL_18_2000_LiAC_SPK13.indb 12Anl_TE_CL_18_2000_LiAC_SPK13.indb 12 06.07.2022 10:21:5506.07.2022 10:21:55

GB
- 13 -
4. Operation
4.1 Installing the battery (Fig. 4)
Press the push/lock button of the battery pack
as shown in Fig. 4 and slide the battery pack into
the mount provided. Make sure that the push/lock
button engages properly. To remove the battery
pack, follow the steps in reverse order.
4.2 Charging the lithium battery pack
(Fig. 4/5)
1. Remove the battery pack (10) from the bat-
tery mount (8), pressing the push/lock button
(11) downward to do so.
2. Check that your mains voltage is the same as
that marked on the rating plate of the battery
charger. Insert the power plug of the charger
into the socket outlet. The green LED will then
begin to fl ash.
3. Push the battery pack onto the battery char-
ger.
In section 8 (Charger indicator) you will fi nd a
table with an explanation of the LED indicator on
the charger.
If the battery pack fails to charge, check for the
following:
• whether there is a voltage at the mains power
socket;
• whether there is good contact at the charging
contacts of the charging unit
If the battery pack still fails to charge, please send
• the charging unit
• and the battery pack
to our customer service center.
To ensure that items are properly packaged
and delivered when you send them to us,
please contact our customer service or the
point of sale at which the equipment was
purchased.
When shipping or disposing of batteries and
cordless tools, always ensure that they are
packed individually in plastic bags to prevent
short circuits and fi res.
To ensure that the battery pack provides long ser-
vice, you should take care to recharge it promptly.
You must recharge the battery pack when you
notice that the performance of the device drops.
Never allow the battery pack to become fully di-
scharged. This will cause it to develop a defect.
4.3 ON/OFF switch (Fig. 3 / item 3)
Warning:
Do not look into the light beam.
Switching on:
• Press the ON/OFF switch (3).
• For safety reasons, the lamp will always come
on in its lowest brightness setting.
Switching off :
• Press the ON/OFF switch (3) again.
4.4 Adjusting the brightness (Fig. 3/ item 4)
Warning:
Do not look into the light beam.
• Three different brightness settings are availa-
ble so that the lamp can be adjusted to the
particular lighting conditions.
• For safety reasons, the lamp will always come
on in its lowest brightness setting.
• To increase the brightness, press the bright-
ness control (4).
• The brightness increases to the next level
every time you press the button.
• The current brightness setting is displayed by
the brightness indicator (5).
4.5 Adjusting the lamp position
• You can set the lamp to any position by rota-
ting the lamp head.
• To do this, undo the fixing screw (6) on the
right-hand side of the lamp.
• Then adjust the lamp to the required position
and retighten the fixing screw (6).
4.6 Operation with a power supply unit (9)
• The lamp can also be used in conventional
fashion with the enclosed power supply unit
(9).
• Check that your mains voltage is the same as
the one marked on the rating plate.
• Plug the mains plug (9a) of the power supply
unit into the socket outlet.
• Then connect the plug (9b) into the power
connection (7) of the lamp.
Note: You do not need to take out the battery
when you are operating the lamp with the po-
wer supply unit.
Note: The battery will not be charged when
you are operating the lamp with the power
supply unit.
Anl_TE_CL_18_2000_LiAC_SPK13.indb 13Anl_TE_CL_18_2000_LiAC_SPK13.indb 13 06.07.2022 10:21:5506.07.2022 10:21:55

GB
- 14 -
4.7 Fastening the lamp
The lamp can be fastened quickly and easily in
various ways via the diff erent cutouts on the bot-
tom of the foot.
• Hook (Fig. 6 / item 14): The hook can be used
for quick and easy attachment of the lamp to
e.g. a railing or scaffolding.
• Sawtooth (Fig. 7 / item 15): The sawtooth cu-
tout can be used to hang the lamp to a nail or
similar. The fine tooth spacing allows the lamp
to be perfectly balanced.
• Fastening eyelet (Fig. 8 / item 16): The faste-
ning eyelet can be used to attach the lamp to
the wall with a suitable pan head screw.
• Threaded bushes, ¼“ and ⅝“ (Fig. 9 /
item 17): The threaded bushes can be used
to mount the lamp on a stand.
4.8 Battery capacity indicator (Fig. 10)
Press the battery capacity indicator switch (a).
The battery capacity indicator (b) shows the char-
ge status of the battery using 3 LEDs.
All 3 LEDs lit:
The battery is fully charged.
2 or 1 LED(s) lit:
The battery has an adequate remaining charge.
1 LED fl ashing:
The battery is empty, recharge the battery.
All LEDs fl ashing:
The battery temperature is too high. Remove the
battery from the unit and keep it at room tempera-
ture for one day. If the fault occurs again, the bat-
tery has been deep-discharged and is defective.
Remove the battery from the unit. Never use or
charge a defective battery.
5. Cleaning, maintenance and
ordering of spare parts
Danger!
Always remove the battery pack before starting
any cleaning work.
5.1 Cleaning
• Keep all safety devices, air vents and the
motor housing free of dirt and dust as far as
possible. Wipe the equipment with a clean
cloth or blow it with compressed air at low
pressure.
• We recommend that you clean the device
immediately each time you have finished
using it.
• Clean the equipment regularly with a moist
cloth and some soft soap. Do not use
cleaning agents or solvents; these could at-
tack the plastic parts of the equipment. Ensu-
re that no water can seep into the device. The
ingress of water into an electric tool increases
the risk of an electric shock.
5.2 Maintenance
There are no parts inside the equipment which
require additional maintenance.
5.3 Ordering replacement parts:
Please quote the following data when ordering
replacement parts:
• Type of machine
• Article number of the machine
• Identification number of the machine
• Replacement part number of the part required
For our latest prices and information please go to
www.Einhell-Service.com
6. Disposal and recycling
The equipment is supplied in packaging to pre-
vent it from being damaged in transit. The raw
materials in this packaging can be reused or
recycled. The equipment and its accessories are
made of various types of material, such as metal
and plastic. Never place defective equipment in
your household refuse. The equipment should
be taken to a suitable collection center for proper
disposal. If you do not know the whereabouts of
such a collection point, you should ask in your
local council offi ces.
7. Storage
Store the equipment and accessories in a dark
and dry place at above freezing temperature.
The ideal storage temperature is between 5 and
30 °C. Store the electric tool in its original pa-
ckaging.
Anl_TE_CL_18_2000_LiAC_SPK13.indb 14Anl_TE_CL_18_2000_LiAC_SPK13.indb 14 06.07.2022 10:21:5506.07.2022 10:21:55

GB
- 15 -
8. Charger indicator
Indicator status Explanations and actions
Red LED Green LED
Off Flashing Ready for use
The charger is connected to the mains and is ready for use; there is no
battery pack in the charger
On Off Charging
The charger is charging the battery pack in quick charge mode. The char-
ging times are shown directly on the charger.
Important! The actual charging times may vary slightly from the stated
charging times depending on the existing battery charge.
Off On The battery is charged and ready for use. (READY TO GO)
The unit then changes over to gentle charging mode until the battery is
fully charged.
To do this, leave the rechargeable battery on the charger for approx. 15
minutes longer.
Action:
Take the battery pack out of the charger. Disconnect the charger from the
mains supply.
Flashing Off Adapted charging
The charger is in gentle charging mode.
For safety reasons the charging is performed less quickly and takes more
time. The reasons can be:
- The rechargeable battery has not been used for a very long time.
- The battery temperature is outside the ideal range.
Action:
Wait for the charging to be completed; you can still continue to charge the
battery pack.
Flashing Flashing Fault
Charging is no longer possible. The battery pack is defective.
Action:
Never charge a defective battery pack.
Take the battery pack out of the charger.
On On Temperature fault
The battery pack is too hot (e.g. due to direct sunshine) or too cold
(below 0° C).
Action:
Remove the battery pack and keep it at room temperature (approx. 20° C)
for one day .
Anl_TE_CL_18_2000_LiAC_SPK13.indb 15Anl_TE_CL_18_2000_LiAC_SPK13.indb 15 06.07.2022 10:21:5606.07.2022 10:21:56

GB
- 16 -
For EU countries only
Never place any electric power tools in your household refuse.
To comply with European Directive 2012/19/EC concerning old electric and electronic equipment and
its implementation in national laws, old electric power tools have to be separated from other waste and
disposed of in an environment-friendly fashion, e.g. by taking to a recycling depot.
Recycling alternative to the return request:
As an alternative to returning the equipment to the manufacturer, the owner of the electrical equipment
must make sure that the equipment is properly disposed of if he no longer wants to keep the equipment.
The old equipment can be returned to a suitable collection point that will dispose of the equipment in
accordance with the national recycling and waste disposal regulations. This does not apply to any ac-
cessories or aids without electrical components supplied with the old equipment.
Please note that batteries and lamps (e.g. light bulbs) must be removed from the tool before it is dispo-
sed of.
The reprinting or reproduction by any other means, in whole or in part, of documentation and papers ac-
companying products is permitted only with the express consent of the Einhell Germany AG.
Subject to technical changes
Anl_TE_CL_18_2000_LiAC_SPK13.indb 16Anl_TE_CL_18_2000_LiAC_SPK13.indb 16 06.07.2022 10:21:5606.07.2022 10:21:56

GB
- 17 -
Warranty certifi cate
Dear Customer,
All of our products undergo strict quality checks to ensure that they reach you in perfect condition. In the
unlikely event that your device develops a fault, please contact our service department at the address
shown on this guarantee card. You can also contact us by telephone using the service number shown.
Please note the following terms under which guarantee claims can be made:
1. These guarantee terms apply to consumers only, i.e. natural persons intending to use this product
neither for their commercial activities nor for any other self-employed activities. These warranty
terms regulate additional warranty services, which the manufacturer mentioned below promises to
buyers of its new products in addition to their statutory rights of guarantee. Your statutory guarantee
claims are not aff ected by this guarantee. Our guarantee is free of charge to you.
2. The warranty services cover only defects due to material or manufacturing faults on a product which
you have bought from the manufacturer mentioned below and are limited to either the rectifi cation of
said defects on the product or the replacement of the product, whichever we prefer.
Please note that our devices are not designed for use in commercial, trade or professional applica-
tions. A guarantee contract will not be created if the device has been used by commercial, trade or
industrial business or has been exposed to similar stresses during the guarantee period.
3. The following are not covered by our guarantee:
- Damage to the device caused by a failure to follow the assembly instructions or due to incorrect
installation, a failure to follow the operating instructions (for example connecting it to an incorrect
mains voltage or current type) or a failure to follow the maintenance and safety instructions or by ex-
posing the device to abnormal environmental conditions or by lack of care and maintenance.
- Damage to the device caused by abuse or incorrect use (for example overloading the device or the
use or unapproved tools or accessories), ingress of foreign bodies into the device (such as sand,
stones or dust, transport damage), the use of force or damage caused by external forces (for ex-
ample by dropping it).
- Damage to the device or parts of the device caused by normal or natural wear or tear or by normal
use of the device.
4. The guarantee is valid for a period of 24 months starting from the purchase date of the device. Gu-
arantee claims should be submitted before the end of the guarantee period within two weeks of the
defect being noticed. No guarantee claims will be accepted after the end of the guarantee period.
The original guarantee period remains applicable to the device even if repairs are carried out or
parts are replaced. In such cases, the work performed or parts fi tted will not result in an extension
of the guarantee period, and no new guarantee will become active for the work performed or parts
fi tted. This also applies if an on-site service is used.
5. To make a claim under the guarantee, please register the defective device at:
www.Einhell-Service.com. Please keep your bill of purchase or other proof of purchase for the new
device. Devices that are returned without proof of purchase or without a rating plate shall not be
covered by the guarantee, because appropriate identifi cation will not be possible. If the defect is co-
vered by our guarantee, then the item in question will either be repaired immediately and returned to
you or we will send you a new replacement.
Of course, we are also happy off er a chargeable repair service for any defects which are not covered by
the scope of this guarantee or for units which are no longer covered. To take advantage of this service,
please send the device to our service address.
Also refer to the restrictions of this warranty concerning wear parts, consumables and missing parts as
set out in the service information in these operating instructions.
Anl_TE_CL_18_2000_LiAC_SPK13.indb 17Anl_TE_CL_18_2000_LiAC_SPK13.indb 17 06.07.2022 10:21:5606.07.2022 10:21:56

F
- 18 -
Danger !
Lors de l’utilisation d’appareils, il faut respecter
certaines mesures de sécurité afi n d’éviter des
blessures et dommages. Veuillez donc lire atten-
tivement ce mode d’emploi/ces consignes de
sécurité. Veillez à le conserver en bon état pour
pouvoir accéder aux informations à tout moment.
Si l’appareil doit être remis à d’autres personnes,
veillez à leur remettre aussi ce mode d’emploi/
ces consignes de sécurité. Nous déclinons toute
responsabilité pour les accidents et dommages
dus au non-respect de ce mode d’emploi et des
consignes de sécurité.
Explication des symboles utilisés
(voir fi gure 11)
1. Danger! - Lisez ce mode d’emploi pour dimi-
nuer le risque de blessures.
2. Attention ! Ne regardez pas en direction
du rayon lumineux.
3. Attention aux pièces brûlantes !
1. Consignes de sécurité
Vous trouverez les consignes de sécurité corres-
pondantes dans le cahier en annexe.
Danger !
Veuillez lire toutes les consignes de sécurité
et instructions. Tout non-respect des consignes
de sécurité et instructions peut provoquer une
décharge électrique, un incendie et/ou des bles-
sures graves.
Conservez toutes les consignes de sécurité
et instructions pour une consultation ultéri-
eure.
2. Description de l’appareil et
volume de livraison
2.1 Description de l’appareil (fi gure 1)
1. Poignée de transport
2. Tête de lampe
3. Interrupteur marche/arrêt
4. Régulateur de luminosité
5. Affi chage de luminosité
6. Vis de fi xation
7. Branchement réseau
8. Logement de l’accumulateur
9. Bloc d’alimentation
10. Accumulateur
11. Touche à crans
12. Chargeur
13. Pied
14. Crochet
15. Denture en dents en scie
16. Œillet de suspension
17. Douilles fi letées ¼ pouce et ⅝ pouce
2.2 Volume de livraison
Veuillez contrôler si l‘article est complet à l‘aide
de la description du volume de livraison. S‘il
manque des pièces, adressez-vous dans un délai
de 5 jours maximum après votre achat à notre
service après-vente ou au magasin où vous avez
acheté l‘appareil muni d‘une preuve d‘achat vala-
ble. Veuillez consulter pour cela le tableau des
garanties dans les informations service après-
vente à la fi n du mode d‘emploi.
• Ouvrez l’emballage et prenez l’appareil en le
sortant avec précaution de l’emballage.
• Retirez le matériel d’emballage tout comme
les sécurités d’emballage et de transport (s’il
y en a).
• Vérifiez si la livraison est bien complète.
• Contrôlez si l’appareil et ses accessoires ne
sont pas endommagés par le transport.
• Conservez l’emballage autant que possible
jusqu’à la fin de la période de garantie.
Danger !
L’appareil et le matériel d’emballage ne sont
pas des jouets ! Il est interdit de laisser des
enfants jouer avec des sacs et des fi lms en
plastique et avec des pièces de petite taille.
Ils risquent de les avaler et de s’étouff er !
• Lampe sans fil
• Mode d’emploi d’origine
3. Données techniques
Alimentation en tension
Réseau : .............................100-240 V~ 50-60 Hz
Alimentation en tension accumulateur : ..18 V d.c.
Nombre de LEDs : ........................................... 20
Flux lumineux : ........................................2000 lm
Poids : ........................................................1,3 kg
Attention !
L’appareil est livré sans accumulateur et sans
chargeur et ne doit être utilisé qu’avec les accu-
mulateurs Li-Ion de la série Power X-Change !
Anl_TE_CL_18_2000_LiAC_SPK13.indb 18Anl_TE_CL_18_2000_LiAC_SPK13.indb 18 06.07.2022 10:21:5606.07.2022 10:21:56

F
- 19 -
Les accumulateurs Li-Ion de la série Power X-
Change ne doivent être chargés qu’avec le char-
geur Power-X.
4. Commande
4.1 Montage de l’accumulateur (fi gure 4)
Appuyez sur la touche à crans de l’accumulateur
comme indiqué sur la fi gure 4 et insérez
l’accumulateur dans le logement d’accumulateur
prévu à cet eff et. Veillez à ce que la touche
à crans s’enclenche ! Le démontage de
l’accumulateur s’eff ectue dans l’ordre inverse !
4.2 Charge du bloc accumulateur lithium
(fi gure 4/5)
1. Sortez le bloc accumulateur (10) de son loge-
ment (8), en appuyant sur les touches à crans
(11).
2. Comparez si la tension du secteur indiquée
sur la plaque signalétique correspond à la
tension réseau disponible. Branchez la fi che
de contact du chargeur dans la prise de cou-
rant. Le voyant LED vert commence à cligno-
ter.
3. Poussez l’accumulateur sur le chargeur.
Au point 8 (affi chage chargeur), vous trouverez
un tableau avec les signifi cations des affi chages
LED du chargeur.
S’il est impossible de charger le bloc accumula-
teur, veuillez contrôler
• si la tension réseau est présente au niveau de
la prise de courant.
• si un contact correct est présent au niveau
des contacts de charge du chargeur.
Si le chargement du bloc accumulateur reste
impossible, nous vous prions de bien vouloir
renvoyer,
• le chargeur
• et le bloc accumulateur
à notre service après-vente.
Pour un envoi correct, nous vous prions de
contacter notre service après-vente ou le
point de vente où vous avez acheté l’appareil.
Veillez à ce que, lors de l’envoi ou de la mise
au rebut, les accumulateurs ou les appareils
sans fi l soit emballés séparément dans des
sacs en plastique afi n d’éviter les courts-
circuits ou un incendie !
Dans l‘intérêt d‘une longue durée de fonctionne-
ment du bloc accumulateur, vous devez prendre
soin de recharger le bloc accumulateur en temps
voulu. Ceci est dans tous les cas indispensable
lorsque vous constatez une diminution de la
puissance de l‘appareil. Ne déchargez jamais
complètement le bloc accumulateur. Ceci cause
l‘endommagement du bloc accumulateur !
4.3 Interrupteur marche/arrêt (fi gure 3/pos. 3)
Avertissement !
Ne regardez pas en direction du rayon lumi-
neux !
Mise en circuit :
• Appuyez sur l’interrupteur marche/arrêt (3).
• Pour des raisons de sécurité, la lampe
s’allume au niveau le plus bas.
Mise hors circuit :
• Appuyez à nouveau sur l’interrupteur marche/
arrêt (3)
4.4 Réglage de la luminosité (fi gure 3/pos. 4)
Avertissement !
Ne regardez pas en direction du rayon lumi-
neux !
• La luminosité peut être adaptée individuelle-
ment en trois niveaux à la situation de travail-
ler respective.
• Pour des raisons de sécurité, la lampe
s’allume toujours au niveau le plus bas.
• Pour augmenter la luminosité, appuyez sur le
régulateur de luminosité (4).
• La luminosité augmente d’un niveau à
chaque pression.
• Le niveau de luminosité actuel est indiqué par
l’affichage de luminosité (5).
4.5 Réglage de la position lumineuse
• Tournez la tête de lampe pour régler
n’importe quelle position lumineuse.
• Desserrez pour ce faire la vis de fixation (6)
sur le côté droit de l’appareil.
• Réglez à présent la position lumineuse adap-
tée et resserrez la vis de fixation (6).
Anl_TE_CL_18_2000_LiAC_SPK13.indb 19Anl_TE_CL_18_2000_LiAC_SPK13.indb 19 06.07.2022 10:21:5706.07.2022 10:21:57

F
- 20 -
4.6 Fonctionnement avec bloc d’alimentation
(9)
• La lampe peut également être exploitée avec
le bloc d’alimentation joint (9) de manière tra-
ditionnelle sur le réseau électrique.
• Comparez la tension indiquée sur la plaque
signalétique avec la tension réseau disponib-
le.
• Branchez la fiche de contact (9a) du bloc
d’alimentation dans la prise de courant.
• Insérez ensuite la fiche (9b) dans le branche-
ment électrique (7) de la lampe.
Remarque ! L’accumulateur n’a pas besoin
d’être retiré de la lampe en cas de fonction-
nement avec le bloc d’alimentation !
Remarque ! L’accumulateur n’est pas chargé
en cas de fonctionnement avec le bloc
d’alimentation !
4.7 Fixation de la lampe
La lampe peut être fi xée rapidement et de diver-
ses manières via les diff érents évidements au
niveau de la partie inférieure du pied.
• Crochet (figure 6/pos. 14) : Le crochet permet
de fixer la lampe rapidement et en toute sé-
curité par ex. à une balustrade ou un échafau-
dage.
• Denture en dents en scie (figure 7/pos. 15) :
La denture en dents en scie permet
d’accrocher la lampe à un clou ou similaire.
Le crantage fin permet un tarage optimal de
la lampe.
• Œillet de fixation (figure 8/pos. 16) : L’œillet
de fixation permet de monter la lampe à la
paroi avec une vis conique bombée corres-
pondante.
• Douilles filetées ¼ pouce et ⅝ pouce (figu-
re 9/pos. 17) : Les douilles filetées permettent
de monter la lampe sur un trépied.
4.8 Indicateur de charge de l’accumulateur
(fi gure 10)
Appuyez sur le bouton indicateur de charge de
l’accumulateur (a). L’indicateur de charge de
l’accumulateur (b) vous indique l’état de charge
de l’accumulateur à l’aide de trois voyants LED.
Les 3 voyants LED sont allumés :
L’accumulateur est complètement rechargé.
2 ou 1 voyant(s) LED sont allumés :
L’accumulateur dispose encore d’un résidu de
charge suffi sant.
1 voyant LED clignote :
L’accumulateur est vide, il faut le recharger.
Tous les voyants LEDs sont allumés :
La température de l’accumulateur est trop élevée.
Retirez l’accumulateur de l’appareil et laissez-le
reposer pendant un jour à température ambiante.
Si l’erreur survient à nouveau, cela signifi e que
l’accumulateur est en décharge profonde et dé-
fectueux. Retirez l’accumulateur de l’appareil. Un
accumulateur défectueux ne doit plus être utilisé
ou chargé.
5. Nettoyage, maintenance et
commande de pièces de
rechange
Danger !
Retirez l’accumulateur avant tous travaux de
nettoyage.
5.1 Nettoyage
• Maintenez les dispositifs de protection, les
fentes à air et le carter de moteur aussi pro-
pres (sans poussière) que possible. Frottez
l’appareil avec un chiffon propre ou soufflez
dessus avec de l’air comprimé à basse pres-
sion.
• Nous recommandons de nettoyer l’appareil
directement après chaque utilisation.
• Nettoyez l’appareil régulièrement à l’aide d’un
chiffon humide et un peu de savon. N’utilisez
aucun produit de nettoyage ni détergeant;
ils pourraient endommager les pièces en
matières plastiques de l’appareil. Veillez à
ce qu’aucune eau n’entre à l’intérieur de
l’appareil. La pénétration de l’eau dans un
appareil électrique augmente le risque de
décharge électrique.
5.2 Maintenance
Aucune pièce à l’intérieur de l’appareil n’a besoin
de maintenance.
5.3 Commande de pièces de rechange :
Pour les commandes de pièces de rechange,
veuillez indiquer les références suivantes:
• Type de l’appareil
• No. d’article de l’appareil
• No. d’identification de l’appareil
• No. de pièce de rechange de la pièce requise
Vous trouverez les prix et informations actuelles à
l’adresse www.Einhell-Service.com
Anl_TE_CL_18_2000_LiAC_SPK13.indb 20Anl_TE_CL_18_2000_LiAC_SPK13.indb 20 06.07.2022 10:21:5706.07.2022 10:21:57
La page est en cours de chargement...
La page est en cours de chargement...
La page est en cours de chargement...
La page est en cours de chargement...
La page est en cours de chargement...
La page est en cours de chargement...
La page est en cours de chargement...
La page est en cours de chargement...
La page est en cours de chargement...
La page est en cours de chargement...
La page est en cours de chargement...
La page est en cours de chargement...
La page est en cours de chargement...
La page est en cours de chargement...
La page est en cours de chargement...
La page est en cours de chargement...
La page est en cours de chargement...
La page est en cours de chargement...
La page est en cours de chargement...
La page est en cours de chargement...
La page est en cours de chargement...
La page est en cours de chargement...
La page est en cours de chargement...
La page est en cours de chargement...
La page est en cours de chargement...
La page est en cours de chargement...
La page est en cours de chargement...
La page est en cours de chargement...
La page est en cours de chargement...
La page est en cours de chargement...
La page est en cours de chargement...
La page est en cours de chargement...
La page est en cours de chargement...
La page est en cours de chargement...
La page est en cours de chargement...
La page est en cours de chargement...
La page est en cours de chargement...
La page est en cours de chargement...
La page est en cours de chargement...
La page est en cours de chargement...
La page est en cours de chargement...
La page est en cours de chargement...
La page est en cours de chargement...
La page est en cours de chargement...
La page est en cours de chargement...
La page est en cours de chargement...
La page est en cours de chargement...
La page est en cours de chargement...
La page est en cours de chargement...
La page est en cours de chargement...
La page est en cours de chargement...
La page est en cours de chargement...
La page est en cours de chargement...
La page est en cours de chargement...
La page est en cours de chargement...
La page est en cours de chargement...
La page est en cours de chargement...
La page est en cours de chargement...
La page est en cours de chargement...
La page est en cours de chargement...
La page est en cours de chargement...
La page est en cours de chargement...
La page est en cours de chargement...
La page est en cours de chargement...
La page est en cours de chargement...
La page est en cours de chargement...
La page est en cours de chargement...
La page est en cours de chargement...
La page est en cours de chargement...
La page est en cours de chargement...
La page est en cours de chargement...
La page est en cours de chargement...
La page est en cours de chargement...
La page est en cours de chargement...
La page est en cours de chargement...
La page est en cours de chargement...
La page est en cours de chargement...
La page est en cours de chargement...
La page est en cours de chargement...
La page est en cours de chargement...
La page est en cours de chargement...
La page est en cours de chargement...
La page est en cours de chargement...
La page est en cours de chargement...
La page est en cours de chargement...
La page est en cours de chargement...
La page est en cours de chargement...
La page est en cours de chargement...
La page est en cours de chargement...
La page est en cours de chargement...
La page est en cours de chargement...
La page est en cours de chargement...
La page est en cours de chargement...
La page est en cours de chargement...
La page est en cours de chargement...
La page est en cours de chargement...
La page est en cours de chargement...
La page est en cours de chargement...
La page est en cours de chargement...
La page est en cours de chargement...
La page est en cours de chargement...
La page est en cours de chargement...
La page est en cours de chargement...
La page est en cours de chargement...
La page est en cours de chargement...
La page est en cours de chargement...
La page est en cours de chargement...
La page est en cours de chargement...
-
 1
1
-
 2
2
-
 3
3
-
 4
4
-
 5
5
-
 6
6
-
 7
7
-
 8
8
-
 9
9
-
 10
10
-
 11
11
-
 12
12
-
 13
13
-
 14
14
-
 15
15
-
 16
16
-
 17
17
-
 18
18
-
 19
19
-
 20
20
-
 21
21
-
 22
22
-
 23
23
-
 24
24
-
 25
25
-
 26
26
-
 27
27
-
 28
28
-
 29
29
-
 30
30
-
 31
31
-
 32
32
-
 33
33
-
 34
34
-
 35
35
-
 36
36
-
 37
37
-
 38
38
-
 39
39
-
 40
40
-
 41
41
-
 42
42
-
 43
43
-
 44
44
-
 45
45
-
 46
46
-
 47
47
-
 48
48
-
 49
49
-
 50
50
-
 51
51
-
 52
52
-
 53
53
-
 54
54
-
 55
55
-
 56
56
-
 57
57
-
 58
58
-
 59
59
-
 60
60
-
 61
61
-
 62
62
-
 63
63
-
 64
64
-
 65
65
-
 66
66
-
 67
67
-
 68
68
-
 69
69
-
 70
70
-
 71
71
-
 72
72
-
 73
73
-
 74
74
-
 75
75
-
 76
76
-
 77
77
-
 78
78
-
 79
79
-
 80
80
-
 81
81
-
 82
82
-
 83
83
-
 84
84
-
 85
85
-
 86
86
-
 87
87
-
 88
88
-
 89
89
-
 90
90
-
 91
91
-
 92
92
-
 93
93
-
 94
94
-
 95
95
-
 96
96
-
 97
97
-
 98
98
-
 99
99
-
 100
100
-
 101
101
-
 102
102
-
 103
103
-
 104
104
-
 105
105
-
 106
106
-
 107
107
-
 108
108
-
 109
109
-
 110
110
-
 111
111
-
 112
112
-
 113
113
-
 114
114
-
 115
115
-
 116
116
-
 117
117
-
 118
118
-
 119
119
-
 120
120
-
 121
121
-
 122
122
-
 123
123
-
 124
124
-
 125
125
-
 126
126
-
 127
127
-
 128
128


EINHELL TE-CL 18-2000 LiAC Manuel utilisateur
- Taper
- Manuel utilisateur
dans d''autres langues
Documents connexes
-
EINHELL Expert TE-CL 18/2000 LiAC Manuel utilisateur
-
-
EINHELL TE-CL 18/2000 LiAC-Solo Cordless Light Manuel utilisateur
-
-
-
Einhell Classic TC-CL 18/1800 Li - Solo Manuel utilisateur
-
-
-
-
EINHELL TE-CD 12-1 3X-Li Manuel utilisateur