
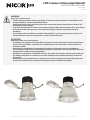
CDR Commercial Downlight Retrot
INSTALLATION INSTRUCTIONS
Model(s): CDR6
CDR8
WARNING
Risk of re or electric shock.
• LED Retrot Kit installation requires knowledge of luminaires electrical systems. If not qualied, do not
attempt installation. Contact a qualied electrician.
• Install these kits only in the luminaires that has the construction features and dimensions shown in the
photographs and/or drawings.
• To prevent wiring damage or abrasion, do not expose wiring to edges of sheet metal or other sharp objects.
• Do not make or alter any open holes in an enclosure of wiring or electrical components during kit
installation.
• This luminaire must be installed in accordance with the NEC or your local electrical code. If you are not
familiar with these codes and requirements, consult a qualied electrician.
AT TENTION
Risque d’incendie ou de choc électrique.
• L’installation des systèmes d’éclairage LED nécessite des connaissances dans les systèmes électriques.
Si vous n’êtes pas qualiés, ne tentez pas une installation par vous même. Dans ce cas, contactez un
électricien qualié.
• Respectez les caractéristiques et dimensions des systèmes d’éclairage lors de leurs installations.
Les informations relatives aux caractéristiques techniques et dimensions sont présentes dans les ches
techniques et/ou schémas et/ou photographies.
• An d’éviter d’endommager l’installation électrique des systèmes d’éclairage, veillez à ne pas positionner
les câblages électriques en contact avec les cadres métalliques des systèmes d’éclairage et tout autre
objet pointu.
• Ne pas apporter de modication sur les dimensions du boitier de logement du système d’éclairage et ne
pas faire de modication des composants électriques pendant l’installation du système.
NICOR, Inc. | 2200 Midtown Place NE, Albuquerque, NM 87107 | 800.821.6283 | www.nicorlighting.com | August 25, 2015 1:55 PM

NICOR, Inc. | 2200 Midtown Place NE, Albuquerque, NM 87107 | 800.821.6283 | www.nicorlighting.com | August 25, 2015 1:55 PM
NOTE:
This luminaire has been modied and can no longer operate the originally intended lamp.
The provided label must be applied to the retrotted luminaire where visible during re-lamping.
TURN POWER OFF AT BREAKER PANEL BEFORE WIRING.
Housing Compatibility
CDR6: 6”min - 6.7”max
CDR8: 7.7”min - 8.4”max
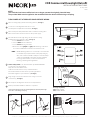
Remove existing lamp(s) and discard existing reector. (See Fig. 1)
Locate J-box of existing xture and remove cover.
Cut all input and output wires from ballast. (See Fig. 2)
Remove lamp base whip and exible metal conduit from existing J-Box.
Remove desired knockout from J-Box for driver power supply.
Place LED Driver box through ceiling cut-out and rest on ceiling.
Install Driver power supply into J-Box. (See Fig. 3)
a. Connect Black wire to live wire.
b. Connect White wire to neutral wire
c. Connect Green wire to ground wire
d. Route and connect purple and grey 0-10V dimming control wires
in accordance with dimmer instructions and electrical code.
NOTE: If 0-10V dimming is NOT to be connected, it is recommended
to cut o the exposed, tinned leads on the purple and grey
wires, and cover the ends with a small piece of electrical tape
or wire nut. If bare 0-10V control wires should accidentally
touch a grounded surface, it could cause unintended
ickering or dimming of the light xture.
Attach Safety Cable: Secure xture to structure per state and local codes.
Locate and loosen cable fastener.
Wrap cable around suitable anchor.
Guide end of cable into hole on top of fastener button.
Press fastener button to allow cable to pass through fastener.
Pull cable to tighten loop around frame. (See Fig. 4)
Plug orange connector from driver box into orange connector
on LED Lamp. (See Fig. 5)
Place lamp into existing frame. Ensure it is securely fastened.
Restore power after installation of xture is completed.
Attach provided lamping replacement marking label and cautionary label to light
xture where visible during re-lamping.
1
2
3
4
5
6
7
8
Fig. 1
Fig. 2
Fig. 3
Fig. 5
Fig. 4
CDR Commercial Downlight Retrot
INSTALLATION INSTRUCTIONS
Model(s): CDR6
CDR8
-
 1
1
-
 2
2


NICOR CDR6-27W-40K-SN Guide d'installation
- Taper
- Guide d'installation
- Ce manuel convient également à
dans d''autres langues
Autres documents
-
Halco SDL6-15-CS Guide d'installation
-
-
-
 Green Creative 24T5HODRIVER/4CH Guide d'installation
-
Eaton HALO ML4 Series Mode d'emploi
-
Halo BLD6089SWHR-CA Mode d'emploi
-
Vista Architectural Series Installation Instructions Manual
-
Halo SMD6R6950WH Mode d'emploi
-
-
