
CARE INSTRUCTIONS
Rinse the product with clear water.
Dry the product with a soft cloth.
DO NOT:
Use abrasive cleansers, cloths, or
paper towels. Use any cleaning agents
containing acid, polish, wax, alcohol,
ammonia, bleach, solvent or any other
corrosive or harsh chemical cleansers.
INSTRUCTIONS D’ENTRETIEN
Rincer le robinet avec de l’eau claire
et l’essuyer avec un tissu doux.
À NE PAS FAIRE :
Utiliser des tissus ou essuie-tout
abrasifs, produits nettoyants contenant
de l’acide, agent polisseur, cires, alcool,
ammoniaque, eau de Javel, solvants ou
tout autres produits chimiques corrosifs.
Customer Service
Monday to Friday:
8 a.m. - 4:30 p.m. E.S.T.
Tel: 1-800-361-5960
Service à la clientèle
Lundi au vendredi :
8 h 00 à 16 h 30 H.N.E.
Fax : 1-888-533-8313
clientinfo@belanger-upt.com
Replacement parts are available on order
Les pièces de remplacement sont disponibles sur commande
IBSYM001CP_v141120
ENSEMBLE DE POMMES DE DOUCHE FIXE ET DOUCHE À MAIN
SUR GLISSIÈRE / SLIDE BAR MOUNTED HAND AND FIXED
SHOWER HEAD KIT
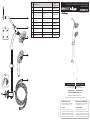
SYM001CP
2
4
5
6
9
1
3
7
8
No Description
Part
Pièce
1
Shower flange Bride de douche
B54-130
2
Shower arm Bras de douche
B29-106
3
Rubber washers
(19 mm x 11 mm x 2.5 mm)
Rondelles
de caoutchouc
(19 mm x 11 mm x 2,5 mm)
FCWAA1007
4
Bar, diverter
and slider kit
Ensemble de barre,
inverseur et glissière
B95-001-2CP
5
Shower head Pomme de douche
B96-001
6
Hand shower Douche à main
B91-005
7
Plastic support and
silicone
Support plastique
et silicone
B97-003
8
Suction cup Ventouse
B97-001
9
Flexible hose Boyau
96179
essentialfaucet.com

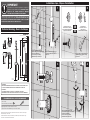
Installation steps - Étapes d’installation
Technical drawing - Dessin technique
IMPORTANT
The slide bar is not to be used as a grab bar or for support. It is
intended for holding a handshower only. WE DENY ALL LIABILITY
RELATED TO ANY ACCIDENT, INCIDENT OR BREAKAGE
FOLLOWING ANY USAGE IN BREACH OF THIS WARNING.
La barre à glissière ne doit en aucun cas être utilisée comme barre d’appui. Elle a été
conçue pour supporter une douche à main.
NOUS NOUS DÉGAGEONS DE TOUTE
RESPONSABILITÉ POUR QUELQUE ACCIDENT, INCIDENT OU BRIS OCCASIONNÉ
SUITE À UN USAGE QUI NE TIENT PAS COMPTE DE CET AVIS.
The model shown in the installation steps may differ from the one in box however connection type
and installation steps are the same.
Le modèle démontré dans les étapes d’installation peut différer du produit en boîte, mais le type
de connexions et d’installation demeure le même.
RECOMMENDED TOOLS / OUTILS RECOMMANDÉS
** Apply Bélanger thread seal tape on threaded connections.
Appliquez du ruban d’étanchéité Bélanger sur les connexions letées.
Thread seal tape
Ruban d’étanchéité pour joints letés **
Finished wall / Mur ni
7-15/16"
(201 mm)
28"
(711 mm)
25-5/8"
(650 mm)
4-1/32"
(102 mm)
1"
(25 mm)
4-5/16"
(109 mm)
8-7/8"
(225 mm)
5"
(127 mm)
3-3/8"
(86 mm)
5"
(127 mm)
INSTALL RUBBER WASHERS AND
TIGHTEN FIRMLY. DO NOT OVERTIGHTEN.
PLACER LES RONDELLES
DE CAOUTCHOUC ET SERRER
FERMEMENT MAIS SANS EXCÈS.
INSTALL RUBBER WASHERS AND
TIGHTEN FIRMLY. DO NOT OVERTIGHTEN.
PLACER LES RONDELLES
DE CAOUTCHOUC ET SERRER
FERMEMENT MAIS SANS EXCÈS.
MAKE SURE TO LEVEL VERTICALLY.
S’ASSURER D’UNE MISE À NIVEAU
VERTICALE.
ALLOW TO DRY 24 HOURS BEFORE USE.
LAISSEZ SÉCHER 24 HEURES AVANT
UTILISATION.
FOR COMPLETELY FLAT
OR NON-POROUS SURFACE
POUR SURFACE ENTIÈREMENT
LISSE ET NON POREUSE
FOR IRREGULAR
OR POROUS SURFACE
POUR SURFACE
IRRÉGULIÈRE OU POREUSE
OR
OU
SYM001CP
IMPORTANT:
THE DISTANCE BETWEEN THE TOP OF THE VALVE FACE PLATE AND THE
TIP OF THE SHOWER ARM SHOULD BE A MINIMUM OF 27 INCHES.
IMPORTANT :
LA DISTANCE ENTRE LE HAUT DE LA PLAQUE DE LA VALVE ET
L’EXTRÉMITÉ DU BRAS DE DOUCHE DOIT ÊTRE DE 27 POUCES MINIMUM.
1
2
3 4
-
 1
1
-
 2
2


dans d''autres langues
- English: Keeney SYM001CP Installation guide
Documents connexes
-
Keeney KIT-NEO130CCP Guide d'installation
-
-
-
-
-
-
-