IKEA PROFFSIG Manuel utilisateur

Catégorie
Lave-vaisselle
Taper
Manuel utilisateur
PROFFSIG en
de
fr
it
ENGLISH  11
DEUTSCH  17
FRANÇAIS  23
ITALIANO  29
PROFFSIG
www.ikea.com
1
1
2
3
4
5
6
7
8
9
10
11
12
13
2
3 4
1
2
3
5 6
1
2
78
9 10
11 12
13
1
2
14
15 16
17
12324
18
12 4
3
2
5
19
25 6
1347
8
9
10
B
AC
20
1
2 3 4 5
21
+
= 1h
+ = 2h
+ = 24h
1 2 3
22
11ENGLISH
Product information
Product information
Product information
→Fig. 1
Familiarising yourself with your appliance
Appliance
You can find an overview of the parts of your appliance here.
→Fig. 2
Rating plate Rating plate with E number and FD number.
The data you need for Customer Service.
Detergent dispenser Add detergent to the detergent dispenser.
Bottom basket Bottom basket
Dispenser for special salt Add special salt to the dispenser for special salt.
Lower spray arm The lower spray arm washes the tableware in the bottom basket.
If the tableware has not been washed properly, clean the spray
arms.
Tablet collecting tray During the wash cycle tablets automatically fall out of the deter-
gent dispenser into the tablet collecting tray where they can fully
dissolve.
Top basket Top basket
Cutlery drawer Cutlery drawer
LED Interior lighting of the appliance.
Cutlery shelf Cutlery shelf
Upper spray arm The upper spray arm washes the tableware in the top basket.
If the tableware has not been washed properly, clean the spray
arms.
Filter system Filter system
Dispenser for rinse aid Add rinse aid to the dispenser for rinse aid.
Features
You can find an overview of the possible features of your ap-
pliance and how to use them here.
These features depend on the model of your appliance.
Adjusting top basket with side levers
To wash large items of tableware in the baskets, adjust the
shelf position of the top basket.
→Fig. 3- 4
Reorganising cutlery drawer
You can fold down the side shelves and front prongs to
make more space for longer/wider items of cutlery.
→Fig. 5- 6
Folding down prongs
If you do not need the folding tines, fold them down.
→Fig. 7
Before using for the first time
Performing the initial configuration
On initial start-up or after a reset to the factory settings, you
will need to make settings.
Requirement:The appliance has been installed and connec-
ted.
1. Add special salt.
2. Add rinse aid.
3. Switch on the appliance.
4. Setting the water softening system.
5. Set the amount of rinse aid to be dispensed.
6. Add detergent.
7. Start the Programme with the highest cleaning temperat-
ure without tableware.
We recommend you clean the appliance without table-
ware before using it for the first time to remove any
marks from water or other residues.
Tip:You can change these settings and other Basic settings
at any time.
To download the full document, visit www.ikea.com
12ENGLISH
Adding special salt
If the special salt refill indicator lights up, add special salt to
the dispenser for special salt just before the programme
starts.
ATTENTION!
Detergent may damage the water softening system.
Only fill the dispenser of the water softening system
with special dishwasher salt.
Special salt can damage the tub due to corrosion.
To make sure that any special salt that escapes is
washed out of the tub, add the special salt to the dis-
penser for special salt immediately before the pro-
gramme starts.
→Fig. 8- 13
Adding rinse aid
If the rinse aid refill indicator lights up, top up with rinse aid.
Only use rinse aid for domestic dishwashers.
→Fig. 14 - 17
Setting water softening system
Set the water hardness on your appliance.
→Fig. 18
Overview of water hardness settings
You can find an overview of the water hardness values that can be selected here.
WATER HARDNESS °E HARDNESS RANGE MMOL/L SETTING VALUE
0 - 8 Soft 0 - 1.1 H:00
9 - 10 Soft 1.2 - 1.4 H:01
11 - 12 Medium 1.5 - 1.8 H:02
13 - 15 Medium 1.9 - 2.1 H:03
16 - 20 Medium 2.2 - 2.9 H:04
21 - 26 Hard 3.0 - 3.7 H:05
27 - 38 Hard 3.8 - 5.4 H:06
39 - 62 Hard 5.5 - 8.9 H:07
Regeneration of the water softening sys-
tem – overview
In order to ensure fault-free function of the water softening
system, the water softening system is regenerated in all pro-
grammes before the end of the main rinse cycle.
Here you can find an overview of the maximum additional
running time and consumption values during regeneration
of the water softening system. You can find the column ap-
plicable to your product variant according to its water con-
sumption in the Eco50° programme.
The consumption values specified are laboratory measure-
ments determined in accordance with the currently applic-
able standard and using the Eco 50° programme and the
factory value of the water hardness is set to 16 - 20°E.
Setting the amount of rinse aid
If there are streaks or water marks on tableware, change the
amount of rinse aid.
Note:A low level adds less rinse aid during the wash cycle, a
higher setting adds more rinse aid during the wash cycle.
→Fig. 19
Detergent
Only use detergents that are suitable for dishwashers. Both
separate and combined detergents are suitable.
For optimum washing and drying results, use separate de-
tergent, adding special salt and rinse aid separately.
Note:Follow the manufacturer's instructions for each deter-
gent.
If you are using tablets, one is enough. Insert the tablets in a
horizontal position.
If you are using powder or liquid detergent, follow the man-
ufacturer's instructions and quantities for dosage in the de-
tergent dispenser.
20ml–25ml detergent is sufficient for normal soiling. If
tableware is only lightly soiled, slightly less than the amount
of detergent specified is usually sufficient.
Controls
Controls
Controls
You can use the control panel to configure all functions of
your appliance and to obtain information about the operat-
ing status.
→Fig. 20
ON/OFF button Switching on the appliance
Switching off the appliance
To download the full document, visit www.ikea.com
13ENGLISH
Programme buttons Programmes
Water supply display Display for water supply
Special salt refill indicator Water softening system
Rinse aid refill indicator Rinse aid system
Programme buttons and additional functions Programmes
Additional functions
Start button and reset button Starting the programme
Terminating the programme
Timer programming Setting timer programming
Display The display shows information about the remaining running
time or the basic settings. You can change the basic settings
via the display and the setting buttons.
Door opener Opening the appliance door
To download the full document, visit www.ikea.com
14ENGLISH
Programmes
Programmes
Programmes
You can find an overview of the programmes that can be se-
lected here.
Start a programme:
→Fig. 21
Set the start time for a programme:
→Fig. 22
PROGRAMME 1) PROGRAMME DURATION IN H:MIN
2) ENERGY CONSUMPTION IN KWH
3) WATER CONSUMPTION IN L
PROGRAMME SEQUENCE ADDITIONAL FUNCTIONS
Intensive 70°
1) 2:05 - 2:15
2) 1,450 - 1,500
3) 12 - 15
Intensive:
Pre-rinse
Clean 70°C
Intermediate rinse
Final rinse 69°C
Dry
Auto 45-65°
1) 1:30 - 2:40
2) 0,950 - 1,600
3) 7 - 18
Sensor-optimised:
Optimised by sensors de-
pending on the soiling of
the washing water.
Eco 50°
1) 3:55
2) 0,836
3) 9,5
Most economical pro-
gramme:
Pre-Rinse
Cleaning 50°C
Intermediate rinse
Rinsing 60°C
Drying
Automatic opening of ap-
pliance door
NightProgram
1) 3:55 - 4:00
2) 1,050 - 1,090
3) 10
Reduced noise:
Pre-rinse
Clean 50°C
Intermediate rinse
Final rinse 65°C
Dry
Quick 45°
1) 0:29
2) 0,800
3) 10
Time-optimised:
Clean 45°C
Intermediate rinse
Final rinse 55°C
PreRinse
1) 0:15
2) 0,050
3) 4
Cold rinse:
Pre-rinse None
Information for test institutes
Test institutes are provided with information for comparabil-
ity tests, e.g. according to EN60436.
These are the conditions for conducting the tests, however
they are not the results or consumption values.
E-mail enquiries to: [email protected]
The product number (E-Nr.) and the production number (FD)
are required here. They can be found on the rating plate on
the appliance door.
Additional functions
You can find an overview of the additional functions that can
be selected here.
ADDITIONAL FUNCTIONS USE
Reduce time
The running time is
shortened by 20% to 66%
depending on the wash-
ing programme.
ADDITIONAL FUNCTIONS USE
Energy and water con-
sumption are increased.
To download the full document, visit www.ikea.com
15ENGLISH
ADDITIONAL FUNCTIONS USE
ExtraDry
For a better drying result
the final rinse temperat-
ure is increased and the
drying phase extended.
Especially suitable for dry-
ing plastic parts.
There is a slight increase
in energy consumption
and the running time is
extended.
Hygiene
To ensure a higher hy-
giene status for the appli-
ance and tableware, the
temperature is raised and
maintained for an extra-
long period.
Especially suitable for
cleaning chopping boards
or baby bottles.
Continuous use of this
function increases the hy-
giene status.
This will increase the run-
ning time and energy
consumption.
ADDITIONAL FUNCTIONS USE
Intensive Zone
Switch on with mixed
loads containing table-
ware with different soil-
ing levels, e.g. place very
soiled pots and pans in
the bottom basket and
normally soiled tableware
in the top basket.
The spray pressure in the
bottom basket is in-
creased and the max-
imum programme tem-
perature held longer. This
will increase the running
time and energy con-
sumption.
Handling problems
Handling problems
Handling problems
If you have a problem with your appliance, refer to the
"Troubleshooting" section in the full version of the user
manual, which is available on the following pages:
www.ikea.com.
Information regarding Open Source Software
This product includes software components that are li-
censed by the copyright holders as free software or open
source software. The appropriate license texts are printed
below.
FreeRTOS
Copyright © 2019 Amazon.com, Inc. or its affiliates. All Rights
Reserved. Permission is hereby granted, free of charge, to
any person obtaining a copy of this software and associated
documentation files (the "Software"), to deal in the Software
without restriction, including without limitation the rights to
use, copy, modify, merge, publish, distribute, sublicense,
and/or sell copies of the Software, and to permit persons to
whom the Software is furnished to do so, subject to the fol-
lowing conditions:
The above copyright notice and this permission notice shall
be included in all copies or substantial portions of the Soft-
ware.
THE SOFTWARE IS PROVIDED "AS IS", WITHOUT WARRANTY
OF ANY KIND, EXPRESS OR IMPLIED, INCLUDING BUT NOT
LIMITED TO THE WARRANTIES OF MERCHANTABILITY, FIT-
NESS FOR A PARTICULAR PURPOSE AND NONINFRINGE-
MENT. IN NO EVENT SHALL THE AUTHORS OR COPYRIGHT
HOLDERS BE LIABLE FOR ANY CLAIM, DAMAGES OR OTHER
LIABILITY, WHETHER IN AN ACTION OF CONTRACT, TORT OR
OTHERWISE, ARISING FROM, OUT OF OR IN CONNECTION
WITH THE SOFTWARE OR THE USE OR OTHER DEALINGS IN
THE SOFTWARE.
To download the full document, visit www.ikea.com
16ENGLISH
Technical specifications
Dimensions (HxWxD) 865 x 598 x 550mm
Weight Max.: 60kg
Voltage 220 - 240V, 50Hz or 60Hz
Power rating 2000 - 2400W
Fuse 10 - 16A
Water pressure Min. 0.05MPa (0.5bar)
Max. 1MPa (10bar)
Inlet rate Min. 10l/min
Water temperature Cold water.
Hot water max.: 60°C
Capacity 13place settings
You can find more information about your model online at
https://eprel.ec.europa.eu/. This web address is linked to the
official EU EPREL product database. Please then follow the
instructions on searching for the models. The model identi-
fier is made up of the model name and article number
without dots. This information can be found on the label on
the right side of the appliance door.
Note:To save energy and water, load the machine with the
maximum number of place settings specified.
To download the full document, visit www.ikea.com
17DEUTSCH
Produktinformation
Produktinformation
Produktinformation
→Abb. 1
Kennenlernen
Kennenlernen
Kennenlernen
Gerät
Hier finden Sie eine Übersicht über die Bestandteile Ihres
Geräts.
→Abb. 2
Typenschild Typenschild mit E-Nummer und FD-Nummer.
Die Daten benötigen Sie für den Kundendienst.
Reinigerkammer In die Reinigerkammer füllen Sie Reiniger.
Unterer Geschirrkorb Unterer Geschirrkorb
Vorratsbehälter für Spezialsalz In den Vorratsbehälter für Spezialsalz füllen Sie Spezialsalz.
Unterer Sprüharm Der untere Sprüharm reinigt das Geschirr im unteren Geschirr-
korb.
Wenn das Geschirr nicht optimal gereinigt wird, reinigen Sie die
Sprüharme.
Tab-Auffangschale Tabs fallen während des Spülgangs automatisch von der Reiniger-
kammer in die Tab-Auffangschale, wo diese sich optimal auflösen
können.
Oberer Geschirrkorb Oberer Geschirrkorb
Besteckschublade Besteckschublade
LED Innenbeleuchtung des Geräts.
Etagere Etagere
Oberer Sprüharm Der obere Sprüharm reinigt das Geschirr im oberen Geschirrkorb.
Wenn das Geschirr nicht optimal gereinigt wird, reinigen Sie die
Sprüharme.
Siebsystem Siebsystem
Vorratsbehälter für Klarspüler In den Vorratsbehälter für Klarspüler füllen Sie Klarspüler.
Ausstattung
Hier erhalten Sie einen Überblick über die mögliche Ausstat-
tung Ihres Geräts und dessen Verwendung.
Die Ausstattung ist abhängig von Ihrer Gerätevariante.
Oberen Geschirrkorb mit seitlichen Hebeln
einstellen
Um große Geschirrteile in den Geschirrkörben zu spülen,
stellen Sie die Einschubhöhe des oberen Geschirrkorbs ein.
→Abb. 3- 4
Besteckschublade umbauen
Um mehr Platz für höhere und breitere Besteckteile zu er-
halten, können Sie die seitlichen Ablagen herunterklappen
und die vorderen Stachelreihen umklappen.
→Abb. 5- 6
Klappstacheln umklappen
Wenn Sie die Klappstacheln nicht benötigen, klappen Sie die-
se um.
→Abb. 7
Vor dem ersten Gebrauch
Erste Inbetriebnahme vornehmen
Bei der ersten Inbetriebnahme oder nach dem Zurückstellen
auf Werkseinstellungen müssen Sie Einstellungen vorneh-
men.
Voraussetzung:Das Gerät ist aufgestellt und angeschlos-
sen.
1. Spezialsalz einfüllen.
2. Klarspüler einfüllen.
3. Gerät einschalten.
4. Enthärtungsanlage einstellen.
5. Klarspülerzugabemenge einstellen.
6. Den Reiniger einfüllen.
7. Das Programm mit der höchsten Reinigungstemperatur
ohne Geschirr starten.
Wir empfehlen, aufgrund von möglichen Wasserflecken
und anderen Rückständen das Gerät ohne Geschirr vor
dem ersten Gebrauch zu reinigen.
Tipp:Diese Einstellungen und weitere Grundeinstellungen
können Sie jederzeit wieder ändern.
Um das vollständige Dokument herunterzuladen, besuchen Sie www.ikea.com
18DEUTSCH
Spezialsalz einfüllen
Wenn die Spezialsalznachfüllanzeige leuchtet, füllen Sie un-
mittelbar vor dem Programmstart Spezialsalz in den Vorrats-
behälter für Spezialsalz.
ACHTUNG!
Reiniger kann die Enthärtungsanlage beschädigen.
Nur mit Spezialsalz für Geschirrspüler den Vorratsbe-
hälter der Enhärtungsanlage füllen.
Spezialsalz kann den Spülbehälter durch Korrosion be-
schädigen.
Damit übergelaufenes Spezialsalz aus dem Spülbehäl-
ter gespült wird, das Spezialsalz unmittelbar vor dem
Programmstart in den Vorratsbehälter für Spezialsalz
füllen.
→Abb. 8- 13
Klarspüler einfüllen
Wenn die Klarspülernachfüllanzeige leuchtet, füllen Sie Klar-
spüler nach. Verwenden Sie nur Klarspüler für Haushaltsge-
schirrspüler.
→Abb. 14 - 17
Enthärtungsanlage einstellen
Stellen Sie das Gerät auf den Wasserhärtegrad ein.
→Abb. 18
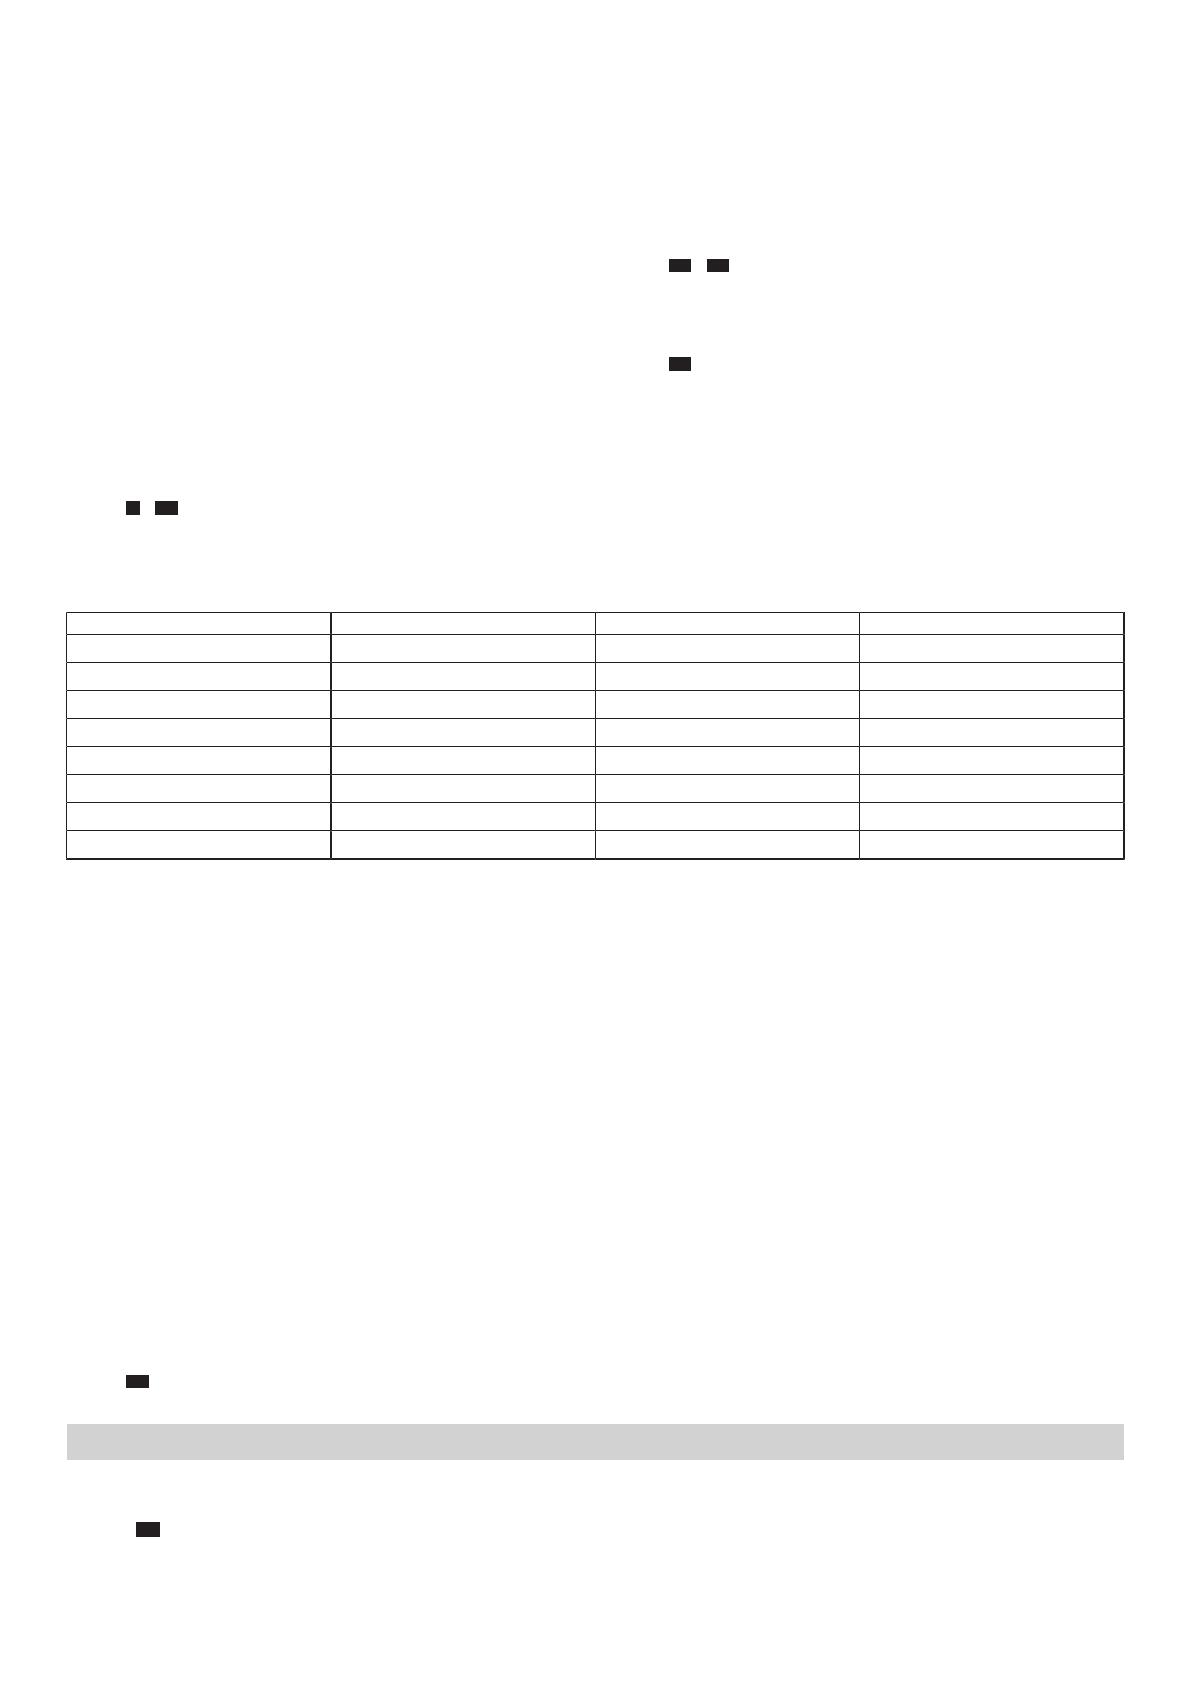
Übersicht der Wasserhärteeinstellungen
Hier finden Sie eine Übersicht über die einstellbaren Wasserhärtewerte.
WASSERHÄRTEGRAD °DH HÄRTEBEREICH MMOL/L EINSTELLWERT
0 - 6 weich 0 - 1,1 H:00
7 - 8 weich 1,2 - 1,4 H:01
9 - 10 mittel 1,5 - 1,8 H:02
11 - 12 mittel 1,9 - 2,1 H:03
13 - 16 mittel 2,2 - 2,9 H:04
17 - 21 hart 3,0 - 3,7 H:05
22 - 30 hart 3,8 - 5,4 H:06
31 - 50 hart 5,5 - 8,9 H:07
Übersicht Regenerieren der Enthärtungs-
anlage
Um die störungsfreie Funktion der Enthärtungsanlage zu er-
halten, erfolgt in allen Programmen vor Ende des Haupt-
spülgangs das Regenerieren der Enthärtungsanlage.
Hier finden Sie eine Übersicht der maximal zusätzlichen
Laufzeit und Verbrauchswerte beim Regenerieren der Ent-
härtungsanlage. Die gültige Spalte für Ihre Gerätevariante
entnehmen Sie mittels des Wasserverbrauchs im Programm
Eco50°
Die angegebenen Verbrauchswerte sind Labormesswerte
nach aktuell gültigem Standard und anhand des Programms
Eco50° sowie dem werkseitig eingestellten Wert des Was-
serhärtegrads 13 - 16 °dH ermittelt.
Klarspülerzugabemenge einstellen
Wenn Schlieren oder Wasserflecken auf dem Geschirr zu-
rückbleiben, ändern Sie die Klarspülerzugabemenge.
Hinweis:Eine niedrige Stufe gibt dem Spülgang weniger
Klarspüler zu, eine höhere Stufe gibt dem Spülgang mehr
Klarspüler zu.
→Abb. 19
Reiniger
Verwenden Sie nur Reiniger, der für Geschirrspüler geeignet
ist. Geeignet sind sowohl Solo-Reiniger als auch kombinierte
Reiniger.
Um optimale Spülergebnisse und Trockungsergebnisse zu
erzielen, verwenden Sie Solo-Reiniger in Verbindung mit ge-
trennter Anwendung von Spezialsalz und Klarspüler.
Hinweis:Beachten Sie bei jedem Reiniger die Herstellerhin-
weise.
Wenn Sie Tabs verwenden, genügt eine Tablette. Tabs quer
einlegen.
Wenn Sie Pulverreiniger oder Flüssigreiniger verwenden, be-
achten Sie die Dosierungshinweise des Herstellers und die
Dosierungseinteilung der Reinigerkammer.
Bei normaler Verschmutzung genügen 20ml–25ml Reini-
ger. Bei wenig verschmutztem Geschirr genügt eine etwas
geringere als die angegebene Reinigermenge.
Bedienelemente
Bedienelemente
Bedienelemente
Über das Bedienfeld stellen Sie alle Funktionen Ihres Geräts
ein und erhalten Informationen zum Betriebszustand.
→Abb. 20
Um das vollständige Dokument herunterzuladen, besuchen Sie www.ikea.com
19DEUTSCH
EIN-/AUS-Taste Gerät einschalten
Gerät ausschalten
Programmtasten Programme
Wasserzulaufanzeige Anzeige für Wasserzulauf
Spezialsalznachfüllanzeige Enthärtungsanlage
Klarspülernachfüllanzeige Klarspüleranlage
Programmtasten und Zusatzfunktionen Programme
Zusatzfunktionen
Start-Taste und Reset-Taste Programm starten
Programm abbrechen
Zeitvorwahl Zeitvorwahl einstellen
Display Das Display zeigt Ihnen Informationen zur Restlaufzeit oder
zu Grundeinstellungen. Über das Display und die Einstelltas-
ten können Sie die Grundeinstellungen ändern.
Türöffner Gerätetür öffnen.
Um das vollständige Dokument herunterzuladen, besuchen Sie www.ikea.com
20DEUTSCH
Programme
Programme
Programme
Hier finden Sie eine Übersicht über die einstellbaren Pro-
gramme.
Ein Programm starten:
→Abb. 21
Die Startzeit für ein Programm einstellen:
→Abb. 22
PROGRAMM 1) PROGRAMMDAUER IN H:MIN
2) ENERGIEVERBRAUCH IN KWH
3) WASSERVERBRAUCH IN L
PROGRAMMABLAUF ZUSATZFUNKTIONEN
Intensiv 70°
1) 2:05 - 2:15
2) 1,450 - 1,500
3) 12 - 15
Intensiv:
Vorspülen
Reinigen 70°C
Zwischenspülen
Klarspülen 69°C
Trocknen
Auto 45-65°
1) 1:30 - 2:40
2) 0,950 - 1,600
3) 7 - 18
Sensor-optimiert:
Wird abhängig von der
Verschmutzung des Spül-
wassers durch Sensorik
optimiert.
Eco 50°
1) 3:55
2) 0,836
3) 9,5
Sparsamstes Programm:
Vorspülen
Reinigen 50°C
Zwischenspülen
Klarspülen 60°C
Trocknen
Automatisches Öffnen der
Gerätetür
Nachtprogramm
1) 3:55 - 4:00
2) 1,050 - 1,090
3) 10
Geräuschoptimiert:
Vorspülen
Reinigen 50°C
Zwischenspülen
Klarspülen 65°C
Trocknen
Schnell 45°
1) 0:29
2) 0,800
3) 10
Zeitoptimiert:
Reinigen 45°C
Zwischenspülen
Klarspülen 55°C
Vorspülen
1) 0:15
2) 0,050
3) 4
Kaltes Abspülen:
Vorspülen Keine
Hinweise für Testinstitute
Testinstitute erhalten die Hinweise für Vergleichsprüfungen,
zum Beispiel nach EN60436.
Hierbei handelt es sich um die Bedingungen zur Durchfüh-
rung der Tests, jedoch nicht um die Ergebnisse oder Ver-
brauchswerte.
Anfrage per E-Mail an: [email protected]
Benötigt werden die Erzeugnisnummer (E-Nr.) und die Ferti-
gungsnummer (FD), die sich auf dem Typenschild an der Ge-
rätetür befinden.
Zusatzfunktionen
Zusatzfunktionen
Zusatzfunktionen
Hier finden Sie eine Übersicht über die einstellbaren Zusatz-
funktionen.
ZUSATZFUNKTIONEN VERWENDUNG
Zeit sparen
Die Laufzeit wird abhän-
gig vom Spülprogramm
um 20% bis 66% ver-
kürzt.
ZUSATZFUNKTIONEN VERWENDUNG
Der Wasserverbrauch
und der Energiever-
brauch werden erhöht.
Um das vollständige Dokument herunterzuladen, besuchen Sie www.ikea.com
  • Page 1 1
  • Page 2 2
  • Page 3 3
  • Page 4 4
  • Page 5 5
  • Page 6 6
  • Page 7 7
  • Page 8 8
  • Page 9 9
  • Page 10 10
  • Page 11 11
  • Page 12 12
  • Page 13 13
  • Page 14 14
  • Page 15 15
  • Page 16 16
  • Page 17 17
  • Page 18 18
  • Page 19 19
  • Page 20 20
  • Page 21 21
  • Page 22 22
  • Page 23 23
  • Page 24 24
  • Page 25 25
  • Page 26 26
  • Page 27 27
  • Page 28 28
  • Page 29 29
  • Page 30 30
  • Page 31 31
  • Page 32 32
  • Page 33 33
  • Page 34 34
  • Page 35 35
  • Page 36 36

IKEA PROFFSIG Manuel utilisateur

Catégorie
Lave-vaisselle
Taper
Manuel utilisateur

dans d''autres langues