Green Creative 16PLL-840-GL-BYP Guide d'installation
- Taper
- Guide d'installation

WARNING - Risk of fire or electric shock. LED Retrofit Kit installation requires knowledge of luminaire electrical systems. Installation should be performed only by a qualified
electrician in accordance with the National Electrical Code and relevant local code.
WARNING - Risk of fire or electric shock. Install this kit only in the luminaires that have the construction features and dimensions shown in the photographs and/or drawings.
WARNING - To prevent wiring damage or abrasion, do not expose wiring to edges of sheet metal or other sharp objects.
WARNING - Risk of fire or electric shock. Luminaire wiring and electrical parts may be damaged when drilling for installation of LED retrofit kit. Check for enclosed wiring and
components.
• Disconnect power at the source before installation, inspection or removal. Do not simply switch off fixture.
• This item is rated at 120-277V. Installer must determine whether line voltage 120-277V is available at the luminaire before installation.
• Not intended for use with emergency exit fixtures or emergency exit lights.
• Not for use with luminaire ballast.
• Do not use if product is damaged.
• Not for use with dimmers.
• Do not make or alter any open holes in an enclosure of wiring or electrical components during kit installation.
• “This luminaire has been modified to operate LED lamps” shall be marked on the retrofit luminaire where readily visible by the user during normal maintenance including
re-lamping.
• Risk of fire or electric shock. Do not open or modify. No user serviceable parts inside.
• Installers should not disconnect existing wires from lamp holder terminals to make new connections at lamp holder terminals. Instead installers should cut existing lamp
holder leads away from the lamp holder and make new electrical connections to lamp holder lead wires by employing applicable connectors.
• SUITABLE FOR DAMP LOCATIONS. Suitable for use in wet locations when used in an outdoor-rated fixture. Not for use where directly exposed to the weather or water.
• Complies with Part 15 of FCC. Operation is subject to the following two conditions: (1) This device may not cause harmful interference, and (2) This device must accept any
interference received including interference that may cause undesired operation.
• No external weight or mechanical force should be applied to tube or components.
• THE RETROFIT ASSEMBLY IS ACCEPTED AS A COMPONENT OF A LUMINAIRE WHERE THE SUITABILITY OF THE COMBINATION SHALL BE DETERMINED BY
AUTHORITIES HAVING JURISDICTION.
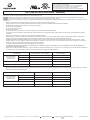
• Models 17PLL/xxx/GL/BYP, 16PLL/xxx/GL/BYP, 17PLL/xxx/BYP/R are intended to retrofit surface mount, Type IC or non-IC recessed mount Listed fluorescent luminaires that
use maximum three lamps with or without a diffuser, the minimum dimension of luminaries are tabulated below:
• Models 10PLL/xxx/GL/BYP, 8.5PLL/xxx/GL/BYP intended to retrofit surface mount Listed fluorescent luminaires that use maximum two lamps without a diffuser, the minimum
dimension of luminaries are tabulated below:
LED TUBE INSTALLATION GUIDE – WARNING
032322
For model #: 17PLL/xxx/GL/BYP, 16PLL/xxx/GL/BYP, 10PLL/xxx/GL/BYP,
8.5PLL/xxx/GL/BYP ,17PLL/xxx/BYP/R
Where xxx means 824-965 which indicates CRI and color temperature
Pour les produits suivants: 17PLL/xxx/GL/BYP, 16PLL/xxx/GL/BYP,
10PLL/xxx/GL/BYP, 8.5PLL/xxx/GL/BYP ,17PLL/xxx/BYP/R
Où xxx signifie 824-965 qui correspond au CRI et couleur de température
Model Number 17PLL/xxx/GL/BYP 17PLL/xxx/BYP/R
61.5
60.5
10.5
3
8.5
61.5
60.5
10.5
3
8.5
16PLL/xxx/GL/BYP
Lamp compartment of
Luminaire, overall
dimensions (cm)
Maximum Lamps in Luminaire
Length
Width
Height
Lampholder-to-Lampholder Spacing (cm)
Model Number 10PLL/xxx/GL/BYP
44
14
10
2
1
44
14
10
2
1
8.5PLL/xxx/GL/BYP
Lamp compartment of
Luminaire, overall
dimensions (cm)
Maximum Lamps in Luminaire
Length
Width
Height
Lampholder-to-Lampholder Spacing (cm)
www.greencreative.com - [email protected] - Tel / Fax: (866) 774-5433 - / GREENCREATIVELED / GClightingLED / GREEN-CREATIVE An ILLUMUS Brand

GUIDE D'INSTALLATION – ATTENTION
WARNING - Risque d’incendie ou de choc électrique. L’installation de ce kit LED nécéssite la connaissance des systèmes électriques des luminaires. L’installation doit être faite par
un électricien qualifié en accord avec les normes électriques nationales et locales en vigueur.
WARNING - Risque d’incendie ou de choc électrique. Installer uniquement dans des luminaires aux spécificités et dimensions similaires au dessin et/ou photos.
WARNING - Afin d’éviter tout dommage ou abrasion ne pas laisser de câble en contact avec les bords métaliques ou autre endroit abrasif.
WARNING - Risque d’incendie ou de choc électrique. Le câblage du luminaire peut être endomagé pendant le perçage pour l’installation de ce kit de conversion LED. Vérifier les
câblage et composants qui peuvent être enclos.
• Couper l'alimentation à la source avant l'installation, l'inspection ou le retrait. Ne pas simplement éteindre l'appareil.
• Ce produit est évalué à 120-277V. L'installateur doit déterminer si la tension de ligne 120-277V est disponible au niveau du luminaire avant l'installation.
• Non destiné à être utilisé avec un luminaire de sortie de secours ou un éclairage de sortie de secours
• Ne pas utiliser avec un ballast de luminaire
• Ne pas utiliser si le produit est endommagé
• Ne pas utiliser avec un gradateur.
• Ne pas faire ou modifier des trous dans la boîte de câblage ou tout autre composant électrique pendant l’installation.
• “Ce luminaire a été modifié pour faire fonctionner une lampe DEL” doit être inscrit sur le luminaire converti de manière à être visible pendant l’entretien et notamment le
changement de lampe.
• Risque de choc électrique. Ne pas ouvrir. Aucune pièce ne peut être changée à l’intérieur.
• L’installateur ne doit pas déconnecter les câbles existants au niveau des connecteur de la douille. L’installateur doit couper le câble existant à distance des douilles et utiliser
des connecteurs appropriés pour faire une nouvelle connection.
• CONVIENT AUX EMPLACEMENTS HUMIDES. Convient aux emplacements mouillés si installé dans un luminaire pour extérieur. Ne pas utiliser si directement exposé aux
éléments ou à l’eau.
• Conforme à la partie 15 de la FCC. Le fonctionnement est soumis aux deux conditions suivantes: (1) cet appareil ne doit pas causer d'interférences nuisibles et (2) doit
accepter les interférences reçues, y compris les interférences susceptibles de provoquer un fonctionnement indésirable.
• Aucun poids externe ou force mécanique ne doit être appliqué au tube ou aux composants.
• L’INSTALLATION DE CE KIT DE CONVERSION EST ACCEPTÉ COMME UN COMPOSANT DU LUMINAIRE POUR LEQUEL LE CARATÈRE APPROPRIÉ DE LA
COMBINAISON DOIT ÊTRE DETERMINÉ PAR LES AUTORITÉS COMPÉTENTES AYANT JURISDICTION.
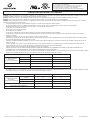
• Les modèles 17PLL / xxx / GL / BYP et 16PLL / xxx / GL / BYP, 17PLL/xxx/BYP/R sont destinés à la mise à niveau de luminaires fluorescents listés pour un montage en surface,
de type IC ou un montage encastré de type non-IC. Les dimensions minimales des luminaires sont tabulées ci-dessous:
• Les modèles 10PLL / xxx / GL / BYP, 8.5PLL / xxx / GL / BYP sont destinés à la mise à niveau de luminaires fluorescents listé pour un montage en surface utilisant au maximum
deux lampes sans diffuseur. Les dimensions minimales des luminaires sont indiquées ci-dessous.
Numéro de modèle 17PLL/xxx/GL/BYP
61.5
60.5
10.5
3
8.5
61.5
60.5
10.5
3
8.5
16PLL/xxx/GL/BYP
Compartiment à lampes
du luminaires,
dimensions d’ensemble (cm)
Nombre de lampes maximum dans le luminaire
Longueur
Largeur
Hauteur
Espacement de douille à douille (cm)
Numéro de modèle 10PLL/xxx/GL/BYP
44
14
10
2
1
44
14
10
2
1
8.5PLL/xxx/GL/BYP
Compartiment à lampes
du luminaires,
dimensions d’ensemble (cm)
Nombre de lampes maximum dans le luminaire
Longueur
Largeur
Hauteur
Espacement de douille à douille (cm)
For model #: 17PLL/xxx/GL/BYP, 16PLL/xxx/GL/BYP, 10PLL/xxx/GL/BYP,
8.5PLL/xxx/GL/BYP ,17PLL/xxx/BYP/R
Where xxx means 824-965 which indicates CRI and color temperature
Pour les produits suivants: 17PLL/xxx/GL/BYP, 16PLL/xxx/GL/BYP,
10PLL/xxx/GL/BYP, 8.5PLL/xxx/GL/BYP ,17PLL/xxx/BYP/R
Où xxx signifie 824-965 qui correspond au CRI et couleur de température
17PLL/xxx/BYP/R
www.greencreative.com - [email protected] - Tel / Fax: (866) 774-5433 - / GREENCREATIVELED / GClightingLED / GREEN-CREATIVE An ILLUMUS Brand

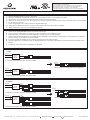
LED TUBE INSTALLATION GUIDE – INSTALLATION STEPS / GUIDE D’INSTALLATION – ETAPES D’INSTALLATION
1) Lisez tous les AVERTISSEMENTS avant de continuer cette section.
2) Assurez-vous que l'alimentation est coupée à la source à l'endroit où vous installez le produit.
3) Retirez la lentille, le couvercle et les tubes fluorescents. Couper tous les fils reliant le ballast.
4) Assurez-vous de raccorder la ligne (L) et le neutre (N) aux extrémités correspondantes du tube marqué L et N. Notez que ce produit est à
double extrémité, ne pas câbler à une seule extrémité.
5) Suivre les schémas de câblage pour le nombre de lampes et le type de ballast d'origine.
6) Apposez visiblement le "L’AUTOCOLLANT DE MODIFICATION" sur le luminaire et réinstallez le couvercle du boîtier et la lentille, le cas
échéant.
7) Remettre le courant à la source et l'installation est terminée.
1) Read all WARNINGS before continuing this section.
2) Make sure POWER IS TURNED OFF at the source to the location at which you are installing the product.
3) Remove lens, cover and fluorescent tubes. Cut away all wires connecting the ballast.
4) Make sure to connect the line (L) and neutral (N) to the corresponding ends of the tube marked L and N. Note this product is double-ended,
do not wire to a single end.
5) Follow wiring diagrams for number of lamps and original ballast type.
6) Visibly affix the “Modification Sticker” to the fixture and reinstall housing cover and lens if applicable.
7) Return power back to the source and installation is complete.
Cut all wires connected to the ballast, remove the ballast
Cut all wires connected to the ballast, remove the ballast
Rewire the fixture according to the wiring configuration
1 LAMP
INSTANT
START
BALLAST
N(WHITE)
L(BLACK)
N(WHITE)
L(BLACK)
BLUE
RED
PROGRAM
START
BALLAST
N(WHITE)
L(BLACK)
BLUE
RED
BLUE
RED
Cut all wires connected to the ballast, remove the ballast
Cut all wires connected to the ballast, remove the ballast
Rewire the fixture according to the wiring configuration
2 LAMPS
INSTANT
START
BALLAST
N(WHITE)
L(BLACK)
N(WHITE)
L(BLACK)
BLUE
RED
BLUE
PROGRAM
START
BALLAST
N(WHITE)
L(BLACK)
BLUE
YELLOW
YELLOW
RED
RED
BLUE
L
L
N
N
L
L
N
N
L
L
N
N
For model #: 17PLL/xxx/GL/BYP, 16PLL/xxx/GL/BYP, 10PLL/xxx/GL/BYP,
8.5PLL/xxx/GL/BYP ,17PLL/xxx/BYP/R
Where xxx means 824-965 which indicates CRI and color temperature
Pour les produits suivants: 17PLL/xxx/GL/BYP, 16PLL/xxx/GL/BYP,
10PLL/xxx/GL/BYP, 8.5PLL/xxx/GL/BYP ,17PLL/xxx/BYP/R
Où xxx signifie 824-965 qui correspond au CRI et couleur de température
www.greencreative.com - [email protected] - Tel / Fax: (866) 774-5433 - / GREENCREATIVELED / GClightingLED / GREEN-CREATIVE An ILLUMUS Brand
-
 1
1
-
 2
2
-
 3
3


