Intellinet 508957 Quick Instruction Guide
- Taper
- Quick Instruction Guide


2
This guide presents the basic steps to set up and operate this device.
For specifications, visit intellinetnetwork.com. Register your product at
register.intellinet-network.com/r/508957 or scan the QR code on the cover.
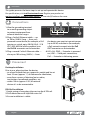
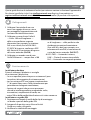
Connections
1 Wire the grounding terminal
to an earth grounding object
to protect equipment from
external electrical surges.
2 Plug a Cat5e/6 Ethernet cable — up
to 100 m (330 ft.) long — from your
powered source device (for example, a PoE
injector or switch; up to 90.0 W, 50.0 - 57.0
VDC; IEEE 802.3bt/at/af compliant) into
the PoE IN connector on the extender.
3 Plug a second Cat5e/6 Ethernet cable —
also up to 100 m long (330 ft.) — from
the device you want to transmit power
(up to 80 W) and data to (for example,
a PoE network camera) into the PoE
OUT connector on the extender.
4 LEDs (lit): PWR — Extender is powered
on; LINK — Valid port connection;
PoE — Extender is delivering power.
Placement
Desktop Installation
Prior to use, place/position the device:
• on a level surface that can support its weight and has at
least 25 mm (approx. 1”) of clearance for ventilation;
• away from sources of electrical noise: radios,
transmitters, broadband amplifiers, etc.;
• within 100 m (approx. 328’) of network
devices it’s to be connected to.
DIN-Rail Installation
1 Angle spring of mounting clip over top lip of DIN rail.
2 Push device down till clip clicks onto rail.
3 Ensure installation is stable.
3 2 14
35 mm
1
2
3
English
Instructions

3
Anleitung
Deutsch
Diese Kurzanleitung zeigt die grundlegenden Schritte zur
Einrichtung und Inbetriebnahme dieses Geräts.
Die Spezifikationen finden Sie auf intellinetnetwork.com. Registrieren Sie Ihr Produkt auf
register.intellinet-network.com/r/508957 oder scannen Sie den QR-Code auf dem Deckblatt.
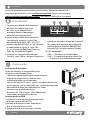
Anschlüsse
1 Verdrahten Sie die Erdungsklemme
mit einem Erdungsobjekt,
um das Gerät vor externen
Überspannungen zu schützen.
2 Schließen Sie ein Cat5e/6-
Netzwerkkabel — mit einer Länge bis
zu 100 m — von Ihrem PSE-Gerät (“Power
Sourcing Equipment”, z. B. ein PoE-injektor
oder -Switch; bis 90 W Eingang, 50,0 - 57,0
VDC ; IEEE 802.3bt/at/af-konform) an
den “PoE IN”-Port des Extenders an.
3 Schließen Sie ein zweites Cat5e/6-
Netzwerkkabel — auch mit einer
Länge bis zu 100 m — an das Gerät
an, zu dem Sie Strom (bis 80 W) und
Daten übertragen möchten (z. B. eine
PoE-Netzwerk- kamera). Schließen Sie
das andere Ende des Kabels an den
“PoE OUT”-Port des Extenders an.
4 LED (an): PWR — Extender ist
eingeschaltet.; LINK — Verbindung ist
hergestellt; PoE — Extender liefert Strom.
Nutzungsumgebung
Desktop-Installation
Er wird empfohlen, das Gerät vor der Nutzung
folgendermaßen aufzustellen:
• auf ebenem Untergrund, der das Gewicht des
Gerätes (und evtl. anderer Gegenstände) trägt;
• mit mindestens 25 mm Abstand zu allen Seiten
für angemessenen Luftdurchsatz;
• fern von anderen Übertragungsgeräten wie
Radios, Breitband- verstärker, etc.
• max. 100 m vom zu verbindenden Netzwerkgerät entfernt.
DIN-Schienenmontage
1 Winkeln Sie die Feder des Montageclips über
die obere Lippe der DIN-Schiene.
2 Drücken Sie das Gerät nach unten, bis der
Clip auf der Schiene einrastet.
3 Stellen Sie sicher, dass die Installation stabil ist.
3 2 14
35 mm
1
2
3

4
Instrucciones
Español
Esta guía presenta los pasos básicos para instalar y operar este dispositivo.
Para mas especificaciones, visita intellinetnetwork.com. Registre el producto en
register.intellinet-network.com/r/508957 o escanee el código QR en la cubierta.
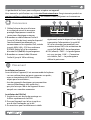
Conexiónes
1 Conecte un cable desde la conexión
de tierra a un objeto con toma
de tierra, así el equipo estará
protegido frente a sobrecargas
eléctricas de origen externo.
2 Desde el dispositivo de alimentación
(por ejemplo: inyector o switch PoE;
entrada de hasta 90 W, 50.0 - 57.0 VDC;
cumple con IEEE 802.3bt / at / af), conecte
el cable Ethernet Cat5e/ 6 - máx. 100
m - en el conector PoE IN del Extensor
PoE+ de alta potencia Gigabit.
3 Conecte un segundo cable ethernet
Cat5e/6 - máx. 100 m - desde el dispositivo
que desee alimentar de energía (hasta 80
W) y datos (por ejemplo: una cámara de
red PoE) hacia el conector PoE OUT del
Extensor PoE+ de alta potencia Gigabit.
4 DEL (encendido):
PWR — El extensor está encendido.;
LINK — Conexión de puerto válida; PoE
— El extensor está entregando energía.
Colocación
Instalación de escritorio
Antes de utilizarlo, se recomienda que el
dispositivo sea colocado/fijado:
• sobre una superficie plana que pueda soportar
el peso del dispositivo (y cualquier otro
artículo que deba ser considerado);
• con un mínimo de 25 mm (1” aprox.) de espacio libre en la
parte superior y en los lados para una ventilación adecuada;
• apartado de fuentes de ruido eléctrico: radios,
transmisores, amplificadores, etc.
• dentro de los 100 m (aprox. 328’) deben estar
conectados los dispositivos de red.
Instalación del rail DIN
1 Incline el resorte del clip de montaje sobre
el borde superior del riel DIN.
2 Empuje el dispositivo hacia abajo hasta
que el clip haga clic en el riel.
3 Asegúrese de que el montaje es estable.
3 2 14
35 mm
1
2
3

5
Français
Instructions
Ce guide décrit les bases pour configurer et opérer cet appareil.
Vous trouvez les spécifications sur, visitez intellinetnetwork.com. Enregistrez votre produit sur
register.intellinet-network.com/r/508957 ou scannez le code QR figurant sur la couverture.
Connexions
1 Câblez la borne de mise à la terre
à un objet de mise à la terre pour
protéger l’équipement contre les
surtensions électriques externes.
2 Branchez un câble Ethernet Cat5e/6
(jusqu’à 100 m de long) entre le dispositif
source alimenté (par exemple, un
commutateur ou un injecteur PoE ; entrée
jusqu’à 90 W, 50,0 - 57,0 Vcc; conforme
IEEE 802.3bt/at/af) et le connecteur
d’entrée PoE (PoE IN) du prolongateur.
3 Branchez un second câble Ethernet
Cat5e/6 (jusqu’à 100 m de long
également) entre le dispositif vers lequel
transmettre l’alimentation (jusqu’à 80
W) et les données (par exemple, une
caméra réseau PoE) et le connecteur de
sortie PoE (PoE OUT) du prolongateur.
4 DEL (allumé) : PWR — Le prolongateur
est sous tension ; LINK — Connexion
est établie ; PoE — Le prolongateur
délivre la puissance.
Placement
Installation en bureau
Avant d’utiliser l’appareil, il est recommandé de le placer :
• sur une surface plane qui peut supporter son poids ;
• avec un écartement de 25 mm d’autres
objets pour la ventilation ;
• loin des appareils électriques qui peuvent être
source d‘interférence (des radios etc.) ;
• pas plus loin que 100 m de l’appareil réseau
auquel vous voudriez connecter.
Installation du DIN-Rail
1 Angle du ressort du clip de montage sur
la lèvre supérieure du rail DIN.
2 Poussez l’appareil vers le bas jusqu’à ce
que le clip s’enclenche sur le rail.
3 Assurez-vous que l’installation est stable.
3 2 14
35 mm
1
2
3

6Polski
Instrukcja
Ta instrukcja prezentuje podstawowe kroki podłączenia i instalacji urządzenia.
Pełną specyfikację produktu znajdziecie Państwo na stronie
intellinetnetwork.com. Zarejestruj produkt na register.intellinet-network.com/r/508957
lub zeskanuj znajdujący się na pokrywie kod QR.
Podłączenie
1 Podłączyć gniazdo uziemienia
do instalacji uziemiającej, aby
zabezpieczyć sprzęt przed
zewnętrznymi skokami napięcia.
2 Połącz kablem sieciowym Cat.5e/6
– długość do 100 m – zasilone
urządzenie sieciowe (adapter PoE
lub przełącznik; do 90 W, 50.0 - 57.0
VDC mocy wejściowej; zgodność ze
standardem IEEE 802.3bt/at/af) z portem
wejściowym (PoE IN) Extendera.
3 Połącz drugim kablem sieciowym
Cat.5e/6 – długość do 100 m – urządzenie,
które ma być zasilone (np. kamera
sieciowa PoE, do 80 W) z portem
wyjściowym (PoE OUT) Extendera.
4 Diody LED (On [wł.]): PWR — Extendera
jest włączony; LINK — Prawidłowe
podłączenie portu; PoE —
Extendera dostarcza zasilanie.
Umiejscowienie
Instalacja pulpitu
Zaleca się, aby urządzenie w trakcie
użytkowania było umiejscowione:
• w trakcie użytkowania było umiejscowione na płaskiej
powierzchni, w miejscu odpowiednim do wagi urządzenia;
• dla zapewnienia dobrej wentylacji w odległości co najmniej 25
mm obudowy urządzenia od podłoża, na którym się znajduje;
• z dala od źródeł zakłóceń elektrycznych:
radia, nadajniki szerokopasmowe, itp.
• w odległości do 100 m od innych urządzeń sieciowych,
z którymi bezpośrednio jest połączony.
Montaż na szynie DIN
1 Ustawić zacisk kątowy klipsa montażowego
nad górną krawędzią szyny DIN.
2 Docisnąć urządzenie do dołu, aż klips zatrzaśnie się na szynie.
3 Upewnić się, że urządzenie jest prawidłowo zainstalowane.
3 2 14
35 mm
1
2
3

7
Italiano
Questa guida fornisce le indicazioni basilari per settare e mettere in funzione l’apparecchio.
Per ulteriori specifiche, visita il sito intellinetnetwork.com. Registra il tuo prodotto su
register.intellinet-network.com/r/508957 o scansiona il codice QR presente sulla copertina.
Collegamenti
1 Collegare il terminale di messa a
terra a un oggetto di messa a terra
per proteggere l’apparecchiatura da
sovratensioni elettriche esterne.
2 Collegate un cavo di rete Cat5e/6
— fino a 100 m di lunghezza —
dalla vostra periferica sorgente
alimentata (per esempio, un iniettore
PoE o uno switch; fino a 90 W 50.0 -
57.0 VDC di ingresso; conforme a IEEE
802.3bt/at/af) al connettore d’ingresso
del vostro extender (PoE IN).
3 Collegate un secondo cavo di rete
Cat5e/6 Ethernet — sempre fino a 100
m di lunghezza — dalla periferica che
desiderate trasmetta alimentazione
(fino a 80 W) e dati (per esempio, una
telecamera di rete PoE) al connettore di
uscita del vostro extender (PoE OUT).
4 LED: PWR — L’extender è acceso;
LINK — Porta di connessione valida;
PoE — L’extender sta erogando potenza.
Posizionamento
Installazione desktop
Prima di utilizzare il prodotto si consiglia
di posizionare il dispositivo:
• su una superficie piana che possa sostenerne il peso
(o qualsiasi altro oggetto di cui tenere conto);
• con un minimo di 25 mm (approssimativamente
1”) di spazio libero verso l’alto e lateralmente per
permettere un’adeguata ventilazione;
• lontano da sorgenti che possono provocare
disturbi e interferenze elettro magnetiche: radio,
trasmettitori, amplificatori di banda, ecc.
• entro 100 m dalle periferiche di rete a cui è stato connesso.
Installazione su guida DIN
1 Posizionare ad angolo la molla della clip di montaggio
sul bordo superiore della guida DIN.
2 Spingere il dispositivo verso il basso finché
la clip non scatta sulla guida.
3 Verificare la stabilità del montaggio.
3 2 14
35 mm
1
2
3
Istruzioni

8
Notes

9
Notes

10
WASTE ELECTRICAL & ELECTRONIC EQUIPMENT
DISPOSAL OF ELECTRIC AND ELECTRONIC EQUIPMENT
(Applicable In The European Union And Other European Countries With Separate Collection Systems)
ENGLISH: This symbol on the product or its
packaging means that this product must not
be treated as unsorted household waste. In
accordance with EU Directive 2012/19/EU
on Waste Electrical and Electronic Equipment
(WEEE), this electrical product must be disposed
of in accordance with the user’s local regulations
for electrical or electronic waste. Please dispose of
this product by returning it to your local point of
sale or recycling pickup point in your municipality.
DEUTSCH: Dieses auf dem Produkt oder der
Verpackung angebrachte Symbol zeigt an,
dass dieses Produkt nicht mit dem Hausmüll
entsorgtwerden darf. In Übereinstimmung mit
der Richtlinie 2012/19/EU des Europäischen
Parlaments und des Rates über Elektro- und
Elektronik-Altgeräte (WEEE) darf dieses
Elektrogerät nicht im normalen Hausmüll oder
dem Gelben Sack entsorgt werden. Wenn Sie
dieses Produkt entsorgen möchten, bringen
Sie es bitte zur Verkaufsstelle zurück oder zum
Recycling-Sammelpunkt Ihrer Gemeinde.
ESPAÑOL: Este símbolo en el producto
o su embalaje indica que el producto no
debe tratarse como residuo doméstico. De
conformidad con la Directiva 2012/19/EU de
la UE sobre residuos de aparatos eléctricos y
electrónicos (RAEE), este producto eléctrico no
puede desecharse se con el resto de residuos
no clasificados. Deshágase de este producto
devolviéndolo a su punto de venta o a un punto
de recolección municipal para su reciclaje.
FRANÇAIS: Ce symbole sur Ie produit ou son
emballage signifie que ce produit ne doit
pas être traité comme un déchet ménager.
Conformément à la Directive 2012/19/EU
sur les déchets d’équipements électriques et
électroniques (DEEE), ce produit électrique ne
doit en aucun cas être mis au rebut sous forme
de déchet municipal non trié. Veuillez vous
débarrasser de ce produit en Ie renvoyant à son
point de vente ou au point de ramassage local
dans votre municipalité, à des fins de recyclage.
ITALIANO: Questo simbolo sui prodotto o
sulla relativa confezione indica che il prodotto
non va trattato come un rifiuto domestico. In
ottemperanza alla Direttiva UE 2012/19/EU sui
rifiuti di apparecchiature elettriche ed elettroniche
(RAEE), questa prodotto elettrico non deve
essere smaltito come rifiuto municipale misto.
Si prega di smaltire il prodotto riportandolo al
punto vendita o al punto di raccolta municipale
locale per un opportuno riciclaggio.
POLSKI: Jeśli na produkcie lub jego opakowaniu
umieszczono ten symbol, wówczas w czasie
utylizacji nie wolno wyrzucać tego produktu
wraz z odpadami komunalnymi. Zgodnie z
Dyrektywą Nr 2012/19/EU w sprawie zużytego
sprzętu elektrycznego i elektronicznego
(WEEE), niniejszego produktu elektrycznego
nie wolno usuwać jako nie posortowanego
odpadu komunalnego. Prosimy o usuniecie
niniejszego produktu poprzez jego zwrot do
punktu zakupu lub oddanie do miejscowego
komunalnego punktu zbiórki odpadów
przeznaczonych do recyklingu.
WARRANTY AT: | GARANTIE AUF: | GARANTÍA EN: | GARANTIE À : | GWARANCJA NA: | GARANZIA A:
intellinetnetwork.com
EN MÉXICO: Póliza de Garantía Intellinet Network Solutions — Datos del importador y responsable
ante el consumidor • IC Intracom México, S.A.P.I. de C.V. • Av. Interceptor Poniente # 73, Col. Parque
Industrial La Joya, Cuautitlán Izcalli, Estado de México, C.P. 54730, México. • Tel. (55)1500-4500
La presente garantía cubre los siguientes productos contra cualquier defecto de fabricación en sus
materiales y mano de obra. A) Garantizamos los productos de limpieza, aire comprimido y consumibles,
por 60 dias a partir de la fecha de entrega, o por el tiempo en que se agote totalmente su contenido
por su propia función de uso, lo que suceda primero. B) Garantizamos los productos con partes
móviles por 3 años. C) Garantizamos los demás productos por 5 años (productos sin partes móviles),

North America
IC Intracom America
550 Commerce Blvd.
Oldsmar, FL 34677 USA
Asia & Africa
IC Intracom Asia
4-F, No. 77, Sec. 1, Xintai 5th Rd.
Xizhi Dist., New Taipei City 221, Taiwan
Europe
IC Intracom Europe
Löhbacher Str. 7, D-58553
Halver, Germany
11
bajo las siguientes condiciones: 1. Todos los productos a que se refiere esta garantía, ampara su
cambio físico, sin ningún cargo para el consumidor. 2. El comercializador no tiene talleres de servicio,
debido a que los productos que se garantizan no cuentan con reparaciones, ni refacciones, ya que
su garantía es de cambio físico. 3. La garantía cubre exclusivamente aquellas partes, equipos o sub-
ensambles que hayan sido instaladas de fábrica y no incluye en ningún caso el equipo adicional o
cualesquiera que hayan sido adicionados al mismo por el usuario o distribuidor. • Para hacer efectiva
esta garantía bastará con presentar el producto al distribuidor en el domicilio donde fue adquirido o en
el domicilio de IC Intracom México, S.A.P.I. de C.V., junto con los accesorios contenidos en su empaque,
acompañado de su póliza debidamente llenada y sellada por la casa vendedora (indispensable el
sello y fecha de compra) donde lo adquirió, o bien, la factura o ticket de compra original donde se
mencione claramente el modelo, número de serie (cuando aplique) y fecha de adquisición. Esta
garantía no es válida en los siguientes casos: Si el producto se hubiese utilizado en condiciones
distintas a las normales; si el producto no ha sido operado conforme a los instructivos de uso; o si
el producto ha sido alterado o tratado de ser reparado por el consumidor o terceras personas.
REGULATORY STATEMENTS
FCC Class A
This equipment has been tested and found to comply with the limits for a Class A digital device,
pursuant to Part 15 of the Federal Communications Commission (FCC) Rules. These limits are
designed to provide reasonable protection against harmful interference when the equipment
is operated in a commercial environment. This equipment generates, uses and can radiate radio
frequency energy, and if not installed and used in accordance with the instruction manual may
cause harmful interference to radio communications. Operation of this equipment in a residential
area is likely to cause harmful interference, in which case the user will be required to correct
the interference at his own expense. Any changes or modifications made to this equipment
without the approval of the manuafacturer could result in the product not meeting the Class
A limits, in which case the FCC could void the user’s authority to operate the equipment.
CE
ENGLISH : This device complies with the requirements of CE 2014/30/EU and / or
2014/35/EU. The Declaration of Conformity for is available at:
DEUTSCH : Dieses Gerät enspricht der CE 2014/30/EU und / oder 2014/35/EU. Die
Konformitätserklärung für dieses Produkt finden Sie unter:
ESPAÑOL : Este dispositivo cumple con los requerimientos de CE 2014/30/EU y / o
2014/35/EU. La declaración de conformidad esta disponible en:
FRANÇAIS : Cet appareil satisfait aux exigences de CE 2014/30/EU et / ou
2014/35/EU. La Déclaration de Conformité est disponible à:
POLSKI : Urządzenie spełnia wymagania CE 2014/30/EU I / lub 2014/35/EU. Deklaracja
zgodności dostępna jest na stronie internetowej producenta:
ITALIANO : Questo dispositivo è conforme alla CE 2014/30/EU e / o 2014/35/EU.
La dichiarazione di conformità è disponibile al:
support.intellinet-network.com/barcode/508957

-
 1
1
-
 2
2
-
 3
3
-
 4
4
-
 5
5
-
 6
6
-
 7
7
-
 8
8
-
 9
9
-
 10
10
-
 11
11
-
 12
12


Intellinet 508957 Quick Instruction Guide
- Taper
- Quick Instruction Guide
dans d''autres langues
- italiano: Intellinet 508957
- English: Intellinet 508957
- español: Intellinet 508957
- Deutsch: Intellinet 508957
- polski: Intellinet 508957
Documents connexes
-
Intellinet 508919 Quick Instruction Guide
-
Intellinet 561693 Quick Instruction Guide
-
Intellinet 509107 Quick Instruction Guide
-
Intellinet 561211 Quick Instruction Guide
-
-
-
-
Intellinet 561907 Quick Instruction Guide
-
-
Intellinet 561938 Quick Instruction Guide