CMP New Construction Water Leveler Mode d'emploi
- Taper
- Mode d'emploi

WARNING
!
This product is must be installed and serviced by a pool and spa professional. These
instructions must be followed exactly to ensure proper function of the parts.
BACKFLOW
It is recommended to install the Water Leveler
with a control to prevent reverse flow such as
an anti-siphon or a double-check valve.
OVERFLOW
An opening for overflow protection is built
into the Water Leveler. To install the unit without
the overflow protection, seal the opening with the
1/2-inch plug included in the packaging.
NOTE: BODY, PLUG, AND ADAPTERS ARE
ABS PLASTIC - USE ABS TO PVC GLUE WHEN
PLUMBING TO PIPE.
CHECK FOR LEAKS BEFORE PROCEEDING
WITH THE INSTALLATION.
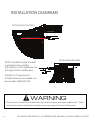
Follow the diagram to the right for proper
installation.
Take particular care when installing the float
lever. The entire assembly should be installed
by hand, and each adjustment should not
exceed ¼ of a turn.
Be sure unit is installed flush with the deck. To
adjust the water level loosen the wing nut, move
the float up or down, and tighten the nut.
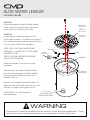
25504-200-001- 2” Collar Extensions
(Sold Separately)
WING NUT
VALVE
OVERFLOW
1/2" OR 3/4"
WATER INLET
1", 1-1/2", OR 2"
SLIP CONNECTION
(ADAPTERS INCLUDED)
FLOAT
25504-000-100
CMP 25504-10X-000
AUTO WATER LEVELER
®
WHITE LID
25544-000-000
GRAY LID
25544-001-000
TAN LID
25344-019-000

4”
INSTALLATION FOR POOLS
INSTALLATION FOR SPAS
INSTALLATION DIAGRAMS
NOTE: This Water Leveler has built
in protection from overflow.
If this feature is not needed glue the
1/2" plug into the overflow port.
The float is 4” deep from lid.
If Collar Extensions are needed, use
part number 25504-200-001.
0218ab CUSTOM MOLDED PRODUCTS | 36 HERRING ROAD, NEWNAN, GA 30265 | WWW.C-M-P.COM
WARNING
!
This product is must be installed and serviced by a pool and spa professional. These
instructions must be followed exactly to ensure proper function of the parts.

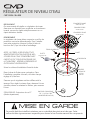
COUVERCLE BLANC
25544-000-000
COUVERCLE GRIS
25544-001-000
COUVERCLE FAUVE
25344-019-000
FLOTTE
25504-000-100
CMP 25504-10X-000
MISE EN GARDE
!
Ce produit doit être installé et entretenu par un spécialiste des piscines et des spas. Cette
notice doit être rigoureusement respectée pour assurer le bon fonctionnement des composants.
REFOULEMENT
On recommande d’installer un régulateur de niveau
d’eau avec un dispositif pour empêcher un écoulement
inversé, comme un clapet antisiphonnement ou un
clapet antiretour double.
DÉBORDEMENT
Le régulateur de niveau d’eau comporte un orifice de
protection contre les débordements. Pour l’installer
sans cette protection, bloquer l’orifice à l’aide du
bouchon de 1/2 po inclus dans l’emballage.
NOTE : LE CORPS, LE BOUCHON ET LES
ADAPTATEURS SONT EN PLASTIQUE ABS –
UTILISER DE LA COLLE COMPATIBLE AVEC
L’ABS ET LE PVC POUR LES INSTALLER SUR
LA TUYAUTERIE. VÉRIFIER LA PRÉSENCE DE
FUITES AVANT L’INSTALLATION.
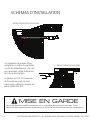
Suivre le schéma d’installation illustré à droite.
Poser le bras du flotteur avec précaution. Faire
l’installation complète à la main, et limiter chaque
réglage à 1/4 de tour.
S’assurer que le régulateur est bien affleurant à la
terrasse. Pour régler le niveau d’eau, desserrer l’écrou
à oreilles, relever ou abaisser le flotteur, puis resserrer
l’écrou.
25504-200-001- Extensions de col 2 "
(Vendu séparément)
ÉCROU À OREILLES
CLAPET
TROP-PLEIN
ENTRÉE
D’EAU DE
1/2 OU
3/4 PO
RACCORD COULISSANT
DE 1, 1 1/2 OU 2 PO
(ADAPTATEURS INCLUS)
RÉGULATEUR DE NIVEAU D’EAU
®

INSTALLATION POUR LES PISCINES
INSTALLATION POUR LES SPAS
0218ab CUSTOM MOLDED PRODUCTS | 36 HERRING ROAD, NEWNAN, GA 30265 | WWW.C-M-P.COM
Ce régulateur de niveau d’eau
comporte un orifice de protection
contre les débordements. S’il n’est
pas nécessaire, coller le bouchon
de 1/2 po dans l’orifice.
Le flotteur est à 4 "du couvercle.
Si des extensions de col sont
nécessaires, utilisez le numéro de
pièce 25504-200-001.
SCHÉMAS D'INSTALLATION
4”
MISE EN GARDE
!
Ce produit doit être installé et entretenu par un spécialiste des piscines et des spas. Cette
notice doit être rigoureusement respectée pour assurer le bon fonctionnement des composants.
-
 1
1
-
 2
2
-
 3
3
-
 4
4


