Copystar TASKalfa 4820w Guide de démarrage rapide
- Taper
- Guide de démarrage rapide

TASKalfa 4820w
QUICK GUIDE


1
English
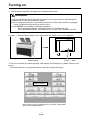
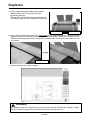
Turning on
1. Ensure that the machine is plugged into a dedicated wall outlet.
2. Press “ | ” side the Power Switch on the right side of the printer to turn on the Machine.
Power Switch Press “ | “ side.
3. The User Interface (UI) starts operating, and displays the following Copy Mode Screen in one
minute.
The Ready Indicator on Copy Mode Screen will flash during warming up.
The UI screen may vary depending on your system configuration.
(Shown with available options)
WARNING
(1) Do not handle the Power Plug with wet hands, or you may receive an electrical shock.
(2) Make sure to earth the machine for safety.
(3) Do not plug the printer into a multi-wiring connector in which other devices are plugged.
It may overheat the outlet and may result in a fire.
(4) The OUTLET must satisfy the following conditions.
120 V Specification Model: 120V plus/minus 10%, 50/60Hz and 15A
230 V Specification Model: 220-240V plus 6% or minus 10%, 50/60Hz and 10A
Ready Indicator

2
English
4. When Ready Indicator stops flashing, this machine is ready for operation.
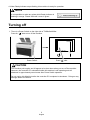
Turning off
1. There is a Power Switch on the right side of TASKalfa 4820w.
Press its “ ” side to turn off the machine.
Power Switch Press “ ” side.
CAUTION
This machine print engine and UI appear to be shut down when you turn off the machine.
However, the controller PC embedded inside this machine is still operating and will
shutdown in approximately two minutes after Power Switch operation.
Do not unplug this Machine before the controller PC completes its shutdown. Doing so may
damage data or the device.
NOTE
It is impossible to make any prints while Ready Indicator is
flashing in orange. Please wait until it turns in green.

3
English
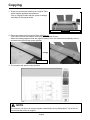
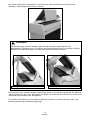
Copying
1. There are several size markings on Original Table
which indicate possible feed positions.
Line up Original Guides with the proper markings
according to the original width.
2. Place the original on the Original Table with face up
.
Then insert it under the Scanner Unit along with Original Guides.
When the leading edge touches the original feeding roller, the machine automatically carries
and sets the original at the proper position.
3. The machine will start the copy process.
NOTE
The scanner unit does not accept originals automatically during Sleep Mode. Tap on the UI
screen and then insert an original.
Original Guide Original Guide
Original Guide

4
English
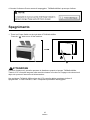
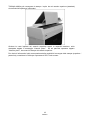
The machine has 2 print delivery system, the print tray (front, standard) / rear stacking equipment
(back, option).
For the front stacking, the printer will inform you of “Upper Bin Full” on exceeding capacity of
stacking. If the UI screen shows “Upper Bin Full”, remove all the prints on the print tray.
For further information of switching front / back delivery, see IPS Touch screen Operator’s Guide.
NOTE
For the front stacking, gently lift up the prints on the print tray to the arrow direction to avoid
rubbing the print surface. A large number of prints should be removed in several sheets.
Correct: Gently lift up and remove Wrong: Do not pull downward

5
Français
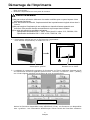
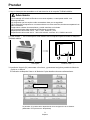
Démarrage de l’Imprimante
Mise sous tension :
1. Brancher l'imprimante sur une prise de courant.
2. L’interrupteur général est sur le côté droit de l'imprimante.
Pour allumer l'imprimante, le mettre sur « I ».
Interrupteur général Poussez sur ce côté I.
3. Le tableau de commande commence à fonctionner et l'écran opérateur donnant accès
aux différentes fonctions apparaît après environ 1 minute. Un témoin « Prêt » (Ready)
sur l'écran clignote pendant le processus de mise en température.
Seules les fonctions disponibles seront affichées à l'écran. Les fonctions non disponibles
sont « grisées ». Les informations affichées par l’Ecran Tactile de l’interface utilisateur
AVERTISSEMENT
(1)Ne pas toucher la fiche du câble avec les mains mouillées pour ne pas s'exposer à des
décharges électriques.
(2)Pour des raisons de sécurité, l'imprimante doit être impérativement équipée d'une mise à
la terre.
(3)Ne pas brancher l'imprimante à une multiprise sur laquelle d'autres appareils sont
branchés. Elle pourrait chauffer excessivement et provoquer des incendies.
(4) La prise doit remplir les conditions suivantes.
Spécification du Modèle 230 V : 220V - 240V plus 6%, moins 10 %, 50/60Hz, 10A
Spécification du Modèle 120 V :120V ± 10%, 50/60 Hz, 15A
Indicateur Prêt (En Ligne)

6
Français
reste dépendante des configurations, des options disponibles et acquises dans le cadre
de la vente.
4. Lorsque le témoin « Prêt » s'arrête de clignoter, le TASKalfa 4820W est prête à copier,
numériser et imprimer.
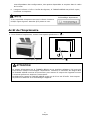
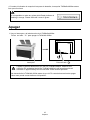
Arrêt de l'Imprimante
1. Pour éteindre l'imprimante, mettre l'interrupteur général sur « ».
L’interrupteur général Poussez sur le côté.
ATTENTION
Le moteur d’impression de la TASKalfa 4820W et son interface utilisateur (IU) sont mis
hors fonction lorsque vous éteigner l’imprimante. Toutefois, le contrôleur PC intégré dans
la TASKalfa 4820W continue de fonctionner pour assurer la coupure de l'appareil environ
2 minutes après avoir actionner l'interrupteur.
Ne débrancher jamais la TASKalfa 4820W avant que le PC ne soit à l'arrêt. Vous risquez
de perdre les données ou d’endommager l’appareil.
Il est impossible d’imprimer tant que le témoin lumineux
Prêt/En Ligne clignote. Attendez qu’il passe au vert.
Préchauffage Imprimante

7
Français
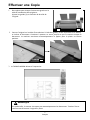
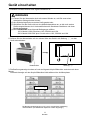
Effectuer une Copie
1. Desrepèrespourchaqueformatsontgravéssurla
tabled’introductiondesoriginaux.
Ajustezlesguides(1)enfonctiondelataillede
l'original.
2. Centrezl’originalsurlatabled’introductionàl'aidedesguides,lafaceimpriméesurledessus,
et insérez le document. Continuez à pousser en avant jusqu’à ce que le scanner accepte le
document. La machine entrainera automatiquement le papier pour le placer en bonne
position.
3.LeTASKalfa4820Wdémarrel'impression.
REMARQUE
Enmodeveille,lescannern'acceptepasautomatiquementlesdocuments.Touchezl'écran
tactileavantdemettrel'originalenplace.
1
1 1

8
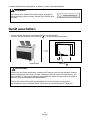
Français
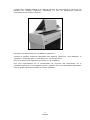
L’imprimante TASKalfa 4820W a la capacité d’éjecter les impressions et copies sur les
plateaux de réception supérieure (standard) ou vers un équipement optionnel
permettant de les empiler (stacker).
Réception des documents sur les plateaux supérieurs :
Lorsque la capacité maximum admissible des plateaux supérieurs sera dépassée, le
message « réceptacle plein » sera affiché sur l’écran opérateur.
Retirer les documents imprimés et stockés sur le réceptacle.
Pour plus d’information sur la commutation de l’éjection des impressions via le
réceptacle supérieur ou le réceptacle arrière, reportez vous aux informations disponibles
dans le guide opérateur interactif de l’écran opérateur.

9
Español
Prender
1. Hay un interruptor de encendido en el lado derecho de la maquina TASKalfa 4820w.
2. Pulse el lado “ | ” de el interruptor al lado derecho de loa impresora para encender la maquina
TASKalfa 4820w.
Interruptor Pulse el Lado “ | “
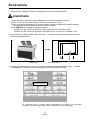
3. Interfaz de Usuario (IU) comenzara a funcionar, y presentara la siguinte pantalla de Modo de
Copia en un Minuto
El indicador de Maquina Lista en el Modo de Copia destellara durante calientamiento.
La pantalla (IU) puede variar dependiendo de la configuración de su sistema.
(Mostrando con opciónciones disponibles)
Advertencia
(1) No maneje el Enchufe de Electrico con manos mojadas, o usted puede recibir una
descarga eléctrica.
(2) Asegurese que la maquina a sido conectada a tierra por su seguridad.
(3) No enchufar la impresora en un tomacorriente con varios enchufes, donde otros aparatos han
sido enchufados.
Puede sobre calentar el tomacorirente y podría ocasionar un incinedo.
(4) El tomacorriente debe satisfacer las siguientes condiciónes
Especificación del modelo 120 V: 120 +/- 10%, 50/60 Hz y 15A
Especificación del modelo 230 V: 220-240V mas 6% o menos 10%, 50/60Hz and 10A
Ready Indicator

10
Español
4. Cuando el Indicador de maquina Lista pare de destellar, la maquina TASKalfa 4820w estatra
lista para funcionar
Apagar
1. Hay un interruptor a el lado derecho de la TASKalfa 4820w.
Pulsar a el aldo “ O ” para apagar la TASKalfa 4820w.
Interruptor Pulse el Lado “ “
I appear to be shut down when you turn off TASKalfa 4820w. However, the
controller PC embedded inside the TASKalfa 4820w is still operating and will
shutdown in approximately two minutes after Power Switch operation.
No desenchufar la TASKalfa 4820w antes de que la PC controladora termine de apagar
Hacer esto puede causar daños a el dispositivo
U
It is impossible to make any prints while Ready Indicator is
flashing in orange. Please wait until it turns in green.
D

11
Deutsch
Gerät einschalten
1. Schließen Sie das Gerät an eine eigene Steckdose an.
2. Drücken Sie den Netzschalter auf der rechten Seite des Gerät in die Stellung “ | ”, um das
Gerät einzuschalten.
Netzschalter Stellung “ | “.
3. Die Berührungsanzeige leuchtet auf und der folgende Kopier-Bildschirm erscheint nach einer
Minute.
Die Bereit-Anzeige auf dem Kopier-Bildschirm blinkt während der Aufwärmphase.
Die Berührungsanzeige kann sich je nach verwendeter Ausstattung
unterscheiden. (Die installierten Optionen werden angezeigt.)
WARNUNG
(1) Fassen Sie den Netzstecker nicht mit nassen Händen an, weil Sie sonst einen
elektrischen Schlag erleiden können.
(2) Aus Sicherheitsgründen muss das Gerät geerdet sein.
(3) Schließen Sie das Gerät nicht an eine Mehrfachsteckdose an, an die noch andere
Geräte angeschlossen sind. Anderenfalls kann die Steckdose überhitzen und einen
Brand verursachen.
(4) Die STECKDOSE muss folgende Bedingungen erfüllen.
120 V Modell: 120V plus/minus 10%, 50/60Hz und 15A
230 V Modell: 220-240V plus 6% oder minus 10%, 50/60Hz und 10A
Bereit-Anzeige

12
Deutsch
4. Sobald die Bereit-Anzeige aufhört zu blinken, ist das Gerät betriebsbereit.
Gerät auschalten
1. Auf der rechten Seite des Geräts befindet sich ein Netzschalter.
Drücken Sie den Schalter in die Stellung “ ”, um das Gerät auszuschalten.
Netzschalter Stellung “ ”.
ACHTUNG
Sobald Sie das Gerät ausschalten, entsteht der Eindruck, dass das Drucksystem und die
Berührungsanzeige nicht mehr arbeiten. Allerdings muss der interne Druckkontroller, wie
ein normaler PC, erst ordnungsgemäß herunterfahren. Dieser Vorgang dauert ungefähr 2
Minuten nach dem Betätigen des Netzschalters.
Ziehen Sie in dieser Zeit nicht das Netzkabel ab, da der Kontroller erst komplett
herunterfahren muss. Zerstörte Daten oder Fehler am Gerät könnten die Folge sein.
HINWEIS
Es können keine Ausdrucke erstellt werden, solange die
Bereit-Anzeige orange leuchtet. Warten Sie bis diese grün
leuchtet.

13
Deutsch
Kopieren
1. Auf der Originalanlage befinden sich mehrere
Markierungen, die die möglichen Einzugs-
positionen anzeigen.
Richten Sie die Originalführungen entsprechend
der Markierungen für das verwendete Format aus.
2. Legen Sie die Originale mit der Schrift nach oben
auf der Originalanlage an. Schieben Sie das
Original entlang der Originalführungen unter die Scannereinheit. Sobald die Vorderkante des
Papiers die Einzugsrollen berührt, transportiert die Maschine das Original automatisch, um es
zu scannen.
3. Das Gerät startet den Kopiervorgang.
HINWEIS
Der Scanner zieht keine Originale ein, wenn sich das Gerät im Ruhemodus befindet. Tippen
Sie auf die Berührungsanzeige und schieben Sie das Original dann ein.
Originalführung Originalführung
Originalführung

14
Deutsch
Das Gerät verfügt über 2 Ausgaben für die Ausdrucke, das Auslaufblech für Drucke (vorne,
Standard) / das Ablagesystem (hinten, optional).
Bei Benutzung der vorderen Ablage, blendet das Gerät in der Berührungsanzeige die Meldung
“Obere Ablage voll” ein, wenn die Anzahl der Blätter die Kapazität überschreitet. In diesem Fall
entnehmen Sie die Blätter vom Ablageblech.
Für weitere Informationen zur Umschaltung zwischen vorderer und hinterer Ablage siehe in der
Bedienungsanleitung der Berührungsanzeige.
HINWEIS
Bei Benutzung der vorderen Ablage, heben Sie die Ausdrucke vorsichtig aus dem
Ablageblech in Pfeilrichtung an, um Reibung auf der bedruckten Seite zu vermeiden. Größere
Mengen von Ausdrucken sollten in mehreren Schritten entnommen werden.
Richtig: Leicht anheben und entnehmen Falsch: Nicht nach vorne ziehen

15
Italiano
Accensione
1. Verificare che TASKalfa 4820w sia collegata ad una presa a muro dedicata.
AVVERTENZA
(1) Non toccare la spina con le mani bagnate per evitare di prendere la scossa.
(2) Per un uso sicuro della macchina, verificare la sua messa a terra.
(3) Non collegare la stampante a una presa multipla cui sono collegate altre apparecchiature.
La presa potrebbe surriscaldarsi provocando un incendio.
(4) La PRESA deve soddisfare i seguenti requisiti.
Modello per 120 V secondo specifiche:120V più/meno 10%, 50/60Hz e 15A
Modello per 230 V secondo specifiche:220-240V più 6% o meno10%, 50/60Hz e 10A
2. Per accendere TASKalfa 4820w, premere il lato “ | ” dell'Interruttore di alimentazione posto sul
lato destro della stampante.
Interruttore Premere il lato “ | “
3. L'Interfaccia utente (IU) si avvia e in un minuto visualizza la schermata Modo Copia. Durante
il riscaldamento, l'indicatore Pronto lampeggia sulla schermata Modo Copia.
La schermata varia in funzione della configurazione del sistema. (La schermata
illustrata fa riferimento alla configurazione completa di accessori opzionali)
Ready Indicator

16
Italiano
4. Quando l'indicatore Pronto smette di lampeggiare, TASKalfa 4820w è pronta per l'utilizzo.
Spegnimento
1. There is a Power Switch on the right side of TASKalfa 4820w.
Press its “ ” side to turn off the machine.
Power Switch Press “ ” side.
ATTENZIONE
Il motore di stampa e il pannello operatore si disattivano quando si spegne TASKalfa 4820w.
Tuttavia, il PC controller integrato nella macchina rimane in funzione e si spegne circa due minuti
dopo aver premuto l'interruttore di alimentazione.
Non scollegare TASKalfa 4820w prima che il PC controller abbia completato la fase di
spegnimento. In caso contrario, i dati o il dispositivo potrebbero danneggiarsi.

17
Italiano
Copiatura
1. Sul piano dell'originale sono presenti varie indicazioni di formato che segnalano le diverse
posizioni di alimentazione dei fogli. Allineare le guide dell'originale (1) agli opportuni
contrassegni in funzione della larghezza dell'originale.
2. Posizionare l'originale sul piano degli originali con il lato stampato rivolto verso l'alto
. Quindi
inserirlo sotto lo scanner facendolo scorrere lungo le guide (1). Quando il bordo superiore
tocca il rullo di trasporto, la stampante preleva automaticamente l'originale e lo colloca nella
posizione corretta.
3. TASKalfa 4820w avvia il processo di copiatura.
NOTA
Lo scanner non accetta automaticamente gli originali durante la modalità Sleep. Picchiettare sul
pannello operatore quindi inserire l'originale.
1
1
1

18
Italiano
TASKalfa 4820w può consegnare le stampe / copie sia nel vassoio superiore (standard)
sia nell'unità di impilatura (opzionale).
Qualora la carta impilata nel vassoio superiore superi la capacità massima, sulla
stampante appare il messaggio “Vassoio pieno”. Se sul pannello operatore appare
“Vassoio pieno”, rimuovere le stampe dal vassoio superiore.
Per ulteriori informazioni sulla commutazione della modalità di consegna delle stampe (superiore /
posteriore), consultare la Guida per l'operatore di IPS Touch screen.
La page est en cours de chargement...
La page est en cours de chargement...
La page est en cours de chargement...
La page est en cours de chargement...
-
 1
1
-
 2
2
-
 3
3
-
 4
4
-
 5
5
-
 6
6
-
 7
7
-
 8
8
-
 9
9
-
 10
10
-
 11
11
-
 12
12
-
 13
13
-
 14
14
-
 15
15
-
 16
16
-
 17
17
-
 18
18
-
 19
19
-
 20
20
-
 21
21
-
 22
22
-
 23
23
-
 24
24


