Sigma 500mm F 4.0 DG OS HSM SPORTS для CANON Manuel utilisateur
- Taper
- Manuel utilisateur

J E D F N
E
s
I S
D
k
C K R P
185161001
500mm
F4
DG
OS
HSM
0 1 6
日本語
5~11
SVENSKA
58~64
ENGLISH
12~18
DANSK
65~71
DEUTSCH
19~26
中文
72~78
FRANÇAIS
27~34
한 국 어
79~85
NEDERLANDS
35~42
РУCCКИЙ
86~92
ESPAÑOL
43~50
PORTUGUÊS
93~99
ITALIANO
51~57
使用説明書/INSTRUCTIONS

2

3

4

5
日本語
このたびは、シグマレンズをお買い求めいただきありがと
うございます。本説明書をご精読の上、レンズの機能、操
作、取り扱い上の注意点を正しく理解して、写真撮影をお
楽しみください。なお本説明書は、各カメラ用共用となっ
ておりますので、項目によりご使用カメラの該当箇所をお
読みになり、ご使用カメラの説明書もあわせてご覧くださ
い。お読みになったあとは、大切に保管してください。
安全上のご注意
人的損害や物的損害を未然に防止するため、ご使用の前に
この項目の内容を十分ご理解いただくようお願いします。
警
告
この表示を無視して、誤った取り扱いをすると、
人が死亡または重傷を負う可能性が想定される内
容を示しています。
注
意
この表示を無視して、誤った取り扱いをすると、
人が障害を負う可能性が想定される内容および物
的損害の発生が想定される内容を示しています。
各文章の
記号は注意
、
もしくは警告を促す内容を告げています
。
各文章の
記号は行為を禁止する内容を告げています。
警 告
レンズを付けたカメラで、太陽や強い光源を見ると、視
力障害を起こす恐れがあります。特にレンズ単体で太陽
を直接見ると、失明の原因となります。
注 意
レンズ、またはレンズを付けたカメラを太陽に向け
ないでください。太陽の光が集光現象を起こし、故
障や火災の原因となる場合があります。
レンズ、またはレンズを付けたカメラを、レンズキ
ャップを付けないまま放置しないでください。太陽
の光が集光現象を起こし、火災の原因となる場合が
あります。
マウント部は複雑な形状をしておりますので、手荒
に扱うと怪我の原因となります。
三脚は十分に強度のあるものをご使用ください。弱
いものをご使用になりますと、転倒する恐れがあり
ます。
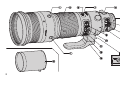
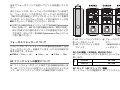
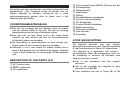
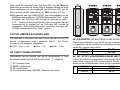
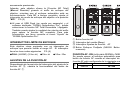
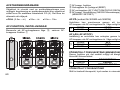
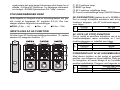
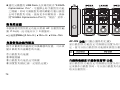
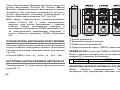
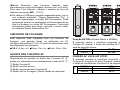
各部の名称(P. 2)
①
AF
ファンクションボタン
② ビープ音スイッチ
③ AF ファンクション設定
スイッチ
④ フォーカスプリセットボ
タン(NIKON 用:メモリー
セットボタン)
⑤ フォーカスリング
⑥ 補助的距離目盛
⑦ 指標線
⑧ マウント
⑨ フォーカスモード切換え
スイッチ
⑩ フォーカスリミッタース
イッチ
⑪ OS スイッチ
⑫ カスタムモードスイッチ
⑬ 三脚座
⑭
クリ
ッ
ク
ON/OFF
スイ
ッ
チ
⑮ レンズフード

6
ニコン AF 用について
このレンズは、電磁絞り機構を搭載しており、ニコン製
AF レンズにおける E タイプレンズと同等の仕様になって
います。表(A)に記載のカメラでご使用になれます。(★印
の機種は、カメラのファームウェアを最新のバージョンに
アップデートしてください。)
フイルム一眼レフカメラではご使用になれません。
表(B)の機種ではご使用になれません。
最新機種につきましては、E タイプレンズに対応してい
るか、ご使用のカメラの説明書で確認してください。
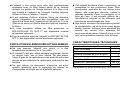
(A)
D5, D4S, Df, D810, D810A, D750, D610, D500, D7200,
D7100, D5500, D5300, D5200, D5100, D5000, D3400,
D3300, D3200, D3100
★ D4, D3X, D3S, D3, D800, D800E, D700, D600,
D300S, D300, D7000
(B)
D2XS, D2X, D2HS, D2H, D1X, D1H, D1, D200, D100,
D90, D80, D70S, D70, D60, D50, D40X, D40, D3000
レンズの着脱方法
カメラへの着脱方法は、ご使用のカメラの説明書に従って
着脱してください。
マウント面には絞り連動用、AF 連動用の装置や、電気
接点等があります。キズや汚れがつくと誤作動や故障の
原因となりますのでご注意ください。
露出について
露出の決定方法は、ご使用のカメラの説明書に従って、絞
りやシャッター速度等をセットしてください。
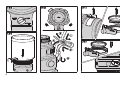
ピント合わせ
オートフォーカスで撮影する場合は、フォーカスモード切
り換えスイッチを AF にセットします。P. 3-(1)
マニュアルで撮影する場合は、フォーカスモード切り換え
スイッチを M にセットし、フォーカスリングを回してピ
ントを合わせます。P.3-(2)
カメラのフォーカスモードの切り換えは、ご使用のカメ
ラの説明書に従ってください。
マニュアルでピントを合わせる際には、目盛が∞(無限
遠)の位置でも遠景にピントが合わないことがあります
ので、ファインダーで確認しながらピントを合わせてく
ださい。
このレンズは、AF にセットしたままでマニュアルでのピ
ント補正をすることも可能です。カメラをシングル AF モ
ードにセットして、合焦後、シャッターボタンを半押しの

7
ままでフォーカスリングを回してピントを調整してくだ
さい。
またこのレンズは、オートフォーカスが作動している時で
も、フォーカスリングを回すとマニュアルに切り替わる
「MF 切り替え機能」(マニュアルオーバーライド)を備え
ています。レンズのフォーカスモード切り換えスイッチを
MO にセットして使用してください。P.3-(3)
別売りの
USB DOCK
とソフトウエア「
SIGMA Optimization
Pro
」
を用いて、MF 切り替え機能の有効/無効の設定、
および MFに切り替わるタイミングの調整をすることが
できます。詳しくは「SIGMA Optimization Pro」のヘル
プをご覧ください。
フォーカスリミッターについて
このレンズは、オートフォーカスの作動範囲を制限できる
フォーカスリミッターを備えています。以下の三段階に切
換え可能です。P.3-(4)
● FULL(3.5m
~
∞) ● 10m
~
∞ ● 3.5m
~
10m
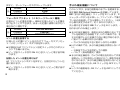
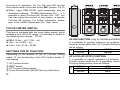
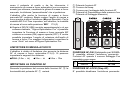
AF ファンクションの設定について
AF ファンクションボタン①に設定できる機能を説明しま
す。AF ファンクション設定スイッチ③のポジションによ
って、AF ファンクションボタンの機能が変わります。
①
AF
ファンクションボタン
② ビープ音スイッチ
③ AF ファンクション設定
スイッチ
④ フォーカスプリセットボ
タン
(NIKON 用:メモリーセ
ットボタン)
AF-ON 機能(SIGMA, NIKON のみ)
AF ファンクションボタンを押すとオートフォーカスが作
動します。
③
SIGMA AF-ON
NIKON AF-ON
AF ロック(AF ストップ)機能
オートフォーカスの駆動中に AF ファンクションボタンを

8
押すと、オートフォーカスがストップします。
③
SIGMA AFL
CANON STOP
NIKON AF-L
フォーカスプリセット(メモリーリコール)機能
任意のピント位置を記憶し、瞬時に記憶したピント位置を
呼び出すことができます。決まった位置に頻繁に戻りたい
場合などに便利です。
③
SIGMA FOCUS RECALL
CANON PRESET
NIKON MEMORY RECALL
ピント位置を記憶する
記憶したい位置にピントを合わせてフォーカスプリセッ
ト(メモリーセット)ボタン④を押します。
記憶時は AF ファンクション設定スイッチがどのポジシ
ョンでも構いません。
ビープ音スイッチ②が ON のときは、ピッと電子音が鳴
ります。
記憶したピント位置を呼び出す
AF ファンクションボタンを押すと、記憶されたピント位
置に戻ります。
ビープ音スイッチ②が ON のときは、ピピッと電子音が
鳴ります。
手ぶれ補正機能について
このレンズは、手持ち撮影時の手ブレを軽減する、手ぶれ
補正機能 OS(Optical Stabilizer)を搭載しています。
OS(手ぶれ補正機能)スイッチを 1 にします。P.3-(5)
シャッターボタンを半押しし、ファインダーで像が安定し
ているのを確認してから撮影してください。(半押しして
から像が安定するまで、約1秒かかります。)
流し撮りをする時は OS スイッチを 2 にします。(上下方
向の手ぶれのみ補正します。)
手ぶれ補正機能は、通常の手持ち撮影において生じる手
ブレを軽減させる機能です。以下の条件では、手ぶれ補
正の効果が十分に発揮されない場合があります。
▪ 動いている乗り物からの撮影
▪ カメラの向きを大きく動かしながらの撮影
以下の条件では、手ぶれ補正機能は使用しないでくださ
い。
▪ 三脚等でカメラを固定しての撮影
▪ バルブ(長時間露光)撮影
手ぶれ補正機能は、カメラの電池を利用して作動します。
通常のレンズを使用した場合に比べ、撮影可能枚数が少
なくなります。手ぶれ補正機能を使用しないときは、電
池の消耗を防ぐため、OS スイッチを OFF にしてくださ
い。
レンズの着脱時は、OS スイッチを OFF にしてから行っ
てください。

9
シャッターボタンから指を離しても、カメラの露出計が
はたらいている間は、手ぶれ補正機能も作動しています。
作動中にレンズを外したり、カメラの電池を取り出すと、
レンズの故障の原因となります。
手ぶれ補正機能が作動中、レンズを外したりカメラの電
源を切ったとき、レンズを振るとカタカタと音がする場
合がありますが故障ではありません。
カスタムモードについて
このレンズは、別売りの USB DOCK とソフトウエア
「SIGMA Optimization Pro」を用いて、AF の速度、OS の
効き具合、フォーカスリミッターの範囲などを好みの状態
にカスタマイズして、カスタムモードスイッチに登録する
ことができます。詳しくは「SIGMA Optimization Pro」の
ヘルプをご覧ください。
通常はカスタムモードスイッチを OFF にセットしてく
ださい。カスタムモードが ON(C1、C2)にセットさ
れていると、フォーカスリミッタースイッチが無効とな
ります。P. 3-(6)
USB DOCK は各マウント専用です。ご使用のレンズに
対応した USB DOCK をご用意ください。異なるマウン
ト用の USB DOCK はご使用になれません。
ソフトウエア「SIGMA Optimization Pro」は、弊社ウェ
ブサイトより無料でダウンロードできます。
http://www.sigma-global.com/download/
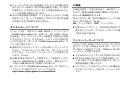
三脚座
三脚座は固定ノブをゆるめると、360 度フリーに回転しま
すので、画面の縦横の調節が簡単にできます。P.3-(7)
クリック ON/OFF スイッチ
状況に合わせ、90°毎の位置決めクリックの有無を選択す
ることができます。P.4-(8)
ON- クリックあり OFF- クリックなし
別売りのレンズフット(TRIPOD SOCKT TS-81)と交
換することにより、アルカスイスタイプの雲台・クラン
プ等に対応できます。
テレコンバーターについて
このレンズは、別売りのテレコンバーターTC-1401 との組
合せで 1.4 倍(700mm F5.6 AF)、テレコンバーター
TC-2001 との組合せで 2 倍(1000mm F8 MF)の超望遠
レンズとして活用できます。
上記以外のコンバーターはご使用になれません。
AF が F8 対応のカメラでご使用の場合、テレコンバータ
ーTC-2001 でも AF 撮影が可能です。詳しくはカメラの
使用説明書をご覧ください。
ライブビューによるコントラスト AF 機能を備えたカメ
ラでは、ライブビュー時のオートフォーカス撮影が可能
です。

10
レンズフード
レンズフードは、画質に悪影響を与える有害光線のカット
に有効です。レンズ先端にレンズフードをはめ込み、ロッ
クネジで確実に固定してください。P.4-(9)
ケースに収納する際には、レンズフードを逆さにはめ込
み、上記と同じ要領で固定してください。
ショルダーストラップ
このレンズは携帯時に便利なショルダーストラップを取
り付けることができます。P.4-(10) のように 2 個所の取付
け部に確実に取付けてください。
フィルター
このレンズは、レンズ前部に市販のフィルターを取り付け
ることができません。フィルターは、46mm 径のフィルタ
ーをフィルターホルダーにセットして使用します。
フィルターの取り外し
フィルターホルダーにはあらかじめノーマルフィルター
(WR-PROTECTOR)がセットされています。フィルタ
ーホルダー固定ノブを左に回し、フィルターホルダーを引
き抜き、フィルターを左に回して外します。P.4-(11)
フィルターの取り付け
フィルターを右に回して固定し、向きを間違えないように
して
フ
ィ
ルタ
ー
ホルダ
ー
を差し込み口に戻します
。
P.4-(12)
このレンズは、フィルターを含めた状態で、最良の性能
が発揮できる設計になっています。通常はノーマルフィ
ルター(WR-PROTECTOR)をセットして使用してく
ださい。
市販の 46mm 径のフィルターも使用できますが、フィ
ルター枠の幅が 5.5mm(ネジ部を除く)、外径が 49mm
を越えるものは取付けできません。
偏光フィルターを使用したい場合は、別売りの(WR-
CIRCULAR PL RCP-11)をご使用ください。
レンズ前部の保護には、専用のレンズ保護フィルター
(WR-PROTECTOR LPT-11)(別売)をご使用ください。
保管、取扱上の注意
湿気はカビや錆の原因となります。長期間使用しない場
合は、乾燥剤と一緒に密閉性の良い容器に入れて保管し
てください。ナフタリン等、防虫剤のある場所には保管
しないでください。
レンズ面には直接指で触れないでください。ゴミや汚れ
が付いたときには、ブロアーかレンズブラシで取り除い
てください。指の跡などは、市販のレンズクリーナー液
とレンズクリーニングペーパーで軽く拭いてください。
ベンジン、シンナー等の有機溶剤は絶対に使わないでく
ださい。

11
このレンズは防塵・防滴構造となっており、小雨などで
の使用は可能ですが、防水構造ではありません。水辺な
どでの使用では、大量の水が掛らないように注意してく
ださい。水がレンズ内部に入り込むと、大きな故障の原
因となり、修理不能になる場合があります。
急激な温度変化により、レンズ内部に水滴が生じること
があります。寒い屋外から暖かい室内に入るときなどは、
ケースやビニール袋に入れ、周囲の温度になじませてか
らご使用ください。
品質保証とアフターサービスについて
この製品の保証の内容、およびアフターサービスについて
は、別紙の“保証書”を御覧ください。
製品のお問い合わせは… シグマ
カスタマーサポート部
フリーコール :
0120-9977-88
携帯電話
・
PHS をご利用の方は
044-989-7436
にご連絡ください
サポート・インターネットページアドレス
http://www.sigma-photo.co.jp/support/index.htm
株式会社シグマ 本社
〒215-8530 神奈川県川崎市麻生区栗木 2 丁目 4 番 16 号
(044) 989-7430 (代) FAX: (044) 989-7451
インターネットホームページアドレス
http://www.sigma-photo.co.jp
主な仕様
レンズ構成(群
-
枚) 11 - 16
画 角
5°
最小絞り
32
最短撮影距離 3.5m
最大撮影倍率 1:6.5
フィルターサイズ
46mm
(フィルタ
ー
ホルダ
ー
にセット)
最大径 X 全長 144.8 x 380.3mm
重 量 3,310g
大きさ重さは、シグママウントのものです。
APO レンズは特殊低分散ガラスを使用しています。こ
のレンズは材質の特性上、小さな気泡を多少含む場合が
あり、それが前側のレンズで拡大されて見えることがあ
りますが、異常ではありません。また、レンズの光学性
能には全く影響ありません。
このレンズは、鉛やひ素を含まない 環境対策ガラス を
使用しています。

12
ENGLISH
Thank you very much for purchasing a Sigma Lens. In
order to get the maximum performance and enjoyment out
of your Sigma lens, please read this instruction booklet
thoroughly before you start to use the lens.
SAFETY PRECAUTIONS
After attaching a lens, do not look directly at the sun,
through the viewfinder. Doing so can cause damage to
the eye or loss of eyesight.
Do not look at the sun with the lens of your camera;
otherwise you can lose your eyesight.
Do not look at the sun through the lens. If strong direct
sunlight enters the lens, the concentration of light could
cause a fire.
The mount part of the lens is complicated. Improper
usage may cause injury.
Please select a sturdy tripod that is capable of
supporting this lens. If the tripod is not sturdy enough, it
may cause the lens to fall.
DESCRIPTION OF THE PARTS (P.2)
① AF Function button
② BEEP switch
③ AF Function Setting switch
④ Focus Preset button (NIKON: Memory Set button)
⑤ Focus Ring
⑥ Distance Scale
⑦ Focus Index Line
⑧ Mount
⑨ Focus Mode Switch
⑩ Focus Limiter Switch
⑪ OS Switch
⑫ Custom Mode Switch
⑬ Tripod Socket
⑭ Click Stop On/off Switch
⑮ Filter Holder
⑯ Lens Hood
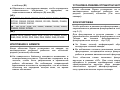
FOR NIKON MOUNT
This lens includes an electromagnetic diaphragm
mechanism, the same specifications as the E-type
mechanism in Nikon AF lenses. The lens is compatible
with the cameras listed in Table (A). (The models with the
★ mark require the latest version of the camera firmware
to ensure compatibility.)
It is not compatible with film single-lens reflex cameras.
It is not possible to use the lens with the cameras in
Table (B).
For models not listed in Table (A) or Table (B), please

13
refer to the camera’s instruction manual to check for
compatibility of E-type lenses.
(A)
D5, D4S, Df, D810, D810A, D750, D610, D500, D7200,
D7100, D5500, D5300, D5200, D5100, D5000, D3400,
D3300, D3200, D3100
★ D4, D3X, D3S, D3, D800, D800E, D700, D600,
D300S, D300, D7000
(B)
D2XS, D2X, D2HS, D2H, D1X, D1H, D1, D200, D100,
D90, D80, D70S, D70, D60, D50, D40X, D40, D3000
ATTACHING TO THE CAMERA BODY
When this lens is attached to the camera body it will
automatically function in the same way as the camera
manufacturer’s lens. Please refer to the instruction booklet
for your camera body.
On the lens mount surface, there are a number of
couplers and electrical contacts. Please keep them
clean to ensure proper connection. While changing the
lens, be sure to place it front end down to avoid
damaging the rear mount.
SETTING THE EXPOSURE MODE
The Sigma lens functions automatically once attached to
the camera. Please refer to the camera instruction book.
FOCUSING
For autofocus operation, set the focus mode switch on the
lens to the “AF” position. P.3-(1)
If you wish to focus manually, set the focus mode switch
on the lens to the “M” position. You can adjust the focus by
turning the focus ring. P.3-(2)
Please refer to camera’s instruction manual for details
on changing the camera’s focusing mode.
When operating this lens in manual focus mode, it is
recommended that correct focus be confirmed visually
in the viewfinder rather than relying on the distance
scale. This is due to possible focus shift resulting from
extreme changes in temperature which cause various
components in the lens to expand and contract. Special
allowance is made for this at the infinity setting.
This lens also permits manual focusing even in the
autofocus mode. With the camera set to the One-Shot AF
(AF-S) mode, it is possible to manually override the
autofocus while the shutter release button is pressed
halfway.
Also, this lens can offer [Full-time MF function] (Manual
Override) by rotating the focus ring of the lens while auto

14
focusing is in operation. For For Full- time MF, set the
focus mode switch on the lens to the “MO” position. P.3-(3)
When using USB DOCK (sold separately) and its
dedicated software,“SIGMA Optimization Pro”, it is
possible to select Full-time MF function ON / OFF, You
can also adjust the amount of ring rotation to operate
Full-time MF function. For further information, please
refer to the SIGMA Optimization Pro “Help” menu.
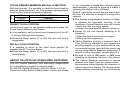
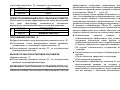
FOCUS LIMITER SWITCH
This lens is equipped with the focus limiter switch, which
enables a limit of the AF range. It is possible to switch to
the following three modes. P.3-(4)
FULL (3.5m ~ ∞) (11.5ft ~ ∞)
10m
~ ∞ (32.8ft ~ ∞)
3.5m
~ 10m (11.5ft ~ 32.8ft)
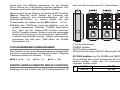
SETTINGS THE AF FUNCTION
Depending on the position of the AF Function Setting
switch ③, the functionality of the AF Function button ①
can change.
① AF Function button
② BEEP switch
③ AF Function Setting switch
④ Focus Preset button (NIKON: Memory Set button)
AF-ON FUNCTION (only for SIGMA and NIKON)
It is possible to operate autofocus by pressing the AF
Function button when then AF Function Setting switch is
set as follows:
③
SIGMA AF-ON
NIKON AF-ON
AF LOCK (AF STOP) FUNCTION
It is possible to cancel autofocus by pressing the AF
Function button while the AF is operating, when then AF
Function Setting switch is set as follows:
③
SIGMA AFL
CANON STOP
NIKON AF-L

15
FOCUS PRESET (MEMORY RECALL) FUNCTION
With this function, it is possible to recall the focus position
that has been previously set. This enables photographers
to return to a fixed focus position instantly.
③
SIGMA FOCUS RECALL
CANON PRESET
NIKON MEMORY RECALL
PRESET FOCUS POSITION
Set the focus point at the desired position and press the
Focus Preset (Memory Set) button.
It is possible to set the focus point irrespective of the AF
Function Setting switch position.
When the Beep switch ② is ON, the lens will emit a
single beep.
RECALL FOCUS POSITION
It is possible to return to the fixed focus position by
pressing the AF Function Button.
When the Beep switch ② is ON, the lens will emit a
double beep.
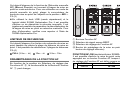
ABOUT OS (OPTICAL STABILIZER) FEATURES
This OS (Optical Stabilizer) lens effectively compensates
for image blurring caused by camera shake.
Set the OS (Optical Stabilizer) switch to Mode 1. P.3-(5)
Press the shutter button halfway down, confirm the image
in the viewfinder is stable then take the picture. (It takes
approximately 1 second to produce a stable image, after
pressing the shutter button halfway).
Mode
2
, detects the vertical camera shake, and overcomes
blurring. It is effective on subjects moving horizontal to the
camera.
The blurring compensation function of Optical Stabilizer
is effective for hand-held shooting. In the following
conditions, Optical Stabilizer may not function properly.
▪ Shots from the a moving vehicle.
▪ If there is a considerable camera motion or shake.
Please do not use Optical Stabilizer in the following
situations.
▪ When the lens is mounted on a tripod.
▪ Bulb (long time exposure).
Optical Stabilizer function is powered from the camera.
If the OS lens is attached to your camera and activated,
shooting capacity of your camera will be lower than with
conventional lenses used with the same camera. If you
are not using Optical Stabilizer, please turn OFF the OS
switch, in order to prevent consumption of a battery.
Be sure to turn of OS switch to OFF position, before
attaching or detaching the lens to the camera.
The Optical Stabilizer continues to operate after you
release your finger from the shutter button, as long as
the exposure meter displays the exposure value. Never
remove the lens or remove the camera’s battery while the
image stabilizer is operating, you could damage the lens.

16
If the camera power is turned off or lens is detached
while the Optical Stabilizer function is in operation, the
lens may emit a chattering noise, but this is not a
malfunction.
CUSTOM MODE SWITCH
By using USB DOCK (sold separately) and its dedicated
software, SIGMA Optimization Pro, it is possible to
customize the AF speed, OS effect and range of Focus
Limiter of the lens, and the setting can be saved with the
Custom Mode Switch. For further information, please refer
to the SIGMA Optimization Pro “Help” menu.
For your regular use, please turn off the Custom Mode
Switch. The Focus Limiter Switch does not function when
the custom mode is ON and set as C1 or C2. P.3-(6)
USB DOCK is dedicated for each mount. Please use a
USB DOCK which corresponds to your lens mount.
USB DOCK for different mounts cannot be used.
SIGMA Optimization Pro can be downloaded free of
charge from the following website:
http://www.sigma-global.com/download/
TRIPOD SOCKET AND COLLAR
This lens is equipped with a tripod socket. When you
loosen the locking knob on the collar, the lens and camera
can rotate freely to easily position the camera horizontally
or vertically. P.3-(7)
CLICK STOP ON/OFF SWITCH
Depending on the shooting conditions, it is possible to turn
the click stop ON or OFF.
P.4-(8) ON - using Click stop OFF - not using Click Stop
An optional lens foot, TRIPOD SOCKET TS-81, makes
the lens compatible with the Arca Swiss quick release
plate and clamp.
ABOUT TELE CONVERTERS
This lens can be used as a 1.4x (700mm F5.6 AF) or a 2x
(1000mm F8 MF) hyper-telephoto lens by attaching
SIGMA TELE CONVERTER TC-1401 or SIGMA TELE
CONVERTER TC-2001 respectively.
Do not use other manufacturers ’teleconverter’s, only
those listed above are compatible.
When SIGMA TELE CONVERTER TC-2001 is attached
to cameras that are compatible with AF at F8, it is
possible to shoot with AF. For details, please refer to
user manual of camera body.
It is possible to use auto focus in Live View if the
camera is in“contrast detect”AF mode.
LENS HOOD
A detachable hood is provided with the lens. This lens

17
hood helps to prevent flare and ghosted images caused by
bright illumination from outside the picture area. Attach the
hood and lock the knob to fix the hood in place. P.4-(9)
In order to place the lens and hood into the storage
case, you must first remove the hood, then replace it on
the lens in the reverse position.
SHOULDER STRAP
Please attach the shoulder strap to the two slings as
described in figure P.4-(10).
FILTER
It is not possible to attach conventional filters to the front of
the lens body. It is necessary to use the dedicated Filter
Holder and 46mm Filter.
REMOVING THE FILTER
The WR-PROTECTOR is set inside the filter holder as
standard. In order to remove the filter from the filter holder,
turn the filter holder fixing knob counter-clockwise and pull
the filter holder out. Then, rotate the filter counter-
clockwise. P.4-(11)
ATTACHING THE FILTER
Rotate the fixing knob of the filter holder clockwise, and
insert the filter holder. P.4-(12)
This lens has been designed to deliver optimum
performance with a filter installed in the lens assembly.
The quality of the picture decreases if the filter is not
installed inside the lens. Please always use a filter
inside the lens assembly.
It is possible to use any other 46mm filters. However, if
the filters have the thickness of more than 5.5mm
(screw thread excluded) or diameter of more than
49mm, they cannot be attached.
If you wish to use a polarizing filter, the WR-CIRCULAR
PL RCP-11 is available as an optional accessory.
For protection of the front lens element, the WR-
PROTECTOR LPT-11 is available as an optional
accessory.
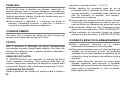
BASIC CARE AND STORAGE
Avoid any shocks or exposure to extreme high or low
temperatures or to humidity. For extended storage,
choose a cool and dry place, preferably with good
ventilation. To avoid damage to the lens coating, keep
away from mothballs or naphthalene gas.
Do not use thinner, benzine or other organic cleaning
agents to remove dirt or finger prints from the lens
elements. Clean by using a soft, moistened lens cloth or
lens tissue.
This lens benefits from a dust and splash proof
construction. Although this construction enables the
lens to be used under light rain, it is not the same as
being water proof. Please pay attention to prevent a

18
large amount of water from splashing on the lens,
especially when using it by a waterside. It is often
impractical to repair the internal mechanism, lens
elements and electric components if damaged by water.
Sudden temperature changes may cause condensation
or fog to appear on the surface of the lens. When
entering a warm room from the cold outdoors, it is
advisable to keep the lens in the case until the
temperature of the lens approaches room temperature.
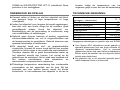
SAFETY PRECAUTIONS
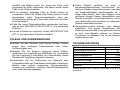
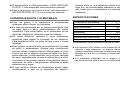
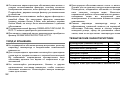
Lens construction 11 - 16
Angle of View 5°
Minimum Aperture 32
Minimum Focusing Distance 3.5m (11.5ft)
Magnification 1:6.5
Filter Size 46mm
Dimensions (Dia.×Length)
144.8 x 380.3mm
(5.7×14.97in)
Weight 3310g (116.8oz)
Dimensions and weight include the SIGMA mount.
APO lenses use Special Low Dispersion glass. This
special glass normally has some tiny air bubbles but it does
not affect the optical performance.
The glass materials used in the lens do not contain
environmentally hazardous lead and arsenic.
This device complies with Part 15 of the FCC Rules. Operation
is subject to the following two conditions: (1) this device may
not cause harmful interference, and (2) this device must accept
any interference received, including interference that may
cause undesired operation.
The CE Mark is a Directive conformity mark of the European
Community (EC).
SIGMA (Deutschland) GmbH
Carl Zeiss Str. 10/2, D 63322 Roedermark, Germany
Verkauf:01805-90 90 85-0
Service:01805-90 90 85-85 Fax(Service):01805-90 90 85-35
Disposal of Electric and Electronic Equipment in Private
Households
Disposal of used Electrical & Electronic Equipment (Applicable
in the European Union and other European countries with
separate collection systems)
This symbol on the product, in the manual/warranty, and/or on the
packaging indicates that this product must not be treated as household
waste. Instead it should be handed over to the appropriate collection point
for the recycling of electrical and electronic equipment. If your equipment
contains easy removable batteries, please dispose of these separately
according to your local legislation. It is your responsibility to ensure that
this product is recycled correctly. In doing so you will help conserve natural
resources, protect the environment and human health. For more detailed
information about recycling this product, please contact your local city
office, your household waste disposal service or the shop where you
purchased the product.

19
DEUTSCH
Wir danken Ihnen für das Vertrauen, das Sie uns mit dem
Kauf dieses SIGMA Produktes erwiesen haben. Bitte
lesen Sie sich diese Anleitung vor der ersten Benutzung
des Gerätes aufmerksam durch.
VORSICHTSMAßNAHMEN
Schauen Sie nie direkt in die Sonne, wenn Sie die
Kamera mit angesetztem Objektiv am Auge haben!
Anderenfalls kann es zu schweren Verletzungen des
Auges oder zur Erblindung kommen!
Schauen Sie nie durch das Objektiv direkt in die Sonne!
Anderenfalls kann es zu schweren Verletzungen des
Auges oder zur Erblindung kommen!
Richten Sie das Objektiv nicht direkt in die Sonne. Die
Bündelung des starken Sonnenlichts durch das Objektiv
kann einen Brand verursachen.
Der Anschlußteil des Objektivs ist komplex. Unsachgemäßer
Gebrauch kann Verletzungen herbei führen.
Bitte wählen Sie ein stabiles Stativ, das für den Einsatz
mit einem Objektiv wie diesem ausgelegt ist. Ein
ungeeignetes Stativ könnte einen Sturz verursachen.
DESCRIPTION OF THE PARTS (S.2)
① AF-Funktionstaste
② BEEP-Schalter
③ AF-Funktionsschalter
④ Fokus-Preset-Taste (NIKON: Memory-Set-Taste)
⑤ Entfernungsring
⑥ Entfernungsskala
⑦ Einstellindex
⑧ Anschluß
⑨ Fokussierschalter
⑩ Fokussierbereichsbegrenzer
⑪ OS Schalter
⑫ Benutzermodus-Schalter
⑬ Stativanschluß
⑭ On/Off-Schalter Für 90°-Rastung
⑮ Filterschublade
⑯ Streulichtblende
NIKON ANSCHLUSS
Dieses Objektiv besitzt einen elektromagnetischen
Blendenmechanis-mus mit den gleichen Spezifikation wie
der E-Typ-Mechanismus der Nikon-AF- Objektive. Das
Objektiv ist mit den in der Tabelle (A) genannten
Kameramodellen kompatibel. (Die Modelle mit der ★
-Markierung benötigen die aktuelle Kamera-Firmwareversion,
um die Kompatibilität zu gewährleisten.)
Es ist nicht kompatibel mit analogen Spiegelreflexkameras.
Es ist nicht möglich, das Objektiv mit den in Tabelle (B)
genannten Kameramodellen zu verwenden.

20
Bei Kameramodellen, die weder in Tabelle (A) noch
Tabelle (B) aufgelistet sind, entnehmen Sie die
Information zur Kompatibilität mit E-Typ-Objektiven bitte
der Bedienungsanleitung der Kamera.
(A)
D5, D4S, Df, D810, D810A, D750, D610, D500, D7200,
D7100, D5500, D5300, D5200, D5100, D5000, D3400,
D3300, D3200, D3100
★ D4, D3X, D3S, D3, D800, D800E, D700, D600,
D300S, D300, D7000
(B)
D2XS, D2X, D2HS, D2H, D1X, D1H, D1, D200, D100,
D90, D80, D70S, D70, D60, D50, D40X, D40, D3000
ANSETZEN AN DAS KAMERAGEHÄUSE
An die Kamera angesetzt, funktioniert das Objektiv
genauso automatisch wie lhr Normalobjektiv. Einzelheiten
hierüber finden Sie in der Bedienungsanleitung zur
Kamera.
Halten Sie die Kontakte und Kupplungselemente am
Objektivanschluß stets sauber. Stellen Sie das Ovjektiv
grundsätzlich nur mit der Vorderseite nach unten ab, um
eine Beschädingung der Kupplungselemente zu vermeiden.
EINSTELLEN DER BETRIEBSART
Das SIGMA Objektiv stellt nach dem Ansetzen an die
Kamera alle Funktionen automatisch zur Verfügung.
Einzelheiten entnehmen Sie bitte der Gebrauchsanleitung
der Kamera.
EINSTELLUNG VON SCHÄRFE
Für die automatische Scharfeinstellung schalten Sie den
Fokussierschalter am Objektiv auf die “AF”-Position.
S.3-(1)
Sollten Sie die Schärfe manuell einstellen wollen, schalten
Sie den Fokussierschalter am Objektiv auf die “M”-
Position. Sie können die Schärfe nun durch Drehen des
Entfernungsrings einstellen. S.3-(2)
Hinweise zum Wechsel der Fokussierbetriebsart der
Kamera entnehmen Sie bitte der Bedienungsanleitung
der Kamera.
Bei manueller Fokussierung sollte die Schärfe auf der
Mattscheibe eingestellt werden, da durch
Temperaturschwankungen Abweichungen von der
Entfernungsskala auftreten können. Dies gilt
insbesondere für die Unendlich-Einstellung.
Dieses Objektiv kann auch manuell scharfgestellt werden,
während die AF-Betriebsart eingestellt ist. Wenn die
Kamera auf Einzelbild-AF eingestellt ist, können Sie,
nachdem das Objektiv von der Automatik scharfgestellt
La page charge ...
La page charge ...
La page charge ...
La page charge ...
La page charge ...
La page charge ...
La page charge ...
La page charge ...
La page charge ...
La page charge ...
La page charge ...
La page charge ...
La page charge ...
La page charge ...
La page charge ...
La page charge ...
La page charge ...
La page charge ...
La page charge ...
La page charge ...
La page charge ...
La page charge ...
La page charge ...
La page charge ...
La page charge ...
La page charge ...
La page charge ...
La page charge ...
La page charge ...
La page charge ...
La page charge ...
La page charge ...
La page charge ...
La page charge ...
La page charge ...
La page charge ...
La page charge ...
La page charge ...
La page charge ...
La page charge ...
La page charge ...
La page charge ...
La page charge ...
La page charge ...
La page charge ...
La page charge ...
La page charge ...
La page charge ...
La page charge ...
La page charge ...
La page charge ...
La page charge ...
La page charge ...
La page charge ...
La page charge ...
La page charge ...
La page charge ...
La page charge ...
La page charge ...
La page charge ...
La page charge ...
La page charge ...
La page charge ...
La page charge ...
La page charge ...
La page charge ...
La page charge ...
La page charge ...
La page charge ...
La page charge ...
La page charge ...
La page charge ...
La page charge ...
La page charge ...
La page charge ...
La page charge ...
La page charge ...
La page charge ...
La page charge ...
La page charge ...
-
 1
1
-
 2
2
-
 3
3
-
 4
4
-
 5
5
-
 6
6
-
 7
7
-
 8
8
-
 9
9
-
 10
10
-
 11
11
-
 12
12
-
 13
13
-
 14
14
-
 15
15
-
 16
16
-
 17
17
-
 18
18
-
 19
19
-
 20
20
-
 21
21
-
 22
22
-
 23
23
-
 24
24
-
 25
25
-
 26
26
-
 27
27
-
 28
28
-
 29
29
-
 30
30
-
 31
31
-
 32
32
-
 33
33
-
 34
34
-
 35
35
-
 36
36
-
 37
37
-
 38
38
-
 39
39
-
 40
40
-
 41
41
-
 42
42
-
 43
43
-
 44
44
-
 45
45
-
 46
46
-
 47
47
-
 48
48
-
 49
49
-
 50
50
-
 51
51
-
 52
52
-
 53
53
-
 54
54
-
 55
55
-
 56
56
-
 57
57
-
 58
58
-
 59
59
-
 60
60
-
 61
61
-
 62
62
-
 63
63
-
 64
64
-
 65
65
-
 66
66
-
 67
67
-
 68
68
-
 69
69
-
 70
70
-
 71
71
-
 72
72
-
 73
73
-
 74
74
-
 75
75
-
 76
76
-
 77
77
-
 78
78
-
 79
79
-
 80
80
-
 81
81
-
 82
82
-
 83
83
-
 84
84
-
 85
85
-
 86
86
-
 87
87
-
 88
88
-
 89
89
-
 90
90
-
 91
91
-
 92
92
-
 93
93
-
 94
94
-
 95
95
-
 96
96
-
 97
97
-
 98
98
-
 99
99
-
 100
100


Sigma 500mm F 4.0 DG OS HSM SPORTS для CANON Manuel utilisateur
- Taper
- Manuel utilisateur
dans d''autres langues
- italiano: Sigma 500mm F 4.0 DG OS HSM SPORTS для CANON Manuale utente
- español: Sigma 500mm F 4.0 DG OS HSM SPORTS для CANON Manual de usuario
- Nederlands: Sigma 500mm F 4.0 DG OS HSM SPORTS для CANON Handleiding
- português: Sigma 500mm F 4.0 DG OS HSM SPORTS для CANON Manual do usuário
- dansk: Sigma 500mm F 4.0 DG OS HSM SPORTS для CANON Brugermanual
Documents connexes
-
Sigma 185955 Manuel utilisateur
-
-
-
-
-
-
-
Sigma 150-600mm F/5-6.3 DG OS HSM|C NIKON Manuel utilisateur
-
