Electrolux ER6523P Manuel utilisateur
- Catégorie
- Congélateurs
- Taper
- Manuel utilisateur

2222 109-26
I N F O
INSTALLATION - UND GEBRAUCHSANWEISUNGEN
INSTRUCTIONS POUR LÕINSTALLATION ET LÕEMPLOI
INSTALLATIE - EN GEBRUIKSAANWIJZINGEN
INSTALLATION AND INSTRUCTION MANUAL
ER 6523 P
ER 6523 P
ER 6523 P
ER 6523 P
K†HLSCHRANK
REFRIGERATEUR
KOELKAST
FRIDGE

2
WARNUNGEN UND WICHTIGE HINWEISE
Es ist sehr wichtig, da§ diese Bedienungsanleitung mit dem betreffenden GerŠt aufbewahrt wird. Sollte
dieses GerŠt verkauft bzw. einer anderen Person gegeben werden, so ist es nštig, die Anleitung
beizufŸgen, damit der neue Besitzer Ÿber den Betrieb des GerŠtes bzw. die entsprechenden Warnungen.
Sollte dieses GerŠt mit Magnet-TŸrverschlu§ als Ersatz fŸr ein altes GerŠt dienen, das noch mit einem
Schnappschlo§ ausgerŸstet ist, so machen Sie bitte dieses Schlo§ unbrauchbar, bevor Sie das GerŠt
beiseite stellen oder zum MŸll geben. Sie verhindern damit, da§ spielende Kinder sich selbst einsperren
und damit in Lebensgefahr kommen.
Diese Warnungen wurden zu Ihrem bzw. dem Schutz anderer erarbeitet. Wir bitten Sie daher, diese
aufmerksam zu lesen, bevor das GerŠt in Betrieb genommen wird.
Sicherheit
¥ Dieses GerŠt wurde hergestellt, um von
Erwachsenen benutzt zu werden. Es ist
unbedingt darauf zu achten, da§ Kinder es nicht
anfassen oder es als Spielzeug verwenden.
¥ Es ist gefŠhrlich, die Eigenschaften dieses
GerŠtes zu Šndern.
¥ Vor der inneren bzw. Šu§eren Reinigung des
GerŠtes sowie beim Auswechseln der
GlŸhlampe (bei damit ausgestatteten GerŠten)
das GerŠt spannungslos machen.
¥ Eis aus dem Gefrier- bzw. Frosterfach nicht
sofort essen, es kšnnte KŠlte-Brandwunden
verursachen.
¥ Dieses GerŠt ist schwer. Beim Versetzen bitte
darauf achten!
¥ Beachten Sie, dan wŠhrend der Bewegung
des GerŠtes der KŠltemittelkreislauf nicht
beschŠdigt wird.
¥ Das GerŠt darf nicht in unmittelbarer NŠhe
von Heizkšrpern oder Gasherden aufgestellt
werden.
¥ Ein Standort mit direkter Sonneneinstrahlung
sollte vermieden werden.
¥ Eine ausreichende Luftzirkulation an der
GerŠterŸckseite mu§ gewŠhrleistet sein.
Jegliche BeschŠdigung des KŸhlkreislaufes
ist zu vermeiden.
¥ NUR F†R GEFRIERSCHR€NKE
(EinbaugerŠte ausgenommen): ein optimaler
Aufstellungsort ist der Keller.
¥ Keine ElektrogerŠte (z.B. Eismaschinen) in
das GerŠt stellen.
Stšrungen - Kundendienst
¥ Sollte die Installation des GerŠtes eine €nderung
der elektrischen Hausinstallation verlangen, so
darf diese nur von Elektro-FachkrŠften
durchgefŸhrt werden.
¥ Eventuelle Reparaturen dŸrfen nur von einem
Kundendienst oder sonstigen autorisierten
Stellen durchgefŸhrt werden.
¥ Es ist wichtig, da§ nur Original-Ersatzteile
verwendet werden.
¥ Dieses GerŠt enthŠlt im KŠltekreislauf
Kohlenwasserstoff. Aus diesem Grund darf die
Wartung und das Nachfiillen ausschlie§lich von
autorisiertem Fachpersonal durchgefŸhrt werden.
¥ Benutzen Sie nie MetallgegenstŠnde um das
GerŠt zu reinigen, da es beschŠdigt werden
kšnnte.
¥ Tritt eine Stšrung oder ein Defekt ein, versuchen
Sie nicht, das GerŠt selbst zu reparieren.
ElektrogerŠte dŸrfen nur von Elektro-FachkrŠften
repariert werden, da durch unsachgemŠ§e
Reparaturen erhebliche FolgeschŠden entstehen
kšnnen. Wenden Sie sich bitte an die nŠchste
Kundendienststelle.
Aufstellung
¥ Sich vergewissern, da§ das GerŠt nach der
Installation nicht auf dem Netzkabel steht.
Wichtig:BeschŠdigte Versorgungskabel mŸssen
durch ein Spezialkabel bzw. einen Spezialsatz
ersetzt werden, die beim Hersteller oder den
Kundendienst erhŠltlich sind.
¥ WŠhrend das GerŠt in Betrieb ist, werden der
VerflŸssiger und der Kompressor, die sich auf der
RŸckseite des GerŠtes befinden, hei§. Es ist
darauf zuachten, dass die Luft um das GerŠt frei
zirkulieren kann, damit die WŠrme abgefŸhrt
werden kann. Eine ungenŸgende Luftzirkulation
kann einen unregelmŠssigen Betrieb bzw.
SchŠden am GerŠt verursachen. Achten Sie auf
die Installationsanweisungen.
¥ Teile, die hei§ werden (z.B. KompressorgehŠuse,
VerflŸssiger und zugehšrige Rohre), sollen nicht
frei zugŠnglich sein. Wo es auch immer mšglich
ist, soll das GerŠt mit der RŸckseite gegen eine
Wand gestellt werden.

3
¥ WŠhrend des Transports kann es vorkommen,
da§ das im Motorkompressor enthaltene …l in
den KŠltekreislauf ablŠuft. Man sollte mindestens
2 Std. warten, bevor das GerŠt in Betrieb
genommen wird, damit das …l in den
Kompressor zurŸckstršmen kann.
Gebrauch
¥ Die HaushaltskŸhl- und GefriergerŠte sind nur
zur Einlagerung bzw. zum Einfrieren von
Nahrungsmitteln bestimmt.
¥ Die beste Leistung erzielt man bei
Raumtemperaturen von +18¡C bis +43¡C (Klasse
T); +18¡C bis +38¡C (Klasse ST); +16¡C bis
+32¡C (Klasse N); +10¡C bis +32¡C (Klasse SN);
die GerŠteklasse ist auf dem Typschild
angegeben.
Zu beachten: Wird dieses GerŠtes bei anderen
Umgebungstemperaturen betrieben als den in
der entsprechenden Klimaklasse angegebenen
Werten, sind folgende Hinweise zu beachten:
sinkt die Umgebungstemperatur unter den
angegebenen Mindestwert ab, kšnnte die
Lagertemperatur im Gefrierabteil nicht mehr
garantiert sein; es wird daher empfohlen, die
eingelagerten Lebensmittel so rasch als mšglich
zu verbrauchen.
¥ Einaufgetautes Produkt darf nicht wieder
eingefroren werden.
¥ FŸr das Aufbewahren bzw. das Einfrieren der
Lebensmittel sind die Anweisungen des
Herstellers zu befolgen.
¥ In allen KŸhl- und GefriergerŠten bedecken sich
im Laufe der Zeit alle kŠltefŸhrenden Teile mit
einer Reif bzw. Eissicht. Diese Schicht wird je
nach Modell automatisch oder mit der Hand
abgetaut.
¥ Die Reifsicht niemals mit MetallgegenstŠnden
abkratzen, das GerŠt kšnnte beschŠdigt werden.
Dazu nur den mitgelieferten Plastikschaber
verwenden.
¥ Zum Lšsen der festgefrorenen Eisschalen keine
scharfkantigen oder spitzn GegenstŠnde
benutzen.
¥ Es sollten keine kohlensŠurehaltigen GetrŠnke in
das Gefrier- bzw. Frosterfach eingestellt werden,
sie kšnnten platzen.
Umweltnormen
Dieses GerŠt enthŠlt im KŸhlkreislauf und in der
Isolierung kein ozonschŠdigendes Gas. Das
GerŠt darf nicht mit dem HausmŸll entsorgt
werden. Eine BeschŠdigung des
KŠltemittelkreislaufs, insbesondere des
WŠrmetauschers auf der RŸckseite des GerŠtes,
mu§ verhindert werden. Auskunft Ÿber
Abholtermine oder SammelplŠtze gibt die
šrtliche Gemeindeverwaltung an. Die in diesem
GerŠt verwendeten und mit dem Symbol
gekennzeichneten Materialien,sind
recyclingfŠhig.
HINWEISE ZUR VERPACKUNGSENTSORGUNG
Verpackungen und Packhilfsmittel unserer Elektro-
Gro§gerŠte sind mit Ausnahme von Holzwerkstoffen
recyclingfŠhig und sollen grundsŠtzlich der
Wiederverwertung zugefŸhrt werden.
Wir empfehlen Ihnen:
¥ Papier-, Pappe- und Wellpappeverpackungen
sollten in die entsprechenden SammelbehŠlter
gegeben werden.
¥ Kunststoffverpackungsteile sollten ebenfalls in
die dafŸr vorgesehenen SammelbehŠlter
gegeben werden. Solange solche in Ihrem
Wohngebiet noch nicht vorhanden sind, kšnnen
Sie diese Materialien zum HausmŸll geben.
Als Packhilfsmittel sind bei uns nur recyclingfŠhige
Kunststoffe zugelassen, z.B.:
In den Beispielen steht
PE fŸr PolyŠthylen** 02 = ^ PE-HD; 04 = ^ PE-LD
PP fŸr Polypropylen
PS fŸr Polystyrol
BESTANDTEILE AUS PLASTIK
Zur einfacheren Entsorgung und/oder Recycling ist
ein Gro§teil der Materialien dieses GerŠtes
gekennzeichnet, um ihre Identifizierung zu
ermšglichen.
PS
SAN
ABS
02**
PE
05
PP
06
PS
2222 109-26

Reinigung der Innenteile
Bevor Sie das GerŠt in Betrieb nehmen, beseitigen
Sie den typischen ÇNeugeruchÈ am besten durch
Auswaschen der Innenteile mit lauwarmem Wasser
GEBRAUCH
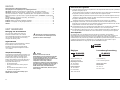
INHALT
Warnungen und wichtige Hinweise . . . . . . . . . . . . . . . . . . . . . . . . . . . . . . . . . . . . . . . . . . . . . . . . . .2
Hinweise zur Verpackungsentsorgung . . . . . . . . . . . . . . . . . . . . . . . . . . . . . . . . . . . . . . . . . . . . . . .3
Gebrauch - Reinigung der Innenteile- Inbetriebnahme - Temperaturregelung . . . . . . . . . . . . . . . . . . .4
Gebrauch - Hinweise zum richtigen KŸhlen von Lebensmitteln und GetrŠnken - Einfrieren von . . . . . .
frischen Lebensmitteln - Aufbewahrung der TiefkŸhlkost - Auftauen - EiswŸrfelbereitung . . . . . . . . . . . .
Gebrauch - Hšhenverstellbare Abstellregale . . . . . . . . . . . . . . . . . . . . . . . . . . . . . . . . . . . . . . . . . . . .5
Gebrauch - Hšhenverstellung der Abstellregale - Tips - Tips fŸr das KŸhlen - Tips fŸr das Einfrieren - .6
Tips - Tips fŸr TiefkŸhlkost - Wartung - RegelmŠ§ige Reinigung - Stillstandzeiten - Innenbeleuchtung . . .7
Wartung - Abtauen - Stšrungen . . . . . . . . . . . . . . . . . . . . . . . . . . . . . . . . . . . . . . . . . . . . . . . . . . . . . .8
Technische Daten - Installation - Aufstellung - Elektrischer Anschlu§ . . . . . . . . . . . . . . . . . . . . . . . .9
Installation - Montageanleitungen fŸr den integrierten Einbau . . . . . . . . . . . . . . . . . . . . . . . . . . . . . .10
und einem neutralen Reinigungsmittel SorgfŠltig
nachtrocknen.
Bitte keine Reinigungs- bzw. Scheuermittel
verwenden, die das GerŠt beschŠdigen kšnnten.
Inbetriebnahme
Netzstecker in die Steckdose einstecken.
KŸhlschranktŸr šffnen und Thermostatknopf von der
Stellung Ò0Ó (STOP) aus im Uhrzeigesinn drehen.
Den Stillstand erhŠlt man durch Drehen des
Thermostatknopfes auf Stellung ÇOÈ.
Temperaturregelung
Die Temperatur wird automatisch geregelt und kann
erhšht werden (wŠrmer) durch Drehen des Thermo-
statknopfes auf niedrigere Einstellungen oder verring-
ert (kŠlter) durch das Drehen auf hšhere Zahlen.
Die richtige Einstellung erhŠlt man, unter
BerŸcksichtigung folgender, die Innentemperatur
beeinflussender Faktoren:
¥ Raumtemperatur,
¥ HŠufigkeit des TŸršffnens,
¥ Menge der eingelagerten Lebensmittel,
¥ Aufstellung des GerŠtes.
Die mittlere Einstellung ist meistens die
geeignetste.
Wichtig
Hšchste KŠlteeinstellung bei hoher Raumtempe-
ratur und erheblicher Lebensmittelmenge kann
fortdauernden KŸhlschrank-Betrieb verursach-
en, dabei kann sich eine Reif- oder Eisschicht an
der hinteren Innenwand bilden. In diesem Falle
den Thermostatknopf auf wŠrmere Temperaturen
stellen, damit das automatische Abtauen, mit
folglich geringerem Stromverbrauch,
gewŠhrleistet werden kann.
4
61
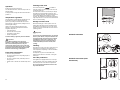
Aligning the appliance door (where
necessary)
Inserting the appliance door

5
Hinweise zum richtigen KŸhlen
von Lebensmitteln und GetrŠnken
Um die besten Leistungen des KŸhlschrankes zu
erreichen, beachten Sie bitte folgendes:
¥ Keine warmen Speisen oder dampfenden
FlŸssigkeiten in den KŸhlschrank einstellen.
¥ Geruchverbreitende Lebensmittel mŸssen
abgedeckt oder eingewickelt werden.
¥ Die Lebensmittel mŸssen so eingelagert werden,
da§ die KŠlte um sie frei zirkulieren kann.
Einfrieren von frischen Lebensmitteln
FŸr das Einfrieren von Lebensmitteln ist es nicht
nštig, die Thermostateinstellung zu Šndern. WŸnscht
man aber ein rasches Einfrieren, so mu§ der
Thermostatknopf auf die hšchste Stellung gedreht
werden. Sollte jedoch bei dieser Einstellung die
Temperatur im KŸhlraum unter 0¡C sinken, so mu§
eine niedrigere Reglerstellung gewŠhlt werden.
Aufbewahrung der TiefkŸhlkost
Nach einem lŠngeren Stillstand oder bei der ersten
Inbetriebnahme des GerŠtes mu§ vor der
Einlagerung der TiefkŸhlkost die hšchste Stellung
des Thermostatknopfes gewŠhlt werden. Nach ca. 2
Stunden kann dieser auf eine mittlere Stellung
zurŸckgedreht werden.
Wichtig
Unbeabsichtigt aufgetaute Lebensmittel,
beispielsweise wegen Stromausfall, mŸssen,
wenn der Betrieb fŸr lŠnger als die in der Tabelle
technische Daten unter der Position ãLagerzeit
bei StšrungÒ angegebene Dauer unterbrochen
ist, kurzfristig verbraucht oder sofort gekocht
und erneut eingefroren werden (nach
AbkŸhlung).
Auftauen
Die eingefrorenen oder tiefgekŸhlten Lebensmittel
sollten vor dem Gebrauch aufgetaut werden, indem
man sie am besten im KŸhlabteil oder je nach der
zur VerfŸgung stehenden Zeit bei Raumtemperatur
auftaut. Kleine StŸcke kšnnen eingefroren gekocht
werden. SelbstverstŠndlich verlŠngert sich dabei die
Kochzeit.
EiswŸrfelbereitung
Das GerŠt hat eine oder mehrere EiswŸrfelschalen,
welche mit Wasser aufgefŸllt in das Gefrierfach
gestellt werden.
Bitte zur Entnahme der EiswŸrfelschalen keine
MetallgegenstŠnde benutzen!
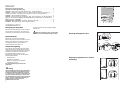
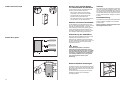
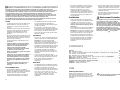
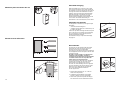
Hšhenverstellbare Abstellregale
Der Abstand zwischen den verschiedenen Abstellre-
galen kann je nach Wunsch geŠndert werden. Dazu
die Regale herausnehmen und auf das gewŸnschte
Niveau einsetzen.
Zur besseren Raumnutzung kšnnen die vorderen
Halbteile der Ablagen auf die rŸckwŠrtigen
hinautgelegt werden.
D338
60
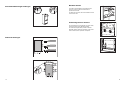
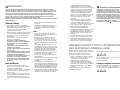
Install screw-head caps
Attach decor panel

TIPS
¥ Der Gefriervorgang dauert ca. 24 Stunden. In
dieser Zeit sollte keine zusŠtzliche Ware in das
Gefrierabteil eingelegt werden.
¥ Nur erstklassige, frische und gut gesŠuberte
Produkte einfrieren.
¥ Die Nahrungsmittel vor dem Einfrieren in kleine
Portionen einteilen, damit der Gefriervorgang
beschleunigt wird; dies ermšglicht das spŠtere
Auftauen von kleineren Portionen.
¥ Die Lebensmittel in Alu- oder PolyŠthylenfolien
luftdicht verpacken.
¥ Es soll vermieden werden, da§ die
einzufrierenden Lebensmittel mit den bereits
eingefrorenen in BerŸhrung kommen, um eine
WŠrmeŸbertragung an diese zu verhindern.
¥ Es ist zu beachten, da§ mageres Fleisch besser
und lŠnger haltbar ist. Fetthaltiges Fleisch hat
eine geringere Lagerzeit. Ferner reduziert Salz
die Haltbarkeitsdauer.
¥ Speiseeis, direkt aus dem Gefrierfach
genommen, kann KŠlte-Brandwunden
verursachen.
¥ Es ist empfehlenswert, auf der Verpackung das
Einfrierdatum zu notieren, damit die
Aufbewahrungszeit eingehalten werden kann.
¥ Es sollten keine kohlensŠurehaltigen
GetrŠnke in das Gefrierfach eingestellt
werden, da sie explodieren kšnnen.
Tips fŸr das Einfrieren
FŸr ein einwandfreies Einfrieren der Lebensmittel
geben wir folgende RatschlŠge:
¥ Das Gefriervermšgen des Gefrierabteils (in 24
Std.) kann auf dem Typenschild abgelesen
werden.
6
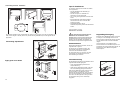
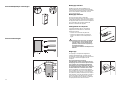
Hšhenverstellung der
Abstellregale
Zur Einlagerung von Lebensmittel-Packungen ver-
schiedener Grš§e, sind die Abstellregale der
innentŸr hšhenverstellbar.
Hierzu wie folgt vorgehen:
das Abstellregal stufenweise in Pfeilrichtung drŸcken
bis es frei wird; dann in der gewŸnschten Hšhe
wieder anbringen.
PR249
PR250
Tips fŸr das KŸhlen
Nachstehend einige praktische RatschlŠge:
Fleisch (alle Sorten) in Plastikfolie einpacken und
auf die Glasplatte, die sich Ÿber der GemŸseschale
(Ÿber den GemŸseschalen) befindet, legen.
In dieser Lage kann das Fleisch lŠngstens 1-2
Tage aufbewahrt werden.
Gekochte Nahrungsmittel, kalte Platten, usw.
zugedeckt aufbewahren. Sie kšnnen auf jeden
beliebigen Rost gelegt werden.
Obst und GemŸse: nach vorherigem SŠubern und
Waschen in der GemŸseschale (in den
GemŸseschalen) aufbewahren.
Butter und KŠse: in speziellen BehŠltern aufbe-
wahren oder in Alu- bzw. Plastikfolie einpacken, um
den Kontakt mit der Luft zu vermeiden.
Milch in Flaschen: gut verschlossen auf die Konsol
der InnentŸr stellen.
Wenn Bananen, Kartoffeln, Zwiebeln und
Knoblauch nicht verpackt sind, sollen sie nicht
in den KŸhlschrank gegeben werden.
59
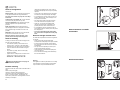
Screw the appliance into place
Attach ventilation grille, push
appliance into place

7
WARTUNG
Vor jeder Reinigungsarbeit immer den
Netzstecker aus der Steckdose ziehen.
Achtung: Dieses GerŠt enthŠlt im KŠltekreislauf
Kohlenwasserstoff. Aus diesem Grund darf die
Wartung und das Nachfiillen ausschlie§lich von
autorisiertem Fachpersonal durchgefŸhrt werden.
RegelmŠ§ige Reinigung
Benutzen Sie nie MetallgegenstŠnde um das GerŠt
zu reinigen, da es beschŠdigt werden kšnnte.
Den Innenraum mit lauwarmem Wasser und Natron
und die lackierten Teile mit einem Poliermittel
reinigen.
Gut nachwaschen und sorgfŠltig trocknen.
Den Kondensator und den Motorkompressor mit
einer BŸrste oder einem Staubsauger reinigen. Dies
begŸnstigt den guten Betrieb mit folglicher
Stromersparnis.
Tips fŸr TiefkŸhlkost
Um optimale Leistungen des GerŠtes zu erhalten,
sich vergewissern,
¥ da§ die TiefkŸhlkost beim VerkŠufer gut
aufbewahrt wurde
¥ da§ der Transport vom VerkŠufer zum
Verbraucher in kurzer Zeit erfolgt.
¥ TŸr so wenig wie mšglich šffnen und nicht offen
lassen.
¥ Einmal aufgetaute Lebensmittel verderben
schnell und kšnnen kein ein zweites Mal
eingefroren werden.
¥ Das Haltbarkeitsdatum auf der
TiefkŸhlkostverpackung sollte nicht Ÿberschritten
werden.
Stillstandszeiten
Bei lŠngerem Stillstand des GerŠtes, mŸssen Sie
folgenderma§en vorgehen:
den Stecker aus der Steckdose ziehen; alle
Lebensmittel herausnehmen; GerŠt abtauen,
Innenraum und Zubehšrteile reinigen;
die TŸren offen lassen, um im Innern eine gute
Luftzirkulation zu gewŠhrleisten und somit
Geruchsbildung zu vermeiden.
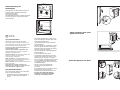
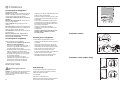
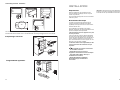
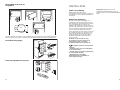
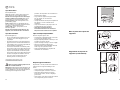
Innenbeleuchtung
Die Innenbeleuchtungslampe im KŸhlabteil ist durch
folgende Arbeitsschritte zugŠnglich:
¥ Lšsen Sie die Befestigungsschraube der
Lampenabdeckung.
¥ Heben Sie den beweglichen Teil ab, indem Sie
wie in der Abbildung gezeigt darauf drŸcken.
Sollte sich die Beleuchtung beim …ffnen der TŸre
nicht einschalten, ist zu ŸberprŸfen, ob die
GlŸhbirne fest eingeschraubt ist; wenn die Stšrung
dennoch bestehen bleibt, die defekte GlŸhbirne
durch eine neue Birne gleicher Leistung ersetzen.
Die maximale Leistung ist am Leuchtkšrper
angegeben.
D411
58
Apply joint cover fillets
The following installation steps are illustrated only when the door is hinged on the right (as supplied). If you
want the door hinged on the left, please carry out the following installation steps on the opposite side as
appropriate.
Performing adjustments
TŸranschlag wechseln
- Gefrierfach
180°

8
ST…RUNGEN
Falls das GerŠt Stšrungen aufweisen sollte,
ŸberprŸfen Sie zuerst folgendes:
¥ Steckt der Netzstecker in der Steckdose?
¥ Befindet sich der Hauptschalter der elektrischen
Anlage in der richtigen Stellung?
¥ Ist die Stromzufuhr unterbrochen?
¥ Befindet sich der Thermostatknopf in richtiger
Stellung?
¥ WasserpfŸtze auf dem Boden des KŸhlfaches:
¥ Abtauwasserloch verstopft? (siehe Abschnitt
ÒAbtauenÓ)
Sollten Sie nach o.e. PrŸfungen zu keinem Resultat
kommen, so wenden Sie sich bitte an unseren
nŠchsten Kundendienst.
Um ein rasches Beheben des Schadens zu
ermšglichen, ist es beim Anruf an den
Kundendienst notwendig, die Modell- und
Seriennummer anzugeben, die Sie dem
Garantieschein oder dem Typenschild (Ð linke
Seite Ð unten) entnehmen kšnnen.
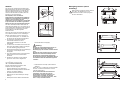
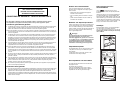
Abtauen
Die sich auf dem Verdampfer des KŸhlschrankes
bildende Reifschicht taut jedesmal in den Stillstand-
zeiten des Motorkompressors von selbst ab. Das
Tauwasser lŠuft durch eine Rinne in eine Plastik-
schale auf der RŸckseite des GerŠtes (Ÿber dem
Kompressor) und verdunstet dort.
Wir empfehlen, das in der Mitte der
Abtauwasserrinne des KŸhlraumes befindliche
Ablaufloch fŸr das Abtauwasser regelmŠ§ig zu
reinigen, um zu vermeiden, da§ das
Abtauwasser auf die eingelagerten Lebensmittel
tropft. Verwenden Sie den dafŸr vorgesehenen
Reiniger,der sich schon im Ablaufloch befindet.
Die sich im Gefrierfach bildende Reifschicht soll,
sobald diese eine StŠrke von 4 mm erreicht hat, mit
einem Plastikschaber abgekratzt werden. WŠhrend
dieses Vorganges ist es nicht nštig, das GerŠt
auszuschalten und die Nahrungsmittel
herauszunehmen.
Wenn sich jedoch eine dicke Eisschicht bildet, mu§
man vollkommen abtauen. Um ein vollstŠndiges
Abtauen durchzufŸhren, geht man wie folgt vor:
1. Den Thermostatknopf auf ÇOÈ einstellen oder
den Stecker aus der Steckdose herausziehen.
2. Die eventuell im Frosterfach liegenden
Lebensmittel herausnehmen, sie in
Zeitungspapier einwickeln und sehr kŸhl
aufbewahren.
3. TŸr offen lassen. Ein GefŠ§ auf den ersten Rost
direkt unter das Ablaufloch stellen. Den Stšpsel
wie in der Abbildung gezeigt entfernen.
4. Nach beendetem Abtauproze§ das Gefrierteil gut
nachtrocknen und den Stšpsel wieder
hineingeben.
5. Den Thermostatknopf wieder in die gewŸnschte
Stellung drehen bzw. den Stecker wieder
einstecken.
6. Nachdem das GerŠt fŸr 2-3 Std. in Betrieb
genommen wurde, kšnnen tiefgefrorene
D037
Lebensmittel darin zurŸckgelegt
Achtung:
Benutzen Sie niemals MetallgegenstŠnde, um
die Reifschicht abzukratzen, damit eine
BeschŠdigungen des GerŠtes vermieden werden
kann.
Benutzen Sie kein mechanisches oder anderes
Mittel fŸr einen schnelleren Abtauproze§ mit
Ausnahme der vom Hersteller empfohlenen.
Ein Temperaturanstieg der TiefkŸhlkost wŠhrend
des Abtauens kšnnte die Aufbewahrungsdauer
verkŸrzen.
PR151
57
Rehingeing the door (where
necessary)
Warning! When changing the side at which the
door opens, the appliance may not be
connected to the mains. Remove plug from
the mains beforehand.

Elektrischer Anschlu§
Bevor Sie den Stecker in die Steckdose einstecken,
ŸberprŸfen Sie bitte, da§ die auf dem Typenschild
des GerŠtes angegebene Spannung sowie
Frequenz mit dem Anschlu§wert des Hauses
Ÿbereinstimmen. Eine Abweichung von ±6% von der
Nominalspannung ist zulŠssig. FŸr die Anpassung
des GerŠtes an andere Spannungen mu§ ein
Spartransformator angemessener Leistung
vorgeschaltet werden.
Das GerŠt mu§ unbedingt vorschriftsmŠ§ig geerdet
werden. Zu diesem Zweck ist der Stecker des
Speisekabels mit dem dafŸr vorgesehenen Kontakt
versehen. Sollte die Netzleitung im Haus nicht mit
einer Erdleitung versehen sein, so mu§ das GerŠt
an eine getrennte Erdleitung vorschriftsmŠ§ig und
unter Hinzuziehung eines Fachmanns
angeschlossen werden.
Die Erzeugerfirma lehnt jede Verantwortung ab,
falls diese UnfallverhŸtungsvorschrift nicht
beachtet wird.
Dieses GerŠt entspricht der folgende EWG
Richtlinie:
- 87/308 EWG vom 2.6.87 (Deutschland-
AusfŸhrung) bzw. der …VE-Richtlinie Nr. F 61/84
(…sterreich-AusfŸhrung) bezŸglich
INSTALLATION
Aufstellung
Das GerŠt sollte nicht in der NŠhe von
WŠrmequellen wie Heizkšrpern oder …fen
aufgestellt und vor direkter Sonneneinstrahlung
geschŸtzt werden. FŸr den Einbau bitte den
entsprechenden Abschnitt durchlesen.
Funkentstšrung.
- 73/23 EWG vom 19/02/73 (Niederspannung) und
folgende €nderungen;
- 89/336 EWG vom 03/05/89 (Elektromagnetische
VertrŠglichkeit) und folgende €nderungen.
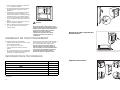
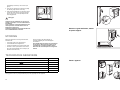
TECHNISCHE DATEN
Euro- Effizenz-Klasse A
123
17
0,60
219
2
12
Nutzinhalt des KŸhlschrankes in Liter
Energieverbrauch in kWh/24h
Energieverbrauch in kWh/Jahr
Gefrierleistung kg/24h
Lagerzeit bei Stšrung -18¡/-9¡C in h
Nutzinhalt des in Liter
Die Technische Daten kšnnen Sie auf dem Typschild feststellen. Das Typschild befindet sich links unten an der
Seitewand.
Achtung:
Es mu§ mšglich sein, das GerŠt vom Netz zu
trennen; nach der Installation mu§ sie Steckdose
daher zugŠnglich bleiben.
9
56
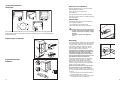
Aligning the furniture housing
100
90°
90°
Detaching the appliance door
Instructions for totally built-in
appliances
Building-in instructions
Dimensions of housing
Height 880 mm
Depth 550 mm
Width 560 mm
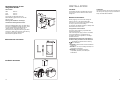
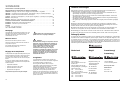
For safety reasons, minimum ventilation must be as
shown in Fig.
Attention: keep ventilation openings clear of
obstruction.
Air is taken in through the ventilation grille at the
bottom of the appliance, but an air outlet ÒgapÓ,
measuring 50 mm deep by 540 mm wide (Fig.),
must be provided in the rear of the kitchen unit. This
outlet gap must also be kept clear between the top
of the unit and the ceiling.

10
Mšbelschrank ausrichten
100
90°
90°
GerŠtetŸr abnehmen
Montageanleitung fŸr den
integrierten Einbau
Nischenma§e
Hšhe 880 mm
Tiefe 550 mm
Breite 560 mm
Aus GrŸnden der Sicherheit mu§ eine
MindestbelŸftung gesichert sein, wie aus der
Abb.hervorgeht.
Achtung: Die Ventilations - …ffnungen
mŸssenimmer saubergehalten werden.
Durch das EntlŸftungsgitter unten am GerŠt stršmt
die Luft ein; die EntlŸftung erfolgt nach oben. DafŸr
mu§ an der RŸckseite der Schranknische ein
ÇKaminschachtÈ vorgesehen werden. Der
Kaminschacht mu§ folgende Abmessungen haben:
Tiefe 50 mm, Breite 540 mm (Abb.). Diese …ffnung
mu§ auch oben zwischen Schrank und
Zimmerdecke eingehalten werden.
55
ATTENTION!
It must be possible to disconnect the appliance from
the mains power supply; the plug must therefore be
easily accessible after installation.
INSTALLATION
Location
The appliance should be installed well away from
sources of heat such as radiators, boilers, direct
sunlight etc.
Electrical connection
Before plugging in, ensure that the voltage and
frequency shown on the serial number plate
correspond to your domestic power supply. Voltage
can vary by ±6% of the rated voltage.
For operation with different voltages, a suitably sized
auto-transformer must be used.
The appliance must be earthed.
The power supply cable plug is provided with a
contact for this purpose.
If the domestic power supply socket is not earthed,
connect the appliance to a separate earth in
compliance with current regulations, consulting a
specialist technician.
The Manufacturer declines all responsibility if
the above safety precautions are not observed.
This appliance complies with the following
E.E.C. Directives:
- 87/308 EEC of 2/6/87 relative to radio interference
suppression.
- 73/23 EEC of 19.2.73 (Low Voltage Directive) and
subsequent modifications;
- 89/336 EEC of 3.5.89 (Electromagnetic
Compatibility Directive) and subsequent
modifications.

11
TŸranschlag wechseln (falls erforderlich)
Warnung! WŠhrend des TŸranschlagwechsels
darf das GerŠt nicht am Stromnetz
angeschlossen sein. Vorher Netzstecker
ziehen.
54
TECHNICAL INFORMATION
Energy Efficiency Class A
123
17
0,60
219
2
12
Net Fridge Capacity lt.
Energy Consumption kWh/24h
Energy Consumption kWh/annuo
Freezing Capacity kg/24h
Rising Time
Net Capacity lt.
The Technical info are on the rating plate situated on the left inside the appliance.
CUSTOMER SERVICE AND SPARE PARTS
If the appliance is not functioning properly, check
that:
¥ the plug is firmly in the wall socket and the mains
power switch is on;
¥ there is an electricity supply (find out by plugging
in another appliance);
¥ the thermostat knob is in the correct position.
¥ If there are water drops on the bottom of the
cabinet, check that the defrost water drain
opening is not obstructed (see ÒDefrostingÓ
section).
¥ If your appliance is still not working properly after
making the above checks, contact the nearest
service centre.
To obtain fast service, it is essential that when you
apply for it you specify the model and serial number
of your appliance which can be found on the
guarantee certificate or on the rating plate located
inside the appliance, on the bottom left-hand side.
3. leave the door open, place a basin on the top
shelf of the refrigerator compartment, under the
drain hole, remove the plug as shown in the
figure;
4. when defrosting is completed, dry the interior
thoroughly and refit the plug;
5. turn the thermostat knob back to the required
setting or replace the plug in the power socket.
6. After two or three hours, reload the previously
removed food into the compartment.
Important:
Never use sharp metal tools to scrape off frost
from the evaporator as you could damage it.
Do not use a maechanical device or any artificial
means to speed up the thawing process other
than those recommended by the manufacturer.
A temperature rise of the frozen food packs,
during defrosting, may shorten their safe
storage life.
PR151

12
Fugenabdeckleisten
ankleben
Anpassungen vornehmen
Die nachfolgenden Montageschritte sind nur fŸr TŸranschlag rechts (Lieferzustand) dargestellt. Bei
TŸranschlag links, bitte die nachfolgenden Montageschritte entsprechend auf der gegenŸberliegenden
GerŠteseite ausfŸhren.
TŸranschlag wechseln
-
Gefrierfach
180°
53
Periods of non-operation
When the appliance is not in use for long periods,
take the following precautions:
remove the plug from the wall socket;
remove all food;
defrost and clean the interior and all accessories;
leave the door ajar to allow air to circulate to prevent
unpleasant smells.
Interior light
The light bulb inside the refrigerator compartment
can be reached as follows:
- unscrew the light cover securing screw.
- unhook the moving part as shown in the figure.
If the light does not come on when the door
is open, check that it is screwed into place
properly. If it still does not light up, change
the bulb.
The rating is shown on the light bulb
cover.
D411
Defrosting
Frost is automatically eliminated from the evaporator
of the refrigerator compartment every time the motor
compressor stops, during normal use. The defrost
water drains out through a trough into a special
container at the back of the appliance, over the
motor compressor, where it evaporates.
It is important to periodically clean the defrost
water drain hole in the middle of the refrigerator
compartment channel to prevent the water
overflowing and dripping onto the food inside.
Use the special cleaner provided, which you will
find already inserted into the drain hole.
The freezer compartment, however, will become
progressively covered with frost. This should be
removed with a plastic scraper, whenever the
thickness of the frost exceeds 4 mm. During this
operation it is not necessary to switch off the power
supply or to remove the foodstuffs.
Never use sharp metal tools to scrape off frost
from the evaporator as you could damage it.
However, when the ice becomes very thick on the
inner liner, complete defrosting should be carried out
as follows:
1. pull out the plug from the wall socket or turn the
thermostat knob to the ÇOÈ setting;
2. remove any stored food, wrap it in several layers
of newspaper and put it in a cool place;
D037

13
GerŠt festschrauben
Gitter aufstecken und GerŠt
einschieben
52
Periodic cleaning
Clean the inside with warm water and bicarbonate of
soda.
Rinse and dry thoroughly.
Clean the condenser (black grill) and the
compressor at the back of the appliance with a
brush or a vacuum cleaner. This operation will
improve the performance of the appliance and save
electricity consumption.
MAINTENANCE
Hints for storage of frozen food
To obtain the best performance from this appliance,
you should:
¥ make sure that the commercially frozen
foodstuffs were adequately stored by the retailer;
¥ be sure that frozen foodstuffs are transferred
from the foodstore to the freezer in the shortest
possible time;
¥ not open the door frequently or leave it open
longer than absolutely necessary.
¥ Once defrosted, food deteriorates rapidly and
cannot be refrozen.
¥ Do not exceed the storage period indicated by
the food manufacturer.
Unplug the appliance before carrying out
any maintenance operation.
rapidly and completely frozen and to make it
possible subsequently to thaw only the quantity
required;
¥ wrap up the food in aluminium foil or polythene
and make sure that the packages are airtight;
¥ do not allow fresh, unfrozen food to touch food
which is already frozen, thus avoiding a rise in
temperature of the latter;
¥ lean foods store better and longer than fatty
ones; salt reduces the storage life of food;
¥ water ices, if consumed immediately after
removal from the freezer compartment, can
possibly cause the skin to be freeze burnt;
¥ it is advisable to show the freezing-in date on
each individual pack to enable you to keep tab of
the storage time;
¥ do not put carbonated liquids (fizzy drinks,
etc.) in the freezer compartment as they may
burst.
Hints for freezing
To help you make the most of the freezing process,
here are some important hints:
¥ the maximum quantity of food which can be
frozen in 24 hrs. is shown on the rating plate;
¥ the freezing process takes 24 hours. No further
food to be frozen should be added during this
period;
¥ only freeze top quality, fresh and thoroughly
cleaned, foodstuffs;
¥ prepare food in small portions to enable it to be
HINTS
Warning
This appliance contains hydrocarbons in its cooling
unit; maintenance and recharging must therefore
only be carried out by authorized technicians.
Hints for refrigeration
Useful hints:
Meat (all types): wrap in polythene bags and place
on the glass shelf above the vegetable drawer.
For safety, store in this way only one or two days
at the most.
Cooked foods, cold dishes, etc..: these should be
covered and may be placed on any shelf.
Fruit and vegetables: these should be thoroughly
cleaned and placed in the special drawer(s)
provided.
Butter and cheese: these should be placed in
special airtight containers or wrapped in aluminium
foil or polythene bags to exclude as much air as
possible.
Milk bottles: these should have a cap and should
be stored in the bottle rack on the door.
Bananas, potatoes, onions and garlic, if not
packed, must not be kept in the refrigerator.

14
Dekorsatz anbringen
Schraubenabdeckungen anbringen
51
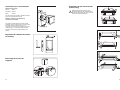
Movable shelves
The walls of the refrigerator are equipped with a
series of runners so that the shelves can be
positioned as desired.
For better use of space, the front half-shelves can lie
over the rear ones.
D338
Positioning the door shelves
To permit storage of food packages of various sizes,
the door shelves can be adjusted in height.
To make these adjustments proceed as follows:
Gradually pull the shelf in the direction of the arrows
until it comes off, then reposition as required.
PR249
PR250

15
GerŠtetŸr ausrichten (falls
erforderlich)
GerŠtetŸr einsetzen
50
Operation
Insert the plug into the wall socket.
Turn the thermostat knob ,clockwise, beyond the ÒOÓ
(STOP) position.
To stop operation, simply turn the thermostat knob to
position ÒOÓ.
Temperature regulation
The temperature is automatically regulated and can
be increased to achieve a higher temperature
(warmer) by rotating the thermostat knob toward
lower settings or reduced (colder) rotating the knob
towards higher settings.
However, the exact setting should be chosen
keeping in mind that the temperature inside the
refrigerator depends on:
¥ room temperature;
¥ how often the door is opened;
¥ the quantity of food stored;
¥ location of appliance.
A medium setting is generally the most suitable.
Important
If the ambient temperature is high or the
appliance is fully loaded, and the appliance is
set to the lowest temperatures, it may run
continuously causing frost to form on the rear
wall. In this case the dial must be set to a higher
temperature to allow automatic defrosting and
therefore reduced energy consumption.
Fresh food refrigeration
To obtain the best performance:
¥ do not store warm food or evaporating liquids in
the refrigerator;
¥ do cover or wrap the food, particularly if it has a
strong flavour.
¥ Position food so that air can circulate freely round
it.
Freezing fresh food
The 4-star compartment is suitable for
long term storage of commercially frozen food, and
for freezing fresh food.
To freeze fresh foods It is not necessary to change
the setting of the thermostatknob. However, for a
quicker freezing operation, turn the thermostat knob
to the coldest setting; but remeber that, in this
condition, the refrigerator compartment temperature
might drop below 0¡C. If this occurs reset thermostat
knob to a warmer setting.
Ice-cube production
This appliance is equipped with one or more trays
for the production of ice-cubes. Fill these trays with
water, then put them in the freezer compartment.
Do not use metallic instruments to remove the
trays from the freezer.
Thawing
Deep-frozen or frozen food, prior to being used, can
be thawed in the refrigerator compartment or at
room temperature, depending on the time available
for this operation.
Small pieces may even be cooked still frozen,
directly from the freezer: in this case, cooking will
take longer.
Storage of frozen food
When first starting-up or after a period out of use,
before putting the products in the compartment let
the appliance run at least two hours on the coldest
setting, then turn the thermostat knob to the normal
operating position.
Important
In the event of accidental defrosting, for example
due to a power failure, if the power has been off
for longer that the value shown in the technical
characteristics chart under Òrising timeÓ, the
defrosted food must be consumed quickly or
cooked immediately and then refrozen (after
cooling).

16
AVERTISSEMENTS ET CONSEILS IMPORTANTS
Il est tr•s important que cette notice dÕutilisation soit gardŽe avec lÕappareil pour toute future
consultation. Si cet appareil devait •tre vendu ou transfŽrŽ ˆ une autre personne, assurez-vous que la
notice dÕutilisation suive lÕappareil, de fa•on ˆ ce que le nouvel utilisateur puisse •tre informŽ du
fonctionnement de celui-ci et des avertissements relatifs.Si cet appareil, muni de fermeture
magnŽtique, doit •tre employŽ pour en remplacer un autre avec une fermeture ˆ ressort, nous vous
conseillons de rendre celle-ci inutilisable avant de mettre lÕancien appareil de c™tŽ. Cela dans le but
dÕŽviter que des enfants puissent sÕy renfermer et se mettre ainsi en danger de mort.
Ces avertissements sont donnŽs pour votre sžretŽ et pour celle dÕautrui.Nous vous prions donc de
bien vouloir les lire attentivement avant dÕinstaller et dÕutiliser lÕappareil.
SžretŽ
¥ Cet appareil a ŽtŽ con•u pour •tre utilisŽ par des
adultes. Veillez donc ˆ ce que les enfants nÕy
touchent pas ou quÕils ne lÕutilisent pas comme
un jouet.
¥ DŽbranchez toujours la prise de courant avant de
procŽder au nettoyage intŽrieur et extŽrieur de
lÕappareil et au remplacement de la lampe
dÕŽclairage (pour les appareils qui en sont
ŽquipŽs).
¥ Ne consommez pas certains produits tels que les
b‰tonnets glacŽs d•s leur sortie de lÕappareil; la
tempŽrature tr•s basse ˆ laquelle ils se trouvent
peut provoquer des bržlures.
¥ Cet appareil est lourd. Faites attention lors du
dŽplacement.
¥ Faites tr•s attention lorsque vous dŽplacez
lÕappareil afin de ne pas endommager des
parties du circuit de rŽfrigŽrant et ainsi
dÕŽviter le risque de fuites de liquide.
¥ LÕappareil ne doit pas •tre situŽ ˆ proximitŽ
de radiateurs ou cuisini•res ˆ gaz.
¥ Evitez une exposition prolongŽe de lÕappareil
aux rayons solaires.
¥ II doit y avoir une circulation dÕair suffisante ˆ
la partie arri•re de lÕappareil et il faut Žviter
tout endommagement du circuit rŽfrigŽrant.
¥ Seulement pour congŽlateurs (sauf mod•les
encastrŽs): un emplacement optimal est la
cave.
¥ Ne pas mettre dÕinstruments Žlectriques ˆ
lÕintŽrieur de lÕappareil (sorbeti•re, par
exemple).
Service/RŽparation
¥ Une Žventuelle modification ˆ lÕinstallation
Žlectrique de votre maison qui devait •tre nŽces-
saire pour lÕinstallation de lÕappareil ne devra •tre
effectuŽe que par du personnel qualifiŽ.
¥ Il est dangereux de modifier ou dÕessayer de
modifier les caractŽristiques de cet appareil.
¥ Cet appareil contient des hydrocarbures dans
son circuit de rŽfrigŽrant; IÕentretien et la
recharge ne doivent done •tre effectuŽs que par
du personnel autorisŽ.
¥ En cas de panne, nÕessayez pas de rŽparer
lÕappareil vous-m•me. Les rŽparations effectuŽes
par du personnel non qualifiŽ peuvent provoquer
des dommages. Contactez le Service Apr•s-
Vente le plus proche et nÕexigez que des pi•ces
dŽtachŽes originales.
Installation
¥ Assurez-vous, apr•s avoir installŽ lÕappareil, que
celuici ne repose pas sur le c‰ble dÕalimentation.
Important: en cas de dommage au c‰ble
dÕalimentation, il faudra le remplacer avec un
c‰ble spŽcial ou un ensemble disponibles chez le
fabricant ou le service technique aprŽs-vente.
¥ LÕappareil se rŽchauffe sensibilment au niveau du
condenseur et du compresseur. Veillez ˆ ce que
lÕair circule librement tout autour de lÕappareil.
Une ventilation insuffisante entra“nerait un
mauvais fonctionnement et des dommages sur
lÕappareil. Suivez les instructions donnŽes pour
lÕinstallation.
¥ A cause du syst•me de transport, lÕhuile
contenue dans le compresseur pourrait sÕŽcouler
dans le circuit rŽfrigŽrant. Attendez 2 heures au
moins avant de brancher lÕappareil pour
permettre ˆ lÕhuile de refluer dans le
compresseur.
Utilisation
¥ Les rŽfrigŽrateurs et/ou congŽlateurs mŽnagers
sont destinŽs uniquement ˆ la conservation et/ou
congŽlation des aliments et des boissons.
¥ Pour le bon fonctionnement de votre appareil, la
tempŽrature ambiante du local doit •tre comprise
entre +18¡C et +43¡C (Classe T); +18¡C et
+38¡C (Classe ST); +16¡C et +32¡C (Classe N);
+10¡C et +32¡C (Classe SN); La classe
dÕappartenance est indiquŽe sur la plaque
signalŽtique.
49
Cleaning the interior
Before using the appliance for the first time, wash
the interior and all internal accessories with luke-
warm water and some neutral soap so as to remove
the typical smell of a brand-new product, then dry
thoroughly.
USE
Do not use detergents or abrasive powders,
as these will damage the finish.
CONTENTS
Warnings . . . . . . . . . . . . . . . . . . . . . . . . . . . . . . . . . . . . . . . . . . . . . . . . . . . . . . . . . . . . . . . . . . . . . . . . . . .48
Use - Cleaning the interior . . . . . . . . . . . . . . . . . . . . . . . . . . . . . . . . . . . . . . . . . . . . . . . . . . . . . . . . . . . . . . . . .49
Use - Operation - Temperature regulation - Fresh food refrigeration - Freezing fresh food - Storage of frozen .
food - Thawing - Ice-cube production . . . . . . . . . . . . . . . . . . . . . . . . . . . . . . . . . . . . . . . . . . . . . . . . . . . . . . . . . . .50
Use - Movable shelves - Positioning the dor shelves . . . . . . . . . . . . . . . . . . . . . . . . . . . . . . . . . . . . . . . . . . . . . .51
Hints - Hints for refrigeration - Hints for freezing - Hints for storage of frozen food - Maintenance . . . . . . . .
Maintenance - Periods of no operation . . . . . . . . . . . . . . . . . . . . . . . . . . . . . . . . . . . . . . . . . . . . . . . . . . . .52
Maintenance - Periodic cleaning - Interior light - Defrosting . . . . . . . . . . . . . . . . . . . . . . . . . . . . . . . . . . . . .53
Customer service and spareparts - Technical information . . . . . . . . . . . . . . . . . . . . . . . . . . . . . . . . . . .54
Installation - Location - Electrical connection . . . . . . . . . . . . . . . . . . . . . . . . . . . . . . . . . . . . . . . . . . . . . . . .55
Installation - Building-in instructions . . . . . . . . . . . . . . . . . . . . . . . . . . . . . . . . . . . . . . . . . . . . . . . . . . . . . .56
¥ Do not place carbonated or fizzy drinks in the
freezer as it creates pressure on the container,
which may cause it to explode, resulting in
damage to the appliance. Do not use a
mechanical device or any artificial means to
speed up the thawing process other than those
recommended by the manufacturer. Never use
metal objects for cleaning your appliance as it
may get damaged.
Installation
¥ During normal operation, the condenser and
compressor at the back of the appliance heat up
considerably. For safety reasons, minimum
ventilation must be as shown in the instructions.
Attention: keep ventilation openings clear of
obstruction.
¥ Care must be taken to ensure that the appliance
does not stand on the electrical supply cable.
Important: if the supply cord is damaged, it must
be replaced by a special cord or assembly availa-
ble from the manufacturer or its service agent.
¥ If the appliance is transported horizontally, it is
possible that the oil contained in the compressor
flows in the refrigerant circuit. It is advisable to
wait at least two hours before connecting the
appliance to allow the oil to flow back in the
compressor.
¥ There are working parts in this product which
heat up. Always ensure that there is adequate
ventilation as a failure to do this will result in
component failure and possible food loss. See
installation instructions.
¥ Parts which heat up should not be exposed.
Wherever possible the back of the product
should be against a wall.
Environment Protection
This appliance does not contain gasses which
could damage the ozone layer, in either its
refrigerant circuit or insulation materials. The
appliance shall not be discarded together with
the urban refuse and rubbish. Avoid damaging
the cooling unit, especially at the rear near the
heat exchanger. Information on your local
disposal sites may be obtained from municipal
authorities. The materials used on this appliance
marked by the symbol are recyclable.

17
RENSEIGNEMENTS POUR LÕƒLIMINATION
DES MATƒRIAUX DÕEMBALLAGE
Tous les matŽriaux et les accessoires utilisŽs pour
emballer nos grands ŽlectromŽnagers, sauf ceux qui
sont en bois recyclables et peuvent donc se
rŽcupŽrer. Voici ce que nous vous conseillons:
¥ DŽposez les emballages en papier, en carton et
en carton ondulŽ aux endroits prŽvus pour le
ramassage de ce genre de matŽriau.
¥ Mettez les piŽces en plastique dans les
conteneurs prŽvus ˆ cet effet. Si ce genre de
conteneurs nÕexistent pas encore ˆ lÕendroit o•
vous habitez, vous pouvez Žliminer les matŽriaux
en question en les mettant dans les ordures
mŽnag•res.
Pour les emballages de mati•res plastiques
recyclables, par example:
Les exemples reportent les symboles suivants:
PE pour polyŽthyl•ne** 02 = ^ PE-HD; 04 = ^ PE-LD
PP pour le polypropyl•ne
PS pour le polystyr•ne
PIƒCES EN MATIƒRE PLASTIQUE
Pour faciliter lÕŽlimination et :ou le recyclage des
matŽriaux, la plupart des pi•ces de lÕappareil ont
une contremarque qui en facilite lÕindentification.
PS
SAN
ABS
02**
PE
05
PP
06
PS
ATTENTION: En dehors des tempŽratures
ambiantes indiquŽes par la classe climatique
dÕappartenance de ce produit, il est obligatoire de
respecter les indications suivantes: lorsque la
tempŽrature ambiante descend sous la valeur
minimum, la tempŽrature de conservation du
compartiment congŽlateur peut ne pas •tre
garantie; il est donc conseillŽ de consommer les
produits que ce dernier contient au plus vite.
¥ Un produit dŽcongelŽ ne doit jamais •tre
recongelŽ.
¥ Suivez les indications du fabricant pour la
conservation et/ou congŽlation des aliments.
¥ Dans tous les appareils de rŽfrigŽration et
congŽlation il y a des surfaces qui se couvrent de
givre. Suivant le mod•le, ce givre peut •tre
ŽliminŽ automatiquement (dŽgivrage
automatique) ou bien manuellement.
¥ NÕessayez jamais dÕenlever le givre avec un objet
mŽtallique, vous risqueriez dÕendommager
irrŽparablement lÕŽvaporateur. NÕemployez pour
cela que la spatule en plastique livrŽe avec
lÕappareil.
¥ De m•me, ne dŽcollez jamais les bacs ˆ glace
avec un couteau ou tout autre objet tranchant.
¥ Ne placez ni bouteilles ni bo”tes de boissons
gazeuses dans le congŽlateur/compartiment ˆ
basse tempŽrature, elles pourraient exploser.
Protection de lÕenvironnement
Cet appareil ne contient pas, dans son circuit de
rŽfrigŽrant et ses mati•res isolantes, de gaz
rŽfrigŽrant nocifs ˆ la couche dÕozone. LÕappareil
ne doit pas •tre mis au rebut avec les ordures
urbaines et la ferraille. Il faut Žviter dÕendom-
mager le circuit de rŽfrigŽrant, surtout ˆ lÕarri•re
de lÕappareil, pr•s de lÕŽnchangeur thermique.
Vous pouvez vous renseigner sur les centres de
ramassage aupr•s de votre bureau municipal.
Les matŽriaux utilisŽs dans cet appareil
identifiŽs par le symbole sont recyclables.
48
WARNINGS
It is most important that this instruction book should be retained with the appliance for future
reference. Should the appliance be sold or transferred to another owner, or should you move house
and leave the appliance, always ensure that the book is supplied with the appliance in order that the
new owner can be acquainted with the functioning of the appliance and the relevant warnings.
If this appliance featuring magnetic door seals is to replace an older appliance having a spring lock
(latch) on the door or lid, be sure to make that spring lock unusable before you discard the old
appliance. This will prevent it from becoming a death-trap for a child.
These warnings are provided in the interest of safety. You must read them carefully before installing or
using the appliance.
General Safety
¥ This appliance is designed to be operated by
adults. Children should not be allowed to tamper
with the controls or play with the product.
¥ It is dangerous to alter the specifications or
modify this product in any way.
¥ Before any cleaning or maintenance work is carried
out, be sure to switch off and unplug the appliance.
¥ This appliance is heavy. Care should be taken
when moving it
¥ Ice lollies can cause frost burns if consumed
straight from the appliance.
¥ Take utmost care when handling your
appliance so as not to cause any damages to
the cooling unit with consequent possible
fluid leakages.
¥ The appliance must not be located close to
radiators or gas cookers.
¥ Avoid prolonged exposure of the appliance to
direct sunlight.
¥ There must be adequate ventilation round the
back of the appliance and any damage to the
refrigerant circuit must be avoided.
¥ For freezers only (except built-in models): an
ideal location is the cellar or basement.
¥ Do not use other electrical appliances (such
as ice cream makers) inside of refrigerating
appliances.
Service/Repair
¥ Any electrical work required to install this
appliance should be carried out by a qualified
electrician or competent person
¥ This product should be serviced by an authorized
Service Centre, and only genuine spare parts
should be used.
¥ Under no circumstances should you attempt to
repair the appliance yourself. Repairs carried out
by inexperienced persons may cause injury or
more serious malfunctioning. Refer to your local
Service Centre, and always insist on genuine
spare parts.
¥ This appliance contains hydrocarbons in its
cooling unit; maintenance and recharging must
therefore only be carried out by authorized
technicians.
Use
¥ The domestic refrigerators and freezers are
designed to be used specifically for the storage
of edible foodstuffs only.
¥ Best performance is obtained with ambient
temperature between +18¡C and +43¡C (class
T); +18¡C and +38¡C (class ST); +16¡C and
+32¡C (class N); +10¡C and +32¡C (class SN).
The class of your appliance is shown on its rating
plate.
Warning: when the ambient temperature is not
included within the range indicated for the class
of this appliance, the following instructions must
be observed: when the ambient temperature
drops below the minimum level, the storage
temperature in the freezer compartment cannot
be guaranteed; therefore it is advisable to use
the food stored as soon as possible.
¥ Frozen food must not be re-frozen once it has
been thawed out.
¥ ManufacturersÕ storage recommendations should
be strictly adhered to. Refer to relevant
instructions.
¥ The inner lining of the appliance consists of
channels through which the refrigerant passes. If
these should be punctured this would damage the
appliance beyond repair and cause food loss. DO
NOT USE SHARP INSTRUMENTS to scrape off
frost or ice. Frost may be removed by using the
scraper provided. Under no circumstances should
solid ice be forced off the liner. Solid ice should be
allowed to thaw when defrosting the appliance.

18
SOMMAIRE
Avertissements et conseils importants . . . . . . . . . . . . . . . . . . . . . . . . . . . . . . . . . . . . . . . . . . . . . .16
Renseignements pour lÕŽlimination des matŽriaux dÕemballage . . . . . . . . . . . . . . . . . . . . . . . . . .17
Utilisation - Nettoyage - Mise en service - RŽglage de la tempŽrature - CongŽlation . . . . . . . . . . . . .18
Utilisation - Conservation des produits surgelŽs - DŽcongŽlation - Gla•ons - Tablettes amovibles . . . . . .
Utilisation - Positionnement des balconnets de la contre-porte . . . . . . . . . . . . . . . . . . . . . . . . . . . . . . .19
Conseils - Conseils pour la rŽfrigeration - Conseils pour la congŽlation - Conseils pour la surgŽlation
Entretien - Arr•t prolongŽ . . . . . . . . . . . . . . . . . . . . . . . . . . . . . . . . . . . . . . . . . . . . . . . . . . . . . . . . . .20
Entretien - Nettoyage - Changement de lÕampoule - DŽgivrage . . . . . . . . . . . . . . . . . . . . . . . . . . . . .21
Anomalie de fonctionnement - Informations techniques . . . . . . . . . . . . . . . . . . . . . . . . . . . . . . . .22
Installation - Emplacement - Branchement Žlectrique . . . . . . . . . . . . . . . . . . . . . . . . . . . . . . . . . . . .23
Installation - Instructions pour lÕencastrement . . . . . . . . . . . . . . . . . . . . . . . . . . . . . . . . . . . . . . . . . .24
Garantie . . . . . . . . . . . . . . . . . . . . . . . . . . . . . . . . . . . . . . . . . . . . . . . . . . . . . . . . . . . . . . . . . . . . . . . .30
Nettoyage
LÕappareil Žtant convenablement installŽ, nous vous
conseillons de le nettoyer soigneusement avec de
lÕeau ti•de savonneuse, pour enlever lÕodeur
caractŽristique de ÇneufÈ.
UTILISATION
. NÕutilisez pas de produits abrasifs, de
poudre ˆ rŽcurer ni dÕŽponge mŽtallique.
RŽglage de la tempŽrature
La tempŽrature est rŽglŽe automatiquement et peut
•tre augmentŽe (moins froid) en tournant le bouton
vers les numŽros les plus bas ou bien diminuŽe
(plus froid) en le tournant vers les numŽros les plus
ŽlevŽs.
En tout cas, lÕexacte position doit •tre repŽrŽe en
considŽrant que la tempŽrature interne dŽpend des
facteurs suivants:
¥ tempŽrature ambiante;
¥ frŽquence dÕouverture des portes;
¥ quantitŽ dÕaliments conservŽs;
¥ emplacement de lÕappareil.
Une position moyenne est la plus indiquŽe.
Mise en service
Enfoncez la fiche dans la prise de courant
Tournez le bouton du thermostat vers la droite sur
une position moyenne.
Pour arr•ter lÕappareil tournez le bouton du
thermostat sur la position ÇOÈ.
Important
Si le thermostat est rŽglŽ sur la position de froid
maximum, lorsque la tempŽrature ambiante est
ŽlevŽe et que l'appareil est plein, il est possible
que le compresseur fonctionne en rŽgime
continu. Dans ce cas, il y a un risque de
formation excessive de givre sur la paroi
postŽrieure ˆ lÕintŽrieur de lÕappareil. Pour Žviter
cet inconvŽnient, placez le thermostat sur une
position moins ŽlevŽe, de fa•on ˆ permettre un
dŽgivrage automatique et, par consŽquent, des
Žconomies de courant.
CongŽlation
Le compartiment ˆ 4 Žtoiles sert ˆ congeler des
aliments frais et ˆ conserver des denrŽes congelŽes
et surgelŽes pendant un certain temps.
Pour congeler les aliments frais il nÕest pas
nŽcessaire de rŽgler le thermostat sur une position
diffŽrente de celle employŽe en Žtat de
fonctionnement habituel. Toutefois, si vous dŽsirez
congeler plus rapidement vous pouvez rŽgler le
thermostat sur une position plus froide tout en
veillant ˆ ce que la tŽmperature ne descende pas en
dessous de 0¡C dans le compartiment rŽfrigŽrateur.
Dans ce cas il faudra ramener le thermostat sur une
position moins froide
47
Garantie-uitsluitingen
8 Het kosteloos uitvoeren van herstel- en/of vervangingswerkzaamheden, zoals bedoeld in de
betreffende hieraan voorafgaande punten, is niet van toepassing indien:
- de aankoopnota of kwitantie, waaruit tenminste de aankoopdatum en de identificatie van het
apparaat blijkt, niet getoond kan worden of meegezonden werd;
- het apparaat voor andere, of ——k voor andere dan de huishoudelijke doeleinden, waarvoor het
apparaat bestemd is, gebruikt wordt;
- het apparaat niet volgens de aanwijzingen in het installatievoorschrift of de gebruiksaanwijzing
ge•nstalleerd, bediend, behandeld of gebruikt wordt;
- het apparaat op ondeskundige wijze door daartoe niet bevoegde personen hersteld of gewijzigd
werd.
8a Indien het apparaat zodanig ingebouwd, ondergebouwd, opgehangen of geplaatst is dat de
benodigde tjd voor het uit- en inbouwen samen meer dan dertig minuten bedraagt, dan worden de
hierdoor ontstane extra kosten aan de eigenaar in rekening gebracht.
8b Schade welke ontstaat door het, met toestemming van de eigenaar, op abnormale wijze uit- of
inbouwen van een apparaat, kan niet op de fabrikant of haar servicedienst verhaald worden.
8c Beschadigingen, zoals krassen en deuken of zoals breuk van uit- of afneembare delen, welke niet
ten tijde van de aflevering ter kennis van de fabrikant gebracht worden, vallen niet onder garantie.
Belangrijk advies
De constructie van dit apparaat is zodanig, dat de veiligheid daarvan gewaarborgd is. Ondeskundige
reparaties kunnen echter de veiligheid in gevaar brengen. Terwille van een blijvende veiligheid, en ook
om mogeljke schade te voorkomen, is het raadzaam dat reparaties uitsluitend verricht worden door
personen die daarvoor de vereiste vakbekwaamheid bezitten. Wij adviseren u herstel- en/of
controlewerkzaamheden door uw vakhandelaar of door ELECTROLUX SERVICE te laten uitvoeren en
uitsluitend originele DISTRIPARTS onderdelen te laten plaatsen.
ELECTROLUX SERVICE
Nederland
Vennootsweg 1
2404 CG Alphen aan den Rijn
Postbus 120
2400 AC Alphen aan den Rijn
Storingsmeldingen op werkdagen
tijdens kantooruren:
Tel.: 0172 - 46 83 00
Fax.: 0172 - 46 82 55
Onderdelenverkoop op werkdagen
tijdens kantooruren:
Tel.: 0172 - 46 84 00
Fax.: 0172 - 46 83 76
ELECTROLUX SERVICE
Belgi‘
Bergensesteenweg 719
1520 Halle (Lembeek)
Thuisherstellingen:
Tel.: 02-3630444
Fax: 02-3630400
Wisselstukken:
Tel.: 02-3630555
Fax: 02-3630500
ELECTROLUX SERVICE
Luxembourg/
Luxemburg
7, Rue de Bitbourg
L-1273 Luxembourg-Hamm
Service apr•s vente:
Kundendienst:
Tel.: 42 43 11
Fax: 42 43 14 60
ELECTROLUX SERVICE

19
Conservation des produits
surgelŽs
A la premi•re mise en fonctionnement ou apr•s un
arr•t prolongŽ faites fonctionner lÕappareil pendant
duex heures au moins avec le bouton du thermostat
sur la position de froid maximum. Ramenez ensuite
le thermostat sur une position moyenne.
Attention
En cas de dŽcongŽlation accidentelle, par
exemple en cas de coupure de courant, si la
pŽriode dÕinterruption est supŽrieure ˆ la valeur
du Òautonomie, en cas de panneÓ indiquŽe dans
le tableau des donnŽes techniques, il sera
nŽcessaire de consommer rapidement les
aliments ou de les cuisiner aussit™t et de les
recongeler (apr•s quÕils ont refroidi).
DŽcongŽlation
Avant dÕ•tre utilisŽs, les aliments congelŽs ou
surgelŽs doivent •tre dŽcongelŽs dans le
rŽfrigŽrateur ou ˆ tempŽrature ambiante, selon le
temps dont on dispose pour cette opŽration.
SÕil sÕagit de produits minces ou divisŽs, placez-les
directement ˆ cuire: dans ce cas le temps de
cuisson sera plus long.
Gla•ons
L'appareil est ŽquipŽ d'un ou de plusieurs bacs ˆ
glace pour faire des gla•ons. Il faut remplir ces bacs
d'eau potable et les placer dans le congŽlateur.
NÕemployez pas dÕobjet mŽtallique pour dŽcoller
les bacs ˆ glace.
Tablettes amovibles
Les glissi•res se trouvant sur les parois de la cuve
vous permettent de positionner les tablettes ˆ diffŽ-
rentes hauteurs, selon vos besoins. Pour une
meilleure utilisation de lÕespace vous pouvez
superposer les demi-tablettes antŽrieures aux demi-
tablettes postŽrieures.
D338
Positionnement des balconnets de
la contre-porte
II est possible de changer de place les balconnets. A
cet effet procedez comme suit:
DŽgagez les balconnets en agissant dans le sens
indiquŽ par les fl•ches. Remontez les balconnets ˆ
la hauteur dŽsiree.
PR249
PR250
46
GARANTIEBEPALINGEN EN SERVICE VOOR DE BENELUX
(B-NL en L)
Bij aanspraak op kosteloos herstel dient het origineel van de betreffende aankoopnota of
kwitantie te worden getoond of meegezonden.
Algemene garantiebepalingen
1 De fabrikant verleent ŽŽn jaar garantie op het op de bijbehorende koopnota vermelde apparaat,
gerekend vanaf de koopdatum. Indien zich binnen deze periode een storing voordoet, welke het
gevolg is van een materiaal- en/of constructiefout, heeft de koper het recht op kosteloos herstel.
1a Voor stofzuigers, bedoeld voor huishoudelijk gebruik, geldt een algemene garantieperiode van twee
jaar. Accessoires zjn aan directe slijtage onderhevig; deze verbruiksartikelen zijn derhalve van garantie
uitgesloten.
2 Indien binnen de garantietermijn door ELECTROLUX reparaties worden verricht, wordt de
oorspronkelijke garantietermijn niet verlengd. Op reparaties buiten de garantietermijn door
ELECTROLUX verricht, en op de hierbeij geleverde, betaalde en gemonteerde onderdelen wordt 1
jaar garantie verleend.
Indien na drie maal uitvoeren van eenzelfde reparatie, hetzelfde defect opnieuw optreedt en geen
resultaat van een opnieuw uitvoeren van een reparatie verwacht mag worden, zal een nieuw
exemplaar of soortgelijk toestel worden aangeboden. De aanbieding geschiedt tegen bijbetaling op
basis van een te bepalen jaarlijks afschrijvingspercentage.
3 Servicebezoeken aan huis worden alleen gebracht voor grote, moeilijk transporteerbare apparaten,
per definitie: wasautomaten, droogtrommelautomaten, atwasautomaten, koelkasten, diepvrieskasten/-
kisten, ovens, fornuizen en inbouwapparaten.
3a De regeling als bedoeld onder punt 3 geldt ook voor caravankoelkasten, mits de plaats waar zich
het apparaat bevindt binnen de landsgrenzen ligt en over normale, voor het autoverkeer opengestelde
wegen bereikbaar is. Voorts dient ten tijde van het bezoek het apparaat en de eigenaar, of diens
gemachtigde plaatsvervanger, op de afgesproken bezoekplaats aanwezig te zjn.
4 Indien, naar het oordeel van de fabrikant, het apparaat zoals bedoeld onder punt 3 naar haar
servicewerkplaats getransporteerd moet worden, dan geschiedt dit transport op de door de fabrikant
vastgestelde wijze en voor rekening en risico van de fabrikant.
5 Alle niet onder punt 3 en 3a genoemde apparaten, alsmede apparaten welke wel de betreffende
functionele eigenschappen hebben maar daarnaast juist bedoeld zijn voor gemakkelijk transport,
dienen franco aan het adres van de servicedienst verzonden of aangeboden te worden. Binnen de
algemene garantieperiode vindt terugzending voor rekening van de fabrikant plaats.
6 Indien een onder garantie en binnen de algemene garantieperiode vallend defect aan een apparaat
niet hersteld kan worden, vindt kosteloze vervanging van het apparaat plaats.
Garantie-uitbreidingen
7 Voor koel/vries-motorcompressoren (exclusief startrelais en motorbeveiliging) geldt een aflopende
garantieperiode, in geljke percentages van twintig procent perjaar, van vijfjaar na koopdatum van het
op de bijbehorende koopnota vermelde apparaat, met inachtname van volledig kosteloos herstel
binnen de algemene garantieperiode. Na de algemene garantieperiode worden bezoek-, arbeidsloon-
en bijkomende materiaalkosten in rekening gebracht.

20
Arr•t prolongŽ
Lorsque l'appareil doit rester ˆ l'arr•t pendant un
certain temps, prenez les prŽcautions suivantes:
dŽbranchez la prise de courant;
videz l'appareil;
dŽgivrez-le et nettoyez-le ˆ fond;
laissez les portes entrouvertes pour faire circuler de
l'air, de fa•on ˆ Žviter les mauvaises odeurs.
ENTRETIEN
DŽbranchez lÕappareil avant toute
opŽration.
Attention: Cet appareil contient des hydrocarbures
dans son circuit de rŽfrigŽrant; IÕentretien et la
recharge ne doivent done •tre effectuŽs que par du
personnel autorisŽ.
Conseils pour la surgŽlation
Comment utiliser ce compartiment au mieux:
¥ vŽrifiez que les aliments aient bien ŽtŽ conservŽs
en magasin;
¥ assurez-vous que le transport, du moment de
l'achat jusqu'ˆ celui de la mise en place dans le
compartiment, dure le moins longtemps possible;
¥ Žvitez dÕouvrir trop souvent la porte et ne la
laissez ouverte que le temps nŽcessaire.
¥ Il convient de faire tr•s attention, car les aliments
dŽgelŽs, ne peuvent •tre recongelŽs.
¥ Ne dŽpassez jamais la date limite dÕutilisation
gŽnŽralement marquŽe sur les paquets.
CONSEILS
Conseils pour la congŽlation
R•gles ˆ respecter pour la congŽlation:
¥ le pouvoir max. de congŽlation par 24 heures
figure sur la plaque signalŽtique;
¥ le processus de congŽlation prend 24 heures. Il
vaut mieux ne pas ajouter d'autres aliments ˆ
congeler pendant ce laps de temps;
¥ les produits destinŽs ˆ la congŽlation doivent •tre
frais, bien nettoyŽs et dÕexcellente qualitŽ;
¥ prŽparez de petites portions, de fa•on ˆ faciliter
la congŽlation et ˆ permettre de ne dŽcongeler
que la quantitŽ nŽcessaire;
¥ enveloppez les denrŽes dans du papier
d'aluminium ou de polyth•ne, en Žliminant les
bulles d'air et en fermant bien les paquets;
¥ Žvitez de placer des produits ˆ congeler en
contact avec des denrŽes dŽjˆ entreposŽes, pour
Žviter d'en Žlever la tempŽrature;
¥ les aliments maigres se conservent mieux et plus
longtemps que les gras; le sel rŽduit la durŽe de
conservation;
¥ ne consommez pas les b‰tonnets glacŽs toute
de suite apr•s les avoir sortis du congŽlateur. La
tempŽrature tr•s basse ˆ laquelle ils se trouvent
peut provoquer des bržlures:
¥ indiquez sur chaque paquet la date de
congŽlation, afin de pouvoir contr™ler le temps
dÕentreposage;
¥ ne placez ni bouteilles ni bo”tes de boissons
gazeuses dans le congŽlateur, car elles
pourraient Žclater.
Conseils pour la rŽfrigeration
O• placer les denrŽes?
Viandes (de toutes sortes): enveloppez-la dans des
sachets en plastique et placez-la sur la tablette en
verre au-dessus du(des) bac(s) ˆ lŽgumes.
La pŽriode de conservation est de 1 ˆ 2 jours au
maximum.
Aliments cuits, plats froids, etc.: placez-les, bien
couverts, sur une clayette.
Fruits et lŽgumes: bac(s) ˆ lŽgumes (une fois
nettoyŽs).
Beurre et fromage: enveloppez-les soigneusement
dans des feuilles dÕaluminium ou de polyŽthyl•ne et
mettez-les dans les casiers appropriŽs.
Lait en bouteille: ˆ placer dans lÕun des balconnets
de la contreporte.
Bananes, pommes de terre, oignon et ail ne
doivent pas •tre placŽs dans le rŽfrigŽrateur,
sÕils ne sont pas conditionnŽs.
45
Toesteldeur richten (indien nodig)
Toesteldeur inzetten
La page est en cours de chargement...
La page est en cours de chargement...
La page est en cours de chargement...
La page est en cours de chargement...
La page est en cours de chargement...
La page est en cours de chargement...
La page est en cours de chargement...
La page est en cours de chargement...
La page est en cours de chargement...
La page est en cours de chargement...
La page est en cours de chargement...
La page est en cours de chargement...
-
 1
1
-
 2
2
-
 3
3
-
 4
4
-
 5
5
-
 6
6
-
 7
7
-
 8
8
-
 9
9
-
 10
10
-
 11
11
-
 12
12
-
 13
13
-
 14
14
-
 15
15
-
 16
16
-
 17
17
-
 18
18
-
 19
19
-
 20
20
-
 21
21
-
 22
22
-
 23
23
-
 24
24
-
 25
25
-
 26
26
-
 27
27
-
 28
28
-
 29
29
-
 30
30
-
 31
31
-
 32
32


Electrolux ER6523P Manuel utilisateur
- Catégorie
- Congélateurs
- Taper
- Manuel utilisateur
dans d''autres langues
- English: Electrolux ER6523P User manual
- Deutsch: Electrolux ER6523P Benutzerhandbuch
- Nederlands: Electrolux ER6523P Handleiding
- eesti: Electrolux ER6523P Kasutusjuhend