Whirlpool WWDE 7512 Mode d'emploi
- Catégorie
- Machines à laver
- Taper
- Mode d'emploi

1
EN
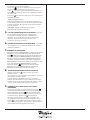
DAILY REFERENCE GUIDE
Please read the content of the Health &
Safety and Installation Guides thoroughly
before you use this appliance.
The transit bolts must be removed
before the appliance is used.
See the Health & Safety and Installation
Guides for detailed instructions on how to
remove the transit bolts.
THANK YOU FOR BUYING A WHIRLPOOL PRODUCT.
For even more complete user support, register your
appliance at www.whirlpool.eu/register
Download the Instructions for use from the
website http://docs.whirlpool.eu
Follow the procedure described on the last
page.
WWW
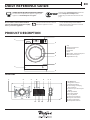
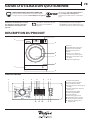
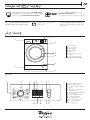
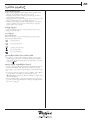
PRODUCT DESCRIPTION
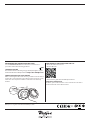
CONTROL PANEL
1. Top
2. Detergent dispenser
3. Control Panel
4. Lid handle
5. Door
6. Water lter - behind kick panel
7. Removable kick panel
8. Adjustable feet (2)
APPLIANCE
1. On/O button
2. Programme selector
3. Start/Pause button
4. Led washing and drying
phases button
5. Led door open /End of cycle
button
6. Half spin button
7. Start delay button
8. Dry only button
9. Intensive rinse button
10. Dryness level button
11. Drying time button
12. Temperature button
1.
3.
2.
5.
4.
7.
6.
8.
9h
6h
3h
Temp. °C
Sport
Drying
time
Dryness
level
Start
delay
Half spin
Intensive
rinse
Dry only
Cotton
Wool
Delicates
Mixed
Colours
Wash & Dry 45’
Rinse & Spin Wash & Dry 90’
Rapid 30’
Cotton+Prewash
Spin & Drain
Synthetics
Cotton
90
45
1.
2.
3.
4.
7.
9.
10.
12.
11.
8.
6.
5.

2
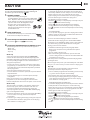
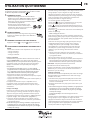
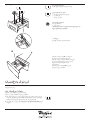
DETERGENT DISPENSER
See the section DAILY USE for instructions on selecting and starting a
programme.
First cycle operation
Remove any manufacturing debris:
1. Select the“Cotton” programme with a temperature setting of 90 °C.
2. Pour a small quantity of detergent powder into the main wash
compartment of the detergent dispenser (maximum 1/3 of the
quantity the detergent manufacturer recommends for lightly soiled
laundry).
3. Start the programme without loading the washer dryer machine
(with empty drum).
FIRST TIME USE
B
A
Prewash Compartment
• Detergent for prewash
Main Wash Compartment
• Detergent for the main wash
• Stain remover
• Water softener
Softener compartment
• Softener
• Liquid starch
Pour softener or starch solution into the
compartment without exceeding the “max” level.
Release button
(press to remove tray for cleaning).
Preferably use the partition A when
washing with a liquid detergent for
washing, to ensure that the correct
quantity of detergent is used (the
partition is included in the bag
containing the instructions).
Move the partition into slot B when
using detergent powder.

3
EN
DAILY USE
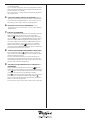
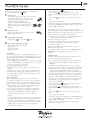
1. LOADING LAUNDRY.
• Prepare the laundry, following the
recommendations given in the section “HINTS AND
TIPS”. - Open the door and load the laundry into the
drum, without exceeding the maximum load
capacities indicated in the Programme Chart.
• Close the door, pressing until the latch
audibly locks, and check that there is no
laundry trapped between the door glass
and the rubber seal.
2. OPEN THE WATER TAP
Check that the washer dryer is connected correctly
to the water mains. Open the water tap.
3. SWITCHING ON THE WASHER DRYER MACHINE.
Press button ; the lamp ashes slowly.
4. SELECTING A PROGRAMME AND CUSTOMISING A CYCLE.
The following functions are possible with this appliance:
• Wash only
• Wash and dry
• Dry only
Wash only
Select the required programme with the PROGRAMME
selector dial. The washer-dryer automatically displays the
maximum temperature specied for the programme set, via
the corresponding led light. Press the relevant button to
change the temperature.
• Pressing the “Temp. °C” button reduces the temperature
progressively, to a minimum of 20 °C. Pressing the button
again will return to the maximum temperature permitted
for the programme.
Select the required options (if necessary).
• Pressthebuttontoselecttheoption;therespectivebutton
lamp illuminates.
• Pressthebuttonagaintocanceltheoption;thelamp
extinguishes.
! If the selected option is not compatible with the
programme set, an error warning tone sounds and the
indicator lamp ashes three times. The option is not selected.
Wash and dry
To wash and dry a load with no interruption between the
wash and dry cycles, make sure that the load does not
exceed the maximum permissible drying load for the
selected programme (see the column “Max. load for drying
cycle” in the Programme chart).
1. Follow the instructions given in the paragraph “Wash Only”
to select and, if necessary, customise the required
programme.
2. Select the type of drying desired, by pressing the “Dryness
level” button for automatic drying levels or the “Drying
time” button to set drying time.
- Automatic drying with selectable levels:
In automatic drying mode, the washer dryer machine dries
the laundry until the set level of dryness is reached. Pressing
button “Dryness level” once automatically selects the
highest drying level available for the selected programme.
Press the button again to reduce the drying level.
The following levels are available:
Wardrobe : laundry is completely dry and ready to be put
away in the wardrobe without ironing.
Hanger : laundry is left slightly damp to minimise
creasing. Garments must be hung to air dry completely.
Iron : garments are left reasonably damp to make ironing
easier.
- Timer drying mode:
To set a specic drying time, press the “Drying time” button
until the led for the desired time is illuminated. Values from
180 to 40 minutes are settable.
To wash a load of laundry larger than the maximum
permissible load for drying (see the column “Max. load for
drying cycle” in the Programme chart), remove a few garments
once the washing cycle has nished before starting the
drying cycle. Proceed as follows:
1. Follow the instructions given in the paragraph “Wash
Only” to select and, if necessary, customise the required
programme.
2. Do not include a drying cycle.
3. Once the washing cycle is nished, open the door and
remove a few garments to reduce the load. Now follow the
instructions for “Dry only”.
N.B.: always allow a cooling down period after drying before
opening the door.
When using the two preset cycles “Wash & Dry 45’” and “Wash
& Dry 90’”, it is not necessary to select and start a drying cycle.
Dry only
This function is used to simply dry a wet load washed
previously in the washer dryer or by hand.
1. Select a suitable programme for the laundry you want to dry
(e.g. select cotton to dry wet cotton laundry).
2. Press button “Dry only” to dry without a wash cycle.
3. Select the type of drying desired, by pressing the “Dryness
level” button for automatic drying levels or the “Drying
time” button to set drying time.
- Automatic drying with selectable levels:
In automatic drying mode, the washer dryer machine dries the
laundry until the set level of dryness is reached. Pressing
button “Dryness level” once automatically selects the highest
drying level available for the selected programme. Press the
button again to reduce the drying level.
The following levels are available:
Wardrobe : laundry is completely dry and ready to be put
away in the wardrobe without ironing.
Hanger : laundry is left slightly damp to minimise
creasing. Garments must be hung to air dry completely.
Iron : garments are left reasonably damp to make ironing
easier.
For more information on functions, a more detailed guide may
be requested or downloaded from the website following the
instructions given on the last page.
WWW

4
- Timer drying mode:
To set a specic drying time, press the “Drying time” button
until the led for the desired time is illuminated. Values from
180 to 40 minutes are settable.
N.B.: always allow a cooling down period after drying before
opening the door.
5. USING THE CORRECT AMOUNT OF DETERGENT. Pull out
the tray and pour detergent into the relative compartments
as described in “Detergent dispenser”. This is only necessary
when using a wash only or a wash + dry programme.
6. DELAYING THE START OF A PROGRAMME. To set a
programme to start at a later time, see the section “Options
and Functions”.
7. STARTING A PROGRAMME.
Press the START/PAUSE button. The corresponding indicator
light is illuminated, the door locks and the door open
indicator is illuminated. To change a programme while a
cycle is in progress, press START/PAUSE to pause the washer
dryer (the START/ PAUSE lamp ashes amber slowly); then
select the required cycle and press START/PAUSE again. To
open the door while a cycle is in progress, press START/
PAUSE; if the door open light turns of, the door can be
opened. Press the START/PAUSE button again to resume the
programme from where it was paused.
8. CANCELLING A RUNNING PROGRAMME IF NECESSARY
Press and hold the button until the washer dryer stops.
If the water level and temperature are low enough, the door
unlocks and may be opened.
The door remains locked if there is water in the drum. To
unlock the door, switch the washer dryer on and select the
SPIN & DRAIN programme. The water is emptied and the door
unlocks at the end of the programme.
9. SWITCHING THE WASHER DRYER OFF AT THE END OF A
PROGRAMME.
At the end of the programme, the door open light will
switch o. It is only possible to open the door when the door
open light is switched o. Check that the door open light
is o, then open the door and remove the laundry.
Press to switch the washer dryer o. To save energy, if the
washer dryer is not switched o manually with the
button, it turns o automatically approximately 30 minutes
after the end of the programme.
Leave the door ajar to let the interior of the washer dryer dry.

5
EN
RULES FOR SEPARATING LAUNDRY
• Fabric type / indications on label (cotton, mixed bres, synthetic,
wool, handwash items)
• Colour (separate coloured garments from whites, wash new
coloured items separately)
• Size (wash items of dierent sizes in the same load to improve
washing ecacy and weight distribution in the drum)
• Delicates (place small items – such as nylon stockings – and
garments with clasps – such as braziers – in a laundry bag or in a
pillow case with a zip).
EMPTY POCKETS
• Objects such as coins or safety pins can damage laundry and the
washer dryer drum.
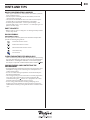
WASH SYMBOLS
ON GARMENT LABELS
The value given in the tub symbol is the maximum temperature
possible for washing the garment.
Normal mechanical action
Reduced mechanical action
Much reduced mechanical action
Hand wash only
Do not wash
CLEAN THE WATER FILTER REGULARLY
• This is needed to prevent the lter from blocking and preventing
the water from draining correctly. See the section “Cleaning and
Maintenance” / “Cleaning the water lter” in the detailed guide
that may be requested or downloaded from the website.
WWW
SAVING ENERGY AND PROTECTING THE
ENVIRONMENT
• Keeping within the load limits indicated in the programme chart
will optimise energy, water and detergent consumption and
reduce washing times.
• Do not exceed the detergent quantities recommended by the
detergent manufacturer.
• Save energy by using a 60°C instead of a 90°C wash programme,
or by using a 40°C instead of a 60°C wash programme. We
recommend using the “ Cotton” 60 °C programme for cotton
garments, which is longer but uses less energy.
• To save energy and time when washing and drying, select
highest spin speed available for the programme to reduce the
residual water remaining in the garments at the end of the wash
cycle.
HINTS AND TIPS

6
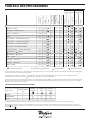
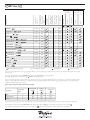
PROGRAMME CHART
The cycle duration indicated on the display or in the manual is an estimated time calculated for standard conditions. The actual cycle time may vary in relation
to a number of dierent factors, such as inlet water temperature and pressure, ambient temperature, quantity of detergent, size and type of load, load
balancing and any additional optional functions selected.
1) Test programme in compliance with standard EN 50229 (Wash): select the “ Cotton” programme with a temperature of 60°C.
2) Long cotton programme: set the “ Cotton” programme with a temperature of 40°C.
For wash programmes with temperatures above 50°C, we recommend using powder detergent rather than liquid, and following the directions given on
the detergent package.
Detergents and
additives
Recommended
detergent
Programme
Available tempera-
tures
Max. spin speed
(rpm)
Drying
Max. load for wash
cycle (kg)
Max. load for dry-
ing cycle (kg)
Duration (Minutes)
Prewash
Main
Softener
Powder
Liquid
COTTON 0-90°C 1200 7 5 200 -
SYNTHETICS 0-60°C 1000
4,5 4 140 -
RAPID 30’ 0-30°C 800 - 3,5 - 30 -
SPORT 0-40°C 600 4 4 100 -
WASH & DRY 45’ 30°C 1200 1 1 45 -
WASH & DRY 90’ 30°C 1200 2 2 90 -
SPIN & DRAIN - 1200 7 5 10 - - -
RINSE & SPIN - 1200
7 5 50 - -
COTTON+PREWASH 0-90°C 1200 7 5 215
COTTON 1
0-60°C 1200
7 5 175 -
COTTON 2
0-40°C 1200
7 5 160 -
WOOL 0-40°C 800
2 2 90 -
DELICATES 0-30°C 0 1 1 80 -
COLOURS 0-40°C 1200 7 5 125 -
MIXED 0-40°C 1000 4,5 4,5 90 -
Selectable/optional
-
Not selectable/applicable Required quantity Optional quantity
Fabric type Max. load. (kg)
Wardrobe
level
Hanger
level
Iron
level
COTTON 5 220’ 195’ 180’
SYNTHETICS 4 180’ 140’ 120’
WOOL 2 160’ 130’ 120’
AUTOMATIC DRYING LEVEL TIMING CHART
Test programme in compliance with standard EN 50229 (Drying): the smaller load (2kg) must be dried by selecting the dryness level. The load must
consist of 2 sheets, 1 pillowcase and 1 hand towel; the remainder of the load must be dried by selecting the dryness level.
The time given is purely indicative and refers to the maximum load; with smaller loads, drying times will be reduced.

7
EN
INTENSIVE RINSE
Selecting this option adds an additional rinse, ensuring
optimal detergent removal. It is particularly suitable for those
with sensitive skin.
PROGRAMMES
OPTIONS AND FUNCTIONS
COTTON+PREWASH
for washing heavily soiled towels, underwear, table and bed
linen etc. in resilient cotton and linen where a prewash is
required. Use only powder detergent in the “Main Wash
Compartment”.
COTTON
for washing normally soiled cotton garments. At 60°C, this is
the standard cotton programme and the most ecient and
terms of water and energy consumption.
WOOL
all wool garments can be washed using programme “Wool”,
even those carrying the “hand-wash only” label. For best
results, use special detergents and do not exceed 2 kg of
laundry.
DELICATES
for washing particularly delicate garments. Preferably turn
garments inside out before washing.
COLOURS
for washing coloured cotton garments. This programme is
optimised to keep colours bright even after repeated washing.
MIXED
for washing lightly to normally soiled resilient garments in
cotton, linen, synthetic bres and mixed bres.
COTTON
for washing normally to heavily soiled towels, underwear, table
and bed linen etc. in resilient cotton and linen.
SYNTHETICS
for washing normally soiled garments made from synthetic
bres (such as polyester, polyacrylic, viscose etc.) or cotton/
synthetic blends.
RAPID 30’
for washing lightly soiled garments quickly: this cycle lasts only 30
minutes, saving time and energy. Maximum load 3,5 Kg.
SPORT
for washing lightly soiled sports clothing (tracksuits, shorts, etc.);
for best results, we recommend not exceeding the maximum
load indicated in the “Programme chart”. We recommend using
liquid detergent, and adding the amount suitable for a half-load.
WASH & DRY 45’
for washing and drying lightly soiled cotton and synthetic bre
garments quickly. This cycle washes and dries a laundry load of
up to 1 Kg in just 45 minutes.
WASH & DRY 90’
for washing and drying cotton and synthetic bre garments
quickly. This cycle washes and dries a laundry load of up to 2 Kg in
just 90 minutes.
SPIN & DRAIN
spins the load then empties the water. For resilient garments.
RINSE & SPIN
rinses and then spins. For resilient garments.
Follow the directions indicated in the garment wash
symbols.
START DELAY
To set the a delayed start for the selected programme,
press the button until the led for the desired delay is
illuminated (9h - 6h - 3h). To cancel the delayed start, press
the button until all e lights are switched o
HALF SPIN
This option reduces the spin speed of the wash
programme selected by half
OPTIONS selectable directly by pressing the relative
button
! If the selected option is not compatible with the
programme set, an error warning tone sounds and the
indicator lamp ashes three times. The option is not
selected.

8
HOW TO RECEIVE THE INSTRUCTIONS FOR USE
> Phone the After-Sales Service
> Use this QR Code
> Download the guide from the Whirlpool website
http://docs.whirlpool.eu
To do this, you need to enter the correct commercial code of the
product indicated on the adhesive label.
MAINTENANCE AND TROUBLESHOOTING GUIDE
See the Instructions for use for instructions on maintenance
procedures and troubleshooting problems.
TECHNICAL DOSSIER
The technical dossier containing energy consumption gures may be
downloaded from the Whirlpool website http://docs.whirlpool.eu
CONTACTING THE AFTERSALES SERVICE
When contacting the After-Sales Service, you will need to be able to
provide the codes indicated on the adhesive label on the inner side
of the door. The telephone number is indicated in the warranty
booklet.
Whirlpool® is a registered trademark of Whirlpool, USA.
WWW
n
001
Whirlpool Europe s.r.l.
Viale G.Borghi 27
21025 Comerio - Italy

9
FR
GUIDE D'UTILISATION QUOTIDIENNE
Veuillez lire attentivement le contenu
des Utilisation, sécurité et Consignes
d’installation avant d'utiliser votre
appareil.
Les boulons de transport doivent
être enlevés avant d'utiliser
l'appareil.
Voir les Utilisation, sécurité et Consignes
d’installation pour plus d'informations sur
comment enlever les boulons de transport.
MERCI D'AVOIR CHOISI UN PRODUIT WHIRLPOOL.
Pour un soutien aux utilisateurs encore plus complet,
enregistrez votre appareil à www.whirlpool.eu/register
Téléchargez les Directives d'utilisation du
site Web http://docs.whirlpool.eu
Suivez les procédures décrites à la dernière
page.
WWW
DESCRIPTION DU PRODUIT
PANNEAU DE COMMANDE
1. Dernier
2. Distributeur de détergent
3. Panneau de commande
4. Poignée du couvercle
5. Porte
6. Filtre à eau - derrière le
panneau de seuil de porte
7. Enlevez le panneau de seuil
de porte
8. Supports réglables (2)
APPAREIL
1. Touche Marche/Arrêt
2. Sélecteur de programme
3. Touche Marche / Pause
4. Voyant des phases de lavage et
séchage
5. Voyant d’ouverture de porte/
n de cycle
6. Touche Essorage limité
7. Touche Départ diéré
8. Touche Séchage
9. Touche Rinçage intensif
10. Touche Niveau de séchage
11. Touche Temps de séchage
12. Touche de réglage de la
température
1.
3.
2.
5.
4.
7.
6.
8.
9h
6h
3h
Temp. °C
Sport
Drying
time
Dryness
level
Start
delay
Half spin
Intensive
rinse
Dry only
Cotton
Wool
Delicates
Mixed
Colours
Wash & Dry 45’
Rinse & Spin Wash & Dry 90’
Rapid 30’
Cotton+Prewash
Spin & Drain
Synthetics
Cotton
90
45
1.
2.
3.
4.
7.
9.
10.
12.
11.
8.
6.
5.

10
DISTRIBUTEUR DE DÉTERGENT
Voir la section UTILISATION QUOTIDIENNE pour les directives sur la
sélection et le démarrage d'un programme.
Premier cycle de lavage
Enlevez tout débris de fabrication :
1. Sélectionnez le programme “Cotton” avec la température réglée à
90 °C.
2. Versez une petite quantité de détergent en poudre dans le
compartiment de lavage principal du distributeur de détergent
(au maximum 1/3 de la quantité de détergent recommandée par
le fabricant pour le linge légèrement sale).
3. Démarrez le programme sans linge dans le lave-linge/sèche-
linge(tambour vide).
PREMIÈRE UTILISATION
B
A
Compartiment de prélavage
• Détergent pour le prélavage
Compartiment de lavage principal
• Détergent pour le lavage principal
• Détachant
• Assouplissant
Compartiment adoucissant
• Assouplissant
• Amidon liquide
Versez l'assouplissant ou l'amidon dans le
compartiment sans dépasser le niveau “ max ”.
Bouton déclencheur
(appuyez pour enlever le bac pour le nettoyer).
De préférence, utilisez le séparateur A
lorsque que vous lavez avec un détergent
liquide, pour être certain d'utiliser la bonne
quantité de détergent (le séparateur est
inclus dans le sac contenant les directives).
Insérez le séparateur dans la fente B lorsque
vous utilisez du détergent en poudre.

11
FR
UTILISATION QUOTIDIENNE
1. CHARGER LA LESSIVE.
• Préparez votre linge selon les recommandations
gurant à la section “ TRUCS ET ASTUCES”. - Ouvrez la
porte et charger la lessive dans le tambour, sans
dépasser la capacité de charge maximum indiquée
sur le Tableau des programmes.
• Fermez la porte, poussez jusqu'à ce que
vous entendiez le verrou s'enclencher, et
assurez-vous que le linge n'est pas pris entre
la porte et le joint de caoutchouc.
2. OUVREZ LE ROBINET
Assurez-vous que le lave-linge/sèche-linge est bien
branché au conduites principales d'eau. Ouvrez le
robinet d'eau.
3. DÉMARRER L'APPAREIL LAVE-LINGE/SÉCHEUSE.
Appuyez la touche ; le voyant clignote lentement.
4. SÉLECTIONNER UN PROGRAMME ET PERSONNALISER LE
CYCLE.
Les fonctions suivantes sont disponibles avec cet appareil :
• Lavage seulement
• Lavage et séchage
• Séchage seulement
Lavage seulement
Sélectionnez le programme désiré en utilisant le cadran de
réglage PROGRAMME. Le lave-linge/sèche-linge ache
automatiquement la température maximale spéciée pour le
programme choisi, par le biais du voyant correspondant.
Appuyer sur le bouton correspondant pour changer la
température.
• En appuyant sur le bouton “Temp. °C” vous réduisez
progressivement la température, jusqu’à un minimum de
20 °C. Appuyez à nouveau sur le bouton pour revenir la
température maximale autorisée pour le programme.
Sélectionnez les options nécessaires (au besoin).
• Appuyezsurlatouchepoursélectionnerl'option;levoyant
associé à la touche s'illumine.
• Appuyezdenouveausurlatouchepourannulerl'option;le
voyant s'éteint.
! Si l'option sélectionnée n'est pas compatible avec le
programme choisi, une tonalité d'avertissement se fait
entendre et le voyant clignote trois fois. L'option n'est pas
sélectionnée.
Lavage et séchage
Pour laver et sécher une charge sans interruption entre les
cycles de lavage et séchage, assurez-vous que la charge ne
dépasse la charge de séchage maximum autorisé pour le
programme sélectionné (voir la colonne “ Charge max. pour
le cycle de séchage ” dans le Tableau des programmes).
1. Suivez les directives indiquées au paragraphe “Lavage
seulement ” pour sélectionner et, au besoin, personnaliser
le programme désiré.
Sélectionnez le type de séchage souhaité, en appuyant sur
le bouton “Dryness level” pour des niveaux de séchage
automatiques ou sur le bouton “Drying time” pour régler
le temps de séchage.
- séchage automatique avec niveaux qui peuvent être sélectionnés :
En mode séchage automatique, le lave-linge/sécheuse sèche
le linge jusqu'à ce que le degré de séchage soit atteint.
Appuyez sur la touche “Dryness level” une fois sélectionne
automatiquement le plus haut degré de séchage disponible
pour le programme choisi. Appuyez de nouveau sur la
touche pour réduire le degré de séchage.
Les niveaux suivants sont disponibles :
Garde-robe : le linge est complètement sec et est prêt à
être rangé dans la garde-robe sans être repassé.
Cintre : le linge est légèrement humide pour qu'il ne se
froisse pas. Les vêtements doivent être suspendus pour nir
de sécher à l'air.
Repassage : les vêtements sont laissés assez humide pour
faciliter le repassage.
- Mode séchage par minuterie :
Pour régler un temps de séchage spécique, appuyez sur le
bouton “Drying time” jusqu’à ce que le voyant pour le temps
souhaité soit allumé. Vous pouvez choisir des valeurs entre
180 et 40 minutes.
Pour laver une charge de linge plus grande que la charge
maximum autorisée pour le séchage (voir la colonne
“ Charge max. pour le cycle de séchage ” dans le tableau
des programmes), enlevez quelques morceaux de linges
une fois que le cycle de lavage est terminé, et avant de
débuter le cycle de séchage. Procédez de la manière
suivante:
1. Suivez les directives indiquées au paragraphe “Lavage
seulement ” pour sélectionner et, au besoin, personnaliser
le programme désiré.
2. Ne pas sélectionner le cycle de séchage.
3. Une fois que le cycle de lavage est terminé, ouvrez la porte et
enlevez quelques morceaux de linge pour réduire la charge.
Suivez maintenant les directives pour “Séchage seulement ”.
REMARQUE: toujours permettre une période de
refroidissement avant d'ouvrir la porte.
Lorsque vous utilisez les cycles préréglés “Wash & Dry 45’” et
“Wash & Dry 90’”, il n'est pas nécessaire de sélectionner et
démarrer le cycle de séchage.
Séchage seulement
Cette fonction est utilisée simplement pour sécher une charge
de linge mouillée, précédemment lavée dans le lave-linge/
sécheuse ou à la main.
1. Sélectionnez un programme adéquat pour la lessive vous
désirez sécher (p. ex. sélectionnez coton pour sécher une
lessive de coton humide).
2. Appuyez sur la touche “Dry only” pour sécher sans le cycle
de lavage.
3. Sélectionnez le type de séchage souhaité, en appuyant sur
le bouton “Dryness level” pour des niveaux de séchage
automatiques ou sur le bouton “Drying time” pour régler
le temps de séchage.
- Séchage automatique avec niveaux qui peuvent être
sélectionnés :
En mode séchage automatique, le lave-linge/sécheuse sèche
le linge jusqu'à ce que le degré de séchage soit atteint.
Appuyez sur la touche “Dryness level” une fois sélectionne
automatiquement le plus haut degré de séchage disponible
pour le programme choisi. Appuyez de nouveau sur la
touche pour réduire le degré de séchage.
Pour plus d'information sur les fonctions, vous pouvez demander
un guide plus complet ou le télécharger sur le site Web en suivant
les directives disponibles à la dernière.
WWW

12
Les niveaux suivants sont disponibles :
Garde-robe : le linge est complètement sec et est prêt à
être rangé dans la garde-robe sans être repassé.
Cintre : le linge est légèrement humide pour qu'il ne se
froisse pas. Les vêtements doivent être suspendus pour nir
de sécher à l'air.
Repassage : les vêtements sont laissés assez humide pour
faciliter le repassage.
- Mode séchage par minuterie :
Pour régler un temps de séchage spécique, appuyez sur le
bouton “Drying time” jusqu’à ce que le voyant pour le temps
souhaité soit allumé. Vous pouvez choisir des valeurs entre
180 et 40 minutes.
REMARQUE: toujours permettre une période de
refroidissement avant d'ouvrir la porte.
5. UTILISER LA BONNE QUANTITÉ DE DÉTERGENT. Tirez sur le
bac et versez du détergent dans les compartiments
correspondants comme décrit dans “Distributeur De
Détergent”. Ceci est seulement nécessaire lorsque vous
utilisez un programme de lavage seulement ou un
programme de lavage et séchage.
6. DIFFÉRER LE DÉMARRAGE D'UN PROGRAMME. Pour régler
un programme avec un démarrage diéré, voir la section
“ Options et Fonctions ”.
7. DÉMARRER UN PROGRAMME.
Appuyez sur la touche MARCHE/PAUSE. Le témoin correspondant
est allumé, la porte se verrouille et l’indicateur d’ouverture de
porte s’allume. Pour changer un programme lorsqu'un cycle
est en cours, appuyez sur MARCHE/PAUSE pour interrompre le
lave-linge/sécheuse (le voyant jaune MARCHE/PAUSE clignote
lentement); électionnez ensuite le cycle désiré et appuyez sur
MARCHE/PAUSE de nouveau. Pour ouvrir la porte lorsque le cycle
est en cours, appuyez sur MARCHE/PAUSE; si le témoin
d’ouverture de porte s’éteint, la porte peut être ouverte.
Appuyez sur la touche MARCHE/PAUSE de nouveau pour
reprendre le programme là où il a été interrompu.
8. ANNULER UN PROGRAMME EN COURS AU BESOIN
Appuyez sur la touche jusqu'à ce que le lave-linge/
sécheuse s'arrête.
Si le niveau d'eau et la température sont assez bas, la porte se
déverrouille et peut être ouverte.
La porte demeure verrouillée s'il reste de l'eau dans le
tambour. Pour déverrouiller la porte, démarrez le lave-linge/
sécheuse et sélectionnez le programme SPIN & DRAIN . L'eau se
vide et la porte se déverrouille à la n du programme.
9. ÉTEINDRE LE LAVELINGE/SÉCHEUSE À LA FIN DU
PROGRAMME.
À la n du programme, le témoin d’ouverture de porte
s’éteint. Il n’est possible d’ouvrir la porte que lorsque le
témoin d’ouverture de porte est éteint. Vériez que le
témoin d’ouverture de porte est éteint, puis ouvrez la porte
et enlevez le linge. Appuyez sur pour éteindre le
lave-linge/sécheuse. Pour économiser de l'énergie, si le
lave-linge/sécheuse n'est pas éteint manuellement avec la
touche , il s'éteint automatiquement environ 30 minutes
après la n du programme. Laissez la porte entrouverte pour
laisser l'intérieur du lave-linge/sécheuse sécher.

13
FR
RÈGLES POUR SÉPARER LA LESSIVE
• Type de tissu / indications sur l'étiquette (coton, bres mixtes,
synthétiques, laine, articles à laver à la main)
• Couleur (séparez les articles de couleur et le blanc, lavez
séparément les articles de couleur neufs)
• Taille (lavez les articles de taille diérente ensemble pour
améliorer l'ecacité du lavage et la distribution à l'intérieur du
tambour)
• Délicats (placez les petits articles – comme les bas de nylon – et
les vêtements avec des fermoirs – comme les soutiens-gorges –
dans un sac à lessive ou dans une taie d'oreiller avec une
fermeture éclaire).
VIDEZ LES POCHES
• Les objets comme la monnaie ou les épingles de sûreté peuvent
endommager le tambour de l'appareil.
SYMBOLES DE LAVAGE
SUR LES ÉTIQUETTES DE VÊTEMENT
La valeur indiquée dans le symbole de la cuve est la température
maximum possible pour laver le vêtement.
Mouvement mécanique normal
Action mécanique réduite
Action mécanique très réduite
Lavage à la main uniquement
Ne pas laver
NETTOYEZ LE FILTRE À EAU RÉGULIÈREMENT
• Ceci est nécessaire pour empêcher le ltre de se bloquer, ce qui
pourrait entraver la vidange de l'eau. Voir la section “ Nettoyage et
entretien ”/ “ Nettoyer le ltre à eau ” dans le guide détaillé qui peut
être demandé ou téléchargé à partir du site Web.
WWW
ÉCONOMISEZ DE L'ÉNERGIE ET PROTÉGEZ
L'ENVIRONNEMENT
• Restez dans les limites de charge indiquées dans le tableau des
programmes optimisera la consommation d'énergie, d'eau, et de
détergent, et réduira le temps de lavage.
• Ne dépassez pas la quantité de détergent recommandée par le
fabricant du détergent.
• Économisez de l'énergie en utilisant un programme de lavage à
60°C au lieu d'un programme à 90°C, ou en utilisant un
programme de lavage à 40°C au lieu de 60°C. Nous
recommandons d'utiliser le programme “ Cotton” 60 °C pour
les vêtements de coton; il est plus long, mais utilise moins
d'énergie.
• Pour économiser de l'énergie et du temps lors du lavage et le
séchage, sélectionnez la plus haute vitesse d'essorage disponible
pour le programme pour réduire la quantité d'eau dans les
vêtements à la n du cycle de lavage.
TRUCS ET ASTUCES

14
TABLEAU DES PROGRAMMES
La durée du cycle indiquée sur l'écran ou dans le manuel est une approximation calculée à partir de conditions normales. Plusieurs facteurs peuvent inuencer la
durée de cycle réelle; la pression et la température d'arrivée d'eau, la température ambiante, la quantité de détergent, la grosseur et type de lessive, l'équilibre de
la charge, et toute autre fonction sélectionnée.
1) Programme de vérication conrme à la norme EN 50229 (Lavage): sélectionnez le “ Cotton” programme avec une température de 60°C.
2) Programme coton prolongé : réglez le “ Cotton” programme avec une température de 40°C.
Pour les programmes de lavage avec des températures supérieures à 50°C, nous recommandons l'utilisation de détergent en poudre plutôt que liquide,
et suivez les directives sur l'emballage du détergent.
Détergents et
produits additifs
Détergent
recommandé
Programme
Températures
disponibles
Vit. max. essor.
(tr/min)
Séchage
Charge max. pour le
cycle de lavage (kg)
Charge max. pour
le cycle de séchage
(kg)
Durée (minutes)
Prélavage
Lavage
Assouplissant
Poudre
Liquide
COTTON COTON 0-90°C 1200 7 5 200 -
SYNTHETICS SYNTHÉTIQUES 0-60°C 1000
4,5 4 140 -
RAPID 30’ RAPIDE 30’ 0-30°C 800 - 3,5 - 30 -
SPORT 0-40°C 600 4 4 100 -
WASH & DRY 45’ LAVAGE & SÉCHAGE 45’ 30°C 1200 1 1 45 -
WASH & DRY 90’ LAVAGE & SÉCHAGE 90’ 30°C 1200 2 2 90 -
SPIN & DRAIN ESSORAGE & VIDANGE - 1200 7 5 10 - - -
RINSE & SPIN RINÇAGE & ESSORAGE - 1200
7 5 50 - -
COTTON+PREWASH COTON + PRÉLAVAGE
0-90°C 1200
7 5 215
COTTON 1 COTON
0-60°C 1200
7 5 175 -
COTTON 2 COTON
0-40°C 1200
7 5 160 -
WOOL LAINE 0-40°C 800
2 2 90 -
DELICATES DÉLICATS 0-30°C 0 1 1 80 -
COLOURS COULEURS 0-40°C 1200 7 5 125 -
MIXED (MIXTE 0-40°C 1000 4,5 4,5 90 -
Disponible/facultatif
-
Non disponible/ne s’applique pas Quantité requise Quantité facultative
Programme de vérication conrme à la norme EN 50229 (Séchage): pour le séchage de la charge de linge réduite (2kg), sélectionner le niveau de
séchage , le linge doit comprendre: 2 draps et 1 taie d’oreiller et 1 serviette de toilette; pour le séchage de la charge de linge restante, sélectionner le
niveau de séchage .
Type de tissu
Charge maximale
(kg)
Niveau
Garde-robe
Niveau
Cintre
Niveau
Repassage
COTON 5 220’ 195’ 180’
SYNTHÉTIQUES 4 180’ 140’ 120’
LAINE 2 160’ 130’ 120’
Le temps indiqué est purement indicatif et se réfère à la charge maximale ; avec des charges plus petites, les temps de séchage seront réduits.
TABLEAU DES NIVEAUX DE SÉCHAGE AUTOMATIQUE

15
FR
PROGRAMMES
OPTIONS ET FONCTIONS
RINSE & SPIN RINÇAGE & ESSORAGE
rince et essore ensuite. Pour vêtements résistants.
COTTON+PREWASH COTON 90°C+PRÉLAVAGE
pour laver les serviettes, sous-vêtements, linges de lit et de
table, etc., en coton et lin résistants, très sales. Utilisez
seulement du détergent en poudre dans le “ Compartiment de
lavage principal ”.
COTTON (COTON
pour laver les vêtements en coton sales. À 60°C, c'est le
programme standard pour le coton, et le plus ecace en terme
de consommation d'eau et d'énergie.
WOOL (LAINE
grâce au programme «Laine» vous pouvez laver à la machine
tous vos vêtements en laine, y compris ceux qui portent
l’étiquette “ lavage à la main uniquement “ . Pour obtenir
d’excellents résultats utilisez un produit lessiviel spécial et ne
dépassez pas une charge de 2 kg.
DELICATES DÉLICATS
pour laver les vêtements délicats. De préférence, tournez les
vêtements à l'envers avant de les laver.
COLOURS COULEURS
pour laver les vêtements de couleur en coton. Ce programme
est optimisé pour garder les couleurs brillantes, même après
plusieurs lavages.
MIXED MIXTE
pour laver les vêtements en coton, lin, bres synthétiques, et
bres mixtes résistants, sales à légèrement sales.
COTTON (COTON
pour laver les serviettes, sous-vêtements, linges de lit et de table,
etc. en coton et lin résistants, sales à très sales.
SYNTHETICS SYNTHÉTIQUES
pour laver les vêtements sales en bres synthétiques (comme le
polyester, polyacrylique, viscose, etc.) ou un mélange de coton et
bres synthétiques.
RAPID 30’ (RAPIDE 30’)
pour laver rapidement les vêtements légèrement sales : ce cycle
dure seulement 30 minutes, économisant temps et énergie.
Charge maximum 3,5 Kg.
SPORT
pour laver des textiles propres aux vêtements de sport
(survêtements, shorts, etc.) peu sales ; pour obtenir d’excellents
résultats nous recommandons de ne pas dépasser la charge
maximale indiquée dans le “Tableau des programmes”. Nous
recommandons d’utiliser de la lessive liquide, avec une dose
appropriée pour une demi-charge.
WASH & DRY 45’ (LAVAGE & SÉCHAGE 45’
pour laver et sécher rapidement les vêtements en coton et bres
synthétiques légèrement sales. Ce cycle lave et sèche une charge
de linge d'un maximum de 1 Kg en seulement 45 minutes.
WASH & DRY 90’ LAVAGE & SÉCHAGE 90’
pour laver et sécher rapidement les vêtements en coton et bres
synthétiques. Ce cycle lave et sèche une charge de linge d'un
maximum de 2 Kg en seulement 90 minutes.
SPIN & DRAIN ESSORAGE & VIDANGE
essore la charge de linge pour ensuite vider l'eau. Pour les
vêtements résistants.
Suivez les directives indiquées sur le symbole de lavage du
morceau de linge.
OPTIONS disponibles en appuyant directement sur la
touche associée
! Si l'option sélectionnée n'est pas compatible avec le
programme choisi, une tonalité d'avertissement se fait
entendre et le voyant clignote trois fois. L'option n'est pas
sélectionnée.
START DELAY DÉPART DIFFÉRÉ
Pour régler un départ diéré pour le programme choisi,
appuyez sur le bouton jusqu’à ce que le voyant pour le
départ diéré souhaité soit allumé (9h - 6h - 3h). Pour
annuler le départ diéré, appuyez sur le bouton jusqu’à ce
que tous les témoins s’éteignent.
HALF SPIN ESSORAGE LIMITÉ
Cette option réduit la vitesse d’essorage du programme de
lavage choisi de la moitié.
INTENSIVE RINSE RINÇAGE INTENSIF
En sélectionnant cette option, vous ajoutez un rinçage
supplémentaire, en assurant une élimination optimale du
détergent. Elle est particulièrement adaptée pour les
personnes à la peau sensible.

16
COMMENT RECEVOIR LES DIRECTIVES D'UTILISATION
> Communiquez avec le Service après-vente
> Utilisez le code QR
> Téléchargez le guide du site Web de Whirlpool
http://docs.whirlpool.eu
Pour cela, vous devez entrer le bon code commercial du produit,
indiqué sur l'étiquette adhésive.
GUIDE D'ENTRETIEN ET DE DÉPANNAGE
Voir les Directives d'utilisation pour les directives sur l'entretien et
le dépannage de problèmes.
DOSSIER TECHNIQUE
Le dossier technique, contenant les données de consommation
d'énergie, peut être téléchargé à partir du site Web de Whirlpool
http://docs.whirlpool.eu
CONTACTER LE SERVICE APRÈSVENTE
Lorsque vous contactez le Service après-vente, vous devez avoir en
votre possession les codes indiqués sur l'étiquette adhésive sur le
côté intérieur de la porte. Le numéro de téléphone est indiqué
dans le livret de garantie.
Whirlpool® est une marque de commerce enregistrée de Whirlpool, États-Unis.
WWW
n
001
Whirlpool Europe s.r.l.
Viale G.Borghi 27
21025 Comerio - Italy

17
AR
الدليل المرجعي اليومي
يرجى قراءة محتويات دليل الصحة والسلامة
والتركيب بتأني قبل استخدام هذا الجهاز.
يلزم خلع براغي النقل هذا قبل
استخدام الجهاز.
انظر دليل الصحة والسلامة والتركيب لمزيد
من المعلومات التفصيلية حول طريقة خلع
براغي النقل
نشكرك على شرائك أحد منتجات شركة WHIRLPOOL.
وللحصول على دعم فني أكثر تكاملا، يرجى تسجيل
جهازك على الموقع www.whirlpool.eu/register
قم بتنزيل تعليمات الاستخدام من الموقع
http://docs.whirlpool.eu
اتبع الإجراءات المبينة في الصفحة الأخيرة.
WWW
شرح المنتج
لوحة التحكم
1. الجزء العلوي
2. درج مادة الغسل
3. لوحة التحكم
4. مقبض الغطاء
5. الباب
6. فلتر الماء - خلف لوح
القاعدة
7. لوح قاعدة قابل للخلع
8. أرجل قابلة للضبط (2)
الجهاز
1. زر التشغيل/الإيقاف
2. مفتاح اختيار البرنامج
3. زر بدء التشغيل / الإيقاف
المؤقت
4. لمبة دايود مراحل الغسيل
والتجفيف.
5. لمبة دايود فتح الباب /نهاية الدورة.
6. زر نصف عصر
7. زر بدء التشغيل اللاحق
8. زر التجفيف فقط
9. زر الشطف المكثف
10. زر مستوى التجفيف
11. زر وقت التجفيف
12. زر درجة الحرارة
1.
3.
2.
5.
4.
7.
6.
8.
9h
6h
3h
Temp. °C
Sport
Drying
time
Dryness
level
Start
delay
Half spin
Intensive
rinse
Dry only
Cotton
Wool
Delicates
Mixed
Colours
Wash & Dry 45’
Rinse & Spin Wash & Dry 90’
Rapid 30’
Cotton+Prewash
Spin & Drain
Synthetics
Cotton
90
45
1.
2.
3.
4.
7.
9.
10.
12.
11.
8.
6.
5.

18
درج مادة الغسل
انظر فصل «الاستخدام اليومي» لمزيد من المعلومات حول اختيار وبدء
تشغيل البرنامج.
دورة التشغيل الأولى
تخلص من أي شوائب من عملية الإنتاج:
1. اختر برنامج “Cotton” بدرجة حرارة 90 °م.
2. ضع كمية صغيرة من مسحوق الغسل في حجيرة الغسل الرئيسية
بدرج مادة الغسل (بحد أقصى 3/1 الكمية الموصى بها من قبل الجهة
الصانعة لمادة الغسل للغسيل المتسخ بدرجة خفيفة).
3. ابدأ تشغيل البرنامج دون وضع شيء في الغسالة المجففة(والحلة
فارغة).
الاستخدام لأول مرة
B
A
حجيرة الغسل الأولي
• مادة الغسل الخاصة بالغسل الأولي
حجيرة الغسل الرئيسي
• مادة الغسل للغسل الرئيسي
• مزيل البقع
• مزيل عسر الماء
حجيرة منعّم الملابس
• مُنعّم الملابس
• نشا سائل
أضف منعم الملابس أو محلول النشا داخل الحيز دون
تجاوز علامة الحد «الأقصى».
زر التحرير
(اضغط لإزالة الدرج لتنظيفه).
يفضل استخدام الدرج A عند الغسل
باستخدام سائل تنظيف مخصص
للغسل، لضمان استخدام الكمية الصحيحة
من سائل التنظيف (يوجد هذا الدرج في
الحقيبة المشتملة على دليل
التعليمات).
انقل الدرج إلى الفتحة B في حالة
استخدام مسحوق تنظيف.

19
AR
الاستخدام اليومي
1. وضع الغسيل.
• قم بتحضير الغسيل وفقا للتوصيات الواردة في
جزء «إرشادات ونصائح». - افتح الباب وضع
الغسيل داخل الحلة، دون تجاوز السعة القصوى
للكمية المبينة في مخطط البرامج.
• أغلق الباب، من خلال الضغط إلى أن ينغلق
القفل بصوت مسموع، وتحقق من عدم انحشار
قطع الغسيل بين الباب الزجاج والعازل
المطاطي.
2. فتح صنبور الماء
تأكد من توصيل الغسالة بماسورة المياه بشكل
صحيح. افتح صنبور الماء.
3. تشغيل الغسالة المجففة.
اضغط على الزر ; تومض اللمبة ببطء.
4. اختيار برنامج وتخصيص دورة الغسل.
توجد الوظائف الآتية بهذه الغسالة:
• الغسل فقط
• الغسل والتجفيف
• التجفيف فقط
الغسل فقط
اختر «البرنامج» المرغوب باستخدام مفتاح الاختيار الدوار. 3.
يعرض جهاز الغسل والتجفيف أوتوماتيكيا أقصى درجة حرارة
مقررة للبرنامج المضبوط عن طريق لمبة LED المعنية. اضغط
على الزر المعني لتغيير درجة الحرارة.
• يقلل الضغط على الزر “Temp. °C” من درجة الحرارة بالتدريج
إلى أن تصل إلى 20°C م. عند الضغط على الزر مرة أخرى تعود
أقصى درجة حرارة مسموح بها للبرنامج.
اختر الخيارات المطلوبة (عند اللزوم).
• اضغط على الزر لاختيار أحد الخيارات، فتضيء لمبة الزر
المعني.
• اضغط على الزر مرة أخرى لإلغاء الاختيار، فتنطفئ اللمبة.
! إذا لم يكن الخيار المختار غير متوافق مع ضبط البرنامج،
تصدر إشارة تحذير صوتية وتومض لمبة البيان 3 مرات. ولا
يتم تفعيل الاختيار.
الغسل والتجفيف
لغسل وتجفيف كمية الغسيل بدون فترة فاصلة بين
دورتي الغسل والتجفيف، احرص على عدم تجاوز الكمية لحدود
الحمولة القصوى المسموح بها للبرنامج المختار (انظر عمود
«الحدود القصوى لكميات التجفيف» في مخطط البرنامج).
1. اتبع التعليمات الواردة في فقرة «غسل فقط» لاختيار
وتخصيص البرنامج المطلوب، إذا لزم الأمر.
اختر نوع التجفيف المرغوب، بالضغط على زر “Dryness
level” للاختيار من مستويات التجفيف الأوتوماتيكية أو
اضغط على الزر “Drying time” لضبط مدة تجفيف.
- التجفيف الأوتوماتيكي مع المستويات القابلة
للاختيار:
في وضع التجفيف الأوتوماتيكي، تقوم الغسالة المجففة
بتجفيف الغسيل حتى الوصول إلى مستوى التجفيف
المضبوط. يؤدي الضغط على الزر “Dryness level” مرة واحدة
إلى اختيار أعلى مستوى تجفيف متوفر للبرنامج المختار.
اضغط على الزر مرة أخرى لتقليل مستوى التجفيف.
تتوفر المستويات الآتية:
مستوى خزانة الملابس : يكون الغسيل جاف تماما وجاهز
للوضع في خزانة الملابس دون كي.
مستوى الشماعة : يظل الغسيل رطبا بعض الشيء
لتقليل الكرمشة. ويلزم تعليق الملابس لتجف تماما في
الهواء.
مستوى الكي : تظل الملابس رطبة إلى حد ما لتسهيل
الكي.
- وضع التجفيف بالمؤقت:
لضبط مدة تجفيف محددة، اضغط على الزر “Drying time” إلى
أن تضيء لمبة LED الخاصة بالمدة المرغوبة.. يمكن ضبط
القيم من 180 إلى 40 دقيقة.
لغسل كمية غسيل أكبر من الكمية القصوى المسموح بها
للتجفيف (انظر عمود«الحدود القصوى لكمية التجفيف» في
مخطط البرنامج), قم بإزالة بعض قطع الملابس فور انتهاء دورة
الغسل وقبل بدء دورة التجفيف. استمر كما يلي:
1. اتبع التعليمات الواردة في فقرة «غسل فقط» لاختيار
وتخصيص البرنامج المطلوب، إذا لزم الأمر.
2. لا تقم بتضمين دورة تجفيف.
3. فور انتهاء دورة الغسل، افتح الباب وأخرج بعض قطع
الملابس لتقليل الحمل. بعد ذلك، اتبع تعليمات
«التجفيف فقط».
ملحوظة: احرص دائما على الانتظار لفترة بعد تجفيف
الملابس وقبل فتح الباب.
عند استخدام الدورتين سابقتي الضبط “Wash & Dry 45’” و
“Wash & Dry 90’” ، لا يلزم اختيار دورة تجفيف أو بدء
تشغيلها.
التجفيف فقط
تستخدم هذه الوظيفة لتجفيف الملابس المبللة التي تم
غسلها سابقا في الغسالة المجففة أو يدويا.
1. اختر برنامجا مناسبا للغسيل التي ترغب في تجفيفه
(على سبيل المثال، اختر «أقطان» لترطيب الملابس
القطنية).
2. اضغط على الزر “Dry only” للتجفيف بدون دورة غسيل.
3. اختر نوع التجفيف المرغوب، بالضغط على زر “Dryness
level” للاختيار من مستويات التجفيف الأوتوماتيكية أو
اضغط على الزر “Drying time” لضبط مدة تجفيف.
- التجفيف الأوتوماتيكي مع المستويات القابلة للاختيار:
في وضع التجفيف الأوتوماتيكي، تقوم الغسالة المجففة
بتجفيف الغسيل حتى الوصول إلى مستوى التجفيف
المضبوط. يؤدي الضغط على الزر “Dryness level” مرة واحدة
إلى اختيار أعلى مستوى تجفيف متوفر للبرنامج المختار.
اضغط على الزر مرة أخرى لتقليل مستوى التجفيف.
تتوفر المستويات الآتية:
مستوى خزانة الملابس : يكون الغسيل جاف تماما وجاهز
للوضع في خزانة الملابس دون كي.
مستوى الشماعة : يظل الغسيل رطبا بعض الشيء
لتقليل الكرمشة. ويلزم تعليق الملابس لتجف تماما في
الهواء.
مستوى الكي : تظل الملابس رطبة إلى حد ما لتسهيل
الكي.
- وضع التجفيف بالمؤقت:
لضبط مدة تجفيف محددة، اضغط على الزر“Drying time” إلى
أن تضيء لمبة LED الخاصة بالمدة المرغوبة.. يمكن ضبط
القيم من 180 إلى 40 دقيقة.
ملحوظة: احرص دائما على الانتظار لفترة بعد تجفيف
الملابس وقبل فتح الباب.
لمزيد من المعلومات حول الوظائف، يمكنك طلب دليل أكثر
تفصيلا أو تنزيله من الموقع من خلال اتباع التعليمات
الواردة في الصفحة الأخيرة.
WWW

20
5. استخدام الكمية المناسبة من مادة الغسل. اجذب الدرج وقم بصب
مادة الغسل في الحجيرات المخصصة لذلك كما هو مبين في
فصل «درج مادة الغسل». لا يعد ذلك ضروريا إلا في حالة
استخدام برنامج غسل فقط أو غسل + تجفيف.
6. تأخير توقيت بدء البرنامج. لضبط البرنامج كي يعمل في
وقت لاحق، انظر فصل «الخيارات والوظائف».
7. بدء تشغيل برنامج.
اضغط زر بدء التشغيل / الإيقاف المؤقت. يضيء المبين
المعني ويتم تأمين غلق الباب ويضيء مبين فتح الباب .
لتغيير البرنامج أثناء تشغيل دورة الغسل، اضغط زر بدء
التشغيل/الإيقاف المؤقت لإيقاف الغسالة المجففة مؤقتا
(تومض لمبة بدء التشغيل/الإيقاف المؤقت باللون البرتقالي
ببطء)، ثم اختر دورة التشغيل المطلوبة، واضغط على زر بدء
التشغيل/الإيقاف المؤقت المؤقت مرة أخرى. لفتح الباب أثناء
تشغيل الدورة، اضغط على زر بدء التشغيل/الإيقاف إذا انطفأت
لمبة فتح الباب يكون من الممكن فتح الباب. اضغط على
زر بدء التشغيل/الإيقاف المؤقت مرة أخرى لبدء تشغيل
البرنامج من اللحظة التي توقف عندها.
8. إلغاء برنامج أثناء تشغيله (عند اللزوم)
اضغط مع الاستمرار على الزر إلى أن تتوقف الغسالة
المجففة.
إذا كان مستوى الماء ودرجة حرارته منخفضين بما يكفي،
يتحرر قفل الباب ويمكن فتحه..
ويظل الباب مقفلا في حالة وجود ماء في الحلة. لتحرير قفل
الباب، قم بتشغيل الغسالة المجففة غير واختر برنامج SPIN
& DRAIN . يتم تفريغ الماء ويتحرر قفل الباب في نهاية
البرنامج.
9. إيقاف الغسالة المجففة في نهاية البرنامج.
في نهاية البرنامج تنطفئ لمبة فتح الباب . لا يمكن
فتح الباب إلى بعد أن تنطفئ لمبة فتح الباب . تأكد
أن لمبة فتح الباب مطفأة ثم افتح الباب وأخرج الغسيل. .
اضغط على الزر لإيقاف الغسالة المجففة. ولتوفير
الطاقة، إذا لم يتم إيقاف الغسالة المجففة يدويا باستخدام
الزر ، فسوف تنطفئ أوتوماتيكيا بعد حوالي 30 دقيقة
من نهاية البرنامج.
اترك الباب مفتوحا لتجف الغسالة المجففة من الداخل.
La page est en cours de chargement...
La page est en cours de chargement...
La page est en cours de chargement...
La page est en cours de chargement...
-
 1
1
-
 2
2
-
 3
3
-
 4
4
-
 5
5
-
 6
6
-
 7
7
-
 8
8
-
 9
9
-
 10
10
-
 11
11
-
 12
12
-
 13
13
-
 14
14
-
 15
15
-
 16
16
-
 17
17
-
 18
18
-
 19
19
-
 20
20
-
 21
21
-
 22
22
-
 23
23
-
 24
24


Whirlpool WWDE 7512 Mode d'emploi
- Catégorie
- Machines à laver
- Taper
- Mode d'emploi
dans d''autres langues
- English: Whirlpool WWDE 7512 User guide