
THANK YOU
We appreciate the trust and confidence you have placed in Hampton Bay through the purchase of this exterior wall lantern.
We strive to continually create quality products designed to enhance your home. Visit us online to see our full line of
products available for your home improvement needs. Thank you for choosing Hampton Bay!
Item # 000-000
Model # XXXXXXX
USE AND CARE GUIDE
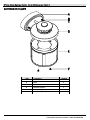
EXTERIOR MOTION SENSOR, DUSK-TO-DAWN
LED SMALL WALL LANTERN
Questions, problems, missing parts? Before returning to the store,
call Hampton Bay Customer Service
8 a.m. - 7 p.m., EST, Monday - Friday, 9 a.m. - 6 p.m., EST, Saturday
1-855-HD-HAMPTON
HAMPTONBAY.COM
Item #1002 246 562
Model #IZD1691LS-3

2
Table of Contents
Table of Contents ................................. 2
Safety Information ................................ 2
Warranty ............................................... 2
What is Covered ........................................... 2
What is Not Covered .................................... 2
Pre-Installation ..................................... 3
Specifications ............................................. 3
Selecting a Location .................................... 3
Planning Installation .................................... 3
Tools Required
…………….……………..
4
Hardware Included......................................4
Package Contents........................................5
Installation ........................................... 6
Operating Motion Sensor......................8
Care and Cleaning ............................... 9
Troubleshooting .................................. 9
Safety Information
WARNING: Carefully read and understand the information
given in this manual before beginning the assembly and
installation. Failure to do so could lead to electric shock, fire or
other injuries which could be hazardous or even fatal.
WARNING: Be sure the electricity to the wires you are
working on is shut off. Either remove the fuse or turn the circuit
off.
NOTICE: Changes or modifications not expressly approved by the party
responsible for compliance could void the user’s authority to operate the
equipment.
WHAT IS COVERED
The manufacturer warrants this lighting fixture to be free from defects in materials and workmanship for a period of five (5) years
from date of purchase. This warranty applies only to the original consumer and only to products used in normal use and service.
If this product is found to be defective, the manufacturer’s only obligation, and your exclusive remedy, is the repair or
replacement of the product at the manufacturer’s discretion, provided that the product has not been damaged through misuse,
abuse, accident, modifications, alterations, neglect or mishandling.
WHAT IS NOT COVERED
This warranty shall not apply to any product that is found to have been improperly installed, set-up, or used in any way not in
accordance with the instructions supplied with the product. This warranty shall not apply to a failure of the product as a result of
an accident, misuse, abuse, negligence, alteration, or faulty installation, or any other failure not relating to faulty material or
workmanship. This warranty shall not apply to the finish on any portion of the product, such as surface and/or weathering, as
this is considered normal wear and tear.
The manufacturer does not warrant and specifically disclaims any warranty, whether express or implied, of fitness for a particular
purpose, other than the warranty contained herein. The manufacturer specifically disclaims any liability and shall not be liable
for any consequential or incidental loss or damage, including but not limited to any labor / expense costs involved in the
replacement or repair of said product.
Contact the Customer Service Team at 1-855-HD-HAMPTON or visit HAMPTON.COM.
NOTICE: This equipment has been tested and found to comply
with the limits for a Class B digital device, pursuant to Part 15 of the
FCC Rules.
These limits are designed to provide reasonable protection against
harmful interference in a residential installation.
This equipment generates, uses and can radiate radio frequency
energy and, if not installed and used in accordance with the
instructions, may cause harmful interference to radio
communications.
However, there is no guarantee that interference will not occur in a
particular installation.
If this equipment does cause harmful interference to radio or
television reception, which can be determined by turning the
equipment off and on, the user is encouraged to try to correct the
interference by one or more of the following measures:
–Reorient or relocate the receiving antenna.
–Increase the separation between the equipment and receiver.
–Connect the equipment into an outlet on a circuit different from
that to which the receiver is connected.
–Consult the dealer or an experienced radio/TV technician for help.
Warranty

3 HAMPTONBAY.COM
Please contact 1-855-HD-HAMPTON for further assistance.
Pre-Installation
SPECIFICATIONS
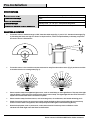
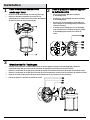
SELECTING A LOCATION
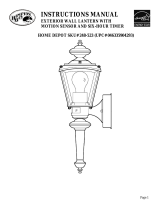
□ The motion sensor’s maximum range is 180° detection width angle (Fig. 1), and is 30° detection down-angle (Fig.
2). Mounting the fixture too high or in front of a sloped surface, such as an uphill walkway or driveway, may affect
the motion sensor’s effectiveness.
□ The motion sensor is less sensitive to movement toward or away from the motion sensor (Fig. 3) and more sensitive
to movement across its coverage area (Fig. 4).
□ Select locations away from nighttime light sources, such as street lamps or other light fixtures. They may shine light
onto the fixture’s photocell sensor (located in the motion sensor head). This light might trick the circuit to think it is
daytime and not allow the fixture’s functions to operate.
□ Select locations away from heat sources, such as heating vents, air conditioners, and heated swimming pools.
□ Shade from a deep porch or an eave may not allow enough daylight to shine onto the photocell sensor and may
trick the circuit to think it is nighttime, and subsequently cause the light to illuminate during the day.
□ Motorized equipment, such as power tools, on the same electrical circuit may cause oscillations on the
electrical line which might cause the fixture to malfunction.
Motion Sensor Range
Up to 30 ft. (varies with surrounding temperature)
Sensor Detection Angle
180°
Electrical Requirements
120 VAC, 60HZ
Installation Height
Ideally, 6.5 ft.±0.7 ft. (1.8 - 2.2 m) above the ground.
Minimum to Maximum Outdoor Temperature
-20°to 50°Celsius (-4°to 122°Fahrenheit)

4
Pre-Installation (continued)
PLANNING INSTALLATION
Read all instructions before assembly. Before starting installation of this fixture or removal of a previous fixture,
disconnect the power by turning off the circuit breaker or by removing the fuse from the fuse box. To avoid damaging
this product, assemble it on a soft, non-abrasive surface such as carpet or cardboard.
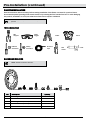
TOOLS REQUIRED
Wire
Strippers
Safety
Goggles
Ladder
Gloves
Flathead
Screwdriver
Phillips
Screwdriver
Electrical
Tape
Wire
Cutters
Caulk
HARDWARE INCLUDED
NOTE: Hardware not shown to actual size.
NOTE: Keep your receipt and these instructions for proof of
purchase.
Part
Description
Quantity
AA
Mounting Plate
1
BB
Ground Screw
1
CC
Mounting Screw (40 mm)
2
DD
Outlet Box Screw (15 mm)
2
EE
Wire Connector
3

5 HAMPTONBAY.COM
Please contact 1-855-HD-HAMPTON for further assistance.
Pre-Installation (continued)
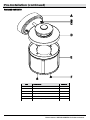
PACKAGE CONTENTS
Part
Description
Quantity
A
Wall Plate
1
B
Washer
2
C
Lock Nut
2
D
Top Cover
1
E
Fixture Frame
1
F
Pan Screw (8 mm)
2

6
Installation
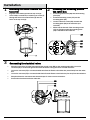
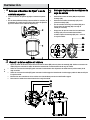
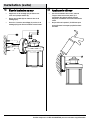
1
Attaching the fixture frame to the
top cover
2
Attaching the mounting plate to
the outlet box
□ Align the fixture frame (E) under the top cover (D).
□ Use a Phillips screwdriver to screw the pan screws (F)
through the holes on the fixture frame (E) into the
holes on the top cover (D).
□ Screw the ground screw (BB) into the mounting
plate (AA).
□ Screw the mounting screws (CC) into the
mounting plate (AA).
□ Use the outlet box screws (DD) to attach the
mounting plate (AA) to the outlet box (not
included).
□ Make sure the threads of the mounting screws
(CC) are facing out when the mounting plate
(AA) is attached to the outlet box.
3 Connecting the electrical wires
□ Wrap the ground wire from the fixture around the ground screw (BB) on the mounting plate (AA). Use a wire
connector (EE) to connect the ground wire from the fixture to the ground wire from the outlet box.
□ Use a wire connector (EE) to connect the white wire from the fixture to the white wire (neutral wire) from the outlet
box.
□ Use a wire connector (EE) to connect the black wire from the fixture to the black wire (live wire) from the outlet box.
□ Wrap the three wire connections with electrical tape for a more secure connection.
□ Position the wires back inside the outlet box.

7 HAMPTONBAY.COM
Please contact 1-855-HD-HAMPTON for further assistance.
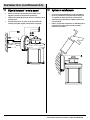
Installation (continued)
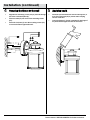
4
Securing the fixture to the wall
5
Applying caulk
□ Align the two mounting screws (CC) to protrude through
the holes on the wall plate (A).
□ Place a washer (B) onto each of the mounting screws
(CC).
□ Screw the lock nuts (C) onto the mounting screws (CC)
to secure the fixture against the wall.
□ Caulk the space between the wall and the upper 3/4
area of the wall plate (A) to prevent water seeping
into the outlet box.
□ Leave the bottom 1/4 area uncaulked for drainage of
any water which might leak into the enclosure.

8
Operating Motion Sensor
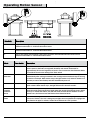
Sensitivity
Description
H
High. In this setting, the sensitivity is the highest. The fixture will illuminate when the motion sensor
detects motion within 3 - 30 ft from the motion sensor.
M
Medium. In this setting, the sensitivity is average. The fixture will illuminate when the motion sensor
detects motion within 3 - 15 ft from the motion sensor.
L
Low. In this setting, the sensitivity is the lowest. The fixture will illuminate when the motion sensor
detects motion within 3 - 5 ft from the motion sensor.
Mode
Timer Switch
Description
Stand-by
Test, 2, or 6
This is the initial state. If you have turned off the power for a long period of time and then
restore power to the fixture, the light will illuminate and remain illuminated for
approximately 20 seconds regardless of motion. Then it enters the Auto Detection Mode
or Test Mode based on the setting of the Timer switch.
Auto
Detection
2 or 6
This is the normal motion detection mode. The motion sensor illuminates the light
automatically after sensing movement in the coverage area at dusk and stays on as long
as motion is detected. When motion stops, the light remains on for either 2 minutes or 6
minutes (as set on Timer Switch) and then automatically turns off.
Test
Test
This mode allows you to adjust the sensitivity of the motion sensor to a desired level at
dusk or dawn. When motion stops, the light will turn off in about 5 seconds.
Manual
Override
with Auto
Reset
N/A
This mode allows you to keep the fixture illuminated for about 8 straight hours. The
manual override mode only works at night (when the outside light intensity level is below
20 Lux). To activate the feature, turn the wall switch off then back on within 2 seconds.
After 8 hours, the fixture resets itself back to Auto Detection Mode.
Dusk-to-
Dawn
D-D
In this mode, the light turns on at dusk and off at dawn automatically, regardless of the
presence of motion. The “D-D” setting ensures lights are non-operational in daylight and
only function at night. To activate, set the Timer switch to the “D-D” position.

9 HAMPTONBAY.COM
Please contact 1-855-HD-HAMPTON for further assistance.
Clean the fixture with a soft, dry cloth.
Do not use any cleaners with chemicals, solvents or hash abrasives.
WARNING: Before attempting to clean the fixture,
disconnect the power to the fixture by turning the breaker off
or removing the fuse from the fuse box.
Care and Cleaning
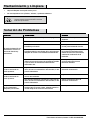
Troubleshooting
Problem
Possible Cause
Solution
In motion sensing mode,
the light does not turn on
when there is motion.
The wall switch or circuit breaker is off.
Turn on a switch or circuit breaker.
There are incorrect or loose wire connections.
Check the wire connections.
Too much sunlight is shining onto the photocell
sensor in the early evening.
Relocate the fixture away from a
western facing wall.
Too much light is shining onto the photocell sensor
due to another light source, such as a street lamp
or other light fixture.
Eliminate or turn off other light
source, block other light source from
shining onto photocell sensor, or
relocate the fixture.
Moving people or vehicles are below the view of the
motion sensor, because the motion sensor is
mounted too high.
Relocate the fixture to a lower
position or to a different location.
In motion sensing mode,
the light stays on
continuously.
There is false triggering caused by a heat source,
such as a heater or dryer vent, or heated swimming
pool.
Eliminate the heat source or relocate
the fixture.
The light comes on for no
apparent reason.
Street or sidewalk traffic is triggering the motion
sensor.
Lower the sensitivity.
False triggering is being caused by a heat source,
such as a heater or dryer vent, or heated swimming
pool.
Eliminate the heat source or relocate
the fixture.
The light comes on during
the daytime or too early in
the evening.
The fixture may be installed in a shaded area, such
as under a porch or eave, preventing daylight from
shining onto the photocell sensor.
Relocate the fixture.

Questions, problems, missing parts? Before returning to the store,
call Hampton Bay Customer Service
8 a.m. - 7 p.m., EST, Monday - Friday, 9 a.m. - 6 p.m., EST, Saturday
1-855-HD-HAMPTON
HAMPTONBAY.COM
Retain this manual for future use.

GRACIAS POR TU COMPRA
Agradecemos la confianza que ha tenido en Hampton Bay a traves de de la compra de esta lámpara artesanales al aire libre
LED. Nos esforzamos para continuamente crear productos de calidad diseñados para mejorar tu hogar. Visítanos por
Internet para ver nuestra línea completa de productos disponibles para las necesidades de mejoras de tu hogar. ¡Gracias
por elegir Hampton Bay!
GUÍA DE USO Y MANTENIMIENTO
SENSOR DE MOVIMIENTO EXTERIOR, DESDE EL
AMANECER HASTA EL ANOCHECER
LINTERNA DE PARED PEQUEÑA LED
Preguntas, problemas o piezas faltantes? Antes de regresar a la tienda,
llama al Servicio al Cliente de Hampton Bay
de Lunes a Viernes entre 8 a.m. y 7 p.m., El Sábado entre 9 a.m. y 6 p.m.(hora del Este de EE. UU.)
1-855-HD-HAMPTON
HAMPTONBAY.COM
Artículo #1002 246 562
Modelo #IZD1691LS-3

12
Índice
Índice .................................................. 12
Información de Seguridad ................. 12
Garantía .............................................. 12
Lo que esta cubierto .................................. 12
Lo que (no) esta cubierto ........................... 12
Pre-Instalación ................................... 13
Especificaciones………..……....13
Seleccionar Ubicación………...13
Planificación de la Instalatión..14
Herraminentas Necesarias........................ 14
Hardware Incluido .................................... 14
Contenido del Paquete ............................. 15
Instalación ..........................................16
Sensor de Movimiento Operacional ..18
Mantenimiento y Limpieza .................19
Solución de Problemas………………..19
Información de Seguridad
ADVERTENCIA: Lea cuidadosamente y entienda la
información dada en este manual antes de empezar el proceso
de ensamble e instalación. Si falla en hacerlo, puede ocasionar
un choque eléctrico, incendio u otros daños que pueden ser
perjudiciales o fatales.
ADVERTENCIA: Asegúrese de que la electricidad que
llega a los cables con los que se encuentra trabajando estén
apagados. Remueva el fusible o apague el interruptor.
ANUNCIO: Cualquier cambio o modificación que no se encuentre
expresamente aprobada por el proveedor responsable del cumplimiento
puede revocar la autorización del usuario a utilizar el equipo.
Garantía
LO QUE ESTA CUBIERTO
El fabricante garantiza que esta lámpara no presentará defectos materiales o de fabricación por un período de cinco (5)
años a partir de la fecha de compra. Esta garantía es válida sólo para el comprador original y sólo cubre los productos en
uso y funciones normales. Si se descubre algún defecto en este producto, la única obligación y solución exclusiva del
fabricante, a criterio del mismo, será reparar o reemplazar el producto siempre y cuando el defecto no sea resultado de un
mal uso, abuso, accidente, modificaciones, alteraciones,negligencia o manejo indebido.
LO QUE (NO) ESTA CUBIERTO
Esta garantía no cubre ningún producto instalado, configurado o usado incorrectamente sin seguir las instrucciones
adjuntas al producto. Esta garantía no cubre fallas del producto a consecuencia de un accidente, mal uso, abuso,
negligencia, modificaciones o instalaciones defectuosas, o cualquier otra falla no relacionada con defectos materiales o de
fabricación. Esta garantía no se aplica al acabado de ninguna parte del producto, como por ejemplo el de la superficie, ni al
deterioro por condiciones ambientales, ya que eso se considera un desgaste normal.
El fabricante no garantiza y rechaza especialmente cualquier garantía, expresa o implícita, de idoneidad para un propósito
en particular, distinta de la garantía indicada aquí. El fabricante se exime específicamente de cualquier obligación y no es
responsable por daños o pérdidas directas o indirectas, lo que incluye cualquier costo de mano de obra o gastos
relacionados con el reemplazo o reparación de dicho producto.
Comunícate con el Equipo de Servicio al Cliente al 1-855-HD-HAMPTON o visita HAMPTONBAY.COM.
NOTA: Este equipo ha sido probado y se encuentra que cumple con
los límites de dispositivos de la Clase B, y cumple con la arte 15 de
la regla del FCC.
Estos límites están diseñados para suministrar una protección
razonable contra interferencia perjudicial en una instalación
residencial.
Este equipo genera, utiliza y puede irradiar energía de frecuencia
radial, si no se instala e utiliza según las instrucciones, puede causar
interferencia dañina en las comunicaciones de radio.
Sin embargo, no hay garantía de que la interferencia no ocurrirá en
una instalación en particular.
Si el equipo causa interferencia perjudicial a la radio o a la
recepción del televisor, lo cual puede determinar apagando el quipo,
se le invita al usuario a intentar corregir la interferencia con una de
las siguientes medidas:
–Reorientar o reubicar la antena receptora.
–Aumente la separación entre el quipo y el receptor.
–Conecte el equipo en el enchufe de un circuito diferente a aquel
donde se encuentra conectado el receptor.
–Consulte al distribuidor o a un técnico experto en radio/TV para
solicitar ayuda.

13 HAMPTONBAY.COM
Para obtener asistencia, llama al 1-855-HD-HAMPTON.
Pre-Instalación
ESPECIFICACIONES
SELECCIONAR UBICACIÓN
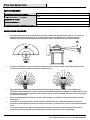
□ El alcance máximo del sensor de movimiento es de 180° de detección del ángulo ancho (Fig. 1), y es de 30° de
detección hacia abajo del ángulo (Fig. 2). Un montaje del accesorio demasiado alto o sobre una superficie
inclinada, tal como una cuesta arriba o en entrada, puede afectar a la eficacia del sensor de movimiento.
□ El sensor de movimiento es menos sensible al movimiento hacia o desde el sensor de movimiento (Fig. 3) y más
sensible al movimiento a través de su área de cobertura (Fig. 4).
□ Seleccione lugares alejados de cualquier fuente de luz durante la noche, como farolas u otros artefactos de
iluminación. Pueden alumbrar luz sobre el sensor de la fotocélula del dispositivo (situado en la cabeza del sensor de
movimiento). Esta luz podría engañar al circuito a pensar que es de día y no permitir que las funciones del proyector
funcionen correctamente.
□ Seleccione lugares alejados de fuentes de calor, como conductos de calefacción, aire acondicionado y piscinas
climatizadas.
□ La sombra de un porche profundo o un alero puede no permitir que una luz suficiente alumbre el sensor de la
fotocélula y puede engañar al circuito a pensar que es de noche, y, posteriormente, llevar a la luz a iluminar durante
el día.
□ Los equipos monitorizados, tales como herramientas eléctricas, en el mismo circuito eléctrico pueden causar
oscilaciones en la línea eléctrica que podrían causar que el accesorio no funcione correctamente.
Alcance del Sensor de Movimiento
De hasta 30 pies (varía con la temperatura circundante)
Ángulo de Detección del Sensor
180°
Requisitos Eléctricos
120 VAC, 60HZ
Altura de Instalación
Idealmente entre 6,5 pies y 0,7 pies (1,8 - 2,2 metros) por encima del suelo.
Temperatura Minima a Maxima al Aire Libre
-20°a 50°Celsius (-4°a 122°Fahrenheit)

14
Pre-Instalatión
PLANIFICACIÓN DE LA INSTALACIÓN
Lee todas las instrucciones antes de ensamblar. Antes de comenzar la instalación o de quitar la instalación anterior,
desconecte la alimentacion apagando el interruptor del circuito o quitando el fusible en la caja de fusible. Para evitar dañar
el artículo, ensámblalo sobre una superficie suave, no abrasiva, como por ejemplo una alfombra o cartón.
NOTA: Conserva el recibo y estas Instrucciones como
Comprobante de Compra.
HERRAMIENTAS NECESARIAS
Peladores
de Cables
Gafas de
Seguridad
Escalera
Guantes
Destornillador
de Cabeza
Plana
Destornillador
Phillips
Cinta
Aislan
Pinzas
Cortacables
Calafate
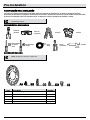
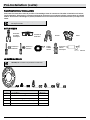
HARDWARE INCLUIDO
NOTA: El objeto no se muestra en su tamaño real.
Pieza
Descripción
Cantidad
AA
Placa de Montaje
1
BB
Tornillo de Terre
1
CC
Tornillo de Montage (40 mm)
2
DD
Tornillo de la Boîte de Sortie (15 mm)
2
EE
Conector de Cable
3

15 HAMPTONBAY.COM
Para obtener asistencia, llama al 1-855-HD-HAMPTON.
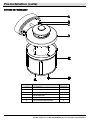
CONTENIDO DEL PAQUETE
Pre-Instalación (continuación)
Pieza
Descripción
Cantidad
A
Placa de la Pared
1
B
Junta
2
C
Tuerca de Cierre
2
D
Cubierta Superior
1
E
Bastidor de Fijación
1
F
Tornillo Pan (8mm)
2

16
Instalación
1
1 Coloque el bastidor de fijación en la
cubierta superior
2
Coloque la placa de montaje en la
caja de salida
□ Linee el bastidor de fijación (E) bajo la cubierta superior
(D).
□ Use un destornillador Phillips para atornillar los tornillos de
la bandeja (F) a través de los orificios del marco de fijación
(E) en los orificios de la cubierta superior (D).
□ Atornille el tornillo de tierra (BB) en la placa de
montaje (AA).
□ Atornille los tornillos de montaje (CC) en la
placa de montaje (AA).
□ Use los tornillos de la caja de salida (DD) para
fijar la placa de montaje (AA) a la caja de
salida (no incluida).
□ Asegúrese de que las roscas de los tornillos de
montaje (CC) están mirando hacia afuera
cuando la placa de montaje (AA) esté unida a
la caja de salida.
3
3 Conexión de los cables eléctricos
□ Ajuste el cable de tierra del dispositivo al tornillo de tierra (BB) sobre la placa de montaje (AA). Utilice un conector de
cable (EE) para conectar el cable de tierra de la luminaria al cable de tierra de la caja de salida.
□ Utilice un conector de cable (EE) para conectar el cable blanco del dispositivo al cable blanco (cable neutro) de la
caja de salida.
□ Utilice un conector de cable (EE) para conectar el cable negro de la luminaria al cable negro (cable de alta tensión) de
la caja de salida.
□ Envuelva las tres conexiones de los cables con cinta aislante para una conexión más segura.
□ Posicione los cables de vuelta al interior de la caja de salida.

17 HAMPTONBAY.COM
Para obtener asistencia, llama al 1-855-HD-HAMPTON.
Instalación (continuación)
4
Fijar la instalación en la pared
5
Aplicar el calafateado
□ Alinee los tornillos de montaje (CC) a travé de los
agujeros que hay en el placa de la pared (A).
□ Coloque una junta (B) en cada uno de los tornillos de de
montaje (CC).
□ Atornille las tuercas de cierre (C) en los tornillos de
montaje (CC) para sujetar el dispositivo a la pared.
□ Una vez que la instalación haya sido montada en
la pared, calafatear el espacio entre la pared y la
3/4 partes del área superior de la placa de la
pared (A) para prevenir que el agua se filtre en la
caja de salida.
□ Deje 1/4 parte del área inferior si calafatear para
el drenaje de posible agua que haya podido
filtrarse en el recinto.

18
Sensor de Movimiento Operacional
Sensitividad
Descripción
H
Alta. En esta configuración, la sensibilidad es la más alta. El aparato se encenderá cuando el sensor de
movimiento detecte un movimiento entre 3 y 30 pies del sensor de movimiento.
M
Media. En esta configuración, la sensibilidad es normal. El aparato se encenderá cuando el sensor de
movimiento detecte un movimiento entre 3 y 15 pies del sensor de movimiento.
L
Baja. En esta configuración, la sensibilidad es la más baja. El aparato se encenderá cuando el sensor de
movimiento detecte un movimiento entre 3 y 5 pies del sensor de movimiento.
Modo
Interruptor del
temporizador
Descripción
Espera
Test, 2 o 6
Este es el estado inicial. Si ha apagado el dispositivo durante un largo periodo de
tiempo y luego restaura la potencia a la luminaria, la luz se encenderá y permanecerá
iluminada durante aproximadamente 20 segundos, independientemente del
movimiento. Entonces, se inicia el modo de detección automática o modo de prueba
en base a la posición del interruptor del temporizador.
Detección
automática
2 o 6
Este es el modo de detección de movimiento normal. El sensor de movimiento
enciende la luz automáticamente tras detectar un movimiento en el área de cobertura
en la oscuridad y la luz se mantiene iluminada durante el tiempo que se detecta
movimiento. Cuando se detiene el movimiento, la luz permanece encendida, ya sea 2 o
6 minutos (según lo establecido en el interruptor del temporizador) y luego se apaga
automáticamente.
Test
Test
Este modo le permite ajustar la sensibilidad del sensor de movimiento a un nivel
deseado al anochecer o al amanecer. Cuando se detiene el movimiento, la luz se
apagará en unos 5 segundos.
Anulación
manual con
reajuste
automático
Sin respuesta
Este modo le permite mantener el dispositivo de iluminación durante
aproximadamente 8 horas seguidas. El modo de anulación manual funciona sólo por la
noche (cuando el nivel de intensidad de la luz exterior es inferior a 20 lux). Para activar
la función, gire el interruptor de pared hacia fuera en un plazo de 2 segundos. Después
de 8 horas, el dispositivo se reinicia de nuevo en modo de detección automática.
Desde el
atardecer
hasta el
amanecer
D-D
En este modo, la luz se enciende al atardecer y se apaga al amanecer de forma
automática, sin tener en cuenta la presencia de movimiento. El ajuste "DD" asegura
que las luces están fuera de funcionamiento durante el día y sólo funcionan por la
noche. Para activar este modo, configure el temporizador y cambie a la posición "D-
D".

19 HAMPTONBAY.COM
Para obtener asistencia, llama al 1-855-HD-HAMPTON.
□ Limpia la lámpara con un paño suave y seco.
□ No uses limpiadores con químicos, solvents, o productos abrasivos.
PRECAUCIÓN: Antes de intentar limpiar la
pieza,desconéctela o apague el interruptor o remueva el
fusible de la caja de fusibles.
Solución de Problemas
Mantenimiento y Limpieza
Limpieza Limpieza
Problema
Causa Posible
Solución
En modo de detección de
movimiento, la luz no se
enciende cuando hay
movimiento.
El interruptor de pared o disyuntor está apagado.
Encienda un interruptor o un
disyuntor.
Conexiones de cables sueltos o incorrectas.
Testee las conexiones de los cables.
Demasiada luz solar está iluminando el sensor de la
fotocélula por la tarde.
Recoloque el accesorio de distancia
en una pared orientada al oeste.
Demasiada cantidad de luz ilumina el sensor de la
fotocélula debido a otra fuente de luz, tal como una
lámpara de la calle u otro artefacto de iluminación.
Elimine o apague la otra fuente de
luz y evite que otra fuente de luz
ilumine el sensor de la fotocélula,
cambiando la ubicación de la
luminaria.
Personas o vehículos en movimiento pasan por
debajo de la vista del sensor de movimiento, debido
a que el sensor de movimiento está montado
demasiado alto.
Recoloque el dispositivo en una
posición más baja o en una
ubicación diferente.
La luz se enciende sin
razón aparente.
Hay una falsa activación causada por una fuente de
calor, tal como un calentador o una secadora, o una
piscina climatizada.
Elimine la fuente de calor o la
ubicación del accesorio.
La luz se enciende sin
razón aparente.
El tráfico de la calle o de la acera está activando el
sensor de movimiento.
Baje la sensibilidad.
Hay una falsa activación causada por una fuente de
calor, tal como un calentador o una secadora, o una
piscina climatizada.
Elimine la fuente de calor o la
ubicación del accesorio.
La luz se enciende durante
el día o demasiado
temprano por la noche.
El accesorio se puede instalar en una zona de
sombra, bajo un porche o alero, evitando que la luz
del día refleje en el sensor de la fotocélula.
Recoloque el accesorio.

Item # 000-000
Model # XXXXXXX
Preguntas, problemas o piezas faltantes? Antes de regresar a la tienda, llama
al Servicio al Cliente de Hampton Bay
de lunes a Viernes entre 8 a.m. y 7 p.m.,,El sábado entre 9 a.m. y 6 p.m., (hora del Este de EE. UU.)
1-855-HD-HAMPTON
HAMPTONBAY.COM
Conserva este manual para referencias futuras.
La page charge ...
La page charge ...
La page charge ...
La page charge ...
La page charge ...
La page charge ...
La page charge ...
La page charge ...
La page charge ...
La page charge ...
-
 1
1
-
 2
2
-
 3
3
-
 4
4
-
 5
5
-
 6
6
-
 7
7
-
 8
8
-
 9
9
-
 10
10
-
 11
11
-
 12
12
-
 13
13
-
 14
14
-
 15
15
-
 16
16
-
 17
17
-
 18
18
-
 19
19
-
 20
20
-
 21
21
-
 22
22
-
 23
23
-
 24
24
-
 25
25
-
 26
26
-
 27
27
-
 28
28
-
 29
29
-
 30
30


dans d''autres langues
Documents connexes
-
 Hampton Bay NTSW30030LBL-MS Guide d'installation
-
 Hampton Bay RFSW30030LRS-MS Guide d'installation
-
 Hampton Bay 1002 956 545 Mode d'emploi
-
Hampton Bay 5A1600N-SN Mode d'emploi
-
 Hampton Bay 705207 Mode d'emploi
-
 Hampton Bay EST-13-50-Y Manuel utilisateur
-
 Hampton Bay EST-534T-10-Y Guide d'installation
-
 Hampton Bay EST-540T-10-Y Guide d'installation
-
 Hampton Bay EST-540T-10-Y Mode d'emploi
-
 Hampton Bay HB8033MPALU-05 Mode d'emploi


