ZyXEL DI-106 Le manuel du propriétaire
- Catégorie
- Les routeurs
- Taper
- Le manuel du propriétaire
Ce manuel convient également à

www.zyxel.com
NBG-417N
Wireless N-lite Home Router
Version 1.00
Edition 1, 1/2009
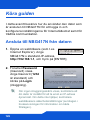
QUICK START GUIDE
DEFAULT LOGIN DETAILS
LAN Port LAN1 ~ LAN4
IP Address http://192.168.1.1
Password 1234
CONTENTS
ENGLISH 3
DEUTSCH 25
ESPAÑOL 49
FRANÇAIS 73
ITALIANO 97
SVENSKA 121
NEDERLANDS 143
2009 ZyXEL Communications Corporation
C

[Document Title]
2

ENGLISH
3
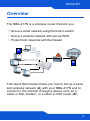
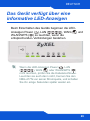
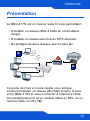
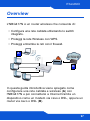
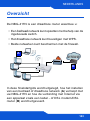
Overview
The NBG-417N is a wireless router that lets you:
• Set up a wired network using the built-in switch.
• Set up a wireless network with secure WPS.
• Protect both networks with the firewall.
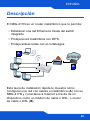
This Quick Start Guide shows you how to set up a wired
and wireless network (A) with your NBG-417N and to
connect to the Internet through a device such as a
cable or DSL modem, or a cable or DSL router (B).
A
B

ENGLISH
4
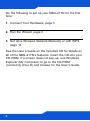
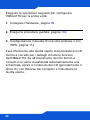
Do the following to set up your NBG-417N for the first
time:
1. Connect Your Hardware, page 5
2. Run the Wizard, page 8
3. Set Up a Wireless Network Manually or with WPS,
page 18
See the User’s Guide on the included CD for details on
all of the NBG-417N’s features. Insert the CD into your
CD-ROM, if a screen does not pop-up, use Windows
Explorer (My Computer) to go to the CD-ROM
(commonly drive D) and browse for the User’s Guide.

ENGLISH
5
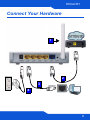
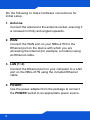
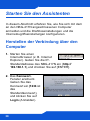
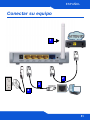
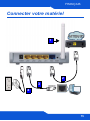
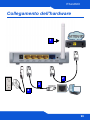
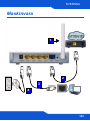
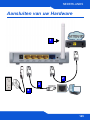
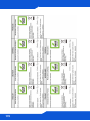
Connect Your Hardware
3
4
2
1

ENGLISH
6
Do the following to make hardware connections for
initial setup.
1. Antenna:
Connect the antenna to the antenna socket, ensuring it
is screwed in firmly and angled upwards.
2. WAN:
Connect the WAN port on your NBG-417N to the
Ethernet port on the device with which you are
accessing the Internet (for example, a modem) using
an Ethernet cable.
3. LAN (1~4):
Connect the Ethernet port on your computer to a LAN
port on the NBG-417N using the included Ethernet
cable.
4. POWER:
Use the power adapter from the package to connect
the POWER socket to an appropriate power source.

ENGLISH
7
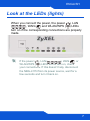
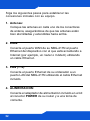
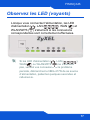
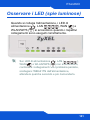
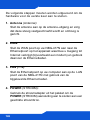
Look at the LEDs (lights)
When you connect the power, the power (), LAN
( ), WAN ( ) and WLAN/WPS ( ) LEDs
turn on if the corresponding connections are properly
made.
If the power ( ), LAN ( ), WAN () or
WLAN/WPS ( ) LEDs do not turn on, check
your connections. If this doesn’t help, disconnect
the NBG-417N from its power source, wait for a
few seconds and turn it back on.

ENGLISH
8
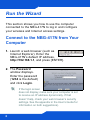
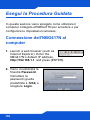
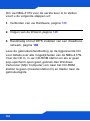
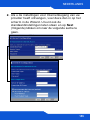
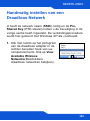
Run the Wizard
This section shows you how to use the computer
connected to the NBG-417N to log in and configure
your wireless and Internet access settings.
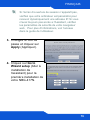
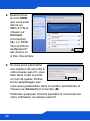
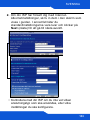
Connect to the NBG-417N from Your
Computer
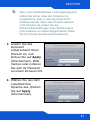
1. Launch a web browser (such as
Internet Explorer). Enter the
NBG-417N’s default IP address,
http://192.168.1.1, and press [ENTER].
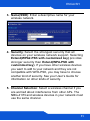
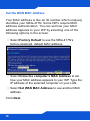
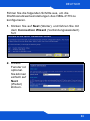
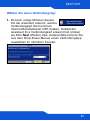
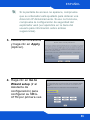
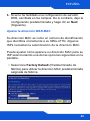
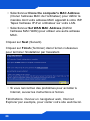
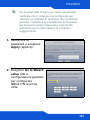
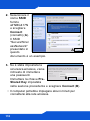
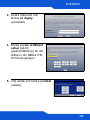
2. The Password
window displays.
Enter the password
(1234 is the default)
and click Login.
If the login screen
does not display, make sure your computer is set
to receive an IP address dynamically. If that
doesn’t help, check your web browser’s security
settings. See the appendix in the User’s Guide for
information on both suggestions).

ENGLISH
9
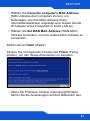
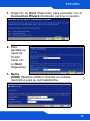
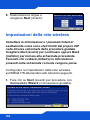
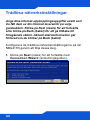
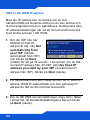
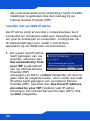
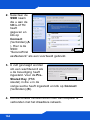
3. Change the password
and click Apply.
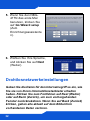
4. Click Go to Wizard
setup to set up your
NBG-417N for the first
time.
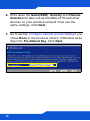
5. Choose your language and
click Next.

ENGLISH
10
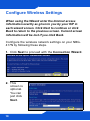
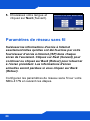
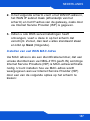
Configure Wireless Settings
When using the Wizard enter the Internet access
information exactly as given to you by your ISP in
each wizard screen. Click Next to continue or click
Back to return to the previous screen. Current screen
information will be lost if you click Back.
Configure the wireless network settings on your NBG-
417N by following these steps.
1. Click Next to proceed with the Connection Wizard.
2. This
screen is
optional.
You can
just click
Next.

ENGLISH
11
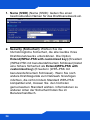
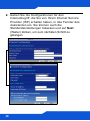
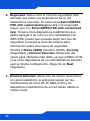
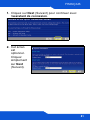
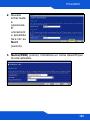
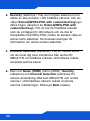
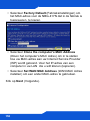
3. Name(SSID): Enter a descriptive name for your
wireless network.
4. Security: Select the strongest security that all
devices on your wireless network support. Selecting
Extend(WPA2-PSK with customized key) provides
stronger security than Extend(WPA-PSK with
customized key). If you have other wireless devices
you want to add to your network and they are not
compatible with WPA-PSK, you may have to choose
another kind of security. See your User’s Guide for
information on other kinds of security.
5. Channel Selection: Select a wireless channel if you
are worried about interference from other APs. The
NBG-417N and wireless devices in your network must
use the same channel.

ENGLISH
12
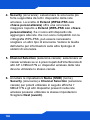
6. Write down the Name(SSID), Security and Channel
Selection for later use as the NBG-417N and other
devices on your wireless network must use the
same settings. Click Next.
7. Go to section Configure Internet Access Setting if you
chose None in the previous screen. Otherwise write
down the Pre-Shared Key. Click Next.

ENGLISH
13
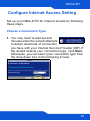
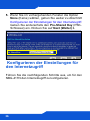
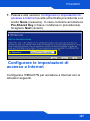
Configure Internet Access Setting
Set up your NBG-417N for Internet access by following
these steps.
Choose a Connection Type.
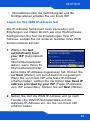
1. You may need to wait several
minutes while the wizard attempts
to detect what kind of connection
you have with your Internet Service Provider (ISP).If
the wizard detects your connection type, click Next.
Otherwise, you can select your connection type from
the drop-down box in the following screen.

ENGLISH
14
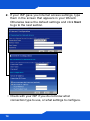
2. If your ISP gave you Internet access settings, type
them in the screen that appears in your Wizard.
Otherwise leave the default settings and click Next
to go to the next section.
• Check with your ISP if you do not know what
connection type to use, or what settings to configure.

ENGLISH
15
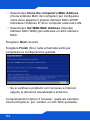
Set Your WAN IP Address
Your IP address lets you send and receive network
traffic in a similar way to how a street address lets you
send and receive mail. Configure your IP address
settings here so you can communicate with other
devices on your WAN.
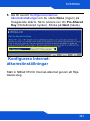
1. If your ISP did not
assign you a fixed IP
address, select Get
automatically from
your ISP and click Next
to go to section .
Otherwise, if your ISP
gave you a fixed IP address, select Use fixed IP
address provided by your ISP. Click Next.
2. In the screen that appears type the WAN IP address,
and, depending on the screen, the WAN IP subnet
mask and the gateway IP address given by your ISP.
3. If you are given DNS server settings, type them in
the screen that appears. Otherwise leave the default
settings and click Next.

ENGLISH
16
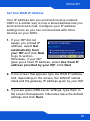
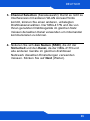
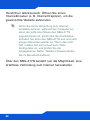
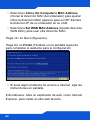
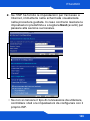
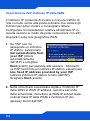
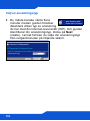
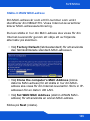
Set the WAN MAC Address
Your MAC address is like an ID number which uniquely
identifies your NBG-417N. Some ISPs require MAC
address authentication. You can set how your MAC
address appears to your ISP by selecting one of the
following options in the screen.
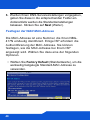
•Select Factory Default to use the NBG-417N’s
factory-assigned, default MAC address.
•Select Clone the computer’s MAC Address to set
how your MAC address appears to your ISP. Type the
IP address of the selected computer on your LAN.
•Select Set WAN MAC Address to use another MAC
address.
Click Next.

ENGLISH
17
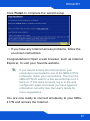
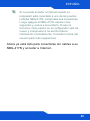
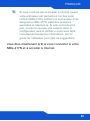
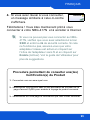
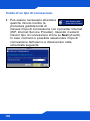
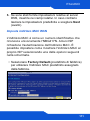
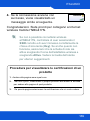
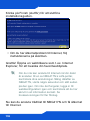
Click Finish to complete the wizard setup.
• If you have any Internet access problems, follow the
on-screen instructions.
Congratulations! Open a web browser, such as Internet
Explorer, to visit your favorite website.
If you cannot access the Internet when your
computer is connected to one of the NBG-417N’s
LAN ports, check your connections. Then turn the
NBG-417N off, wait for a few seconds then turn it
back on. If that does not work, log in to the web
configurator again and check you have typed all
information correctly. See the User’s Guide for
more suggestions.
You are now ready to connect wirelessly to your NBG-
417N and access the Internet.

ENGLISH
18
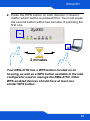
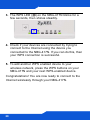
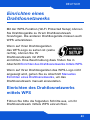
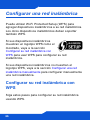
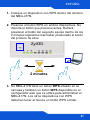
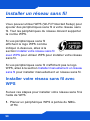
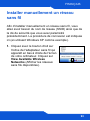
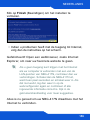
Set Up a Wireless Network
You can use Wi-Fi Protected Setup (WPS) to add
wireless devices to your wireless network. The other
wireless devices must also support WPS.
If your wireless devices display the
WPS logo as shown, go to section
Set up Your Wireless Network with
WPS to use WPS to set up your
wireless network.
If your wireless devices do not display the WPS logo,
go to section Set up a Wireless Network Manually to
manually set up a wireless network.
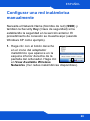
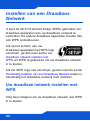
Set up Your Wireless Network with
WPS
Follow these steps to set up your wireless network
using WPS.
1. Place a WPS-enabled device within range of the
NBG-417N.

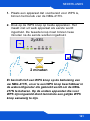
ENGLISH
19
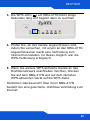
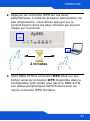
2. Press the WPS button on both devices. It doesn’t
matter which button is pressed first. You must press
the second button within two minutes of pressing the
first one.
Your NBG-417N has a WPS button located on its
housing, as well as a WPS button available in the web
configurator used to manage the NBG-417N. Other
WPS-enabled devices should have at least one
similar WPS button.
2 minutes

ENGLISH
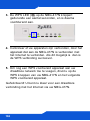
20
3. The WPS LED ( ) on the NBG-417N blinks for a
few seconds, then shines steadily.
4. Check if your devices are connected by trying to
connect to the Internet using the device you
connected to the NBG-417N. If you can do this, then
your WPS connection is successful.
5. To add another WPS enabled device to your
wireless network, press the WPS buttons on your
NBG-417N and your next WPS-enabled device.
Congratulations! You are now ready to connect to the
Internet wirelessly through your NBG-417N.
La page est en cours de chargement...
La page est en cours de chargement...
La page est en cours de chargement...
La page est en cours de chargement...
La page est en cours de chargement...
La page est en cours de chargement...
La page est en cours de chargement...
La page est en cours de chargement...
La page est en cours de chargement...
La page est en cours de chargement...
La page est en cours de chargement...
La page est en cours de chargement...
La page est en cours de chargement...
La page est en cours de chargement...
La page est en cours de chargement...
La page est en cours de chargement...
La page est en cours de chargement...
La page est en cours de chargement...
La page est en cours de chargement...
La page est en cours de chargement...
La page est en cours de chargement...
La page est en cours de chargement...
La page est en cours de chargement...
La page est en cours de chargement...
La page est en cours de chargement...
La page est en cours de chargement...
La page est en cours de chargement...
La page est en cours de chargement...
La page est en cours de chargement...
La page est en cours de chargement...
La page est en cours de chargement...
La page est en cours de chargement...
La page est en cours de chargement...
La page est en cours de chargement...
La page est en cours de chargement...
La page est en cours de chargement...
La page est en cours de chargement...
La page est en cours de chargement...
La page est en cours de chargement...
La page est en cours de chargement...
La page est en cours de chargement...
La page est en cours de chargement...
La page est en cours de chargement...
La page est en cours de chargement...
La page est en cours de chargement...
La page est en cours de chargement...
La page est en cours de chargement...
La page est en cours de chargement...
La page est en cours de chargement...
La page est en cours de chargement...
La page est en cours de chargement...
La page est en cours de chargement...
La page est en cours de chargement...
La page est en cours de chargement...
La page est en cours de chargement...
La page est en cours de chargement...
La page est en cours de chargement...
La page est en cours de chargement...
La page est en cours de chargement...
La page est en cours de chargement...
La page est en cours de chargement...
La page est en cours de chargement...
La page est en cours de chargement...
La page est en cours de chargement...
La page est en cours de chargement...
La page est en cours de chargement...
La page est en cours de chargement...
La page est en cours de chargement...
La page est en cours de chargement...
La page est en cours de chargement...
La page est en cours de chargement...
La page est en cours de chargement...
La page est en cours de chargement...
La page est en cours de chargement...
La page est en cours de chargement...
La page est en cours de chargement...
La page est en cours de chargement...
La page est en cours de chargement...
La page est en cours de chargement...
La page est en cours de chargement...
La page est en cours de chargement...
La page est en cours de chargement...
La page est en cours de chargement...
La page est en cours de chargement...
La page est en cours de chargement...
La page est en cours de chargement...
La page est en cours de chargement...
La page est en cours de chargement...
La page est en cours de chargement...
La page est en cours de chargement...
La page est en cours de chargement...
La page est en cours de chargement...
La page est en cours de chargement...
La page est en cours de chargement...
La page est en cours de chargement...
La page est en cours de chargement...
La page est en cours de chargement...
La page est en cours de chargement...
La page est en cours de chargement...
La page est en cours de chargement...
La page est en cours de chargement...
La page est en cours de chargement...
La page est en cours de chargement...
La page est en cours de chargement...
La page est en cours de chargement...
La page est en cours de chargement...
La page est en cours de chargement...
La page est en cours de chargement...
La page est en cours de chargement...
La page est en cours de chargement...
La page est en cours de chargement...
La page est en cours de chargement...
La page est en cours de chargement...
La page est en cours de chargement...
La page est en cours de chargement...
La page est en cours de chargement...
La page est en cours de chargement...
La page est en cours de chargement...
La page est en cours de chargement...
La page est en cours de chargement...
La page est en cours de chargement...
La page est en cours de chargement...
La page est en cours de chargement...
La page est en cours de chargement...
La page est en cours de chargement...
La page est en cours de chargement...
La page est en cours de chargement...
La page est en cours de chargement...
La page est en cours de chargement...
La page est en cours de chargement...
La page est en cours de chargement...
La page est en cours de chargement...
La page est en cours de chargement...
La page est en cours de chargement...
La page est en cours de chargement...
La page est en cours de chargement...
La page est en cours de chargement...
La page est en cours de chargement...
La page est en cours de chargement...
La page est en cours de chargement...
La page est en cours de chargement...
La page est en cours de chargement...
La page est en cours de chargement...
La page est en cours de chargement...
La page est en cours de chargement...
La page est en cours de chargement...
La page est en cours de chargement...
La page est en cours de chargement...
-
 1
1
-
 2
2
-
 3
3
-
 4
4
-
 5
5
-
 6
6
-
 7
7
-
 8
8
-
 9
9
-
 10
10
-
 11
11
-
 12
12
-
 13
13
-
 14
14
-
 15
15
-
 16
16
-
 17
17
-
 18
18
-
 19
19
-
 20
20
-
 21
21
-
 22
22
-
 23
23
-
 24
24
-
 25
25
-
 26
26
-
 27
27
-
 28
28
-
 29
29
-
 30
30
-
 31
31
-
 32
32
-
 33
33
-
 34
34
-
 35
35
-
 36
36
-
 37
37
-
 38
38
-
 39
39
-
 40
40
-
 41
41
-
 42
42
-
 43
43
-
 44
44
-
 45
45
-
 46
46
-
 47
47
-
 48
48
-
 49
49
-
 50
50
-
 51
51
-
 52
52
-
 53
53
-
 54
54
-
 55
55
-
 56
56
-
 57
57
-
 58
58
-
 59
59
-
 60
60
-
 61
61
-
 62
62
-
 63
63
-
 64
64
-
 65
65
-
 66
66
-
 67
67
-
 68
68
-
 69
69
-
 70
70
-
 71
71
-
 72
72
-
 73
73
-
 74
74
-
 75
75
-
 76
76
-
 77
77
-
 78
78
-
 79
79
-
 80
80
-
 81
81
-
 82
82
-
 83
83
-
 84
84
-
 85
85
-
 86
86
-
 87
87
-
 88
88
-
 89
89
-
 90
90
-
 91
91
-
 92
92
-
 93
93
-
 94
94
-
 95
95
-
 96
96
-
 97
97
-
 98
98
-
 99
99
-
 100
100
-
 101
101
-
 102
102
-
 103
103
-
 104
104
-
 105
105
-
 106
106
-
 107
107
-
 108
108
-
 109
109
-
 110
110
-
 111
111
-
 112
112
-
 113
113
-
 114
114
-
 115
115
-
 116
116
-
 117
117
-
 118
118
-
 119
119
-
 120
120
-
 121
121
-
 122
122
-
 123
123
-
 124
124
-
 125
125
-
 126
126
-
 127
127
-
 128
128
-
 129
129
-
 130
130
-
 131
131
-
 132
132
-
 133
133
-
 134
134
-
 135
135
-
 136
136
-
 137
137
-
 138
138
-
 139
139
-
 140
140
-
 141
141
-
 142
142
-
 143
143
-
 144
144
-
 145
145
-
 146
146
-
 147
147
-
 148
148
-
 149
149
-
 150
150
-
 151
151
-
 152
152
-
 153
153
-
 154
154
-
 155
155
-
 156
156
-
 157
157
-
 158
158
-
 159
159
-
 160
160
-
 161
161
-
 162
162
-
 163
163
-
 164
164
-
 165
165
-
 166
166
-
 167
167
-
 168
168


ZyXEL DI-106 Le manuel du propriétaire
- Catégorie
- Les routeurs
- Taper
- Le manuel du propriétaire
- Ce manuel convient également à
dans d''autres langues
- italiano: ZyXEL DI-106 Manuale del proprietario
- English: ZyXEL DI-106 Owner's manual
- español: ZyXEL DI-106 El manual del propietario
- Deutsch: ZyXEL DI-106 Bedienungsanleitung
- Nederlands: ZyXEL DI-106 de handleiding
- svenska: ZyXEL DI-106 Bruksanvisning
Documents connexes
-
 ZyXEL Communications 3G Manuel utilisateur
-
 ZyXEL Communications NBG-420N Le manuel du propriétaire
-
ZyXEL Communications NBG460N Manuel utilisateur
-
ZyXEL NBG-417N Guide de démarrage rapide
-
ZyXEL P-660HNU-F1 Guide de démarrage rapide
-
-
ZyXEL P-661HNU-F3 Guide de démarrage rapide
-
ZyXEL Communications NBG4604 Le manuel du propriétaire
-
-


