Candy FCP 602X Manuel utilisateur
- Catégorie
- Plaques de cuisson
- Taper
- Manuel utilisateur
Ce manuel convient également à

FORNI
ISTRUZIONI PER L'USO
IT
FOURS ENCASTRABLES
NOTICE D’EMPLOI ET D’INSTALLATION
FR
NAVODILO ZA UPORABO
VEČNAMENSKE VGRADNE PEČICE
SI
ФУРНИ
ИНСТРУКЦИИ ЗА ПОТРЕБИТЕЛЯ
BG
CANDY HOOVER GROUP S.R.L. • Via Privata Eden Fumagalli • 20047 Brugherio Milano Italy
07
HORNOS EMPOTRABLES
INSTRUCCIONES DE USO
ES
17
12
22
27
OVENS
USER INSTRUCTIONS
GB
02
0002-1576

• WARNING: the appliance and accessible parts become hot during use. Be careful not to touch any hot parts.
•WARNING: the accessible parts can become hot when the oven is in use. Children must be kept at a safe
distance.
•WARNING: ensure that the appliance is switched off before replacing the bulb, to avoid the possibility of electric
shocks.
•WARNING: before initiating the automatic cleaning cycle:
- Clean the oven door;
- Remove large or coarse food residues from the inside of the oven using a damp sponge. Do not use detergents;
- Remove all accessories and the sliding rack kit (where present);
- Do not place tea towels
• In ovens with meat probe it is necessary, before making the cleaning cycle, close the hole with the nut provided.
Always close the hole with the nut when the meat probe is not used.
•Children under 8 must be kept at a safe distance from the appliance if not continuously supervised.
•Children must not play with the appliance. The appliance can be used by those aged 8 or over and by those with
limited physical, sensorial or mental capacities, without experience or knowledge of the product, only if supervised
or provided with instruction as to the operation of the appliance, in a safe way with awareness of the possible risks.
•Cleaning and maintenance should not be carried out by unsupervised children.
•Do not use rough or abrasive materials or sharp metal scrapers to clean the oven door glasses, as they can
scratch the surface and cause the glass to shatter.
•The oven must be switched off before removing the removable parts and, after cleaning, reassemble them
according the instructions.
•Only use the meat probe recommended for this oven.
•Do not use a steam cleaner for cleaning operations.
• Connect a plug to the supply cable that is able to bear the voltage, current and load indicated on the tag and
having the earth contact. The socket must be suitable for the load indicated on the tag and must be having the earth
contact connected and in operation. The earth conductor is yellow-green in colour. This operation should be
carried out by a suitably qualified professional. In case of incompatibility between the socket and the appliance
plug, ask a qualified electrician to substitute the socket with another suitable type. The plug and the socket must be
conformed to the current norms of the installation country. Connection to the power source can also be made by
placing an omnipolar breaker between the appliance and the power source that can bear the maximum connected
load and that is in line with current legislation. The yellow-green earth cable should not be interrupted by the
breaker. The socket or omnipolar breaker used for the connection should be easily accessible when the appliance
is installed.
•The disconnection may be achieved by having the plug accessible or by incorporating a switch in the fixed wiring
in accordance with the wiring rules.
•If the power cable is damaged, it must be substituted with a cable or special bundle available from the
manufacturer or by contacting the customer service department.
•The type of power cable must be H05V2V2-F.
•Failure to comply with the above can compromise the safety of the appliance and invalidate the guarantee.
•Any excess of spilled material should be removed before cleaning.
•During the pyrolytic cleaning process, surfaces can heat up more than usual, children must therefore be kept at a
safe distance.
•The appliance must not be installed behind a decorative door in order to avoid overheating.
•When you place the shelf inside, make sure that the stop is directed upwards and in the back of the cavity.
The shelf must be inserted completely into the cavity
• WARNING: Do not line the oven walls with aluminum foil or single-use protection available from stores. Aluminum
foil or any other protection, in direct contact with the hot enamel, risk melting and deteriorating the enamel of the
insides.
• WARNING: Never remove the oven door seal.
SAFETY INSTRUCTIONS
This appliance is marked according to the European directive 2012/19/EU on Waste Electrical and Electronic Equipment (WEEE). WEEE
contains both polluting substances (which can cause negative consequences for the environment) and basic components (which can be re-
used). It is important to have WEEE subjected to specific treatments, in order to remove and dispose properly all pollutants, and recover and
recycle all materials. Individuals can play an important role in ensuring that WEEE does not become an environmental issue; it is essential to
follow some basic rules:
• WEEE shall not be treated as household waste.
• WEEE shall be handed over to the relevant collection points managed by the municipality or by registered companies. In many countries, for large
WEEE, home collection could be present.
• When you buy a new appliance, the old one may be returned to the retailer who has to collect it free of charge on a one-to-one basis, as long as the
equipment is of equivalent type and has the same functions as the supplied equipment.
ENERGY SAVINGAND RESPECTING THE ENVIRONMENT
Where possible, avoid pre-heating the oven and always try to fill it. Open the oven door as infrequently as possible, because heat from the cavity
disperses every time it is opened. For a significant energy saving, switch off the oven between 5 and 10 minutes before the planned end of the cooking
time, and use the residual heat that the oven continues to generate. Keep the seals clean and in order, to avoid any heat dispersal outside of the cavity.
If you have an electric contract with an hourly tariff, the "delayed cooking" programme makes energy saving more simple, moving the cooking process
to start at the reduced tariff time slot.
GB 02

Summary
General Warnings
4
1.1 Declaration of compliance
1.2 Safety hints
1.3 Installation
1.4 Fitting the oven into the kitchen unit
1.5 Important
1.6 Connecting to the power supply
1.7 Oven equipment
2.1 Shelf safety system
2.2 Grilling
2.3 The U COOK models
2.4 Cleaning and maintenance
2.5 Service centre
Useful Tips
5
3.1 Using the minute timer
3.2 Using the end of cooking timer
Timer
6
Operating Instructions
6
GB 03

1. GENERAL WARNINGS
Thank you for choosing one of our products. To get the most out of your oven we recommend that you:
• Read the notes in this manual carefully: they contain important instructions on how to install, use and service this oven safely.
• Keep this booklet in a safe place for easy, future reference.
All accessible parts are hot when the appliance is in operation, take care to not touch these elements.
When the oven is first switched on it may give out acrid smelling fumes. This is because the bonding agent for insulating panels around the oven has
been heated up for the first time.
This is a completely normal, if it does occur you merely have to wait for the fumes to clear before putting the food into the oven.
An oven by its very nature becomes very hot. Especially the glass of the oven door.
The parts of this appliance that may come into contact with foodstuffs
comply with the provisions of EEC Directive 89/109.
By placing the mark on this product, we are confirming
compliance to all relevant European safety, health and environmental
requirements which are applicable in legislation for this product.
When you have unpacked the oven, make sure that it has not been
damaged in any way. If you have any doubts at all, do not use it:
contact a professionally qualified person. Keep packing materials
such as plastic bags, polystyrene, or nails out of the reach of children
because they are dangerous for children.
1.1 DECLARATION OF COMPLIANCE
1.2 SAFETY HINTS
•The oven must be used only for the purpose for which it was designed:
it must only be used for cooking food. Any other use, e.g. as a form of
heating, is an improper use of the oven and is therefore dangerous.
•The manufacturers cannot be held responsible for any damage caused
by improper, incorrect or unreasonable use. When using any
electrical appliance you must follow a few basic rules.
– Do not pull on the power cable to remove the plug from the socket.
– Do not touch the oven with wet or damp hands or feet.
– Do not use the oven unless you are wearing something on your feet.
– It is not generally a good idea to use adapters, multiple sockets for
several plugs and cable extensions.
– If the oven breaks down or develops a fault switch it off at the mains
and do not touch it.
•If the cable is at all damaged it must be replaced promptly.
When replacing the cable, follow these instructions. Remove the power
cable and replace it with one of the H05RRF, H05VV-F, H05V2V2-F
type. The cable must be able to bear the electrical current required by
the oven. Cable replacement must be carried out by properly qualified
technicians. The earthing cable (yellow-green) must be 10 mm longer
than the power cable.
Use only an approved service centre for repairs and ensure that only
original parts are used. If the above instructions are not adhered to the
manufacturers cannot guarantee the safety of the oven.
•Do not line the oven walls with aluminium foil or single-use
protection available from stores. Aluminium foil or any other
protection, in direct contact with the hot enamel, risks melting and
deteriorating the enamel of the insides.
1.3 INSTALLATION
Installation is the customer’s responsibility. The manufacturers have no
obligation to carry this out. If the assistance of the manufacturer is
required to rectify faults arising from incorrect installation, this
assistance is not covered by the guarantee.
The installation instructions for professionally qualified personal must
be followed. Incorrect installation may cause harm or injury to people,
animals or belongings. The manufacturer cannot be held responsible
for such harm or injury.
1.4 FITTING THE OVEN INTO THE KITCHEN UNIT
Fit the oven into the space provided in the kitchen unit; it may be fitted
underneath a work top or into an upright cupboard. Fix the oven in
position by screwing into place, using the four fixing holes in the frame.
(Fig.on last page).
To locate the fixing holes, open the oven door and look inside.To allow
adequate ventilation, the measurements and distances indicated in the
diagram on last page must be adhered to when fixing the oven.
Note: For ovens that are combined with a hob unit the instructions
contained in the manual for the hob unit must be followed.
Plug into the power supply. Ensure first that there is a third contact that
acts as earthing for the oven. The oven must be properly earthed.
If the model of oven is not fitted with a plug, fit a standard plug to the
power cable. It must be able to bear the power supply indicated on the
specifications plate. The earthing cable is yellowgreen. The plug must
be fitted by a properly qualified person. If the socket and the plug are
incompatible the socket must be changed by a properly qualified
person.A properly qualified person must also ensure that the power
cables can carry the current required to operate the oven.
An ON/OFF switch may also be connected to the power supply. The
connections must take account of the current supplied and must comply
with current legal requirements. The yellow-green earthing cable must
not be governed by the ON/OFF switch. The socket or the ON/OFF
switch used for connecting to the power supply must be easily
accessible when the oven has been installed.
1.6 CONNECTING TO THE POWER SUPPLY
If the oven is to work properly, the kitchen housing must be suitable. The
panels of the kitchen unit that are next to the oven must be made of a
heat resistant material. Ensure that the glues of units made of veneered
wood can withstand temperatures of at least 120 °C. Plastics or glues
that cannot withstand such temperatures will melt and deform the unit.
Once the oven has been lodged inside the unit, the electrical parts must
be completely insulated. This is a legal safety requirement. All guards
must be firmly fixed into place so that it is impossible to remove them
without using special tools.
Remove the back of the kitchen unit to ensure an adequate current
of air circulates around the oven. The hob must have a rear gap of
at least 45 mm.
1.5 IMPORTANT
Plug into the power supply. Ensure first that there is a third contact that
acts as earthing for the oven. The oven must be properly earthed.
If the model of oven is not fitted with a plug, fit a standard plug to the
power cable. It must be able to bear the power supply indicated on the
specifications plate. The earthing cable is yellowgreen. The plug must
be fitted by a properly qualified person. If the socket and the plug are
incompatible the socket must be changed by a properly qualified
person.A properly qualified person must also ensure that the power
cables can carry the current required to operate the oven.
An ON/OFF switch may also be connected to the power supply. The
connections must take account of the current supplied and must comply
with current legal requirements. The yellow-green earthing cable must
not be governed by the ON/OFF switch. The socket or the ON/OFF
switch used for connecting to the power supply must be easily
accessible when the oven has been installed.
Important: During installation, position the power cable in such a way
that it will not be subjected to temperatures of above 50°C at any point.
The oven complies with safety standards set by the regulatory bodies.
The oven is safe to use only if it has been adequately earthed in
compliance with current legal requirements on wiring safety. You must
ensure that the oven has been adequately earthed.
The manufacturers cannot be held responsible for any harm or
injury to persons, animals or belongings caused by failure to
properly earth the oven.
WARNING: the voltage and the supply frequency are showed on
the rating plate (fig. on last page).
The cabling and wiring system must be able to bear the maximum
electric power required by the oven. This is indicated on the
specifications plate. If you are in any doubt at all, use the services of a
professionally qualified person.
GB 04

It is necessary to do an initial cleaning of the equipment before the
first use of each of them.Wash them with a sponge. Rinse and dry
off.
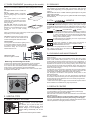
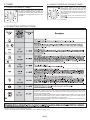
1.7 OVEN EQUIPMENT (according to the model)
The simple shelf can take moulds and
dishes.
The tray holder shelf is especially
good for grilling things. Use it with the
drip tray.
The special profile of the shelves
means they stay horizontal even when
pulled right out. There is no risk of a dish
sliding or spilling.
The drip tray catches the juices from
grilled foods. It is only used with the Grill,
Rotisserie, or Fan Assisted Grill ; remove
it from the oven for other cooking
methods.
Never use the drip tray as a roasting tray as this creates smoke and fat
will spatter your oven making it dirty.
The pizza set is designed for pizza cooking.
In order to obtain the best results the set
must be used together with Pizza function.
The tray holder
The tray holder shelf is ideal for grilling. Use it
in conjunction with the drip tray. A handle
is included to assist in moving the both
accessories safely. Do no leave the
handle inside the oven.
A
1- Remove the knurled nuts by turning them counter clockwise.
2- Remove the wire racks by pulling them towards yourself.
3- To clean the wire racks either put them in the dishwasher or use
a wet sponge, ensuring that they are dried afterwards.
4- After the cleaning process install the wire racks in reverse order.
5- Replace the knurled nuts.
Removing and cleaning wire racks
2. USEFUL TIPS
2.1 SHELF SAFETY SYSTEM
The oven features a new shelf safety
system.
This allows you to pull out the oven
shelves when inspecting the food
without danger of food spillages or
shelves falling accidentally out of the
oven.
To remove the shelves pull out and lift.
All ovens feature the function.
This allows a management of the distribution of moisture
and temperature. It reduces the loss of humidity of the 50
%, which guarantees the food remains tender and tastes
better. This a delicate cooking is recommended for the
baking of the bread and pastry.
Ovens have an electronic control of the fan speed, called
and patented VARIOFAN. During the cooking, this system changes
automatically the speed of the fan (in multifunction mode) in order to
optimize the air flow and the internal temperature in the cavity of the
oven.
2.2 GRILLING
Grilling makes it possible to give food a rich brown colour quickly.
For browning we recommend that you insert the grill onto the
fourth level, depending on the proportions of the food (see fig.
page 7).
Almost all food can be cooked under the grill except for very lean
game and meat rolls.
Meat and fish that are going to be grilled should first be lightly
doused with oil.
2.3 The MODELS
It reduces the time of preheating of ovens: only 8 minutes
to reach 200 degrees Celsius.
Some ovens are equipped with the new doorj " WIDE DOOR " which
has a bigger window area, this allows better maintenance and a
improved thermal insulation.
It gives the possibility of setting level and intensity of
grilling, up to 50 % more power in comparison with a
traditional multifunction oven.
2.4 CLEANING AND MAINTENANCE
Never use abrasive cleaners, wire wool or sharp objects to clean the
glass oven door.
Clean the stainless steel and enamelled surfaces with warm, soapy
water or with suitable brand products. On no account use abrasive
powders that may damage surfaces and ruin the oven’s appearance. It
is very important to clean the oven each time that it is used. Melted fat is
deposited on the sides of the oven during cooking. The next time the
oven is used this fat could cause unpleasant odours and might even
jeopardise the success of the cooking. Use hot water and detergent to
clean; rinse out thoroughly.
To make this chore unnecessary all models can be lined with catalytic
self-cleaning panels: these are supplied as an optional extra (see the
section SELF-CLEANING OVEN WITH CATALYTIC LINING).
Use detergents and abrasive metal pads like «brillo pads» for the
stainless steel grills.
The glass surfaces as the top, oven door and warming compartment
door must be cleaned when they are cold. Damage that occurs to them
because this rule was not adhered to are not covered by the guarantee.
To replace the interior light:
• switch off the mains power supply and unscrew bulb. Replace with an
identical bulb that can withstand very high temperatures
2.5 SERVICE CENTRE
Before calling the Service Centre
If the oven is not working, we recommend that:
you check that the oven is properly plugged into the power supply.
If the cause of the fault cannot be detected:
disconnect the oven from the mains, do not touch the oven and call the
after sales service.
Before calling the Service Centre remember to make a note of the
serial number on the specifications plate (see fig. On last page).
The oven is supplied with a guarantee certificate that ensures that it
will be repaired free of charge by the Service Centre
GB 05
Lateral wire grids
Lateral wire grid if included.

3.2 USING THE END OF COOKING TIMER
This control enables to set the desired
cooking time (max. 120 min.) the oven will
automatically switch off at the end of the set
time.The timer will count down from the set
time return to the O position and switch off
automatically.
For normal use of oven set the timer to the
position.
To set the oven ensure the timer is not on the
O position.
To set the cooking time, turn dial one
complete revolution and then position the
index to the required time. When the time
has lapsed, the signal will ring for a few
seconds.
3.1 USING THE MINUTE TIMER
3. TIMER
4. OPERATING INSTRUCTIONS
The " " function allows you to cook in a healthier way, by reducing the amount of fat orCOOK LIGHT
oil required. Thanks to the use of the grill and fan combined with a pulsating cycle of air, it will
retain the moisture content of the food, grilling the surface and using a shorter cooking time,
without compromising on taste.
It is particularly suitable for cooking meat, roasted vegetables and omelettes. The cycle of pulsed
air keeps the humidity inside the oven and the moisture content of the food, preserving the
nutritional values and ensuring a rapid uniform cooking process.
Try all your recipes and reduce the amount of dressing you usually use and experience the
lightness of this new function!
GB 06
*Tested in accordance with the CENELEC EN 60350-1
**Tested in accordance with the CENELEC EN 60350-1 used for definition of energy class.

INSTALACIÓN
ES
INSTALLAZIONE
IT
INSTALLATION
FR
VGRADNJA
SI
МОНТАЖ БГ
La Ditta costruttrice declina ogni responsabilità per eventuali errori di stampa contenuti nel presente libretto. Si riserva inoltre il diritto di apportare le modifiche
che si renderanno utili ai propri prodotti senza compromettere le caratteristiche essenziali.
IT
La empresa constructora declina toda responsabilidad derivada de eventuales errores de impresión contenidos en el presente libro. Se reserva ademásel
derecho de realizar las modificaciones que se consideren útiles a los productos sin comprometer las características esenciales.
ES
Le constructeur décline toute responsabilité concernant d'éventuelles Inexacltudes Imputables à des erreurs d'impression ou de transcription contenue dans
cette notice. Le constructeur se réserve le droit de modifier les produits en cas de nécessité, même dans l'intérêt de l'utilisation, sans causer de préjudices
aux caractéristiques de fonctionnement de sécurité des appareils.
FR
12.2017 • REV.B • 42817764
The manufacturer will not be responsible for any inaccuracy resulting from printing or transcript errors contained in this brochure. We reserve the right to carry
out modifications to products as required, including the interests of consumption, without prejudice to the characteristics relating to safety or function.
SI
Производителя не носи отговорност за неточности и грешки възникнали при печата на тази инструкция. Производителя си запазва правото да
внесе изменения в своите продукти, който смята за полезни, без това да е в ущърб на характеристиките свързани със сигурността или основните
функции на уреда .
БГ
INSTALLATION
GB
The manufacturer will not be responsible for any inaccuracy resulting from printing or transcript errors contained in this brochure. We reserve the
right to carry out modifications to products as required, including the interests of consumption, without prejudice to the characteristics relatingto
safety or function.
GB
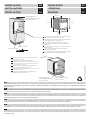
Se il mobile ha un fondo posteriore, praticare un foro
per il passaggio del cavo di alimentazione.
Si le fond du meuble est doté d’un panneau de
fermeture, prévoyez un orifice pour le passage du câble
d’alimentation.
ES
Si el mueble tiene panel posterior, haga un orificio para el
cable de alimentación.
Če je omarica na zadnji strani zaprta, naredite
odprtino za napajalni kabel.
SI
Ао шафът, ойто се гра да фурната, има заден
апа, напраете отор за захранащия абе.
BG
GB
IT
If the oven does not have a cooling fan, create an
opening 460 mm x 15 mm
IT
Se il forno non dispone di una ventola di
raffreddamento, lasciare uno spazio 460 mm x 15 mm
Si le four n’a pas de ventilateur de refroidissement, créer
une ouverture 460 mm x 15 mm
FR
ES
Si el horno no tiene ventilador de refrigeración,
practique una abertura. 460 mm x 15 mm
SI
Če pečica nima hladilnega ventilatorja, napravite ustrezno
odprtino 460 mm x 15 mm
Ако фурната няма вентилатор за охлаждане,
направете отвор. 460 mm x 15 mm
BG
590 mm
560 mm
560 mm
595 mm
595 mm
545 mm
22 mm
580 mm
550 mm
560 mm x 45 mm
500 mm x 10 mm
GB
IT
FR
If the furniture is equpped with a bottom at the back part,
provide an opening for the power supply cable.
Opening/Apertura/
Ouverture/Odprtina/Отвор
460 mm x 15 mm
600
mm
560
mm
560
mm
Opening/Apertura/
Ouverture/Odprtina/Отвор
560 mm x 45 mm
Opening/Apertura/
Ouverture/Odprtina/Отвор
500 mm x 10 mm
-
 1
1
-
 2
2
-
 3
3
-
 4
4
-
 5
5
-
 6
6
-
 7
7


Candy FCP 602X Manuel utilisateur
- Catégorie
- Plaques de cuisson
- Taper
- Manuel utilisateur
- Ce manuel convient également à
dans d''autres langues
- English: Candy FCP 602X User manual
Documents connexes
-
Candy FCDIE206X Manuel utilisateur
-
Candy CGHOPK60X/E Manuel utilisateur
-
Candy FCP615XL/E1 Manuel utilisateur
-
-
-
-
-
Candy FCP625VXL/E Manuel utilisateur
-
Candy FCP612NXL/E1 Manuel utilisateur
-
Candy FCP605XL/E/1 Manuel utilisateur