
Robot Vacuum
Aspirateur Robot
RV1100SRCA Series • Série
OWNER’S GUIDE
GUIDE D’UTILISATION

sharkclean.comsharkclean.com
WARNING
To reduce the risk of fire, electric shock, injury, or property damage:
IMPORTANT SAFETY INSTRUCTIONS
PLEASE READ CAREFULLY BEFORE USE • FOR HOUSEHOLD USE ONLY
SAVE THESE INSTRUCTIONS
If the charging cable plug does not fit fully into the outlet, reverse the plug. If it still does not fit,
contact a qualified electrician. DO NOT force into outlet or try to modify to fit.
For the latest warnings and cautions, go to sharkclean.com/robothelp
GENERAL WARNINGS
When using an electrical appliance, basic
precautions should always be followed,
including the following:
1. Robotic vacuum cleaner consists of a
robotic vacuum and charging base with
power supply. These components contain
electrical connections, electrical wiring,
and moving parts that potentially present
risk to the user.
2. Before each use, carefully inspect all
parts for any damage. If a part is damaged,
discontinue use.
3. Use only identical replacement parts.
4. This robotic vacuum cleaner contains no
serviceable parts.
5. Use only as described in this manual.
DO NOT use the robotic vacuum cleaner
for any purpose other than those
described in this manual.
6. With the exception of filters, DO NOT
expose any parts of the robotic vacuum
cleaner to water or other liquids.
USE WARNINGS
7. This appliance can be used by persons
with reduced physical, sensory or mental
capabilities or lack of experience and
knowledge if they have been given
supervision or instruction concerning
use of the appliance in a safe way and
understand the hazards involved.
a) Children shall not play with the
appliance.
b) Cleaning and user maintenance shall
not be made by children without
supervision.
8. Always turn o the robotic vacuum
cleaner before inserting or removing the
filter or dust bin.
9. DO NOT handle plug, charging base,
charging cable, or robotic vacuum
cleaner with wet hands. Cleaning and
user maintenance shall not be made by
children without supervision.
10. DO NOT use without robot dust bin and
filters in place.
11. DO NOT damage the charging cord:
a) DO NOT pull or carry charging base
by the cord or use the cord as a
handle.
b) DO NOT unplug by pulling on cord.
Grasp the plug, not the cord.
c) DO NOT close a door on the cord,
pull the cord around sharp corners,
or leave the cord near heated
surfaces.
12. DO NOT put any objects into nozzle or
accessory openings. DO NOT use with
any opening blocked; keep free of dust,
lint, hair, and anything that may reduce
airflow.
13. DO NOT use if robotic vacuum cleaner
airflow is restricted. If the air paths
become blocked, turn the vacuum
cleaner o and remove all obstructions
before turning on the unit again.
14. Keep nozzle and all vacuum openings
away from hair, face, fingers, uncovered
feet, or loose clothing.
15. DO NOT use if robotic vacuum cleaner
is not working as it should, or has been
dropped, damaged, left outdoors, or
dropped into water.
16. DO NOT place vacuum cleaner on
unstable surfaces.
17. DO NOT use to pick up:
a) Liquids
b) Large objects
c) Hard or sharp objects (glass, nails,
screws, or coins)
d) Large quantities of dust (drywall
dust, fireplace ash, or embers).
DO NOT use as an attachment to
power tools for dust collection.
e) Smoking or burning objects (hot
coals, cigarette butts, or matches)
f) Flammable or combustible
materials (lighter fluid, gasoline,
or kerosene)
g) Toxic materials (chlorine bleach,
ammonia, or drain cleaner)
18. DO NOT use in the following areas:
a) Wet or damp surfaces
b) Outdoor areas
c) Spaces that are enclosed and may
contain explosive or toxic fumes
or vapors (lighter fluid, gasoline,
kerosene, paint, paint thinners,
mothproofing substances, or
flammable dust)
d) Near fireplaces with unobstructed
entrances.
e) In an area with a space heater.
19. Turn o the robotic vacuum cleaner
before any adjustment, cleaning,
maintenance or troubleshooting.
20. Allow all filters to air-dry completely
before replacing in the robotic vacuum
cleaner to prevent liquid from being
drawn into electric parts.
21. DO NOT modify or attempt to repair the
robotic vacuum cleaner or the battery
yourself, except as indicated in this
manual. DO NOT use the vacuum if it has
been modified or damaged.
22. To reduce the risk of electric shock, this
appliance has a polarized plug (one blade
is wider than the other). This plug will
fit in a polarized outlet only one way. If
the plug does not fit fully in the outlet,
reverse the plug. If it still does not fit,
contact a qualified electrician to install
the proper outlet. Do not change the
plug in any way.
23. In case the self-empty base has a
thermal shuto the unit needs to have a
hard power reset to restart.
BATTERY USE
24. The battery is the power source for
the vacuum. Carefully read and follow
all charging instructions.
25. To prevent unintentional starting, ensure
the vacuum is powered o before picking
up or carrying the vacuum. DO NOT
carry the appliance with your finger on
the power switch.
26. Use ONLY the Shark® self-empty base
XSKDOCK130 and use only battery
RVBAT850. Use of batteries or battery
chargers other than those indicated may
create a risk of fire.
27. Keep the battery away from all metal
objects such as paper clips, coins, keys,
nails, or screws. Shorting the battery
terminals together increases the risk of
fire or burns.
28. Under abusive conditions, liquids may be
ejected from the battery. Avoid contact
with this liquid, as it may cause irritation
or burns. If contact occurs, flush with
water. If liquid contacts eyes, seek
medical help.
29. Robotic vacuum cleaner should not be
stored, charged, or used at temperatures
below 50°F (10°C) or above 104°F
(40°C). Ensure the battery and vacuum
have reached room temperature before
charging or use. Exposing the robot
or battery to temperatures outside of
this range may damage the battery and
increase the risk of fire.
30. DO NOT expose the robotic vacuum
cleaner or battery to fire or temperatures
above 265°F (130°C) as it may cause
explosion.
31. Non-rechargeable batteries cannot
be recharged.
BOTBOUNDARY® STRIPS
32. DO NOT put BotBoundary strips
underneath carpet or rugs.
33. Always use BotBoundary strips around
reflective flooring and surfaces.
34. BotBoundary strips should always be
used near carpeted stairs.
35. DO NOT place BotBoundary strips within
10 feet of the dock.
36. For your robot’s cli sensors to work
properly, all runners, rugs, or carpets
must be eight inches from any stairs (or
it must be continuous and extend over
the edge of the stairs). If a runner, rug or
carpet edge that is less than eight inches
from the stairs cannot be moved, you
must use a BotBoundary strip to block
o the stairs.

sharkclean.comsharkclean.com
GETTING TO KNOW YOUR SHARK IQ ROBOT™ GETTING TO KNOW YOUR SHARK IQ ROBOT™
!
Clean Button
Charging Contact
Pre-Motor
Filter Housing
Pre-Motor
Filter Housing
Charging Base
Charging Contact
Charging Base
Fill Window
Debris Intake
Power
Indicator Light
Charging
Indicator Light
Base Dust Bin
Release
Base Dust Bin
Base Dust Bin
Base Dust Bin
Release
Post-Motor Filter
Access Door
Front Bumper
Battery Indicator Light FRONT
BACK
Error Indicator Light Wi-Fi Indicator Light
Docking Sensor
Cli and Boundary Sensors
Charging Contact
Vision
Module
Side Brush
Battery Door
Self-Cleaning
Brushroll Drive Wheel
Robot Dust Bin
and Filter
Brushroll Door
Front Caster
Wheel
Dock Button
Navigation
Module
Power Switch
Debris Discharge
Opening
Dust Bin
Release Tabs
Charger Cord Wrap
Power Switch

sharkclean.comsharkclean.com
1.5 m1 m
1 m
BASE SETUP
The Self-Empty Base charges your robot and holds dirt and debris from up to 30 days of cleaning.
• Select a permanent location for the base. Every time you move the base, your robot will have to
completely re-map your house.
• Choose a level surface in a central area. Remove protective film from base.
• Place the base with its back against the wall, in an area with a good Wi-Fi signal.
• Set up the base on bare floor.
• Remove any objects closer than 3 feet from the sides of the base, or closer than 5 feet from the from the front.
• Plug in the Charging Cord, and turn on the Power Switch on the back of the base. When the base is plugged
in and the power switch is turned on, the GREEN Power Indicator Light on the base will illuminate.
INSTALLING THE SIDE BRUSHES
Snap the 2 included Side Brushes located in the
red packaging, onto the square pegs on the bottom
of the robot.
Clean Dock
!
If the robot has no charge and cannot return to
the base, manually place it on the base. When the
robot evacuates dust and debris into the base,
the blue light on the base will be solid blue. Once
charging starts, the robot will beep and the blue
light on the base will pulse.
When charging begins, the robot will beep. The BLUE
Charging Indicator Light on the base will PULSE, and
the Battery Indicator Light on the robot will flash
blue. When the robot is fully charged, the battery light
on the robot and the blue charging indicator light on
the base will illuminate steadily.
When the cleaning cycle is complete, or if the battery
is running low, the robot will search for the base. If your
robot doesn’t return to the base, its charge may have
run out. Make sure that all the protective film has been
removed from the base, and recharge the robot
CHARGING
IMPORTANT: The Shark iQ Robot™ has a pre-installed rechargeable battery. Charge the battery completely
before using the robot. It may take up to 6 hours to fully charge.
To charge, place the robot with its BACK side against
the base. The metal Charging Pads on the bottom of
the robot must be touching the Charging Contacts on
the base. Make sure the power switches on BOTH the
robot and the base are turned to the (I) ON position.
NOTE: When manually placing the robot on the base, make sure the charging contacts on the bottom of the robot are
touching the ones on the base and the robot's dust bin is touching the debris intake on the base. When the robot is fully
charged, the battery light on the robot and the indicator light on the base will both turn solid blue.
NOTE: When picking up the robot be careful not to place fingers between the bumper and the base of the robot.
NOTE: Do not place base against heating elements or baseboards, or in direct sunlight.
NOTE: The robot will make a loud noise when it empties its debris into the base. This is normal and not a cause for concern.
1,5 m 1 m
1 m

sharkclean.comsharkclean.com
ROBOT BATTERY INDICATOR LIGHT
BASE INDICATOR LIGHTS
NOTE: If the battery indicator light on the robot is blinking red, there is not enough charge for the robot to return to the
base. Manually place the robot on the base.
NOTE: If your floor plan is smaller than 1000 sq. ft., we recommend that you DO NOT use the Evacuate & Resume function.
The battery indicator light on the robot shows how much charge is remaining. When the robot is charging, the
battery light will flash blue. When charging is complete, the light will illuminate steadily in blue.
There are 2 indicator lights on the front of the base, the green power indicator light and the blue charging
indicator light. When the base is plugged in and the power switch is turned on, the GREEN power light will
illuminate. When the robot is charging on the base, the BLUE light will pulse. When charging is complete, the
blue light will illuminate steadily.
BUTTONS AND INDICATOR LIGHTS
!
DOCK BUTTON
Press to stop cleaning and
send robot back to the
charging base.
EVACUATE & RESUME
Press and hold the DOCK
button for 15 seconds to
turn Evacuate & Resume
ON or OFF.
BATTERY INDICATOR LIGHT
Displays the amount of
charge remaining in the
battery.
“!” ERROR INDICATOR
See Troubleshooting section
for full list of error codes.
WI-FI INDICATOR
Blue light: connected to
Wi-Fi.
Red light: not connected.
Flashing blue: setup mode.
No light: not set up yet.
CLEAN BUTTON
Press to begin a cleaning
session. Press again to stop.
RECHARGE & RESUME
Press and hold the CLEAN
button for 15 seconds to
turn Recharge & Resume
ON or OFF.
NAVIGATION MODULE
Please keep clear and do not
cover.
Upward-facing sensor aids
advanced navigation.
In Use
Full
Charge
(Blue)
Partial
Charge
(Blue)
Low
Charge
(Red)
While
Charging
(Blue)
No Charge
or O
The Recharge & Resume function is turned OFF by
default. Turn ON Recharge & Resume for complete
coverage if your home's floor plan is bigger than
1500 sq. ft. Your robot will return to the base,
recharge, and can pick up cleaning where it left o.
Turn ON Evacuate & Resume for homes with pets.
Your robot will return to the base to empty the
dust bin after 30 minutes, then resume cleaning
where it left o.
Power
Indicator Light
Charging
Indicator Light
ROBOT BATTERY INDICATOR LIGHT

sharkclean.comsharkclean.com
MAPPING AND NAVIGATION
MANUAL CLEANING MODE
To manually start a cleaning cycle, press the Clean button on the robot or on the mobile app. To stop the
robot before it finishes cleaning and automatically returns to the base, press the Dock button.
RUMPELSTILTSKIN
Schedule History
EDIT OPTIONS
MapsControl
Shark
Kitchen
Living Room
Dining Room
o
m
NOTE: Be sure to charge the robot completely before its first cleaning so that it can explore, map, and clean as much of
your home as possible. It may take up to 6 hours to fully charge the robot.
NOTE: Avoid picking up and moving the robot or base. If either are relocated, the robot may not be able to follow its
intelligent cleaning path, or find its way back to the base. If the robot is picked up or moved for any reason, it should be
returned to within 6 inches of its last location.
As it cleans, your robot will create a map of your
home. It may take several cleanings for the robot to
finish its mapping. Once mapping is complete, an
Interactive Map of your floor plan will be available
on the app.
The interactive map in the app allows you to name
rooms, then select which rooms to clean, and send
the robot to immediately clean specific locations.
As cleanings continue, the robot will update and
refine its path to provide optimized cleaning coverage.
After each use, a cleaning report will be available
in the app.
PREP YOUR HOME
NOTE: Scheduling is one of many features that are only available in the app.
Your robot uses an array of sensors to navigate around walls, furniture legs, and other obstacles while it
cleans. To prevent the robot from bumping into objects or navigating to areas you don't want it to, use the
included BotBoundary™ strips. For best results, prepare your home as indicated below, and schedule a daily
cleaning to ensure all floor areas are regularly maintained.
Clean Dock
!
OBSTRUCTIONS
Clear cords and small objects
from floors and open interior
doors to ensure a complete
map of your home.
THRESHOLDS
Your robot may have
trouble clearing some high
thresholds. Block o high
thresholds with the included
BotBoundary strips.
AVOID MOVING THE
ROBOT OR BASE
While your robot is cleaning,
do not pick it up and move it,
or move the charging base—
this will impact the robot’s
ability to map your home.
CHECK BASE FILL LEVEL
During the first few weeks,
your robot will empty more
debris than usual. Check the
fill level regularly. The dust
bin is designed to hold up
to 30 days’ worth of debris,
but home environments
vary, and the bin may fill up
quicker in some homes.
STAIRS
Your robot's cli sensors will
prevent it from falling o
ledges. For the cli sensors
to work properly, all runners,
rugs, or carpets must be at
least 8 inches from any stairs
(or extend over the edge of
the stairs.)
8-inch
Min.
!
LIGHTING CONDITIONS
For best results, run your
robot in well-lit conditions. If
you run your robot at night,
keep the lights on in the areas
to be cleaned.
BOTBOUNDARY STRIPS
PREPPING YOUR HOME USING BOTBOUNDARY STRIPS
Use the BotBoundary strips to quickly and easily create no-go zones to keep your robot out of the areas you
would like it to avoid. These may include:
• Near power cords
• In front of thresholds higher than an inch
USAGE INSTRUCTIONS
1. You can cut BotBoundary strips to shorten
them as needed. (18-inch minimum) If cutting
a strip, make sure it’s still long enough to cover
the entire area you need to block o. Gaps may
cause BotBoundary strips to malfunction.
2. Make sure each BotBoundary strip lies
completely flat against the floor, with no
overlapping. NOTE: DO NOT place BotBoundary
strips on top of one another.
3. For best results, place the strips between fixed
objects like furniture legs or door frames, or
make a closed loop around an obstacle.
(18” Minimum)
BotBoundary strip
FURNITURE DOORWAYS PET BOWLS
!
!
BotBoundary® strips
BotBoundary strips

sharkclean.comsharkclean.com
MAINTENANCE
EMPTYING THE ROBOT DUST BIN
Press the Dust Bin Release Tabs and slide out the
dust bin.
CAUTION: Turn o power before performing any maintenance.
To avoid spills, be sure to hold the dust bin in an
upright position. Pinch and lift to open the lid.
Empty debris and dust into trash. Look between the filter and plastic shield and make
sure there is no debris buildup.
Remove and clean any debris build-up as needed
with a dry cloth or soft brush.
USING THE SHARK IQ ROBOT™
Get the most out of your Shark iQ Robot™ with these app features:
• Interactive Map
Your robot knows where it is
in your home. Identify rooms
for Room Select.
• Room Select
Immediately send your robot
directly to any room on that
floor.
• Recharge and Resume
Use Recharge and Resume
to help ensure complete,
multi-room coverage in your
home.
• Scheduling
Set whole-home cleanings
for any time, any day.
• Control From Anywhere
Wherever you are, you’re in
control of your robot.
• Cleaning Reports
Each time your robot cleans,
your app will generate a
cleaning report.
• Volume Control
You can adjust the volume
level of your robot's audio
notifications.
Search for SharkClean in the app store and download the app to your iPhoneTM or AndroidTM.
ERROR CODE PROBLEM
! (RED) + Wi-Fi indicator (RED Flashing) Wrong password for Wi-Fi
! (Flashing red) + Wi-Fi (RED) SSID cannot be found, try connecting again
! + Wi-Fi (Flashing RED alternately) Wrong user name or password for your Shark account
! + Wi-Fi (Flashing RED at the same time) Cannot connect to Wi-Fi
USING THE SHARKCLEAN™ APP AND VOICE CONTROLS
SETTING UP VOICE CONTROL WITH THE GOOGLE ASSISTANT OR AMAZON ALEXA
Visit sharkclean.com/app for setup instructions which include how to enable Shark Skill for Amazon Alexa
and using with Google Assistant.
Google Assistant:
“OK Google, tell Shark to start cleaning.”
“OK Google, tell Shark to pause my robot.”
“ OK Google, tell Shark to send my robot to
the dock.”
Amazon Alexa:
“Alexa, tell Shark to start cleaning.”
“Alexa, tell Shark to pause my robot.”
“ Alexa, tell Shark to send my robot to
the dock.”
Please visit sharkclean.com/app or call 1-888-228-5531 for answers to all your app questions.
RUMPELSTILTSKIN
Schedule History
EDIT OPTIONS
MapsControl
Shark
Kitchen
Living Room
Dining Room
o
m
WI-FI TROUBLESHOOTING
• To use the app, your phone must be connected to
a 2.4GHz network. The app will only work on a
2.4GHz network.
• Typical home Wi-Fi networks support both 2.4GHz
and 5GHz.
• Do not use a VPN or a proxy server.
• Make sure Wi-Fi isolation is turned o on the
router.
• If you cannot connect, call 1-888-228-5531.
STILL CAN'T CONNECT?
Restart your phone
• Turn o phone, wait a few minutes, then turn it
back on and connect to Wi-Fi.
Reboot your robot
• Make sure the power switch on the back of the
BASE is in the ON position.
• Press the power switch on the side of the ROBOT
to the OFF position. Wait 10 seconds, then press it
again to turn power back ON.
Reboot your router
• Unplug the router power cable for 30 seconds,
then plug it back in. Allow several minutes for your
router to reboot completely.

sharkclean.comsharkclean.com
MAINTENANCE MAINTENANCE
EMPTYING THE BASE DUST BIN
The Base Dust Bin holds up to 30 days' worth of
dust and debris. Empty the bin when the debris
level approaches the max fill line.
To detach the bin, press and hold the Release
button on the top and slide out the bin.
To empty the bin, hold it over the trash, then press
the release button with the trash can icon on the
bottom of the bin. The bin lid will open, releasing
dust and debris. Lightly tap the dust bin against
the inside of the trash receptacle to knock o any
remaining debris. Reinstall the bin by sliding it into
the slot in the base until it clicks into place.
CLEANING AND REPLACING THE ROBOT FILTER
Remove and empty the robot dust bin. Pull filter out of the dust bin by the tabs.
Lightly tap the filter to remove dust and debris. Reinsert the filter into the robot dust bin, then
slide the dust bin back into the robot.
For best results, regularly clean and replace the filter in the robot. See sharkaccessories.com
for replacement filters.
IMPORTANT: DO NOT use water to clean the robot filter.
NOTE: Make sure to insert the dust bin completely, until it clicks into place.

sharkclean.comsharkclean.com
MAINTENANCE
SELF-CLEANING BRUSHROLL
MAINTENANCE
To access the brushroll, push up on the tabs on the
brushroll access door, then lift o the door.
Lift out the brushroll, and clean o any debris.
Reinstall the brushroll, inserting the flat end first.
Close the brushroll access door and press down until
both sides click into place.
NOTE: When cutting away debris, be sure not to cut the brushroll.
NOTE: Replace brushroll every 6 to 12 months, or when visibly worn. See sharkaccessories.com for replacement parts.
NOTE: The pre-motor foam and felt filters should be replaced every 2.5 years. The post-motor filter should be replaced every 3 years.
NOTE: Clean the mesh filter inside the dust bin with a small brush once a month.
CLEAN POST-MOTOR FILTER EVERY YEAR
Press the button at the top of the Filter Door, then
tilt the door and lift it o. Remove the Post-Motor
Filter from the base. To reinstall the post-motor filter,
insert it into the base and replace the filter door.
CLEAN PRE-MOTOR FILTERS ONCE A MONTH
To open the filter housing lid, hold the top right edge
of the base and pull up on the lid. With the lid open,
remove the foam filter by the top handle, then lift out
the felt filter underneath. Tap the filters clean over the
trash, then rinse them with cold water ONLY, as soap
may damage them. Allow filters to air-dry completely
before reinstalling them.
The filters must be installed correctly for the base
to work properly. Reinsert the felt filter first, then the
foam filter.
For best results, regularly clean and replace the filters in the base.
To clean filters, rinse with cold water ONLY to prevent damage from cleaning chemicals. Allow all filters to
air-dry for at least 24 hours before reinstalling them to prevent liquid from being drawn into electricparts.
The Self-Cleaning Brushroll removes debris over time as it cleans. If some debris remains wrapped around
the brushroll, continue cleaning to allow the brushroll to remove it.
If some debris remains on the brushroll after continued cleaning, follow the steps below to remove it.
CLEANING AND REPLACING THE BASE FILTERS
IMPORTANT: DO NOT use soap when cleaning the filters.
Filter
Door

sharkclean.comsharkclean.com
CLEANING SENSORS AND CHARGING PADS
CLEANING SIDE BRUSHES
MAINTENANCE
Carefully unwind and remove any string or hair
wrapped around brushes.
Gently wipe brushes with a dry cloth. To reinstall,
snap the brushes over the pegs. Spin the brushes
manually to make sure they are installed correctly.
CLEAN SENSORS AND CHARGING PADS AS NEEDED. With a dry cloth, gently dust o the sensors and
pads located on the bottom of the robot and on the base.
NOTE: Remove and replace any side brushes that are bent or damaged. To remove a brush, lift it o its peg.
IMPORTANT: The robot uses cli sensors to avoid stairs and other steep drops. Sensors may work less eectively when
they are dirty. For best results, clean sensors regularly.
CLEAN SIDE BRUSHES AS NEEDED.
CLEANING THE WHEELS
MAINTENANCE
REMOVE AND CLEAN THE FRONT CASTER WHEEL AS NEEDED.
See sharkaccessories.com for replacement parts.
NOTE: Tools may be required to pry o front caster wheel.
NOTE: Brush not included.
Pull the Front Caster Wheel from its housing and
remove any debris buildup.
Clean the wheel housing, then reinsert the
caster wheel.
Periodically clean the drive wheels and the
housing around them. To clean, rotate each drive
wheel while dusting.

sharkclean.comsharkclean.com
REPLACEMENT PARTS: ROBOT REPLACEMENT PARTS: BASE
REPLACEMENT PARTS
Filter
Self-Cleaning
Brushroll
Side Brushes
Robot Dust Bin Base Dust Bin
Brushroll
Door
Battery Self-Empty Base
NOTE: To order replacement parts and filters, visit sharkaccessories.com.
Pre-Motor Foam &
Felt Filter Kit
Replacement
Post-Motor Filter
TROUBLESHOOTING
MAINTENANCE
If any error lights are illuminated or flashing on your Shark iQ Robot™, see the error code
chart below:
ERROR CODE ERROR
NUMBER SOLUTION
CLEAN (RED) flashing 10 Robot may be stuck on an obstacle. Move robot to a new
location on a level surface.
DOCK (RED) flashing 6Front bumper may be jammed. Clean the bumper and
make sure it moves in and out freely. If the issue persists,
please contact Shark Customer Care at 1-888-228-5531.
CLEAN (BLUE) + DOCK (RED) solid 14 BotBoundary® error. Move your robot to a flat surface
away from the magnetic boundary strip check to see if
the magnetic boundary strips are set up properly.
CLEAN (RED) + DOCK (BLUE) flashing 7Cli sensor error. Move your robot to a new location and
clean its cli sensors.
CLEAN (RED) + DOCK (RED) flashing 9Robot dust bin needs to be reinstalled. Insert the dust bin
until it clicks in place.
DOCK (RED) + ! (RED) flashing 2
Robot's side brush got stuck while trying to clean.
Remove any debris from around the side brushes. If the
issue persists, please contact Shark Customer Care at
1-888-228-5531.
CLEAN (RED) + DOCK (RED) + ! (RED) flashing 2A drive wheel is stuck. Clean the wheels and remove any
debris wrapped around the axles so they can move freely.
CLEAN (RED) + DOCK (BLUE) alternating 16 Robot is stuck. Move your robot to a new location and
make sure the front bumper moves in and out freely.
CLEAN (BLUE) + ! (RED) flashing 2
Robot's brushroll got stuck while trying to clean. Remove
any debris from the brushroll by removing the brushroll
access door and checking inside and around the brushroll
for any items that are stuck.
CLEAN (RED) + DOCK (BLUE) + ! (RED) flashing 21 Robot has encountered an error while booting. Please turn
the power o and back on.
CLEAN (BLUE) + DOCK (RED) flashing 23 Make sure your base indicator light turns blue to confirm
your robot is placed on the base correctly.
BATTERY ICON (RED) flashing 24
Battery is critically low and needs recharging. Please
pick up your robot and place it on the base. Make sure
the base indicator light turns blue to confirm your robot
is placed on the base correctly.
CLEAN (RED) + ! (RED) alternating 2Blockage in brushroll. Remove any debris from around
the brushroll so that it can spin freely.
DOCK (RED) FLASHING + ! (RED) solid 26 Blockage in dust bin. Check base and robot dust bin for
clogs. Clear any debris and reinstall the dust bin, ensuring
that it clicks into place.
DOCK (BLUE) + ! (RED) flashing 24 Robot has encountered an error while charging. Please
make sure you are using the correct power cord for the
base.
CLEAN (RED) + ! (RED) flashing 3Suction motor failure. Remove and empty the dust bin,
clean the filters, and remove blockages.
CLEAN (BLUE) + DOCK (RED) + ! (RED) flashing 2Wheel motor encoder failure. Please contact Shark
Customer Service at 1-888-228-5531.
For all other issues, please call Customer Service at 1-888-228-5531.
CAUTION: Turn o power before performing any maintenance.
BotBoundary®

sharkclean.comsharkclean.com
TROUBLESHOOTING
What should I do if my robot won't connect to Wi-Fi, or loses connection with Wi-Fi or the app?
Your robot may temporarily lose connectivity when it goes under furniture, moves far from your
router, or enters a zone that blocks Wi-Fi. Your robot should automatically reconnect to Wi-Fi on
its own. If your robot loses connectivity and does not reconnect:
• Make sure your phone is connected to your home Wi-Fi network before trying to connect
your robot.
• Typical home Wi-Fi networks support both 2.4 GHz and 5 GHz. Make sure you are connected to
a 2.4 GHz network when you enter your username and password.
• Make sure the robot’s power switch is turned to the (I) ON position. There should be an audio
prompt when the robot's power is turned on.
• Do not use a VPN or a proxy server. Make sure Wi-Fi isolation is turned o on the router.
To reconnect your robot:
• Press and hold both the Dock and Clean buttons simultaneously until you hear the audio
prompt and the Wi-Fi light on the robot blinks.
• If you are using an iOS phone, exit the app at this point. Open Wi-Fi settings and select your
robot from the menu. Exit settings and return to the SharkClean app.
• Select your 2.4 GHz Wi-Fi network to connect your robot.
If the robot still won't connect:
1. Press the switch on the side of the robot to the (O) position to turn o the power. Wait 10 sec-
onds, then turn the power back on and wait for the audio prompt.
2. Power o your phone. Wait 30 seconds, then power your phone back on.
3. Open Wi-Fi settings on your phone. Find the Shark network, then select Forget Network.
4. Reopen the SharkClean app and try the connection process again. For more help, please con-
tact robot support at 1-888-228-5531.
How do I select specific rooms to clean?
Use the SharkClean™ app. From the home screen of the app, select Clean. If your map is
complete and you have defined and named the rooms on the map, a list of the rooms will appear.
You can choose up to 3 rooms from the list to clean immediately. Select Start Cleaning to begin.
Or you can use voice commands through Amazon Alexa or Google Home to clean one room at a time:
• "Alexa, tell Shark to clean the (name of the room)."
• "Okay Google, tell Shark to clean the (name of the room)."
For more help, contact robot support at 1-888-228-5531.
TROUBLESHOOTING
Why isn't my robot charging?
• Verify that the base is connected to power and the power switch on the back of the base is in
the (I) ON position. When the base is plugged in and the power switch is turned on, the GREEN
power indicator light on the base will illuminate. If the green light is not on, try connecting to a
dierent electrical outlet.
• If the BLUE charging indicator light on the base is not on, verify that the power switch on the
side of the robot is set to the (I) ON position. If the robot still is not charging, verify that the
power switch on the back of the base is set to the (I) ON position.
• The robot must be aligned correctly on the base, with its back side against the debris intake on
the base. The two metal pads on the bottom of the robot must be touching the metal charging
contacts on the base.
When charging begins, the robot will beep. The BLUE charging indicator light on the base will
PULSE, and the battery light on the robot will flash blue.
When charging is complete, the battery light on the robot and the blue charging indicator light
on the base will both illuminate steadily.
How long will it take my robot to generate an interactive map?
It may take several cleanings for the robot to finish building the interactive map in the app. Make
sure your robot is fully charged before sending it out to clean. It may take 4-6 hours to reach
a full charge. If the robot has a problem when mapping, resolve the issue and restart the robot
from the same spot. Make sure to open interior doors in rooms to be cleaned and that the robot
is operating in well-lit areas. If the robot is running at night, make sure to turn on the lights in all
rooms to be cleaned.
NOTE: Avoid picking up or moving the robot or the base. If either are relocated, the robot may not be able to generate a
map or find its way back to the base. For more help, please contact robot support at 1-888-228-5531.
NOTE: Charge the battery completely before first use. A full charge may take up to 6 hours. When charging
is complete, the battery indicator light on the robot and the blue charging indicator light on the base will
illuminate steadily. For more help, contact robot support at 1-888-228-5531.

sharkclean.comsharkclean.com
END-USER LICENSE AGREEMENT FOR SHARKNINJA SOFTWARE
IMPORTANT: PLEASE READ THE TERMS AND CONDITIONS OF THIS LICENSE AGREEMENT CAREFULLY
BEFORE CONTINUING WITH THIS PROGRAM INSTALL OR USE OF THIS PRODUCT: SharkNinja Operating
LLC’s (“SharkNinja”) End-User License Agreement (“EULA”) is a legal agreement between You (either
a single entity or an individual) and SharkNinja for SharkNinja’s Software Applications, including those
installed by You onto your SharkNinja products or already installed on your device, including all firmware
(referred hereafter as “SN APPS”). By installing, copying, checking a box, clicking a button confirming
your agreement to these terms, or otherwise continuing to use the SN APPS, You agree to be bound by the
terms of this EULA. This license agreement represents the entire agreement concerning SN APPS between
You and SharkNinja, and it supersedes any prior proposal, representation, or understanding between the
parties. If You do not agree to the terms of this EULA, do not install or use the SN APPS or this product.
The SN APPS are protected by copyright laws and international copyright treaties, as well as other
intellectual property laws and treaties.
1. GRANT OF LICENSE. The SN APPS are licensed as follows:
1.1 Installation and Use. SharkNinja grants You the right to download, install, and use SN APPS on the
specified platform for which the SN APP was designed and in connection with SharkNinja products with
which the SN APPS are designed to operate (“SN Devices”).
1.2 Backup Copies. You may also make a copy of SN APPS downloaded and installed by You for backup and
archival purposes.
2. DESCRIPTION OF OTHER RIGHTS AND LIMITATIONS.
2.1 Maintenance of Copyright Notices. You must not remove or alter any copyright notices on any and all
copies of the SN APPS.
2.2 Distribution. You may not distribute copies of the SN APPS to third parties.
2.3 Prohibition on Reverse Engineering, Decompilation, and Disassembly. You may not reverse engineer,
decompile, or disassemble SN APPS, except and only to the extent that such activity is expressly permitted
by applicable law notwithstanding this limitation.
2.4 Rental. You may not rent, lease, or lend SN APPS without written permission from SharkNinja.
2.5 NOT FOR RESALE SOFTWARE. Applications identified as “Not for Resale” or “NFR,” may not be resold,
transferred, or used for any purpose other than demonstration, test, or evaluation.
2.6 Support Services. SharkNinja may provide You with support services related to SN APPS (“Support
Services”). Any supplemental software code provided to You as part of the Support Services shall be
considered part of SN APPS and subject to the terms and conditions of this EULA.
2.7 Compliance with Applicable Laws. You must comply with all applicable laws regarding use of SN APPS.
3. UPDATES. SharkNinja may provide You with upgrades or updates to SN APPS. This EULA will govern
any upgrades provided by SharkNinja that replace and/or supplement SN APPS, unless such upgrade is
accompanied by a separate EULA, in which case the terms of that EULA will govern. If You decide not to
download and use an upgrade or update provided by SharkNinja, You understand that You could put SN
Apps at risk to serious security threats or cause SN Apps to become unusable or unstable.
4. DATA AND PRIVACY. SharkNinja is committed to ensuring your privacy by adhering to high standards
of fairness and integrity. We are committed to keeping our customers informed about how we use the
information we gather from You through the use of each of our websites or SN APPS. Our privacy practices
are described in SharkNinja’s Privacy Policy, as well as in separate notices given when an app, product, or
service is purchased or downloaded. By using SN APPs or providing us with your personal information,
You are accepting and consenting to the practices, terms, and conditions described in SharkNinja’s Privacy
Policy. At all times your information will be treated in accordance with the SharkNinja Privacy Policy,
which is incorporated by reference into this EULA and can be viewed at the following URL:
http://www.sharkninja.com/privacypolicy.
5. THIRD-PARTY APPLICATION LIBRARIES AND EMBEDDED SOFTWARE.
5.1 You acknowledge that Ayla Networks, Inc. (“Ayla”) has provided certain application libraries that have
been embedded into SN APPS (“Ayla Application Libraries”) and enables SN Devices to connect to the Ayla
Cloud Service (“Ayla Embedded Software”).
5.2 You will not use the Ayla Application Libraries except as an incorporated portion of SN APPS,
unmodified from the form provided to You.
5.3 You will not use the Ayla Embedded Software except as an incorporated portion of SN Devices,
unmodified from the form provided to You.
5.4 You will not modify, adapt, translate, or create derivative works based on, or decompile, disassemble,
reverse engineer, or otherwise attempt to derive the source code or underlying algorithms of, the Ayla
Application Libraries or the Ayla Embedded Software.
5.5 SharkNinja retains all ownership of SN APPS (and the Ayla Application Libraries contained therein) and
any software installed on SN Devices (including the Ayla Embedded Software) and only a license thereto is
granted to You for use in connection with the SN APPS and SN Devices.
END-USER LICENSE AGREEMENT FOR SHARKNINJA SOFTWARE
5.6 You will not use the Ayla Application Libraries or Ayla Embedded Software to attempt to gain
unauthorized access to or use of the systems/services of SharkNinja’s other licensors; nor will You transmit
viruses, worms, Trojan horses, time bombs, spyware, malware, cancelbots, passive collection mechanisms,
robots, data mining software, or any other malicious or invasive code or program into the systems/services
of SharkNinja’s other licensors.
5.7 You will not use the Ayla Application Libraries or Ayla Embedded Software to interfere with, breach,
or circumvent any security feature, authentication feature, or any other feature that restricts or enforces
limitations on the use of, or access to, the systems/services of SharkNinja’s other licensors.
5.8 You will not probe, attack, scan, or test the vulnerability of the systems/services of SharkNinja’s other
licensors.
5.9 SharkNinja’s other licensors of the SN APPS, Ayla Application Libraries, and the Ayla Embedded
Software are the express third-party beneficiaries of this EULA, and the provisions of this Section of this
EULA are made expressly for the benefit of such licensors, and are enforceable by such licensors.
6. TERMINATION. Without prejudice to any other rights, SharkNinja may terminate this EULA if You fail to
comply with the terms and conditions of this EULA. In such event, You must destroy all copies of SN APPS
in your possession.
7. COPYRIGHT. All title, including but not limited to copyrights, in and to SN APPS and any copies thereof
are owned by SharkNinja or its suppliers. All title and intellectual property rights in and to the content
which may be accessed through use of SN APPS are the property of the respective content owner and may
be protected by applicable copyright or other intellectual property laws and treaties. This EULA grants You
no rights to use such content. All rights not expressly granted are reserved by SharkNinja.
8. OPEN SOURCE SOFTWARE. You hereby acknowledge that SN APPS may contain software that is
subject to “open source” or “free software” licenses (“Open Source Software”). The license granted by this
EULA does not apply to Open Source Software contained in the SN APPS. Rather, the terms and conditions
in the applicable Open Source Software license shall apply to the Open Source Software. Nothing in this
EULA limits your rights under, or grants You rights that supersede, any Open Source Software license. You
acknowledge that the Open Source Software license is solely between You and the applicable licensor of
the Open Source Software. To the extent the terms of the licenses applicable to the Open Source Software
require SharkNinja to provide the Open Source Software, in either source or executable form, or to provide
copies of applicable license terms or other required information, You may obtain a copy of the software
by contacting SharkNinja at the below physical address. Additional information about the Open Source
Software, and its terms of use, may be found at www.sharkclean.com/opensource.
9. NO WARRANTIES. SharkNinja expressly disclaims any warranty for SN APPS, Ayla Application Libraries,
or Ayla Embedded Software. SN APPS, Ayla Application Libraries, and Ayla Embedded Software are
provided ‘As Is’ without any express or implied warranty of any kind, including but not limited to any
warranties of merchantability, noninfringement, fitness of a particular purpose, or title. SharkNinja does
not warrant or assume responsibility for the accuracy or completeness of any information, text, graphics,
links, or other items contained within the SN APPS. SharkNinja makes no warranties respecting any harm
that may be caused by the transmission of a computer virus, worm, logic bomb, or other such computer
program. SharkNinja further expressly disclaims any warranty or representation to any third party.
10. LIMITATION OF LIABILITY. In no event shall SharkNinja or its suppliers be liable for any special,
incidental, punitive, indirect, or consequential damages whatsoever (including, but not limited to, damages
for loss of profits or confidential or other information, for business interruption, for personal injury, for
loss of privacy, for failure to meet any duty including of good faith or of reasonable care, for negligence,
and for any other pecuniary or other loss whatsoever) arising out of or in any way related to the use of or
inability to use SN Devices or SN APPS, the provision of or failure to provide support or other services,
information, software, and related content through the product or otherwise arising out of the use of
SN APPS, or otherwise under or in connection with any provision of this EULA, even in the event of the
fault, tort (including negligence), strict liability, breach of contract, or breach of warranty of SharkNinja or
any supplier, and even if SharkNinja or any supplier has been advised of the possibility of such damages.
SharkNinja shall have no liability with respect to the content of the SN APPS or any part thereof, including
but not limited to errors or omissions contained therein, libel, infringements of rights of publicity, privacy,
trademark rights, business interruption, personal injury, loss of privacy, moral rights, or the disclosure of
confidential information.
11. APPLICABLE LAW. The laws of the Commonwealth of Massachusetts will govern this EULA and
You hereby consent to exclusive jurisdiction and venue in the state and federal courts sitting in the
Commonwealth of Massachusetts.
12. ASSIGNMENT. SharkNinja may assign this EULA without notice to Licensor.
13. ENTIRE AGREEMENT. This EULA (including any addendum or amendment to this EULA which is
included with the SN Devices) is the entire agreement between You and SharkNinja relating to the SN
APPS and supersedes all prior or contemporaneous oral or written communications, proposals and
representations with respect to the SN APPS or any other subject matter covered by this EULA. To the
extent the terms of any SharkNinja policies or programs for support services conflict with the terms of this
EULA, the terms of this EULA shall control.
If You have questions regarding this EULA, please contact SharkNinja at 89 A Street, Suite 100,
Needham, MA 02494.

sharkclean.comsharkclean.com
ONE (1) YEAR LIMITED WARRANTY
The One (1) Year Limited Warranty applies to purchases made from authorized retailers of SharkNinja
Operating LLC. Warranty coverage applies to the original owner and to the original product only and is
not transferable.
SharkNinja warrants that the unit shall be free from defects in material and workmanship for a period
of one (1) year from the date of purchase when it is used under normal household conditions and
maintained according to the requirements outlined in the Owner’s Guide, subject to the following
conditions and exclusions:
What is covered by this warranty?
1. The original unit and/or non-wearable components deemed defective, in SharkNinja’s sole discretion,
will be repaired or replaced up to one (1) year from the original purchase date.
2. In the event a replacement unit is issued, the warranty coverage ends six (6) months following the
receipt date of the replacement unit or the remainder of the existing warranty, whichever is later.
SharkNinja reserves the right to replace the unit with one of equal or greater value.
What is not covered by this warranty?
1. Normal wear and tear of wearable parts (such as foam filters, filters, batteries, brushrolls, etc.), which
require regular maintenance and/or replacement to ensure the proper functioning of your unit, are not
covered by this warranty. Replacement parts are available for purchase at sharkaccessories.com.
2. Any unit that has been tampered with or used for commercial purposes.
3. Damage caused by misuse (e.g., vacuuming up water or other liquids), abuse, negligent handling, failure
to perform required maintenance (e.g., not cleaning the filters), or damage due to mishandling in transit.
4. Consequential and incidental damages.
5. Defects caused by repair persons not authorized by SharkNinja. These defects include damages caused
in the process of shipping, altering, or repairing the SharkNinja product (or any of its parts) when the
repair is performed by a repair person not authorized by SharkNinja.
6. Products purchased, used, or operated outside North America.
How to get service
If your appliance fails to operate properly while in use under normal household conditions within the warranty
period, visit sharkclean.com/support for product care and maintenance self-help. Our Customer Service
Specialists are also available at 1-888-228-5531 to assist with product support and warranty service options,
including the possibility of upgrading to our VIP warranty service options for select product categories.
Please register your product and have it with you when contacting Customer Service.
SharkNinja will cover the cost for the customer to send in the unit to us for repair or replacement. A fee of
$24.95 (subject to change) will be charged when SharkNinja ships the repaired or replacement unit.
How to initiate a warranty claim
You must call 1-888-228-5531 to initiate a warranty claim. You will need the receipt as proof of purchase.
A Customer Service Specialist will provide you with return and packing instruction information.
How state law applies
This warranty gives you specific legal rights, and you also may have other rights that vary from state to
state. Some states do not permit the exclusion or limitation of incidental or consequential damages, so the
above may not apply to you.
EXPECTED PERFORMANCE
Expected runtime: at least 60 minutes
Expected charging time: 6 hours
TIP: You can find the model and serial
numbers on the QR code label on the
bottom of the robot.
RECORD THIS INFORMATION
Model Number: ������������������������
Date Code: ����������������������������
Date of Purchase: ����������������������
(Keep receipt)
Store of Purchase: ����������������������
BATTERY REMOVAL AND DISPOSAL
This product uses a battery. When the battery no longer holds a charge, it should be removed from the vacuum and recycled. DO NOT incinerate or
compost the battery.
When your lithium-ion battery needs to be replaced, dispose of it or recycle it in accordance with local ordinances or regulations. In some areas, it is
illegal to place spent lithium-ion batteries in the trash or in a municipal solid waste stream. Return spent battery to an authorized recycling center or to
retailer for recycling. Contact your local recycling center for information on where to drop o the spentbattery.
For more information on battery removal for disposal, please visit sharkclean.com/batterysupport.
The RBRC™ (Rechargeable Battery Recycling Corporation) seal on the lithium-ion battery indicates that the costs to recycle the battery at the end of
its useful life have already been paid by SharkNinja. In some areas, it is illegal to place spent lithium-ion batteries in the trash or municipal solid waste
stream and the RBRC program provides an environmentally conscious alternative.
RBRC, in cooperation with SharkNinja and other battery users, has established programs in the United States and Canada to facilitate the collection
of spent lithium-ion batteries. Help protect our environment and conserve natural resources by returning the spent lithium-ion battery to an
authorized SharkNinja service center or to your local retailer for recycling. You may also contact your local recycling center for information on where
to drop o the spent battery, or call 1-800-798-7398.
REGISTER YOUR PURCHASE
registeryourshark.com

sharkclean.comsharkclean.com
18. N’UTILISEZ PAS l’appareil dans les endroits
suivants:
a)Des surfaces humides ou mouillées
b) À l’extérieur
c) Dans des endroits fermés pouvant
contenir des matières explosives
ou des fumées ou vapeurs toxiques
(essence à briquet, essence, kérosène,
peinture, diluants à peinture, produits
de traitement antimite ou poussières
inflammables)
d) Près des cheminées avec entrées sans
obstruction.
e) Dans un endroit où se trouve un
appareil de chauage autonome.
19. Éteignez l’aspirateur robot avant de
procéder à tout ajustement, nettoyage,
entretien ou dépannage.
20. Laissez tous les filtres sécher
complètement avant de les remettre
dans l’aspirateur robot pour éviter que du
liquide ne soit aspiré dans les composants
électriques.
21. NE MODIFIEZ PAS ni ne tentez de réparer
l’aspirateur robot ou la batterie vous-même,
à moins d’indication contraire dans ce
manuel. N’UTILISEZ PAS l’aspirateur s’il a
été modifié ou endommagé.
22. Afin de réduire le risque d’électrocution, cet
appareil est muni d’une fiche polarisée (une
lame étant plus large que l’autre). Cette
fiche d’alimentation s’insère dans une prise
de courant polarisée dans un seul sens. Si
la fiche ne s’insère pas entièrement dans la
prise, inversez-la. Si elle ne s’insère toujours
pas, communiquez avec un électricien
qualifié pour faire installer une prise de
courant appropriée. Ne modifiez pas la
fiche d’alimentation, de quelque façon que
ce soit.
23. Si la protection thermique de la base à
vidange automatique est activée, il faut
complètement couper l’alimentation et la
rétablir pour exécuter une réinitialisation.
UTILISATION DE LA BATTERIE
24. La batterie est la source d’alimentation
de l’aspirateur. Lisez attentivement et
respectez les instructions de chargement.
25. Afin d’éviter qu’il ne se mette en marche
par erreur, assurez-vous que l’aspirateur
est éteint avant de le soulever ou de le
transporter. NE TRANSPORTEZ PAS
l’appareil avec votre doigt sur l’interrupteur
d’alimentation.
26. Utilisez UNIQUEMENT la base à vidange
autonome XSKDOCK130 de Shark®
et utilisez uniquement une batterie
RVBAT850. L’utilisation d’autres chargeurs
ou d’autres batteries que celles-ci pourrait
causer un risque d’incendie.
27. Gardez la batterie à l’écart des objets
métalliques comme des trombones, de la
monnaie, des clés, des clous ou des vis.
Court-circuiter les bornes de la batterie
augmente le risque d’incendie ou de
brûlures.
28. Si la batterie est utilisée de façon
inappropriée, il se peut que du liquide s’en
échappe. Évitez le contact avec ce liquide,
car il pourrait causer des irritations ou des
brûlures. En cas de contact, rincez à l’eau.
Si le liquide entre en contact avec les yeux,
obtenez de l’aide médicale.
29. L’aspirateur robot ne doit pas être
entreposé, chargé ou utilisé à des
températures inférieures à 50°F (10°C)
ou supérieures à 104°F (40°C). Assurez-
vous que la batterie et l’aspirateur sont à
température pièce avant de les recharger
ou de les utiliser. L’exposition du robot ou
de la batterie à des températures hors de la
plage indiquée peut endommager l’appareil
et augmenter le risque d’incendie.
30. N’EXPOSEZ PAS l’aspirateur robot ou
la batterie au feu ou à une température
supérieure à 265 °F (130 °C), car cela peut
provoquer une explosion.
31. Les piles non rechargeables ne peuvent pas
être rechargée.
LANIÈRES BOTBOUNDARY®
32. NE PLACEZ PAS les lanières BotBoundary
sous les tapis ou les carpettes.
33. Utilisez toujours des lanières
BotBoundary autour des planchers et
surfaces réfléchissants.
34. Les lanières BotBoundary doivent
toujours être utilisées près des marches
recouvertes de tapis.
35. NE PLACEZ PAS les lanières BotBoundary
à moins de trois mètres de la station de
recharge.
36. Pour que les capteurs de chute de votre
robot fonctionnent adéquatement,
tous les tapis ou les carpettes doivent
être placés à un minimum de 20cm
des escaliers (ou se prolonger de
façon continue par-dessus la limite des
marches). Si l’extrémité d’un tapis ou
d’une carpette qui est à moins de 20cm
des marches ne peut être déplacée, vous
devez utiliser une lanière BotBoundary
pour bloquer l’accès aux escaliers.
CONSERVEZ CES INSTRUCTIONS
Pour les mises en garde et les avertissements les plus récents, allez à sharkclean.com/robothelp
AVERTISSEMENT
Afin de réduire les risques d’incendie, de décharges électriques, de blessure ou
de dommage matériel:
CONSIGNES DE SÉCURITÉ IMPORTANTES
VEUILLEZ LES LIRE ATTENTIVEMENT AVANT L’UTILISATION • POUR UN USAGE
DOMESTIQUE SEULEMENT
Si le cordon d’alimentation du chargeur ne s’insère pas à fond dans la prise de courant, inversez
alors le sens de la fiche. Si elle ne s’insère toujours pas, communiquez avec un électricien qualifié.
NEFORCEZ PAS pour insérer la fiche dans la prise et ne tentez pas de la modifier.
AVERTISSEMENTS GÉNÉRAUX
Lors de l’utilisation d’un appareil électrique, il
faut toujours suivre les précautions de base, y
compris les suivantes:
1. Aspirateur robot qui comprend l’aspirateur
robot et une base de chargement
ainsi qu’un bloc d’alimentation.
Ces composantes comportent des
raccordements électriques, du filage
électrique et des pièces amovibles pouvant
exposer l’utilisateur à certains risques.
2. Avant chaque utilisation, inspectez
soigneusement toutes les pièces afin de
déceler tout dommage. Si une pièce est
endommagée, cessez son utilisation.
3. Utilisez uniquement des pièces de
rechange identiques.
4. Cet aspirateur robot ne renferme aucune
pièce qui peut être réparée.
5. Utilisez cet appareil uniquement aux fins
décrites dans ce manuel. N’UTILISEZ PAS
l’aspirateur robot pour un usage autre que
ceux décrits dans le présent manuel.
6. À l’exception des filtres, N’EXPOSEZ
AUCUNE des pièces de l’aspirateur robot à
l’eau ou à d’autres liquides.
AVERTISSEMENTS CONCERNANT
L’UTILISATION
7. Cet appareil peut être utilisé par des
personnes dont les capacités physiques,
sensorielles ou mentales sont réduites
ou qui manquent d’expérience et de
connaissances si ces personnes sont
supervisées ou informées sur l’utilisation
sécuritaire de l’appareil et si elles
comprennent les dangers possibles.
a) Les enfants ne doivent pas jouer avec
l’appareil.
b) Les enfants ne peuvent pas
nettoyer ni entretenir l’appareil sans
supervision.
8. Éteignez toujours l’aspirateur robot avant
d’insérer ou de retirer le filtre ou le récipient
à poussière.
9. NE MANIPULEZ PAS la prise, la base de
chargement, le cordon d’alimentation ou
l’aspirateur robot avec les mains mouillées.
Les enfants ne peuvent pas nettoyer ni
entretenir l’appareil sans supervision.
10. N’UTILISEZ PAS l’appareil sans que le
récipient à poussière du robot et tous les
filtres soient bien en place.
11. N’ENDOMMAGEZ PAS le cordon
d’alimentation:
a) N’UTILISEZ PAS le cordon comme
une poignée pour porter ou tirer la
base de chargement.
b) NE DÉBRANCHEZ PAS l’appareil
en tirant le cordon d’alimentation.
Agrippez la fiche non le cordon.
c) NE FERMEZ PAS une porte sur le
cordon, ne tirez pas le cordon sur
des coins pointus et ne laissez pas le
cordon près de surfaces chaudes.
12. ÉVITEZ d’insérer des objets dans les
ouvertures de la buse ou de tout autre
accessoire. N’UTILISEZ PAS l’appareil si
une ouverture est obstruée. Veillez à ce que
les ouvertures ne soient pas bloquées par
de la poussière, de la peluche, des cheveux
ou tout autre élément qui pourrait gêner la
circulation de l’air.
13. N’UTILISEZ PAS l’aspirateur robot si son
débit d’air est obstrué. Si les conduits d’air
se bloquent, éteignez l’aspirateur et retirez
toutes les obstructions avant d’allumer
l’appareil de nouveau.
14. Tenez la buse et tous les orifices
d’aspiration éloignés des cheveux, du
visage, des doigts, des pieds déchaussés
ou de vêtements amples.
15. N’UTILISEZ PAS l’aspirateur robot s’il ne
fonctionne pas comme prévu, ou s’il a été
échappé sur le sol, endommagé, laissé à
l’extérieur ou immergé.
16. NE PLACEZ PAS l’aspirateur sur des
surfaces instables.
17. N’UTILISEZ PAS l’appareil pour aspirer:
a) Des liquides
b)De gros objets
c) Des objets durs ou tranchants (verre,
clous, vis ou pièces de monnaie)
d) De grandes quantités de poussière
(poussière de cloison sèche, cendres
ou braises de foyer). N’UTILISEZ PAS
l’aspirateur comme accessoire d’un
outil électrique pour l’aspiration de la
poussière.
e) Des objets produisant de la fumée
ou à combustion (braises chaudes,
embouts de cigarettes ou allumettes)
f) Des matières inflammables ou
combustibles (essence à briquet,
essence ou kérosène)

sharkclean.comsharkclean.com
!
Tampon de
chargement
Récipient à
poussière de la
base
Boîtier du filtre
pré-moteur
Base de
chargement
Tampon de chargement
Base de chargement
Fenêtre de
remplissage
Absorbeur
de débris
Voyant
indicateur
d’alimentation
Voyant
indicateur de
recharge
Récipient
àpoussière
dela base
Récipient à
poussière de la
base
Dégagement
du récipient à
poussière
Porte d’accès au
filtre post-moteur
AVANT
ARRIÈRE
Rembobineur à cordon
d’alimentation
Interrupteur
d’alimentation
PRÉSENTATION DU SHARK IQ ROBOT® PRÉSENTATION DU SHARK IQ ROBOT®
Bouton Clean (nettoyer)
Parechoc avant
Voyants indicateurs de recharge
Voyant indicateur d’erreur Voyant indicateur Wi-Fi
Capteur de station de recharge
Bouton Dock (station
de recharge)
Module de navigation
Bouton Power
(mise en marche)
Ouverture de déchargement
des débris
Languettes de dégagement
du récipient à poussière
Capteurs de chute et de frontières
Tampon de chargement
Module optique
Brosse latérale
Compartiment
de la batterie
Brosse rotative
autonettoyante Roue motrice
Récipient à poussière
et filtre du robot
Porte d’accès
de la brosse
rotative
Roulette
pivotante avant
Dégagement du
récipient à poussière
de la base

sharkclean.comsharkclean.com
1.5 m1 m
1 m
INSTALLATION DE LA BASE
Clean Dock
!
Lorsque la charge commence, le robot émet un bip.
Le voyant indicateur de recharge BLEU sur la base
PULSE et le voyant indicateur de batterie du robot
clignote en bleu. Lorsque le robot est complètement
chargé, le voyant de la batterie sur le robot et le
voyant de charge bleu sur la base s'allument en
continu.
1 m
1 m
1,5 m
La base à vidange automatique charge votre robot, et contient la poussière et les débris provenant d’un
maximum de 30 jours de nettoyage.
• Choisissez un emplacement permanent pour la base. Chaque fois que vous la déplacez, votre robot doit
rétablir complètement la carte de votre maison.
• Choisissez une surface plane dans une aire centrale. Retirez la pellicule protectrice de la base.
• Placez la base dos contre le mur, dans un endroit où le signal du réseau Wi-Fi est fort.
• Installez la base à même le sol.
• Déplacez tous les objets situés à moins de 1 mètre de chaque côté de la base, ou à moins de 1,5 mètre à partir
de l’avant.
• Branchez le cordon de chargement, et allumez l’interrupteur d’alimentation à l’arrière de la base. Lorsque
la base sera branchée et que l’interrupteur d’alimentation sera en position de marche, le voyant indicateur
d’alimentation VERT sur la base s’allumera.
INSTALLATION DES BROSSES LATÉRALES
Insérez les deux brosses latérales comprises dans
les chevilles carrées logées sur le dessous du robot.
REMARQUE : Ne pas placer la base contre des éléments chauants, ou des plinthes, ou encore en plein soleil.
REMARQUE : Le robot émettra un bruit fort lorsqu’il videra ses débris dans la base. Cela est normal et il n’y a pas lieu de
s’inquiéter.z
EN CHARGE
IMPORTANT: Le Shark iQ Robot™ est doté d’une batterie rechargeable préinstallée. La batterie doit être
complètement chargée avant l’utilisation. Il pourrait falloir jusqu’à 6heures pour une charge complète.
Pour charger, mettez le bouton Power (mise en
marche), situé sur le côté du robot, à la position ON
(marche) (I). Le robot émet un signal sonore lorsqu’il
commence à se charger.
Si le robot n’a plus de charge et que le robot ne peut
pas retourner à la base, placez-le vous-même sur la
base. Le voyant indicateur clignote bleu et le robot
émet un signal sonore lorsqu’il commence à charger.
Lorsque le cycle de nettoyage se termine, ou si la
batterie est faible, le robot recherchera la base. Si
votre robot ne retourne pas à la base, il se peut que
la charge de la batterie soit épuisée.
REMARQUE: Lors du placement manuel du robot sur la base, assurez-vous que les tampons de chargement de la partie
inférieure du robot sont alignés sur ceux de la base et que le récipient à poussière du robot est en contact avec l’absorbeur
de débris sur la base. Pendant que le robot charge, les deux voyants DEL bleus s’allument en alternance. Une fois l’appareil
complètement chargé, les deux voyants bleus s’allumeront en continu.
REMARQUE: Au moment de ramasser le robot, évitez de placer vos doigts entre le parechoc et la base du robot.

sharkclean.comsharkclean.com
VOYANTS INDICATEURS DE RECHARGE
REMARQUE: Si le voyant de charge faible clignote en rouge, il n’y a pas assez de charge pour que le robot puisse revenir à la
base. Placez manuellement le robot sur la base.
BOUTONS ET VOYANTS INDICATEURS
!
LES VOYANTS INDICATEURS
DE RECHARGE
indiquent la quantité de
charge restante dans la
batterie.
VOYANT INDICATEUR
D’ERREUR «!»
Consultez la section
Dépannage pour voir la liste
complète des codes d’erreurs.
VOYANT INDICATEUR WI-FI
Voyant bleu: connecté au
Wi-Fi.
Voyant rouge: non connecté.
Voyant bleu clignotant: mode
de configuration.
Aucun voyant: pas encore
configuré.
MODULE DE NAVIGATION
Tenez-vous à l’écart et ne
couvrez pas l’appareil.
Le capteur orienté vers le
haut permet une navigation
avancée.
En cours
d’utilisation
Pendant la
charge (Bleu)
Charge nulle
ou éteint
BOUTON DOCK (STATION
DERECHARGE)
Appuyez sur le bouton
pour arrêter le nettoyage et
renvoyer l’appareil à la station
de recharge.
EVACUATE & RESUME
(ÉVACUER ET CONTINUER)
Appuyez sur le bouton DOCK
(station de recharge) et
maintenez-le enfoncé pendant
15secondes pour activer
ou désactiver la fonction
Evacuate & Resume(évacuer
et continuer).
BOUTON CLEAN (NETTOYER)
Appuyez sur le bouton pour
commencer un cycle de
nettoyage. Appuyez à nouveau
sur le bouton pour l’arrêter.
RECHARGE & RESUME
(RECHARGER ET CONTINUER)
Appuyez sur le bouton CLEAN
(nettoyer) et maintenez-le
enfoncé pendant 15secondes
pour activer ou désactiver la
fonction Recharge & Resume
(recharger et continuer).
La fonction Recharge & Resume (recharger et
continuer) est désactivée par défaut. Activez
la fonction Recharge & Resume (recharger et
continuer) pour une couverture complète si le plan
d’étage de votre maison est supérieur à 140m².
Votre robot retournera à la base, reprendra et peut
ramasser le nettoyage là où il l’a laissé.
Activez l’option Evacuate & Resume (évacuer et
continuer) en présence d’animaux dans la maison.
Votre robot retournera après 30minutes à la base
pour vider le récipient à poussière, puis il reprendra
le nettoyage là où il s’était arrêté.
REMARQUE: Si votre plan d’étage est inférieur à 93m², nous vous recommandons de NE PAS UTILISER la fonction Evacuate &
Resume(évacuer et continuer).
VOYANTS INDICATEURS DE BASE
Les voyants indicateurs de la batterie sur le robot indiquent la charge restante. Lorsque le robot se rechargera,
le voyant de la batterie clignotera en bleu. Une fois l’appareil complètement chargé, le voyant bleu s’allumera en
continu.
Il y a deux voyants indicateurs à l’avant de la base, le voyant d’alimentation vert et le voyant de charge bleu.
Lorsque la base sera branchée et que l’interrupteur d’alimentation sera en position de marche, le voyant
indicateur d’alimentation VERT s’allumera. Lorsque le robot sera en cours de chargement sur la base, le voyant
BLEU clignotera. Une fois l’appareil complètement chargé, le voyant bleu s’allumera en continu.
Voyant
indicateur
d’alimentation
Voyant
indicateur de
recharge
ROBOT BATTERY INDICATOR LIGHT
Complètement
chargé
(Bleu)
Charge
partielle
(Bleu)
Charge
faible
(Rouge)

sharkclean.comsharkclean.com
RUMPELSTILTSKIN
Schedule History
EDIT OPTIONS
MapsControl
Shark
Kitchen
Living Room
Dining Room
o
m
PRÉPAREZ VOTRE MAISON
Votre robot utilise une gamme de capteurs pour naviguer autours des murs, des pieds de meuble et
d’autres obstacles au fur et à mesure qu’il nettoie. Utilisez les lanières BotBoundary™ comprises pour
empêcher le robot de heurter certains objets ou créer des zones interdites. Pour de meilleurs résultats,
préparez votre maison comme indiqué ci-dessous, et planifiez un nettoyage quotidien afin de vous assurer
que toutes les zones du sol sont entretenues de façon régulière.
REMARQUE: La programmation est l’une des nombreuses fonctions disponibles uniquement dans l’application.
Clean Dock
!
ÉVITEZ DE DÉPLACER LE
ROBOT OU LA BASE
Évitez de soulever et de dé-
placer le robot lorsqu’il net-
toie, ou de déplacer la base,
car cela pourrait l’empêcher
de cartographier correcte-
ment votre maison.
VÉRIFIEZ LE NIVEAU DU
RÉSERVOIR DE LA BASE
Durant les premières
semaines d’utilisation, votre
robot fera une vidange plus
souvent qu’à l’habitude.
Vérifiez régulièrement le
niveau du réservoir. Le
récipient à poussière est
conçu pour contenir jusqu’à
30 jours de débris, mais
chaque maison est diérente
et le récipient pourrait se
remplir plus rapidement
chezcertains.
OBSTACLES
Déplacez les cordons, retirez
les petits objets et ouvrez les
portes intérieures pour une
cartographie complète de
votre maison.
SEUILS
Votre robot pourrait éprouver
de la diculté avec certains
seuils élevés. Bloquez l’accès
aux seuils élevés en utilisant
les lanières BotBoundary
incluses.
ESCALIERS
Votre robot est équipé de
capteurs de chute pour
prévenir les chutes en bas
des corniches. Pour que les
capteurs de chute fonctionnent
adéquatement, tous les tapis
ou les carpettes doivent être
placés à un minimum de 20 cm
(8 inches) des escaliers (ou se
prolonger par-dessus la limite
des marches).
CONDITIONS D’ÉCLAIRAGE
Pour de meilleurs résultats,
faites fonctionner votre
robot dans des conditions
de bon éclairage. Si vous
faites fonctionner votre robot
la nuit, laissez les lumières
allumées dans les zones à
nettoyer.
BOTBOUNDARY STRIPS
PRÉPARATION DE VOTRE MAISON À L’AIDE DES LANIÈRES BOTBOUNDARY
Utilisez les lanières BotBoundary pour créer rapidement et facilement des « zones interdites » pour tenir votre robot
à l’écart des zones que vous souhaitez qu’il évite. Ces zones pourraient être, entre autres :
• Près des cordons d’alimentation
• Devant des seuils élevés supérieurs à 2,2 cm
CONSIGNES D’UTILISATION
1. Vous pouvez couper les lanières BotBoundary
pour les raccourcir au besoin (minimum
de 45 cm). Sivous coupez une lanière,
assurez-vous qu’elle est susamment longue
pour couvrir toute la surface que vous devez
bloquer. Les écarts peuvent entraîner un mauvais
fonctionnement des lanières BotBoundary.
2. Assurez-vous que chaque lanière BotBoundary se
trouve complètement à plat contre le plancher, sans
aucun chevauchement. REMARQUE: NE PLACEZ
PAS les lanières BotBoundary l’une sur l’autre.
3. Pour obtenir de meilleurs résultats, placez les
lanières entre des objets fixes, comme les cadres de
porte ou les pattes de meuble, ou faites une boucle
fermée autour d’un objet.
(45 cm
(18pouces)
auminimum) Lanières BotBoundary
MEUBLES CADRES DE PORTE BOLS POUR ANIMAUX DE COMPAGNIE
!
!
BotBoundary® strips
Lanières BotBoundary
CARTOGRAPHIE ET NAVIGATION
MODE DE NETTOYAGE MANUEL
Pour démarrer manuellement un cycle de nettoyage, appuyez sur le bouton Clean (nettoyer) situé sur le robot
ou dans l’appli mobile. Pour arrêter le robot avant qu’il ne termine le nettoyage et retourne automatiquement à
la base, appuyez sur le bouton Dock (station de recharge).
REMARQUE: Assurez-vous de charger entièrement le robot avant son premier nettoyage, afin qu’il puisse explorer, créer
une carte et nettoyer autant de votre domicile que possible. Il pourrait falloir jusqu’à six heures pour charger entièrement
votre robot.
REMARQUE: Évitez de soulever ou de déplacer le robot ou la base. Si on déplace l’un ou l’autre, le robot pourrait ne pas
pouvoir suivre son chemin de nettoyage intelligent ou retourner à la base. Si le robot est soulevé ou déplacé pour quelque
raison que ce soit, il doit être retourné à moins de 15cm de son dernier emplacement.
À mesure qu’il nettoie, votre robot va établir une
carte de votre maison. Cela peut prendre plusieurs
lavages avant que le robot ne finisse l’établissement
de la carte. Une fois la cartographie établie, une carte
interactive de votre plan d’étage sera accessible sur
votre appli.
La carte interactive dans l’appli vous permet de
nommer des pièces, puis de sélectionner celles qu’il
faut nettoyer et d’envoyer immédiatement le robot
nettoyer un emplacement spécifique.
D’un nettoyage à l’autre, le robot actualisera et
améliorera son itinéraire afin de fournir une couverture
de nettoyage optimisée. Après chaque nettoyage, un
rapport de nettoyage sera fourni dans l’application.
8-inch
Min.
!

sharkclean.comsharkclean.com
ENTRETIEN
VIDANGE DU RÉCIPIENT À POUSSIÈRE DU ROBOT
Appuyez sur les languettes de dégagement du
récipient à poussière et faites glisser le récipient à
poussière.
ATTENTION: Mettez l’appareil hors tension avant d’eectuer tout entretien.
Pour éviter les dégâts, assurez-vous de tenir le
récipient à poussière en position verticale. Pincez et
soulevez le couvercle.
Jetez les débris et la poussière aux ordures. Vérifiez qu’aucun débris ne s’est accumulé entre le
filtre et l’écran en plastique.
Au besoin, retirez les débris et nettoyez la zone avec
un linge sec ou une brosse douce.
UTILISATION DU SHARK IQ ROBOT™
Profitez pleinement des fonctionnalités de votre Shark iQ Robot™:
•
Interactive Map (carte interactive)
À mesure qu’il nettoie, votre
robot établit une carte
interactive de votre foyer. Vous
pouvez utiliser la carte pour
créer des pièces.
• Room Select (choisir les pièces)
Envoyez immédiatement votre
robot à une pièce spécifique de
cet étage.
• Recharge and Resume
(recharger et continuer)
Utilisez cette fonction pour
assurer une couverture
complète et multipièce dans
votre maison.
• Scheduling (programmation)
Prévoyez le nettoyage de
toute la maison pour une
heure précise, une journée
donnée.
• Control From Anywhere
(exercer le contrôle de tout
endroit)
Peu importe où vous êtes,
vous contrôlez votre robot.
• Cleaning Reports (rapports
de nettoyage)
Pour chaque nettoyage
de votre robot, votre appli
produira un rapport de
nettoyage.
• Contrôle du volume
Vous pouvez régler le volume
des notifications audio de
votre robot.
CODE D’ERREUR PROBLÈME
! (ROUGE) + voyant indicateur Wi-Fi (ROUGE clignotant) Mauvais mot de passe pour le Wi-Fi
! (Clignote en rouge) + Wi-Fi (ROUGE) Impossible de trouver le SSID, essayez de connecter à nouveau
! et Wi-Fi (clignotent en ROUGE en alternance) Mauvais nom d’utilisateur ou mot de passe pour votre compte
Shark
! et Wi-Fi (clignotent en ROUGE en même temps) Impossible de se connecter au Wi-Fi
UTILISATION DE L’APPLICATION SHARKCLEAN™ ET DES COMMANDES VOCALES
CONFIGURER LA COMMANDE VOCALE AVEC ASSISTANT GOOGLE OU ALEXA AMAZON
Visitez sharkclean.com/app pour obtenir des informations de configuration, qui comprennent la manière
d’activer la compétence Shark pour Alexa Amazon et l’utilisation avec l’Assistant Google.
Assistant Google:
«OK Google, dis à Shark de commencer le nettoyage».
«OK Google, dis à Shark d’arrêter mon robot».
« OK Google, dis à Shark d’envoyer mon robot à la
station de recharge».
Alexa d’Amazon:
«Alexa, dis à Shark de commencer le nettoyage».
«Alexa, dis à Shark d’arrêter mon robot».
« Alexa, dis à Shark d’envoyer mon robot à la station
de recharge».
Veuillez visiter sharkclean.com/app ou composer le 1888228-5531 pour toutes vos questions liées à l’appli.
RUMPELSTILTSKIN
Schedule History
EDIT OPTIONS
MapsControl
Shark
Kitchen
Living Room
Dining Room
o
m
Recherchez SharkClean dans la boutique d’applications
et téléchargez l’appli sur votre iPhoneTM ou AndroidTM.
DÉPANNAGE POUR
WI-FI
• Pour utiliser l’application, votre téléphone doit
être connecté à un réseau 2,4GHz. L’application
fonctionnera seulement sur un réseau 2,4GHz.
• Les réseaux Wi-Fi domestiques typiques prennent en
charge 2,4GHz ainsi que 5GHz.
• N’utilisez pas de RPV ni de serveur proxy.
• Assurez-vous que l’isolation Wi-Fi est éteinte
sur le routeur.
• Si vous n’arrivez pas à vous connecter, composez le
1 888 228-5531.
VOUS N’ARRIVEZ TOUJOURS PAS À
VOUS CONNECTER?
Redémarrez votre téléphone
• Éteignez le téléphone, attendez quelques minutes,
puis rallumez-le et connectez-vous au Wi-Fi.
Redémarrez votre robot
• Assurez-vous que l’interrupteur d’alimentation à
l’arrière de la BASE est en position ON (I) (marche).
• Appuyer sur le bouton d’alimentation du côté du
ROBOT à la position à la position OFF (0) (arrêt)
pendant 10secondes, puis appuyer de nouveau pour
remettre l’appareil sous tension.
Redémarrez votre routeur.
• Débranchez le câble d’alimentation du routeur
pendant 30secondes, puis rebranchez-le. Patientez
quelques minutes, le temps que votre routeur se
réinitialise complètement.
La page est en cours de chargement...
La page est en cours de chargement...
La page est en cours de chargement...
La page est en cours de chargement...
La page est en cours de chargement...
La page est en cours de chargement...
La page est en cours de chargement...
La page est en cours de chargement...
La page est en cours de chargement...
-
 1
1
-
 2
2
-
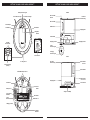 3
3
-
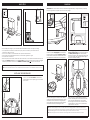 4
4
-
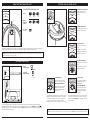 5
5
-
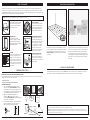 6
6
-
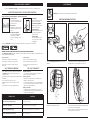 7
7
-
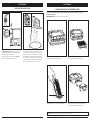 8
8
-
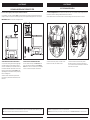 9
9
-
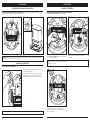 10
10
-
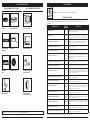 11
11
-
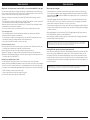 12
12
-
 13
13
-
 14
14
-
 15
15
-
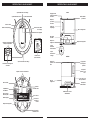 16
16
-
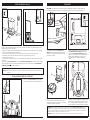 17
17
-
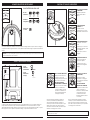 18
18
-
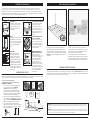 19
19
-
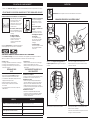 20
20
-
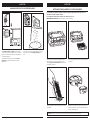 21
21
-
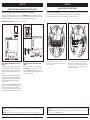 22
22
-
 23
23
-
 24
24
-
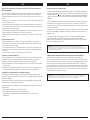 25
25
-
 26
26
-
 27
27
-
 28
28
-
 29
29


