
-1-
Customer Support:
Service client:
www.oneforall-canada.ca
OFA warranty / terms & conditions:
Garantie OFA / termes et conditions:
www.oneforall-canada.ca
Imported into Canada by:
Importé au Canada par:
Universal Electronics BV –
Europe & International
P.O. Box 3332, 7500 DH Enschede
The Netherlands
www.oneforall.com
One For All is a registered trademark of Universal
Electronics BV
One For All est une marque deposée de Universal
Electronics BV
URC 4812 Sony:
SONY® is a registered trademark of SONY Corporation.
URC 4812 Sony:
SONY® est une marque deposée de SONY Corporation.
Industry Canada Regulatory Information
CAN ICES-3 (B)/NMB-3 (B)
Avis d’Industrie Canada CAN ICES-3 (B)/NMB-3 (B)
712981
RDN 1211020
ENGLISH 4
FRANÇAIS 8
AUDIO CODELIST 12
OFA SONY
Universal
Replacement Remote
URC 4812
712981_SONY Manual_CAN_URC4812_RDN1211020.indd 1-6 21-10-2020 16:08

-2-
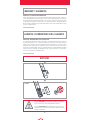
2x AAA
English: CAUTION: Risk of explosion if battery is replaced
by an incorrect type. Use quality Alkaline batteries.
Français: ATTENTION: Risque d’explosion si les piles sont
remplacées par un mauvais type de piles. Utilisez des piles
alcalines / de qualité.
WARRANTY / GUARANTEE INFORMATION
Terms and Conditions for “100% Guaranteed To Work” policy, and the separate 1
Year Limited Warranty against defects in material and workmanship can be found
at www.oneforall.com/remoteguarantee, or you may request hard copies via mail
to UEI Technical Support Service, Suite 301, 26250 Euclid Ave., Euclid, OH 44132.
Please include your full name, product information, and contact information in your
request communication.
www.oneforall.com
GARANTIE / INFORMATIONS SUR LA GARANTIE
Les conditions et modalités relatives aux règles “ Fonctionnement garantit à 100%”et
la garantie limitée de 1 an contre tout défaut de matériaux et de main-d’œuvre
peuvent être consultés sur www.oneforall.com/remoteguarantee, ou vous pouvez
demander une copie papier en composant, ou par courrier électronique au service
d’assistance technique UEI, Suite 301, 26250 Euclid Ave., Euclid, OH 44132. Veuillez
inclure votre nom complet, les informations sur votre produit et vos coordonnées
dans votre demande de communication.
www.oneforall.com
WARRANTY / GUARANTEE
GARANTIE / INFORMATIONS SUR LA GARANTIE
BATTERIES
712981_SONY Manual_CAN_URC4812_RDN1211020.indd 1-6 21-10-2020 16:08

-3-
INPUT
APP 1
EXIT
I
APP 2
SLEEP
RED, GREEN,
YELLOW,
BLUE
VOL + / -
AUDIO
DIGI/
ANALOG
BACK
0-9
POWER
TEXT
LIST
APP 3
GUIDE
PROG + / -
OPTIONS
FORMAAT
SYNC
HELP
UP, DOWN,
LEFT,
RIGHT,
OK
LAST
HOME
MUTE
SUB
1
6
4
9
7
2
5
10
8
12
20
15
26
28
24
13
19
16
21
23
3
11
17
18
22
27
14
REW, PLAY,
FF, REC,
PAUSE,
STOP
25
712981_SONY Manual_CAN_URC4812_RDN1211020.indd 1-6 21-10-2020 16:08

-4-
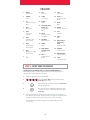
ENGLISH
THE MAJORITY OF NEWER SONY TV’S SHOULD WORK DIRECTLY.
After putting batteries in, just test some of the keys, and if they work, your
remote is ready. If not, follow the next steps:
1. Make sure your TV is on (not on standby).
2. Hold down Red + Blue until the LED behind the
Power Key blinks twice.
3. Point towards the TV and hold down the Power key
until the TV turns o
4. The remote will send a di erent Power signal every
3 seconds. As soon as the TV turns o , let go of the
Power key.
5. The light will blink twice. Now test the rest of the keys on the remote, if
they work as your original did, your remote is ready to use. If you nd some
keys do not work as expected (or at all), proceed to the next step.
- If you nd some keys still do not work as expected (or at all), proceed to
the next step.
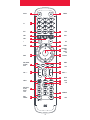
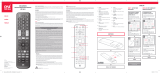
1. INPUT
Input Select
2. POWER
Power
3. 0-9
Digits for Channel
Entry
4. EXIT
Menu Exit
5. TEXT
Teletext on
and o
6. APP 1
YouTube / App
Shortcut Key
7. APP 2
Net ix / App
Shortcut Key
8. APP 3
Google Play / App
Shortcut Key
9. I
Info
10. LIST
Title List
11. SLEEP
Sleep Timer
12. GUIDE
Guide
13. UP, DOWN, LEFT,
RIGHT, OK
Navigate the
Menu
14. BACK
Back one level in
the Menu
15. OPTIONS
Options, Menu
16. HOME
Home
17. RED, GREEN,
YELLOW, BLUE
Fastext
18. VOL + / -
Volume Up and
Down
19. LAST
Last Channel
20. PROG + / -
Channel Up and
Down
21. MUTE
Mute
22. AUDIO
Audio / Language
23. SUB
Subtitles
24. HELP
Help
25. REW, PLAY, FF,
PAUSE, REC,
STOP
Playback control
26. FORMAT
Screen Format
27. DIGI/ANALOG
Digital / Analog
28. SYNC
Sync, Bravia Sync
STEP 1: SET UP YOUR TELEVISION
712981_SONY Manual_CAN_URC4812_RDN1211020.indd 1-6 21-10-2020 16:08

-5-
ENGLISH
LEARN A NEW FUNCTION TO YOUR REMOTE
Your One For All remote can learn any function from your original (working)
remote.
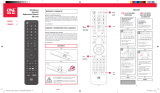
1.
Place the original remote facing the One For All remote on a at surface.
2. To learn: Hold down GREEN + YELLOW until the LED
blinks twice.
3. Press 975. The LED will blink twice.
4. Press the key on the One For All remote you want to learn on,
for Example: the VOL + key. The LED will blink rapidly.
5. Press the key on the Original remote you want to learn, for
Example: the VOL + key of your Audio Device
6. Two blinks: ok. Repeat from step 4 for any more keys to learn.
Long blink: try again from step 4.
7. When you have learned all the keys you need, press and hold
the OK key for 3 seconds. The LED will blink twice.
HOW TO DELETE A LEARNED FUNCTION
1. Hold down GREEN + YELLOW until the LED blinks twice.
2. Press 976.
3. Press the key to reset twice.
4. The LED ashes twice and the key will revert to the original function.
LEARNING
2 - 5 CM
ARE SOME KEYS NOT WORKING AS EXPECTED?
If you nd some keys do not work as expected (or at all), proceed to the next
step.
1. Make sure your TV is on (not on standby).
2. Hold down RED + BLUE until the LED behind the
Power Key blinks twice
3. Point towards the TV and hold one of the keys that is
not working correctly (for example HOME).
4. The remote will send a signal every 3 seconds.
5. When the correct function is shown on the screen (in this case the HOME),
let go of the key.
6. The LED will blink twice - your remote is ready to use.
STEP 2: IF STEP 1 DOES NOT WORK AS EXPECTED
712981_SONY Manual_CAN_URC4812_RDN1211020.indd 1-6 21-10-2020 16:08

-6-
ENGLISH
SOUND BAR / AUDIO RECEIVER VOLUME CONTROL
If you have your TV connected to a Sound Bar or Audio Receiver, it’s possible to
set up your One For All remote to control the Volume and Mute of this device.
There are two ways to do this:
AUDIO SIMPLESET
If you have a Sound Bar or Audio Device from one of the brands listed in the
table below, you can use the SimpleSet method to program your remote to
control it. If you do not have one of the below brands, please proceed to the
next section.
Note that each of the brands has a digit associated with it, for example 4 for LG
(and JVC).
To set up your remote to control your Sound Bar / Audio Device, rst make sure
your TV and Sound Bar / Audio Device are both powered on, and that there is
something playing that you can hear (this procedure will test the Mute function).
Next:
1. Hold down the VOLUME UP and VOLUME DOWN buttons together until
the LED under the POWER key blinks twice.
2. Now point the remote towards your Sound Bar / Audio Devices and hold
down the digit key for your brand (for example 4 for LG). The remote will
send the Mute function to your device every 3 seconds.
3. As soon as your Sound Bar / Audio Device mutes the volume, release the
digit key. The LED under the Power key will blink twice, and the Volume Up,
Down and Mute keys should now control your Sound Bar / Audio Device.
AUDIO CODE SETUP
If your Sound Bar / Audio Device is not one of the brands listed above, you can
also set up the remote to control it by entering a 4 digit code. The codes are
listed in the Audio Codelist section of this manual, and are listed by brand and
then popularity. Locate the brand of your Sound Bar / Audio Device in this code
list and then the procedure is:
SOUND BAR / AUDIO RECEIVER VOLUME CONTROL
Digit
Brand
Bose
Denon
Samsung / Harman/Kardon / JBL
LG / JVC
Marantz / Philips
Onkyo
Panasonic / Technics
Pioneer
Sony
Yamaha
712981_SONY Manual_CAN_URC4812_RDN1211020.indd 1-6 21-10-2020 16:08

-7-
1. Hold down the VOLUME UP and VOLUME DOWN keys until the LED under
the Power key blinks twice.
2. Enter the rst 4 digit code for your Sound Bar / Audio Device.
The LED should blink twice on the last digit.
3. Now try the Volume Up, Down and Mute and see if they control your
Sound Bar or Audio Device.
4. If they work, your remote is set up. If not try again from step 1 using the
next code in the list.
POWER MACRO
If you have set up your Sound Bar or Audio Device using SimpleSet or Code
Setup, you can now turn your TV and Audio Device both on and o using a
single key. Simply hold down the Power key for 3 seconds and the remote will
send the Power function to both the TV and the Audio Device / Sound Bar. If you
press and release the key, it will only control the TV.
APP SHORTCUT KEYS
The One For All remote features three App Shortcut Keys which can be used to
open apps on your TV. If your original remote control has a YouTube, Netix, or
Google Play key, these keys will perform the same function.
However if you try these keys and they do not work, but your TV still has the
ability to watch a streaming service, you can use this key as a shortcut by
programming a macro (a series of button presses) on it. You could also program
the keys to access other apps on your TV.
To program the macro, you rst need to know the sequence keys you use to
access the service. For example, some TVs will start Netix by pressing the Home
key, then Menu Right twice, and nally the Enter key.
Once you have determined the sequence for the app you want on your TV,
follow these steps:
1. Sit in front of your device with It switched on (not on standby)
2.
Hold down the App Shortcut key until the LED blinks twice.
3. Now perform the sequence of keys exactly as would normally. The remote
will operate your TV and the macro is recorded in real time -
so if it normally
takes a few seconds for your device to react don’t worry.
4. Once you have nished the sequence - and the Streaming Service has
started on your device - hold down the App Shortcut key until the LED
blinks twice and goes out. The macro is now stored.
Tips
• Make sure the OFA remote Is operating the TV before programming
• If you nd the Macro doesn’t work as expected, you can just repeat the same
sequence to reprogram
• When programming, wait for your TV to respond rst, the remote will
remember the timing
RESET
If you would like to reset your remote back to its default settings, please do the
following:
1. Hold down the Green and Yellow keys until the LED blinks twice
2. Press 977
3. The LED will blink 4 times and the remote is now reset.
ENGLISH
712981_SONY Manual_CAN_URC4812_RDN1211020.indd 7-12 21-10-2020 16:08

-12-
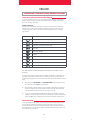
AUDIO CODELIST
A.V.International 0269
Acoustic Solutions 1501, 1470
Agile 0269
Aiwa 0121, 0406, 0158, 0159
Akai 4242, 0609
Anam 0609
Andersson 0493
Arcam 0641, 0269, 0189
Argos 4122
AS 1501, 1470
Audio Agile 0269
Audio Pro 3264
Audiolab 0269, 0189
Auvisio 3654
AVI 0269
B & O 0799
Bang & Olufsen 0799
Bauhn 4242
Blaupunkt 3654
Bose 1229, 3708, 3079, 4024,
3832
Bush 4122
Cairn 0189
Cambridge Audio 1730, 1647, 4157, 4222
Canton 3000
Carver 0189, 0269
Celcus 4146
Coby 3654
Copland 0269
Curtis Mathes 0039
Denon 0004, 1360, 2857, 3347,
2516, 0272, 1260, 3380,
3639, 3947, 4111, 2681,
4551, 2502, 4025
Dicra 3654
DIKE 5070
Dual 4134
Dutch Originals 5070
Energy Sistem 3654
Epworth 0121, 0406, 0158, 0159
Goodmans 4146, 0609, 2151, 1199
Grundig 0189, 0269, 5174, 1199
Harman/Kardon 1304, 0110, 1004, 3756,
4197, 0189, 0269
HIFIAkademie 0269, 0189
Hitachi 4590, 3050, 5130, 1199
Horizon 4411
IKEA 4050
Inkel 0027
Insten 2151
Integra 1805, 2989, 2993, 1320,
3992, 0135
Jay-tech 4146
JBL 3756, 4575, 5070, 0110
JTC 4146
JVC 1400, 0074, 0464, 4411,
1199
Kenwood 0313, 0027, 1400
Kogan 3654
LG 2676, 4043, 4667
Linn 0269, 0189
Loewe 0269, 0189
Logik 4242
Logitech 2436, 1408, 3561
Magnat 4485
Magnavox 0189, 1269, 3282, 0269
Majority 4146
Marantz 2117, 0189, 0269, 4673,
0039, 0641, 1269, 3347,
4556
Maxell 3997
MCS 0039
Medion 4242
Meridian 0715
Micromega 0269, 0189
Musical Fidelity 0688
Myryad 0189, 0269
NAD 0320, 1093, 1743, 0609
Naim 1895
Nakamichi 3296
New Acoustic
Dimension 0320, 1093, 1743, 0609
Nikko 0609
Nubert 4331
Onkyo 1805, 0135, 1320, 2989,
2993, 3050, 4533, 3992
Optimus 0300, 0013
Orbitsound 4098
Otone 4242
Panasonic 0309, 1779, 4007, 3425,
0308, 0367, 0039
Philips 1269, 0189, 2459, 4105,
3289, 2986, 1673, 0269,
3282, 0641
Philips Magnavox 0189
Pioneer 1935, 0013, 1459, 3742,
0300, 1284, 3629, 3631
Polk Audio 0269, 0189
Proficient 0609
Proson 0609
Pyle 4242
Quasar 0039
RCA 0300, 1459, 0082
Restek 0189
Revox 0140, 0189, 0269
Rotel 0793
Samsung 2660, 2809, 1199, 2137,
3822, 1304
Sansui 0189, 0609
Sanyo 3282
Schaub Lorenz 4242
Sentra 0688
Sharp 3096, 5070
Siemens 0609
Sonos 3919
Sony 0158, 0159, 2522, 1758
Soundwave 0609
Sunfire 0313
Sungpo 3096, 5070
T+A 2302, 1270
Teac 0609, 1199, 3253, 4242
Technics 0309, 0308, 0039, 0208
TechniSat 4134, 4486
Techwood 0609
Teufel 4051, 3296, 3574, 4477,
2322, 4159, 4460, 4559
Thomson 1194, 3654
Thorens 0269, 0189
Toshiba 3627, 5070
Universum 0609, 0269, 0189
Victor 0074
Wards 0013, 0158, 0189
Yamaha 0176, 1276, 2061, 2467,
3283, 2469, 0082, 0848,
1176, 1949, 0354, 3267,
3602, 2342
712981_SONY Manual_CAN_URC4812_RDN1211020.indd 7-12 21-10-2020 16:08
-
 1
1
-
 2
2
-
 3
3
-
 4
4
-
 5
5
-
 6
6
-
 7
7
-
 8
8


dans d''autres langues
- English: One For All URC 4812 User guide
Documents connexes
-
 One For All URC 4811 Mode d'emploi
-
 One For All URC-4912 Mode d'emploi
-
 One For All URC 4914 Manuel utilisateur
-
Emos KE4913 Manuel utilisateur
-
Emos KE4911 Manuel utilisateur
-
Emos SAMSUNG URC-4910 Manuel utilisateur
-
Emos KE4912 Manuel utilisateur
-
Emos URC 4914 Manuel utilisateur
-
 One For All URC1810 Manuel utilisateur
-
 One For All URC1916 Mode d'emploi


