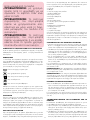
Chicco ALYSIA Manuel utilisateur
- Catégorie
- Poussettes
- Taper
- Manuel utilisateur


3
1
2
A
B
2
1
1
2
3A
3B 4
1A
CLACK
4A
4B
1B
3
4C 5

4
6
11
7 8
CLACK
9
11A
6A 6B
10
10A
11B
6C

5
A
B
C
12
14 15
16
12A
13
16A
17
13A
17A 17B 17C

6
B
A
18
21D
20 21
21A
21E
18A 18B
21B 21C
22
19

7
23
A
B
24B 24C
25
23A
24
25A 25B
24A
25C 25D 25E

8
28
28A
27
26

9

10
IMPORTANTE - LEG-
GERE ATTENTA-
MENTE E CONSER-
VARE PER FUTURO
RIFERIMENTO.
ATTENZIONE: PRIMA DELL’USO RI-
MUOVERE ED ELIMINARE EVENTUA-
LI SACCHETTI DI PLASTICA E TUTTI
GLI ELEMENTI FACENTI PARTE DELLA
CONFEZIONE DEL PRODOTTO O
COMUNQUE TENERLI LONTANI DAL-
LA PORTATA DEI BAMBINI.
AVVERTENZE
• ATTENZIONE: Non lasciare mai il
bambino incustodito.
• ATTENZIONE: Prima dell’uso as-
sicurarsi che tutti i meccanismi di
bloccaggio siano correttamente
agganciati.
• ATTENZIONE: Per evitare lesioni
o ferimenti assicurarsi che il bam-
bino sia a debita distanza durante
le operazioni di apertura e chiusura
del prodotto.
• ATTENZIONE: Non lasciare che il
bambino giochi con questo pro-
dotto.
• ATTENZIONE: Utilizzare sempre il
sistema di ritenuta.
• L’uso di spartigambe e cinture di
sicurezza è indispensabile per ga-
rantire la sicurezza del bambino.
Utilizzare sempre le cinture di sicu-
rezza contemporaneamente allo
spartigambe.
• ATTENZIONE: Prima dell’ uso con-
trollare che i meccanismi di aggan-
cio della seduta, della navicella o
del seggiolino auto siano corretta-
mente agganciati.
• ATTENZIONE: Questo prodotto
non è adatto per correre o pattinare.
• Il passeggino è adatto a bambini
no a 22 kg di peso e no ai 4 di
età, a seconda di cosa si verica pri-
ma.
• Il passeggino è omologato no a
15 kg con la seduta rivolta nel sen-
so opposto a quello di marcia.
• Il passeggino è omologato no a
22 kg con la seduta rivolta nel sen-
so di marcia.
• Per bambini dalla nascita no a cir-
ca 6 mesi d’età, lo schienale deve
essere utilizzato in posizione com-
pletamente reclinata.
• Solo il Seggiolino Auto CHICCO
KIROS I-SIZE CLIP-ON e/o Navicel-
la CHICCO LIGHT NAP CLIP-ON
ALYSIA dotate dell’apposito dispo-
sitivo di aggancio compatibile pos-
sono essere agganciate al passeg-
gino CHICCO ALYSIA.
• Con la sacca installata sul passeggi-
no; ATTENZIONE: Questo prodot-
to nella congurazione carrozzina
è adatto ad un bambino che non è
in grado di stare seduto autonoma-
mente, di girarsi e di tirarsi su appog-
giandosi alle mani e alle ginocchia.
Peso massimo del bambino: 9 kg.
• ATTENZIONE: Non aggiungere un
altro materasso sulla parte superio-
re del materasso fornito o racco-
mandato dal fabbricante.
• Il dispositivo di frenatura deve esse-
re sempre inserito quando si posi-

11
ziona e rimuove il bambino.
• Utilizzare il dispositivo frenante
ogni qualvolta si sosti.
• Non lasciare mai il passeggino su un
piano inclinato, con dentro il bambi-
no, anche se con i freni azionati.
• Non sovraccaricare il cestello. Peso
massimo 3 kg.
• Ogni peso attaccato ai manici e/o
sullo schienale e/o sui lati del pas-
seggino potrebbe compromettere
la stabilità del passeggino.
• Non trasportare più di un bambino
alla volta.
• Non applicare al passeggino ac-
cessori, parti di ricambio o compo-
nenti non fornite o approvate dal
costruttore.
• Non usare il prodotto se alcune par-
ti sono rotte, strappate o mancanti.
• Con il Seggiolino Auto installato
sul passeggino, questo veicolo non
sostituisce una culla o lettino. Se il
bambino necessita di dormire, al-
lora dovrebbe essere collocato in
una navicella, culla o lettino.
• Vericare prima dell’assemblaggio
che il prodotto e tutti i suoi com-
ponenti non presentino eventuali
danneggiamenti dovuti al traspor-
to, in tal caso il prodotto non deve
essere utilizzato e dovrà essere
tenuto lontano dalla portata dei
bambini.
• Nelle operazioni di regolazione, as-
sicurarsi che le parti mobili del pas-
seggino non vengano in contatto
con il corpo del bambino.
• Assicurarsi che gli utilizzatori del
passeggino siano a conoscenza
dell’esatto funzionamento dello
stesso.
• Questo prodotto deve essere utiliz-
zato esclusivamente da un adulto.
• Il prodotto deve essere assemblato
esclusivamente da un adulto.
• Per evitare rischi di strangolamento,
non dare al bambino e non riporre vici-
no al bambino oggetti muniti di corde.
• Non usare il passeggino sulle scale
o sulle scale mobili: si potrebbe per-
dere improvvisamente il controllo.
• Prestare attenzione quando si sale e
scende un gradino o il marciapiede.
• Se lasciate il passeggino esposto
al sole per molto tempo, aspettate
che si rareddi prima di mettervi il
bambino. L’esposizione prolungata
al sole può causare cambiamenti di
colore nei materiali e tessuti.
• Evitare il contatto del passeggino
con acqua salina per prevenire la
formazione di ruggine.
• Non utilizzare il passeggino in
spiaggia.
• Quando non in uso, il passeggino
va tenuto lontano dalla portata dei
bambini.
• ATTENZIONE: non utilizzare mai
l’impugnatura per sollevare il pas-
seggino con dentro il bambino.
• ATTENZIONE: Il sistema di ritenu-
ta della sacca porta bambini deve
essere utilizzato solo ed esclusiva-
mente durante il trasporto in auto
del bambino.
• ATTENZIONE: Il sistema di ritenu-
ta della sacca porta bambini deve
essere rimosso o nascosto quando
il prodotto viene usato al di fuori
dell’autovettura.
CONSIGLI PER LA PULIZIA E LA MANUTENZIONE
Questo prodotto necessita di manutenzione periodica. Le ope-
razioni di pulizia e manutenzione devono essere eettuate da
un adulto.

12
PULIZIA
Il passeggino è sfoderabile (fare riferimento al capitolo “Vesti-
zione/svestizione seduta”). Per la pulizia delle parti tessili riferirsi
alle etichette di lavaggio. Di seguito sono riportati i simboli di
lavaggio ed i relativi signicati:
Lavare a mano in acqua fredda
Non candeggiare
Non asciugare meccanicamente
Non stirare
Non lavare a secco
Pulire le parti in plastica periodicamente con un panno umido,
non utilizzare solventi o prodotti abrasivi. Asciugare le parti in
metallo, dopo un eventuale contatto con acqua, al ne di evita-
re il formarsi di ruggine.
MANUTENZIONE
Controllare periodicamente lo stato di usura delle ruote e te-
nerle pulite da polvere e sabbia. Assicurarsi che tutte le parti
in plastica siano pulite da polvere, sporco e sabbia, al ne di
evitare attriti che possono compromettere il corretto funziona-
mento del passeggino. Tenere il passeggino in un posto asciut-
to. Lubricare le parti mobili, in caso di necessità, con olio secco
al silicone.
LISTA DEI COMPONENTI
Vericare di avere tutti i componenti per questo modello prima
di assemblare il prodotto. Se qualche parte è mancante, si pre-
ga di rivolgersi al Customer Service Chicco. Per il montaggio del
prodotto non è necessario usare alcun attrezzo. Per assemblare
il prodotto è necessario disporre dei seguenti pezzi:
• Telaio
• Seduta
• Tubo poggiagambe
• Tessile seduta
• Riduttore schienale
• Cuscino seduta
• Capote
• Manicotto paracolpi
• Kit comfort (spallacci e infragambe)
• Cestello porta oggetti
• Copertina / coprigambe
• Mantellina parapioggia
• 2 ruote posteriori
• 2 ruote anteriori
Nota importante: le immagini e le istruzioni contenute in que-
sto libretto si riferiscono ad una versione del passeggino. Al-
cune componenti ed alcune funzionalità qui descritte possono
variare a seconda della versione da voi acquistata.
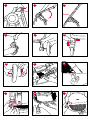
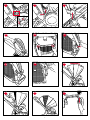
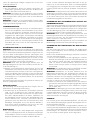
MONTAGGIO DEL PASSEGGINO
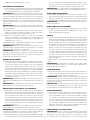
1. Premere il tasto A e, successivamente, premere il tasto B (Fig.
1); contemporaneamente estendere la struttura no ad udire
il clack di avvenuto bloccaggio (Fig. 1A-1B).
2. Inserire la ruota anteriore nell’apposito foro, no a sentire il
clack di bloccaggio (Fig. 2). Ripetere la stessa operazione per
la seconda ruota anteriore.
3. Per montare le ruote posteriori inserire il perno della ruota
nel foro del tubo gamba posteriore (Fig. 3). Ripetere la stessa
operazione per l’altra ruota.
Per rimuovere le ruote anteriori e posteriori azionare i dispositivi
di sgancio indicati nelle gure 3A-3B.
ATTENZIONE: Prima di utilizzare il passeggino accertarsi che le
ruote siano ben ssate alla struttura, tirando leggermente verso
l’esterno.
ATTENZIONE: Eettuare questa operazione facendo atten-
zione che il bambino ed eventuali altri bambini siano a debita
distanza. Assicurarsi che in queste fasi le parti mobili del pas-
seggino non vengano a contatto con il corpo del bambino.
CESTELLO PORTAOGGETTI
4. Per montare il cestello al passeggino avvolgere e richiudere il
velcro sul tubo anteriore (Fig. 4) e, successivamente, avvolge-
re le fettucce tessili nelle apposite sedi presenti sulle gambe
anteriori e ssarle con i bottoni (Fig. 4A-4B).
Per ssare la parte posteriore, avvolgere e chiudere il velcro
nella fessura posta sul tubo posteriore del passeggino (Fig. 4C).
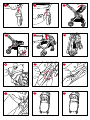
VESTIZIONE/SVESTIZIONE SEDUTA
L’operazione di vestizione deve essere fatta con la seduta stac-
cata dal passeggino.
5. Prima di iniziare la vestizione è necessario inserire il tubo pog-
giagambe nella propria sede tessile (Fig. 5).
6. Adagiare il tessile sul telaio della seduta e, sulla parte poste-
riore, chiudere la cerniera orizzontale avvolgendo il tubo (Fig.
6-6A). Prima di chiudere la cerniera sul tubo posteriore, ac-
certarsi che la cintura girovita sia sempre inserita nelle due
asole tessili verticali e passi attraverso le due fessure poste sui
lati(Fig. 6B). Successivamente far passare la cintura infragam-
be nell’apposita fessura (Fig. 6C).
ATTENZIONE: Tirare lo spartigambe verso l’alto per assicurarsi
che sia correttamente ssato.
7. Rivestire lo schienale avvolgendolo con il tessile e chiudendo
la cerniera posta sul retro (Fig. 7).
8. Agganciare il tessile della seduta al telaio con i due rispettivi
bottoni posizionati sui lati (Fig. 8).
9. Inserire il tubo poggiagambe nelle apposite sedi no ad udire
il clack di avvenuto aggancio (Fig. 9).
10. Collocare il cuscino sulla seduta facendo passare la cintura
infragambe nella fessura (Fig. 10) e ssandolo al tessile sot-
tostante con i due bottoni (Fig. 10A).
La seduta potrebbe essere già utilizzata in questa congura-
zione; tuttavia è presente anche un cuscino riduttore per lo
schienale.
11. Per montare il cuscino riduttore far passare le cinture nelle
fessure superiori (Fig. 11) e la cintura addominale nelle asole
laterali (Fig. 11A); ssare la parte posteriore con i bottoni a
pressione (Fig. 11B).
Per svestire la seduta eseguire le operazioni appena descritte
in senso inverso.
ATTENZIONE: Dopo la rimozione delle cinture di sicurezza (es.
per il lavaggio), assicurarsi che le cinture siano riassemblate cor-
rettamente usando i punti di ancoraggio. Le cinghie devono
essere nuovamente regolate. Per assicurarsi che le cinture siano
agganciate correttamente (sulla supercie posteriore della se-
duta), una volta messo il bambino e ssato, tirare con forza la
parte nale delle cinture.
KIT COMFORT
Il Kit Comfort è composto di 2 spallacci ed uno spartigambe
imbottiti.
12. Inlare gli spallacci nelle bretelle ed inserire la bbia nello
spartigambe imbottito (Fig. 12-12A).
CINTURE DI SICUREZZA
13. Il passeggino è dotato di sistema di ritenuta a cinque punti
di ancoraggio costituito da due spallacci, una cintura girovi-
ta ed uno spartigambe con bbia.
ATTENZIONE: Per l’utilizzo con bambini dalla nascita no a

13
circa 6 mesi può essere necessario ridurre la lunghezza delle
cinture per adattarle alla corporatura del bambino; in questo
caso utilizzare gli spallacci facendoli passare prima attraverso
le due asole di regolazione orizzontali e allo stesso modo far
passare la cintura girovita nelle due asole di regolazione verti-
cali (Fig. 13-13A).
ATTENZIONE: l’utilizzo è lo stesso sia nella congurazione in-
vernale (con cuscino riduttore) sia nella versione estiva (senza
cuscino riduttore).
14. Vericare che gli spallacci siano all’altezza ideale per il vostro
bambino. In caso contrario regolarne l’altezza e ripetere la
stessa operazione anche per il girovita (Fig. 14).
15. Dopo aver adagiato il bambino nel passeggino, allacciare
le cinture facendo passare le due forchette (A) attraverso la
bbia degli spallacci (B) e poi in quella dello spartigambe
(C) (Fig. 15).
Per sganciare la cintura girovita, rimuovere le forchette dalla
bbia premendo sulle estremità.
ATTENZIONE: Per garantire la sicurezza del bambino è indi-
spensabile utilizzare contemporaneamente spartigambe, cin-
tura girovita e cinture di sicurezza.
ATTENZIONE: Dopo la rimozione delle cinture di sicurezza (es.
per il lavaggio), assicurarsi che le cinture siano riassemblate cor-
rettamente usando i punti di ancoraggio. Le cinghie devono
essere nuovamente regolate.
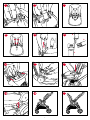
MANICOTTO PARACOLPI
16. La seduta è dotata di manicotto paracolpi. Per agganciare
il manicotto inserire lo stesso nelle sedi in prossimità dello
snodo (Fig. 16) e assicurarsi che il manicotto sia ben aggan-
ciato tirandolo verso di sé. Per estrarre il manicotto paracolpi
premere i due tasti esterni (Fig. 16A) ed estrarlo dalle sedi.
Per facilitare l’alloggiamento del bambino è possibile sgan-
ciare solo un lato del manicotto. Il manicotto è utilizzabile
sia in congurazione fronte strada sia fronte mamma.
ATTENZIONE: Allacciare sempre il bambino con le cinture
di sicurezza. Il manicotto NON è un dispositivo di ritenuta del
bambino.
ATTENZIONE: il manicotto non deve essere utilizzato per sol-
levare il prodotto con il bambino all’interno.
MONTAGGIO SEDUTA AL PASSEGGINO
17. Per montare la seduta del passeggino sul telaio occorre in-
serire la stessa sugli appositi ganci metallici, no ad udire il
clack di avvenuto aggancio (Fig. 17). Per facilitare l’aggancio
della seduta al passeggino sui lati della seduta sono presen-
ti delle fessure guida che indicano il corretto allineamento
della seduta con i ganci metallici (Fig. 17A). La seduta può
essere montata sia in congurazione fronte strada (Fig. 17B)
sia fronte mamma (Fig. 17C).
ATTENZIONE: Prima dell’utilizzo assicurarsi che la seduta sia
ben agganciata tirandola verso l’alto.
ATTENZIONE: Nel caso non fosse agganciata correttamente,
rimuoverla attraverso i pulsanti di sgancio e ripetere l’operazio-
ne. In caso contrario rivolgersi al servizio assistenza Chicco.
18. Per sganciare la seduta agire sui tasti posti sugli snodi della
seduta. Premere il tasto piccolo A e, contemporaneamente,
spingere verso il basso il tasto centrale B (Fig. 18-18A); fatta
questa operazione sollevare la seduta per il completo sgan-
cio (Fig. 18B).
ATTENZIONE: Le operazioni di sgancio/aggancio della seduta
devono essere eettuate senza il bambino all’interno.
REGOLAZIONE SCHIENALE
19. Azionando il tasto posto sul retro dello schienale del pas-
seggino è possibile regolarne l’inclinazione no al raggiun-
gimento della posizione desiderata (Fig. 19). Rilasciando il
tasto lo schienale si blocca nella posizione più vicina.
ATTENZIONE: con il peso del bambino le operazioni possono
risultare più dicoltose.
REGOLAZIONE POGGIAGAMBE
20. Il poggiagambe è regolabile in due posizioni. Per regolarlo
agire sui due tasti posti ai lati del poggiagambe (Fig. 20).
CAPOTE
21. Il passeggino è dotato di capotta parasole e paravento rego-
labile in più posizioni. La seduta è dotata di due perni posi-
zionati nella zona laterale del tubo schienale per il ssaggio
della capotta. Inserire le clip di aggancio sul tubo facendo
combaciare il perno con il foro (Fig. 21-21A). Completare il
montaggio della capotta alla seduta agganciando i 2 botto-
ni a pressione sul retro dello schienale (Fig. 21B). Per aprire e
chiudere la capotta agire sull’archetto anteriore (Fig. 21C). Per
garantire maggiore protezione al bambino è possibile am-
pliare la supercie della capotte aprendo la cerniera posta tra
gli spicchi (Fig. 21D-21E). Per togliere la capotta è suciente
sganciarla dai perni del tubo schienale e staccare i bottoni.
Pulire le parti in tessuto mediante una spugna umida e del sa-
pone neutro.
ATTENZIONE: L’operazione di ssaggio della capotta deve
avvenire su entrambi i lati del passeggino. Vericare il corretto
bloccaggio della stessa.
FRENO DI STAZIONAMENTO
22. Il freno di stazionamento agisce contemporaneamente su
entrambe le ruote posteriori del passeggino. Per attivare il
sistema frenante premere la leva verso il basso (Fig. 22).
ATTENZIONE: Utilizzare sempre il freno quando si sosta. Non
lasciare mai il passeggino su un piano inclinato con dentro il
bambino, anche se il freno di stazionamento è inserito.
ATTENZIONE: Dopo aver azionato la leva del freno assicurarsi
che i freni siano correttamente innestati su entrambi i gruppi
ruota posteriori.
RUOTE PIROETTANTI
23. Il passeggino è dotato di ruote anteriori piroettanti/sse.
Si consiglia di utilizzare le ruote sse quando si percorro-
no terreni particolarmente accidentati. Le ruote in modalità
piroettante, invece, sono consigliate per aumentare la ma-
novrabilità del passeggino su fondo stradale normale. Per
rendere le ruote anteriori piroettanti spingere verso il basso
la leva posta sulla parte anteriore del gruppo ruote (Fig. 23).
Per bloccarla, spingerla verso l’alto inserendola nell’apposita
sede (Fig. 23 A).
CHIUSURA DEL PASSEGGINO
ATTENZIONE: Eettuare questa operazione facendo atten-
zione che il bambino ed eventuali altri bambini siano a debita
distanza. Assicurarsi che in queste fasi le parti mobili del pas-
seggino non vengano a contatto con il corpo del bambino. Il
passeggino può essere chiuso sia nella posizione fronte-strada
sia fronte-mamma. Le istruzioni da seguire sono le medesime
per le 2 varianti.
ATTENZIONE: È necessario togliere il contenuto del cestello
prima di chiudere il passeggino e rimuovere la borsa se aggan-
ciata al maniglione.
24. Abbattere lo schienale premendo il tasto posto sul retro
della capotte (Fig. 24). Agire sul meccanismo di chiusura
premendo il tasto A e, contemporaneamente, il tasto B (Fig.
24A) e tirare verso l’alto la maniglia di chiusura (Fig. 24B) il
passeggino inizierà a chiudersi su sé stesso, no ad udire il
clack di avvenuto bloccaggio (Fig. 24C).
Il passeggino può essere chiuso anche senza la seduta, otte-

14
nendo così un minore ingombro.
COPERTINA/COPRIGAMBE
La copertina della sacca funge anche da coprigambe per la
congurazione passeggino.
25. Inserire il poggiagabe nella tasca interna del coprigambe
(Fig. 25); avvolgere il nastro asolato sul perno laterale del
passeggino (Fig. 25A) e richiuderlo su sé stesso (Fig. 25B).
Completare l’operazione avvolgendo al manicotto il lem-
bo tessile superiore intorno e ssarlo con le apposite asole
(Fig.25C-25D). Per garantire maggiore protezione al bambi-
no, è possibile far passare la parte superiore del coprigambe
sotto il manicotto paracolpi e ssarla nella posizione più alta
inserendo i bottoni nelle asole presenti sulle estremità tessili
della capotte (Fig. 25E).
MANTELLINA PARAPIOGGIA
26. Il passeggino è dotato di mantellina parapioggia. Adagiare
la mantellina parapioggia sulla capotta agganciando i bot-
toni alle asole presenti sulla stessa e completare il ssaggio
in prossimità delle ruote per mezzo dei bottoni automatici
posti sui nastri (Fig. 26).
A ne utilizzo, lasciare asciugare all’aria la mantellina (qualora
si bagnasse) prima di ripiegare e riporre la mantellina. La man-
tellina parapioggia può essere utilizzata sia in congurazione
fronte strada che fronte mamma.
ATTENZIONE: La mantellina parapioggia non può essere uti-
lizzata sul passeggino sprovvisto di capotta, poiché può provo-
care il soocamento del bambino. Quando la mantellina para-
pioggia è montata sul passeggino, non lasciare mai lo stesso
esposto al sole con dentro il bambino per evitare il rischio di
surriscaldamento.
UTILIZZO SEGGIOLINO AUTO E SACCA
Su questo passeggino possono essere montati solo il Seggioli-
no Auto KIROS I-SIZE CLIP-ON e/o Navicella CHICCO LIGHT NAP
CLIP-ON ALYSIA, che prevedono l’utilizzo del medesimo siste-
ma di aggancio alla struttura. Per l’aggancio e lo sgancio della
sacca riferirsi alle apposite istruzioni.
ATTENZIONE: Prima di utilizzare il passeggino in combinazio-
ne con sacca o seggiolino auto, vericare sempre che il sistema
di aggancio sia correttamente bloccato tirandoli verso l’alto.
ATTENZIONE: La sacca si deve agganciare al telaio solo ed
esclusivamente in posizione fronte genitore.
UTILIZZO PASSEGGINO CON SEGGIOLINO AUTO
Sul passeggino Alysia è possibile montare il seggiolino auto Ki-
ros i-Size, dotato del dispositivo di aggancio CLIP-ON.
Prima di agganciare il seggiolino rimuovere la seduta del pas-
seggino.
27. Impugnare il seggiolino con il maniglione in posizione verti-
cale ed agganciarlo al telaio, posizionando le fessure laterali
in concomitanza degli agganci metallici (Fig. 27), prestando
particolare attenzione a vericare che si agganci su entram-
bi i lati. Si udirà un CLICK di avvenuto aggancio.
ATTENZIONE: Il seggiolino auto si deve agganciare al telaio
solo ed esclusivamente in posizione fronte genitore.
ATTENZIONE: Prima dell’uso controllare che i dispositivi di s-
saggio del Seggiolino auto siano correttamente innestati. Nel
caso non fosse agganciato correttamente, rimuoverlo attraver-
so i pulsanti di sgancio e ripetere l’operazione. In caso persista
la situazione di aggancio non corretto, rivolgersi al servizio as-
sistenza Chicco.
28. Per sganciare il seggiolino dal passeggino tirare la maniglia
di sgancio posteriore (Fig. 28) e, successivamente, sollevare
il Seggiolino impugnandolo dal maniglione (Fig. 28A).
ATTENZIONE: L’aggancio e lo sgancio si possono eettuare con
il bambino nel seggiolino, anche se con il peso del bambino le
operazioni suddette potrebbero risultare meno agevoli. In que-
sto caso si raccomanda attenzione nell’eettuare le operazioni.
GARANZIA
Il prodotto è garantito contro ogni difetto di conformità in
normali condizioni di utilizzo secondo quanto previsto dalle
istruzioni d’uso.
La garanzia non sarà applicata, dunque, in caso di danni de-
rivanti da un uso improprio, usura o eventi accidentali. Per la
durata della garanzia sui difetti di conformità si rinvia alle speci-
che previsioni delle normative nazionali applicabili nel Paese
d’acquisto, dove previste.

15
IMPORTANT – READ
CAREFULLY AND
KEEP FOR FUTURE
REFERENCE.
WARNING: BEFORE USE, REMOVE
AND DISPOSE OF ALL PLASTIC BAGS
AND PACKAGING MATERIALS AND
KEEP THEM OUT OF REACH OF
CHILDREN.
WARNINGS
• WARNING: Never leave the child
unattended.
• WARNING: Ensure that all the
locking devices are engaged be-
fore use.
• WARNING: To avoid injury ensure
that the child is kept away when
unfolding and folding this product.
• WARNING: Do not let the child
play with this product.
• WARNING: Always use the re-
straint system.
• Use of the crotch strap and safety
harness is necessary to guarantee
the safety of your child. Always use
the complete safety harness.
• WARNING: Check that the pram
body or seat unit or car seat at-
tachment devices are correctly en-
gaged before use.
• WARNING: This product is not suit-
able for running or skating.
• The stroller is suitable for children
up to 22 kg or 4 years of age, which-
ever comes rst.
• The stroller is type approved up to
15 kg with the seat in the rear-fac-
ing position.
• The stroller is type approved up to
22 kg with the seat in the front-fac-
ing position.
• It is recommended that the back-
rest should be used in its most re-
clined position for children from
birth to 6 months of age.
• Only the CHICCO KIROS I-SIZE CLIP-
ON car seat and/or the CHICCO
LIGHT NAP CLIP-ON ALYSIA carry-
cot with the compatible tting de-
vice can be attached to the CHIC-
CO ALYSIA stroller.
• With the carrycot installed on the
stroller; WARNING: This product in
pram conguration is only suitable
for children who cannot sit up un-
aided or roll over and cannot push
up on their hands and knees. Maxi-
mum weight of the child: 9 Kg.
• WARNING: Do not add another
mattress on top of the mattress
supplied or recommended by the
manufacturer.
• The parking device shall be en-
gaged when placing and removing
the children.
• Always apply the brakes when the
stroller is stationary.
• Never leave the stroller on a sloped
surface, with a child on board, even
when the brakes are on.
• Do not overload the storage bas-
ket. Maximum weight 3 kg.
• Any weight attached to the han-
dles and/or backrest and/or on the
sides of the stroller may upset the
stability of the stroller.
• Do not transport more than one

16
child at a time.
• Do not use accessories, replace-
ment parts, or any component not
supplied or approved by the man-
ufacturer / distributor.
• Do not use this product if any part
is broken, torn or missing.
• For car seats used in conjunction
with a chassis, this vehicle does
not replace a cot or a bed. Should
your child need to sleep, then they
should be placed in a suitable pram
body, cot or bed.
• Before assembly, ensure that the
product and its components have
not been damaged during trans-
portation. In this case, do not use
and keep out of reach of children.
• During adjustment operations, en-
sure that the moving parts of the
stroller do not come into contact
with your child.
• Make sure that the person using
the stroller knows how to operate
it in the safest way.
• This product must only be used by
an adult.
• The product must only be assem-
bled by an adult.
• To avoid all strangulation hazards, nev-
er give children objects with cords or
strings attached, or leave them close to
such objects.
• Never use the stroller on staircases
or escalators: you could suddenly
lose control of it.
• Always pay attention when going
up and down steps or pavements.
• If the stroller is left exposed to di-
rect sunlight for an extended pe-
riod of time, allow it to cool down
before placing your child inside.
Prolonged exposure to direct sun-
light may cause the colour of the
materials and fabric to fade.
• Prevent the stroller from coming
into contact with salt water. It may
cause rusting.
• Do not use the stroller on the
beach.
• When not in use, the stroller should
be kept out of reach of children.
• WARNING: never use the hand
grip to lift the stroller with the child
inside.
• WARNING: The carrycot restraint
system must be used only when
transporting your child in the car.
• WARNING: The carrycot restraint
system must be removed or hid-
den when the product is used out-
side the car.
TIPS FOR CLEANING AND MAINTENANCE
This product requires periodical maintenance. Cleaning and
maintenance should only be carried out by an adult.
CLEANING
The lining can be removed (please refer to the section "Fitting/
removing the seat lining"). Please refer to the care labels for in-
structions on how to clean the fabric parts. The washing sym-
bols and relative meanings are indicated below:
Hand wash
Do not bleach
Do not tumble dry
Do not iron
Do not dry clean
Routinely wipe clean plastic parts with a soft damp cloth. Never
use solvents or abrasive detergents. To prevent the formation
of rust, always dry metal parts if they have come into contact
with water.
MAINTENANCE
Regularly check the condition of the wheels and clean o all
dust and sand. To avoid friction that may compromise the cor-
rect functioning of the stroller, make sure that all plastic parts are
clean of dust, dirt and sand. Keep the stroller in a dry place. If
necessary, lubricate the moving parts with dry silicone lubricant.
LIST OF COMPONENTS
Check that none of the components of this model are missing

17
before assembling the product. If any part is missing, contact
Chicco Customer Service. No tools are needed to assemble this
product. The following pieces are needed for product assem-
bly:
• Frame
• Seat
• Legrest tube
• Seat lining
• Backrest reducer cushion
• Seat cushion
• Canopy
• Bumper bar
• Comfort kit (shoulder and crotch straps)
• Storage basket
• Pram apron / leg cover
• Rain cover
• 2 Rear wheels
• 2 front wheels
Important Note: the pictures and instructions contained in this
booklet refer to a specic version of the stroller. Some of the
components and functions described here may vary depend-
ing on the model purchased.
ASSEMBLING THE STROLLER
1. Press button A and then press button B (Fig 1); at the same
time extend the structure until you hear the locking click (g.
1A-1B).
2. Insert the front wheel in the dedicated hole until you hear
the locking click (g. 2). Repeat the same operation for the
second front wheel.
3. To assemble the rear wheels insert the wheel pin in the rear
leg tube (g. 3). Repeat the same operation for the other
wheel.
To remove the front and rear wheels press the release mecha-
nisms in gures 3A-3B.
WARNING: Before using the stroller, make sure that the wheels
are rmly attached to the structure by pulling gently outwards.
WARNING: When opening or closing the stroller, make sure
that your child or other children are at a safe distance. Make
sure that during these operations the moving parts of the stroll-
er do not come into contact with your child.
CARRY-ALL BASKET
4. To attach the basket to the stroller, wrap and close the velcro
on the front tube (Fig. 4) then wrap the fabric straps in the
appropriate spaces on the front legs and fasten them with
the buttons (Fig. 4A-4B).
To fasten the rear section, wrap and close the velcro in the slot
located on the rear tube of the stroller (Fig. 4C).
FITTING/REMOVING THE SEAT LINING
The lining must be tted with the seat disengaged from the
stroller.
5. Before you start tting the lining, insert the legrest tube into
its fabric slot (Fig. 5).
6. Place the fabric on the seat frame and, on the back, close
the horizontal zipper wrapping the tube (Fig. 6-6A). Before
closing the zip on the rear tube, make sure that the waist
strap is always inserted into the two vertical fabric slots and
runs through the two side slots (Fig. 6B). Then pass the crotch
strap through the slot (Fig. 6C).
WARNING: Pull the crotch strap upwards to make sure it is
properly secured.
7. Cover the backrest by wrapping it with the fabric and closing
the zipper on the back (Fig. 7).
8. Attach the seat fabric to the frame with the two respective
buttons positioned on the sides (Fig. 8).
9. Insert the legrest tube in the dedicated slots until they click
into place (Fig. 9).
10. Place the cushion on the seat by passing the crotch strap
through the slot (Fig. 10) and fastening it to the fabric un-
derneath with the two buttons (Fig. 10A).
The seat could already be used in this conguration; however,
there is also a reducer cushion for the backrest.
11. To t the reducer cushion, pass the belts through the upper
slots (Fig. 11) and the waist belt through the side slots (Fig.
11A); fasten the rear part with the snap buttons (Fig. 11B).
To remove the lining, follow the same steps in the reverse order.
WARNING: After removal of the safety harness (e.g. for wash-
ing), ensure that the harness is reassembled correctly using the
anchorage points. The harness must be re adjusted. To ensure
that the harness is adjusted correctly, tting your child and
securely closed, pull rmly on the end of the harness (on the
underside of the seat).
COMFORT KIT
The Comfort Kit comprises 2 shoulder straps and crotch strap.
12. Insert the shoulder pads on the straps and insert the buckle
in the padded crotch strap (Fig. 12-12A).
STROLLER SAFETY HARNESS
13. The stroller comes with a ve-point safety harness which
consists in two shoulder straps, a waist strap and a crotch
strap with a buckle.
WARNING: when using with children aged 0 to 6 months, you
may have to shorten the length of the straps to adjust them to
your baby; in this case, use the shoulder straps, passing them
rst through the two horizontal adjustment holes and then
pass the waist strap through the two vertical adjustment holes
(Fig. 13-13A) in the same way.
WARNING: the use is the same both in winter conguration
(with reducer cushion) and in the summer version (without re-
ducer cushion).
14. Make sure the shoulder straps are at a suitable height for
your child. if they are not, adjust their height and repeat the
same operation for the waist strap as well (g. 14).
15. Fasten the straps by passing the waist clip (A) through the
buckle on the shoulder strap (B), and secure in the crotch
strap buckle (C) (Fig. 15).
To release the waist strap, remove the prongs from the buckle
by pressing on the ends.
WARNING: To ensure the safety of your child, you must use
the crotch strap, waist belt and safety harness at the same time.
WARNING: After removal of the safety harness (e.g. for wash-
ing), ensure that the harness is reassembled correctly using the
anchorage points. The harness must be re adjusted.
BUMPER BAR
16. The seat features a bumper bar. To attach the bar, insert it
in the slots near the joint (Fig. 16) and check that the bar
is rmly in place by pulling it towards you. To pull out the
bumper bar, press the two buttons at the extremities (Fig.
16A) and pull it out. You can release one side of the bumper
bar to easily seat your child. The bumper bar can be used
both forward facing and parent facing.
WARNING: Always fasten your child with the safety harnesses.
The bumper bar IS NOT a device for containing your child.
WARNING: Never use the bumper bar to lift the stroller up
with your child sitting in it.
FITTING THE SEAT ON THE STROLLER
17. To attach the stroller seat, insert it in the relevant metal
fasteners until you hear the click which conrms that it has
been fastened (Fig. 17). To make it easier to attach the seat

18
to the stroller there are guide slots showing you the correct
alignment of the seat with the metal fasteners (g. 17A). The
seat can be attached both forward facing (g. 17B) and par-
ent facing (g. 17C).
WARNING: Before using, make sure that the seat is properly
locked on by pulling it upwards.
WARNING: If it is not properly fastened, remove it using the
release buttons and repeat the step. Otherwise contact the
Chicco customer service.
18. To release the seat, use the buttons on the joints of the seat.
Press the small button A and, at the same time, push down
the central button B (Fig. 18-18A); once this step is done, lift
the seat for complete release (Fig. 18B).
WARNING: The child must never be sitting in the seat when
fastening/unfastening it.
ADJUSTING THE BACKREST
19. Press the button on the back of the stroller backrest to re-
cline it to the desired position (Fig. 19). Release the button
and the backrest will click into the closest lock position.
WARNING: The child’s weight can make these operations
more dicult.
HOW TO ADJUST THE LEGREST
20. The legrest has two positions. To adjust it, use the buttons
on the sides of the legrest (Fig. 20).
CANOPY
21. The stroller is equipped with a sun canopy and windshield
that can be adjusted to various positions. The seat features
two pins positioned on the sides of the backrest tube to
which the canopy can be attached. Insert the fastening clips
on the tube matching the pin with the hole (Fig. 21-21A).
Complete tting the canopy to the seat by hooking the 2
snap buttons on the back of the backrest (Fig. 21B). To open
and close the canopy, use the front arch (Fig. 21C). To make
sure your child is even more protected, the surface of the
hood can be increased by opening the zip between the aps
(Fig. 21D-21E). To remove the canopy, simply unhook it from
the pins of the backrest tube and remove the buttons.
Clean the fabric parts using a wet terrycloth and neutral soap.
WARNING: The canopy must be xed to both sides of the
stroller. Ensure that the canopy is correctly fastened.
PARKING BRAKE
22. The parking brake acts on both stroller's rear wheels at the
same time. To activate the brake press down on the lever
(Fig. 22).
WARNING: Always apply the brakes whenever the stroller is
stopped. Never leave the stroller on a sloped surface, with a
child inside, even with the parking brakes engaged.
WARNING: After operating the brake lever, ensure that the
brakes are correctly engaged in both of the rear wheel units.
SWIVEL WHEELS
23. The stroller has front swivel/xed wheels. It is recommend-
ed to use the wheels in the xed mode on particularly
changeable surfaces. The use of the wheels in the swivel
mode is recommended in order to increase the control of
the stroller on a normal road surface. To use the front wheels
in swivel mode, push down on the lever located in front of
the wheels (Fig. 23). To lock it, push upwards returning the
lever to its original position (Fig. 23 A).
FOLDING THE STROLLER
WARNING: When opening or closing the stroller, make sure
that your child or other children are at a safe distance. Make
sure that during these operations the moving parts of the stroll-
er do not come into contact with your child. The stroller can be
closed either forward or parent facing. The instructions are the
same for both positions.
WARNING: You must remove all contents from the basket be-
fore closing the stroller, and remove the bag if it is attached to
the handle.
24. Lower the backrest by pressing the button on the back of
the canopy (Fig. 24). Operate the locking mechanism by
pressing button A and button B at the same time (Fig. 24A),
pull the locking handle (Fig. 24B) upwards – the stroller will
begin to fold on itself – until you hear the locking click (Fig.
24C).
The stroller can also be closed without the seat so it takes up
less room.
PRAM APRON/ LEG COVER
The carrycot cover may be also used as leg cover for the stroller
conguration.
25. Insert the legrest in the inner pocket of the leg cover (Fig.
25); wrap the slotted strap around the side pin of the stroller
(Fig. 25A) and close it on itself (Fig. 25B). Complete the op-
eration by wrapping the top fabric ap around the bumper
bar and fasten using the buttonholes provided (Fig.25C-
25D). To guarantee greater protection for the child, the top
portion of the leg cover can be passed under the bumper
bar and fastened in the highest position by inserting the
buttons in the buttonholes on the extremities of the canopy
fabric (Fig. 25E).
RAIN COVER
26. The stroller is equipped with a rain cover. Attach the rain
cover to the hood by fastening the buttons in the holes on
the hood and complete by fastening the buttons on the
straps by the wheels (g. 26).
After use, if wet, let the rain cover dry o before folding and
storing it. The rain cover can be used both forward facing and
parent facing.
WARNING: The rain cover cannot be used on the stroller with-
out the hood being extended, as it may cause suocation.
When the rain cover is tted on the stroller, never leave it ex-
posed to direct sunlight with the child inside, as the tempera-
ture will rise considerably.
USING THE CAR SEAT AND CARRYCOT
This stroller can only be tted with the KIROS I-SIZE CLIP-ON car
seat and/or the CHICCO LIGHT NAP CLIP-ON ALYSIA carrycot,
which use the same fastening system. To fasten and release the
carrycot, read the related instructions.
WARNING: Before using the stroller with the carrycot or child
car seat, always make sure that the fastening system is properly
locked by pulling it up.
WARNING: The carrycot may only be attached to the chassis in
the parent-facing position.
USING THE STROLLER WITH CHILD CAR SEAT
The Kiros i-Size car seat, , which is equipped with the Clip-On
tting device, can be tted on the Alysia stroller.
Before fastening the stroller seat, remove the stroller seat.
27. Hold the seat by the handle in a vertical position and fasten
it to the frame, positioning the side slots on the metal fas-
teners (Fig. 27), paying particular attention to ensure that
it engages on both sides. You will hear a CLICK when it is
fastened correctly.
WARNING: The child car seat may only be attached to the
chassis in the parent-facing position.
WARNING: Before use, make sure that all the child car seat

19
fastening devices are correctly engaged. If it is not properly fas-
tened, remove it using the release buttons and repeat the step.
If you are unable to successfully lock the component contact
Chicco customer service.
28. To release the child car seat from the stroller, pull rst the
rear release handle (Fig. 28) and then lift the child car seat
by the carry handle (Fig. 28A).
WARNING: The child car seat can be fastened and unfastened
with the baby inside even if these procedures could be more
dicult due to the weight of the baby. Be very careful when per-
forming the steps described.
WARRANTY
The product is guaranteed against any conformity defect in
normal conditions of use as described in the instructions.
The warranty shall not therefore apply in the case of damage
caused by improper use, wear or accidental events. For the
duration of warranty on conformity defects, please refer to the
specic provisions of national laws applicable in the country of
purchase, where provided.

20
IMPORTANT - À LIRE
ATTENTIVEMENT
ET À CONSERVER
POUR RÉFÉRENCE
ULTÉRIEURE.
AVERTISSEMENT: AVANT L’EMPLOI,
ENLEVER ET ÉLIMINER TOUS LES SACS
EN PLASTIQUE ET ÉLÉMENTS QUI
FONT PARTIE DE L’EMBALLAGE DU
PRODUIT ET LES TENIR HORS DE POR-
TÉE DES ENFANTS.
AVERTISSEMENT
• AVERTISSEMENT: Ne jamais lais-
ser l’enfant sans surveillance.
• AVERTISSEMENT : S'assurer que
tous les dispositifs de verrouillage
sont enclenchés avant utilisation.
• AVERTISSEMENT : Pour éviter
toute blessure, maintenir votre en-
fant à l'écart lors du dépliage et du
pliage du produit.
• AVERTISSEMENT: Ne pas laisser
votre enfant jouer avec ce produit.
• AVERTISSEMENT: Toujours utili-
ser le système de retenue.
• L’utilisation de l’entrejambe et du
harnais de sécurité est indispen-
sable pour garantir la sécurité de
l’enfant. Ne jamais utiliser l’entre-
jambe sans le harnais de sécurité.
• AVERTISSEMENT: Vérier que les
dispositifs de xation de la nacelle,
du siège ou du siège-auto sont
correctement enclenchés avant
utilisation.
• AVERTISSEMENT : Ce produit ne
convient pas pour faire du jogging
ou des promenades en rollers.
• La poussette convient aux enfants
pesant jusqu'à 22 kg et jusqu'à
l'âge de 4 ans, selon ce qui survient
en premier.
• La poussette est homologuée
jusqu'à 15 kg avec l'assise orientée
face aux parents.
• La poussette est homologuée
jusqu'à 22 kg avec l'assise orientée
face à la route.
• De 0 à 6 mois environ, le dossier
doit être utilisé complètement in-
cliné.
• Seul le siège-auto CHICCO KIROS
I-SIZE CLIP-ON et/ou la nacelle
CHICCO LIGHT NAP CLIP-ON ALY-
SIA équipés de dispositifs de xa-
tion compatibles peuvent être xés
à la poussette CHICCO ALYSIA.
• Avec la nacelle montée sur la pous-
sette ; AVERTISSEMENT: Ce pro-
duit, dans la conguration landau,
convient à un enfant qui ne sait pas
s’asseoir seul, rouler sur lui-même ni
se redresser en appui sur les mains
et les genoux. Poids maximum du
bébé: 9 kg.
• AVERTISSEMENT: Ne pas super-
poser un autre matelas sur le ma-
telas fourni ou recommandé par le
fabricant.
• Le système de freinage doit être ac-
tionné avant de positionner ou de
retirer l’enfant.
• Utiliser le dispositif de freinage
chaque fois que la poussette est à
l’arrêt.
• Ne jamais laisser la poussette sur un
plan incliné avec l’enfant à l’intérieur,
La page est en cours de chargement...
La page est en cours de chargement...
La page est en cours de chargement...
La page est en cours de chargement...
La page est en cours de chargement...
La page est en cours de chargement...
La page est en cours de chargement...
La page est en cours de chargement...
La page est en cours de chargement...
La page est en cours de chargement...
La page est en cours de chargement...
La page est en cours de chargement...
La page est en cours de chargement...
La page est en cours de chargement...
La page est en cours de chargement...
La page est en cours de chargement...
La page est en cours de chargement...
La page est en cours de chargement...
La page est en cours de chargement...
La page est en cours de chargement...
La page est en cours de chargement...
La page est en cours de chargement...
La page est en cours de chargement...
La page est en cours de chargement...
La page est en cours de chargement...
La page est en cours de chargement...
La page est en cours de chargement...
La page est en cours de chargement...
La page est en cours de chargement...
La page est en cours de chargement...
La page est en cours de chargement...
La page est en cours de chargement...
La page est en cours de chargement...
La page est en cours de chargement...
La page est en cours de chargement...
La page est en cours de chargement...
La page est en cours de chargement...
La page est en cours de chargement...
La page est en cours de chargement...
La page est en cours de chargement...
La page est en cours de chargement...
La page est en cours de chargement...
La page est en cours de chargement...
La page est en cours de chargement...
La page est en cours de chargement...
La page est en cours de chargement...
La page est en cours de chargement...
La page est en cours de chargement...
La page est en cours de chargement...
La page est en cours de chargement...
La page est en cours de chargement...
La page est en cours de chargement...
La page est en cours de chargement...
La page est en cours de chargement...
La page est en cours de chargement...
La page est en cours de chargement...
La page est en cours de chargement...
La page est en cours de chargement...
La page est en cours de chargement...
La page est en cours de chargement...
La page est en cours de chargement...
La page est en cours de chargement...
La page est en cours de chargement...
La page est en cours de chargement...
La page est en cours de chargement...
La page est en cours de chargement...
La page est en cours de chargement...
La page est en cours de chargement...
La page est en cours de chargement...
La page est en cours de chargement...
La page est en cours de chargement...
La page est en cours de chargement...
La page est en cours de chargement...
La page est en cours de chargement...
La page est en cours de chargement...
La page est en cours de chargement...
La page est en cours de chargement...
La page est en cours de chargement...
La page est en cours de chargement...
La page est en cours de chargement...
La page est en cours de chargement...
La page est en cours de chargement...
La page est en cours de chargement...
La page est en cours de chargement...
La page est en cours de chargement...
La page est en cours de chargement...
La page est en cours de chargement...
La page est en cours de chargement...
-
 1
1
-
 2
2
-
 3
3
-
 4
4
-
 5
5
-
 6
6
-
 7
7
-
 8
8
-
 9
9
-
 10
10
-
 11
11
-
 12
12
-
 13
13
-
 14
14
-
 15
15
-
 16
16
-
 17
17
-
 18
18
-
 19
19
-
 20
20
-
 21
21
-
 22
22
-
 23
23
-
 24
24
-
 25
25
-
 26
26
-
 27
27
-
 28
28
-
 29
29
-
 30
30
-
 31
31
-
 32
32
-
 33
33
-
 34
34
-
 35
35
-
 36
36
-
 37
37
-
 38
38
-
 39
39
-
 40
40
-
 41
41
-
 42
42
-
 43
43
-
 44
44
-
 45
45
-
 46
46
-
 47
47
-
 48
48
-
 49
49
-
 50
50
-
 51
51
-
 52
52
-
 53
53
-
 54
54
-
 55
55
-
 56
56
-
 57
57
-
 58
58
-
 59
59
-
 60
60
-
 61
61
-
 62
62
-
 63
63
-
 64
64
-
 65
65
-
 66
66
-
 67
67
-
 68
68
-
 69
69
-
 70
70
-
 71
71
-
 72
72
-
 73
73
-
 74
74
-
 75
75
-
 76
76
-
 77
77
-
 78
78
-
 79
79
-
 80
80
-
 81
81
-
 82
82
-
 83
83
-
 84
84
-
 85
85
-
 86
86
-
 87
87
-
 88
88
-
 89
89
-
 90
90
-
 91
91
-
 92
92
-
 93
93
-
 94
94
-
 95
95
-
 96
96
-
 97
97
-
 98
98
-
 99
99
-
 100
100
-
 101
101
-
 102
102
-
 103
103
-
 104
104
-
 105
105
-
 106
106
-
 107
107
-
 108
108


Chicco ALYSIA Manuel utilisateur
- Catégorie
- Poussettes
- Taper
- Manuel utilisateur
dans d''autres langues
- dansk: Chicco ALYSIA Brugermanual
Documents connexes
-
Chicco Living Smart Le manuel du propriétaire
-
Chicco Trio I-Move Le manuel du propriétaire
-
Chicco Trio Living Le manuel du propriétaire
-
-
-
-
-