Kanto SP26PL Manuel utilisateur
- Catégorie
- Équipement musical supplémentaire
- Taper
- Manuel utilisateur

REFERENCE DESKTOP SPEAKERS
YU4
YU6
TUK
SPW1 + TUK
SX26 ST34 / ST34P
ST28 / ST28P
SP26PL SP26PL / SP32PL SX22
YU Passive 5.25”
YU YU Passive 4”
Kanto Audio kantoaudio
Kanto Solutions Kanto Living
kantoaudio.com
SE6 / SE4 / SE2
TUK / YU / ORA
S6 / S4 / S2
YU6 / YU4 / ORA
SP9 / SP6HD
YU4 / YU6
H2
H1
HH
Supporting your digital lifestyle™
23-H
www.kantoliving.com | [email protected]
Toll Free: 1-888-848-2643
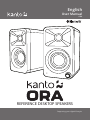
English
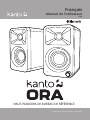
User Manual
ORA

Important Safety Precautions
• Read these instructions.
• Keep these instructions.
• Heed all warnings.
• Follow all instructions.
• Do not use this apparatus near water.
• Clean only with a dry cloth.
• Do not block any openings. Install in accordance
with the manufacturer’s instructions.
• Do not install near any heat sources such as
radiators, heat registers, stoves, or other apparatus
(including ampliers) that produce heat.
• Protect the power-supply cord from being walked
on or pinched, particularly at plugs, convenience
receptacles and the point where they exit from the
apparatus.
• When a stand is used, use caution when moving
the stand/apparatus combination to avoid injury
from tip-over.
• Unplug this apparatus during lightning storms or
when unused for long periods of time.
• Refer all servicing to qualied service personnel.
Servicing is required when the apparatus has been
damaged in any way, such as power-supply cord or
plug is damaged, liquid has been spilled or objects
have fallen into the apparatus, the apparatus has
been exposed to rain or moisture, the apparatus
does not operate normally, or the apparatus has
been dropped.
• Apparatus shall be connected to a MAINS socket
outlet with a protective earthing connection.
• An appliance input coupler is used as the
disconnect device - the disconnect device shall
remain readily operable.
CAUTION: TO REDUCE THE RISK
OF ELECTRIC SHOCK, DO NOT
REMOVE BACK PANEL.NO USER
SERVICEABLE PARTS INSIDE.
REFER SERVICING TO QUALIFIED
SERVICE PERSONNEL.
DANGEROUS VOLTAGE
The lightning ash with arrowhead, within an
equilateral triangle, is intended to alert the user
of the presence of non-insulated “dangerous
voltage” within the product’s enclosure that may
be of sucient magnitude to constitute a risk of
electric shock to persons.
ATTENTION
The exclamation point within an
equilateral triangle is intended to
alert the user of the presence of
important operating and maintenance
(servicing) instructions in the literature
accompanying the apparatus.
FCC Warnings
This device complies with part 15 of the FCC Rules. Operation is subject to the following two conditions: (1) This device may not
cause harmful interference, and (2) this device must accept any interference received, including interference that may cause
undesired operation.
Any Changes or modications not expressly approved by the party responsible for compliance could void the user’s authority
to operate the equipment.
Note: This equipment has been tested and found to comply with the limits for a Class B digital device, pursuant to part 15
of the FCC Rules. These limits are designed to provide reasonable protection against harmful interference in a residential
installation. This equipment generates uses and can radiate radio frequency energy and, if not installed and used in
accordance with the instructions, may cause harmful interference to radio communications. However, there is no guarantee
that interference will not occur in a particular installation. If this equipment does cause harmful interference to radio or
television reception, which can be determined by turning the equipment o and on, the user is encouraged to try to correct the
interference by one or more of the following measures:
-Reorient or relocate the receiving antenna.
-Increase the separation between the equipment and receiver.
-Connect the equipment into an outlet on a circuit dierent from that to which the receiver is connected.
-Consult the dealer or an experienced radio/TV technician for help. This equipment complies with FCC radiation exposure limits
set forth for an uncontrolled environment. This equipment should be installed and operated with minimum distance 20cm
between the radiator & your body.
IC WARNING
This radio transmitter has been approved by Industry Canada.
This Class B digital apparatus complies with Canadian standard ICES-003. This device complies with Industry Canada License
exempt RSS standard(s). Operation is subject to the following two conditions.
(1)This device may not cause interference, and (2) this device must accept any interference, including interference that may
cause undesired operation of the device.
This equipment complies with ISED radiation exposure limits set forth for an uncontrolled environment. This equipment
should be installed and operated with minimum distance 20cm between the radiator & your body.
Limited Warranty
Kanto Living Inc. (Kanto) warrants the equipment it manufactures to be free from defects in
material or workmanship for the limited warranty period of 2 years. This warranty is valid in
the country of purchase.
If equipment fails and Kanto is notied within 24 months from the date of purchase with
proof of original receipt from an authorized reseller, Kanto will, at its option, provide
replacement parts, repair the original equipment, or replace the equipment, and be
responsible for return shipping to the customer, provided that the equipment has not been
subjected to mechanical, electrical, or other abuse or modications. Any replacement parts,
repaired or replaced equipment are covered by the full warranty of the original purchase.
The maximum liability of Kanto shall not exceed the actual purchase price paid by the
original purchaser for the product.
If you purchased a Kanto product second-hand the limited warranty is fully transferable
provided that you can furnish a copy of the original receipt to establish purchase date and
the serial number on the product is intact.
Customers will be responsible for obtaining a Return Authorization Number through
Customer Support and are responsible for return shipping costs to a Kanto location or
authorized depot unless otherwise prohibited. Please keep the original packaging to prevent
damage to the product during shipping. Kanto recommends insuring your shipment.
Customer Support: [email protected]
The information in the manual has been carefully checked and is believed to be accurate.
However, Kanto assumes no responsibility for any inaccuracies that may be contained
in the manual. In no event will Kanto be liable for direct, indirect, special, incidental, or
consequential damages resulting from any defect in the equipment, even if advised of
the possibility of such damages. This warranty is in lieu of all other warranties expressed
or implied, including without limitation, any implied warranty, including any warranty of
merchantability and tness for any particular purpose, all of which are expressly disclaimed.
2Supporting your digital lifestyle™11

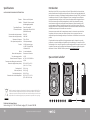
Introduction
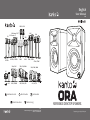
Thank you for choosing ORA, designed by Kanto in Canada. ORA bridges the gap between
computer speakers and studio monitors giving you studio-grade, audiophile-approved sound
without dominating your space. ORA has modern inputs like USB-C to get the best sound
from your PC or Mac, Bluetooth 5.0 to pair with your phone or smart home device, and RCA
for your analog gear. Sporting a crossover that automatically sends bass to a connected
subwoofer, you get awless low-end integration freeing up the 3” woofers and ¾” silk dome
tweeters to focus on what they do best. ORA is the perfect blend of reference-quality sound
and modern features at a size small enough to t under a monitor.
These powered speakers were carefully tested and inspected during production, and
before packaging and shipping. After unpacking, please check for any damage. It is
rare that a unit is damaged during shipping, but if this happens contact your retailer
immediately.
You can also call Kanto directly at 1-888-848-2643 or email [email protected].
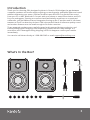
What’s In the Box?
Specications
ORA REFERENCE DESKTOP SPEAKERS
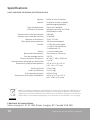
NOTICE: This appliance is labeled in accordance with European Directive 2002/96/
EC concerning waste electrical and electronic equipment (WEEE). This label indicates
that this product should not be disposed of with household waste. It should be
deposited at an appropriate facility to enable recovery and recycling.
MANUFACTURER AND IMPORTER:
Kanto Living Inc., 9136 196A Street, Langley, BC, Canada V1M 3B4
Tweeter
Woofer
Amplier Type
Power Output
Power Output (per tweeter)
Power Output (per woofer)
Frequency Response
High/Low-Pass Filter
Inputs
Outputs
Speaker Terminals
Rear Mounting Hole
Input Voltage / Frequency
Standby Power Consumption
Dimensions (each speaker)
Net Weight (active)
Net Weight (passive)
Gross Weight (boxed pair)
Shipping Box Dimensions
3/4” silk dome
3” paper cone (magnetically shielded)
Class D bi-amplied
100 W peak power
(50 W total RMS)
9 W RMS
16 W RMS
70 Hz - 22 kHz
100 Hz (automatic)
1 x RCA line-level
1 x USB-C (24 bit/96 kHz)
1 x Bluetooth 5.0
1 x sub-out
4-pin connector
1/4”-20
AC 100 V - 240 V 50/60 Hz
< 0.5 W
3.9” W x 5.6” D x 6.9” H
(10 x 14.1 x 17.5 cm)
2.2 lb (1 kg)
2.2 lb (1 kg)
8.2 lb (3.7 kg)
8.9” W x 15.1” D x 10” H
(22.7 x 38.3 x 25.4 cm)
Supporting your digital lifestyle™
10 3

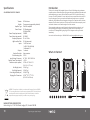
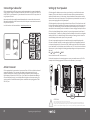
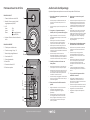
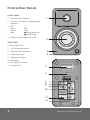
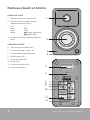
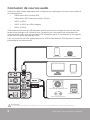
FRONT PANEL
1 3/4” Silk Dome Tweeter
2 3” Paper Cone Woofer (magnetically
shielded)
3 LED
Green - RCA
Yellow - USB
Blue - Pairing (ashing)
- Paired (solid)
4 Volume / Input Select / On / O
REAR PANEL
5 Bass Reex Port
6 1/4”-20 Mounting Hole
7 Bluetooth Pairing Button
8 USB Audio Input
9 Subwoofer Output
10 RCA Input
11 DC Input Connection
12 Speaker Out
Front & Rear Panels
2
3
8
7
9
10
11
12
1
4
Audio Troubleshooting Guide
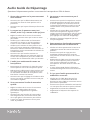
Frequently asked questions about Kanto’s ORA speakers.
• Make sure the power supply is connected to
the speaker and power outlet.
• Ensure that the power outlet is providing
power.
• Set the volume of the source to its highest
level. Low source volume can negatively
aect dynamic range.
• Ensure that the rear of the speaker is
spaced away from the wall by at least 20
cm, allowing the rear port function to be left
unimpeded.
• Test a dierent song or source to isolate the
issue.
• Set the volume of the source to its highest
level. Ensure audio source is playing audio.
• Check that the audio cable connected to and
from the source is rmly connected. Test
another audio cable if available.
• Verify that the volume of the speaker is not at
its minimum level. Turn the volume up using
the knob on the front of the speakers.
• Make sure the correct input is selected. Press
the knob on the front of the speakers to cycle
through the dierent inputs to select the
correct input.
• Reconnect the 4-pin connector between the
active speaker and passive speaker.
• Check that the audio cable connected to and
from the source is rmly seated. Try a dierent
cable or source to isolate the issue.
• Ensure that the balance setting on the source
is centered. Some sources may not have an
adjustable balance setting.
• Verify if the noise is coming from the source
by removing all sources from the speakers.
• Make sure it is not a power issue by trying a
power outlet that is on a dierent circuit.
• Check that the audio cable connected to
and from the source is rmly seated. Try
a dierent cable or source to isolate the
issue.
• If using USB, set the source’s sample rate to
96 kHz or lower.
2.
1.
4.
7.
3.
6.
The light on the front panel is illuminated
but there’s no audio playing.
None of the lights on the front panel are
illuminated.
You are experiencing poor audio
quality.
Audio is only playing through one
speaker.
You are experiencing buzzing, hissing or
distortion.
There’s no audio coming from an
attached subwoofer.
• Check that the RCA cable connected to and
from the subwoofer is rmly seated. Try a
dierent cable or source to isolate the issue.
• Make sure the subwoofer is connected to a
power outlet and is set to “On” or “Auto”.
• Increase the volume of the subwoofer.
• Increase the cuto frequency of the
subwoofer to its highest position.
• Ensure the speakers are in Bluetooth mode
by cycling through the inputs. Press the
knob on the front of the speakers until the
blue light on the front panel of the speakers
is visible.
• Make sure the blue light on the front panel
of the speakers is ashing, indicating
speakers are in pairing mode. If the blue
light is not ashing press the Bluetooth
pairing button on the back of the right
speaker. Blue light will ash indicating
pairing mode.
• Turn the device you are trying to pair on
and o.
5. The source will not connect to Bluetooth.
5
6
Supporting your digital lifestyle™9
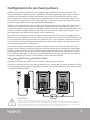
4

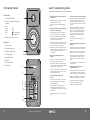
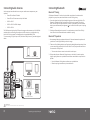
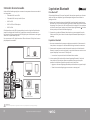
Setting Up Your Speakers
ORA is designed for desktop use to enhance your listening in a near-eld environment.
However, ORA can also be used as a stand-alone stereo speaker system mated with a
multitude of audio sources. In either setup, the space between the two speakers and the
distance from the rear wall is important. If the speakers are positioned too close or too far
apart, stereo imaging will not be fully developed.
ORA is designed to perform optimally positioned at least 20cm to 25cm from the rear wall
for best bass response. Regardless of the setup you choose, keep in mind that rooms vary
in shape, size, and furnishing; a certain amount of experimentation may be necessary to
determine the most suitable position that delivers the most satisfying sound performance.
ORA can be placed sideways below a monitor for space saving measures but will sound
best when upright. To avoid early reections from the desktop surface, which can degrade
audio performance, it is advised to angle ORA towards your listening position. Kanto has
several desktop speaker stand options to suit your needs.
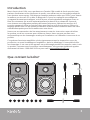
Connect the two speakers together as shown below using the supplied speaker cable.
Connect the Speaker Out from the active speaker (right) to the corresponding Speaker In
on the passive speaker (left). Connect the AC/DC power supply from ORA’s active speaker
to your wall outlet. Press the volume control knob to turn it on. Press the knob to select an
input source. It cycles through the following inputs depending on what input source was
last used.
RCA USB BLUETOOTH REPEAT
Press and hold to turn o. Press to turn on.
Follow the instructions on the ensuing pages to connect your audio sources to ORA. The
examples in the following pages are not meant to be exhaustive - just examples.
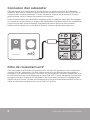
Connecting a Subwoofer
ORA is equipped with an RCA connector to provide output signal to a powered subwoofer.
Simply connect a single RCA subwoofer cable from the SUB OUT connection on ORA to the
AUDIO INPUT on your subwoofer. If your sub-woofer has a stereo L/R RCA input, either left
or right inputs will work.
We recommend the Kanto sub8 powered subwoofer with crossover and volume controls.
Most quality subwoofers oer these controls, which allow you to customize the amount of
bass you will experience.
Look for details on the Kanto website at: www.kantospeakers.com
SUBWOOFER
x4
ATTENTION
After connecting all cables, the unit can be turned ON.
When the volume is high, this system can produce noise levels that could permanently damage your
hearing. ORA is a self-powered speaker system. Do not connect the speaker terminals to the speaker
outputs of a stereo amplier. Damage may occur. Use only the power supply provided with the speakers.
Active Crossover
ORA is equipped with an automatic active crossover lter at 100 Hz to allow for advanced
setup with subwoofers. This crossover will reduce the bass extension of the main
speakers, allowing them to focus on the mid and high frequencies, while reducing the
high-frequency output of the SUB OUT port. If your sub has an adjustable bandwidth or
crossover frequency setting, it can be adjusted to the highest or most open setting. The
active crossover is enabled automatically when a subwoofer cable is plugged into ORA’s
SUB OUT port.
8Supporting your digital lifestyle™5

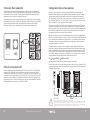
Connecting Audio Sources
Use the appropriate audio cable to connect your audio source components to your
speakers.
• Stereo RCA to Stereo RCA cable
• Stereo RCA to 3.5 mm stereo mini-jack AUX cable
• USB-C to USB-C
• USB-C to USB-C w/ USB-A adapter
• USB-C to USB-A
The ORA features a high-quality USB input that supports data streams up to 24-bit/96 kHz
resolution. When connecting your computer via USB connection, you bypass the noisy
built-in DAC of the computer, and audio signals are instead decoded by ORA.
To connect using USB, cycle input to USB, and select ‘ORA by Kanto’ as your audio playback
device.
USB-C
BLUETOOTH®
COMPUTER TABLET
RCA
CASSETTE PLAYER
TURNTABLE W/ PHONO PRE-AMP
RETRO GAME CONSOLES
SMART HOME DEVICE
SMARTPHONE
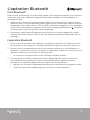
Connecting Bluetooth
Bluetooth® Operation
1. We recommend keeping a maximum distance of 10 meters between the speaker and
your device. The best signal delity is within this range.
2. Take note of the following behavior and functionality during Bluetooth operation. When
you are successfully connected, the Blue LED will be lit solid, and your device will show
as connected to ‘ORA by Kanto’.
• The connection does not remain active while in other inputs.
3. ORA speakers feature a Bluetooth Pairing button on the back of the active speaker
(right) to quickly disconnect a paired device and allow a second device to pair with the
speaker.
• Press the Bluetooth Pairing button to disconnect a paired device.
• Follow the pairing instructions to pair another device.
Bluetooth® Pairing
ORA features Bluetooth 5.0 and can be paired with many devices for wireless audio
playback from your phone, smart home device or tablet. Pairing is easy.
1. Press the volume knob and cycle through the inputs until the status light is blue. The
Bluetooth LED (blue) will ash to indicate that ORA is in pairing mode. If the light is
solid, then the ORA is already connected to a device. If you wish to connect to another
device, press the Bluetooth pairing button ( ) on the back of the ORA to put it in pairing
mode.
2. Enable your Bluetooth device to search for a new device to pair with. Select ‘ORA by
Kanto’ from the list of Bluetooth devices available for pairing.
ATTENTION
Some models of turntables include a built-in Phono Pre-Amp.
Supporting your digital lifestyle™
67

YU4
YU6
TUK
SPW1 + TUK
SX26 ST34 / ST34P
ST28 / ST28P
SP26PL SP26PL / SP32PL SX22
YU Passive 5.25”
YU YU Passive 4”
Kanto Audio kantoaudio
Kanto Solutions Kanto Living
kantoaudio.com
SE6 / SE4 / SE2
TUK / YU / ORA
S6 / S4 / S2
YU6 / YU4 / ORA
SP9 / SP6HD
YU4 / YU6
H2
H1
HH
HAUT-PARLEURS DE BUREAU DE RÉFÉRENCE
23-G
www.kantoliving.com | [email protected]
Toll Free: 1-888-848-2643
Français
Manuel de l’utilisateur
ORA
Supportant votre mode de vie digital™

Limited Warranty
Kanto Living Inc. (Kanto) garantit ses équipements contre tout défaut de matériel ou de
fabrication pendant une période limitée de 2 ans. Cette garantie est valable dans le pays
d’achat.
Si l’équipement tombe en panne et Kanto en est informé dans les 24 mois suivant la
date d’achat avec la facture d’origine d’un revendeur agréé, Kanto orira, à sa discrétion,
des pièces de rechange, la réparation de l’équipement d’origine ou le remplacement de
l’équipement, et prendra en charge les frais de retour au client, à condition que l’équipement
n’ait pas été soumis à des abus mécaniques, électriques ou autres ou à des modications.
Toutes les pièces de rechange, ainsi que tout équipement réparé ou remplacé, sont couverts
par la garantie complète de l’achat d’origine. La responsabilité maximale de Kanto ne
dépassera pas le prix d’achat réel payé par l’acheteur d’origine du produit.
Si vous avez acheté un produit Kanto usagé, la garantie limitée est entièrement transférable
à condition que vous puissiez fournir une copie de la facture originale établissant la date
d’achat et que le numéro de série du produit soit intact.
Les consommateurs sont tenus d’obtenir un numéro d’autorisation de retour auprès de
l’assistance à la clientèle et de prendre en charge les frais d’expédition vers un site Kanto
ou un dépôt agréé, sauf interdiction contraire. Veuillez conserver l’emballage d’origine pour
éviter d’endommager le produit pendant le transport. Kanto vous recommande d’assurer
votre colis.
Assistance à la clientèle : [email protected]
Les renseignements du manuel ont été soigneusement contrôlés et sont considérés comme
exacts. Kanto décline toutefois toute responsabilité pour toute erreur contenue dans le
manuel. Kanto ne pourra en aucun cas être tenu responsable de tout dommage direct,
indirect, spécial, accidentel ou consécutif résultant d’un défaut quelconque de l’équipement,
même si l’éventualité de tels dommages a été prévenu. Cette garantie remplace toutes les
autres garanties explicites ou implicites, y compris, sans limitation, toute garantie implicite, y
compris toute garantie de qualité marchande et d’adéquation à un usage particulier, toutes
expressément exclues.
Mesures de sécurité importantes
• Lisez ces instructions.
• Conservez ces instructions.
• Observez tous les avertissements.
• Suivez toutes les instructions.
• N’utilisez pas cet appareil près de l’eau.
• Nettoyez-le uniquement avec un chion sec.
• Ne bloquez pas les ouvertures de ventilation. Installez selon
les instructions du fabricant.
• N’installez pas près de sources de chaleur telles que des
radiateurs, registres de chaleur, poêles ou autres appareils
(incluant les amplicateurs) produisant de la chaleur.
• Protégez le cordon d’alimentation électrique en assurant
qu’il ne soit piétiné ou pincé, en particulier au niveau des
ches, derrière les douilles de convenance et derrière le
point où ils quittent de l’appareil.
• Utilisez seulement les accessoires recommandés par le
fabricant.
• Si vous utilisez un support, soyez prudent lorsque vous
déplacez l’ensemble support/appareil an d’éviter les
blessures dues au basculement.Débranchez l’appareil
pendant les orages ou s’il n’est pas utilisé pendant de
longues périodes de temps.
• Conez toutes les réparations à un personnel qualié.
Une réparation est nécessaire lorsque l’appareil a été
endommagé de quelque façon. Par exemple, le cordon
d’alimentation ou la che est endommagé, du liquide a été
renversé, des objets sont tombés à l’intérieur du produit, le
produit a été exposé à la pluie ou à l’humidité, le produit ne
fonctionne pas normalement, ou si le produit est tombé.
• L’appareil doit être raccordé à une prise secteur MAINS
reliée à la terre pour protection.
• Un coupleur d’entrée d’appareil est utilisé comme dispositif
de déconnexion - le dispositif de déconnexion doit rester
facilement accessible.
Avertissements FCC
Cet appareil est conforme à la partie 15 des règles de la FCC. Son fonctionnement est soumis aux deux conditions suivantes :
(1) cet appareil ne doit pas causer d’interférences nuisibles, et (2) cet appareil doit accepter toute interférence reçue, y compris
les interférences qui pourraient provoquer un fonctionnement indésirable.
Tout changement ou modication non expressément approuvé par la partie responsable de la conformité peut invalider
l’autorité de l’utilisateur à faire fonctionner l’équipement.
Note : Cet équipement a été testé et déclaré en accord avec les limites d’un appareil numérique de classe B, conformément
à la partie 15 des règles de la FCC. Ces limites sont conçues pour fournir une protection raisonnable contre les interférences
nuisibles dans une installation résidentielle. Cet équipement génère, utilise et peut émettre de l’énergie de fréquence radio
et, s’il n’est pas installé et utilisé conformément aux instructions, peut causer des interférences nuisibles aux communications
radio. Cependant, il n’y a aucune garantie que des interférences ne se produiront pas dans une installation particulière. Si cet
équipement provoque des interférences nuisibles à la réception de la radio ou de la télévision, ce qui peut être déterminé en
éteignant et en allumant l’équipement, l’utilisateur est encouragé à essayer de corriger les interférences en prenant l’une ou
plusieurs des mesures suivantes :
-Réorientez ou déplacez l’antenne de réception.
-Éloignez l’équipement du récepteur.
-Branchez l’appareil sur une prise de courant située sur un circuit diérent de celui sur lequel le récepteur est branché.
-Consultez le revendeur ou un technicien de radio ou téléviseur expérimenté pour obtenir de l’aide.
Cet appareil est conforme aux limites d’exposition aux radiations xées par la FCC pour un environnement non contrôlé. Cet
appareil doit être installé et utilisé avec une distance minimale de 20 cm entre le radiateur et votre corps.
Industrie Canada (IC)
Le présent appareil est conforme aux CNR d’Industrie Canada applicablesaux appareils radio exempts de
licence. L’exploitation est autorisée aux deux conditions suivantes: (1) l’appareil ne doit pas produire de brouillage, et
(2) l’utilisateur de l’appareil doit accepter tout brouillage radioélectrique subi, même si le brouillage est susceptible d’en
compromettre le fonctionnement.
AVISRELATIFS À L’EXPOSITION RF
Cet équipement est conforme aux limites d’exposition au rayonnement ISED établies pour un environnement non contrôlé.
Cet équipement doit être installé et utilisé à une distance minimale de 20 cm entre le radiateur et votre corps.
TENSION DANGEREUSE
L’éclair éché dans un triangle équilatéral est
destiné à alerter l’utilisateur de la présence de
“tension dangereuse” non-isolée à l’intérieur de
l’enceinte du produit qui peut être de magnitude
susante pour constituer un risque de choc
électrique pour les personnes.
ATTENTION: POUR RÉDUIRE LES
RISQUES D’ÉLECTROCUTION,
NE RETIREZ PAS LE PANNEAU
ARRIÈRE. AUCUNE PIÈCE PAR
L’UTILISATEUR À L’INTÉRIEUR.
FAITES APPEL A UN TECHNICIEN
QUALIFIE.
ATTENTION
Le point d’exclamation dans un triangle
équilatéral est destiné à alerter l’utilisateur
de la présence d’exploitation et de
maintenance importantes (entretien)
dans la documentation accompagnant
l’appareil.
RISQUE D’ÉLECTROCUTION.
N’OUVREZ PAS.
ATTENTION
211
Supportant votre mode de vie digital™

Introduction
Merci d’avoir choisi ORA, conçu par Kanto au Canada. ORA comble le fossé entre les haut-
parleurs d’ordinateur et les moniteurs de studio, vous orant un son de qualité audiophile
sans dominer votre espace. ORA dispose d’entrées modernes telles que l’USB-C pour obtenir
le meilleur son de votre PC ou Mac, le Bluetooth 5.0 pour le couplage à votre téléphone
ou appareil domestique intelligent, et le RCA pour votre équipement analogique. Avec un
ltre de croisement qui envoie automatiquement les basses à un subwoofer connecté,
vous obtenez une intégration parfaite des basses fréquences, libérant les woofers de 3
po et les tweeters à dôme en soie de 3/4 po pour faire ce qu’ils font le mieux. ORA est le
mélange parfait d’un son de qualité de référence et de fonctions modernes dans une taille
susamment petite pour être installée sous votre écran.
Nous vous recommandons de lire attentivement toutes les instructions avant d’utiliser
le système, et de les conserver pour référence future. Kanto ne peut pas être tenu
responsable pour des dommages causés par l’installation ou l’utilisation incorrecte de ce
produit.
Ce système d’enceintes ampliées a été soigneusement testé et inspecté en cours de
production, et avant l’emballage et l’expédition. Après le déballage, s’il vous plaît vérier
les dommages. Il est rare qu’un appareil est endommagé pendant le transport, mais si cela
se produit, contactez votre revendeur immédiatement. Vous pouvez également appeler
directement à Kanto 1-888-848-2643 ou par e-mail à [email protected].
Que contient la boîte?
AVIS: Cet appareil est étiqueté conformément à la directive européenne 2002/96 /EC qui
concerne les déchets d’équipements électriques et électroniques (WEEE). Cette étiquette
indique que ce produit ne doit pas être éliminé avec les déchets ménagers. Il devrait être
déposé dans une installation appropriée pour permettre la récupération et le recyclage.
Fabricant et importateur:
Kanto Living Inc., 9136 196A Street, Langley, BC, Canada V1M 3B4
10 3
Supportant votre mode de vie digital™
Spécications
HAUT-PARLEURS DE BUREAU DE RÉFÉRENCE ORA
Tweeter
Woofer
Type d’amplicateur
Puissance de sortiet
Puissance de sortie (par tweeter
Puissance de sortie (par woofer)
Réponse en fréquence
Filtre passe-haut/passe-bas
Entrées
Sorties
Bornes de haut-parleurs
Trou de montage arrière
Tension d’entrée / Fréquence
Consommation d’énergie en mode veille
Dimensions (chaque haut-parleur)
Poids net (Actif)
Poids net (Passive)
Poids brut (boxed pair)
Dimensions de la boîte d’expédition
Dôme en soie 3/4 pouce
3” Woofer à cône en papier
(blindé magnétiquement
Classe D bi-amplié
Puissance de crête de 100 W
(50 W RMS au total)
9 W RMS
16 W RMS
70 Hz - 22 kHz
100 Hz (automatique)
1 x RCA de niveau ligne
1 x USB-C (24 bit/96 kHz)
1 x Bluetooth 5.0
1 x sortie subwoofer
Connecteur à 4 broches
1/4”-20
AC 100 V - 240 V 50/60 Hz
< 0,5 W
3.9” W x 5.6” D x 6.9” H
(10 x 14.1 x 17.5 cm)
2.2 lb (1 kg)
2.2 lb (1 kg)
8.2 lb (3.7 kg)
8.9” W x 15.1” D x 10” H
(22.7 x 38.3 x 25.4 cm)

PANNEAUX AVANT
1 Tweeter à dôme en soie de 3/4”
2 Woofer à cône en papier (blindé
magnétiquement) de 3/4”
3 LED
Verte - RCA
Jaune - USB
Bleue - Pairage (clignotant)
- Apparié (xe)
4 Volume / Sélection d’entrée / Marche /
Arrêt
PANNEAUX ARRIÈRE
5 Tube de port de réexe bas
6 Trou de montage 1/4 po - 20
7 Bouton d’appairage Bluetooth
8 Entrée audio USB
9 Sortie de subwoofer
10 Entrée RCA
11 Connexion d’entrée DC
12 Sortie haut-parleur
2
3
8
7
9
10
11
12
1
4
5
6
Panneaux Avant et Arrière Audio Guide de Dépannage
Questions fréquemment posées concernant les haut-parleurs ORA de Kanto.
• Assurez-vous que le câble d’alimentation est
connecté à la sortie du haut-parleur et à la
puissance.
• Assurez-vous que la prise électrique fournit du
courant.
• Réglez le volume de la source à son niveau
maximum. Faible volume de source
peut aecter négativement la gamme
dynamique.
• Assurez-vous que l’arrière du haut-parleur
soit éloigné du mur d’au moins 20 cm, an
de ne pas gêner la fonction du port arrière.
• Testez une autre chanson ou source pour
isoler le problème.
• Réglez le volume de la source à son niveau
maximum. Assurez-vous que la source audio
joue audio.
• Vériez que le câble audio est fermement
connecté à la source et aux haut-parleurs.
Testez un autre câble audio si disponible.
• Vériez que le volume du haut-parleur n’est
pas à son niveau minimum. Augmentez le
volume en utilisant le bouton sur la arrière du
haut-parleur ou les commandes de volume de
la télécommande.
• Assurez-vous que l’entrée correcte est
sélectionnée. Appuyez sur le bouton situé sur
la face des haut-parleurs pour faire déler les
entrées an de sélectionner celle qui convient.
• Reconnectez le connecteur à 4 broches entre
le haut-parleur actif et le haut-parleur passif.
• Rebranchez le câble entre le haut-parleur actif
et le haut-parleur passif et assurez-vous que
les extrémités du câble de haut-parleur sont
bien xées à travers les bornes.
• Assurez-vous que le réglage de la balance de la
source est centré. Certaines sources n’ont pas
une balance réglable.
• Assurez-vous que les haut-parleurs sont en
mode Bluetooth en passant d’une entrée
à l’autre. Appuyez sur le bouton situé sur
la face des haut-parleurs jusqu’à ce que la
lumière bleue sur le panneau avant soit
visible.
• Vériez que le voyant bleu sur le panneau
avant des haut-parleurs clignote, ce qui
indique que les haut-parleurs sont en mode
d’appairage. Si le voyant bleu ne clignote
pas, appuyez sur le bouton d’appairage.
• Allumez et éteignez l’appareil que vous
essayez d’appairer.
2.
1.
4.
6.
3.
5.
Le voyant sur le panneau avant est
allumé, mais il n’y a aucun audio qui joue.
Aucun des voyants sur le panneau avant
sont allumés.
Vous rencontrez l’audio de mauvaise
qualité.
L’audio joue seulement à travers un
haut-parleur.
La source ne se connectera pas à
Bluetooth.
Vous recontrez des bourdonnements,
des siements ou des distorsions.
• Vériez si le bruit provient de la source en
supprimant toutes les sources des haut-
parleurs.
• Assurez-vous qu’il ne s’agit pas d’un
problème d’alimentation en essayant
une prise de courant située sur un circuit
diérent.
• Rebranchez le câble entre le haut-parleur
actif et le haut-parleur passif et assurez-
vous que les extrémités du câble de
haut-parleur sont bien xées à travers les
bornes.
• Si vous utilisez USB, réglez la fréquence
d’échantillonnage de la source à 96 kHz ou
moins.
7. Il n’y a pas d’audio provenant d’un
subwoofer connecté.
• Vériez que le câble RCA connecté au
subwoofer est correctement branché.
Essayez un autre câble ou une autre source
pour isoler le problème.
• Assurez-vous que le subwoofer est branché
sur une prise de courant et qu’il est allumé.
• Augmentez le volume du subwoofer.
• Augmentez la fréquence de coupure du
subwoofer.
9
4Supportant votre mode de vie digital™

ORA est conçu pour l’utilisation sur un bureau an d’améliorer votre écoute dans un
environnement de champ proche. Cependant, ORA peut également être utilisé comme
système de haut-parleurs stéréo autonome associé à une multitude de sources audio.
Dans les deux cas, l’espace entre les deux haut-parleurs et leur distance par rapport au
mur arrière sont importants. Si les haut-parleurs se situent trop près ou trop loin l’un de
l’autre, l’image stéréo ne sera pas pleinement développée.
ORA est conçu pour fonctionner de façon optimale placée au moins 20cm à 25cm du mur
arrière pour une meilleure réponse de basse. Quelle que soit la conguration que vous
choisissez, gardez à l’esprit que les chambres varient en forme, taille et ameublement; une
certaine quantité d’éxperimentation peut être nécessaire pour déterminer la position la
plus appropriée qui délivre une qualité sonore meilleure.
Bien que vous puissiez positionner ORA latéralement sous votre écran pour gagner de la
place, le son est meilleur lorsqu’il est placé à la verticale. Pour éviter les réexions précoces
sur la surface du bureau et préserver la qualité du son, il est conseillé d’orienter ORA vers
votre position d’écoute. Kanto propose plusieurs options de support de haut-parleur de
bureau pour répondre à vos besoins.
Connectez les deux haut-parleurs comme indiqué ci-dessous à l’aide du câble de haut-
parleur fourni. Reliez la sortie haut-parleur du haut-parleur actif (à droite) à l’entrée haut-
parleur correspondante du haut-parleur passif (à gauche). Branchez l’alimentation CA/CC
du haut-parleur actif à votre prise murale. Appuyez sur le bouton de contrôle du volume
pour l’allumer. Appuyez sur le bouton pour sélectionner une source d’entrée. Les entrées
suivantes délent en fonction de la dernière source d’entrée utilisée
RCA USB BLUETOOTH RETOUR AU DÉPART
Appuyez et maintenez enfoncé pour éteindre. Appuyez pour allumer.
Suivez les instructions sur les pages suivantes pour connecter vos sources audio au ORA.
Les exemples présentés dans les pages suivantes ne sont pas destinés à être exhaustive
- seulement des exemples.
Connexion d’un subwoofer
ORA est équipé d’un connecteur RCA pour fournir un signal de sortie à un subwoofer
alimenté. Branchez un câble RCA pour subwoofer entre la connexion SUB OUT de ORA et
l’entrée audio de votre subwoofer. Si votre subwoofer dispose d’une entrée RCA stéréo
gauche/droite, l’une ou l’autre des entrées fonctionnera.
Nous recommandons les subwoofers alimentés sub6 ou sub8 par Kanto avec les réglages
de croisement et de volume. La plupart des subwoofers de qualité orent ces commandes,
ce qui vous permet de personnaliser la quantité de basses que vous allez ressentir.
Recherchez les détails sur le site Web de Kanto à l’adresse: www.kantoaudio.com
SUBWOOFER
x4
ATTENTION
Après la connexion de tous les câbles, l’appareil peut être allumé.
Lorsque le volume est élevé, ce système peut produire des niveaux sonores capables d’endommager votre
ouïe de manière permanente. ORA est un système de haut-parleurs auto-alimentés. Ne connectez pas
les bornes des haut-parleurs aux sorties des haut-parleurs d’un amplicateur stéréo. Vous risqueriez des
dommages. Utilisez uniquement le bloc d’alimentation fourni avec les haut-parleurs.
Filtre de croisement actif
ORA est équipé d’un ltre de croisement actif à 100 Hz pour permettre une conguration
avancée avec les subwoofers. Ce ltre réduit l’extension des basses des haut-parleurs
principaux, leur permettant de se concentrer sur les moyennes et hautes fréquences, tout
en réduisant la sortie haute fréquence du canal SUB OUT. Si votre subwoofer vous permet
de régler la largeur de bande ou la fréquence de croisement, choisissez le réglage le plus
élevé ou le plus ouvert. Le ltre de croisement actif est activé automatiquement lorsqu’un
câble de subwoofer est branché au canal SUB OUT de ORA.
Conguration de vos haut-parleurs
85
Supportant votre mode de vie digital™

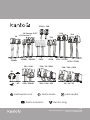
Utilisez le câble d’audio approprié pour connecter les composants de votre source audio à
vos haut-parleurs.
• Câble stéréo RCA à stéréo RCA
• Câble stéréo RCA à mini-jack stéréo 3,5 mm
• USB-C à USB-C
• USB-C à USB-C w/ USB-A adapter
• USB-C à USB-A
ORA dispose d’une entrée USB de haute qualité qui prend en charge les ux de données
jusqu’à une résolution de 24 bits/96 kHz. Lorsque vous connectez votre ordinateur via
une connexion USB, vous contournez le DAC intégré bruyant de l’ordinateur et les signaux
audio sont à la place décodés par ORA.
Pour se connecter via USB, réglez l’entrée sur USB et sélectionnez “ORA by Kanto” comme
périphérique de lecture audio.
USB-C
BLUETOOTH®
COMPUTER TABLET
RCA
CASSETTE PLAYER
TURNTABLE W/ PHONO PRE-AMP
RETRO GAME CONSOLES
SMART HOME DEVICE
SMARTPHONE
ATTENTION
Certains modèles de platines de la génération nouveaux ont un préamplicateur de phonographe intégré.
Connexion de sources audio
67
Supportant votre mode de vie digital™
L’opération Bluetooth
L’opération Bluetooth
1. Nous vous recommandons de respecter une distance maximale de 10 mètres entre le
haut-parleur et votre appareil. La meilleure délité de signal se situe dans cette zone.
2. Prenez note du comportement et des fonctionnalités suivants lors de l’utilisation de
Bluetooth. Lorsque la connexion est réussie, le voyant bleu s’allume en continu et votre
appareil indique qu’il est connecté à “ORA by Kanto”.
• La connexion n’est pas active lors de l’utilisation d’autres entrées.
3. Les haut-parleurs ORA sont dotés d’un bouton d’appairage Bluetooth à l’arrière du
haut-parleur actif (à droite) pour déconnecter rapidement un appareil couplé et
permettre à un deuxième appareil de se coupler avec le haut-parleur.
• Appuyez sur le bouton d’appairage Bluetooth pour déconnecter un appareil couplé.
• Suivez les instructions d’appairage pour connecter un autre appareil.
Paire Bluetooth®
ORA est doté de Bluetooth 5.0 et peut être jumelé à de nombreux appareils pour la lecture
audio sans l de votre téléphone, appareil domestique intelligent ou votre tablette. Le
jumelage est facile.
1. Appuyez sur le bouton de volume et faites déler les entrées jusqu’à ce que le voyant
d’état soit bleu. Le voyant Bluetooth (bleu) clignote pour indiquer que ORA est en mode
d’appairage. Si le voyant est xe, ORA est déjà connecté à un appareil. Si vous souhaitez
connecter un autre appareil, appuyez sur le bouton d’appairage Bluetooth ( ) à l’arrière
du haut-parleur pour le mettre en mode d’appairage.
2. Permettez à votre dispositif Bluetooth de rechercher un nouveau appareil à coupler.
Sélectionnez “ORA by Kanto” dans la liste des dispositifs Bluetooth disponibles pour le
jumelage.

REFERENCE DESKTOP SPEAKERS
Supporting your digital lifestyle™
English
User Manual
ORA

Important Safety Precautions
• Read these instructions.
• Keep these instructions.
• Heed all warnings.
• Follow all instructions.
• Do not use this apparatus near water.
• Clean only with a dry cloth.
• Do not block any openings. Install in accordance
with the manufacturer’s instructions.
• Do not install near any heat sources such as
radiators, heat registers, stoves, or other apparatus
(including ampliers) that produce heat.
• Protect the power-supply cord from being walked
on or pinched, particularly at plugs, convenience
receptacles and the point where they exit from the
apparatus.
• When a stand is used, use caution when moving
the stand/apparatus combination to avoid injury
from tip-over.
• Unplug this apparatus during lightning storms or
when unused for long periods of time.
• Refer all servicing to qualied service personnel.
Servicing is required when the apparatus has been
damaged in any way, such as power-supply cord or
plug is damaged, liquid has been spilled or objects
have fallen into the apparatus, the apparatus has
been exposed to rain or moisture, the apparatus
does not operate normally, or the apparatus has
been dropped.
• Apparatus shall be connected to a MAINS socket
outlet with a protective earthing connection.
• An appliance input coupler is used as the
disconnect device - the disconnect device shall
remain readily operable.
CAUTION: TO REDUCE THE RISK
OF ELECTRIC SHOCK, DO NOT
REMOVE BACK PANEL.NO USER
SERVICEABLE PARTS INSIDE.
REFER SERVICING TO QUALIFIED
SERVICE PERSONNEL.
DANGEROUS VOLTAGE
The lightning ash with arrowhead, within an
equilateral triangle, is intended to alert the user
of the presence of non-insulated “dangerous
voltage” within the product’s enclosure that may
be of sucient magnitude to constitute a risk of
electric shock to persons.
ATTENTION
The exclamation point within an
equilateral triangle is intended to
alert the user of the presence of
important operating and maintenance
(servicing) instructions in the literature
accompanying the apparatus.
FCC Warnings
This device complies with part 15 of the FCC Rules. Operation is subject to the following two conditions: (1) This device may not
cause harmful interference, and (2) this device must accept any interference received, including interference that may cause
undesired operation.
Any Changes or modications not expressly approved by the party responsible for compliance could void the user’s authority
to operate the equipment.
Note: This equipment has been tested and found to comply with the limits for a Class B digital device, pursuant to part 15
of the FCC Rules. These limits are designed to provide reasonable protection against harmful interference in a residential
installation. This equipment generates uses and can radiate radio frequency energy and, if not installed and used in
accordance with the instructions, may cause harmful interference to radio communications. However, there is no guarantee
that interference will not occur in a particular installation. If this equipment does cause harmful interference to radio or
television reception, which can be determined by turning the equipment o and on, the user is encouraged to try to correct the
interference by one or more of the following measures:
-Reorient or relocate the receiving antenna.
-Increase the separation between the equipment and receiver.
-Connect the equipment into an outlet on a circuit dierent from that to which the receiver is connected.
-Consult the dealer or an experienced radio/TV technician for help. This equipment complies with FCC radiation exposure limits
set forth for an uncontrolled environment. This equipment should be installed and operated with minimum distance 20cm
between the radiator & your body.
IC WARNING
This radio transmitter has been approved by Industry Canada.
This Class B digital apparatus complies with Canadian standard ICES-003. This device complies with Industry Canada License
exempt RSS standard(s). Operation is subject to the following two conditions.
(1)This device may not cause interference, and (2) this device must accept any interference, including interference that may
cause undesired operation of the device.
This equipment complies with ISED radiation exposure limits set forth for an uncontrolled environment. This equipment
should be installed and operated with minimum distance 20cm between the radiator & your body.
2Supporting your digital lifestyle™

Introduction
Thank you for choosing ORA, designed by Kanto in Canada. ORA bridges the gap between
computer speakers and studio monitors giving you studio-grade, audiophile-approved sound
without dominating your space. ORA has modern inputs like USB-C to get the best sound
from your PC or Mac, Bluetooth 5.0 to pair with your phone or smart home device, and RCA
for your analog gear. Sporting a crossover that automatically sends bass to a connected
subwoofer, you get awless low-end integration freeing up the 3” woofers and ¾” silk dome
tweeters to focus on what they do best. ORA is the perfect blend of reference-quality sound
and modern features at a size small enough to t under a monitor.
These powered speakers were carefully tested and inspected during production, and
before packaging and shipping. After unpacking, please check for any damage. It is
rare that a unit is damaged during shipping, but if this happens contact your retailer
immediately.
You can also call Kanto directly at 1-888-848-2643 or email [email protected].
What’s In the Box?
3

FRONT PANEL
1 3/4” Silk Dome Tweeter
2 3” Paper Cone Woofer (magnetically
shielded)
3 LED
Green - RCA
Yellow - USB
Blue - Pairing (ashing)
- Paired (solid)
4 Volume / Input Select / On / O
REAR PANEL
5 Bass Reex Port
6 1/4”-20 Mounting Hole
7 Bluetooth Pairing Button
8 USB Audio Input
9 Subwoofer Output
10 RCA Input
11 DC Input Connection
12 Speaker Out
Front & Rear Panels
2
3
8
7
9
10
11
12
1
4
5
6
Supporting your digital lifestyle™
4

Setting Up Your Speakers
ORA is designed for desktop use to enhance your listening in a near-eld environment.
However, ORA can also be used as a stand-alone stereo speaker system mated with a
multitude of audio sources. In either setup, the space between the two speakers and the
distance from the rear wall is important. If the speakers are positioned too close or too far
apart, stereo imaging will not be fully developed.
ORA is designed to perform optimally positioned at least 20cm to 25cm from the rear wall
for best bass response. Regardless of the setup you choose, keep in mind that rooms vary
in shape, size, and furnishing; a certain amount of experimentation may be necessary to
determine the most suitable position that delivers the most satisfying sound performance.
ORA can be placed sideways below a monitor for space saving measures but will sound
best when upright. To avoid early reections from the desktop surface, which can degrade
audio performance, it is advised to angle ORA towards your listening position. Kanto has
several desktop speaker stand options to suit your needs.
Connect the two speakers together as shown below using the supplied speaker cable.
Connect the Speaker Out from the active speaker (right) to the corresponding Speaker In
on the passive speaker (left). Connect the AC/DC power supply from ORA’s active speaker
to your wall outlet. Press the volume control knob to turn it on. Press the knob to select an
input source. It cycles through the following inputs depending on what input source was
last used.
RCA USB BLUETOOTH REPEAT
Press and hold to turn o. Press to turn on.
Follow the instructions on the ensuing pages to connect your audio sources to ORA. The
examples in the following pages are not meant to be exhaustive - just examples.
x4
ATTENTION
After connecting all cables, the unit can be turned ON.
When the volume is high, this system can produce noise levels that could permanently damage your
hearing. ORA is a self-powered speaker system. Do not connect the speaker terminals to the speaker
outputs of a stereo amplier. Damage may occur. Use only the power supply provided with the speakers.
5

Connecting Audio Sources
Use the appropriate audio cable to connect your audio source components to your
speakers.
• Stereo RCA to Stereo RCA cable
• Stereo RCA to 3.5 mm stereo mini-jack AUX cable
• USB-C to USB-C
• USB-C to USB-C w/ USB-A adapter
• USB-C to USB-A
The ORA features a high-quality USB input that supports data streams up to 24-bit/96 kHz
resolution. When connecting your computer via USB connection, you bypass the noisy
built-in DAC of the computer, and audio signals are instead decoded by ORA.
To connect using USB, cycle input to USB, and select ‘ORA by Kanto’ as your audio playback
device.
USB-C
BLUETOOTH®
COMPUTER TABLET
RCA
CASSETTE PLAYER
TURNTABLE W/ PHONO PRE-AMP
RETRO GAME CONSOLES
SMART HOME DEVICE
SMARTPHONE
ATTENTION
Some models of turntables include a built-in Phono Pre-Amp.
Supporting your digital lifestyle™
6

Connecting Bluetooth
Bluetooth® Operation
1. We recommend keeping a maximum distance of 10 meters between the speaker and
your device. The best signal delity is within this range.
2. Take note of the following behavior and functionality during Bluetooth operation. When
you are successfully connected, the Blue LED will be lit solid, and your device will show
as connected to ‘ORA by Kanto’.
• The connection does not remain active while in other inputs.
3. ORA speakers feature a Bluetooth Pairing button on the back of the active speaker
(right) to quickly disconnect a paired device and allow a second device to pair with the
speaker.
• Press the Bluetooth Pairing button to disconnect a paired device.
• Follow the pairing instructions to pair another device.
Bluetooth® Pairing
ORA features Bluetooth 5.0 and can be paired with many devices for wireless audio
playback from your phone, smart home device or tablet. Pairing is easy.
1. Press the volume knob and cycle through the inputs until the status light is blue. The
Bluetooth LED (blue) will ash to indicate that ORA is in pairing mode. If the light is
solid, then the ORA is already connected to a device. If you wish to connect to another
device, press the Bluetooth pairing button ( ) on the back of the ORA to put it in pairing
mode.
2. Enable your Bluetooth device to search for a new device to pair with. Select ‘ORA by
Kanto’ from the list of Bluetooth devices available for pairing.
7

Connecting a Subwoofer
ORA is equipped with an RCA connector to provide output signal to a powered subwoofer.
Simply connect a single RCA subwoofer cable from the SUB OUT connection on ORA to the
AUDIO INPUT on your subwoofer. If your sub-woofer has a stereo L/R RCA input, either left
or right inputs will work.
We recommend the Kanto sub8 powered subwoofer with crossover and volume controls.
Most quality subwoofers oer these controls, which allow you to customize the amount of
bass you will experience.
Look for details on the Kanto website at: www.kantospeakers.com
SUBWOOFER
Active Crossover
ORA is equipped with an automatic active crossover lter at 100 Hz to allow for advanced
setup with subwoofers. This crossover will reduce the bass extension of the main
speakers, allowing them to focus on the mid and high frequencies, while reducing the
high-frequency output of the SUB OUT port. If your sub has an adjustable bandwidth or
crossover frequency setting, it can be adjusted to the highest or most open setting. The
active crossover is enabled automatically when a subwoofer cable is plugged into ORA’s
SUB OUT port.
8Supporting your digital lifestyle™
La page est en cours de chargement...
La page est en cours de chargement...
La page est en cours de chargement...
La page est en cours de chargement...
La page est en cours de chargement...
La page est en cours de chargement...
La page est en cours de chargement...
La page est en cours de chargement...
La page est en cours de chargement...
La page est en cours de chargement...
La page est en cours de chargement...
La page est en cours de chargement...
La page est en cours de chargement...
La page est en cours de chargement...
La page est en cours de chargement...
La page est en cours de chargement...
-
 1
1
-
 2
2
-
 3
3
-
 4
4
-
 5
5
-
 6
6
-
 7
7
-
 8
8
-
 9
9
-
 10
10
-
 11
11
-
 12
12
-
 13
13
-
 14
14
-
 15
15
-
 16
16
-
 17
17
-
 18
18
-
 19
19
-
 20
20
-
 21
21
-
 22
22
-
 23
23
-
 24
24
-
 25
25
-
 26
26
-
 27
27
-
 28
28
-
 29
29
-
 30
30
-
 31
31
-
 32
32
-
 33
33
-
 34
34
-
 35
35
-
 36
36


Kanto SP26PL Manuel utilisateur
- Catégorie
- Équipement musical supplémentaire
- Taper
- Manuel utilisateur
dans d''autres langues
- English: Kanto SP26PL User manual