HQ Power HQ-POWER LEDA03C DMX Controller Output LED Power and Control Unit Manuel utilisateur
- Catégorie
- Stroboscopes
- Taper
- Manuel utilisateur
Ce manuel convient également à

LE
D
DMX
C
DMX-
C
CONT
R
CONT
R
DMX-
C
USER
M
GEBRU
NOTIC
E
MANU
A
BEDIE
N
D
A03C
C
ONTROLL
E
C
ONTROLL
E
RÔ
LEUR D
M
R
OLADOR
D
C
ONTROLL
E
M
ANUAL
IKERSHAN
D
E
D’EMPLOI
A
L DEL USU
A
N
UNGSANLE
E
R FOR LE
D
E
R VOOR L
E
M
X POUR L
E
D
MX PARA
L
E
R FÜR LE
D
D
LEIDING
A
RIO
ITUNG
D
A03
E
DA03
E
DA03
L
EDA03
D
A03
1
1
2
3
8
3
8
3

11/12/20
0
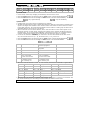
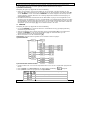
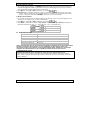
• How t
o
pins in
t
• Contro
aanpa
s
• Modifi
e
broche
• Modifi
c
polos
y
• Die Co
n
anzup
a
0
9
o
turn the contr
o
t
o 5-pins (plug
ller line van 3-
p
s
sen (stekker e
n
e
r la ligne du co
s en 5 broches
c
ar la línea del
c
y
5 polos (cone
c
n
trolle
r
-Linie v
o
a
ssen (Stecker
u
o
ller line from
3
and socket)
p
in naar 5-pin
n
contact).
ntrôleur de 3
(fiche et conta
c
c
ontrolador de
3
c
tor y contacto)
o
n 3-Pin nach 5
-
u
nd Kontakt).
LEDA
0
2
3
-
c
t)
3
-
Pin
0
3C
e
i
r
T
©Vellem
a
terminator
i
ndweerstand
r
ésistance de
terminaison
terminación
T
erminierung
a
n nv

11/12/20
0
1. In
t
To all r
e
Import
a
If in do
Thank y
o
device
w
manual
t
2. Sa
f
• This d
e
Have
a
• Make
s
this m
• Do no
t
if nec
e
• Respe
c
surfac
e
• Do no
t
sensiti
3. Ge
Refer to
• Famili
a
opera
t
0
9
t
roduction
e
sidents of t
h
a
nt environ
m
This symbol
o
lifecycle coul
d
Do not dispo
s
to a specializ
e
This device s
h
Respect the l
o
ubt, contact
y
o
u for buying
t
w
as damaged i
n
t
horoughly be
f
f
ety Instru
c
Be very care
f
electroshock
s
Always disco
n
maintenance
Keep this de
v
Caution: de
v
There are no
service and/
o
e
vice falls und
e
a
qualified per
s
s
ure that the
a
anual.
t
crimp the po
w
e
ssary.
c
t a minimum
e
.
t
stare directly
ve people.
neral Guid
e
the Vellema
n
Indoo
r
drippin
g
Keep t
h
openin
g
Protect
device.
a
rise yourself
w
t
ion by unquali
h
e European
U
m
ental inform
a
o
n the device
o
d
harm the en
v
s
e of the unit (
o
e
d company fo
h
ould be retur
n
o
cal environm
e
y
our local w
a
t
he LEDA03C!
n
transit, don'
t
f
ore bringing t
h
c
tions
f
ul during the i
s
.
n
nect mains p
o
activities are
p
v
ice away fro
m
v
ice heats up
d
use
r
-servicea
b
o
r spare parts.
e
r protection c
s
on carry out t
a
vailable volta
g
w
er cord and
p
distance of 0.
5
at the connec
t
e
lines
n
® Service a
n
r
use only. K
e
g
liquids.
h
is device awa
y
g
s are clear at
this device fr
o
w
ith the functi
o
fied people. A
n
LEDA
0
3
User m
U
nion
a
tion about t
o
r the package
v
ironment.
o
r batteries) a
s
r recycling.
n
ed to your di
s
e
ntal rules.
a
ste disposal
It should co
m
t
install or use
h
is device into
nstallation: to
u
o
wer when de
v
p
erformed. Ha
m
children and
u
d
uring use.
b
le parts insid
e
lass I. It is th
e
he electric co
n
g
e does not ex
c
p
rotect it again
5
m between th
t
ed light sourc
n
d Quality W
a
e
ep this device
y
from dust a
n
all times.
o
m shocks and
o
ns of the dev
i
n
y damage th
a
0
3C
anual
his product
indicates that
s
unsorted mu
s
tributor or to
a
authorities.
m
e with a contr
o
it and contact
service.
u
ching live wir
v
ice not in use
ndle the powe
r
u
nauthorized
u
e
the device.
R
e
refore essenti
a
n
nection.
c
eed the volta
g
st damage. H
a
e connected li
g
e, as this may
a
rranty on th
e
away form rai
n
d extreme he
a
abuse. Avoid
i
ce before act
u
a
t may occur
w
disposal of th
e
nicipal waste;
a
local recyclin
o
ller and this
m
your dealer.
P
es can cause l
i
or when servi
c
r
cord by the
p
u
sers.
R
efer to an aut
h
a
l that the de
v
g
e stated in th
a
ve an authori
s
g
ht output an
d
cause epilepti
e
last pages of
n, moisture, s
a
t. Make sure
t
brute force w
h
u
ally using it.
D
w
ill most proba
b
©Vellem
a
e
device after i
it should be t
a
g service.
m
anual. If the
P
lease read the
i
fe-threatenin
g
c
ing or
p
lug only.
h
orized dealer
v
ice be earthe
d
e specification
s
s
ed dealer repl
d
any illuminat
e
c seizure in
this manual.
plashing and
t
he ventilation
h
en operating
t
D
o not allow
b
ly be due to
a
n nv
ts
a
ken
g
for
d
.
s
of
ace it
e
d
t
he

LEDA03C
11/12/2009 ©Velleman nv
4
unprofessional use of the device.
• All modifications of the device are forbidden for safety reasons. Damage caused by user
modifications to the device is not covered by the warranty.
• Only use the device for its intended purpose. All other uses may lead to short circuits, burns,
electroshocks, lamp explosion, crash, etc. Using the device in an unauthorised way will void the
warranty.
• Damage caused by disregard of certain guidelines in this manual is not covered by the warranty
and the dealer will not accept responsibility for any ensuing defects or problems.
• A qualified technician should install and service this device.
• Do not switch the device on immediately after it has been exposed to changes in temperature.
Protect the device against damage by leaving it switched off until it has reached room
temperature.
• Lighting effects are not designed for permanent operation: regular operation breaks will prolong
their lives.
• Use the original packaging if the device is to be transported.
• Keep this manual for future reference.
4. Features
• auto-, sound-, DMX or master / slave mode
• 18 preset colours + 6 built-in programs with or without DMX
• sound activation possible via DMX mode
• connection possibility for up to 12 x LEDA03 (not incl.)
• indoor use only
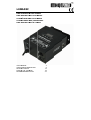
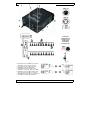
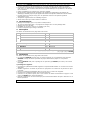
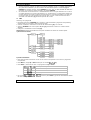
5. Overview
Refer to the illustrations on page 2 of this manual.
A ON/OFF-switch C display
B
Menu button D output port (RJ45)
Enter button E DMX input
Up () button F DMX output
Down () button G power cord
Hardware setup 4 splitter
1 External DMX controller 5 LED lamp
2 LEDA03C 6 DMX cable
3 linking cable 7 DMX terminator
Note: [1], [3], [4], [5], [6] and [7] not included. [2], 1x included.
[3] + [4] + [5] = LEDA03
6. Hardware installation
Refer to the illustrations on page 2 of this manual.
• The LEDA03C can be used stand alone or in combination with other LEDA03Cs. Note that each
LEDA03C requires its own power supply (mains outlet).
• A LEDA03C can control up to 12 LED-lamps (LEDA03, not incl.) via the RJ45 output [D].
a) Mounting
• Have the device installed by a qualified person, respecting EN 60598-2-17 and all other
applicable norms.
• Install the device in a location with few passers-by and inaccessible to unauthorised persons.
• Have a qualified electrician carry out the electrical connection.
• Make sure there is no flammable material within a 50cm radius of the device Make sure the
ventilation openings are clear at all times.
• Connect one or more (max. 12) LEDA03s to the output port. Refer to the illustration on page 2
of this manual and to the user manual that comes with the LEDA03 for more information.
• Connect the device to the mains with the power plug. Don’t connect it to a dimming pack.

LEDA03C
11/12/2009 ©Velleman nv
5
• The installation has to be approved by an expert before the device is taken into service.
b) DMX-512 connection
Refer to the illustrations on page 2 of this manual.
• When applicable, connect an XLR cable to the female 3-pin XLR output of a controller ([1], not
incl.) and the other side to the male 3-pin XLR input [E] of the LEDA03C. Multiple LEDA03Cs
can be linked through serial linking. The linking cable should be a dual core, screened cable with
XLR input and output connectors.
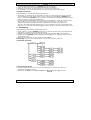
• A DMX terminator is recommended for installations where the DMX cable has to run a long
distance or is in an electrically noisy environment (e.g. discos). The terminator prevents
corruption of the digital control signal by electrical noise. The DMX terminator is simply an XLR
plug with a 120Ω resistor between pins 2 and 3, which is then plugged into the XLR output
socket [F] of the last device in the chain.
7. Operation
Refer to the illustrations on page 2 of this manual.
• The LEDA03C can work in 3 modes: automatic (pre-programmed), sound controlled or DMX-
controlled.
• Make sure all connections are properly made and plug the power cord [G] into a suitable mains
outlet.
• Switch on the LEDA03C with the ON/OFF-switch [A]. The system will start up in the same
mode it was in when it was switched off.
• Use the control buttons [B] to configure the device.
Note: press and hold the control buttons for faster setting.
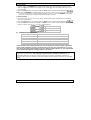
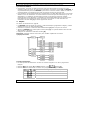
a) menu overview
b) auto mode
• In this mode, you can select one of the 18 preset static colours or 3 build-in programs to run the
whole system
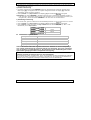
• Press the menu button and press the up- or down button until the display [C] shows .
• Press the enter button and use the up- or down button to select the desired output:
...
fixed colours: static red to static gold
change colours in steps
cross fade colours
strobe light

LEDA03C
11/12/2009 ©Velleman nv
6
• When selecting , or , press the enter button again and use the up- or
down button to set the changing speed:
30s 20s 10s 7s 5s 4s 3s 2s 1s 0.5s
c) sound mode
• In this mode, colour step changing is activated by the beat of the music.
• Press the menu button and press the up- or down button until the display [C] shows .
• Press the enter button and use the up- or down button to set the sound sensitivity:
: very high sensitivity : very low sensitivity
d) DMX mode
• In DMX mode, the system can be controlled via 6 channels.
• All DMX-controlled devices need a digital start address so that the correct device responds to the
signals. This digital start address is the channel number from which the device starts to “listen”
to the DMX controller. The same starting address can be used for a whole group of devices or an
individual address can be set for every device.
• When all devices have the same address, all the units will “listen” to the control signal on one
particular channel. In other words: changing the settings of one channel will affect all devices
simultaneously. If you set individual addresses, each device will “listen” to a separate channel
number. Changing the settings of one channel will only affect the device in question.
• In case of the 6-channel LEDA03C, you will have to set the start address of the first unit to
001, the second unit to 007 (1 + 6), the third to 013 (7 + 6), and so on.
• Press the menu button and press the up- or down button until the display [C] shows .
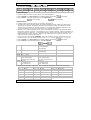
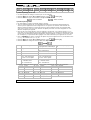
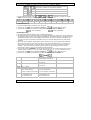
• Press the enter button and use the up- or down button to set the DMX address:
CH1 0 – 150: colour mixing 151 – 230: colour macros
and auto programs
231 – 255: sound activation
CH2 red: 0-100% select 18 colours or 2
programs
-
CH3 green: 0-100% speed: slow to fast -
CH4 blue: 0-100% - -
CH5 strobe:
0-20: no function
21-255: slow to fast
strobe:
0-20: no function
21-255: slow to fast
-
CH6 dimming:
0: intensity 100%
255: intensity 0%
dimming:
0: intensity 100%
255: intensity 0%
-
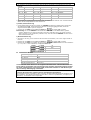
• When the value of channel 1 is between 151 and 230, the function of channel 2 is given below:
1 ~ 12 red 92 ~103 orange 182 ~ 195 chocolate
13 ~ 25 green 104 ~ 116 purple 195 ~ 207 light blue
26 ~ 38 blue 117 ~ 129 yellow/green 208 ~ 220 violet
39 ~ 51 yellow 130 ~ 142 pink 221 ~ 233 gold
52 ~ 64 magenta 143 ~ 155 sky blue 234 ~ 246 step change
65 ~77 cyan 156 ~ 168 orange/red 247 ~ 255 cross fade
78 ~ 91 white 169 ~ 181 pale green
• When the value of channel 1 is between 231 and 255, the system is running in sound mode. Set
the sound sensitivity level according to desired effect and ambient noise levels

LEDA03C
11/12/2009 ©Velleman nv
7
e) slave mode
• In slave mode, the LEDA03C will respond according to the control signals it receives on the
DMX input [E] and forwards these signals on its output [F]. This way multiple devices can run
synchronously.
• Press the menu button and press the up- or down button until the display [C] shows .
Note: the first LEDA03C in the DMX-chain can not be set to slave. It can run an internal program
or can be connected to an external DMX controller (not incl.). The last LEDA03C in the chain
must have a terminator installed to avoid DMX signal corruption.
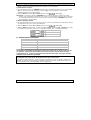
f) manual mode
• In manual mode, you can set the red, green and blue LED outputs individually, thus creating
your own output colour.
• Press the menu button and press the up- or down button until the display [C] shows .
• Press the enter button and use the up- or down button to select a LED. Press the up- or down
button to set the intensity (0 = off, 255 = full brightness):
red
green
blue
8. Technical specifications
power supply 230VAC ~ 50Hz
power consumption max. 36W
data output RJ45
dimensions 125 x 70 x 194mm
weight 1.65kg
ambient temperature max. 45°C
Use this device with original accessories only. Velleman nv cannot be held responsible
in the event of damage or injury resulted from (incorrect) use of this device. For more
info concerning this product, please visit our website www.hqpower.eu. The information
in this manual is subject to change without prior notice.
© COPYRIGHT NOTICE
This manual is copyrighted. The copyright to this manual is owned by Velleman nv. All
worldwide rights reserved. No part of this manual may be copied, reproduced, translated or
reduced to any electronic medium or otherwise without the prior written consent of the copyright
holder.

11/12/20
0
1. Inl
Aan all
e
Belang
r
Hebt u
v
Dank u
v
Werd h
e
Lees de
z
2. Ve
i
• Dit to
e
Een g
e
• De be
s
de ha
n
• De vo
e
nieuw
e
• Zorg
v
opper
v
• Kijk ni
aanva
l
3. Al
g
Raadple
e
• Leer e
e
perso
n
onpro
f
0
9
eiding
e
ingezetene
n
r
ijke milieu-i
n
Dit symbool
o
wordt wegge
w
(en eventuel
e
gespecialisee
of naar een l
o
v
ragen, cont
a
v
oor uw aanko
e
t toestel besc
h
z
e handleiding
i
ligheidsin
s
Wees voorzi
c
dodelijke ele
Trek de stek
k
en als u het
n
Houd dit toe
s
Let op: dit t
o
Er zijn geen
d
reserveonde
r
e
stel valt onde
r
e
schoolde tech
s
chikbare nets
p
n
dleiding.
e
dingskabel m
a
e
kabel plaats
e
v
oor een mini
m
v
lak.
et rechtstreek
s
l
van epilepsie
.
g
emene ric
h
e
g de Vellem
a
Gebrui
k
opspat
t
Besche
versto
p
Besche
e
rst de functie
n
en mogen dit
f
essioneel geb
r
GEBR
U
n
van de Eur
o
n
formatie be
t
o
p het toestel
o
w
orpen, dit to
e
e
batterijen) ni
rd bedrijf tere
c
o
kaal recyclag
e
a
cteer dan d
e
op! De LEDA
0
h
adigd tijdens
grondig voor
u
s
tructies
c
htig bij de ins
t
ktroshocks te
v
k
er uit het sto
p
n
iet gebruikt.
s
tel uit de buu
r
o
estel wordt z
e
d
oor de gebru
i
r
delen, contac
t
r
bescherming
s
nicus moet de
p
anning mag
n
a
g niet bescha
e
n.
m
umafstand va
s
in de lichtbr
o
.
h
tlijnen
a
n
®
service-
e
k
het toestel e
n
t
ende vloeisto
f
rm tegen stof
p
t geraken.
rm tegen sch
o
s van het toes
toestel niet g
e
r
uik.
LEDA
0
8
U
IKERSH
A
o
pese Unie
t
reffende dit
o
f de verpakki
n
e
stel schade k
a
et bij het gew
o
c
htkomen voo
r
e
punt brengen
e
plaatselijke
0
3C wordt gel
e
het transport,
u
het toestel i
n
t
allatie: raak
g
v
ermijden.
p
contact (trek
r
t van kindere
n
e
er warm tijde
i
ker vervangb
a
t
eer uw dealer
s
klasse I, wat
elektrische aa
n
iet hoger zijn
digd zijn of in
g
n 0,5 m tusse
n
o
n. De lichtbro
n
e
n kwaliteits
g
n
kel binnens
f
fen.
en extreme hi
t
o
kken en verm
i
tel kennen vo
o
e
bruiken. Mees
t
0
3C
A
NDLEI
D
product
n
g geeft aan d
a
n toebrengen
o
ne huishoude
r
recyclage. U
m
. Respecteer d
autoriteiten
e
verd met een
installeer het
d
n
gebruik nee
m
g
een kabels aa
niet aan de k
a
n
en onbevoeg
ns het gebrui
k
a
re onderdelen
.
wil zeggen da
t
nsluiting verz
o
dan de spanni
g
ekort worden
.
n
de lichtuitga
n
n
kan bij gevo
e
g
arantie acht
e
huis. Bescher
m
t
te. Zorg dat d
i
jd brute krach
o
r u het gaat g
t
al is beschadi
g
D
ING
at, als het na
z
aan het milie
u
lijke afval; he
t
m
oet dit toest
e
e plaatselijke
m
betreffende
d
controller en
d
d
an niet en ra
a
m
t.
n die onder st
r
a
bel!) voordat
u
den.
k
.
in dit toestel.
t
het toestel g
e
o
rgen.
ng in de speci
f
.
Laat uw deal
e
n
g van een la
m
e
lige mensen l
e
e
raan deze ha
n
m
tegen regen
e verluchtings
t tijdens de b
e
ebruiken. Ong
g
ing het gevol
©Vellem
a
z
ijn levenscycl
u
u
. Gooi dit toe
s
t
moet bij een
e
l naar uw ver
d
m
ilieuwetgevi
n
d
e verwijder
i
d
eze handleidi
n
a
dpleeg uw de
a
r
oom staan o
m
u
het toestel r
e
Voor onderho
u
e
aard moet zij
n
f
icaties achter
a
e
r zo nodig ee
n
m
p en het belic
e
iden tot een
n
dleiding.
, vochtigheid
e
openingen nie
t
e
diening.
eschoolde
g
van
a
n nv
u
s
s
tel
d
eler
n
g.
i
ng.
n
g.
a
ler.
m
e
inigt
u
d of
n
.
a
an
n
hte
e
n
t

LEDA03C
11/12/2009 ©Velleman nv
9
• Om veiligheidsredenen mag u geen wijzigingen aanbrengen. Schade door wijzigingen die de
gebruiker heeft aangebracht valt niet onder de garantie.
• Gebruik het toestel enkel waarvoor het gemaakt is. Andere toepassingen kunnen leiden tot
kortsluitingen, brandwonden, elektrische schokken, enz. Bij onoordeelkundig gebruik vervalt de
garantie.
• De garantie geldt niet voor schade door het negeren van bepaalde richtlijnen in deze
handleiding en uw dealer zal de verantwoordelijkheid afwijzen voor defecten of problemen die
hier rechtstreeks verband mee houden.
• Laat dit toestel installeren en onderhouden door een geschoolde technicus.
• Om beschadiging te vermijden, zet u het toestel best niet aan onmiddellijk nadat het werd
blootgesteld aan temperatuurschommelingen. Wacht tot het toestel op kamertemperatuur
gekomen is.
• Lichteffecten zijn niet ontworpen voor continue werking: regelmatige onderbrekingen doen ze
langer meegaan.
• Gebruik de oorspronkelijke verpakking wanneer u het toestel vervoert.
• Bewaar deze handleiding voor verdere raadpleging.
4. Eigenschappen
• automatische, muziek-, DMX- of master-slavesturing
• 18 presetkleuren + 6 ingebouwde programma’s met of zonder DMX-sturing
• muzieksturing via DMX-modus
• aansluitmogelijkheid tot 12 x LEDA03 (niet meegeleverd)
• enkel geschikt voor gebruik binnenshuis
5. Omschrijving
Raadpleeg de figuren op pagina 2 van deze handleiding.
A aan-uitschakelaar C display
B
menutoets D uitgangsaansluiting (RJ45)
entertoets E DMX-ingang
-toets F DMX-uitgang
-toets G voedingskabel
opstelling van de hardware 4 splitter
1 externe DMX-controller 5 ledspot
2 LEDA03C 6 DMX-kabel
3 linkkabel 7 eindweerstand
Opmerking: [1], [3], [4], [5], [6] en [7] zijn niet meegeleverd. [2], 1x meegeleverd.
[3] + [4] + [5] = LEDA03
6. Installatie
Raadpleeg de figuren op pagina 2 van deze handleiding.
• De LEDA03C is geschikt voor standalonegebruik of samen met meerdere LEDA03C controllers.
Elke LEDA03C heeft wel een eigen voeding nodig (stopcontact).
• Een enkele LEDA03C kan, via de RJ45-uitgang [D], tot 12 ledspots (LEDA03, niet
meegeleverd) voeding.
a) Het toestel monteren
• Laat een geschoolde technicus dit toestel installeren conform EN 60598-2-17 en andere
toepasselijke normen.
• Installeer dit toestel op een plaats waar niemand langs moet lopen, kan neerzitten of het toestel
kan aanraken.
• Verwijder alle brandbaar materiaal in een straal van 0,5 m rond het toestel.
• Een geschoolde elektricien moet het toestel aansluiten.
• Sluit een of meer (maximum 12) LEDA03’s aan op de uitgang. Raadpleeg de figuur op pagina 2
en de handleiding van de LEDA03 voor meer informatie.

LEDA03C
11/12/2009 ©Velleman nv
10
• Sluit het toestel via de stekker aan op het lichtnet. Sluit het niet aan op een dimmerpack.
• De installatie moet voor het eerste gebruik gekeurd worden door een expert.
b) DMX512-aansluiting
Raadpleeg de figuren op pagina 2 van deze handleiding.
• Indien van toepassing, sluit een XLR-kabel aan de vrouwelijke 3-pin XLR-uitgang van een
controller ([1], niet meegeleverd) en de andere kant van de mannelijke 3-pin XLR-ingang [E]
van de LEDA03C. U kunt verscheidene LEDA03C’s aan elkaar koppelen met behulp van een
seriële koppeling. Gebruik daarvoor een 2-aderige afgeschermde kabel met XLR ingang- en
uitgangsaansluitingen.
• Een DMX eindweerstand is aanbevolen als de DMX-kabel vrij lang is of wordt gebruikt in een
omgeving met veel elektrische ruis (bv. een discotheek). De eindweerstand voorkomt corruptie
van het digitale controlesignaal door elektrische ruis. De DMX eindweerstand is niets meer dan
een XLR-stekker met een weerstand van 120 Ω van pin 2 naar 3. Deze XLR-stekker wordt dan
aangesloten op de XLR-uitgang [F] van het laatste toestel in de reeks.
7. Gebruik
Raadpleeg de figuren op pagina 2 van deze handleiding.
• U kunt de LEDA03C op 3 manieren aansturen: automatische sturing (presetprogramma’s),
muzieksturing of DMX-sturing.
• Sluit alle onderdelen aan en steek de stekker van de voedingskabel [G] in het stopcontact.
• Schakel de LEDA03C in met de aan-uitschakelaar [A]. De controller start op in de
aanstuurmodus waarin hij werd uitgeschakeld.
• Stel de controller in met de insteltoetsen [B].
Opmerking: Houd de toetsen ingedrukt om de waarde sneller te wijzigen.
a) Menuoverzicht
b) Automatische aanstuurmodus
• In deze modus kunt u een van de 18 presetkleuren of een van de 3 ingebouwde programma’s
kiezen.
• Druk op Menu en op Up of Down tot de display [C] de aanduiding weergeeft.
• Druk op Enter en kies het programma met Up of Down:
...
vaste kleur: statisch rood naar statisch goudgeel
kleurverandering in stappen
crossfade met kleuren
stroboscoop

LEDA03C
11/12/2009 ©Velleman nv
11
• Om de snelheid onder , of te wijzigen, druk opnieuw op Enter en stel
de snelheid in met Up of Down:
30 s 20 s 10 s 7 s 5 s 4 s 3 s 2 s 1 s 0,5 s
c) Muzieksturing
• In deze modus verandert de kleur dankzij het omgevingsgeluid.
• Druk op Menu en op Up of Down to de display [C] de aanduiding weergeeft.
• Druk op Enter en stel de gevoeligheid in met Up of Down:
: heel gevoelig : weinig gevoelig
d) DMX-sturing
• In DMX-modus wordt het systeem via 6 kanalen aangestuurd.
• Alle DMX-gestuurde toestellen hebben een digitaal startadres nodig, zodat het juiste toestel
reageert op de signalen. Dit digitale startadres is het kanaalnummer van waarop het toestel
‘luistert’ naar het signaal van de DMX-controller. U kunt één enkel startadres gebruiken voor
een groep toestellen of u kunt per toestel een nieuw startadres ingeven.
• Wanneer u een enkel startadres instelt, zullen alle toestellen ‘luisteren’ naar hetzelfde kanaal.
Met andere woorden: wanneer u de instellingen voor 1 kanaal verandert, zullen alle toestellen er
tegelijk op reageren. Wanneer u verschillende adressen instelt, dan luistert elk toestel naar een
ander kanaal. Met andere woorden: wanneer u de instellingen van een kanaal verandert, zal
enkel het toestel op dat kanaal reageren.
• In het geval van de 6-kanaals LEDA03C, zult u het startadres van het eerste toestel op 001
moeten instellen, van het tweede toestel op 007 (1 + 6), van het derde op 013 (7 + 6), enz.
• Druk op Menu en op Up of Down to de display [C] de aanduiding weergeeft.
• Druk op Enter en stel het DMX-adres in met Up of Down:
CH1 0 – 150: kleurenmenging 151 – 230: kleurenmacro’s
en automatische
programma’s
231 – 255: muzieksturing
CH2 red: 0-100% kies 18 kleuren of 2
programma’s
-
CH3 green: 0-100% speed: traag naar snel -
CH4 blue: 0-100% - -
CH5 stroboscoop:
0-20: geen functie
21-255: traag naar snel
stroboscoop:
0-20: geen functie
21-255: traag naar snel
-
CH6 dimmen:
0: sterkte 100%
255: sterkte 0%
dimmen:
0: sterkte 100%
255: sterkte 0%
-
• De functie van kanaal 2 is als volgt indien de waarde van kanaal 1 tussen 151 en 230 ligt:
1 ~ 12 rood 92 ~103 oranje 182 ~ 195 chocoladebruin
13 ~ 25 groen 104 ~ 116 purper 195 ~ 207 lichtblauw
26 ~ 38 blauw 117 ~ 129 geel/groen 208 ~ 220 violet
39 ~ 51 geel 130 ~ 142 roze 221 ~ 233 goudgeel
52 ~ 64 magenta 143 ~ 155 hemelsblauw 234 ~ 246 verandering
65 ~77 cyaan 156 ~ 168 oranje/rood 247 ~ 255 crossfade
78 ~ 91 wit 169 ~ 181 lichtgroen

LEDA03C
11/12/2009 ©Velleman nv
12
• Het systeem is muziekgestuurd indien de waarde van kanaal 1 tussen 231 en 255 ligt. Stel de
gevoeligheid naar wens in.
e) Master-slavesturing
• In master-slavesturing zal de LEDA03C reageren naargelang het ontvangen signaal via de
DMX-ingang [E]. Dit signaal wordt vervolgens doorgestuurd naar de uitgang [F] zodat alle
aangesloten spots synchroon reageren.
• Druk op Menu en op Up of Down to de display [C] de aanduiding weergeeft.
Opmerking: De eerste LEDA03C in de DMX-reeks kan niet in slavemodus geplaatst worden. U
kunt een intern programma selecteren of hem aansluiten op een externe DMX-controller (niet
meegeleverd). Voorzie de laatste LEDA03C in de reeks van een eindweerstand.
f) Handmatige aansturing
• U kunt de rode, groene en blauwe led ook handmatig instellen om zo een eigen kleur te vormen.
• Druk op Menu en op Up of Down to de display [C] de aanduiding weergeeft.
• Druk op Enter en kies een kleur met Up of Down. Stel de lichtsterkte (0 = uit, 255 = volle
lichtsterkte) in met Up of Down:
rood
groen
blauw
8. Technische specificaties
voeding 230 VAC ~ 50 Hz
verbruik max. 36 W
type stekker RJ45
afmetingen 125 x 70 x 194 mm
gewicht 1,65 kg
omgevingstemperatuur max. 45°C
Gebruik dit toestel enkel met originele accessoires. Velleman nv is niet aansprakelijk
voor schade of kwetsuren bij (verkeerd) gebruik van dit toestel. Voor meer informatie
over dit product, zie www.hqpower.eu. De informatie in deze handleiding kan te allen
tijde worden gewijzigd zonder voorafgaande kennisgeving.
© AUTEURSRECHT
Velleman nv heeft het auteursrecht voor deze handleiding.
Alle wereldwijde rechten voorbehouden. Het is niet toegestaan om deze handleiding of gedeelten
ervan over te nemen, te kopiëren, te vertalen, te bewerken en op te slaan op een elektronisch
medium zonder voorafgaande schriftelijke toestemming van de rechthebbende.

11/12/20
0
1. In
t
Aux ré
s
Des inf
o
En cas
d
Nous vo
l’appare
i
Lire la p
2. Co
n
• Cet a
p
terre.
• La ten
s
cette
n
• Le câ
b
de ren
• Respe
c
• Ne pa
s
d’épil
e
3. Di
r
Se référ
e
• Se fa
m
perso
n
non p
r
• Toute
des m
o
0
9
t
roduction
s
idents de l'U
o
rmations en
Ce symbole
s
vie peut poll
u
des piles éve
déchèterie tr
a
fournisseur o
locale relativ
e
d
e questions
,
us remercions
i
l a été endom
résente notice
n
signes de
Ê
tre prude
n
électrocho
c
Débranche
débranche
r
Garder ho
r
Attention
Il n’y a au
c
éventuelle
s
p
pareil ressort
à
Un technicien
q
s
ion réseau n
e
n
otice.
b
le d’alimentati
ouveler le câb
l
c
ter une dista
n
s
regarder dire
e
psie chez cert
a
r
ectives gé
n
e
r à la garant
Utilis
e
l’hu
m
Proté
les f
e
Proté
m
iliariser avec
l
n
nes non quali
f
r
ofessionnel.
modification e
s
o
difications pa
N
O
nion europé
e
vironnement
s
ur l'appareil o
u
u
er l'environne
ntuelles) par
m
a
itera l’appare
u à un service
e
à la protecti
o
,
contacter le
de votre acha
t
magé pendant
attentivemen
t
sécurité
n
t lors de l’ins
t
c
s mortels.
r l’appareil s’il
r
l'appareil ; n
o
r
s de la portée
: le boîtier du
c
une pièce mai
s
chez votre r
e
à
la classe de
p
q
ualifié doit ét
e
peut pas dép
a
on ne peut pa
s
l
e d’alimentati
o
n
ce minimum
d
ctement la so
u
a
ins gens.
n
érales
ie de service
e
r cet appareil
m
idité et des p
r
ger contre la
p
e
ntes de ventil
a
ger contre les
l
e fonctionne
m
f
iées d’opérer
c
s
t interdite po
u
r le client ne t
o
LEDA
0
13
O
TICE D
e
nne
ales importa
n
u
l'emballage i
ment. Ne pas
j
m
i les déchets
m
il en question.
de recyclage l
o
n de l’environ
s autorités l
o
t
! Le LEDA0
3
le transport,
n
t
avant la mis
e
t
allation : touc
n’est pas utili
s
o
n pas le câbl
e
de personnes
spot chauffe
p
ntenable par l
’
e
vendeur.
p
rotection I, c
e
ablir la conne
x
a
sser la tensio
s
être replissé
o
n si nécessai
r
d
e 0,5 m entre
u
rce lumineus
e
et de qualit
é
uniquement
r
ojections d’ea
u
p
oussière. Prot
a
tion ne soien
t
chocs et le tr
a
m
ent de l’appar
e
c
et appareil. L
a
u
r des raisons
o
mbent pas so
0
3C
’EMPLO
I
n
tes concern
a
ndique que l’é
j
eter un appar
m
unicipaux no
n
Renvoyer les
é
ocal. Il convie
n
nement.
o
cales pour é
l
3
C est livré av
e
n
e pas l’install
e
e
en service de
her un câble s
o
s
é ou pour le
n
e
.
non qualifiées
p
endant l’usag
e
’
utilisateur. Co
e
qui implique
x
ion électrique
.
n mentionnée
ou endomma
g
r
e.
le spot et la s
e
comme ceci
p
é
Velleman
®
à
à l'intérieur.
u
.
éger contre la
t
pas bloquées
.
a
iter avec circo
e
il avant de l’
u
a
plupart des
d
de sécurité. L
e
us la garantie.
I
a
nt ce produ
i
limination d’u
n
eil électrique
o
n
sujets au tri
é
quipements
u
n
t de respecte
l
imination.
e
c un contrôle
u
e
r et consulter
l’appareil.
o
us tension p
e
n
ettoyer. Tirer
et de jeunes
e
e
.
mmander des
que l’appareil
.
dans les spéci
f
g
é. Demander
à
urface illumin
é
p
eut entraîner
la fin de cett
e
Protéger de l
a
chaleur extrê
m
.
nspection pen
d
u
tiliser. Ne pas
d
égâts sont ca
u
e
s dommages
o
©Vellem
a
i
t
n
appareil en fi
o
u électroniqu
e
s
électif ; une
u
sagés à votre
r la réglement
a
u
r et cette noti
c
votre revend
e
e
ut causer des
la fiche pour
e
nfants.
pièces de rec
h
doit être mis
à
f
ications à la fi
à
votre revend
é
e.
des crises
e
notice.
a
pluie, de
m
e. Veiller à c
e
d
ant l’opératio
n
permettre pa
s
u
sés par un us
o
ccasionnés p
a
a
n nv
n de
e
(et
a
tion
c
e. Si
e
ur.
h
ange
à
la
n de
eur
e
que
n
.
s
aux
age
a
r

LEDA03C
11/12/2009 ©Velleman nv
14
• N’utiliser votre LEDA03C qu’à sa fonction prévue. Tout autre usage peut causer des courts-
circuits, des brûlures, des électrochocs, etc. Un usage impropre annule d'office la garantie.
• La garantie ne s’applique pas aux dommages survenus en négligeant certaines directives de
cette notice et votre revendeur déclinera toute responsabilité pour les problèmes et les défauts
qui en résultent.
• Confier l’installation et l’entretien à un personnel qualifié.
• Ne pas brancher l’appareil après exposition à des variations de température. Afin d’éviter des
dommages, attendre jusqu’à ce que l’appareil ait atteint la température ambiante avant de l’utiliser.
• Un effet lumineux n’est pas conçu pour une opération continue. Des pauses régulières
prolongeront sa vie.
• Transporter l’appareil dans son emballage originel.
• Garder cette notice pour toute référence ultérieure.
4. Caractéristiques
• pilotages automatique, par le son, DMX et maître/esclave
• 18 couleurs préprogrammées + 6 programmes intégrés avec ou sans pilotage DMX
• pilotage par le son via DMX
• possibilité de connexion jusqu'à 12 x LEDA03 (non incl.)
• convient uniquement pour usage à l'intérieur
5. Description
Se référer aux illustrations à la page 2 de cette notice.
A interrupteur marche/arrêt C afficheur
B
touche MENU D sortie RJ45
touche ENTER E entrée DMX
touche F sortie DMX
touche G cordon d’alimentation
Hardware setup 4 répartiteur
1 contrôleur DMX externe 5 spot LED
2 LEDA03C 6 câble DMX
3 câble d’interconnexion 7 résistance de terminaison
Remarque : [1], [3], [4], [5], [6] et [7] ne sont pas inclus. [2], 1x inclus.
[3] + [4] + [5] = LEDA03
6. Installation
Se référer aux illustrations à la page 2 de cette notice.
• Le contrôleur LEDA03C convient pour un usage autonome ou en combinaison avec plusieurs
LEDA03C. Chaque nécessite cependant sa propre alimentation (depuis un une prise de
courant).
• Un seul LEDA03C suffit pour le pilotage de 12 spots de type LEDA03 (non inclus) via la sortie
RJ45 [D].
a) Montage de l’appareil
• Un technicien qualifié doit installer l’appareil en respectant EN 60598-2-17 et toute autre norme
applicable.
• Installer l’appareil à un endroit où personne ne peut passer ou s’asseoir et où personne ne peut
le toucher.
• Enlever tout matériau inflammable dans un rayon de 0,5 m autour de l’appareil.
• Un électricien qualifié doit établir la connexion électrique.
• Connecter un ou plusieurs spots (max. 12) à la sortie. Se référer à l’illustration en page 2 et à la
notice du LEDA03 pour plus d’informations.
• Brancher l’appareil sur le réseau électrique par la fiche d’alimentation. Ne pas le brancher sur un
bloc de puissance.

LEDA03C
11/12/2009 ©Velleman nv
15
• Un expert doit approuver l’installation avant qu’elle puisse être prise en service.
b) Connexion DMX512
• Si nécessaire, connecter un câble à fiche XLR à la sortie XLR femelle à 3 broches de votre
contrôleur ([1], non inclus) et l’autre fiche XLR mâle à 3 broches à l’entrée [E] du LEDA03C. Il
est possible de relier plusieurs LEDA03C à partir d’une connexion sérielle. Utiliser un câble de
connexion blindé à 2 conducteurs avec des connecteurs d’entrée et de sortie XLR.
• Une résistance de terminaison DMX est à recommander si le câble DMX doit couvrir une grande
distance ou s’il est utilisé dans un environnement avec beaucoup de bruit électrique (p.ex. une
discothèque). La résistance de terminaison prévient la corruption du signal de contrôle
numérique par le bruit électrique. La résistance de terminaison DMX n’est rien d’autre qu’une
fiche XLR avec une résistance de 120 Ω de broche 2 vers broche 3. Cette fiche XLR est
connectée à la sortie XLR [F] du dernier appareil de la série.
7. Emploi
Se référer aux illustrations en page 2.
• Le LEDA03C peut être piloté de 3 façons : mode automatique (programmes intégrés), mode à
pilotage par le son ou mode à pilotage DMX.
• Connecter le système et insérer la fiche d’alimentation [G] dans une prise de courant.
• Allumer le LEDA03C avec l’interrupteur marche/arrêt [A]. Le système démarre dans le mode
dans lequel il a été éteint.
• Configurer le contrôleur à l’aide des touches [B].
Remarque : Maintenir enfoncé une touche pour modifier rapidement les valeurs.
a) Aperçu du menu
b) Mode automatique
• Ce mode permet de sélectionner une des 18 couleurs intégrées ou un des 3 programmes
intégrés.
• Enfoncer Menu et ensuite Up ou Down jusqu’à ce que s’affiche [C].
• Enfoncer Enter et sélectionner la couleur ou le programme avec Up ou Down :
...
couleurs fixes : de rouge à jaune doré statiques
transition de couleurs en étapes
fondu de couleurs
stroboscope

LEDA03C
11/12/2009 ©Velleman nv
16
• En mode , ou , renfoncer Enter et régler la vitesse de transition de
couleurs avec Up ou Down :
30 s 20 s 10 s 7 s 5 s 4 s 3 s 2 s 1 s 0,5 s
c) Mode à pilotage par le son
• Ce mode permet de changer la couleur par un son ambiant.
• Enfoncer Menu et ensuite Up ou Down jusqu’à ce que s’affiche [C].
• Enfoncer Enter et régler la sensibilité avec Up ou Down :
: haute sensibilité : faible sensibilité
d) Mode à pilotage DMX
• En mode DMX, le système est piloté depuis 6 canaux.
• Tous les appareils pilotés par un signal DMX demandent une adresse de départ DMX pour
assurer que les appareils corrects réagissent sur les signaux de contrôle. Cette adresse de
départ numérique indique le numéro de canal sur lequel l’appareil écoute le contrôleur DMX.
Vous avez le choix entre une seule adresse de départ pour toute une série d’appareils ou une
adresse de départ par appareil.
• Dans le cas d’une seule adresse, tous les appareils « écouteront » les mêmes signaux, sur un
seul canal. Tous les appareils seront donc influencés lorsque vous changez les réglages d’un seul
canal. Avec des adresses de départ individuelles, chaque appareil « écoutera » son propre canal.
Par conséquent, un ajustement des réglages d’un canal n’influence que l'appareil sur ce canal.
• Pour le LEDA03C à 6 canaux, l’adresse de départ du premier appareil est 001, du deuxième 007
(1 + 6), du troisième 013 (7 + 6), etc.
• Enfoncer Menu et ensuite Up ou Down jusqu’à ce que s’affiche [C].
• Enfoncer Enter et configurer l’adresse DMX avec Up ou Down :
CH1 0 – 150 : mixage de couleurs 151 – 230 : macros couleurs
et programmes automatique
231 – 255 : pilotage par le
son
CH2 rouge : 0-100% sélection de 18 couleurs ou
de 2 programmes
-
CH3 vert : 0-100% vitesse : lent à rapide -
CH4 bleu : 0-100% - -
CH5 stroboscope :
0-20 : pas de fonction
21-255 : lent à rapide
stroboscope :
0-20 : pas de fonction
21-255 : lent à rapide
-
CH6 variation :
0 : intensité 100%
255 : intensité 0%
variation :
0 : intensité 100%
255 : intensité 0%
-
• Lorsque la valeur du canal 1 est entre 151 et 230, la fonction du canal 2 est la suivante :
1 ~ 12 rouge 92 ~103 orange 182 ~ 195 chocolat
13 ~ 25 vert 104 ~ 116 pourpre 195 ~ 207 bleu clair
26 ~ 38 bleu 117 ~ 129 jaune/vert 208 ~ 220 violet
39 ~ 51 jaune 130 ~ 142 rose 221 ~ 233 jaune doré
52 ~ 64 magenta 143 ~ 155 bleu ciel 234 ~ 246 transition
65 ~77 cyan 156 ~ 168 orange/rouge 247 ~ 255 fondu
78 ~ 91 blanc 169 ~ 181 vert pâle

LEDA03C
11/12/2009 ©Velleman nv
17
• Lorsque la valeur du canal 1 est entre 231 et 255, le système est en mode à pilotage par le son.
Régler le niveau de sensibilité selon l’effet souhaité et le bruit ambiant.
e) Mode maître/esclave
• En mode maître/esclave, le LEDA03C réagira selon le signal de contrôle reçu sur l’entrée DMX
[E]. Ce signal sera ensuite redirigé vers la sortie [F]. De cette manière, tous les spots
connectés réagiront synchroniquement.
• Enfoncer Menu et ensuite Up ou Down jusqu’à ce que s’affiche [C].
Remarque : Le premier contrôleur LEDA03C dans la série ne peut être configuré en mode
esclave. Il est conseillé de sélectionner pour celui-ci un programme interne ou de le connecter
à un contrôleur DMX externe (non inclus). Munir le dernier contrôleur LEDA03C dans la série
d’une résistance de terminaison.
f) Mode à pilotage manuel
• En mode à pilotage manuel, les LED rouge, bleue et verte sont séparément configurable. Ainsi, il
est possible de créer une couleur personnalisée.
• Enfoncer Menu et ensuite Up ou Down jusqu’à ce que s’affiche [C].
• Enfoncer Enter et sélectionner une LED avec Up ou Down. Renfoncer Up ou Down pour régler
l’intensité lumineuse de la couleur (0 = intensité minimale, 255 = intensité maximale):
rouge
vert
bleu
8. Spécifications techniques
alimentation 230 VCA ~ 50 Hz
consommation max. 36 W
type de fiche RJ45
dimensions 125 x 70 x 194 mm
poids 1,65 kg
température ambiante max. 45°C
N’employer cet appareil qu’avec des accessoires d’origine. SA Velleman ne sera
aucunement responsable de dommages ou lésions survenus à un usage (incorrect) de
cet appareil. Pour plus d’information concernant cet article, visitez notre site web
www.velleman.eu. Toutes les informations présentées dans cette notice peuvent être
modifiées sans notification préalable.
© DROITS D’AUTEUR
SA Velleman est l’ayant droit des droits d’auteur pour cette notice.
Tous droits mondiaux réservés. Toute reproduction, traduction, copie ou diffusion, intégrale ou
partielle, du contenu de cette notice par quelque procédé ou sur tout support électronique que se
soit est interdite sans l’accord préalable écrit de l’ayant droit.

11/12/20
0
1. In
t
A los ci
u
Import
a
Si tien
e
¡Gracias
aparato
distribui
d
2. In
s
• Este a
p
puest
o
• Asegú
r
especi
f
• No apl
superf
• Respe
t
• No mi
r
3. No
Véase la
• Famili
a
apara
t
• Por ra
z
daños
0
9
t
roducción
u
dadanos de
a
ntes inform
a
Este símbolo
podrían dañ
a
basura dom
é
aparato a su
relación con
e
dudas, cont
a
por haber co
m
ha sufrido alg
ú
d
o
r
. Lea atent
a
s
truccione
s
Cuidado dur
a
cable conect
Desconecte
s
antes de lim
propio cable
Mantenga el
¡Ojo!: la caj
El usuario n
o
distribuidor
s
p
arato perten
e
o
a tierra. La c
o
r
ese de que la
f
icaciones.
aste el cable
d
icie afilada. Si
t
e una distanci
r
e directament
rmas gene
r
Garantía de
Utilice
e
a ning
ú
No exp
extrem
No agi
t
a
rícese con el
f
t
o. La mayoría
z
ones de segu
r
causados por
MA
N
la Unión Eur
o
a
ciones sobr
e
en este apara
a
r el medio am
é
stica; debe ir
a
distribuidor o
el medio ambi
e
a
cte con las
a
m
prado el LED
A
ú
n daño en el
t
a
mente las ins
s
de seguri
d
a
nte la instala
c
ado a la red el
s
iempre el ap
a
piarlo. Tire sie
.
aparato lejos
a del proyecto
o
habrá de efe
c
s
i necesita pie
z
e
ce a la clase
d
o
nexión eléctri
tensión de re
d
d
e alimentació
n
es necesario,
a de mín. 0.5
m
e a la fuente
d
r
ales
servicio y ca
e
l aparato sól
o
ú
n tipo de salp
i
onga este equ
as. Asegúrese
t
e el aparato.
E
f
uncionamient
o
de los daños
s
r
idad, las mod
i
modificacione
s
LEDA
0
18
N
UAL DE
L
o
pea
e
el medio a
m
to o el embala
biente. No tir
e
a
una empres
a
a la unidad d
e
e
nte.
a
utoridades l
o
A
03C! Incluy
e
t
ransporte no
l
trucciones del
d
ad
c
ión: puede su
éctrica.
a
rato si no va
a
mpre del ench
del alcance de
r se calienta d
u
c
tuar el mante
z
as de recamb
d
e protección I
ca debe llevar
s
d
no sea mayo
r
n
y protéjalo c
o
pida a su distr
m
entre el foc
o
d
e luz. Esto pu
e
lidad Vellem
a
o
en interior
e
i
cadura o gote
o
ipo a polvo. N
o
de que los ori
f
E
vite usar exc
e
o
del aparato.
s
on causados
p
i
ficaciones no
a
s
no autorizad
a
0
3C
L
USUA
R
m
biente conc
e
je indica que,
e
este aparato
a
especializada
e
reciclaje local
o
cales para r
e
e
un controlad
o
l
o instale y pó
n
manual antes
frir una peligr
o
a
usarlo duran
t
ufe para desc
o
personas no
c
u
rante su ope
r
nimiento de ni
io.
. Por lo tanto,
s
e a cabo por
u
r
que la tensió
o
ntra posibles
ibuidor reempl
o
y el área ilu
m
e
de causar un
a
a
n
®
al final de
e
s. No expong
a
o
.
o
exponga est
e
f
icios de ventil
e
siva fuerza du
Sólo personas
p
or un uso ina
d
a
utorizadas de
a
s, no están c
u
R
IO
e
rniente a es
t
si tira las mue
(ni las pilas, si
en reciclaje.
D
. Respete las l
e
siduos.
o
r y este manu
n
gase en cont
a
de usa
r
el ap
a
o
sa descarga
e
t
e un largo pe
r
o
nectar el cabl
e
c
apacitadas y
n
r
ación.
nguna pieza.
C
es esencial qu
u
n técnico cua
n indicada en l
daños causad
o
azar el cable
d
m
inada.
a
taque epilépti
c
este manual
d
a
este equipo
a
e
equipo a tem
ación no esté
n
rante el mane
j
cualificadas p
u
d
ecuado.
l aparato está
n
u
biertos por la
©Vellem
a
t
e producto
stras inservibl
e
las hubiera)
e
D
evuelva este
e
yes locales e
n
al del usuario.
a
cto con su
a
rato.
e
léctrica al toc
a
r
iodo de tiemp
o
e
de red, nunc
a
n
iños.
C
ontacte con s
e el aparato e
s
lificado.
as
o
s por algún ti
p
d
e alimentació
n
c
o.
d
el usuario.
a
lluvia, hume
d
peraturas
n
bloqueados.
j
o y la instalac
u
eden maneja
r
n
prohibidas.
L
garantía.
a
n nv
e
s,
e
n la
n
Si el
a
r un
o
o
a
del
u
s
té
p
o de
n
.
d
ad ni
ión.
r
este
L
os

LEDA03C
11/12/2009 ©Velleman nv
19
• Utilice sólo el LEDA03C para aplicaciones descritas en este manual a fin de evitar p.ej.
cortocircuitos, quemaduras, descargas eléctricas, etc. Un uso desautorizado puede causar daños
y anula la garantía completamente.
• Los daños causados por descuido de las instrucciones de seguridad de este manual invalidarán
su garantía y su distribuidor no será responsable de ningún daño u otros problemas resultantes.
• La instalación y el mantenimiento deben ser realizados por personal especializado.
• No conecte el aparato si ha estado expuesto a grandes cambios de temperatura. Espere hasta
que el aparato llegue a la temperatura ambiente.
• No ha sido diseñado para un uso ininterrumpido. Introduzca frecuentemente una pausa para
prolongar la vida del aparato.
• Transporte el aparato en su embalaje original.
• Guarde este manual del usuario para cuando necesite consultarlo.
4. Características
• control automático, por el sonido, DMX y maestro/esclavo
• 18 colores preprogramados + 6 programas incorporados con o sin control DMX
• control por el sonido por DMX
• es posible conectar hasta 12 x LEDA03 (no incl..)
• sólo apto para el uso en interiores
5. Resumen
Véase las figuras en la página 2 de este manual del usuario.
A interruptor ON/OFF C pantalla
B
tecla MENU D salida RJ45
tecla ENTER E entrada DMX
tecla F salida DMX
tecla G cable de alimentación
Hardware setup 4 separador
1 controlador DMX externo 5 foco LED
2 LEDA03C 6 cable DMX
3 cable de interconexión 7 terminación
Observación: [1], [3], [4], [5], [6] et [7] no están incluidos. [2], 1x incl.
[3] + [4] + [5] = LEDA03
6. Instalación
Véase las figuras en la página 2 de este manual del usuario.
• El controlador LEDA03C es apto para un uso autónomo o junto con varios LEDA03C. Sin
embargo, cada LEDA03C necesita su propia alimentación (enchufe).
• Un solo LEDA03C basta para controlar 12 focos del tipo LEDA03 (no incl.) por la salida RJ45
[D].
a) Montaje del aparato
• Respete la directiva EN 60598-2-17 y toda norma nacional antes de instalar el aparato. La
instalación debe ser realizada por un técnico especializado.
• Instale el aparato fuera del alcance de personas no autorizadas y en un lugar con poca gente.
• Quite todo material inflamable en un radio de 0.5m alrededor del aparato.
• Pregunte a un electricista cómo hacer la conexión eléctrica.
• Conecte uno o varios focos (máx. 12) a la salida. Para más informaciones, véase la figura en la
página 2 y este manual del usuario de la LEDA03.
• Conecte el aparato a la red eléctrica con la conexión de alimentación. Normalmente, no se
conectan efectos luminosos a dimmer packs (reguladores).
• Un experto debe probar la instalación antes de la puesta en marcha.

LEDA03C
11/12/2009 ©Velleman nv
20
b) Conexión DMX512
• Si fuera necesario, conecte un cable con conector XLR ([1], no incl.) a la salida XLR hembra
de 3 polos del controlador y el otro conector XLR macho de 3 polos a la entrada [3] del
LEDA03C. Es posible conectar varios LEDA03C en serie. Use un cable blindado de doble hilo
conductor con conectores XLR de entrada y de salida LEDA03C.
• Se recomienda una terminación si el cable DMX debe cubrir una gran distancia o si se usa en
un medio ambiente con mucho ruido eléctrico (ej. una discoteca). La terminación impide que
el ruido eléctrico corrompa la señal de control numérico. La terminación DMX no es más que
un conector XLR con una resistencia de 120Ω de polo 2 a polo 3. Este conector XLR está
conectado a la salida XLR [F] del último aparato de la serie.
7. Uso
Véase fig. de la página 2.
• Es posible controlar el LEDA03C de 3 maneras: modo automático (programas incorporados),
modo control por el sonido o modo control por DMX.
• Conecte el sistema e introduzca el conector de alimentación [G] a un enchufe.
• Active el LEDA03C con el interruptor ON/OFF [A]. El sistema se activa en el último modo
utilizado.
• Configure el controlador con las teclas [B].
Observación: Mantenga pulsada una tecla para modificar los valores de manera rápida.
a) Resumen del menú
b) Modo automático
• Este modo permite seleccionar uno de los 18 colores incorporados o uno de los 3 programas
incorporados.
• Pulse Menu y luego Up o Down hasta que se visualice [C].
• Pulse Enter y seleccione el color o el programa con Up o Down :
...
colores fijos: de rojo estático a dorado estático
cambio de color en pasos
crossfade de colores
estroboscopio
• En el modo , o , vuelva a pulsar Enter y ajuste la velocidad del cambio
de color con Up o Down :
La page est en cours de chargement...
La page est en cours de chargement...
La page est en cours de chargement...
La page est en cours de chargement...
La page est en cours de chargement...
La page est en cours de chargement...
La page est en cours de chargement...
La page est en cours de chargement...
La page est en cours de chargement...
-
 1
1
-
 2
2
-
 3
3
-
 4
4
-
 5
5
-
 6
6
-
 7
7
-
 8
8
-
 9
9
-
 10
10
-
 11
11
-
 12
12
-
 13
13
-
 14
14
-
 15
15
-
 16
16
-
 17
17
-
 18
18
-
 19
19
-
 20
20
-
 21
21
-
 22
22
-
 23
23
-
 24
24
-
 25
25
-
 26
26
-
 27
27
-
 28
28
-
 29
29


HQ Power HQ-POWER LEDA03C DMX Controller Output LED Power and Control Unit Manuel utilisateur
- Catégorie
- Stroboscopes
- Taper
- Manuel utilisateur
- Ce manuel convient également à
dans d''autres langues
- español: HQ Power HQ-POWER LEDA03C DMX Controller Output LED Power and Control Unit Manual de usuario
- Deutsch: HQ Power HQ-POWER LEDA03C DMX Controller Output LED Power and Control Unit Benutzerhandbuch
- Nederlands: HQ Power HQ-POWER LEDA03C DMX Controller Output LED Power and Control Unit Handleiding
- português: HQ Power HQ-POWER LEDA03C DMX Controller Output LED Power and Control Unit Manual do usuário