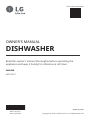
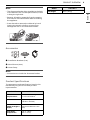
LG LDFC2423W Le manuel du propriétaire
- Catégorie
- Lave-vaisselle
- Taper
- Le manuel du propriétaire
Ce manuel convient également à

OWNER'S MANUAL
DISHWASHER
Read this owner's manual thoroughly before operating the
appliance and keep it handy for reference at all times.
ENGLISH
LDFC242**
MFL71917419
Rev.02_052423
www.lg.com
Copyright © 2023 LG Electronics Inc. All Rights Reserved.
Scan to see the online manual.

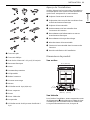
TABLE OF CONTENTS
2
3 IMPORTANT SAFETY
INSTRUCTIONS
3 READ ALL INSTRUCTIONS BEFORE USE
3 WARNING STATEMENTS
6 CAUTION STATEMENTS
8 PRODUCT OVERVIEW
8 Product Features
10 INSTALLATION
10 Before Installing
12 Preparing Cabinet Opening
12 Preparing Water and Electrical Connections
13 Preparing Dishwasher
15 Sliding Dishwasher into Cabinet Opening
16 Connecting Water Supply Line and Power
18 Connecting the Drain Hose
20 Leveling Dishwasher
21 Securing Dishwasher in Cabinet Opening
22 Final Installation Check
24 OPERATION
24 Before Using
26 Control Panel
27 Wash Cycles
27 Options and Extra Functions
29 Loading the Dishwasher
29 Loading the Silverware Basket
30 Loading the Lower Rack
32 Loading the Upper Rack
33 Adding Cleaning Products
36 SMART FUNCTIONS
36 LG ThinQ Application
36 Smart DiagnosisTM Function
37 MAINTENANCE
37 Cleaning and Care
41 TROUBLESHOOTING
41 Before Calling for Service
48 LIMITED WARRANTY
48 CANADA

3IMPORTANT SAFETY INSTRUCTIONS
ENGLISH
IMPORTANT SAFETY INSTRUCTIONS
READ ALL INSTRUCTIONS BEFORE USE
Safety Messages
Your safety and the safety of others are very important.
We have provided many important safety messages in this manual and on your appliance. Always read and
follow all safety messages.
All safety messages will tell you what the potential hazard is, tell you how to reduce the chance of injury,
and tell you what may happen if the instructions are not followed.
WARNING STATEMENTS
WARNING
• To reduce the risk of explosion, fire, death, electric shock, scalding or injury to persons when using this
product, follow basic precautions, including the following:
Installation
• Connect to a properly rated, protected, and sized power circuit to avoid electrical overload.
• To reduce the risk of severe injury or death, follow all installation instructions.
• The appliance must be installed and electrically grounded by qualified service personnel in accordance
with local codes.
• Disconnect the power supply line, house fuse or circuit breaker before installing or servicing the
appliance.
• When moving or installing the product in a different location, call qualified service personnel for
installation and service.
• Keep packing materials out of the reach of children. Packaging material can be dangerous for children.
There is a risk of suffocation.
• Moving or installation of the appliance requires two or more people.
• This appliance is not designed for maritime use or for mobile installations such as in RVs, trailers, or
aircraft.
• Store and install the appliance where it will not be exposed to temperatures below freezing or exposed
to outdoor weather conditions.
• This appliance must be positioned near to an electrical power supply.
• Do not, under any circumstances, cut or remove the ground from the power supply line.
This is the safety alert symbol.
This symbol alerts you to potential hazards that can kill or injure you and others. All safety messages
will follow the safety alert symbol and either the word WARNING or CAUTION.
These words mean:
WARNING
You may be killed or seriously injured if you do not follow instructions.
CAUTION
You may be injured or cause damage to the product if you do not follow instructions.

4IMPORTANT SAFETY INSTRUCTIONS
• When installing or moving the appliance, be careful not to pinch, crush, or damage the power supply
line.
• Do not install the appliance in humid spaces.
• Destroy the carton, plastic bag, and other packing materials after the appliance is unpacked. Children
might use them for play. Cartons covered with rugs, bedspreads, or plastic sheets can become airtight
chambers.
• Never attempt to operate this appliance if it is damaged, malfunctioning, partially disassembled, or has
missing or broken parts, including a damaged power supply line.
• Adhere to all industry recommended safety procedures including the use of long-sleeved gloves and
safety glasses.
• The installer must ensure that the dishwasher is completely enclosed at the time of installation.
• Use new hoses when connecting the appliance to the water supply. Do not reuse old hoses.
• After installing, check the hose connection for leaks.
• Do not damage or place heavy items on the power supply line of the appliance.
Operation
• Repair or immediately replace all power supply lines that have become frayed or otherwise damaged. Do
not use a power supply line that shows cracks or abrasion damage along its length or at either end.
• If you detect a strange sound, a chemical or burning smell, or smoke coming from the appliance, unplug
it immediately, and contact an LG Electronics customer information center.
• Never unplug the appliance by pulling on the power supply line.
• Do not use an extension cable or adapter with this appliance.
• Do not grasp the power supply line or touch the appliance controls with wet hands.
• Do not modify or extend the power cable.
• If the product has been submerged, contact an LG Electronics customer information center for
instructions before resuming use.
• Do not store or use gasoline or other flammable vapors and liquids in the vicinity of this or any other
appliance.
• Keep the area underneath and around your appliances free of combustible materials (lint, paper, rags,
etc.), gasoline, chemicals and other flammable vapors and liquids.
• This appliance is not intended for use by persons (including children) with reduced physical, sensory or
mental capabilities, or lack of experience and knowledge, unless they have been given supervision or
instruction concerning the use of the appliance by a person responsible for their safety.
• If the electrical supply line is damaged, it must only be replaced by the manufacturer or its service agent
or a similar qualified person in order to avoid a hazard.
• Do not abuse, sit on, or stand on the door of the appliance.
• Read all instructions before using the appliance and save these instructions.
• Use this appliance only for its intended purpose.
• Do not allow children to play on, in or with the appliance. Close supervision of children is necessary when
the appliance is used near children.
• Do not tamper with controls.
• In the event of a gas leak (propane gas, LP gas, etc.) do not operate this or any other appliance. Open a
window or door to ventilate the area immediately.
• Under certain conditions, hydrogen gas may be produced in a hot-water system that has not been used
for two weeks or more. HYDROGEN GAS IS EXPLOSIVE. If the hot-water system has not been used for
such a period, before using the appliance turn on all hot water faucets and let the water flow from each
for several minutes. This will release any accumulated hydrogen gas. As the gas is flammable, do not
smoke or use an open flame during this time.

5IMPORTANT SAFETY INSTRUCTIONS
ENGLISH
• Fix the drain hose securely in place.
• Use only detergents or wetting agents recommended for use in a dishwasher and keep them out of the
reach of children.
• Do not let children eat detergent or dishwasher rinse agent.
• When loading items to be washed:
- Locate sharp items so that they are not likely to damage the door seal.
- Load sharp knives with the handles up to reduce the risk of cuts or other injuries.
• Do not wash plastic items unless they are marked "dishwasher safe" or the equivalent. For plastic items
not so marked, check the manufacturer’s recommendations.
• Do not touch the HEATING ELEMENT during or immediately after use.
• Do not operate your dishwasher unless all ENCLOSURE panels are properly in place.
• Do not abuse, sit on, or stand on the door or dish rack of the dishwasher.
• Do not install or store the dishwasher where it will be exposed to weather conditions.
• After cleaning the dishes, turn off the water supply. Before cleaning, turn the water supply back on and
check the connections.
• Do not open the appliance door while it is operating. For safety reasons, the drain pump operates if the
door is opened, resulting in a longer cycle time.
• Be careful not to catch your hand when closing the door of the product.
• Do not plug the dishwasher into a damaged outlet.
• Do not install or keep the dishwasher near electrical components or exposed flames.
• Do not wash dishes exposed to gasoline, solvents or other flammable materials.
• When cleaning, do not spray water on the product directly.
• Do not press buttons with a sharp object such as an awl or pin.
• Do not use solvent-based detergent.
• Do not come into contact with the steam outlet.
• Small parts, such as rack clips and filter retaining posts can be a choke hazard to small children if
removed from the dishwasher. Keep out of reach of small children.
Maintenance
• Do not repair or replace any part of the appliance. All repairs and servicing must be performed by
qualified service personnel unless specifically recommended in this Owner’s Manual. Use only
authorized factory parts.
• Do not disassemble or repair the appliance by yourself.
• Remove any dust or foreign matter from the power supply line.
• Disconnect this appliance from the power supply before cleaning and attempting any user maintenance.
Turning the controls to the OFF position does not disconnect this appliance from the power supply.
• Remove the door before the appliance is removed from service or discarded to avoid the danger of
children or small animals getting trapped inside.
• Unplug the appliance before cleaning to avoid the risk of electric shock.
• Before discarding the appliance, cut off the power supply line and destroy the appliance's control panel.
Grounding Instructions
• For a permanently connected dishwasher: This appliance must be connected to a grounded metal,
permanent wiring system, or an equipment-grounding conductor must be run with the circuit
conductors and connected to the equipment-grounding terminal or lead to the appliance.
• Connect the ground wire to the green ground connector in the terminal box.

6IMPORTANT SAFETY INSTRUCTIONS
• For a cord connected dishwasher: This appliance must be grounded. In the event of a malfunction or
breakdown, grounding will reduce the risk of electric shock by providing a path of least resistance for
electric current.
• This appliance is equipped with a cord having an equipment-grounding conductor and a grounding
plug.
• The plug must be plugged into an appropriate outlet that is installed and grounded in accordance with
all local codes and ordinances.
WARNING
Improper connection of the equipment-grounding conductor can result in a risk of electric shock. Check
with a qualified electrician or service representative if you are in doubt whether the appliance is properly
grounded. Do not modify the plug provided with the appliance, if it will not fit the outlet, have a proper
outlet installed by a qualified electrician.
Tip Over Hazard
• Do not use the dishwasher until completely installed.
• Do not push down on the open dishwasher door.
• Failure to follow these instructions may result in serious injury or cuts.
CAUTION STATEMENTS
CAUTION
• To reduce the risk of minor or moderate injury to persons, malfunction, or damage to the product or
property when using this product, follow basic precautions, including the following:
Installation
• Install the product on a firm and level floor.
• This dishwasher must be connected to a hot water supply with a temperature range between 120 °F (49
°C) and 149 °F (65 °C). This temperature range provides the best washing results and shortest cycle time.
The temperature should not exceed 149°F (65 °C) to prevent damage to dishes.
• Do not put the drain hose under the dishwasher during installation.
• Follow these instructions
a) The power-supply receptacle for the appliance must be installed in a cabinet or on a wall adjacent to
the undercounter space in which the appliance is to be installed;
b) There must be an opening through the partition between the compartments specified in (a) that is
large enough for the attachment plug to pass through. The longest dimension of the opening must not
be more than 38 mm (1.5 in);
c) The edges of the opening specified in (b) must, if the partition is wood, be smooth and rounded, or, if
the partition is metal, be covered with an edge protector; and
d) Care must be exercised, when the appliance is installed or removed, to reduce the likelihood of
damage to the power-supply cord.
• If the power supply cord, water supply hose, or drain hose is passed through an opening in a metal
cabinet, the edges of the opening must be covered by an edge protector to avoid risk of electric shock,
leaking, or fire. 1 1/2" (38.1 mm) plastic or rubber wire grommets can be purchased online or at a local
hardware store for this purpose. For further details, call an LG Electronics Customer Information Center
at 1-800-243-0000 (U.S.A.) or 1-888-542-2623 (Canada).

7IMPORTANT SAFETY INSTRUCTIONS
ENGLISH
SAVE THESE INSTRUCTIONS
Operation
• Do not place objects on top of the appliance.
• Turn off the water faucets and unplug the appliance if the appliance is to be left for an extended period
of time, such as during vacations.
• Do not store or spill liquid detergents, cleaners, or bleaches (chlorine bleach, oxygen bleach) on the
appliance. Doing so may result in corrosion, discoloration or damage to the surface of the appliance.
• Do not touch draining water which may be hot.
• If the drain hose and the water supply hose are frozen in winter, defrost before using the appliance.
• Do not put hands, feet, or metal objects below or behind the appliance.
Maintenance
• If cooking oil is spilled on the exterior of the product, wipe it off immediately. Do not clean the exterior of
the product with cleaners which contain alcohol, thinners, bleach, benzene, flammable liquids, or
abrasives. These substances may discolor or damage the appliance.

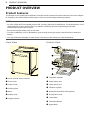
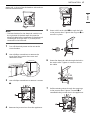
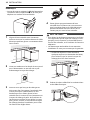
8PRODUCT OVERVIEW
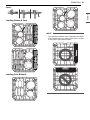
PRODUCT OVERVIEW
Product Features
The images in this guide may be different from the actual components and accessories, which are subject
to change by the manufacturer without prior notice for product improvement purposes.
NOTE
• For your safety and for extended product life, use only authorized components. The manufacturer is not
responsible for product malfunction or accidents caused by the use of separately purchased
unauthorized components or parts.
• Do not remove the safety cover at any time.
• To ensure reliability, each LG dishwasher goes through thorough quality control before it leaves the
factory.
• You may find water droplets or water spots from this process inside your new dishwasher.
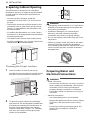
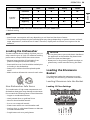
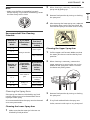
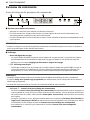
Front View
aControl Panel & Door Handle
bFront Cover
cLower Cover
dLeveling Feet
eBase
fSafety Cover
gShipping Brace
Interior View
aTop Wash Impeller
bUpper Spray Arm
cLower Spray Arm
dFiltration System
eDetergent and Rinse Aid Dispenser
fDrying Vent Cover
gLower Rack
hSilverware Basket
iUpper Rack

9PRODUCT OVERVIEW
ENGLISH
NOTE
• The silverware basket ships installed at the back
of the bottom rack. For best performance, install
it along the right side.
• Remove all packing materials from the exterior
and interior of the dishwasher before installing
the appliance.
• Press the tab to remove the cable tie by hand.
Cutting the tie with a knife or scissors may
damage the rack or the silverware basket.
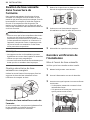
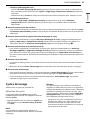
Accessories
aInstallation Brackets (2 ea)
bWood Screws (4 ea)
cHose Clamp
NOTE
• Accessories are inside the silverware basket.
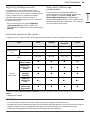
Product Specifications
The appearance and specifications listed in this
manual may vary due to constant product
improvements.
Model LDFC242**
Electrical
Requirements
120 V, 60 Hz AC only,
15 A circuit breaker
Water Pressure 20 psi - 80 psi
(140 kPa - 550 kPa)
Dimensions
(Width X Height X
Depth)
23 3/4” X 33 5/8” X 24 5/8”
(603 mm X 854 mm X 625
mm)
Inlet Water
Temperature
120 ℉ - 149 ℉
(49 ℃ - 65 ℃)
abc
Net Weight 70 lbs. (32 kg)
Model LDFC242**

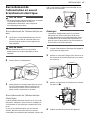
10 INSTALLATION
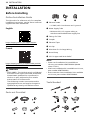
INSTALLATION
Before Installing
Online Installation Guide
This QR code is for reference only. For complete
installation instructions, see the owner's manual
supplied with each dishwasher.
English
https://www.lg.com/ca_en/support/video-
tutorials/CT20098058-1424294103269
French
https://www.lg.com/ca_fr/soutien/aide-produit/
CT20100059-20152463332979
WARNING
• DISCLAIMER - This Guide is strictly confidential
and shall not be copied, disclosed, distributed,
disseminated, publicized or reproduced, in
whole or in part, without the prior written
authorization of LG Electronics.
The Guide may contain inaccuracies and/or
typographical errors and may be changed or
updated at any time by LGE without notice.
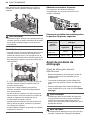
Parts not Provided
aElectrical Cable
• 16 AWG, with 2 conductors and 1 ground
bWater Supply Tube
• Minimum 3/8″ O.D. copper tubing or
stainless steel braided water supply line
cFittings for Tube
dCoupler
eElectrical Tape
fAir Gap
gWire Nuts for 16-Gauge Wiring
hHose Clamp
i3/8″ UL Approved Strain Relief
NOTE
• Power cord installation kit is available on
LG.com, part number AEM75698901 (Model
name : D-PC1)
• Inlet hose installation kit is available on LG.com,
part number AEM75698902.
• Drain extension hose installation kit is available
on LG.com, part number AEM75698903.
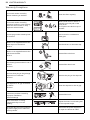
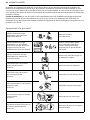
Tools Needed
abc
def
ghi
abc
def
ghi

11INSTALLATION
ENGLISH
aFlat-Blade Screwdriver
bPhillips Screwdriver
cHole Saw min. 2 1/2” bit
dElectric Drill
eGloves
fSafety Glasses
gAdjustable Wrench
hTape Measure
iUtility Knife
jLevel
k1/4” Square Drive Wrench
lNipper
mPliers
nWire Stripper
oTubing Cutter
p3/8” Square Drive Wrench + 1/2” Socket
Installation Overview
Please read the following installation instructions
first after purchasing this dishwasher or
transporting it to another location.
aPreparing Cabinet Opening
bPreparing Water and Electrical Connections
cPreparing Dishwasher
dSliding Dishwasher into Cabinet Opening
eConnecting Water Supply Line and Power
fConnecting the Drain Hose
gLeveling Dishwasher
hSecuring Dishwasher in Cabinet Opening
iFinal Installation Check
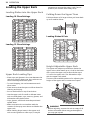
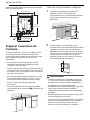
Product Dimensions
Back View
Side View
For easiest installation, see marked areas a for
water and electrical clearances in base of
dishwasher. Water supply hose, drain hose and
electric cable should be passed through this area.
klj
mno
p
23 /4" (603 mm)
3
9 /8"
(238 mm)
3 4 /16"
(119 mm)
5 /4"
(134 mm)
11
1
4 /2"
(115 mm)
1
33 /16"
(846 mm)
5
4 /2"
(115 mm)
1
33 /8"
(854 mm)
5
2 /16" (75 mm)
15
20 /16" (512 mm)
3
24 /8" (625 mm)
5
4 /4" (120 mm)
3
a

12 INSTALLATION
Preparing Cabinet Opening
This dishwasher is designed to fit a standard
dishwasher opening. An opening may be needed
on both sides to route plumbing and electrical
connections.
• To ensure proper drainage, install the
dishwasher no more than 12 ft. (3.65 m) from
the sink.
• The location must have sufficient space for the
dishwasher door to open easily and provide at
least 0.1” (2 mm) between the dishwasher and
the cabinet sides.
• If installing the dishwasher in a corner, leave a
minimum of 2” (50 mm) between the dishwasher
and the adjacent wall.
• The adjacent wall must be free of obstructions.
• For flush installations only, you may remove the
cabinet brace a inside the cabinet.
Choosing the Proper Location
1 Select a location as close to the sink as
possible for easy connections to water supply
line, drain hose and electrical connection.
2 To allow for proper clearance of plumbing
and electrical, use the template included with
the literature to determine the clearance on
the side of the cabinet where the cabinet
meets the back wall. Using a 2 1/2” diameter
hole saw, drill a hole in the target area as
shown on the template.
WARNING
• The opening must be at least 2 1/2" (63.5 mm) in
diameter to prevent damage to the cables and
hoses during installation.
• Installation damage is not covered by the
warranty, and leaks caused by improper
installation may result in property damage.
• Do not use existing holes unless they are in the
target area.
• Failure to properly locate the hole for the water
and drain lines may prevent the dishwasher
from installing flush with the cabinets and could
result in kinked, pinched, crushed, stressed or
damaged lines.
Preparing Water and
Electrical Connections
WARNING
• Water Connection
- Do not reuse an old hose. Use only a new hose
when installing the dishwasher. The old hose
could leak or burst causing flooding and
property damage. Contact an LG Customer
Information Center for assistance in buying a
new hose.
• Electrical Connection
- Use a time-delay fuse or circuit breaker.
- Operate this appliance with the correct voltage
as shown in this manual and on the rating
plate.
- The wiring must be grounded properly. If in
doubt, have it checked by a qualified
electrician.
3.5
''
2.5
''
4
''

13INSTALLATION
ENGLISH
- Connect the appliance using 3-wires, including
a ground wire.
- The appliance and outlet must be positioned
so that the plug is easily accessible.
- Do not use an extension cable or adapter with
this dishwasher.
- Do not overload the outlet with more than one
appliance.
- The included 16AWG wire nuts should be used.
- It is the personal responsibility and obligation
of the product owner to have a proper outlet
installed by a qualified electrician.
CAUTION
• When connecting the dishwasher water supply
line to the house water supply, sealing tape or
compound should be used on pipe threads to
avoid leaks. Tape or compound should not be
used on compression fittings.
• Connect the dishwasher to a hot water supply
with a temperature range between 120 °F (49 ℃)
and 149 °F (65 ℃). This temperature range
provides the best washing results and shortest
cycle time. To prevent damage to dishes, the
temperature should not exceed 149 °F (65 ℃).
• Water supply pressure must be between 20 psi
and 80 psi (140–550 kPa). If the water supply
pressure exceeds 80 psi, a pressure reducing
valve must be installed. Otherwise premature
failure of the inlet valve may occur.
Routing Water Supply Line and
Electrical Wiring
There are 2 channels in the bottom of the
dishwasher for routing the water and electrical
connections.
• As shown in the bottom view below, channel a
is for the water supply line, and channel b is for
the electrical cable.
1 Turn off the house water supply and the
circuit breaker or dedicated power before
connecting the dishwasher.
2 Run the water supply line along the floor 6 1/
2" – 7 3/4" (165 mm – 197 mm) from the left
side of the opening and tape it in place in
front of the opening.
3 Run the electrical cable c along the floor 14"
– 16" (356 mm – 406 mm) from the water
supply line d and tape it in place.
• The electrical outlet must be within 4 ft.
(1.22 m) of either side of the dishwasher.
• The best location for the electrical conduit is
on the right side of the back wall. Re-route
the electrical cable before installation if the
electrical conduit pipe is longer than 3" (76
mm) and is centered on the back wall.
Preparing Dishwasher
WARNING
• Do not remove safety cover a. Removal can
result in fire, electric shock or death.
Releasing Drain Hose
Remove the twist tie holding the drain hose to the
back of the shipping brace.

14 INSTALLATION
Removable Shipping Brace
The rear shipping brace can be removed if
additional clearance is needed when installing the
dishwasher under a low countertop.
Removing Lower Cover
CAUTION
• If you lay the dishwasher on its back, do so
carefully to avoid damaging the drain hose and
the tub.
1 Remove the screws at either side which attach
the lower cover to the dishwasher.
2 Remove the lower cover.
3 If there is insulation padding behind the lower
cover, remove it.
4 Set the parts aside until the installation is
complete.
Removing Packing Materials from
the Interior
Remove all packing materials from the interior of
the dishwasher before installing the appliance.
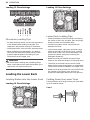
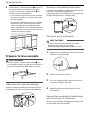
Attaching Installation Brackets
For countertops made of wood or other materials
that will not be damaged by drilling, use the metal
installation brackets provided.
For countertops made of granite, marble, or other
materials that could be damaged by drilling, use
the wood screws to attach the dishwasher to the
cabinet. See installation instructions in Securing
Dishwasher to Cabinet Opening.
NOTE
• Installation brackets and screws can be found in
the silverware basket.
1 Insert the tabbed end of the installation
brackets into the slots in the upper frame.
Rotate the brackets until the tabbed ends are
facing up.
2 Bend the tabs on the brackets to secure them
to the frame using a pair of needle nose
pliers.

15INSTALLATION
ENGLISH
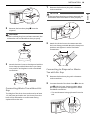
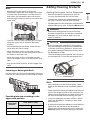
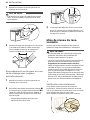
Sliding Dishwasher into
Cabinet Opening
How to Slide Dishwasher
CAUTION
• Do not pull or lift the dishwasher using the
handle a. Doing so can damage the door and
hinges.
• Do not push the door of the dishwasher with
knees when sliding the dishwasher into position.
Doing so can damage the front cover.
• Do not push the top of the dishwasher. Doing so
can damage the interior of the dishwasher.
NOTE
• Open the door and grab the body frame and the
top front opening b of the tub to move or lift the
dishwasher.
1 Align the dishwasher with the opening. Make
sure the water supply line and electrical cable
are in the correct positions to slide into their
channels properly.
2 Smooth out or pad the edges of the hole
drilled for the water supply to avoid damaging
the drain hose.
3 Make sure the drain hose is straight before
feeding the end of it through the hole for the
water supply. As you slide the dishwasher into
the opening, you will want to slowly pull on
the drain hose from inside the cabinet to take
up some slack. Be careful not to kink, pinch,
crush or stress the drain hose during
installation to avoid leaking and water
damage.

16 INSTALLATION
4 Gradually slide the dishwasher into the
opening, making sure that the water supply
line and electrical cable are passing freely
through the channels and do not get caught
under the dishwasher.
CAUTION
• To avoid malfunctions or leakage, it is important
that the drain hose not get kinked, pinched,
stressed or crushed behind or under the
dishwasher or inside the neighboring cabinet.
• Damage resulting from improper installation is
not covered under the warranty.
• As you slide the dishwasher into the
opening, stop periodically (or have an
assistant help) to take up the slack by
pulling the drain hose farther into the
cabinet.
5 Remove the tape from the water supply line
and the electrical cable.
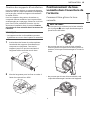
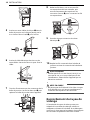
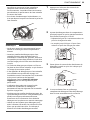
Connecting Water Supply
Line and Power
CAUTION
• Do not turn the dishwasher upside down to
connect the water supply line or electrical
supply. Doing so can damage the product.
Connecting Water Supply Line
1 With the home water supply turned off,
connect the water supply line to the inlet valve
on the left front of the dishwasher.
CAUTION
• Tape or compound should not be used on
dishwasher inlet valve.
2 Tighten the compression nut.
3 Slide the water supply line back through the
channel, pulling gently from inside the
cabinet to make sure the line is not kinked,
pinched, stressed or crushed.
Connecting Power
The dishwasher should have a dedicated properly
grounded branch circuit to connect the 3 wire
setup which includes the ground wire.
If a 3-prong power supply is used, it should be in
an accessible location adjacent to the dishwasher

17INSTALLATION
ENGLISH
within 4 ft. (1.22 m) of the dishwasher side and not
behind the dishwasher.
NOTE
• The best location for the electrical conduit is on
the right side of the back wall. Re-route the
electrical cable before installation if the electrical
conduit pipe is longer than 3” (76 mm) and is
centered on the back wall.
1 Turn off electrical power to the unit at the
circuit breaker.
2 Use a Phillips screwdriver to remove the
screw from the junction box cover and
remove the cover.
3 Use a Phillips screwdriver to remove 2 screws
a.
4 Remove the junction box from the appliance.
5 Insert a 3/8” strain relief b through the hole
in the junction box. Tighten the ring nut c to
secure it in place.
6 Insert the electrical cable through the hole in
the strain relief. Tighten 2 screws to secure
the cable.
7 Pull the existing wires through the openings
in the junction box. Tighten 2 screws d to
reassemble the junction box in the appliance.

18 INSTALLATION
8 Pair the white, black, and green wires to the
matching colored wires from the dishwasher.
Then twist on the provided wire nuts e tightly
to connect the corresponding wires.
9 Wrap electrical tape f around each
connection.
10 Fold the connected wires back into the
junction box and screw on the junction box
cover.
WARNING
• Verify that the black wire is hot (120 V). If not, or
if you are unsure of the power supply, have it
checked by a licensed electrician.
CAUTION
• Do not leave stripped wire exposed. Trim
stripped wire to fit completely inside wire nuts.
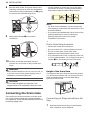
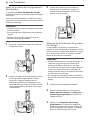
Connecting the Drain Hose
If the end of the drain hose does not fit the drain
line, use a heat and detergent resistant adapter
(not supplied). These may be obtained from a local
plumbing supply store.
• Cut the adapter to match the size of the drain
connection as shown. Cutting just beyond the
flare helps to keep the band clamp in place.
NOTE
• For drain hose installation, use the screw style
hose clamp provided with this dishwasher in the
silverware basket.
• If connecting the dishwasher’s drain hose to the
garbage disposal, be sure to follow your
garbage disposal’s manual for proper
installation instructions.
Drain Hose Requirements
• Follow local codes and ordinances.
• Do not exceed 12 ft. (3.65 m) distance to drain.
• Do not connect drain hoses from other
appliances to the dishwasher’s drain hose.
• If an extension drain hose is required, use a 5/8"
or 7/8" inside diameter, 2-3 ft. length hose and a
coupler a for connecting the two hose ends.
Height of the Drain Hose
The height of the drain hose end must be at least
12" (305 mm) and within 40" (1016 mm) from the
base of the dishwasher to avoid water being
siphoned from the tub.
Connecting to Disposal without Air
Gap
1 Remove the knockout plug on the disposal
with a hammer and screwdriver.

19INSTALLATION
ENGLISH
2 Remove the knockout plug a from the
disposal.
CAUTION
• If the knockout plug has not been removed, the
dishwasher will not be able to drain properly.
3 Attach the drain hose to the disposal with the
hose clamp provided. Move the hose clamp
into position and tighten it with a flat-blade
screwdriver.
Connecting Waste Tee without Air
Gap
The height of the drain hose end must be at least
12” (305 mm) and within 40” (1016 mm) from the
base of the dishwasher to avoid water being
siphoned from the tub.
1 Remove the knockout plug with a hammer
and screwdriver.
CAUTION
• If the knockout plug has not been removed, the
dishwasher will not be able to drain properly.
2 Attach the drain hose to the waste tee with
the hose clamp provided. Move the clamp into
position and tighten it with a flat-blade
screwdriver.
Connecting to Disposal or Waste
Tee with Air Gap
1 Remove the knockout plug with a hammer
and screwdriver.
2 Connect the end of the drain hose a to the air
gap b with the hose clamp provided. Move
the clamp into position and tighten it with a
flat-blade screwdriver.
• This avoids water being siphoned from the
tub.

20 INSTALLATION
3 If it is not connected, attach the rubber hose
connector to the disposal or waste tee with a
hose clamp (not provided).
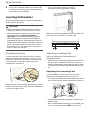
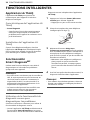
Leveling Dishwasher
Check that the dishwasher is level and adjust the
leveling feet if necessary.
CAUTION
• Failure to level the dishwasher may result in
leakage, problems closing the door, or noise.
• Where the cabinet opening is narrower than
recommended (see Preparing Cabinet
Opening), the dishwasher must be carefully
leveled and aligned so that the dishwasher is
supported fully by the 3 leveling feet and is not
hanging from the installation brackets. Failure to
do so can result in leaks from the front of the
dishwasher, AE errors, difficulty in closing the
door, or failure to operate.
Checking Leveling
To check that the tub is level from front to back,
remove the lower rack and pour 169 oz. (5 L) of
water into the bottom of the tub. The water level
should be near the center of both tub lower
indentations at the front.
With the lower rack removed, place a level on the
inside wall of the tub to check that the dishwasher
is level from side to side.
• If you do not have a level, try using a
smartphone level application instead.
Make sure that the gap between the tub walls and
the door liner is the same on either side.
Adjusting Leveling Feet
Adjust as needed until the dishwasher is
completely leveled.
• Adjust the front and rear leveling feet until they
are all in firm contact with the floor. Failure to
level the dishwasher may prevent the door from
closing properly and the dishwasher will not turn
on.
Adjusting Front Leveling Feet
Use a flat-blade screwdriver to turn the front
leveling feet and adjust the front of the tub.
• Turn the front leveling feet clockwise to raise the
front of the tub and counterclockwise to lower it.
• The adjustments work identically for both front
leveling feet.
• When a flat-blade screwdriver is unavailable, use
a 1/4" square drive wrench a or 3/8" square
La page est en cours de chargement...
La page est en cours de chargement...
La page est en cours de chargement...
La page est en cours de chargement...
La page est en cours de chargement...
La page est en cours de chargement...
La page est en cours de chargement...
La page est en cours de chargement...
La page est en cours de chargement...
La page est en cours de chargement...
La page est en cours de chargement...
La page est en cours de chargement...
La page est en cours de chargement...
La page est en cours de chargement...
La page est en cours de chargement...
La page est en cours de chargement...
La page est en cours de chargement...
La page est en cours de chargement...
La page est en cours de chargement...
La page est en cours de chargement...
La page est en cours de chargement...
La page est en cours de chargement...
La page est en cours de chargement...
La page est en cours de chargement...
La page est en cours de chargement...
La page est en cours de chargement...
La page est en cours de chargement...
La page est en cours de chargement...
La page est en cours de chargement...
La page est en cours de chargement...
La page est en cours de chargement...
La page est en cours de chargement...
La page est en cours de chargement...
La page est en cours de chargement...
La page est en cours de chargement...
La page est en cours de chargement...
La page est en cours de chargement...
La page est en cours de chargement...
La page est en cours de chargement...
La page est en cours de chargement...
La page est en cours de chargement...
La page est en cours de chargement...
La page est en cours de chargement...
La page est en cours de chargement...
La page est en cours de chargement...
La page est en cours de chargement...
La page est en cours de chargement...
La page est en cours de chargement...
La page est en cours de chargement...
La page est en cours de chargement...
La page est en cours de chargement...
La page est en cours de chargement...
La page est en cours de chargement...
La page est en cours de chargement...
La page est en cours de chargement...
La page est en cours de chargement...
La page est en cours de chargement...
La page est en cours de chargement...
La page est en cours de chargement...
La page est en cours de chargement...
La page est en cours de chargement...
La page est en cours de chargement...
La page est en cours de chargement...
La page est en cours de chargement...
La page est en cours de chargement...
La page est en cours de chargement...
La page est en cours de chargement...
La page est en cours de chargement...
La page est en cours de chargement...
La page est en cours de chargement...
La page est en cours de chargement...
La page est en cours de chargement...
La page est en cours de chargement...
La page est en cours de chargement...
La page est en cours de chargement...
La page est en cours de chargement...
La page est en cours de chargement...
La page est en cours de chargement...
La page est en cours de chargement...
La page est en cours de chargement...
La page est en cours de chargement...
La page est en cours de chargement...
La page est en cours de chargement...
La page est en cours de chargement...
La page est en cours de chargement...
La page est en cours de chargement...
La page est en cours de chargement...
La page est en cours de chargement...
La page est en cours de chargement...
La page est en cours de chargement...
La page est en cours de chargement...
La page est en cours de chargement...
-
 1
1
-
 2
2
-
 3
3
-
 4
4
-
 5
5
-
 6
6
-
 7
7
-
 8
8
-
 9
9
-
 10
10
-
 11
11
-
 12
12
-
 13
13
-
 14
14
-
 15
15
-
 16
16
-
 17
17
-
 18
18
-
 19
19
-
 20
20
-
 21
21
-
 22
22
-
 23
23
-
 24
24
-
 25
25
-
 26
26
-
 27
27
-
 28
28
-
 29
29
-
 30
30
-
 31
31
-
 32
32
-
 33
33
-
 34
34
-
 35
35
-
 36
36
-
 37
37
-
 38
38
-
 39
39
-
 40
40
-
 41
41
-
 42
42
-
 43
43
-
 44
44
-
 45
45
-
 46
46
-
 47
47
-
 48
48
-
 49
49
-
 50
50
-
 51
51
-
 52
52
-
 53
53
-
 54
54
-
 55
55
-
 56
56
-
 57
57
-
 58
58
-
 59
59
-
 60
60
-
 61
61
-
 62
62
-
 63
63
-
 64
64
-
 65
65
-
 66
66
-
 67
67
-
 68
68
-
 69
69
-
 70
70
-
 71
71
-
 72
72
-
 73
73
-
 74
74
-
 75
75
-
 76
76
-
 77
77
-
 78
78
-
 79
79
-
 80
80
-
 81
81
-
 82
82
-
 83
83
-
 84
84
-
 85
85
-
 86
86
-
 87
87
-
 88
88
-
 89
89
-
 90
90
-
 91
91
-
 92
92
-
 93
93
-
 94
94
-
 95
95
-
 96
96
-
 97
97
-
 98
98
-
 99
99
-
 100
100
-
 101
101
-
 102
102
-
 103
103
-
 104
104
-
 105
105
-
 106
106
-
 107
107
-
 108
108
-
 109
109
-
 110
110
-
 111
111
-
 112
112


LG LDFC2423W Le manuel du propriétaire
- Catégorie
- Lave-vaisselle
- Taper
- Le manuel du propriétaire
- Ce manuel convient également à
dans d''autres langues
- English: LG LDFC2423W Owner's manual
Documents connexes
-
LG LDF5678ST Le manuel du propriétaire
-
LG LDF5545WW Le manuel du propriétaire
-
-
LG LDP6797ST Le manuel du propriétaire
-
-
LG LDFN4542D Le manuel du propriétaire
-
LG LDP6809BD Manuel utilisateur
-
LG LDF5678SS Le manuel du propriétaire
-
LG LDPM6762D Le manuel du propriétaire
-