NewAge Products 66982 Mode d'emploi
- Catégorie
- Barbecues
- Taper
- Mode d'emploi

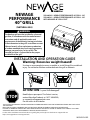
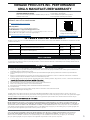
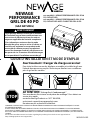
INSTALLATION AND OPERATION GUIDE
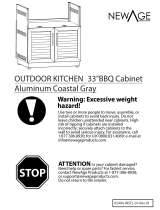
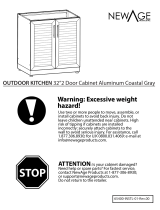
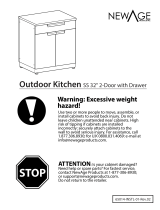
ATTENTION: Is your Grill damaged?
Need help or spare parts? For fastest service,
contact NewAge Products at 1-877-306-8930;
or suppor[email protected]om.
Do not return to the retailer.
STOP
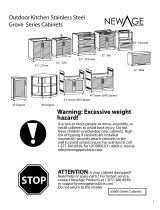
Use two or more people to move, assemble, or install the grill to avoid back
injury. Do not leave children unattended near the grill or cabinets.
THIS INSTRUCTION MANUAL CONTAINS IMPORTANT INFORMATION NECESSARY FOR THE PROPER ASSEMBLY AND SAFE USE OF
THE APPLIANCE.
READ AND FOLLOW ALL WARNINGS AND INSTRUCTIONS BEFORE ASSEMBLING AND USING THE APPLIANCE.
FOLLOW ALL WARNINGS AND INSTRUCTIONS WHEN USING THE APPLIANCE. FAILURE TO OPERATE THIS PRODUCT IN A WELL
VENTILATED AREA CAN CAUSE PROPERTY DAMAGE, INJURY OR DEATH.
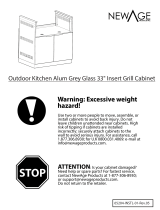
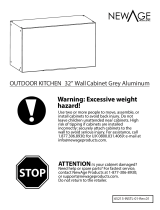
Warning: Excessive weight hazard!
!
NEWAGE
PERFORMANCE
40” GRILL
NATURAL GAS
SKU#66982 NEWAGE PERFORMANCE 40” GRILL NG
SKU#66281 NEWAGE PERFORMANCE 40” GRILL NG
WITH NEWAGE 40” GRILL CART
The NewAge grill must be installed by a licensed
gas tter, in accordance with the manufacturer’s
instructions and all applicable codes and
requirements of the authority having jurisdiction.
If the information in the grill’s instructions are not
followed exactly, a re, explosion or production
of carbon monoxide may result causing property
damage, personal injury or loss of life. The
licensed gas tter is responsible for the proper
installation of the grill.
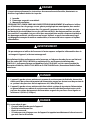
WARNING
For the online installation manual and videos regarding this product, please check out our support hub via:
https://newageproducts.com/support-hub/
IM-GLE.01A-02

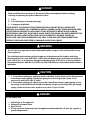
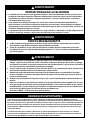
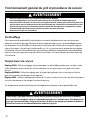
Read and follow the instructions in this manual fully and completely before installing,
servicing or operating the grill to reduce the risk of :
1. 1. Fire
2. 2. Personal injury or property damage
3. 3. Improper installation
THIS PRODUCT IS DESIGNED FOR OUTDOOR USE ONLY. DO NOT INSTALL OR OPERATE
INDOORS, IN A GARAGE, IN A SCREENED IN PORCH, GAZEBO, OR ANY OTHER ENCLOSED AREA.
THIS OUTDOOR COOKING GAS APPLIANCE IS NOT INTENDED TO BE INSTALLED IN OR ON
RECREATIONAL VEHICLES , BOATS OR IN A NONVENTILATED ROOM. FAILURE TO OPERATE THIS
PRODUCT IN A WELL VENTILATED AREA CAN CAUSE PROPERTY DAMAGE, INJURY OR
DEATH. KEEP THE AREA SURROUNDING THE GRILL CLEAR AND FREE FROM COMBUSTIBLE
ATERIALS, GASOLINE AND OTHER FLAMMABLE VAPORS AND LIQUIDS.
DANGER
Do not store or use gasoline or other ammable liquids or vapors in the vicinity of this or any
other appliance.
The installation must conform with local codes or, in the absence of local codes, with either
the National Fuel Gas code, ANSI Z223.1/NFPA 54 or the National Gas and Propane installation
code, CSA B149.1, or the Propane Storage and Handling Code, CSA B149.2, or the Standard for
Recreational Vehicles, ANSI A119.2/ NFPA, and CSA Z240 RV Series, Recreational Vehicle Code as
applicable.
WARNING
1. 1. The outdoor cooking gas appliance and its individual shuto valve must be disconnected
from the gas supply piping system during any pressure testing of that system at test
pressures in excess of 0.5 psi (3.5 kPa).
2. 2. The outdoor cooking gas appliance must be isolated from the gas supply piping system
by closing it individual manual shuto valve during any pressure testing of the gas supply
piping system at test pressures equal to or less than 1/2 psi (3.5 kPa).
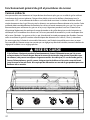
CAUTION
IF YOU SMELL GAS:
1. Shut o gas to the appliance.
2. Extinguish any open ame.
3. Open the lid.
4. If odor continues, keep away from the appliance and immediately call your gas supplier or
your re department.
DANGER

WARNING
1. Massachusetts requires all gas be installed using a plumber or licensed gas tter carrying the
appropriate Massachusetts license.
2. All permanently-installed natural gas installation require a “T” handle type manual gas valve
be installed in the gas supply line to this appliance.
STATE OF MASSACHUSETTS
WARNING
1. This product can expose you to chemicals including Carbon Monoxide, which is a by-
product of combustion known to the State of California to cause cancer and birth defects
or other reproductive harm. For more information go to www.P65Warnings.ca.gov.
2. California law requires businesses to warn customers of potential exposure to such
substances. To minimize exposure to the substances, always operate this unit according
to the use and care instructions found in this manual. Be certain to provide adequate
ventilation when cooking.
3. California Proposition 65 lists “Silica, crystalline” which is used in one of the components of
the IR burner, as an agent known to the state of California to cause cancer.
CALIFORNIA PROPOSITION 65
WARNING
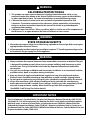
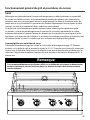
1. Always maintain the required clearances from combustible construction as detailed. The grill
is designed for outdoor use only. Never use in a garage, building, shed, breezeway or other
enclosed area. This grill shall not be used under any unprotected overhead combustible
construction.
2. Gas grills are not design certied for and are not to be installed in or on recreational vehicles,
portable trailers, boats or any other moving installation.
3. Keep any electrical supply cord and the fuel supply hose away from any heated surfaces.
Electrical cords should be placed away from walkways to avoid creating a tripping hazard.
4. Do not repair or replace any part of the grill unless specically recommended in this manual.
5. All gas lines must have a shut-o that is readily and easily accessible. Be sure the owner
knows where the shut-o is located. If you smell gas, check for gas leaks immediately. Check
only with a soap and water solution. Never check for gas leaks with an open ame.
(See INDEX: “Leak Testing” for further details.)
IMPORTANT NOTES
This Gas Barbecue Is Certied Under Canadian And American National Standards, ANSI Z21.58-
2018 and CSA 1.16-2018 respectively for Outdoor Gas Grills and should be installed to conform
with local codes. In absence of local codes, install to the current CAN B149.2 Natural Fuel Gas
Code and the Propane Installation Code, CSA B149.1 Propane Installation Code in Canada or to
the National Fuel Gas Code, ANSI Z223.1/NFPA 54 the National Fuel Gas Code the Natural Gas and
Propane Installation Code, CSA B149.2.

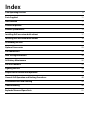
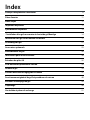
Index
Safe Operating Practices 6
Parts Supplied 11
Tools Needed 12
Product Inspection 12
Product Specications 13
Installing Grill on custom built cabinet 17
Installing Grill on custom built cabinet 18
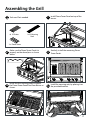
Assembling the Grill 21
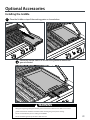
Optional Accessories 23
Gas Connections 26
Leak Testing Instructions 30
AA Battery Maintenance 32
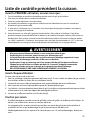
Pre-Grill Checklist 33
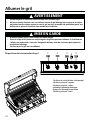
Lighting the Grill 34
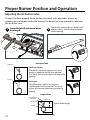
Proper Burner Position and Operation 37
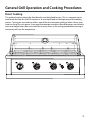
General Grill Operation and Cooking Procedures 40
Grill Maintenance and Cleaning 44
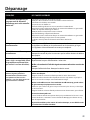
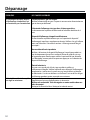
Troubleshooting 48
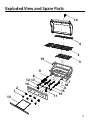
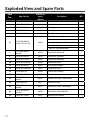
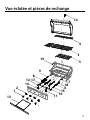
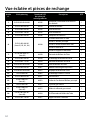
Exploded View and Spare Parts 51

5
Scan this QR code with the camera
on your mobile device to visit the
NewAge Products Support Hub
www.newageproducts.com/support-hub/
NEWAGE PRODUCTS INC. PERFORMANCE
GRILLS MANUFACTURER WARRANTY
PROOF OF PURCHASE IS REQUIRED
TO OBTAIN WARRANTY SERVICE.
Please have the following information available when you call our
customer service team:
• Name, address and telephone number
• Product Name / SKU Number
• A clear, detailed description of the problem
• Proof of purchase including order number
Register your NewAge Products purchase online for quicker customer
assistance and access to exclusive benefits
Visit www.newageproducts.com/register/
Warranty Claim
For warranty service please contact NewAge Products at
1-877-306-8930; or [email protected]
Please review all warranty details below, prior to contacting NewAge Products for a claim.
Scan the QR code on the right to access our support page or
visit www.newageproducts.com/contact-us/
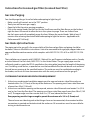
The 304 stainless steel material used in the construction of NewAge Platinum Grill is highly rust resistant, however, chlorine in the air from
swimming pools or the salt from sea air may cause surface rust to appear and even create some pitting corrosion if left on the product. We suggest
cleaning all stainless steel surfaces at least every two weeks to keep your Grill in prime condition. The chemical reaction from salt is easy to
WHAT IS COVERED
When this product is installed, operated and maintained according to the instructions attached to or furnished with the product, NewAge Products
Inc. will replace the defective product or parts if the part fails as a result of defective materials or workmanship for the warranty duration from the
purchase date of the product.
1. Service calls to correct the installation of any NewAge products or to instruct you how to use or install them.
2. Damage resulting from products caused by accident, misuse, abuse, fire, flood, improper installation, acts of God, neglect, modification or
mishandling, improper maintenance & storage.
3. Products damaged by improperly loading beyond the specified maximum weight capacity outlined in the instructions provided with the
product.
4. Repairs or replacement when your product is used in other than normal, residential use, such as a commercial environment, or handled in
anyway inconsistent with the installation instructions included with the product.
5. Cosmetic damage that occurs after customer purchasing the product, including scratches, dings, dents, corrosion, or stains in the material that
6. Surfaces damaged due to improper use of chemicals, and detergents.
7. Discoloration due to the heat, for example beside a grill, is a trait of stainless steel.
8. Surface rust resulting from acid rain or environmental chemicals
9. Replacement parts for NewAge products outside Canada and the United States.
10. Loss due to theft.
11. Damage resulting from use of the product contrary and not in accordance to the instruction manual.
12. Any labor costs during the warranty period.
WHAT IS NOT COVERED
DISCLAIMER OF IMPLIED WARRANTIES
IMPLIED WARRANTIES, INCLUDING TO THE EXTENT APPLICABLE WARRANTIES OF MERCHANTABILITY OR FITNESS FOR A PARTICULAR PURPOSE,
ARE EXCLUDED TO THE EXTENT LEGALLY PERMISSIBLE. ANY IMPLIED WARRANTIES THAT MAY BE IMPOSED BY LAW ARE LIMITED TO ONE YEAR, OR
THE SHORTEST PERIOD ALLOWED BY LAW. THIS WARRANTY IS LIMITED TO THE ORIGINAL BUYER. Some states and provinces do not allow limitations
on the duration of implied warranties of merchantability or fitness, so this limitation may not apply to you. This warranty gives you specific legal rights, and
you also may have other rights that vary from state to state or province to province.
LIMITATION OF REMEDIES; EXCLUSION OF INCIDENTAL AND CONSEQUENTIAL DAMAGES
YOUR SOLE AND EXCLUSIVE REMEDY UNDER THIS LIMITED WARRANTY SHALL BE PRODUCT REPAIR OR REPLACEMENT AT OUR DISCRETION
AS PROVIDED HEREIN. NEWAGE SHALL NOT BE LIABLE FOR INCIDENTAL OR CONSEQUENTIAL DAMAGES. Some states and provinces do not
allow the exclusion or limitation of incidental or consequential damages, so these limitations and exclusions may not apply to you. This warranty
gives you specific legal rights, and you also may have other rights that vary from state to state or province to province.
NewAge is proud to oer a 10 Years Limited Warranty from the date of purchase. This is subject to the limitations and disclaimers set forth below and other
product documentations.
10 YEARS LIMITED WARRANTY
Length of Warranty Warranty Covered Items Cost to NewAge Cost to Customer
5 Years Cooking Grates, Grease Trays, Main Burners, Sear Burner (only applicable for
Performance 40” Grill Appliance) Materials Shipping
10 Years Stainless Steel Lid / Burner Box/ Interior Brackets Materials Shipping
2 Years All other parts Materials Shipping

6
Safe Operating Practices
1. Newage Grill must be assembled and installed according to the instructions in the manual.
2. Read the entire instruction manual prior to operating grill.
3. NewAge Grill must be used outdoors in a well ventilated area, and cannot be used indoors, in a enclosed
area such as a garage, gazebo, screened in porch or other similar enclosed area.
4. NewAge grills are not designed or certied for and are not to be installed in or on recreational vehicles,
portable trailers, boats.
5. Never use the grill in windy conditions. If located in a consistently windy area, oceanfront, mountaintop,
etc., a windbreak will be required. Always adhere to the specied clearances as described in the
INSTALLATION section of this manual. Refer to the page 10 for additional information.
6. Do not modify the NewAge Grill.
7. Do not operate the NewAge Grill under, or near combustible construction.
8. Maintain proper clearance to combustibles, 18” (457 mm)to rear of unit, 14” (356mm) to sides. Additional
clearance of 32” (810mm) is recommended near vinyl siding or panes of glass.
9. When not in use turn o the gas at the supply valve.
10. Always shut o the main valve on the Natural gas supply after each use.
11. Never attach or disconnect to gas supply, or move or alter gas ttings when the grill is in operation or is
hot.
12. Natural gas units must be disconnected from the supply when being stored indoors.
13. Inspect the fuel supply hose before each use. If there is evidence of excessive abrasion or wear or the
hose is cut, it must be replaced prior to using the gas grill with a replacement hose assembly specied by
the grill manufacturer.
14. Leak test the unit before initial use, annually, and whenever any gas components are replaced. Refer to
page 8 for additional information.
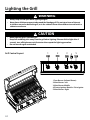
15. Follow lighting instructions carefully when operating grill.
16. Burner controls must be o when turning supply valve on.
17. The grill hood must be fully opened while lighting the grill. Failure to do so will risk an explosion, and
personal injury or death.
18. Never lean over the grill and keep face away from grill when lighting.
19. Never let your gas hose touch your burner box. Refer to page 9 for additional information.
20. Always use a covered hand when opening the grill lid and only do so slowly to allow heat and steam to
escape.
21. Do not leave grill unattended when operating.
22. Do not use aluminum foil to line drip pans or grill grates or radiants. This can severely upset combustion
air ow or trap excessive heat in the control area. The result of this can be melted knobs or damaged
ignition components.
23. Adults and children should be instructed on the hazards of high surface temperatures. Never leave
children unsupervised around the NewAge Grill.
24. Never touch the grill racks, hood or immediate surrounding metal surfaces with your bare hands while
grilling.

7
Safe Operating Practices
25. The NewAge Grill must be cooled before it is covered. Never place the cover on when cooking or while
hot.
26. Never grill without the drip pan installed. Hot grease can leak down and produce a re or explosion.
27. Clean grease trays regularly to prevent grease res. Refer to page 8 for additional information.
28. Spiders and insects like to nest in the burners, venturis, valves and orices of a grill, disrupting the gas
ow. This very dangerous condition can cause a re behind the control panel, damaging the grill and
risking personal injury. If your grill has been unused for a long time, inspect and clean the burners,
venturis, valves and orices.
29. Clean the grill with caution. Avoid steam burns; do not use a wet sponge or cloth to clean the grill while
it is hot. Some cleaners produce noxious fumes or can ignite if applied to a hot surface.
30. Do not locate, store or operate the grill on an inclined plane. If you are using a grill cart, make sure you
lock the castor wheels before operating the grill.
31. Do not move the appliance during use.
32. Do not use a power washer to clean the NewAge Grill.
33. Always have an ABC Fire Extinguisher accessible — never attempt to extinguish a grease re with water
or other liquids.
34. Make sure the licensed gas tter shows you where your gas supply shut-o is located. All gas lines must
have a shut-o that is readily and easily accessible. If you smell gas, check for gas leaks immediately.
Check only with a soap and water solution.
35. For personal safety, wear proper apparel while barbecuing.
36. Do not use the grill for cooking excessively fatty meats or products, which promote are-ups. To Control
are-ups, adjust the controls to lower the temperature. If your grill are-up is out-of-control, turn o the
burners. Don’t use water to put out are-ups. Spraying water on a are-up can cause grease to explode.
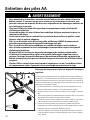
37. Make sure that the AA batteries (rechargeable and non-rechargeable) are removed from the Pulse
Ignitor/ decomposed/ scraped after recommended AA battery life by the manufacturer.
38. NEVER use physically damaged AA batteries, it may corrode the inner parts or completely damage the
Pulse Ignitor.
Note: THIS MANUAL MUST REMAIN WITH THE PRODUCT OWNER FOR FUTURE REFERENCE

8
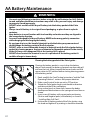
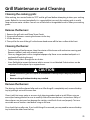
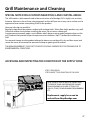
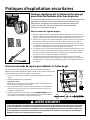
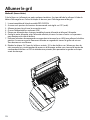
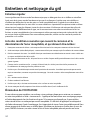
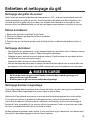
Regularly clean your grill components to prevent
are-ups and grease res
Just like the cooking appliances in your home, your NewAge Grill needs to be
regularly cleaned and maintained to operate at peak performance. This not
only produces tastier, healthier food, but it reduces the chance of dangerous
are-ups or grease res.
Here are the key areas to keep clean:
1. Remove cooking grates and scrape excess food particles with a BBQ brush
after every use. For a deep clean, soak and scrub with dish soap and water a
few times per season.
2. Pull out the grease tray after every use and scrape o any grease or food
chunks. Wash with dish soap and water to keep it sparkling clean.
3. Your Flame Tamer Panels will accumulate a lot of burnt on sauces and
grease drippings. Remove residue from the Panels with a scraper, and use a
wire brush to clear debris from the Flame Tamers.
4. Burners that aren’t used frequently can get blocked by spiders who are
drawn to the gas smell, and build webs inside the burner tubes. Use a wire-
brush to clean the inside of the burners and remove debris from the outside
of the burners.
5. Scrape down the interior of your burner box at least once a season to re-
move carbon build-up. Scoop or vacuum out the debris, reinstall all compo-
nents and enjoy a much cleaner grilling experience.
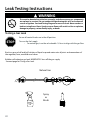
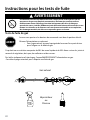
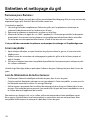
Test your hose connections for gas leaks
Gas leaks are a serious issue that can be easily avoided by doing a quick and
simple leak check annually, or whenever gas components are replaced or
serviced.
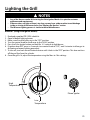
1. Ensure that all grill control knobs are in the o position.
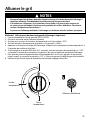
2. Turn on the fuel supply,
For Natural Gas
Turn the valve handle 1/4 turn to align with the gas ow.
3. Brush or spray a half-and-half solution of liquid soap and water
onto all joints and connections of the regulator, hose, manifolds
and valves.
4. Bubbles will indicate a gas leak. IMMEDIATELY turn o the gas
supply and do not use the grill until contacting a
licensed gas tter to replace faulty parts.
WARNING
The leak test must be done before initial use, annually, and whenever any gas components are
replaced or serviced. Do not smoke while performing this test and remove all sources of ignition.
See Leak Testing Diagram for areas to check. Never conduct a leak test using re or ame. Sparks or
open ames will result in a re or explosion, damage to property, serious bodily injury or death.
Leak Testing Diagram
Safe Operating Practices
50% WATER
50% LIQUID
SOAP

9
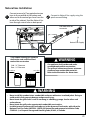
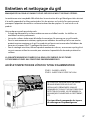
Never let your gas hose touch your burner box
The underside of your grill gets incredibly hot. Pushing your excess gas line into the cavity below your grill, or coiling it
beneath the burner box can melt the exterior coating of the gas hose and cause a re.
Take these steps to make sure your hose is positioned safely:
1. Ensure your grill is o and cooled down.
2. Kneel down and look in the cavity for the hose at the left-hand side of the grill.
3. If the hose is bunched up, or touching the rebox, pull the gas hose from the bottom of the cabinet until any excess
line is removed.
4. Check the hose for signs of melting or damage. If the damage has
occurred, or you are unsure of how to check, contact Customer Support Team > 1-877-306-8930;
or support@newageproducts.com
Safe Operating Practices

10
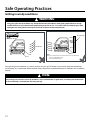
Safe Operating Practices
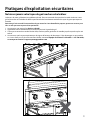
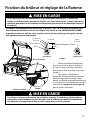
Grilling in windy conditions
Wind Direction
Flame
Burner
Flame Lift o
Exhaust
Min 3”
Flame
Burner
Note
Any damage caused from use in windy conditions, such as melted knobs or igniter wires, or control panel discoloration
from heat buildup, is excluded form warranty coverage.
WARNING
Using your grill in windy conditions may disrupt the front-to-back airow. If, while grilling with all burners on high
and the hood closed, you notice that the temperature gauge fails to rise.....be careful. If wind has kept hot gases from
exiting the rear of the grill the control panel and knobs may have become extremely hot.
During the high wind conditions, it is best if you don’t use your grill. If located in consistently windy area (oceanfront,
mountaintop, etc.) a wind break will be required. Always adhere to the specied clearances as dened in the “Installation
Manual“.
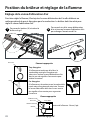
Wind Direction
Flame
Burner
Flame Lift o
Exhaust
Non-Combustible
Min 4”
Flame
Burner
Note:
Make sure to maintain clearance from the windscreen as specied below.
• 4” for non-combustible material.
• 18” for Combustible material.

11
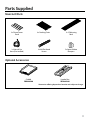
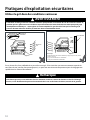
Parts Supplied
1x SS Warming
Rack
1x Natural Gas
Hose (Pre-insalled) 4x M6 Flat Head
Screws
4x Cooking Grate
3x Flame Tamer
Panel
2x Spare Rubber
Bumpers
Main Grill Parts
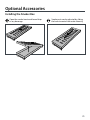
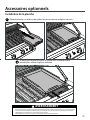
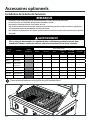
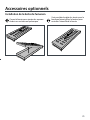
Optional Accessories
*Accessories oering depends on location and subject to change.
Griddle
SKU#66940 SKU#66946
Smoker Box

12
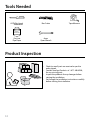
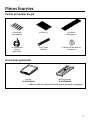
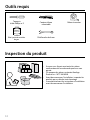
Product Inspection
• Check to see all parts are received as per the
order placed.
• Contact NewAge Products at 1-877-306-8930;
for any missing parts.
• Inspect the products for any damages before
starting the installation.
• Go through the installation instructions carefully
before starting the installation.
Tools Needed
Box Cutter
6mm
Open Wrench
Gas Line
Pipe Dope
#2 Phillips head
screwdriver
Pipe Dope -
Thread Sealant
Tape Measure

13
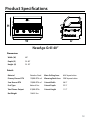
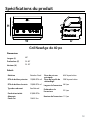
Product Specications
NewAge Grill 40”
H
WD
Width (W) 40”
Depth (D) 23.58”
Height (H) 23.10”
Material Stainless Steel Main Grilling Area 634 Sqare Inches
Primary Burner BTU 12,000 BTUs x3 Warming Rack Area 290 Square Inches
Sear Burner BTU 12,000 BTUs x1 Cutout Width 38.5”
Fuel Type Natural Gas Cutout Depth 22.3”
Total Power Output 51,000 BTUs Cutout Height 11.2”
Net Weight 136.35 Lbs
Dimensions
Details

14
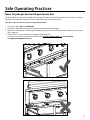
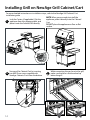
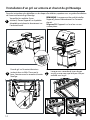
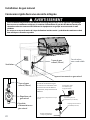
Lock the Casters (if applicable). Pick the
appliance from the shipping pallet, and
place it onto the Cabinet/Cart directly.
Installing Grill on NewAge Grill Cabinet/Cart
Secure grill to Cabinet/Cart by inserting
two M6x12mm screw supplied with
NewAge Cabinets/Carts from the bottom.
While connecting the gas hose to the grill,
make sure the hose is not bunched up
below the grill.
1
3
For more detailed instructions on installation steps, refer to the NewAge Grill Cabinet/ Cart
installation guide. NOTE: When you are ready to install the
appliance, place it directly onto the Cabinet/
Cart.
DO NOT place the appliance on oor or at
surface.

15
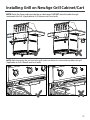
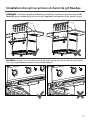
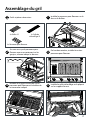
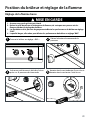
Installing Grill on NewAge Grill Cabinet/Cart
NOTE: Route the Power cable outside the cart back panel. DO NOT route the cable through
underneath the Grill. (Applicable to Grill Cabinets and Carts both)
NOTE: While connecting the gas hose to the grill, make sure the hose is not bunched up below the grill.
(Applicable to Grill Cabinets and Carts both)

16
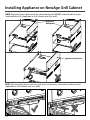
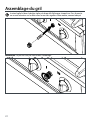
Installing Appliance on NewAge Grill Cabinet
NOTE: Route the Power cable outside the cabinet back panel. DO NOT route the cable through
underneath the Grill. (Applicable to Grill Cabinets and Carts both)
NOTE: While connecting the gas hose to the grill, make sure the hose is not bunched up below the grill.
(Applicable to Grill Cabinets and Carts both)
Appliance back panel
Appliance
back panel

17
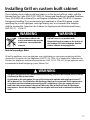
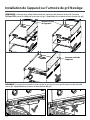
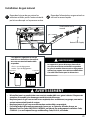
Installing Grill on custom built cabinet
The installation must conform with local codes or, in the absence of local codes, with the
National Fuel Gas Code, ANSI Z223.1/NFPA 54, Storage and Handling of Liqueed Petroleum
Gases, ANSI/NFPA 58; or Natural Gas and Propane Installation Code, CSA B149.1; Propane
Storage and Handling. If you are connecting an appliance to a xed fuel piping system
specifying the use of a rigid pipe, semi-rigid tubing, and/ or a connector that complies
with the standard for Connectors for Outdoor Gas Appliances and Manufactured Homes,
ANSI Z21.75 CSA 6.27.
WARNING
Cabinet frame, cabinet side
panels and counter top must be
made from non-combustible
material.
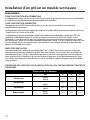
WARNING
DO NOT store or use products with
ammable liquids or vapors in the vicinity of
the NewAge Grill Cabinet,NewAge Outdoor
Kitchen cabinets or any appliances.
Note to licensed gas tter:
All built-in appliances must use rigid pipe, semi-rigid tubing, or a connector complying with the
standard for Connectors for Gas Appliances, ANSI Z21.24. CSA 6.10, or Standard for Connectors for
Outdoor Gas Appliances and Manufactured homes, ANSI Z21.75. CSA 6.27, for the appliance which
are connected to xed fuel piping system (Natural Gas).
WARNING
This grill is designed for non-combustible enclosures only, and must be installed and serviced by
a licensed gas tter to local codes.
As indicated on the rating plate, this gas grill is designed to operate with supply pressure of 7”
WC for Natural Gas. For installations where the gas supply pressure exceeds these requirements,
a regulator must be installed upstream of the grill’s components. If the gas supply pressure is
lower than these requirements, the unit will be under-red and will not reach the maximum
temperatures. Ensure that the supply line size complies with local and/ or national installation
codes.

18
Installing Grill on custom built cabinet
CLEARANCES:
TO NON-COMBUSTIBLE CONSTRUCTION
A minimum of 4” (10 cm) clearance from the back of the grill to non-combustible construction is
required to allow the hood to be opened fully.
TO COMBUSTIBLE CONSTRUCTION
This appliance should NOT be installed over, under or next to unprotected combustible
construction. A minimum clearance to vertical and rear combustible material is 18” (45 cm) and 14”
(36cm) on the sides.
VENTILATION OPENINGS
A minimum of three 10 in² (65 cm²) of ventilation openings must be provided at the bottom of both
left and right sides of your enclosure (island), as well as the back side. A minimum of three 20 in²
(130 cm²) of ventilation openings must be provided at the top of both left, right and back sides of
your enclosure (island) where the top of the opening aligns with the bottom of the grill cut-out.
These openings are required to safely dissipate gas vapors if there is a leak in your enclosure.
The minimum vertical clearance to combustible materials means that ALL combustible materials
must be outside this 18” (45cm) zone. As an example, if you have an island with a stucco or
tiled surface and wood-frame construction beneath, the wood is considered combustible, even
though the grill is touching the stucco or tile surface, which is non-combustible. In extreme
circumstances, the wood could potentially get hot enough to burn.
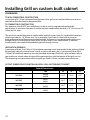
CUTOUT DIMENSIONS FOR INSTALLING GRILL ON A CUSTOM BUILT CABINET
Cutout Dimensions
SKU W D H
33” Grill 66980
66990 31.5” 22.3” 11.2”
36” Grill 66981
66991 34.5” 22.3” 11.2”
40” Grill 66982
66992 38.5” 22.3” 11.2”
Side Burner 66983
66993 15.3” 22.4” 11.3”

19
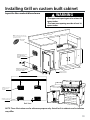
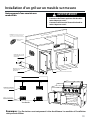
Installing Grill on custom built cabinet
10in
10in
1in
MINIMUM 10 SQ IN (65 SQ CM)
OF VENTILATION REQUIRED
MINIMUM 20 SQ IN (130 SQ
CM) OF VENTILATION
REQUIRED.
Back View
NOTE: These illustrations are for reference purpose only. Actual built-in cabinets and installation
may dier.
Layout for Non-combustible enclosure
NON-COMUSTABLE MATERIAL
MINIMUM 20 SQ IN (130 SQ
CM) OF VENTILATION
REQUIRED ON EACH END OF
CABINET.
5"
2.375” Dia
127mm
MAXIMUM
1"
25.4mm
MAXIMUM
W
D
H
PARTITION TO ISOLATE
CYLINDER FROM GRILL
MINIMUM 10 SQ IN (65 SQ CM)
OF VENTILATION REQUIRED ON
EACH END OF CABINET.
Rubber grommet
Note: Avoid abrasion of hose against the
opening. It is recommended to use a rubber
grommet at the opening.
H1
W1
WARNING
• The upper vent opening must be at least 20
square inches.
• The lower vent opening must be at least 10
square inches.

20
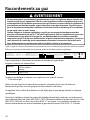
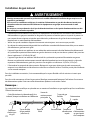
Rigid Connection in a Built in Enclosure
WARNING
Only licensed gas tter must perform the required gas tting on NewAge gas appliances.
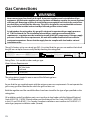
To ensure satisfactory performance, the gas supply line must be sized to accommodate the total
BTU/h requirements of all the gas-red equipment that will be connected to that line.
In no case should pipe less than 3/4” inside diameter or 1” outside diameter ever be used to
connect this product.
Natural Gas Installation
Ventilation
Securely mount the gas
supply components to the
non combustionable
structure. This illustration is for
reference only each
installation will be dierent.
Rigid Piping for supply
(Not Supplied)
Quick Disconnect Coupling NG
(Not Supplied)
Flexible Gas Hose
Supply line
All Other Components are Not Supplied.
Grill Gas line Flexible
corrugated Tubing
(Not Supplied)
Natural gas Supply
Natural gas Supply
Line
Natural Gas
Regulator
Natural gas Hose
(Supplied)
Non - combustible
Construction
Natural gas Hose
(Supplied)
La page est en cours de chargement...
La page est en cours de chargement...
La page est en cours de chargement...
La page est en cours de chargement...
La page est en cours de chargement...
La page est en cours de chargement...
La page est en cours de chargement...
La page est en cours de chargement...
La page est en cours de chargement...
La page est en cours de chargement...
La page est en cours de chargement...
La page est en cours de chargement...
La page est en cours de chargement...
La page est en cours de chargement...
La page est en cours de chargement...
La page est en cours de chargement...
La page est en cours de chargement...
La page est en cours de chargement...
La page est en cours de chargement...
La page est en cours de chargement...
La page est en cours de chargement...
La page est en cours de chargement...
La page est en cours de chargement...
La page est en cours de chargement...
La page est en cours de chargement...
La page est en cours de chargement...
La page est en cours de chargement...
La page est en cours de chargement...
La page est en cours de chargement...
La page est en cours de chargement...
La page est en cours de chargement...
La page est en cours de chargement...
La page est en cours de chargement...
La page est en cours de chargement...
La page est en cours de chargement...
La page est en cours de chargement...
La page est en cours de chargement...
La page est en cours de chargement...
La page est en cours de chargement...
La page est en cours de chargement...
La page est en cours de chargement...
La page est en cours de chargement...
La page est en cours de chargement...
La page est en cours de chargement...
La page est en cours de chargement...
La page est en cours de chargement...
La page est en cours de chargement...
La page est en cours de chargement...
La page est en cours de chargement...
La page est en cours de chargement...
La page est en cours de chargement...
La page est en cours de chargement...
La page est en cours de chargement...
La page est en cours de chargement...
La page est en cours de chargement...
La page est en cours de chargement...
La page est en cours de chargement...
La page est en cours de chargement...
La page est en cours de chargement...
La page est en cours de chargement...
La page est en cours de chargement...
La page est en cours de chargement...
La page est en cours de chargement...
La page est en cours de chargement...
La page est en cours de chargement...
La page est en cours de chargement...
La page est en cours de chargement...
La page est en cours de chargement...
La page est en cours de chargement...
La page est en cours de chargement...
La page est en cours de chargement...
La page est en cours de chargement...
La page est en cours de chargement...
La page est en cours de chargement...
La page est en cours de chargement...
La page est en cours de chargement...
La page est en cours de chargement...
La page est en cours de chargement...
La page est en cours de chargement...
La page est en cours de chargement...
La page est en cours de chargement...
La page est en cours de chargement...
La page est en cours de chargement...
La page est en cours de chargement...
-
 1
1
-
 2
2
-
 3
3
-
 4
4
-
 5
5
-
 6
6
-
 7
7
-
 8
8
-
 9
9
-
 10
10
-
 11
11
-
 12
12
-
 13
13
-
 14
14
-
 15
15
-
 16
16
-
 17
17
-
 18
18
-
 19
19
-
 20
20
-
 21
21
-
 22
22
-
 23
23
-
 24
24
-
 25
25
-
 26
26
-
 27
27
-
 28
28
-
 29
29
-
 30
30
-
 31
31
-
 32
32
-
 33
33
-
 34
34
-
 35
35
-
 36
36
-
 37
37
-
 38
38
-
 39
39
-
 40
40
-
 41
41
-
 42
42
-
 43
43
-
 44
44
-
 45
45
-
 46
46
-
 47
47
-
 48
48
-
 49
49
-
 50
50
-
 51
51
-
 52
52
-
 53
53
-
 54
54
-
 55
55
-
 56
56
-
 57
57
-
 58
58
-
 59
59
-
 60
60
-
 61
61
-
 62
62
-
 63
63
-
 64
64
-
 65
65
-
 66
66
-
 67
67
-
 68
68
-
 69
69
-
 70
70
-
 71
71
-
 72
72
-
 73
73
-
 74
74
-
 75
75
-
 76
76
-
 77
77
-
 78
78
-
 79
79
-
 80
80
-
 81
81
-
 82
82
-
 83
83
-
 84
84
-
 85
85
-
 86
86
-
 87
87
-
 88
88
-
 89
89
-
 90
90
-
 91
91
-
 92
92
-
 93
93
-
 94
94
-
 95
95
-
 96
96
-
 97
97
-
 98
98
-
 99
99
-
 100
100
-
 101
101
-
 102
102
-
 103
103
-
 104
104


NewAge Products 66982 Mode d'emploi
- Catégorie
- Barbecues
- Taper
- Mode d'emploi
dans d''autres langues
Documents connexes
-
NewAge Products 65271 Mode d'emploi
-
 NewAge Products 66456 Guide d'installation
-
NewAge Products 66054 Manuel utilisateur
-
 NewAge Products 66655 Mode d'emploi
-
 NewAge Products 65230 Guide d'installation
-
 NewAge Products 65404 Guide d'installation
-
 NewAge Products 65001 Guide d'installation
-
 NewAge Products 65213 Guide d'installation
-
 NewAge Products 65400 Guide d'installation
-
 NewAge Products 65014 Guide d'installation


