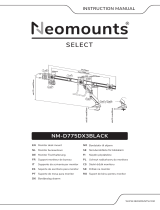
Neomounts ds70s-950wh1 Manuel utilisateur
- Catégorie
- Supports de bureau à panneau plat
- Taper
- Manuel utilisateur

DS70S-950WH1
IT
EN
NL
DE
FR
ES
PT
DK
Monitor desk mount
Monitor bureausteun
Monitor Tischhalterung
Support moniteur de bureau
Supporto da scrivania per monitor
Soporte de escritorio para monitor
Suporte de mesa para monitor
Bordbeslag skærm
NO
SE
FI
PL
CS
SK
RO
Bordstativ til skjerm
Skrivbordsfäste för bildskärm
Näytön pöytäteline
Uchwyt nabiurkowy do monitora
Stolní držák monitoru
Držiak na monitor
Suport de birou pentru monitor
WWW.NEOMOUNTS.COM
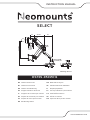
INSTRUCTION MANUAL
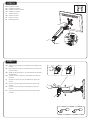
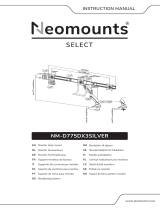
Measuring unit: mm
+90°
-90°
200-520
10-50
117
75
100
75
100
117
320
88 280-334 203
10-55
+/-90°
360°
360°
+/-90°
+/-90°

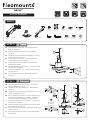
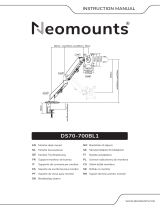
PARTS
DS70S-950WH1
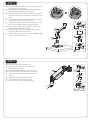
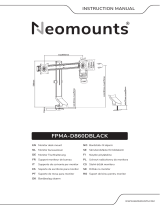
Install the clamp to the desk - for desktop thickness
between 10-50 mm
Installeer de klem aan het bureau - voor bladdikte
10-50 mm
Installieren Sie der Klemme am Schreibtisch - für Tisch-
stärken zwischen 10-50 mm
Vissez la pince sur le bureau - pince prévue pour un
bureau d'épaisseur entre 10-50 mm
Installa il morsetto sulla scrivania - per spessore del
desktop tra 10-50 mm
Instale la abrazadera en el escritorio - para el grosor del
escritorio entre 10-50 mm
Instale a braçadeira na mesa - para espessura de mesa
entre 10-50 mm
Zainstaluj zacisk na biurku - dla grubości pulpitu od
10-50 mm
EN
NL
DE
FR
IT
ES
PT
PL
Tool Drill
A. (x1) B. (x1) C. (x1)
D. (x1) E. (x1) G. (x1)F. (x4)
10-50mm
M-C. D5
(x4)
H. M8x150
(x1)
I. 4mm-3mm
(x1)
J. 6mm
(x1)
M-A. M4x12
(x4)
M-B. M5x12
(x4)
Install the grommet through the desk - for desktop
thickness between 10-55 mm
Installeer de doorvoer in het bureau - voor bladdikte
10-55 mm
Installieren Sie der Tülle durch den Schreibtisch - für Tisch-
stärken zwischen 10-55 mm
Pour une fixation traversante, vissez le support à travers
le bureau avec la plaque sous le plateau - l'oeillet est
prévu pour un bureau d'épaisseur entre 10-55 mm
Installa l'occhiello attraverso la scrivania - per spessore
del desktop tra 10-55 mm
Instale la arandela a través del escritorio - para el grosor
del escritorio entre 10-55 mm
Instale o anel através da mesa - para espessura de mesa
entre 10-55 mm
Zainstaluj przelotkę przez biurko - dla grubości pulpitu
od 10-55 mm
EN
NL
DE
FR
IT
ES
PT
PL
75x75 -
100x100 mm
20-52 cm 8,8-62,5 cm
1-18 kg
or
B
J
10-55mm
Desktop with
existing hole
Ø 10-60mm
10-55mm
Ø 10mm
(Ø 3/8")
J
G
J
H
B1
B1
STEP 1ClampA
STEP 1GrommetB

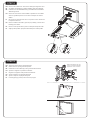
Choose the desired rotation mode (full range or 180° lock)
and attach the arm to the base
Kies de gewenste rotatiemodus (volledig bereik of 180° ver-
grendeling) en bevestig de arm aan de basis
Wählen Sie den gewünschten Rotationsmodus (voller Be-
reich oder 180°-Sperre) und befestigen Sie den Arm an der
Basis
Choisissez le mode de rotation souhaité (gamme complète
ou blocage à 180°) et fixez le bras à la base
Scegliere la modalità di rotazione desiderata (gamma com-
pleta o blocco a 180°) e collegare il braccio alla base
Elija el modo de rotación deseado (rango completo o blo-
queo de 180°) y fije el brazo a la base
Escolha o modo de rotação pretendido (alcance total ou
bloqueio de 180°) e fixe o braço à base
Wybierz żądany tryb obrotu (pełny zakres lub blokada 180°)
i przymocuj ramię do podstawy
EN
NL
DE
FR
IT
ES
PT
PL
Attach the upper arm to the lower arm
Bevestig het bovenste deel van de arm aan het
onderste deel van de arm
Befestigen Sie den oberen Arm am unteren Arm
Fixez le second bras sur le bras inférieur et le visser
Attaccare la parte superiore del braccio al braccio
inferiore
Adjuntar el brazo inferior al brazo superior
Prenda o braço inferior ao braço superior
Przymocuj góne ramię do dolnego ramienia
EN
NL
DE
FR
IT
ES
PT
PL
STEP 3
STEP 2
or
C
D
D
I
I
A
I
I

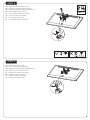
Place the decorative covers
Plaats de decoratieve afdekkapjes
Platzieren Sie die dekorativen Abdeckungen
Placez les couvertures décoratives
Posizionare le coperture decorative
Coloque las tapas decorativas
Colocar as tampas decorativas
Umieścić osłony dekoracyjne
EN
NL
DE
FR
IT
ES
PT
PL
STEP 5
Attach the VESA plate to the screen
Bevestig de VESA-plaat aan het scherm
Bringen Sie die VESA-Platte am Bildschirm an
Fixez la plaque VESA à l'écran
Fissare la piastra VESA allo schermo
Fije la placa VESA a la pantalla
Fixar a placa VESA ao ecrã
Przymocuj płytkę VESA do ekranu
EN
NL
DE
FR
IT
ES
PT
PL
STEP 4
* Not Included
M-A
M-B
M-C
E
F

Install the monitor
Installeer de monitor
Installieren Sie den Monitor
Installer le moniteur
Installa il monitor
Instale el monitor
Instale o monitor
Zainstaluj monitor
EN
NL
DE
FR
IT
ES
PT
PL
Adjust the gas spring to counterbalance the weight of the
monitor
Stel de gasveer af om als contragewicht voor het gewicht
van de monitor
Stellen Sie die Gasfeder ein, um das Gewicht des Monitors
auszugleichen
Ajustez le ressort à gaz pour contrebalancer le poids du
moniteur
Regolare la molla a gas per controbilanciare il peso del
monitor
Ajuste el resorte de gas para contrarrestar el peso del
monitor
Ajustar a mola de gás para contrabalançar o peso do
monitor
Wyreguluj sprężynę gazową, aby zrównoważyć ciężar
monitora
EN
NL
DE
FR
IT
ES
PT
PL
STEP 6
STEP 7
J

Note: If the display does not
stop at your desired position,
tighten the screw as shown.
Remove the cable cover and run the cable(s) through the cover
Verwijder de kabelgoot en leid de kabel(s) door de kabelgoot
Entfernen Sie die Kabelabdeckung und Kabel durch die Kabel-
abdeckung führen
Retirez les couvercles caches câbles et positionnez vos câbles
dans les goulettes prévues à cet effet et reclipsez les caches
câbles
Rimuovere la copertura del cavo e far passare il cavo attraverso
la copertura del cavo
Retire la cubierta del cable y pase el (los) cable(s) a través de la
bandeja para cables
Remova a tampa do cabo e passe o cabo pela tampa do cabo
Zdejmij osłonę kabli i przeprowadź kabel przez osłonę kabla
EN
NL
DE
FR
IT
ES
PT
PL
Adjust the mount to the desired position
Stel de steun in op de gewenste positie
Positionieren der Halterung in der gewünschten Position
Ajustez le support à la position souhaitée
Regolare il supporto nella posizione desiderata
Ajuste el soporte a la posición deseada
Ajuste o suporte na posição desejada
Dostosuj pozycję uchwytu do twoich wymagań
EN
NL
DE
FR
IT
ES
PT
PL
STEP 8
STEP 9
I


-
 1
1
-
 2
2
-
 3
3
-
 4
4
-
 5
5
-
 6
6
-
 7
7
-
 8
8


Neomounts ds70s-950wh1 Manuel utilisateur
- Catégorie
- Supports de bureau à panneau plat
- Taper
- Manuel utilisateur
dans d''autres langues
- English: Neomounts ds70s-950wh1 User manual
- español: Neomounts ds70s-950wh1 Manual de usuario
- Deutsch: Neomounts ds70s-950wh1 Benutzerhandbuch
- português: Neomounts ds70s-950wh1 Manual do usuário
Documents connexes
-
Neomounts ds70s-950wh2 Manuel utilisateur
-
Neomounts ds70s-950bl2 Manuel utilisateur
-
 Neomounts NM-D775DX3BLACK Manuel utilisateur
-
 Neomounts NM-D775DX3SILVER Manuel utilisateur
-
Neomounts NM-D775BLACKPLUS Manuel utilisateur
-
Neomounts ds75s-950bl2 Manuel utilisateur
-
Neomounts ds75s-950wh2 Manuel utilisateur
-
 Neomounts DS70-700BL1 Manuel utilisateur
-
 Neomounts FPMA-D860DBLACK Manuel utilisateur
-
 Neomounts DS70-450BL1 Manuel utilisateur


