
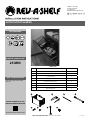
INSTALLATION INSTRUCTIONS: CLOTH TILT-OUT HAMPER
25 MIN
ESTIMATED ASSEMBLY TIME:
CARE AND MAINTENANCE:
Clean with a damp cloth and wipe
parts dry.
TOOLS REQUIRED:
WATCH TUTORIALS OF OUR
PRODUCTS BEING INSTALLED
WWW.REV-A-SHELF.COM/VIDEOS
12400 Earl Jones Way
Louisville, KY 40299
rev-a-shelf.com
Customer Service: 800-626-1126
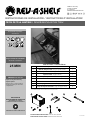
CLOTH TILT-OUT HAMPER
PARTS LIST*
No. Description Qty.
A Cloth Hamper Bag 1
B Arm Brackets 2
C Center Bracket 1
D Bag Support Bars 2
E #8 X 5/8” Wood Screws 4
F M5 X 6MM Euro Screws 4
G Flap Stay Hardware 1
H Bag Holder Clips 4
A
C
F
D
G H
B
E
I-CTOHSL-0521
#2#2#2
1
8
#2#2
PZ2
* Door hinges are required but not included

Customer Service: 800-626-1126 | rev-a-shelf.com
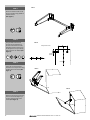
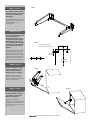
2
Secure the center bracket to the
two arm brackets using (4) M5 x 6
mm Euro screws.
(See Figure 1).
Use provided measurements
to mark and pre-drill holes for
the center bracket/arm bracket
assembly. Find the center line on
the hamper door and pre-drill (4)
holes using the 1/8” drill bit (See
Figure 2).
STEP 1
STEP 2
STEP 3
STEP 4
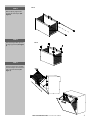
Screw the center bracket/arm
brackets to the hamper door using
the #8 x 5/8” wood screws (See
Figure 3).
Reference the ap stay instruction
sheet and install the ap stay to
the door and the inside of the
cabinet (See Figure 4).
FIG. 1
FIG. 3
FIG. 4
FIG. 2
Center Line
Hamper Door Panel
18”
2-3/16”
(55 mm)
A
11-25/32” 16-25/32” 22-25/32”
24” 30”
#2#2#2
#2#2#2
1
8

INSTALLATION INSTRUCTIONS: CLOTH TILT-OUT HAMPER 3
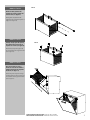
Slide the (2) bag support bars
through the cloth hamper (See
Figure 5).
Place all (4) bag holder clips over
the bag support bars (See Figure
6).
STEP 5
STEP 6
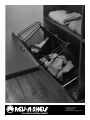
STEP 7
Open the hamper door and slide
the cloth hamper onto the bottom
wire of the arm brackets (See
Figure 7).
FIG. 5
FIG. 7
FIG. 6

4
12400 Earl Jones Way
Louisville, KY 40299
rev-a-shelf.com
Customer Service: 800-626-1126

25 MIN
Tiempo estimado de ensamblado:
Durée de l’installation:
Herramientas requeridas:
Outils Requis:
12400 Earl Jones Way
Louisville, KY 40299
rev-a-shelf.com
Customer Service: 800-626-1126
CESTA DE TELA ABATIBLE / PANIER BASCULANT EN TISSU
No. Descripción / La description Qty.
A Bolsa de tela para cesta / Sac pour panier en tissu 1
B Soportes de brazo / Supports de bras 2
C Soporte central / Support central 1
D Barras de soporte para bolsas / Barres de support de sac 2
E 8 tornillos de madera X 5/8” / Vis à bois #8 X 5/8 po 4
F Tornillos euro M5 X 6MM / Vis européennes M5 X 6 mm 4
G Brazos plegables / Quincaillerie de support de rabat 1
H Clips del soporte de la bolsa / Clips de support de sac 4
A
C
F
D
G H
B
E
I-CTOHSL-0521
#2#2#2
1
8
#2#2
PZ2
* Se requieren bisagras de puerta, pero no están incluidas
* Les charnières de porte sont nécessaires mais ne sont pas incluses.
INSTRUCCIONES DE INSTALACIÓN / INSTRUCTIONS D’INSTALLATION
CUIDADO/ ENTRETIEN:
Limpie con un paño húmedo y
seque las partes.
Nettoyez avec un linge humide et
essuyez les piéces pour les secher
complétement.
VER VIDEOS DE
INSTALACIONES DE PRODUCTOS
REGARDER DES VIDÉOS
D’INSTALLATIONS DE PRODUITS
WWW.REV-A-SHELF.COM/VIDEOS
INSTRUCCIONES DE INSTALACIÓN: CESTA DE TELA ABATIBLE
INSTRUCTIONS D’INSTALLATION: PANIER BASCULANT EN TISSU
Lista de Partes / Liste des Piéces

Customer Service: 800-626-1126 | rev-a-shelf.com
6
Fije el soporte central a los dos
soportes de brazo usando cuatro
(4) tornillos euro M5 x 6 mm.
(Ver gura 1).
Fixez le support central aux deux
supports de bras à l’aide de (4) vis
européennes M5 x 6 mm.
(voir la gure 1).
Use las medidas proporcionadas
para marcar y perforar
previamente los oricios para
el conjunto de soporte central/
brazos. Busque la línea central
de la puerta de la cesta y taladre
previamente cuatro (4) oricios
usando una broca de 1/8” (ver
gura 2).
Utilisez les mesures fournies pour
marquer et pré-percer les trous
pour l’ensemble support central/
support de bras. Trouvez la ligne
centrale sur la porte du panier et
prépercez (4) trous à l’aide d’une
mèche de 1/8 po (voir la gure 2).
PASO 1 / ÉTAPE 1
PASO 2 / ÉTAPE 2
PASO 3 / ÉTAPE 3
PASO 4 / ÉTAPE 4
Atornille los soportes central/
brazos a la puerta de la cesta
usando los 8 tornillos para
madera de 5/8” (ver gura 3).
Vissez le support central/les
supports de bras à la porte du
panier à l’aide des vis à bois #8 x
5/8 po (voir la gure 3).
Consulte la hoja de instrucciones
del brazo plegable e instálelo
en la puerta y el interior del
gabinete (ver gura 4).
Reportez-vous à la feuille
d’instructions du support de rabat
et installez le support de rabat sur
la porte et l’intérieur du meuble
(voir la gure 4).
FIG. 1
FIG. 3
FIG. 4
FIG. 2
Línea central
Ligne centrale
Panel de puerta del cesto
Panneau de la porte du panier
18”
2-3/16”
(55 mm)
A
11-25/32” 16-25/32” 22-25/32”
24” 30”

7
Deslice las dos (2) barras de
soporte de la bolsa a través del
cesto de tela (ver gura 5).
Faites glisser les (2) barres de
support de sac à travers le panier à
linge (voir la gure 5).
Coloque los (4) clips del soporte
de la bolsa sobre las barras de
soporte de la bolsa (ver gura 6).
Placez les (4) clips de support de
sac sur les barres de support de sac
(voir la gure 6).
PASO 5 / ÉTAPE 5
PASO 6 / ÉTAPE 6
PASO 7 / ÉTAPE 7
Abra la puerta de la cesta y
deslice la cesta de tela sobre el
alambre inferior de los soportes
del brazo (ver gura 7).
Ouvrez la porte du panier à linge
et faites glisser le panier à linge sur
le l inférieur des supports de bras
(voir la gure 7).
FIG. 5
FIG. 7
FIG. 6
INSTRUCCIONES DE INSTALACIÓN: CESTA DE TELA ABATIBLE
INSTRUCTIONS D’INSTALLATION: PANIER BASCULANT EN TISSU

8
12400 Earl Jones Way
Louisville, KY 40299
rev-a-shelf.com
Customer Service: 800-626-1126
-
 1
1
-
 2
2
-
 3
3
-
 4
4
-
 5
5
-
 6
6
-
 7
7
-
 8
8


Rev-A-Shelf CTOHSL-24-1 Guide d'installation
- Taper
- Guide d'installation
- Ce manuel convient également à
dans d''autres langues
Documents connexes
-
Rev-A-Shelf CTOHBSL-161419-CR-1 Mode d'emploi
-
Rev-A-Shelf CTOHSL-24-1 Instruction Sheet
-
-
Rev-A-Shelf 5743-04-CR-1 Mode d'emploi
-
-
-
-
-
-