
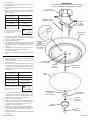
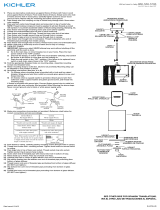
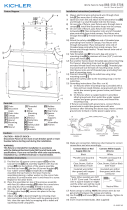
1) Turn off power.
2) Assemble mounting screws into threaded holes in
mounting strap.
3) Attach mounting strap to outlet box. (Screws not pro-
vided)
4) Make wire connections (connectors not provided.)
Reference chart below for correct connections and
wire accordingly.
5) Push fixture to ceiling so mounting screws can pass
through keyhole slots. Turn fixture until screwheads
appear as in detail. Tighten screws
6) Insert recommended lamp.
7) Screw hexnut on to threaded pipe and screw threaded
pipe into coupling on bottom of fixture body. Secure
threaded pipe in place by tightening hexnut against
coupling.
8) Carefully lift glass over threaded pipe. Secure in place
with rubber washer, flat washer and hexnut.
(DO NOT over tighten)
9) Slip trim over threaded pipe and secure in place with
finial.
1) Couper l’alimentation secteur.
2) Visser lles vis de montage dans les trous filetés du la
barrette de montage.
3) Visser la barrette de montage à la boîte de jonction.
(Vis non fournies).
4) Effectuer les raccordements électriques (les cosses
ne sont pas fournies). Si les fils du lustre ne sont pas
noir et blanc, se reporter au tableau ci-dessous pour
effectuer les raccordements convenables et câbler en
conséquence.
5) Pousser l’élément au plafond de manière à ce que les
vis puissent entrer dans les trous des fentes. Tourner
l’élément jusqu’à ce que les vis apparaissent comme
sur le détail. Fixer en place avec les écrous.
6) Installer la lampe recommandée.
7) Visser l’écrou hexagonal sur le tube fileté puis visser
le tube dans l’accouplement sur l’extrémité inférieure
du luminaire. Fixer le tube fileté en serrant l’écrou
hexagonal contre l’acouplement.
8) Soulever avec précaution le verre sur le tube fileté.
Fixer le verre à l’aide de la rondelle en caoutchouc de
la rondelle plate et de l’écrou hexagonal. (NE PAS
serrer avec excès)
9) Passer la garniture sur le tube fileté et fixer à l’aide de
l'ornement.
Connect Black or
Red Supply Wire to: Connect
White Supply Wire to:
Black White
*Parallel cord (round & smooth) *Parallel cord (square & ridged)
Clear, Brown, Gold or Black
without tracer Clear, Brown, Gold or Black
with tracer
Insulated wire (other than green)
with copper conductor Insulated wire (other than green)
with silver conductor
*Note: When parallel wires (SPT I & SPT II)
are used. The neutral wire is square shaped
or ridged and the other wire will be round in
shape or smooth (see illus.) Neutral Wire
HEXNUT
ECROU
HEXAGONAL
GLASS
VERRE
HEXNUT
ECROU
HEXAGONAL
Date Issued: 3/18/05 IS-8064-CB
INSTRUCTIONS
For Assembling and Installing Fixtures in Canada
Pour L’assemblage et L’installation Au Canada
Connecter le fil noir ou
rouge de la boite Connecter le fil blanc de la boîte
A Noir A Blanc
*Au cordon parallèle (rond et lisse) *Au cordon parallele (à angles droits el strié)
Au bransparent, doré, marron, ou
noir sans fil distinctif Au transparent, doré, marron, ou
noir avec un til distinctif
Fil isolé (sauf fil vert) avec
conducteur en cuivre Fil isolé (sauf fil vert) avec
conducteur en argent
*Remarque: Avec emploi d’un fil paralléle
(SPT I et SPT II). Le fil neutre est á angles
droits ou strié et l’autre fil doit étre rond ou
lisse (Voir le schéma). Fil Neutre
MOUNTING SCREW
VIS DE MONTAGE
OUTLET BOX
BOITE DE JONCTION
MOUNTING
STRAP
COLLIER DE
FIXATION
FIXTURE BODY
ELEMENT
THREADED PIPE
TUBE FILETE
RUBBER WASHER
RONDELLE
CAOUTCHOUTÉE
TRIM
GARNITURE
FINIAL
ORNEMENT
COUPLING
ACCOMPLEMENT
SCREW/KEYHOLE
DETAIL
CREW/KEYHOLE
DETAIL
DÈTAIL DE TROU
DE SERRURE
DE LA VIS
FLAT WASHER
RONDELLE PLATE

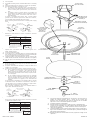
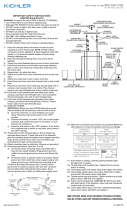
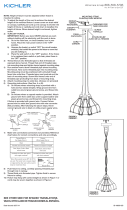
1) Turn off power.
2) Assemble mounting screws into threaded holes in mounting
strap.
3) Attach mounting strap to outlet box. (Screws not provided)
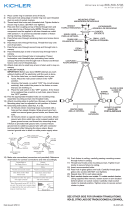
4) Grounding instructions: (See Illus. A or B).
A) On fixtures where mounting strap is provided with a
hole and two raise dimples. Wrap ground wire from out-
let box around green ground screw, and thread into
hole.
B) On fixtures where a cupped washer is provided. Put
ground wire from outlet box under cupped washer and
green ground screw and thread screw into hole in
mounting strap.
If fixture is provided with ground wire. Connect fixture
ground wire to outlet box ground wire with wire connector,
(not provided) after following the above steps.
Never connect ground wire to black or white power supply
wires.
5) Make wire connections (connectors not provided.)
Reference chart below for correct connections and wire
accordingly.
6) Push fixture to ceiling so mounting screws can pass through
keyhole slots. Turn fixture until screwheads appear as in
detail. Tighten screws.
7) Insert recommended lamp.
8) Screw hexnut on to threaded pipe and screw threaded pipe
into coupling on bottom of fixture body. Secure threaded pipe
in place by tightening hexnut against coupling.
9) Carefully lift glass over threaded pipe. Secure in place with
rubber washer, flat washer and hexnut. (DO NOT over tighten)
10) Slip trim piece over threaded pipe and secure in place with
finial.
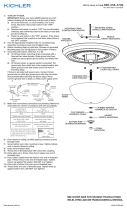
1) Apague la alimentación eléctrica.
2) Monte los tornillos de montaje a la caja de salida. (Los tornil-
los no se proveen).
3) Acople la abrazadera de montaje a la caja de salida. (Los
tornillos no se proveen).
4) Instrucciones de puesta a tierra: (Vea la ilustración A o B)
A) En los artefactos donde se proporciona la abrazadera
de montaje con un agujero y dos depresiones ele-
vadas. Envuelva el alambre a tierra de la caja de sali-
da alrededor del tornillo a tierra verde y rosque el tornil-
lo en el agujero.
B) En los artefactor donde se proporciona una arandela
cóncava. Ponga el alambre a tierra de la caja de salida
entre la arandela cóncava y el tornillo a tierra verde y
rosque el tornillo en el agujero, en la abrazadera de
montaje.
Si se proporciona el artefacto con alambre a tierra, conecte
el alambre a tierra del artefacto al alambrea a tierra de la
caja de salida, con el conector de alambre (no proporciona-
do), después de seguir los pasos de arriba.
Nunca conecte el alambre a tierra a los alambres blanco o
negro de la alimentación eléctrica.
5) Hacer las conexiones de los alambres (conectores no inclu-
idos.) Ver el cuadro más abajo para las conexiones correctas
y alambrar de acuerdo a esto.
GREEN GROUND
SCREW CUPPED
WASHER
AB
OUTLET BOX
GROUND
FIXTURE
GROUND
DIMPLES
WIRE CONNECTOR
(NOT PROVIDED)
OUTLET BOX
GROUND
GREEN GROUND
SCREW
FIXTURE
GROUND
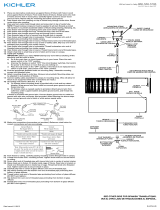
Connect Black or
Red Supply Wire to: Connect
White Supply Wire to:
Black White
*Parallel cord (round & smooth) *Parallel cord (square & ridged)
Clear, Brown, Gold or Black
without tracer Clear, Brown, Gold or Black
with tracer
Insulated wire (other than green)
with copper conductor Insulated wire (other than green)
with silver conductor
*Note: When parallel wires (SPT I & SPT II)
are used. The neutral wire is square shaped
or ridged and the other wire will be round in
shape or smooth (see illus.) Neutral Wire
ARANDELA
CONCAVA
AB
TIERRA DE LA
CAJA DE SALIDA
TORNILLO DE TIERRA,
VERDE
DEPRESIONES
TIERRA
ARTEFACTO
CONECTOR DE ALAMBRE
(NO SE PROVEE)
TIERRA DE LA
CAJA DE SALIDA
TORNILLO DE TIERRA,
VERDE
TIERRA
ARTEFACTO
Conectar el alambre de
suministro negro o rojo al Conectar el alambre de
suministro blanco al
Negro Blanco
*Cordon paralelo (redondo y liso) *Cordon paralelo (cuadrado y estriado)
Claro, marrón, amarillio o negro
sin hebra identificadora Claro, marrón, amarillio o negro
con hebra identificadora
Alambre aislado (diferente del verde)
con conductor de cobre Alambre aislado (diferente del
verde) con conductor de plata
*Nota: Cuando se utiliza alambre paralelo
(SPT I y SPT II). El alambre neutro es de forma
cuadrada o estriada y el otro alambre será de
forma redonda o lisa. (Vea la ilustracíón). Hilo Neutral
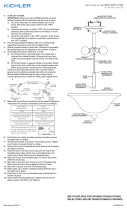
6) Coloque el artefacto de alumbrado en el cielorraso, de modo que los
tornillos de montaje puedan pasar a través de las ranuras tipo
bocallave. Gire el artefacto hasta que las cabessas de los tornillos
aparescan como en el detalle. Apriete los tornillos.
7) Inserte la bombilla recomendada.
8) Atornille la tuerca hexagonal en el tubo roscado y atornille el tubo
roscado en el acoplamiento, en la parte inferior del cuerpo del artefacto.
Sujete el tubo roscado en el lugar apretando la tuerca hexagonal
contra el acoplamiento.
9) Cuidadosamente levante el vidrio sobre el tubo roscado. Sujete en el
lugar con la arandela de caucho, la arandela plana y la tuerca hexagonal.
(NO apriete excesivamente.)
10) Resbale la guarnición sobre el tubo roscado y sujete en el lugar con el
capuchón.
MOUNTING SCREW
TORNILLO DE MONTAJE
FIXTURE
ARTEFACTO
MOUNTING STRAP
ABRAZADERA DE
MONTAJE
OUTLET BOX
CAJA DE SALIDA
THREADED PIPE
TUBO ROSCADO
HEXNUT
TUERCA
HEXAGONAL
GLASS
VIDRIO
HEXNUT
TUERCA
HEXAGONAL
RUBBER WASHER
ARANDELA DE HULE
FINIAL
CAPUCHON
TRIM
GUARNICIÓN
Date Issued: 3/18/05 IS-8064-US
COUPLING
ACOPLAMIENTO
SCREW/
KEYHOLE DETAIL
DETALLE DE
TORNILLO /
BOCALLAVE
FLAT WASHER
ARANDELA PLANA
-
 1
1
-
 2
2


dans d''autres langues
Autres documents
-
 Kichler Lighting 8112CH Manuel utilisateur
-
Kichler Lighting 43194AP Manuel utilisateur
-
 Kichler Lighting 43754AUB Manuel utilisateur
-
 Kichler Lighting 43755AUB Manuel utilisateur
-
 Kichler Lighting 44009MIZ Manuel utilisateur
-
 Kichler Lighting 42474PN Manuel utilisateur
-
 Kichler Lighting 42879NI Manuel utilisateur
-
 Kichler Lighting 42497NI Manuel utilisateur
-
 Kichler Lighting 43600WZC Manuel utilisateur


