Murray 621450X4NB Instruction book
- Catégorie
- Souffleuses à neige
- Taper
- Instruction book
Ce manuel convient également à

F-031023C
Read and keep this book for future reference. This book contains important information on SAFETY,
ASSEMBLY, OPERATION, AND MAINTENANCE.
Lisez et conservez ce manuel pour référence. Ce manuel contient des informations importantes
concernant la SECURITE, LE MONTAGE, L’UTILISATION ET L’ENTRETIEN.
Instruction Book Snow Thrower Model 621450x4NB
Manuel d’instructions chasse−neige modèle 621450x4NB

2
F-031023C
NOTE: This unit is equipped with an internal combustion engine
and must not be used on or near any unimproved
forest-covered, brush-covered or grass-covered land unless
the engine’s exhaust system is equipped with a spark arrester
meeting applicable local or state laws (if any). If a spark arrester
is used, it must be maintained in effective working order by the
operator.
In the State of California, the above is required by law (Section
4442 of the California Public Resources Code). Other states
may have similar laws. Federal laws apply on federal lands. See
an Authorized Service Center for a spark arrester for the
muffler.
REMARQUE : cette machine est équipée d’un moteur à
combustion interne et ne doit pas être utilisée sur un terrain
forestier, buissonnant ou herbeux non préparé, à moins que le
dispositif d’échappement soit pourvu d’un pare-étincelles
conforme à la législation locale ou de l’état (le cas échéant). Si
un pare-étincelles est utilisé, celui-ci doit être maintenu en
parfait état de fonctionnement par l’utilisateur.
Au sein de l’état de Californie, la loi exige la prise en compte
des précautions mentionnées ci-dessus (clause 4442 du
California Public Resources Code). D’autres états peuvent
présenter des lois similaires. Les lois fédérales s’appliquent sur
les terres fédérales. S’adresser à un centre de maintenance
agréé pour l’achat d’un pare-étincelles pour l’échappement.
Les gaz d’échappement du moteur, certains
éléments de leur composition, ainsi que
certains organes du véhicule contiennent ou
émettent des substances chimiques qui, selon
l’État de Californie, peuvent causer le cancer,
des malformations à la naissance, ou
représentent un danger pour la reproduction.
Les bornes et pôles de batterie et autres
accessoires de ce type contiennent du plomb et
des composés de plomb, substances
chimiques qui, selon l’État de Californie,
peuvent causer le cancer, des malformations à
la naissance, ou représentent un danger pour la
reproduction.
Engine Exhaust, some of its constituents, and
certain vehicle components contain or emit
chemicals known to the State of California to
cause cancer and birth defects or other repro-
ductive harm.
Battery posts, terminals and related accesso-
ries contain lead and lead compounds, chemi-
cals known to the State of California to cause
cancer and birth defects or other reproductive
harm. WASH HANDS AFTER HANDLING.

3
F-031023C
1
1
1
2
2
2
3
5
8
15
11
14
12
12
9
10
1
1
2
2
3
4
5
2
1
3
3
1
5
2
2
4
5
6
7
6
14
15
16
14
14
14
17
17
17

4
F-031023C
7
2
1
3
1/8” (3mm)
4
5
8
2
1
9
3
4
4
5
6
10
1
2
3
4
4
11 12
3
5
1
1
4
3
2
6
5

5
F-031023C
13 14
1

ENGLISH
6
F-031023C
CONTENTS
PRODUCT INFORMATION 6
OWNER’S INFORMATION 6
INTERNATIONAL PICTORIALS 7
ASSEMBLY 9
OPERATION 10
MAINTENANCE 12
MAINTENANCE CHART 12
TROUBLE SHOOTING CHART 14
TWO YEAR LIMITED WARRANTY
Murray, Inc. warrants to the original purchaser
that this unit shall be free from defects in
material and workmanship under normal use
and service for a period of Two (2) Year from
the date of purchase; however, this warranty
does not cover engines, accessories (such as
electric starters) and Normal Wear Parts (except
as noted below) as the companies that
manufacture these items furnish their own
warranties and provide service through their
authorized field service facilities. For additional
information, see the warranties covering these
particular parts. If you are uncertain whether
your unit contains or is equipped with one or
more of these parts, consult your dealer prior to
purchase. Subject to the terms and conditions
noted in this Limited Warranty, we shall, at our
option, repair or replace at no cost to the original
purchaser any part covered by this Limited
Warranty during the applicable warranty period.
Normal Wear Parts are defined as drive belts,
augers, shear pins, tires and headlights. These
parts are warranted to be free from defects in
material and workmanship as delivered with the
product. Any claim for repair or replacement of
Normal Wear Parts must be made within thirty
(30) days of the date of purchase. No claims
involving damage caused from material use,
abuse or misuse will be honored.
This Murray, Inc. Two (2) Year Limited
Warranty is your exclusive remedy; however,
this warranty is void or does not apply to any
unit that has been tampered with, altered,
misused, abused or used for rental or other
commercial and/or professional
(non-homeowner) uses. Your warranty does not
cover minor mechanical adjustments which are
not due to any defect in material or
workmanship. For assistance in making such
adjustments, consult your Instruction Book.
To make a claim under this Murray, Inc. Two (2)
Year Limited Warranty, return the unit (or if
authorized in advance, the defective part) along
with your proof of purchase to an Authorized
Service Center near you. To locate the nearest
Authorized Service Center, call the Central Parts
Distributor for your area shown in the list
provided with your unit or check the Yellow Page
listings in your local telephone directory. If you
return the entire unit, we will repair the unit. If we
authorize the return of the defective part only, we
will either replace or repair the part.This Murray,
Inc. Two (2) Year Limited Warranty gives you
specific legal rights, and you may also have
other rights which vary from state to state.
This
Limited Warranty is given in lieu of all other
expressed and implied warranties including
the implied warranty of merchantability and
warranty of fitness for a particular purpose. If
you need additional information on this written
warranty or assistance in obtaining service,
write:
USA - MURRAY, INC.
Outdoor Power Equipment
Customer Service Department
P.O. Box 268
Brentwood, Tennessee 37027
1-800-251-8007
CANADA - MURRAY CANADA, INC.
Factory Customer Service
1195 Coutneypark Drive East
Mississauga, Ont. L5T-1R1
1-800-661-6662
PRODUCT INFORMATION
The owner must be certain that all the product
information is included with the unit. This
information includes the INSTRUCTION
BOOKS, the REPLACEMENT PARTS and the
WARRANTIES. This information must be
included to make sure state laws and other laws
are followed.
OWNER’S INFORMATION
This instruction book is written for a person with
some mechanical ability. Like most service
books, not all the steps are described. Steps on
how to loosen or tighten fasteners are steps
anyone can follow with some mechanical ability.
Read and follow these instructions before you
use the unit.
Know your product: If you understand the unit
and how the unit operates, you will get the best
performance. As you read this manual, compare
the illustrations to the unit. Learn the location
and the function of the controls. To help prevent
an accident, follow the operating instructions
and the safety rules. Keep this manual for future
reference.
IMPORTANT: Many units are not assembled
and are sold in cartons. It is the responsibility of
the owner to make sure the assembly instruc-
tions in this manual are exactly followed. Other
units are purchased in an assembled condition.
On assembled units, it is the responsibility of the
owner to make sure the unit is correctly as-
sembled. The owner must carefully check the
unit according to the instructions in this manual
before it is first used.
WARNING: Look for this symbol to indicate
important safety precautions. This symbol
indicates: “Attention! Become Alert! Your
Safety Is At Risk.”
Responsibility Of The Owner
The responsibility of the owner is to
follow the instructions below.
1. Carefully read and follow the rules for safe
operation.
2. Follow all the assembly and preparation
instructions.
3. Inspect the unit.
4. Make sure that the operator of the unit
knows how to correctly use all standard
and accessory equipment.
5. Operate the unit only with guards, shields,
and other safety items in place and working
correctly.
6. Correctly adjust the unit.
7. Service the unit only with authorized or ap-
proved replacement parts.
8. Complete all maintenance on the unit.
Environmental Awareness
D Do not fill the engine’s fuel tank completely
full.
D Drain fuel for off-season storage.
D Use only unleaded gasoline.
D Service the air cleaner regularly.
D Tune-up the engine regularly.
D Keep equipment in efficient operating
condition.
D Dispose of used engine oil properly.

ENGLISH
7
F-031023C
INTERNATIONAL PICTORIALS
IMPORTANT: The following pictorials are lo-
cated on your unit or on literature supplied
with the product. Before you operate the
unit, learn and understand the purpose for
each pictorial.
15
Engine Off
Engine Stop On Choke Off Choke On
Neutral
N
Slow Fast Electric Start Engine Start Engine Run
Throttle Primer Button Ignition Key Ignition Off Ignition On
Drive Clutch
Forward
Auger Clutch
Auger Collector
Reverse
Engage
Ignition Key
Insert To Run, Pull Out To Stop.
Fuel Oil Fuel Oil Mixture
Discharge DOWN Discharge UP
Discharge LEFT Discharge RIGHT
KGS
KGS
Weight Transfer
Lift Handle To Engage
Weight Transfer
Depress Pedal To Disengage
Transmission
Push To Engage
Electric Starter
Control And Operating Symbols
Safety Warning Symbols
DANGER
Thrown Objects.
Keep Bystanders Away.
DANGER
Thrown Objects.
Keep Bystanders Away.
WARNING
IMPORTANT
Read Owner’s Manual
Before Operating
This Machine.
DANGER
Avoid Injury From
Rotating Auger. Keep
Hands, Feet And
Clothing Away.
DANGER
Stop The Engine
Before Unclogging
Discharge Chute!
STOP
WARNING
Hot Surface

ENGLISH
8
F-031023C
Safe Operation Practices for Snow Throwers
As Recommended By: American National Standards Institute.
IMPORTANT: Safety standards require operator
presence controls to minimize the risk of injury.
Your snow thrower is equipped with such con-
trols. Do not attempt to defeat the function of the
operator presence control under any circum-
stances.
Training
1. Read the operating and service instruction
manual carefully. Be thoroughly familiar with
the controls and the proper use of the equip-
ment. Know how to stop the unit and disen-
gage the controls quickly.
2. Never allow children to operate the equip-
ment. Never allow adults to operate the
equipment without proper instruction.
3. Keep the area of operation clear of all per-
sons, particularly small children and pets.
4. Exercise caution to avoid slipping or falling
especially when operating in reverse.
Preparation
1. Thoroughly inspect the area where the equip-
ment is to be used and remove all doormats,
sleds, boards, wires, and other foreign ob-
jects.
2. Disengage all clutches before starting the en-
gine (motor).
3. Do not operate the equipment without wear-
ing adequate winter outer garments. Wear
footwear that will improve footing on slippery
surfaces.
4. Handle fuel with care; it is highly flammable.
a. Use an approved fuel container.
b. Never remove fuel tank cap or add fuel to
a running engine (motor) or hot engine
(motor).
c. Fill fuel tank outdoors with extreme care.
Never fill fuel tank indoors.
d. Replace fuel cap securely and wipe up
spilled fuel.
e. Never store fuel or snow thrower with fuel
in the tank inside of a building where
fumes may reach an open flame or spark.
f. Check fuel supply before each use, allow-
ing space for expansion as the heat of the
engine (motor) and/or sun can cause fuel
to expand.
5. For all units with electric starting motors use
electric starting extension cords certified
CSA/UL. Use only with a receptacle that has
been installed in accordance with local in-
spection authorities.
6. Adjust the snow thrower height to clear gravel
or crushed rock surface.
7. Never attempt to make any adjustments
while the engine (motor) is running (except
when specifically recommended by manufac-
turer).
8. Let engine (motor) and snow thrower adjust
to outdoor temperatures before starting to
clear snow.
9. Always wear safety glasses or eye shields
during operation or while performing an ad-
justment or repair to protect eyes from foreign
objects that may be thrown from the snow
thrower.
Operation
1. Do not operate this machine if you are taking
drugs or other medication which can cause
drowsiness or affect your ability to operate
this machine.
2. Do not use this machine if you are mentally
or physically unable to operate this machine
safely.
3. Do not put hands or feet near or under rotat-
ing parts. Keep clear of the discharge open-
ing at all times.
4. Exercise extreme caution when operating on
or crossing gravel drives, walks or roads.
Stay alert for hidden hazards or traffic.
5. After striking a foreign object, stop the engine
(motor), remove the wire from the spark plug,
thoroughly inspect snow thrower for any
damage, and repair the damage before re-
starting and operating the snow thrower.
6. If the unit should start to vibrate abnormally,
stop the engine (motor) and check immedi-
ately for the cause. Vibration is generally a
warning of trouble.
7. Stop the engine (motor) whenever you leave
the operating position, before unclogging the
auger/impeller housing or discharge chute
and when making any repairs, adjustments,
or inspections.
8. When cleaning, repairing, or inspecting, make
certain the auger/impeller and all moving
parts have stopped and all controls are dis-
engaged. Disconnect the spark plug wire and
keep the wire away from the spark plug to
prevent accidental starting.
9. Take all possible precautions when leaving
the snow thrower unattended. Disengage the
auger/ impeller, stop engine (motor), and re-
move key.
10. Do not run the engine (motor) indoors, except
when starting the engine (motor) and for
transporting the snow thrower in or out of the
building. Open the outside doors; exhaust
fumes are dangerous (containing CARBON
MONOXIDE, an ODORLESS and DEADLY
GAS).
11. Do not clear snow across the face of slopes.
Exercise extreme caution when changing
direction on slopes. Do not attempt to clear
steep slopes.
12. Never operate the snow thrower without
proper guards, plates or other safety protec-
tive devices in place.
13. Never operate the snow thrower near enclos-
ures, automobiles, window wells, drop- offs,
and the like without proper adjustment of the
snow discharge angle. Keep children and
pets away.
14. Do not overload the machine capacity by at-
tempting to clear snow at too fast a rate.
15. Never operate the machine at high transport
speeds on slippery surfaces. Look behind
and use care when backing up.
16. Never direct discharge at bystanders or allow
anyone in front of the unit.
17. Disengage power to the collector/impeller
when snow thrower is transported or not in
use.
18. Use only attachments and accessories ap-
proved by the manufacturer of the snow
thrower (such as tire chains, electric start kits,
ect.).
19. Never operate the snow thrower without good
visibility or light. Always be sure of your foot-
ing and keep a firm hold on the handles.
Walk;never run.
20. Do not over- reach. Keep proper footing and
balance at all times.
21. Exercise caution if operating on steep slop-
ing surfaces.
22. This snow thrower is for use on sidewalks,
driveways and other ground level surfaces.
23. Do not use the snow thrower on surfaces
above ground level such as roofs of resi-
dences, garages, porches or other such
structures or buildings.
Maintenance And Storage
1. Check shear bolts and other bolts at frequent
intervals for proper tightness to be sure the
equipment is in safe working condition.
2. Never store the snow thrower with fuel in the
tank inside a building where ignition sources
are present such as hot water and space
heaters, clothes dryers, and the like. Allow
the engine (motor) to cool before storing in
any enclosure.
3. Always refer to operator’s guide instructions
for important details if the snow thrower is to
be stored for an extended period.
4. Maintain or replace safety and instruction la-
bels, as necessary.
5. Run the snow thrower a few minutes after
throwing snow to prevent freeze- up of the
auger/impeller.

ENGLISH
9
F-031023C
ASSEMBLY
Read and follow the assembly and adjustment
instructions for your snow thrower. All fasteners
are in the parts bag. Do not discard any parts or
material until the unit is assembled.
WARNING: Before doing any
assembly or maintenance to the
snow thrower, remove the wire
from the spark plug.
NOTE: In this instruction book, left and right
describe the location of a part from the oper-
ator’s position behind the unit.
NOTE: Torque is measured in foot pounds
(metric N.m). This measurement describes
how tight a nut or bolt must be. The torque is
measured with a torque wrench.
NOTE: Illustrations begin on page 3.
Tools Required
1 Knife
1 Pliers
1 1/2 inch adjustable open end wrenches
1 9/16 inch adjustable open end wrenches
1 3/4 inch adjustable open end wrenches
1 Measuring tape or ruler
1 Screwdriver
How To Remove The Snow Thrower
From The Carton
1. Locate all parts that are packed separately
and remove from the carton.
2. Remove and discard the packing material
from around the snow thrower.
3. Cut down all four corners of the carton and
lay the side panels flat.
4. Hold onto the lower handle and pull the snow
thrower off the carton.
CAUTION: DO NOT back over cables.
5. Remove the packing material from the han-
dle assembly.
How To Assemble The Handle
1. Remove the packing material from the upper
and lower handles.
2. (Figure 1) Loosen the knobs (1) on each
side of the handle (2).
3. Raise the upper handle (2) to the operating
position.. Hold the upper handle (2) apart to
prevent scratching the lower handle.
NOTE: Make sure the cables are not
caught between the upper and lower han-
dle.
4. Tighten the knobs (1).
How To Prepare The Engine
WARNING: Follow the engine
manufacturer’s instructions for the
type of fuel and oil to use. Always
use a safety fuel container. Do not smoke
when adding the fuel mixture to the engine.
When inside an enclosure, do not fill the
fuel tank. Before you add the fuel mixture,
stop the engine. Let the engine cool for
several minutes.
See the engine manufacturer’s instructions for
the type of fuel and oil to use. Before you use
the unit, read the information on safety, opera-
tion, maintenance, and storage.
How To Mix The Fuel Mixture
The two cycle engine, used on this snow throw-
er, requires a mixture of gasoline and oil for lu-
brication of the bearings and other moving parts.
The correct fuel mixture ratio is 50:1 (2.6 oz. oil
per one gallon of gas - see the Fuel Mixture
Chart). Gasoline and oil must be pre-mixed in a
clean gasoline container. Always use fresh,
clean, unleaded gasoline.
NOTE: Engine horsepower ratings may vary
by engine adjustments, manufacturing vari-
ances, altitude, atmospheric conditions, fuel
and maintenance.
FUEL MIXTURE CHART (mixture 50:1)
U.S. IMPERIAL SI. (Metric
GAS OIL GAS OIL GAS OIL
1
Gal.
2.6
oz
1
Gal.
3.1
oz
1
liter
20
ML
Mix gasoline and oil as follows:
1. Pour one (1) U.S. quart of fresh, clean, un-
leaded automotive gasoline into a one gallon
size gasoline container.
2. Add 2.6 ounces of clean, high quality, two-
cycle oil to the gasoline container.
IMPORTANT: Do not use outboard motor
oil or multi-viscosity oils,such as 10W-30
or 10W-40.
3. Install the fuel cap onto the gasoline contain-
er. Vigorously shake the gasoline container
to mix the oil with the gasoline.
4. Add an additional three (3) U.S. quarts of
gasoline to the gallon container. Again shake
the gasoline container.
Before You Operate
Before you operate your new snow thrower,
please review the following checklist:
G Make sure all assembly instructions have
been completed.
G Make sure the discharge chute rotates freely.
G Make sure that no loose parts remain in the
carton.
As you learn how to properly use the snow
thrower, pay extra attention to the following im-
portant items.
G Make sure the fuel tank is filled with the
correct mixture of gasoline and oil.
G Become familiar with the location of all
controls and understand their function.
G Before starting the engine, make sure all
controls operate corrently.
Do not fill the fuel tank with gasoline that does not have oil mixed in it. Shake the
gasoline container before each filling of the fuel tank.
Shake Can
OIl
(2.6 oz)
Gasoline
1U.S.
Quart
1 U.S. Gallon container
1 U.S.
Gallon
Special
Gasoline
Add more gas
(3 U. S. Quarts)

ENGLISH
10
F-031023C
OPERATION
NOTE: Illustrations begin on page 3.
Know Your Snow Thrower (Figure 2)
Read this Instruction Book and safety rules be-
fore operation the snow thrower. Compare the
illustration with your snow thrower to familiarize
yourself with the location of various controls and
adjustments.
Crank Assembly (2) - Changes the direction of
the discharge chute.
Discharge Chute (3) - Changes the distance the
snow is thrown.
Auger Drive Lever (5) - Starts and stops the au-
ger which propels the snow thrower.
Ignition Key (8) - Must be inserted and turned to
the on position to start the engine.
Primer Button (9) - Injects fuel directly into the
carburetor for fast starts in cold weather.
Electric Start Button (10) - On electric start mod-
els, used to start the engine.
Switch Box (11) - On electric start models, used
to attach a 120 volt electric power cord.
Recoil Starter Handle (12) - Use to manually
start the engine.
Choke Control (14) - Use to start a cold engine.
Spark Plug Access Panel (15) - Remove to ac-
cess the spark plug.
How To Control
The Discharge Of The Snow
WARNING: Never direct the dis-
charge of snow toward bystanders.
WARNING: Always stop the engine
before unclogging the discharge
chute or the auger housing and be-
fore leaving the snow thrower.
1. (Figure 2) Turn the crank assembly (2) to
change the discharge direction of the snow.
2. (Figure 3) Loosen the wing knob (1) on the
chute deflector (2).
3. Move the chute deflector (2) up for more
distance or down for less distance.
4. Tighten the wing knob (1).
How To Throw Snow (Figure 2)
1. Engage the auger drive lever (5).
2. To stop throwing snow, release the auger
drive lever (5).
WARNING: The operation of any
snow thrower can result in foreign
objects being thrown into the eyes,
which can result in severe eye damage.
Always wear safety glasses or eye shields
while operating the snow thrower. We rec-
ommend standard safety glasses or use a
wide vision safety mask over your glasses.
How To Stop Discharging Snow
(Figure 2)
1. To stop discharging snow, release the auger
drive lever (5).
2. To stop the engine, turn the ignition key (8)
to the off position.
How To Move Forward (Figure 4)
1. Hold the auger drive lever (5) against the
handle (2). The auger will begin rotating.
2. To go forward, raise the handle (2) to allow
the rubber auger blades (1) to contact the
ground. Maintain a firm hold on the handle
(2) as the snow thrower starts to move for-
ward. Guide the snow thrower by moving the
handle (2) either left or right. Do not attempt
to push the snow thrower.
3. To stop, release the auger drive lever (5).
NOTE: If the auger continues to rotate, see
“How To Adjust The Auger Control Cable” in
the Service and Adjustments section.
Before Starting The Engine
1. Before you service or start the engine, famil-
iarize yourself with the snow thrower. Be
sure you understand the function and loca-
tion of all controls.
2. Make sure that all fasteners are tight.
3. Make sure the fuel tank is filled with the cor-
rect mixture of gasoline and oil.
4. Become familiar with the location of all con-
trols and understand their function.
5. Before starting the engine, make sure all
controls operate corrently.
Add The Fuel Mixture
WARNING: Follow the engine
manufacturer’s instructions for the
type of fuel and oil to use. Always
use a safety fuel container. Do not smoke
when adding the fuel mixture to the engine.
When inside an enclosure, do not fill the
fuel tank. Before you add the fuel mixture,
stop the engine. Let the engine cool for
several minutes.
(Figure 4) Fill the fuel tank (3) to the full posi-
tion with a fresh, clean fuel mixture. See “How
To Mix The Fuel Mixture” in the Assembly sec-
tion.
How To Stop The Engine (Figure 2)
To stop the engine, turn the ignition key (8) to
the off position. Keep the ignition key (8) in a
safe place. The engine will not start without the
ignition key (8).
How To Start The Engine (Figure 2)
Models equipped with an Electric Starter
NOTE: An electric starter kit can be added to
recoil start engines. Electric starter kits are
available from your nearest authorized ser-
vice center.
WARNING: The starter is equipped
with a three- wire power cord and
plug and is designed to operate on
120 volt A.C. household current. The power
cord must be properly grounded at all times
to avoid the possibility of electrical shock
which can injure the operator. Carefully fol-
low all instructions in the “How To Start The
Engine” section. Make sure that your house
wiring is a three- wire grounded system. If
you are not sure, ask a licensed electrician.
If your house wire system is not a
three- wire grounded system, do not use
this electric starter under any conditions. If
your system is grounded but a three- hole
grounded receptacle is not available to start
the engine, have a three- hole grounded re-
ceptacle installed by a licensed electrician.
To connect a 120 volt A.C. power cord, al-
ways connect the power cord to the switch
box (11) on the engine first. Then, plug the
other end into the three- hole grounded re-
ceptacle. When disconnecting the power
cord, always unplug the end from the
three- hole grounded receptacle first.
How To Start A Cold Engine (Figure 2)
1. Fill the fuel tank with a fresh, clean fuel mis-
ture. See “How To Mix The Fuel Mixture” in
the Assembly section.
2. Move the choke control to FULL position.
3. Make sure the auger drive lever (5) is in the
disengaged (released) position.
4. Insert the ignition key (8) and turn to the on
position.
5. Move the choke control (14) to the full
choke position.
6. (Electric Start) Connect the power cord to
the switch box (11) located on the engine.
7. (Electric Start) Plug the other end of the
power cord into a three-hole, grounded 120
VOLT, A.C. receptacle. (See the WARNING
in this section).
8. Push the primer button (9). Every time you
push the primer button (9), wait two sec-
onds. For the number of times required to
push the primer button (9), see the engine
manufacturer’s instructions.
9. (Electric Start) Push on the electric start
button (10) until the engine starts. Do not
crank for more than 10 seconds at a time.
The electric starter is thermally protected. If
the electric starter overheates, it will auto-
matically stop and can only be restarted
when it has cooled to a safe temperature. A
wait of about 5 to 10 minutes is required to
allow the electric starter to cool.
10.(Recoil Start) Rapidly pull the recoil starter
handle (12). Do not allow the recoil starter
handle (12) to snap back. Slowly return the
recoil starter handle (12).
11. If the engine does not start in 5 or 6 tries,
See the “Trouble Shooting Chart” Instruc-
tions.
12.(Electric Start) When the engine starts, re-
lease the electric start button (10) and
move the choke control (14) to 1/2 choke
position. When the engine runs smoothly,
move the choke control (14) to the off posi-
tion.
13.(Electric Start) First disconnect the power
cord from the three-hole receptacle. Then,
disconnect the power cord from the switch
box (11).

ENGLISH
11
F-031023C
NOTE: In temperatures below 05F, allow the
engine to warm up for several minutes be-
fore blowing snow.
WARNING: Never run the engine
indoors or in enclosed, poorly ven-
tilated areas. Engine exhaust con-
tains carbon monoxide, an odorless and
deadly gas. Keep hands, feet, hair and
loose clothing away from any moving parts
located on the engine or the snow thrower.
The temperature of muffler and nearby
areas may exceed 150°F. Avoid these
areas.
How To Start A Warm Engine (Figure 2)
If an engine has been running and is still warm,
leave the choke control (14) in the off position
and do not push the primer button (9). If the
engine fails to start, follow the instructions “How
To Start A Cold Engine”.
NOTE: Do not use the primer button (9) to
start a warm engine.
How To Start An Engine With A Frozen Electric
Starter (Figure 2)
If the electric starter is frozen and will not turn
the engine, follow the instructions below.
1. Pull out the recoil starter handle (12) as far
as possible.
2. Quickly release the recoil starter handle
(12). Allow the recoil starter handle (12) to
snap back against the recoil starter.
If the engine still fails to start, repeat the two pre-
vious steps until the engine starts. Then, contin-
ue with the directions “How To Start A Cold
Engine”.
To help prevent the possible freeze-up of the
recoil starter and of the engine controls, proceed
as follows after each snow removal job.
1. With the engine running, quickly pull the re-
coil starter handle (12) three or four times
with a continuous full arm stroke. This will
produce a loud clattering sound that is not
harmful to the engine or starter.
2. Stop the engine. Wipe all snow and moisture
from the carburetor cover, control levers and
cables. Also move the choke control (14)
and recoil starter handle (12) several times.
How To Remove Snow or Debris From
The Auger Housing
(Figure 2)
WARNING: Do not attempt to re-
move snow or debris that may be-
come lodged in auger housing
without taking the following precautions.
1. Release the auger drive lever (5).
2. Remove the ignition key (8).
3. Disconnect the spark plug wire.
4. Do not place your hands in the auger hous-
ing (4) or the discharge chute (3). Use a
pry bar to remove any snow or debris.
Snow Throwing Tips
1. This snow thrower will propel itself forward
when the handle is raised enough to cause
the auger blades to contact the ground. The
auger should stop when auger control bar is
released. If it does not stop, see “How To Ad-
just The Auger Control Cable” in the adjust-
ment section.
2. Most efficient snow throwing is accomplished
when the snow is removed immediately after
if falls.
3. For complete snow removal, slightly overlap
each previous path.
4. Whenever possible, discharge the snow
down wind.
5. The distance the snow will be discharged
can be adjusted by moving the discharge
chute deflector. Raise the deflector for more
distance or lower the deflector for less dis-
tance.
6. In windy conditions, lower the chute deflector
to direct the discharged snow close to the
ground where it is less likely to blow into un-
wanted areas.
7. For safety and to prevent damage to the
snow thrower, keep the area to be cleared
free of stones, toys and other foreign objects.
8. Do not use the auger propelling feature when
clearing gravel or crushed rock driveways.
Move the handle down to slightly raise the
auger.
9. The forward speed of the snow thrower is
dependent on the depth and weight of the
snow. Experience will establish the most ef-
fective method of using the snow thrower un-
der different conditions.
10.After each snow throwing job, allow the en-
gine to run for a few minutes. The snow and
accumulated ice will melt off the engine.
11. Clean the snow thrower after each use.
12.Remove ice, snow and debris from the entire
snow thrower. Flush with water to remove all
salt or other chemicals. Wipe snow thrower
dry.
Dry And Average Snow
1. Snow up to eight inches deep can be re-
moved rapidly and easily by walking at a
moderate rate. For snow or drifts of a greater
depth,slow your pace to allow the discharge
chute to dispose of the snow as rapidly as
the auger receives the snow.
2. Plan to have the snow discharged in the di-
rection the wind is blowing.
Wet Packed Snow
Move slowly into wet, packed snow. If the wet,
packed snow causes the auger to slow down or
the discharge chute begins to clog, back off and
begin a series of short back and forth jabs into
the snow. These short back and forth jabs, four
to six inches, will “belch” the snow from the
chute.
Snow Banks And Drifts
In snow of greater depth than the unit, use the
same “jabbing” technique described above. Turn
the discharge chute away from the snow bank.
More time will be required to remove snow of
this type than level snow.

ENGLISH
12
F-031023C
MAINTENANCE CHART
CUSTOMER RESPONSIBILITIES
SERVICE RECORDS
Fill in dates as you
complete regular
service.
Before
Each
Use
First
2
Hours
Every
5
Hours
Every
10
Hours
Every
25
Hours
Each
Season
Before
Storage
SERVICE DATES
Check And Tighten All Screws and Nuts
√ √
Check Spark Plug
√ √
Check Drive Belt
√
Check Fuel
√
Drain Fuel
√
Lubricate Chute Control Flange
√
MAINTENANCE
NOTE: Illustrations begin on page 3.
Use the following maintenance section to keep
your unit in good operating condition. All the
maintenance information for the engine is in the
engine manufacturer’s instructions. Before you
start the engine, read this book.
WARNING: Before you make an in-
spection, adjustment (except
carburettor), or repair, disconnect
the wire from the spark plug.
General Recommendations
The warranty on this snow thrower does not cov-
er items that have been subjected to operator
abuse or negligence. To receive full value from
the warranty, the operator must maintain the
snow thrower as instructed in this manual.
Some adjustments must be made periodically to
properly maintain the snow thrower.
After Each Use
G Check for any loose or damaged parts.
G Tighten any loose fasteners.
G Check and maintain the auger.
G Check controls to make sure they are
functioning properly.
G If any parts are worn or damaged, replace
immediately.
All adjustments in the Maintenance section of
this manual should be checked at least once
each season.
How To Remove The Top Cover
(Figure 5)
1. Remove the discharge chute (1).
2. Remove the fuel cap.
3. Remove the two bolts and nuts (2) from the
front of the top cover (3).
4. Remove the two bolts (4) from the left and right
side of the top cover (3).
5. Remove the eight screws (5) on the left and
right side of the top cover (3).
6. Remove the three screws (6) from the top por-
tion of the control panel.
7. Carefully pull the rear of the top cover (4) up
and over the gas tank.
8. To install the top cover (4), reverse the
above steps.
Lubrication
Before Storage (Figure 5)
1. Remove the top cover (3). See “How To Re-
move The Top Cover”.
2. Lubricate the clute control flange (7). Apply
a clinging type of grease such as Lubriplate.
How To Adjust The Chute Crank
If the chute crank will not rotate fully to the left or
right, adjust as follows.
1. Remove the top cover. See “How To Remove
The Top Cover”.
2. (Figure 7) Loosen nuts (1).
3. Move the crank adjusting bracket (2) to
allow 1/8 inch (3mm) clearance (3) between
the notch in the flange (4) and the outer di-
ameter of the worm gear (5).
4. Tighten the nuts (1).
How To Adjust The Auger Control Cable
The auger control cable are adjusted at the fac-
tory. During normal use, the auger control cable
can become stretched and the auger drive lever
will not properly engage or disengage the auger.
1. (Figure 8) Remove the “Z” hook (1) from
the auger drive lever (2).
2. (Figure 9) Slide the cable boot (3) off the
cable adjustment bracket (4).
3. Push the bottom of the auger control cable
(5) through the cable adjustment bracket
(4) until the “Z” hook (6) can be removed.
4. Remove the “Z” hook (6) from the cable
adjustment bracket (4). Move the “Z” hook
(6) down to the next adjustment hole.
5. Pull the auger control cable (5) up through
the cable adjustment bracket (4).
6. Put the cable boot (3) over the cable ad-
justment bracket (4).
7. (Figure 8) Install the “Z” hook (1) to the au-
ger drive lever (2).
8. To check the adjustment, start the snow
thrower. Make sure the auger does not rotate
when the auger drive lever is released.
How To Remove The Belt Cover
(Figure 6)
1. If equipped, remove the heat shield (12)
from the rear of the belt cover (13).
2. Remove the four bolts and nuts (14) holding
the belt cover (13) to the auger housing.
3. Remove the one screw (15) holding the belt
cover (13) to the bottom cover (16).
4. To remove, hold the bottom portion of the
belt cover (13) and pull down and out.
5. To install the belt cover (13), reverse the
above steps.
How To Replace The Drive Belt
The drive belt is of special construction and
must be replaced with original factory replace-
ment belt available from your nearest authorized
service center.
1. Remove the belt cover. See “How To Re-
move The Belt Cover”.
2. (Figure 10) Remove the drive belt (1) from
the idler pulley (2).
3. Remove the drive belt (1) from the engine
pulley (3). Be careful, not to bend the belt
guides (4).
4. (Figure 11) Remove the drive belt (1) from
the auger pulley (5).
5. Remove the old drive belt (1).
6. To install the new drive belt (1), reverse the
above steps.
7. Make sure the drive belt (1) is seated prop-
erly on the pulleys.
NOTE: When the auger control lever is
engaged, the belt guides (4) must be 1/16”
from the drive belt (1).
8. Install belt cover. See “How To Remove The
Belt Cover”.
How To Replace The Auger (Figure 12)
1. Remove the belt cover. See “How To Re-
move The Belt Cover”.
2. Remove the drive belt. See “How To Replace
The Drive Belt”.
3. Remove the auger pulley (1) from the auger
shaft (threads are left hand; turn clockwise to
remove).
4. To keep the auger (6) from rotating, set a
2”x4” piece of wood (2) on the center
paddle (3) to secure auger (6).
5. Remove the fasteners from the bearing as-
sembly (4). Remove the bearing assembly
(4) from the auger housing (5).

ENGLISH
13
F-031023C
6. Slide the auger (6) out of the bearing assem-
bly on the right side of the snow thrower.
7. Tip the auger (6) enough to allow the auger
(6) to slide out of the auger housing (5).
8. To install auger (6), reverse the above steps.
How To Replace The Spark Plug
NOTE: This spark ignition system meets all
requirements of the Canadian Interference-
Causing Equipment Regulations.
NOTE: This engine complies with all current
Australian and New Zealand limitations elec-
tromagnetic interference.
The spark plug is housed in the engine compart-
ment under the top cover and cannot be seen
under normal conditions.
1. (Figure 13) Open the spark plug access door
(1) on the control panel.
2. The spark plug and wire are now visible.
3. Remove the spark plug wire.
4. Clean the area around the spark plug base to
prevent dirt from entering the engine when the
spark plug is removed.
5. Remove the spark plug.
6. Check the spark plug. If the spark plug is
cracked, fouled or dirty, it must be replaced .
7. (Figure 14) Set the gap between the elec-
trodes of the new spark plug at .030 inch. Next,
install the spark plug in the cylinder head and
firmly tighten. Recommended torque is 18 to
20 foot pounds.
How To Prepare The Snow Thrower For
Storage
WARNING: Do not remove gasoline
while inside a building, near a fire,
or while you smoke. Gasoline
fumes can cause an explosion or a fire.
1. Drain the fuel tank.
2. Let the engine run until it is out of gasoline.
3. Remove the spark plug from the cylinder.
Pour one ounce of oil into the cylinder. Slow-
ly pull the recoil-start grip so that the oil will
protect the cylinder. Install a new spark plug
in the cylinder.
4. Thoroughly clean the snow thrower.
5. Lubricate all lubrication points. See the Main-
tenance section.
6. Be sure that all nuts, bolts and screws are
securely fastened. Inspect all visible moving
parts for damage, breakage and wear. Re-
place if necessary.
7. Cover the bare metal parts of the blower
housing and auger with spray rust preventa-
tive lubricant.
8. Put the unit in a building that has good ven-
tilation.
9. If the machine must be stored outdoors,
block up the snow thrower to be sure the en-
tire machine is off the ground.
10.Cover the snow thrower with a suitable pro-
tective cover that does not retain moisture.
Do not use plastic.
How To Order Replacement Parts
The replacement parts are shown either on the
back pages of this Instruction Book or in a
separate Parts List Book.
Use only manufacturer’s authorized or approved
replacement parts. The letter placed on the end
of the part number denotes the type of finish for
the part, C for chrome, Z for zinc, a PA for
purchased assembly. It is important that you
include this when ordering a part. Do not use
attachments or accessories not specifically
recommended for this unit. In order to obtain
proper replacement parts you must supply the
model number (see nameplate).
Replacement parts, except for the engine,
transmission, transaxle or differential, are
available from the store where the product was
purchased, a service shop recommended by the
store or from a “Murray, Inc. Central Parts
Distributor” listed on the back page of this
Instruction Book.
If you are unable to obtain parts or service in the
manner outlined above, then contact:
USA - MURRAY, INC.
Outdoor Power Equipment
Customer Service Department
P.O. Box 268
Brentwood, Tennessee 37027
1-800-251-8007
CANADA - MURRAY CANADA, INC.
Factory Customer Service
1195 Coutneypark Drive East
Mississauga, Ont. L5T-1R1
1-800-661-6662 Collect telephone calls will not
be accepted.
Replacement parts for the engine, transaxle, or
transmission, are available from the
manufacturer’s authorized service center found
in the yellow pages of the telephone directory.
Also, see the individual engine or transmission
warranties to order replacement parts.
When ordering the following information is
required:
(1) The Model Number
(2) Serial Number
(3) Part Number
(4) Quantity

ENGLISH
14
F-031023C
TROUBLE SHOOTING CHART
TROUBLE CAUSE CORRECTION
Difficult starting Defective spark plug. Replace spark plug.
Water or dirt in fuel system. Use carburetor bowl drain to flush and refill with
fresh fuel.
Engine runs erratic Blocked fuel line, empty gas tank, or stale
gasoline
Clean fuel line; check fuel supply; add fresh
gasoline
Engine stalls Unit running on CHOKE. Set choke lever to RUN position.
Engine runs erratic;
Loss of power
Water or dirt in fuel system. Use carburetor bowl drain to flush and refill with
fresh fuel.
Excessive vibration Loose parts: damaged impeller Stop engine immediately and disconnect spark
plug wire. Tighten all bolts and make all
necessary repairs. If vibration continues, have
the unit serviced by a competent repairman.
Unit fails to propel itself Drive belt loose or damaged. Replace drive belt.
Unit fails to discharge snow Auger drive belt loose or damaged. Adjust auger drive belt; replace if damaged.
Auger control cable not adjusted correctly. Adjust auger control cable.
Discharge chute clogged. Stop engine immediately and disconnect spark
plug wire. Clean discharge chute and inside of
auger housing.
Foreign object lodged in auger Stop engine immediately and disconnect spark
plug wire. Remove object from auger.

FRANÇAIS
15
F-031023C
SOMMAIRE
INFORMATIONS SUR LE PRODUIT 15
INFORMATIONS DESTINEES AU
PROPRIETAIRE 15
PICTOGRAMMES INTERNATIONAUX 16
MONTAGE 18
FONCTIONNEMENT 19
MAINTENANCE 21
TABLEAU DE MAINTENANCE 21
TABLEAU DE DEPANNAGE 23
GARANTIE LIMITEE DE DEUX ANS
Murray, Inc. garantie auprès de l’acheteur initial
que cette machine est dépourvue de défauts
matériels et de construction sous utilisation et
entretien normaux pendant une durée de deux
(2) ans à partir de la date d’acquisition ; cette
garantie cependant ne couvre pas les moteurs,
accessoires (tels que moteurs électriques) et
pièces d’usure normale (exceptées les pièces
mentionnées ci-dessous) étant donné que les
sociétés fabriquant ces articles offrent leurs
propres garanties et fournissent des réparations
par le biais de leurs centres de maintenance
spécialisés agréés. Pour plus d’informations, se
reporter aux garanties couvrant ces pièces
particulières. Si vous ne savez pas si votre
machine contient ou est équipée d’une ou
plusieurs de ces pièces, adressez vous à votre
revendeur avant l’acquisition. Sous réserve des
modalités et conditions de cette garantie limitée,
nous nous engageons à réparer ou remplacer, à
notre discrétion et gratuitement auprès de
l’acheteur initial, toute pièce couverte par cette
garantie limitée jusqu’à l’expiration de la garantie
applicable.
Les pièces d’usure normale comprennent les
courroies d’entraînement, les fraises
hélicoïdales, les goupilles de cisaillement, les
pneumatiques, et les phares. Ces pièces sont
garanties sans défaut matériel ou de
construction dans l’état où elles ont été livrées
avec le produit. Toute réclamation concernant la
réparation ou le remplacement d’une pièce
d’usure normale doit être effectuée dans les
trente (30) jours suivant la date d’acquisition.
Aucune réclamation ne sera honorée
concernant des dommages provenant de la
simple utilisation, d’un usage abusif, ou d’une
mauvaise utilisation.
Cette garantie Murray, Inc. de deux (2) ans
constitue votre recours exclusif ; cependant,
cette garantie est nulle ou ne s’applique pas aux
machines ayant été modifiées, endommagées,
fait l’objet d’une utilisation abusive, ou utilisées
lors d’une location ou à des fins commerciales
et/ ou professionnelles (autre que domestiques).
Votre garantie ne couvre pas les réglages
mécaniques mineurs non dus à des défauts
matériels de fabrication. Consultez votre manuel
d’utilisation pour obtenir une assistance
concernant ces réglages.
Pour effectuer une réclamation sous la garantie
limitée de deux (2) ans Murray, Inc., retourner
la machine, (ou, suivant notre autorisation
préalable, la pièce défectueuse) accompagnée
de votre preuve d’achat, auprès du Centre de
maintenance agréé le plus proche de chez vous.
Pour localiser le centre de maintenance le plus
proche, contactez le Distributeur de pièces
régional de votre région figurant sur la liste
fournie avec votre machine, ou consultez les
pages jaunes de votre annuaire téléphonique
local. Si vous nous retournez la machine
complète, nous réparerons celle-ci. Si nous
autorisons seulement le retour de la pièce
défectueuse, nous effectuerons soit la réparation
de celle-ci, soit son remplacement. Cette
garantie limitée Murray, Inc. de deux (2) ans
vous octroie des droits légaux spécifiques, et
vous pouvez également vous prévaloir d’autres
droits dont le contenu varie selon l’Etat où ils
s’appliquent. Cette garantie limitée est
délivrée en lieu et place de toute garantie
stipulée ou tacite, ceci incluant la garantie
tacite de commerciabilité et la garantie de
fonctionnalité pour une tâche définie. Si
vous souhaitez recevoir des informations
supplémentaires concernant cette garantie
écrite ou une assistance quant à l’obtention de
services de réparation, adressez-vous à :
USA - MURRAY, INC.
Outdoor Power Equipment
Customer Service Department
P.O. Box 268
Brentwood, Tennessee 37027
1-800-251-8007
CANADA - MURRAY CANADA, INC.
Factory Customer Service
1195 Coutneypark Drive East
Mississauga, Ont. L5T-1R1
1-800-661-6662
INFORMATIONS SUR LE
PRODUIT
Le propriétaire doit être certain que tous les
renseignements sur le produit sont inclus avec
la tondeuse. Ces renseignements comprennent
les MANUELS D’INSTRUCTION, les PIECES
DE RECHANGE, et les GARANTIES. Ces
renseignements doivent être inclus pour
s’assurer que les lois d’Etat et les autres lois
sont observés.
INFORMATIONS DESTINEES AU
PROPRIETAIRE
Ce manuel se dirige aux personnes familiarisées
avec ce genre de manipulations mécaniques. La
plupart des ouvrages de maintenance ne men-
tionnent pas toutes les étapes, et cet ouvrage ne
fait pas exception. Serrer ou desserrer des atta-
ches sont des manipulations que tout le monde
peut effectuer avec une certaine pratique. Lisez
et suivez ces instructions avant d’utiliser la ton-
deuse.
Apprenez à maîtriser l’appareil : si vous com-
prenez le fonctionnement de ce modèle, vous en
obtiendrez les meilleures performances. Au fur
et à mesure que vous lisez le manuel, reportez-
vous aux illustrations. Sachez repérer l’emplace-
ment des commandes et leur fonction. Afin de
prévenir tout risque d’accident, observez les ins-
tructions de fonctionnement et les règles de sé-
curité. Conservez ce manuel pour future
référence.
IMPORTANT : De nombreux appareils ne sont
pas assemblés et sont vendus démontés dans
leur carton d’emballage. Il est alors de la res-
ponsabilité du propriétaire de veiller à ce que les
instructions de montage présentes dans le ma-
nuel soient suivies en toute exactitude. D’autres
appareils sont vendus entièrement montés. En
ce qui concerne les machines déjà montées, il
est de la responsabilité du propriétaire de veiller
à ce que la machine soit correctement assem-
blée. Le propriétaire doit vérifier attentivement la
machine en fonction des instructions présentes
dans le manuel avant de commencer à utiliser
celle-ci.
DANGER : repérez ce symbole qui vous
indiquera les précautions de sécurité im-
portantes. Ce symbole signifie : “Attention!
Soyez prudent! Vous encourrez des ris-
ques.”
Responsabilité de l’utilisateur
La responsabilité de l’utilisateur est de
suivre les instructions ci-dessous.
1. Lire soigneusement ce manuel et suivre les
règles indiquées pour un usage de la ton-
deuse en toute sécurité.
2. Suivre les instructions de montage et de
préparation.
3. Inspecter la tondeuse.
4. S’assurer que l’utilisateur de la tondeuse
sait bien utiliser les équipements standards
et les accessoires.
5. N’utiliser la tondeuse qu’avec les équipe-
ments de protection, les écrans et autres
dispositifs de sécurité bien en place et en
bon état de marche.
6. Procéder aux réglages nécessaires.
7. Entretenir la tondeuse avec les pièces de
rechange autorisées ou agréées.
8. Veiller à ce qu’un entretien complet soit ef-
fectué sur la tondeuse.
Prise de conscience environnementale
D Ne pas remplir le réservoir d’essence du
moteur au ras-bord.
D Vider l’essence pendant le remisage hors
saison.
D N’utiliser que de l’essence sans plomb.
D Entretenir régulièrement le filtre à air.
D Effectuer un réglage du moteur régulière-
ment.
D Conserver le matériel en bon état de mar-
che.
D Eliminer l’huile de vidange de façon écolo-
gique.

FRANÇAIS
16
F-031023C
PICTOGRAMMES INTERNATIONAUX
IMPORTANT : les pictogrammes suivants
sont situés sur votre appareil ou dans la do-
cumentation ci-jointe. Avant de vous servir
de la tondeuse, apprenez à reconnaître cha-
que pictogramme.
16
Moteur à l’arrêt
Arrêt moteur Marche Arrêt starter Marche starter
Point mort
N
Lent Rapide Démarrage électrique Démarrage moteur Moteur en marche
Accélérateur Bouton d’amorçage Clé du démarreur
Démarreur
hors tension
Démarreur
sous tension
Embrayage des roues
Marche avant
Embrayage de la fraise
Collecteur de la fraise
Marche arrière
Embrayage
Clé du démarreur
Insérer pour mettre en marche,
retirer pour arrêter.
Carburant huile
Mélange essence/huile
Déversoir ABAISSE Déversoir LEVE
Décharge gauche Décharge droite
KGS
KGS
Transfert de poids
Lever la manette pour embrayer
Transfert de poids
Abaisser la manette pour débrayer
Transmission
Appuyer pour en-
gager le starter
électrique
Symboles de commandes et de conduite
Symboles de signalisation de danger
DANGER
IMPORTANT
Lire le manuel de l’utilisa-
teur avant de faire fonc-
tionner cette machine
DANGER
Prévenir les blessures dues
à la fraise hélicoïdale en
rotation. Ecarter vos mains,
pieds, et vêtements.
DANGER
Arrêter le moteur avant de
déboucher le déversoir!
STOP
DANGER
surface brûlante
DANGER
Projection d’objets.
Eloigner tout spectateur.
DANGER
Projection d’objets.
Eloigner tout spectateur.

FRANÇAIS
17
F-031023C
REGLES DE SECURITE A SUIVRE POUR L’UTILISATION DES CHASSE-NEIGE
SELON LES RECOMMANDATIONS DE L’AMERICAN NATIONAL STANDARDS INSTITUTE
.
IMPORTANT : les normes de sécurité requiè-
rent des contrôles de la présence du conducteur
pour limiter les risques de blessures. Votre chas-
se-neige est équipé de ces contrôles. Ne pas
tenter de rendre la fonction de contrôle de la
présence du conducteur inopérante quelles que
soient les circonstances.
Conseils préliminaires
1. Lisez soigneusement le manuel de fonction-
nement et les consignes. Familiarisez-vous
avec les commandes ainsi qu’avec les mo-
des appropriés d’utilisation de la machine.
2. N’autorisez jamais un enfant ou une person-
ne ignorant ces consignes de sécurité à se
servir de la tondeuse.
3. Assurez-vous que toute personne, les en-
fants en particulier, sont à l’écart du lieu
d’utilisation de la tondeuse.
4. User de précautions pour éviter de glisser ou
de tomber, surtout lors de la conduite en mar-
che arrière.
Préparation
1. Inspectez à fond le lieu où le matériel doit
être utilisé. Enlevez tous paillassons, patins,
planches, fils, et autres corps étrangers.
2. Débrayer toutes les commandes avant de
démarrer le moteur.
3. Ne pas faire fonctionner la machine sans por-
ter de vêtements d’extérieur appropriés pour
l’hiver. Chausser des chaussures permettant
d’améliorer l’adhérence sur surfaces glissan-
tes.
4. Manipuler le carburant avec prudence ; celui-
ci est hautement inflammable.
a. Utiliser un bidon d’essence approprié.
b. Ne jamais retirer le bouchon du réservoir
d’essence ou ajouter de l’essence dans
un moteur en marche ou un moteur
chaud.
c. Remplir le réservoir en plein air en usant
d’extrêmes précautions. Ne jamais faire
le plein à l’intérieur d’un bâtiment.
d. Revisser le bouchon soigneusement et
essuyer l’essence renversée.
e. Ne remisez jamais de l’essence ou le
chasse-neige lorsqu’il y de l’essence
dans le réservoir, dans un endroit clos où
les émanations pourraient entrer en
contact avec une flamme ou une étincelle.
f. Vérifier le niveau d’essence avant chaque
utilisation, tout en prévoyant de l’espace
pour l’expansion de l’essence due au fait
que la chaleur du moteur et/ou du soleil
peut provoquer l’expansion de l’essence.
5. Pour toutes les machines équipées de mo-
teur à démarrage électrique, utiliser des ral-
longes de démarrage certifiées CSA/UL.
N’utiliser qu’avec une prise de courant ayant
été installée conformément aux autorités
chargées de l’inspection locale.
6. Régler le chasse- neige de façon à éviter les
graviers et les surfaces couvertes de gravats.
7. Ne tentez jamais de faire de quelconques
réglages lorsque le moteur est en marche
(sauf si spécifiquement indiqué par le fabri-
cant).
8. Laisser le moteur et le chasse- neige s’adap-
ter à la température extérieure avant de com-
mencer à déneiger.
9. Portez toujours des lunettes de sécurité ou
un écran pour les yeux lorsque que vous
employez le chasse-neige ou lors de régla-
ges ou de réparations, afin de protéger vos
yeux de corps étrangers pouvant être proje-
tés par le chasse-neige.
Fonctionnement
1. Ne pas se servir de cette machine lors de la
prise de drogues ou d’autres médicaments
pouvant causer la somnolence ou diminuer
vos capacités à conduire la machine.
2. Ne pas utiliser cette machine si vous êtes
dans l’incapacité mentale ou physique de la
conduire sans danger.
3. Tenez vos mains et vos pieds à l’écart des
parties tournantes. Tenez vous à distance
de la goulotte de décharge à tout instant.
4. User de précaution extrême en traversant les
allées en gravier, les trottoirs ou les routes.
Se tenir en garde face aux dangers dissimu-
lés ou à la circulation routière.
5. Si vous heurtez un corps étranger, coupez le
moteur. Retirez le câble de la bougie. In-
spectez soigneusement le chasse-neige
afin de vérifier s’il y a des dégâts. S’il est
endommagé, réparez-le avant de démarrer
et de le faire fonctionner à nouveau.
6. Si la machine vibre anormalement, coupez
le moteur, et déterminez immédiatement la
cause de ce bruit. La vibration signale géné-
ralement un problème.
7. Coupez le moteur lorsque vous arrêtez de
conduire la machine, avant de déboucher le
carter de la fraise/l’impulseur ou le déversoir
et lors de toute réparation, inspection ou de
tout réglage.
8. Lors d’un nettoyage, d’une réparation ou
d’une inspection, assurez-vous que la frai-
se/l’impulseur et toutes les parties mobiles
sont arrêtées. Débranchez le câble de la
bougie, et tenez le fil éloigné de la bougie
afin de prévenir un démarrage accidentel.
9. Prenez toutes les précautions possibles lors-
que vous laissez le chasse- neige sans sur-
veillance. Désengagez la fraise/l’impulseur,
arrêtez le moteur, et retirez la clé.
10. Ne faites pas fonctionner le moteur à l’inté-
rieur, sauf pour démarrer le moteur, et pour
sortir et rentrer la machine. Ouvrir les portes
donnant vers l’extérieur ; les gaz d’échappe-
ment sont dangereux (ils contiennent du
MONOXYDE DE CARBONE, qui est un
GAZ INODORE ET MORTEL).
11. Ne déneigez pas à l’horizontal des pentes.
Soyez extrêmement prudent en changeant
de direction sur les pentes. Ne tentez pas de
déneiger des pentes excessivement abrup-
tes .
12. N’utilisez jamais le chasse-neige sans les
protections nécessaires : déflecteurs, com-
mandes de sécurité, plaques, ou autres dis-
positifs de sécurité en place.
13. Ne jamais utiliser le chasse- neige à proximi-
té de clôtures, d’automobiles, d’encadre-
ments de soupiraux, de points de décharge
de passagers ou lieux similaires sans réglage
approprié de l’angle du déversoir. Eloigner
enfants et animaux.
14. Ne pas surcharger la capacité de la machine
en tentant de déneiger rapidement.
15. Ne jamais conduire le chasse- neige en vites-
se accélérée sur des surfaces glissantes. Re-
garder vers l’arrière et user de précautions en
opérant la marche arrière.
16. Ne jamais diriger le déversoir vers les per-
sonnes environnantes ou permettre à quicon-
que de se placer en face de la machine.
17. Débrayer l’entraînement de la fraise/l’impul-
seur lors du transport du chasse- neige ou de
sa non utilisation.
18. N’utiliser que les pièces et accessoires
agréés par le fabricant du chasse- neige
(comme les chaînes des pneumatiques, les
kits de démarrage électrique, etc.).
19. Ne jamais conduire le chasse- neige sans
visibilité ou lumière suffisante. Toujours
conserver un bon équilibre et bien agripper
les poignées. Marcher et ne jamais courir.
20. Ne pas essayer d’atteindre trop loin. Conser-
ver un bon équilibre et une bonne prise au
sol à chaque instant.
21. Exercer toute précaution en travaillant sur
des surfaces en pente abrupte.
22. Ce chasse-neige est conçu pour l’utilisation
sur trottoirs, accès de garage et autres sur-
faces au sol.
23. Ne pas utiliser le chasse- neige sur des sur-
faces élevées par rapport au sol comme les
toits de maisons, de garages, de porches ou
autres structures ou bâtiments similaires.
Entretien et remisage
1. Vérifiez le bon serrage des boulons de cisail-
lement et des autres boulons à intervalles
fréquents afin de veiller à ce que le matériel
soit en bon état de marche.
2. Ne jamais remiser la tondeuse avec de l’es-
sence dans le réservoir dans un endroit clos
où des sources d’ignition sont présentes,
telles que des chauffe-eaux ou des radia-
teurs, des sèche-linge et appareils similai-
res. Laissez le moteur se refroidir avant de
remiser la machine dans un endroit clos.
3. Toujours se référer aux instructions du guide
utilisateur pour obtenir des détails importants
au cas où le chasse- neige doit être remisé
pendant une longue période de temps.
4. Entretenir ou remplacer les étiquettes de
commandes et de sécurité.
5. Faire tourner le moteur du chasse- neige
pendant quelques minutes afin d’éviter de
geler la fraise/l’impulseur.

FRANÇAIS
18
F-031023C
MONTAGE
Lire et suivre les instructions de montage et de
réglage de votre chasse-neige. Toutes les atta-
ches se trouvent dans le sac de pièces déta-
chées. Ne jeter aucune pièce avant d’avoir
monté la machine.
DANGER : avant de monter le chas-
se-neige ou de procéder à son en-
tretien, retirer le câble de la bougie.
REMARQUE : dans ce manuel, la gauche et
la droite désignent l’emplacement d’une piè-
ce par rapport à la position du conducteur à
l’arrière de la machine.
REMARQUE : le couple de torsion se mesure
en Newton-mètre (pieds-livre). Il permet
d’évaluer le serrage d’un boulon ou d’une
vis. Le couple de torsion se mesure à l’aide
d’une clé dynamométrique.
REMARQUE : les iIlustrations commencent à
la page 3.
OUTILS NECESSAIRES
1 Couteau
1 Pince
1 Clé à molette de 1/2 pouces
1 Clé à molette de 9/16 pouces
1 Clés réglables de 3/4 pouces
1 Mètre ruban ou règle.
1 Tournevis
Retrait du chasse-neige de son carton
d’emballage
1. Repérer toutes les pièces emballées séparé-
ment et les retirer du carton.
2. Retirer et jeter le matériel d’emballage du
chasse-neige.
3. Découper les quatre coins du carton d’em-
ballage et abaisser les panneaux latéraux au
sol.
4. Agripper la poignée inférieure et tirer le chas-
se-neige hors du carton.
ATTENTION: NE PAS rouler sur les
câbles.
5. Retirer l’emballage de l’ensemble guidon.
Montage de la poignée
1. Retirer la couverture d’emballage des poi-
gnées supérieure et inférieure.
2. (Figure 1) Desserrer les boulons (1) de cha-
que côté du manche (2).
3. Soulever la poignée supérieure (2) en posi-
tion d’utilisation. Maintenir la poignée supé-
rieure (2) écartée pour éviter de rayer la
poignée inférieure.
REMARQUE : S’assurer que les câbles ne
se prennent pas entre la poignée inférieu-
re et la poignée supérieure.
4. Serrer les boutons (1).
Préparation du moteur
DANGER : suivre les instructions
du fabricant du moteur pour
connaître le type de carburant et
d’huile à utiliser. Toujours utiliser un bidon
à essence de sûreté. Ne pas fumer en rem-
plissant le réservoir de mélange. . Ne pas
faire le plein à l’intérieur d’un bâtiment. Ar-
rêter le moteur avant d’ajouter du mélange
Laisser refroidir le moteur quelques minu-
tes.
Voir les instructions du fabricant du moteur pour
connaître le type de carburant et d’huile à uti-
liser. Avant d’utiliser la machine, lire les informa-
tions concernant la sécurité, le fonctionnement,
l’entretien et le remisage.
Composition du mélange
Le moteur à deux temps utilisé sur ce chasse-
neige requiert l’utilisation de mélange d’essence
et d’huile pour la lubrification des roulements et
autre pièces mobiles. Le ratio approprié de mé-
lange est de 50 pour 1 (2.6 oz d’huile par gallon
d’essence-voir le Tableau de Mélange). L’huile
et l’essence doivent être pré-mélangées dans
un bidon d’essence propre. Toujours utiliser de
l’essence fraîche, propre et sans plomb.
REMARQUE: La puissance nominale du mo-
teur peut varier en fonction du réglage du
moteur, des divergences de fabrication, de
l’altitude, des conditions atmosphériques, du
carburant utilisé et de l’entretien.
TABLEAU DE MELANGE (mélange de 50:1)
U.S.A.
SYSTEME
BRITANNIQUE
SYSTEME
METRIQUE
ESS HUIL ESS HUIL ESS HUIL
1
Gal.
2.6
oz
1
Gal.
3.1
oz
1
litre
20
ml
Mélanger l’essence et l’huile comme suit :
1. Verser un (1) litre U.S. d’essence moteur
fraîche, propre et sans plomb dans un bidon
d’essence d’une contenance d’un gallon.
2. Ajouter 2.6 onces d’huile deux temps de qua-
lité supérieure dans le bidon d’essence.
IMPORTANT: ne pas utiliser une huile
pour moteur de hors-bord ou des huiles à
viscosité multiple, telles que les huiles
10W-30 ou 10W-40.
3. Reboucher le bidon d’essence. Secouer le
bidon d’essence énergiquement pour mélan-
ger l’huile à l’essence.
4. Ajouter trois (3) litres U.S. supplémentaires
dans le bidon d’un gallon. Secouer le bidon
d’essence une nouvelle fois.
Avant de démarrer
Avant de démarrer votre chasse-neige neuf,
veuillez vérifier les points suivants :
G Veiller à ce que toutes les instructions de
montage aient été effectuées.
G Vérifier que la goulotte de décharge tourne
librement.
G Veiller à ce qu’aucune pièce détachée n’ait
été oubliée dans le carton.
Tout en apprenant à conduire votre chasse-nei-
ge correctement, veuillez faire très attention aux
points suivants.
G Vérifier si le réservoir est bien rempli avec le
mélange d’essence et d’huile approprié.
G S’habituer à l’emplacement de chaque
commande et comprendre leur fonctionne-
ment.
G Avant de démarrer le moteur, s’assurer que
toutes les commandes fonctionnent correcte-
ment.
Ne pas remplir le réservoir avec de l’essence pure sans huile. Secouer le bidon
d’essence avant chaque remplissage du réservoir.
1 gallon
U.S.Mé-
lange
spécial
Ajouter de
l’essence (3
pintes US)
Secouer le bidon
HUILE
(2.6 oz)
Gasoline
1 pinte
US
Bidon de 1 Gallon U.S

FRANÇAIS
19
F-031023C
FONCTIONNEMENT
REMARQUE : les illustrations apparaissent à
la page 3.
Se familiariser avec la chasse-neige
(Figure 2)
Avant d’utiliser la machine, lire le manuel d’utili-
sation et les régles de sécurité. Comparer les
illustrations avec le chasse-neige pour se fami-
liariser avec l’emplacement des différentes com-
mandes et des réglages.
Ensemble vilebrequin (2) - Change l’orientation
du déversoir.
Déversoir (3) - Change la distance à laquelle la
neige est jetée.
Levier d’entraînement de la fraise hélicoïdale
(5) - Démarre et arrête le mouvement de la fraise
entraînant les roues du chasses-neige.
Clé de démarrage (8) - Doit être introduite et tour-
née en position Marche pour démarrer le moteur.
Bouton d’amorçage (9) - Ce bouton sert à injec-
ter de l’essence directement dans le carburateur
pour faciliter la mise en marche par temps froid.
Bouton de démarrage électrique (10) - Sur les
modèles à démarrage électrique, sert à démarrer
le moteur.
Boîte de contacteur (11) - Sur les modèles à dé-
marrage électrique, sert à brancher une rallonge
électrique de 120 volts.
Poignée de démarrage manuel (12) - Sert à dé-
marrer le moteur manuellement.
Commande du starter (14) - Sert à la mise en
marche par temps froid.
Panneau d’accès à la bougie d’allumage (15) -
Retirer celui-ci pour accéder à la bougie d’alluma-
ge.
Commande du déversement de la neige
DANGER : ne jamais diriger le dé-
versement de la neige en direction
des personnes environnantes.
DANGER : Toujours arrêter le mo-
teur avant de déboucher le déver-
soir ou le carter de la fraise et
avant de laisser le chasse-neige.
1. (Figure 2) Tourner l’ensemble vilebrequin
(2) pour changer la direction du déversement
de la neige.
2. (Figure 3) Dévisser le boulon à oreille (1)
situé sur le déflecteur de déversement (2).
3. Lever le déflecteur de déversement (2)
pour augmenter la distance ou l’abaisser
pour raccourcir la distance.
4. Resserrer le boulon à oreilles (1).
Déblaiement de la neige (Figure 2)
1. Embrayer le levier d’entraînement de la
fraise (5).
2. Pour arrêter de déblayer la neige, relâcher le
levier d’entraînement de la fraise (5).
DANGER : L’utilisation de tout
chasse-neige peut susciter la pro-
jection de corps étrangers dans les
yeux, ce qui peut donner lieu à de sévères
blessures occulaires. Toujours porter des
lunettes de protection ou une visière pro-
tectrice lors de l’utilisation du chasse-
neige. Nous vous recommandons de porter
des lunettes de protection classiques ou
un masque de sécurité à vision large par
dessus vos lunettes de vision.
Arrêt du déversement de neige (Figure
2)
1. Pour stopper le déversement de la neige,
relâcher le levier d’entraînement de la frai-
se hélicoïdale (5).
2.
3. Pour arrêter le moteur, tourner la clé d’allu-
mage (8) en position arrêt.
Avancer (Figure 4)
1. Lever et maintenir le levier d’entraînement
de la fraise (5) contre le manche (2). La frai-
se commence alors à tourner.
2. Pour avancer, soulever le manche (2) pour
permettre aux lames de caoutchouc de la
fraise (1) d’entrer en contact avec le sol.
Maintenir le manche (2) d’une poigne ferme
lorsque le chasse-neige commence à avan-
cer. Guider le chasse-neige en poussant le
manche (2) vers la droite ou vers la gauche.
Ne pas essayer de pousser le chasse-neige.
3. Pour arrêter, relâcher le levier d’entraîne-
ment de la fraise (5).
REMARQUE : Si la fraise continue à tourner,
voir “Réglage du câble de commande de la frai-
se” dans la section Maintenance et réglages”
Avant de démarrer le moteur
1. Avant de démarrer ou de réparer le moteur,
se familiariser avec le chasse-neige. Pren-
dre soin de bien comprendre la fonction et
l’emplacement de toutes les commandes.
2. Veiller à ce que toutes les fixations soient
serrées.
3. S’assurer que le réservoir contient le mélan-
ge d’essence et d’huile approprié.
4. Se familiariser avec l’emplacement de toutes
les commandes et bien comprendre leur
fonctionnement.
5. Avant de démarrer le moteur, s’assurer que
toutes les commandes fonctionnent correcte-
ment.
Ajouter le mélange
DANGER: Suivre les instructions
du fabricant du moteur quant au
type d’essence ou d’huile à utiliser.
Toujours utiliser un bidon d’essence équi-
pé d’une sécurité. Ne pas fumer en rem-
plissant le réservoir de mélange du moteur.
Ne pas remplir le réservoir dans un endroit
clos. Arrêter le moteur avant de verser le
mélange dans le réservoir. Laisser le mo-
teur refroidir pendant quelques minutes
avant de remplir le réservoir.
(Figure 4) Faire le plein du réservoir (3) avec
du mélange frais et propre. Voir la rubrique
“Composition du mélange” dans la section Mon-
tage de ce livret.
Arrêt du moteur (Figure 2)
Pour arrêter le moteur, tourner r la clé de dé-
marrage (8) en position Arrêt. Garder la clé de
démarrage (8) en lieu sûr. Le moteur ne peut
pas démarrer sans la clé de démarrage (8).
Démarrage du moteur (Figure 2)
Modèles équipés d’un starter électrique
REMARQUE : Un kit de starter électrique
peut être rajouté aux moteurs à démarrage
manuel. Les kits de starter électrique sont
disponibles dans votre centre de maintenan-
ce agréé le plus proche.
DANGER : Le starter est équipé
d’une rallonge trifilaire conçue pour
fonctionner avec du courant domes-
tique de 120 volts A.C. La rallonge doit être
mise à la terre en permanence afin d’éviter
l’éventualité d’une électrocution pouvant
blesser le conducteur. Suivre attentivement
les instructions dans la section “Démarrage
du moteur”. Assurez- vous que le câblage
électrique de votre maison est trifilaire avec
prise de terre. En cas d’incertitude, consult-
er un électricien. Si le câblage électrique de
votre maison n’est pas trifilaire avec prise
de terre, ne pas utiliser ce starter électrique,
en quelque circonstance que ce soit. Si
votre système électrique est relié à la terre,
mais qu’une prise trifilaire n’est pas dispon-
ible pour démarrer le moteur, faites- en in-
staller une par un électricien agrémenté.
Pour brancher une rallonge de 120 volts
A.C., toujours brancher d’abord la rallonge
sur la prise de contact du moteur. Brancher
ensuite l’autre bout de la rallonge dans la
prise trifilaire. Pour débrancher la rallonge
électrique, toujours débrancher d’abord le
bout de la prise trifilaire reliée à la terre.
Démarrage à froid (Figure 2)
1. Remplir le réservoir avec du mélange frais et
propre. Voir “Composition du mélange” dans
la section Montage..
2. Mettre la commande de starter en position
MAXIMUM.
3. Veiller à ce que lelevier d’entraînement de
la fraise (5) soit en position débrayée (relâ-
chée).
4. Engager la clé de contact (8) et la tourner
en position Marche.
5. Mettre la commande de starter (14) en sa
position maximale.
6. (Démarrage électrique) Brancher la rallon-
ge électrique à la prise de contact (11) si-
tuée sur le moteur.
7. (Démarrage électrique) Brancher l’autre
bout de la rallonge électrique à une prise
trifilaire reliée à la terre de 120 volts A.C.
(Voir le paragraphe DANGER de cette sec-
tion).
8. Appuyer sur le bouton d’amorçage (9). Cha-
que fois que vous appuyez sur le bouton
d’amorçage (9), attendez deux secondes.
Pour connaître le nombre de fois que l’on
doit appuyer sur le bouton d’amorçage (9),
consulter les instructions données par le fa-
bricant du moteur.

FRANÇAIS
20
F-031023C
9. (Démarrage électrique) Appuyer sur le
bouton de démarrage électrique (10)
jusqu’à ce que le moteur démarre. Ne pas
actionner le démarreur pendant plus de 10
secondes à chaque fois. Le démarreur élec-
trique est doté d’une isolation thermique. S’il
entre en surchauffe, il s’arrêtera automati-
quement et ne pourra être redémarré
qu’après avoir refroidi. Il est recommandé
d’attendre de 5 à 10 minutes pour que le dé-
marreur refroidisse.
10.(Démarrage manuel) Tirer rapidement sur la
corde du démarreur (12). Ne pas laisser la
corde du démarreur (12) s’enrouler d’elle-
même et la retenir pour qu’elle s’enroule len-
tement.
11. Si le moteur ne démarre toujours pas après 5
ou 6 essais, voir les instructions données
dans le “Tableau des pannes”.
12.(Démarrage électrique) Lorsque le moteur
démarre, relâcher le bouton de démarrage
électrique (10) et placer la commande du
starter (14) à la moitié de sa position maxi-
male. Lorsque le moteur tourne normale-
ment, placer la commande du starter (14)
en position fermée.
13.(Démarrage électrique) Débrancher la ral-
longe de la prise électrique trifilaire. Débran-
cher-la ensuite de la prise de contact (11).
REMARQUE : à des températures infé-
rieures à 0°F, laisser chauffer le moteur
pendant quelques minutes avant de com-
mencer à déneiger.
DANGER : ne jamais faire fonction-
ner le moteur à l’intérieur d’un local
ou dans un endroit mal ventilé. Les
fumées d’échappement contiennent du mo-
noxyde de carbone qui est un gaz inodore
et mortel. Ne pas approcher les pieds, les
mains les cheveux ou des vêtements lâ-
ches des pièces
mobiles du moteur et du
chasse-neige. Le silencieux et les pièces
avoisinantes peuvent atteindre une tempé-
rature de 150°F. Ne pas les toucher.
Démarrage d’un moteur à chaud (Figure 2)
Si le moteur est encore chaud d’une récente
utilisation, tourner la commande du starter (14)
en position “OFF“ (arrêt). Ne pas appuyer sur le
bouton d’amorçage (9). Si le moteur ne démar-
re toujours pas, suivre les instructions dans “Dé-
marrage d’un moteur froid”.
REMARQUE : ne pas utiliser le bouton
d’amorçage (9) pour chauffer le moteur.
Démarrage d’un moteur lorsque le démarreur
électrique est gelé (Figure 2)
Si le démarreur électrique est gelé et ne démar-
re pas le moteur, suivre les instructions ci-des-
sous.
1. Tirer la corde du démarreur (12) au maxi-
mum.
2. Relâcher rapidement la corde du démar-
reur (12). Laisser la corde du démarreur
(12) s’enrouler d’elle-même contre le démar-
reur manuel.
Si le moteur ne démarre toujours pas, répéter
les deux étapes précédentes jusqu’à ce que le
moteur démarre. Puis poursuivre les instructions
données dans Démarrage à froid”.
Pour éviter que la corde de démarreur ainsi que
les commandes du moteur ne gèlent, procéder
comme suit après chaque séance de chasse-
neige.
1. Alors que le moteur est encore en marche,
tirer d’un coup sec et continu deux ou trois
fois la corde du démarreur (12). Cela pro-
duit un bruit métallique fort inoffensif pour le
moteur ou pour le démarreur.
2. Arrêter le moteur. Essuyer toute trace de nei-
ge ou d’humidité du carter du carburateur,
des leviers de commandes et des câbles.
Agiter également plusieurs fois la comman-
de de starter (14), et la corde du démar-
reur (12).
Nettoyage des traces de neige sur le châssis
de la fraise hélicoïdale (Figure 2)
DANGER : ne pas tenter de retirer
de la neige ou des débris s’étant
coincés dans le châssis de la fraise
sans prendre les précautions suivantes.
1. Débrayer le levier d’entraînement de la
fraise (5).
2. Retirer la clé du démarreur (8).
3. Débrancher le fil de la bougie électrique.
4. Ne pas mettre vos mains dans le châssis de
la fraise (4) ou dans le déversoir (3). Utiliser
un levier pour retirer neige et débris.
Conseils pour l’utilisation du
chasse-neige
1. Pour faire avancer le chasse-neige, soule-
ver suffisamment le manche afin de permet-
tre aux lames de la fraise d’entrer en contact
avec le sol. Pour arrêter la fraise, relâcher la
barre de commande de la fraise. Si la fraise
continue à tourner, voir “ Réglage du câble
de commande de la fraise” dans la section
Réglages.
2. Les meilleurs résultats s’obtiennent lorsque
le travail est effectué immédiatement après
une chute de neige.
3. Faire légèrement chevaucher les différents
passages du chasse-neige pour un déblaya-
ge complet de la neige.
4. Projeter la neige dans le sens du vent dans
la mesure du possible.
5. Pour régler la distance du déversement de la
neige, utiliser le déflecteur de la goulotte de
décharge. Lever le déflecteur pour augmen-
ter la distance ou l’abaisser pour réduire la
distance.
6. Lorsqu’il y a du vent, abaisser le déflecteur
de déversement pour orienter la neige reje-
tée vers un emplacement à moindre risque
de manière à ne pas toucher certaines zones
accidentellement.
7. Pour une plus grande sécurité et éviter tout
endommagement du chasse-neige, enlever
les pierres, les jouets et autres objets de la
surface à déneiger.
8. Ne pas utiliser le dispositif de propulsion de
la fraise lorsque vous déneigez des allées de
pierres ou de graviers. Abaisser le manche
afin de soulever légèrement la fraise.
9. La vitesse du chasse-neige dépend de
l’épaisseur et du poids de la neige. Votre pro-
pre expérience dans ce domaine vous appor-
tera la méthode la plus efficace quant à
l’utilisation du chasse-neige dans différentes
conditions.
10.En fin de travail, laisser le moteur tourner
pendant quelques minutes pour faire fondre
la neige et la glace accumulée sur le moteur.
11. Nettoyer la machine après chaque utilisation.
12.Éliminer la glace, la neige, et les débris de la
machine entière. Rincer à l’eau pour éliminer
sel et autres produits chimiques. Sécher la
machine avec un chiffon.
Pour une neige poudreuse et moyenne
1. On peut retirer la neige rapidement et facile-
ment jusqu’à huit pouces d’épaisseur (soit
vingt cm) en marchant d’un pas moyen. Pour
la neige ou les congères d’une épaisseur
plus importante, ralentir le pas afin de per-
mettre à la goulotte de décharge de rejeter la
neige aussi vite que la fraise la reçoit.
2. Veiller à ce que la neige soit déversée dans
la même direction que celle du vent.
Pour une neige lourde
Avancer lentement dans la neige lourde. Si la
fraise est ralentie par la lourdeur de la neige ou
si la goulotte de décharge commence à se bou-
cher, reculer et effectuer une série de petits va-
et vient dans la neige. Ces petits va-et vient, de
quatre à six pouces, (dix à quinze centimètres),
tasseront la neige rejetée du déversoir.
Amas de neige et Congères
Si l’amas de neige est plus élevé que la hauteur
de la machine, utiliser la même technique décri-
te dans le paragraphe précédent pour tasser la
neige. Détourner la goulotte de décharge de
l’amas de neige. Il faudra plus de temps pour
retirer ce type de neige que pour une neige bas-
se et nivelée.
La page est en cours de chargement...
La page est en cours de chargement...
La page est en cours de chargement...
La page est en cours de chargement...
La page est en cours de chargement...
La page est en cours de chargement...
La page est en cours de chargement...
La page est en cours de chargement...
La page est en cours de chargement...
La page est en cours de chargement...
La page est en cours de chargement...
La page est en cours de chargement...
La page est en cours de chargement...
La page est en cours de chargement...
La page est en cours de chargement...
La page est en cours de chargement...
-
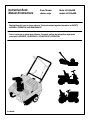 1
1
-
 2
2
-
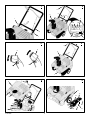 3
3
-
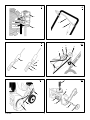 4
4
-
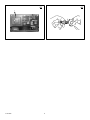 5
5
-
 6
6
-
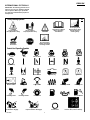 7
7
-
 8
8
-
 9
9
-
 10
10
-
 11
11
-
 12
12
-
 13
13
-
 14
14
-
 15
15
-
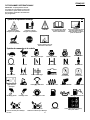 16
16
-
 17
17
-
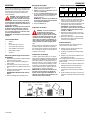 18
18
-
 19
19
-
 20
20
-
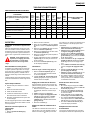 21
21
-
 22
22
-
 23
23
-
 24
24
-
 25
25
-
 26
26
-
 27
27
-
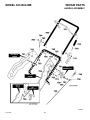 28
28
-
 29
29
-
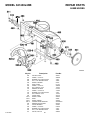 30
30
-
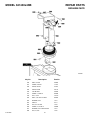 31
31
-
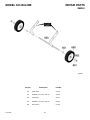 32
32
-
 33
33
-
 34
34
-
 35
35
-
 36
36


Murray 621450X4NB Instruction book
- Catégorie
- Souffleuses à neige
- Taper
- Instruction book
- Ce manuel convient également à
dans d''autres langues
- English: Murray 621450X4NB
Documents connexes
-
Murray 621450X4NB Mode d'emploi
-
-
-
Murray 620351x4NB Mode d'emploi
-
Murray 536885180 Le manuel du propriétaire
-
-
-
-
-