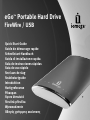
Iomega EGO PORTABLE FIREWIRE Le manuel du propriétaire
- Catégorie
- Disques durs externes
- Taper
- Le manuel du propriétaire
Ce manuel convient également à

eGo
™
Portable Hard Drive
FireWire / USB
Quick Start Guide
Guide de démarrage rapide
Schnellstart-Handbuch
Guida di installazione rapida
Guía de instrucciones rápidas
Guia de uso rápido
Snel aan de slag
Snabbstartguide
Introduktion
Hurtigreferanse
Pikaopas
Gyors útmutató
Stručná příručka
Wprowadzenie
Οδηγός γρήγορης εκκίνησης
*

If you have a problem, we can help. Please do NOT return this product to the
store!
Your answer is on the web. Visit our award-winning web support site
www.iomega.com. Select your region, then select Support and Downloads.
Si vous avez un problème, nous pouvons vous aider. NE RENVOYEZ PAS ce
produit au magasin !
Votre réponse est sur le Web. Site Web d’assistance primé www.iomega.com.
Sélectionnez votre région puis Support et téléchargements.
Si tiene algún problema, podemos ayudar. ¡Por favor, NO devuelva este
producto a la tienda!
Su respuesta está en la web. Destacado sitio Web de atención al cliente
www.iomega.com. Elija su región y luego seleccione asistencia y descarga.
Wenn Sie ein Problem haben, können wir Ihnen helfen. Bringen Sie dieses
Produkt NICHT zu Ihrem Händler zurück!
Ihre Antwort steht im Netz. Preisgekrönte Support-Website
www.iomega.com
.
Wählen Sie Ihr Gebiet aus und klicken Sie auf Support und Downloads.
In caso di problemi, noi possiamo fornire assistenza. NON restituire questo
prodotto al rivenditore!
La risposta è sul Web. Sito di supporto sul Web premiato www.iomega.com.
Selezionare la propria regione, quindi scegliere Supporto tecnico e download.

Contents • Matières • Inhalt • Sommario • Contenido • Conteúdo
Inhoudsopgave
• Innehåll • Indhold • Innhold • Sisällys • Tartalom
Obsah • Spis treści • Περιεχόµενα
Quick Install. . . . . . . . . . . . . . . . . . . . . . . . . . . . . . . . . . . . . . . . . . . . . . . . . . . . . . . . . . . . . . . . . . . . . . . . . . .4
Installation rapide
. . . . . . . . . . . . . . . . . . . . . . . . . . . . . . . . . . . . . . . . . . . . . . . . . . . . . . . . . . . . . . . . . . . . . .4
Schnellstart
. . . . . . . . . . . . . . . . . . . . . . . . . . . . . . . . . . . . . . . . . . . . . . . . . . . . . . . . . . . . . . . . . . . . . . . . . . .5
Installazione rapida . . . . . . . . . . . . . . . . . . . . . . . . . . . . . . . . . . . . . . . . . . . . . . . . . . . . . . . . . . . . . . . . . . . .
5
Instalación rápida
. . . . . . . . . . . . . . . . . . . . . . . . . . . . . . . . . . . . . . . . . . . . . . . . . . . . . . . . . . . . . . . . . . . . . .6
Instalação rápida . . . . . . . . . . . . . . . . . . . . . . . . . . . . . . . . . . . . . . . . . . . . . . . . . . . . . . . . . . . . . . . . . . . . . .
6
Snelle installatie . . . . . . . . . . . . . . . . . . . . . . . . . . . . . . . . . . . . . . . . . . . . . . . . . . . . . . . . . . . . . . . . . . . . . . .
7
Snabbinstallation . . . . . . . . . . . . . . . . . . . . . . . . . . . . . . . . . . . . . . . . . . . . . . . . . . . . . . . . . . . . . . . . . . . . . .
7
Hurtig installation
. . . . . . . . . . . . . . . . . . . . . . . . . . . . . . . . . . . . . . . . . . . . . . . . . . . . . . . . . . . . . . . . . . . . . .8
Rask installering . . . . . . . . . . . . . . . . . . . . . . . . . . . . . . . . . . . . . . . . . . . . . . . . . . . . . . . . . . . . . . . . . . . . . . .
8
Pika-asennus
. . . . . . . . . . . . . . . . . . . . . . . . . . . . . . . . . . . . . . . . . . . . . . . . . . . . . . . . . . . . . . . . . . . . . . . . . .9
Gyors telepítés . . . . . . . . . . . . . . . . . . . . . . . . . . . . . . . . . . . . . . . . . . . . . . . . . . . . . . . . . . . . . . . . . . . . . . . .
9
Rychlá instalace
. . . . . . . . . . . . . . . . . . . . . . . . . . . . . . . . . . . . . . . . . . . . . . . . . . . . . . . . . . . . . . . . . . . . . . .10
Skrócona instrukcja insalacji . . . . . . . . . . . . . . . . . . . . . . . . . . . . . . . . . . . . . . . . . . . . . . . . . . . . . . . . . . . .
10
Γρήγορη
εγκατάσταση . . . . . . . . . . . . . . . . . . . . . . . . . . . . . . . . . . . . . . . . . . . . . . . . . . . . . . . . . . . . . . . . .11
Using the Drive . . . . . . . . . . . . . . . . . . . . . . . . . . . . . . . . . . . . . . . . . . . . . . . . . . . . . . . . . . . . . . . . . . . . . . .
12
Utilisation du lecteur
. . . . . . . . . . . . . . . . . . . . . . . . . . . . . . . . . . . . . . . . . . . . . . . . . . . . . . . . . . . . . . . . . . .14
Das Laufwerk verwenden . . . . . . . . . . . . . . . . . . . . . . . . . . . . . . . . . . . . . . . . . . . . . . . . . . . . . . . . . . . . . . .
16
Uso dell’unità
. . . . . . . . . . . . . . . . . . . . . . . . . . . . . . . . . . . . . . . . . . . . . . . . . . . . . . . . . . . . . . . . . . . . . . . .18
Uso de la unidad . . . . . . . . . . . . . . . . . . . . . . . . . . . . . . . . . . . . . . . . . . . . . . . . . . . . . . . . . . . . . . . . . . . . . .
20
Utilização da unidade
. . . . . . . . . . . . . . . . . . . . . . . . . . . . . . . . . . . . . . . . . . . . . . . . . . . . . . . . . . . . . . . . . .22
Troubleshooting . . . . . . . . . . . . . . . . . . . . . . . . . . . . . . . . . . . . . . . . . . . . . . . . . . . . . . . . . . . . . . . . . . . . . .
13
Dépannage . . . . . . . . . . . . . . . . . . . . . . . . . . . . . . . . . . . . . . . . . . . . . . . . . . . . . . . . . . . . . . . . . . . . . . . . . .
15
Fehlerbehebung . . . . . . . . . . . . . . . . . . . . . . . . . . . . . . . . . . . . . . . . . . . . . . . . . . . . . . . . . . . . . . . . . . . . . .
17
Risoluzione dei problemi . . . . . . . . . . . . . . . . . . . . . . . . . . . . . . . . . . . . . . . . . . . . . . . . . . . . . . . . . . . . . . .
19
Solución de problemas
. . . . . . . . . . . . . . . . . . . . . . . . . . . . . . . . . . . . . . . . . . . . . . . . . . . . . . . . . . . . . . . . .21
Solução de problemas . . . . . . . . . . . . . . . . . . . . . . . . . . . . . . . . . . . . . . . . . . . . . . . . . . . . . . . . . . . . . . . . .
23
Limited Warranty
. . . . . . . . . . . . . . . . . . . . . . . . . . . . . . . . . . . . . . . . . . . . . . . . . . . . . . . . . . . . . . . . . . . . . .24
Garantie Limitée . . . . . . . . . . . . . . . . . . . . . . . . . . . . . . . . . . . . . . . . . . . . . . . . . . . . . . . . . . . . . . . . . . . . . .
25
Eingeschränkte Garantie
. . . . . . . . . . . . . . . . . . . . . . . . . . . . . . . . . . . . . . . . . . . . . . . . . . . . . . . . . . . . . . . .26
Garanzia limitata
. . . . . . . . . . . . . . . . . . . . . . . . . . . . . . . . . . . . . . . . . . . . . . . . . . . . . . . . . . . . . . . . . . . . . .28
Garantía limitada . . . . . . . . . . . . . . . . . . . . . . . . . . . . . . . . . . . . . . . . . . . . . . . . . . . . . . . . . . . . . . . . . . . . .
29
Garantia limitada
. . . . . . . . . . . . . . . . . . . . . . . . . . . . . . . . . . . . . . . . . . . . . . . . . . . . . . . . . . . . . . . . . . . . . .30

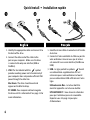
4
Fi
re
Wi
r
e
D
D
C
5
V
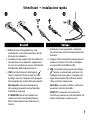
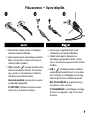
1. Identify the appropriate cable and connect it to
the back of the drive.
2. Connect the other end of the cable to the
port on your computer. Make sure the drive
is connected to only one interface (USB or
FireWire).
3. USB: The line labeled with the symbol
provides auxiliary power and is needed only if
your computer does not provide sufficient USB
power through the other line.
Mac Users: The drive should mount and
appear on the Mac Desktop
.
PC USERS: Your computer will not recognize
the drive until it is reformatted. See page 12 for
more information.
Quick Install • Installation rapide
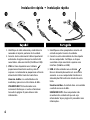
1. Identifiez le bon câble et connectez-le à l’arrière
du lecteur.
2. Connectez l’autre extrémité du câble au port de
votre ordinateur.
Assurez-vous que le lecteur
est connecté à une seule interface (FireWire ou
USB).
3.
USB : La ligne portant le symbole fournit
une alimentation supplémentaire et n’est
nécessaire que si votre ordinateur ne fournit
pas une alimentation USB suffisante via l’autre
ligne.
Utilisateurs de Mac : Le lecteur doit être
monté et apparaître sur le bureau du Mac.
UTILISATEURS PC :
Vous devrez le reformater
pour que l’ordinateur puisse le reconnaître.
Reportez-vous à la page 14 pour plus
d’informations.

5
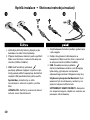
Schnellstart • Installazione rapida
1. Individuare il cavo appropriato e collegarlo
alla connessione situata nella parte posteriore
dell’unità.
2.
Collegare l’altra estremità del cavo alla porta del
computer
. Accertarsi che l’unità sia collegata a
una sola interfaccia (FireWire o USB).
3. USB: l’estremità contrassegnata dal simbolo
fornisce un alimentatore ausiliario, il cui
impiego è necessario solo se il computer non
eroga alimentazione USB sufficiente tramite
l’altra estremità a disposizione.
Utenti Mac: una volta installata, l’unità viene
visualizzata sulla Scrivania Mac.
UTENTI PC: Il computer non riconoscerà
l’unità fino a quando non sarà riformattata. Per
ulteriori informazioni, vedere pag. 18.
1. Wählen Sie das richtige Kabel aus, und
verbinden Sie es mit einem Anschluss auf der
Rückseite des Laufwerks.
2. Verbinden Sie das andere Ende des Kabels mit
dem Anschluss des Computers
. Vergewissern
Sie sich, das Laufwerk nur an eine Schnittstelle
(FireWire oder USB) angeschlossen ist.
3.
USB: Der Kabelstrang mit dem Symbol
liefert zusätzlichen Strom. Es wird nur dann
benötigt, wenn der Computer nicht genügend
Spannung über die andere USB-Leitung liefert.
Mac-Benutzer: Nun wird normalerweise
das Laufwerk gemountet und auf dem Mac-
Schreibtisch angezeigt.
PC-BENUTZER: Erkennt der Computer das
Laufwerk erst nach einer Neuformatierung.
Weitere Informationen hierzu finden Sie auf
Seite 16.
Fi
re
Wi
r
e
D
D
C
5
V

6
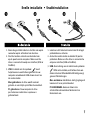
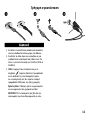
1. Identifique el cable adecuado y conéctelo a la
conexión en la parte posterior de la unidad.
2. Conecte el otro extremo del cable al puerto del
ordenador. Asegúrese de que la unidad está
conectada a sólo una interfaz (FireWire o USB).
3.
USB:
La línea etiquetada con el símbolo
proporciona alimentación auxiliar y sólo se
requiere si el ordenador no proporciona suficiente
alimentación USB a través de la otra línea.
Usuarios de Mac: La unidad debe estar
montada y aparecer en el Escritorio de Mac.
USUARIOS DE PC
: El ordenador no la
reconocerá hasta que se vuelva a formatear.
Consulte la página 20 para obtener más
información.
Instalación rápida • Instalação rápida
1. Identifique o cabo apropriado e conecte-o à
entrada na parte traseira da unidade.
2. Conecte a outra extremidade do cabo à porta
do seu computador. Certifique-se de que
a unidade esteja conectada a apenas uma
interface (FireWire ou USB).
3.
USB: A linha rotulada com o símbolo
fornece alimentação auxiliar e é necessária
somente se o seu computador não fornecer
alimentação USB suficiente através da outra
linha
.
Usuários de Mac: A unidade deve ser montada
e exibida na mesa do Mac.
USUÁRIOS DE PC
: Seu computador não
reconhecerá a unidade até que ela seja
reformatada. Veja a página 22 para obter mais
informações.
Fi
re
Wi
r
e
D
D
C
5
V

7
Snelle installatie • Snabbinstallation
1. Lokalisera rätt kabel och anslut den till uttaget
på baksidan av enheten.
2. Anslut den andra änden av kabeln till porten
på datorn. Make sure the drive is connected to
only one interface (USB or FireWire).
3.
USB: Den ledning som är märkt med symbolen
tillför extra elström, och behövs bara om
datorn inte kan tillhandahålla tillräcklig energi
genom USB-ledningen.
Mac-användare: Hårddisken skall gå igång och
kommer att visas på skrivbordet.
PC-ANVÄNDARE: Kommer datorn inte
att identifiera drivenheten förrän den har
formaterats om.
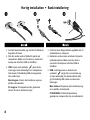
1. Neem de geschikte kabel en sluit die aan op de
connector op de achterkant van de drive.
2. Sluit het andere uiteinde van de kabel aan
op de poort van de computer. Make sure the
drive is connected to only one interface (USB or
FireWire).
3.
USB: De kabel met de symbool levert
hulpstroom en wordt alleen gebruikt als uw
computer onvoldoende USB-stroom levert via
de andere kabel.
Mac-gebruikers: de drive wordt normaal
geladen en verschijnt op het Mac-bureaublad.
PC-gebruikers: Zal uw computer de drive
pas herkennen nadat deze is opnieuw is
geformatteerd.
Fi
re
Wi
r
e
D
D
C
5
V

8
1. Find det korrekte kabel, og slut det til stikket på
bagsiden af drevet.
2. Slut den anden ende af kablet til porten på
computeren. Make sure the drive is connected
to only one interface (USB or FireWire).
3.
USB: Linjen med symbolet giver ekstra
strøm og er kun nødvendigt, hvis computeren
ikke leverer tilstrækkelig USB-strøm gennem
den anden linje.
Mac-brugere: Drevet skal installeres og vises
på Mac-skrivebordet.
Pc-brugere: Vil computeren ikke genkende
drevet, før det er formateret igen.
Hurtig installation • Rask installering
1. Finn frem den riktige kabelen og koble den til
på baksiden av stasjonen.
2. Koble den andre enden av kabelen til porten
på datamaskinen. Make sure the drive is
connected to only one interface (USB or
FireWire).
3.
USB: Ledningen som er merket med
symbolet
sørger for reservestrøm og
er bare nødvendig hvis datamaskinen ikke
gir tilstrekkelig USB-strøm via den andre
ledningen.
Mac-brukere: Stasjonen skal nå aktiveres og
vises på Mac-skrivebordet.
PC-BRUKERE: Vil ikke datamaskinen
gjenkjenne stasjonen før den er omformatert.
Fi
re
Wi
r
e
D
D
C
5
V

9
Pika-asennus • Gyors telepítés
1. Ota tarvittava kaapeli ja kytke se kiintolevyn
takaosassa olevaan liitäntään.
2. Kytke kaapelin toinen pää tietokoneen porttiin.
Make sure the drive is connected to only one
interface (USB or FireWire).
3. USB: Symbolilla merkityn liitännän kautta
laitteessa voi käyttää lisävirtaa. Sitä tarvitaan
vain, jos laite ei saa tietokoneesta riittävästi
USB-virtaa muun liitännän kautta.
Macintosh-käyttäjät: Aseman pitäisi asentua
ja näkyä Mac-työpöydällä.
PC-KÄYTTÄJÄT: Tietokone tunnistaa aseman
vasta, kun se on alustettu uudelleen.
Fi
re
Wi
r
e
D
D
C
5
V
1. Keresse meg a megfelelő kábelt, majd
csatlakoztassa a meghajtó hátuljához.
2. A kábel másik végét csatlakoztassa a
számítógép egyik portjához. Make sure the
drive is connected to only one interface (USB or
FireWire).
3.
USB: A szimbólummal jelölt csatlakozó
segédenergiát (áramot) biztosít, és csak akkor
van rá szükség, ha számítógépe nem ad elég
USB energiát a másik csatlakozón keresztül.
MAC FELHASZNÁLÓK: A meghajtónak meg
kell jelennie a Mac asztalon.
PC FELHASZNÁLÓK: A számítógép nem fogja
felismerni a meghajtót, amíg azt újra nem
formázza.

10
1.
Vyhledejte příslušný kabel a připojte jej do
konektoru na zadní straně jednotky.
2. Připojte druhý konec kabelu k portu v počítači.
Make sure the drive is connected to only one
interface (USB or FireWire).
3. USB: Vodič označený symbolem
poskytuje přídavné napájení a využívá se jen
tehdy, pokud počítač neposkytuje dostatečné
napájení USB prostřednictvím jiného vodiče.
Systém Mac: Jednotka by se měla
nainstalovat a zobrazit na ploše systému
Mac.
UŽIVATELÉ PC: Počítač ji nerozezná, dokud
nebude znovu zformátovaná.
Rychlá instalace • Skrócona instrukcja insalacji
1.
Znajdź odpowiedni kabel i podłącz go do złącza
z tyłu napędu.
2.
Podłącz drugi koniec kabla do portu w
komputerze. Make sure the drive is connected
to only one interface (USB or FireWire).
3. USB: Przewód oznaczony symbolem
dostarcza dodatkowe zasilanie i jest wymagany
tylko wtedy, gdy komputer nie zapewnia
odpowiedniego zasilania USB poprzez inną linię.
Użytkownicy komputerów Macintosh: Dysk
powinien być zainstalowany i widoczny na
pulpicie komputera Macintosh.
UŻYTKOWNICY KOMPUTERÓW PC: Komputer
nie rozpozna napędu, dopóki nie zostanie on
ponownie sformatowany.
Fi
re
Wi
r
e
D
D
C
5
V

11
Γρήγορη εγκατάσταση
Fi
re
Wi
r
e
D
D
C
5
V
1. Εντοπίστε το κατάλληλο καλώδιο και συνδέστε
το στην υποδοχή στο πίσω µέρος του δίσκου.
2. Συνδέστε το άλλο άκρο του καλωδίου σε µια
υποδοχή στον υπολογιστή σας. Make sure the
drive is connected to only one interface (USB or
FireWire).
3.
USB: Η γραµµή που επισηµαίνεται µε το
σύµβολο
παρέχει βοηθητική τροφοδοσία
και η σύνδεσή της είναι απαραίτητη µόνο
αν ο υπολογιστής σας δεν παρέχει επαρκή
τροφοδοσία USB µέσω της άλλης γραµµής.
Χρήστες Mac: Ο δίσκος πρέπει να µονταριστεί
και να εµφανιστεί στο γραφείο του Mac.
ΧΡΗΣΤΕΣ PC: Ο υπολογιστής σας δεν θα τον
αναγνωρίσει έως ότου διαµορφωθεί εκ νέου
.

12
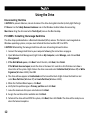
Using the Drive
Disconnecting the Drive
CAUTION! To prevent data loss, do not disconnect the drive during data transfer (activity light flashing).
PC Users: Use the Safely Remove Hardware icon in the Windows taskbar before disconnecting.
Mac Users: Drag the disk icon to the Trash (Eject) icon on the Mac Desktop.
PC USERS: Formatting the Iomega Hard Drive
The drive ships preformatted as a Macintosh Extended (HFS+) volume. This format is not recognized on
Windows operating systems, and you must reformat the drive to either FAT32 or NTFS.
CAUTION! Reformatting the Iomega Hard Drive will erase all existing data on the drive.
1. Connect the Iomega Hard Drive to your computer following the instructions on page 4.
2. Open Windows Disk Management (right click on My Computer, select Manage, and click on Disk
Management).
3. If the Disk Wizard opens, click Next. Select the disk, click Next, then Finish.
If the Wizard does not open, locate the drive in the lower list. Look for a disk that does not show a
drive letter or file system. Right click on the drive name and select Initialize Disk (Windows XP) or Write
Signature (Windows 2000), then
OK.
4. The drive will now appear as Unallocated and the bar will be black. Right click on the black bar and
select
New Partition (Windows XP) or Create Partition (Windows 2000).
5. When the Partition Wizard opens, click Next.
6. Verify that the partition type is Primary partition and click Next.
7. Leave the maximum disk space selected and click Next
.
8. Assign the next drive letter available and click Next
.
9. To format the drive with an NTFS file system, click Next, then click Finish. The drive will be ready to use
when the format completes.

13
NOTE: If you want to use the drive with other operating systems, download the Iomega FAT32 Formatter
from the Support and Downloads area on www.iomega.com and use it to change the format to FAT32
(provides cross-platform compatibility).
Troubleshooting
Drive does not appear in My Computer or Windows Explorer or on the Mac Desktop
PC Users: Make sure the drive is formatted for use with Windows. Refer to the instructions above.
• Try restarting your computer.
• Make sure you are using the USB or FireWire cable that came with the drive.
• If you are connecting to USB, make sure both lines of the USB cable are connected to the computer.
• For a USB connection, try changing the cable connections to different USB ports on the computer.
• Make sure the drive is connected to only one interface (USB or FireWire).
See the Support & Downloads area on www.iomega.com for additional troubleshooting help.
Complete User’s Manual
A complete user’s manual in HTML format is available on the Support & Downloads area on
www.iomega.com
.

14
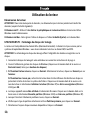
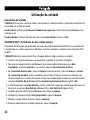
Utilisation du lecteur
Déconnexion du lecteur
ATTENTION ! Pour éviter toute perte de données, ne déconnectez pas le lecteur pendant un transfert de
données (voyant d’activité clignotant).
Utilisateurs de PC : Utilisez l’icône Retirer le périphérique en toute sécurité dans la barre des tâches
Windows avant la déconnexion.
Utilisateurs de Mac : Faites glisser l’icône du disque sur l’icône Corbeille (Ejecter) sur le bureau Mac.
UTILISATEURS PC : Formatage du disque dur Iomega
Le lecteur est livré préformaté au format HFS+ (Macintosh Extended). Ce format n’est pas reconnu par les
systèmes d’exploitation Windows : vous devez reformater le lecteur au format FAT32 ou NTFS
.
ATTENTION ! Le reformatage du disque dur Iomega efface l’intégralité des données enregistrées sur le
disque.
1
.
Connectez le disque dur Iomega à votre ordinateur en suivant les instructions de la page 4.
2. Ouvrez l’utilitaire de gestion des disques de Windows (cliquez avec le bouton droit de la souris sur
Poste de travail, Gérer, puis Gestion des disques).
3. Si l’Assistant lecteur s’ouvre, cliquez sur Suivant. Sélectionnez le lecteur, cliquez sur Suivant puis sur
Terminer.
Si l’Assistant ne s’ouvre pas, recherchez le lecteur dans la liste inférieure. Recherchez un disque ne
présentant ni lettre de lecteur ni système de fichiers. Cliquez avec le bouton droit de la souris sur le
nom du lecteur et sélectionnez Initialiser le lecteur (Windows XP) ou Ecrire une signature (Windows
2000) puis
OK.
4. Le disque apparaît comme Non attribué et la barre doit être noire. Cliquez avec le bouton droit sur la
barre noire et sélectionnez Nouvelle partition (Windows 2000) ou Créer une partition (Windows XP).
5. Lorsque l’Assistant Création de partition s’ouvre, cliquez sur Suivant.
6. Vérifiez que le type de partition sélectionné est bien Partition primaire, puis cliquez sur Suivant.
7. Sélectionnez l’espace disque maximum disponible et cliquez sur Suivant
.

15
8. Attribuez la prochaine lettre de lecteur disponible au disque et cliquez sur Suivant.
9. Pour formater le disque avec système de fichiers NTFS, cliquez sur Suivant, puis sur Terminer. Le
disque peut être utilisé dès que le formatage est terminé.
REMARQUE : pour utiliser le périphérique avec d’autres systèmes d’exploitation, téléchargez Iomega FAT32
Formatter (logiciel de formatage Iomega FAT32) à partir de la section Support et Téléchargement du site
www.iomega.com, puis utilisez ce logiciel pour formater le périphérique au format FAT32, permettant la
compatibilité inter plate-formes.
Dépannage
Le lecteur n’apparaît pas dans le Poste de travail, l’Explorateur Windows ou sur le bureau
du Mac.
Utilisateurs PC : assurez-vous que le périphérique est correctement formaté pour une utilisation sous
Windows. Référez-vous aux instructions ci-dessus.
• Redémarrez votre ordinateur.
• Assurez-vous que vous utilisez le câble USB ou FireWire fourni avec le lecteur.
• Si vous utilisez une connexion USB, assurez-vous que les deux lignes du câble USB sont connectées à
l’ordinateur.
• Pour une connexion USB, essayez de connecter les câbles à d’autres ports USB de l’ordinateur.
• Assurez-vous que le lecteur est connecté à une seule interface (FireWire ou USB).
Visitez la section d’assistance sur le site www.iomega.com pour une aide supplémentaire au dépannage.
Guide complet de l’utilisateur
Un guide de l’utilisateur complet est disponible au format HTML dans la section Support et Téléchargement
du site www.iomega.com
.

16
Das Laufwerk verwenden
Trennen des Laufwerks vom System
ACHTUNG! Um Datenverluste zu vermeiden, trennen Sie das Laufwerk während der Datenübertragung (wenn
Aktivitätsanzeige blinkt) nicht vom Computer.
PC-Benutzer: Klicken Sie vor dem Herausziehen der Stecker auf das Symbol Hardware sicher entfernen in
der Windows-Taskleiste.
Mac-Benutzer: Ziehen Sie das Datenträgersymbol zum Symbol Papierkorb (Auswerfen) auf dem Mac-
Schreibtisch.
PC-BENUTZER: Formatieren der Iomega Festplatte
Das Laufwerk wird mit einem für Macintosh Extended (HFS+) vorformatierten Volume geliefert. Windows-
Betriebssysteme erkennen dieses Format nicht, daher müssen Sie das Laufwerk entweder auf FAT32 oder auf
NTFS umformatieren.
Achtung! Durch das Umformatieren der Iomega Festplatte werden alle auf dem Laufwerk vorhandenen Daten
gelöscht.
1. Schließen Sie die Festplatte gemäß den Anweisungen auf Seite 5 an den Computer an.
2. Öffnen Sie die Windows Datenträgerverwaltung (mit rechter Maustaste auf Arbeitsplatz klicken,
Verwalten wählen und dann auf Datenträgerverwaltung klicken).
3. Falls der Assistent für die Datenträgerinitialisierung gestartet wird, klicken Sie auf Weiter. Wählen
Sie den Datenträger aus. Klicken Sie auf Weiter und dann auf Fertig stellen.
Falls der Assistent für die Datenträgerinitialisierung nicht gestartet wird, suchen Sie das Laufwerk
in der unteren Liste. Suchen Sie nach einem Datenträger, bei dem kein Laufwerksbuchstabe oder
Dateisystem angezeigt wird. Klicken Sie mit der rechten Maustaste auf den Laufwerksnamen und
wählen Sie dann Datenträger initialisieren (Windows XP) oder Signatur schreiben (Windows 2000).
Klicken Sie anschließend auf
OK.
4. Das Laufwerk wird dann als Nicht zugeordnet angezeigt und der Balken schwarz dargestellt. Klicken
Sie mit der rechten Maustaste Right auf den schwarzen Balken und wählen Sie Neue Partition
(Windows XP) oder Partition erstellen (Windows 2000).

17
5. Sobald der Assistent zum Erstellen neuer Partitionen geöffnet wird, klicken Sie auf Weiter.
6. Überprüfen Sie, ob es sich beim Partitionstyp um Primäre Partition handelt, und klicken Sie auf
Weiter.
7. Lassen Sie die Auswahl (maximaler Speicherplatz ) stehen und klicken Sie auf Weiter
.
8. Ordnen Sie der Festplatte den nächsten Laufwerksbuchstaben zu und klicken Sie auf Weiter
.
9. Um das Laufwerk mit einem NTFS-Dateisystem zu formatieren, klicken Sie auf Weiter und dann auf
Fertig stellen. Sobald die Formatierung abgeschlossen ist, können Sie das Laufwerk verwenden.
HINWEIS: Wenn Sie das Laufwerk mit anderen Betriebssystemen verwenden möchten, laden Sie Iomega
FAT32 Formatter
aus dem Bereich “Support & Downloads” unter
www.iomega.com
herunter, und ändern
Sie damit das Format in FAT32 um. Dadurch wird eine plattformübergreifende Kompatibilität gewährleistet.
Fehlerbehebung
Laufwerk wird nicht im Arbeitsplatz, dem Windows Explorer oder auf dem Mac-Desktop
angezeigt
PC-Benutzer: Vergewissern Sie sich, dass das Laufwerk für den Gebrauch mit Windows formatiert ist.
Anweisungen hierzu finden Sie weiter oben.
• Führen Sie probeweise einen Neustart des Computers durch.
• Achten Sie darauf, dass Sie das mit dem Laufwerk gelieferte USB- oder FireWire-Kabel verwenden.
• Wenn Sie eine USB-Verbindung verwenden, stellen Sie sicher, dass beide Leitungen des USB-Kabels am
Computer angeschlossen sind.
• Wenn Sie eine USB-Verbindung verwenden, schließen Sie die Kabel an andere USB-Anschlüsse des
Computers an.
• Vergewissern Sie sich, das Laufwerk nur an eine Schnittstelle (FireWire oder USB) angeschlossen ist.
Weitere Tipps zur Fehlerbehebung erhalten Sie im Supportbereich unter www.iomega.com
.
Benutzerhandbuch (vollständig)
Im Bereich “Support & Downloads” unter www.iomega.com steht Ihnen ein vollständiges
Benutzerhandbuch im HTML-Format zur Verfügung.

18
Uso dell’unità
Scollegamento dell’unità
ATTENZIONE! Per evitare che si verifichino perdite di dati, non scollegare l’unità durante il trasferimento di
informazioni (la spia verde di attività lampeggia).
Utenti PC: Prima di scollegare l’unità, usare l’icona Rimozione sicura dell’hardware nella barra delle
applicazioni di Windows.
Utenti Mac: Trascinare l’icona del disco nel Cestino (Espelli) sulla Scrivania Mac.
UTENTI PC: Formattazione del disco rigido Iomega
L’unità viene fornito preformattato come volume Macintosh Extended (HFS+). Questo formato non è
riconosciuto nei sistemi operativi Windows ed è necessario ripristinare la formattazione FAT32 o NTFS.
ATTENZIONE! La riformattazione del disco rigido Iomega comporta l’eliminazione definitiva di tutti i dati
presenti nell’unità.
1. Collegare il disco rigido Iomega al computer seguendo le istruzioni a pag. 5.
2. Aprire Gestione disco di Windows (fare clic con il pulsante destro del mouse su Risorse del computer,
selezionare Gestisci, quindi fare clic su Gestione disco).
3. Quando si avvia l’Installazione guidata disco, scegliere Avanti. Selezionare il disco, fare clic su
Avanti, quindi su
Fine.
Se la procedura guidata non si avvia, cercare l’unità nella parte inferiore dell’elenco. Cercare un disco
senza lettera di unità o file system. Fare clic con il pulsante destro del mouse sul nome dell’unità e
selezionare Inizializza disco (Windows XP) o Riporta la firma (Windows 2000), quindi scegliere
OK.
4. A questo punto l’unità apparirà come Non allocata e la barra diventerà nera. Fare clic con il pulsante
destro del mouse sulla barra nera, quindi selezionare Nuova partizione (Windows XP) o Crea
partizione (Windows 2000).
5. Quando si apre la Procedura guidata di partizione, fare clic su Avanti.
6. Accertarsi che la tipologia di partizione sia impostata su Partizione primaria, quindi fare clic su Avanti.
7. Lasciare selezionato lo spazio massimo su disco e fare clic su Avanti
.

19
8. Assegnare la successiva lettera di unità disponibile e fare clic su Avanti.
9. Per formattare l’unità con un file system NTFS, fare clic su Avanti, quindi su
Fine. L’unità potrà essere
utilizzata al termine della formattazione.
NOTA
: per utilizzare l’unità con altri sistemi operativi, scaricare il programma Iomega FAT32 Formatter
dall’area Assistenza e download all’indirizzo www.iomega.com e utilizzarlo per modificare la formattazione
in FAT32 (richiesta per compatibilità tra diverse piattaforme).
Risoluzione dei problemi
L’unità non compare in Risorse del computer, in Gestione risorse o sulla Scrivania Mac.
Utenti PC: assicurarsi che l’unità sia formattata per l’utilizzo con Windows. Fare riferimento alle istruzioni
sopra riportate.
• Provare a riavviare il computer.
• Assicurarsi di utilizzare il cavo USB o FireWire fornito in dotazione con l’unità.
• Per eseguire un collegamento USB, assicurarsi che entrambe le linee del cavo USB siano collegate al
computer.
• Per realizzare una connessione USB, provare a inserire il cavo alle altre porte USB del computer.
• Accertarsi che l’unità sia collegata a una sola interfaccia (FireWire o USB).
Per ulteriore assistenza nella risoluzione dei problemi, visitare l’area del supporto tecnico all’indirizzo
www.iomega.com
.
Manuale completo dell’utente
Il manuale completo dell’utente è disponibile nell’area Assistenza e download all’indirizzo
www.iomega.com
.

20
Uso de la unidad
Desconexión de la unidad
PRECAUCIÓN: Para impedir la pérdida de datos, no desconecte la unidad durante el proceso de
transferencia de datos (la luz de actividad parpadea).
Usuarios de PC: Utilice el icono Quitar hardware con seguridad de la barra de tareas de Windows antes de
proceder a la desconexión.
Usuarios de Mac: Arrastre el icono del disco al icono Papelera (Expulsar) del escritorio de Mac.
USUARIOS DE PC: Formateo de la unidad de disco duro Iomega
La unidad viene preformateado como un volumen extendido de Macintosh (HFS+). Los sistemas operativos
de Windows no reconocen este formato y, por lo tanto, debe volver a formatear la unidad en FAT32 o NTFS.
¡PRECAUCIÓN! Si vuelve a formatear la unidad de disco duro Iomega, se eliminarán los datos existentes en
la unidad.
1. Conecte el disco duro Iomega al ordenador siguiendo las instrucciones que se muestran en la página 6.
2. Abra Administración de discos de Windows (haga clic con el botón derecho del ratón en Mi PC,
seleccione Administrar y, a continuación, haga clic en Administración de discos).
3. Si se abre el asistente para discos, haga clic en Siguiente. Seleccione el disco, haga clic en
Siguiente y, a continuación, en Finalizar.
Si el asistente no se abre, localice la unidad en la lista de abajo. Busque un disco que no tenga letra
de unidad asignada o sistema de archivos. Haga clic con el botón derecho del ratón en el nombre de la
unidad y seleccione Inicializar disco (Windows XP) o Escribir firma (Windows 2000). A continuación,
haga clic en Aceptar
.
4. A continuación, la unidad aparecerá como No asignado y la barra se mostrará negra. Haga clic con el
botón derecho del ratón en la barra negra y seleccione Nueva partición (Windows XP) o Crear partición
(Windows 2000).
5. Cuando se abra la ventana del asistente para particiones, haga clic en Siguiente.
6. Compruebe que el tipo de partición sea Partición primaria y haga clic en Siguiente.
La page est en cours de chargement...
La page est en cours de chargement...
La page est en cours de chargement...
La page est en cours de chargement...
La page est en cours de chargement...
La page est en cours de chargement...
La page est en cours de chargement...
La page est en cours de chargement...
La page est en cours de chargement...
La page est en cours de chargement...
La page est en cours de chargement...
La page est en cours de chargement...
La page est en cours de chargement...
La page est en cours de chargement...
La page est en cours de chargement...
La page est en cours de chargement...
-
 1
1
-
 2
2
-
 3
3
-
 4
4
-
 5
5
-
 6
6
-
 7
7
-
 8
8
-
 9
9
-
 10
10
-
 11
11
-
 12
12
-
 13
13
-
 14
14
-
 15
15
-
 16
16
-
 17
17
-
 18
18
-
 19
19
-
 20
20
-
 21
21
-
 22
22
-
 23
23
-
 24
24
-
 25
25
-
 26
26
-
 27
27
-
 28
28
-
 29
29
-
 30
30
-
 31
31
-
 32
32
-
 33
33
-
 34
34
-
 35
35
-
 36
36


Iomega EGO PORTABLE FIREWIRE Le manuel du propriétaire
- Catégorie
- Disques durs externes
- Taper
- Le manuel du propriétaire
- Ce manuel convient également à
dans d''autres langues
- italiano: Iomega EGO PORTABLE FIREWIRE Manuale del proprietario
- English: Iomega EGO PORTABLE FIREWIRE Owner's manual
- español: Iomega EGO PORTABLE FIREWIRE El manual del propietario
- Deutsch: Iomega EGO PORTABLE FIREWIRE Bedienungsanleitung
- português: Iomega EGO PORTABLE FIREWIRE Manual do proprietário
Documents connexes
-
Iomega 33115 Guide de démarrage rapide
-
Iomega PORTABLE HARD DRIVE FIREWIRE Le manuel du propriétaire
-
-
-
-
-
-
-
-