
Safe Operation Practices • Set-Up • Operation • Service And Maintenance • Troubleshooting •
Replacement Parts
OperatOr’s Manual
Form No. 769-26111
(August 17, 2021)
679 cc OHV Vertical Shaft Engines
NOTE: This Operator’s Manual covers several models. Features may vary by model. Not all features in this manual are
applicable to all models and the model depicted may differ from yours.
WARNING
Read and follow all safety rules and instructions in this manual before attempting to operate this
machine.
Failure to comply with these instructions may result in personal injury - SAVE THESE INSTRUCTIONS.
WARNING
CALIFORNIA PROPOSITION 65
Engine Exhaust, some of its constituents, and certain vehicle components contain or emit chemicals
known to State of California to cause cancer and birth defects or other reproductive harm.
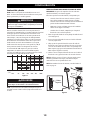
Record Product Information
Before setting up and operating your new
mower, please locate the model plate on the
engine and record the information in the
provided area to the right. You can locate the
model plate by standing at the operator’s
position and looking at the rear, right side of
the engine. This information will be necessary,
should you seek technical support via our web
site, Customer Support Department, or with a
local authorized service dealer.
Model Number
Serial Number
English ......................................................................................................................................Page 2
Spanish (Español) ....................................................................................................................Page 15
French (Français) ......................................................................................................................Page 28
Replacement Parts ..................................................................................................................Page 14

2
SAFE OPERATION PRACTICES
TRAINING
1. Read, understand and follow all warnings and instructions on
the engine and the equipment, and in the operator’s manuals
before attempting to install and/or operate. Keep this manual
in a safe place for future and regular reference and for
ordering replacement parts.
2. Be familiar with all controls and their proper operation. Know
how to stop the engine and disengage them quickly.
3. Never allow children under 14 years of age to operate the
equipment. Children 14 and over should read and understand
the warnings and instructions both on the product and in the
manuals and be trained and supervised by an adult.
4. Never allow adults to operate the equipment without proper
instruction.
5. Keep the area of operation clear of all persons, particularly
small children and pets. Stop the engine if anyone enters
the area.
PREPARATION
1. Wear sturdy, rough-soled work shoes and close fitting slacks
and shirts. Loose fitting clothes or jewelry can be caught in
the moving parts. Never operate the equipment in bare feet
or sandals.
2. Disengage all powered clutch and drive control levers on the
equipment before starting the engine.
3. Never leave the engine running while unattended.
4. Never attempt to make any adjustments while the engine
is running, except where specifically recommended in the
operator’s manual(s).
SAFE HANDLING OF GASOLINE:
To avoid personal injury or property damage, use extreme care
in handling gasoline. Gasoline is extremely flammable and the
vapors are explosive. Serious personal injury can occur when
gasoline is spilled on yourself and/or your clothes which can
ignite. Wash your skin and change clothes immediately.
1. When adding fuel, turn engine OFF and let engine cool at
least 5 minutes before removing the fuel cap.
2. Fill fuel tank outdoors or in well ventilated area.
3. Use only an approved fuel container.
4. Never fill containers inside a vehicle or on a truck or trailer
bed with a plastic liner. Always place containers on the
ground away from your vehicle before filling.
5. If possible, remove equipment from the truck or trailer and
refuel it on the ground. If this is not possible, then refuel
equipment on a trailer with a portable container, rather than
from a fuel pump dispenser nozzle.
6. Keep the nozzle in contact with the rim of the fuel tank or
container opening at all times until fueling is complete. Do
not use a nozzle lock-open device.
7. Do not overfill fuel tank. Fill tank to full as indicated by the
fuel level indicator installed inside the fuel tank to allow
space for fuel expansion. On some models, a fuel level
indicator may NOT be present, in this instance, fill the tank
no more than 1/2 inch below the bottom of the filler neck to
allow space for fuel expansion.
8. Replace fuel cap and tighten securely.
9. If fuel is spilled, wipe it off the engine and the equipment.
Move equipment to another area and wait 5 minutes before
starting the engine.
10. To reduce fire hazards, keep the engine and equipment free
of grass , leaves or other debris build up. Clean up oil or fuel
spillage and remove any fuel-soaked debris.
11. Keep fuel away from sparks, open flames, pilot lights, heat,
and other ignition sources.
WARNING
This symbol points out important safety instructions which, if not followed, could endanger the personal
safety and/or property of yourself and others. Read and follow all instructions in this manual before
attempting to operate. Failure to comply with these instructions may result in personal injury. When you see
this symbol, HEED ITS WARNING!
DANGER
This engine was built to be operated according to the safe operation practices in this manual. As with any type of power
equipment, carelessness or error on the part of the operator can result in serious injury. Failure to observe the following
safety instructions could result in serious injury or death.

3
SAFE OPERATION PRACTICES
12. Never fuel equipment indoors because flammable vapors will
accumulate in the area.
13. Extinguish all cigarettes, cigars, pipes, and other sources of
ignition.
14. Check fuel line, tank, cap, and fittings frequently for cracks or
leaks. Replace if necessary.
OPERATION
1. When starting the engine, make sure spark plug, muffler, and
fuel cap are in place.
2. Do not crank engine with spark plug removed.
3. If fuel is spilled, wipe it off the engine and the equipment.
Move equipment to another area and wait 5 minutes before
starting the engine.
4. Allow engine and muffler to cool before touching.
5. Keep small children away from hot or running engines. They
are unaware of the dangers and can suffer burns from the
engine and muffler.
6. Remove any accumulated debris from the engine cylinder and
muffler areas.
7. Operate equipment with all shields and guards in place.
8. Keep hands and feet away from rotating parts.
9. Wear sturdy, rough-soled work shoes and close-fitting slacks
and shirts. Loose fitting clothes, jewelry and long hair can be
caught in moving parts. Shirts and pants that cover the arms
and legs and steel-toed shoes are recommended.
10. When starting the engine with the recoil starter, pull handle
slowly until resistance is felt, then pull rapidly, repeat if
necessary.
11. Remove all equipment engine loads before starting engine.
12. Direct coupled equipment components such as, but not
limited to blades, impellers, pulleys, sprockets, etc., must be
securely attached.
MAINTENANCE & STORAGE
1. Keep the engine and equipment in safe working condition.
2. Allow the engine to cool at least 5 minutes before storing
equipment. Never tamper with safety devices. Check their
proper operation regularly.
3. Check bolts and screws for proper tightness at frequent
intervals to keep the engine and equipment in safe working
condition. Visually inspect them for any damage.
4. Before cleaning, repairing or inspecting; stop the engine and
make certain all moving parts have stopped. Disconnect the
spark plug wire and ground it against the engine to prevent
unintended starting.
5. Do not change the engine governor settings or over-speed
the engine. The governor controls the maximum safe
operating speed of the engine.
6. Maintain and replace safety and instruction labels as
necessary.
7. Always refer to the operator’s manuals for important details if
the equipment is to be stored for an extended period of time.
8. If the fuel tank has to be drained, do this outdoors.
9. Observe proper disposal laws and regulations for fuel, oil, etc.
to protect the environment.
DO NOT MODIFY ENGINE
To avoid serious injury or death, do not modify engine in
any way. Tampering with the governor setting can lead
to a runaway engine and cause it to operate at unsafe
speeds. Never tamper with factory setting of engine
governor.
NOTICE REGARDING EMISSIONS
Engines which are certified to comply with California and
federal EPA emission regulations for SORE (Small Off Road
Equipment) are certified to operate on regular unleaded
gasoline, and may include the following emission control
systems: Engine Modification (EM), Oxidizing Catalyst
(OC), Secondary Air Injection (SAI) and Three Way Catalyst
(TWC) if so equipped.
INTENDED USE:
The engine models listed on the cover of this manual are
specifically designed and intended for use on designated
outdoor power equipment only. The engine models listed
also have been approved for use as replacement engines
for products such as mowers, edgers and wheeled
string trimmers. These engines are not approved for
use in other applications. Engines used in non-approved
applications or subjected to any modifications or misuse
will void the engine warranty.
WARNING
Failure to use an engine as intended and as instructed
may lead to property damage, personal injury or death.
ENGINE REPLACEMENT:
Please check your equipment specifications for
important specific engine information, such as engine
size (cc), type of shaft (horizontal or vertical) crank shaft
dimensions, mounting bolt pattern, engine speed (rpm),
oil capacity, fuel tank size, controls (throttle/choke),
starting (recoil or electric), shut down capabilities,
accessory wiring needs and other emission related
specifications.

4
SAFE OPERATION PRACTICES
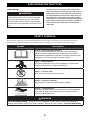
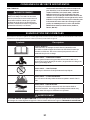
SAFETY SYMBOLS
This page depicts and describes safety symbols that may appear on the engine. Read, understand, and follow all warnings and
instructions on the engine and equipment, along with the operator’s manuals before attempting to install and/or operate.
Symbol Description
WARNING – READ THE OPERATOR’S MANUAL(S)
Read, understand and follow all the safety rules and instructions in the
manual(s) and on the equipment before attempting to operate. Failure to
comply with this information may result in personal injury or death. Keep the
manual(s) in a safe location for future and regular reference.
DANGER — CARBON MONOXIDE
Never run an engine indoors or in a poorly ventilated area. Engine exhaust
contains carbon monoxide, an odorless and deadly gas.
DANGER — ELECTRICAL SHOCK
Do not use the engine’s electric starter in the rain.
WARNING—GASOLINE IS FLAMMABLE
Allow the engine to cool at least 5 minutes before refueling.
WARNING— AVOID BURN INJURY
The muffler and engine become very hot and can cause serious burn injuries.
Do not touch. Allow the equipment to cool for at least 5 minutes before
storing or attempting any service.
WARNING
Your Responsibility—Restrict the use of the equipment to persons who read, understand and follow all
warnings and instructions on the engine and the equipment, and in the operator’s manuals. - SAVE THESE INSTRUCTIONS!
SPARK ARRESTOR
WARNING
Any equipment equipped with an internal combustion
engine should not be used on or near any unimproved
forest-covered, brush covered or grass-covered land
unless the engine’s exhaust system is equipped with a
spark arrestor meeting applicable local or state laws (if
any).
If a spark arrestor is used, it should be maintained in
effective working order by the operator. In the State of
California the above is required by law (Section 4442 of
the California Public Resources Code). Other states may
have similar laws. Federal laws apply on federal lands.
A spark arrestor for the muffler is available through your
nearest engine authorized service dealer or contact the
service department, P.O. Box 361131 Cleveland, Ohio
44136-0019.

5
SET-UP
Fuel & Oil
NOTE: The engine is shipped without fuel or oil in the engine.
Running the engine with insufficient oil can cause serious engine
damage and void the engine warranty.
WARNING
Always keep hands and feet clear of equipment moving
parts. Do not use a pressurized starting fluid. Vapors are
flammable.
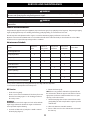
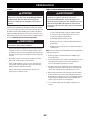
OIL RECOMMENDATIONS
Before starting engine, fill with motor oil, capacity is
1900 ml/64.25 oz. Refer to viscosity chart in Figure 1 for oil
recommendations. Do not over-fill. Use a 4-stroke, or an
equivalent high detergent, premium quality motor oil certified
to meet or exceed U.S. automobile manufacturer’s requirements
for service classification of a minimum level SJ (higher letter
ratings are acceptable such as SL and SM grades). Motor oil will
display this designation on the container.
SAE 10W-30 is recommended for general, all temperature use. If
single viscosity oil is used, select the appropriate viscosity for the
average temperature in your area from the chart below.
-30º -20º -10º 0º
0º 20º 40º 60º 80º 100º
10º 20º 30º 40º
-20º
(ºC)
(ºF)
10w30
30
Synthetic 5W-30
10W-30
5W-30
Figure 1
CAUTION
Do not use non-detergent oil or 2-stroke engine oil. It
could shorten the engine’s service life.
NOTE: A 5w30 synthetic oil may be used to improve start ability
for cold weather (temperatures below 40 ° F).
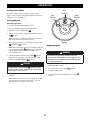
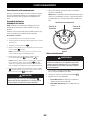
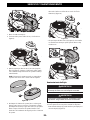
CHECKING OIL LEVEL/ADDING OIL
IMPORTANT: Be sure to check the oil while on a level surface
with the engine off.
To avoid engine damage, it is important to:
• Check oil level before each use and every 5 operating
hours when engine is warm. Check oil level more
frequently during engine break-in.
• Keep oil at the upper limit on the dipstick (Figure 2 inset).
• Be sure oil fill cap is tightened securely when checking.
1. Remove the oil fill cap and wipe the dipstick clean (Figure 2).
2. Insert the oil fill cap into the oil fill neck and securely fasten.
3. Loosen and remove the oil fill cap from the oil fill neck. Note
the oil level, if oil reading on the dipstick is below the upper
limit, slowly add oil to reach the upper limit (Figure 2 inset).
4. Replace the oil fill cap into the oil fill neck and securely fasten
before starting engine.
NOTE: Do not overfill. Overfilling with oil may cause smoking,
hard starting, spark plug fouling, or oil saturation of air cleaner.
NOTE: To change the oil on your engine, see Oil Service on page
9.
Upper
Limit
Figure 2

6
SET-UP
FUEL REQUIREMENTS
CAUTION
Operating the engine with E15 or E85 fuel, an oil/
gasoline mixture, dirty gasoline, or gasoline over
30 days old without fuel stabilizing additive may
result in damage to your engine’s carburetor. Subsequent
damage would not be covered under the manufacturer’s
warranty.
Use automotive gasoline (unleaded or low leaded to minimize
combustion chamber deposits) with a minimum of 87 octane.
Gasoline with up to 10% ethanol (E10) or 15% MTBE (Methyl
Tertiary Butyl Ether) can be used. Never use an oil/gasoline
mixture or dirty gasoline. Avoid getting dirt, dust, or water in the
fuel tank. DO NOT use E15 or E85 gasoline.
WARNING
Gasoline is extremely flammable and is explosive under
certain conditions.
• Refuel in a well-ventilated area with the engine off and
allowed to cool. Do not smoke or allow flames or sparks in the
area where the engine is refueled or where gasoline is stored.
• Do not overfill the fuel tank. After refueling, make sure the
fuel cap is closed properly and securely.
• If fuel is spilled, wipe it off the engine and the equipment.
Move equipment to another area and wait 5 minutes before
starting the engine.
• Avoid repeated or prolonged contact with skin or breathing
of vapor.
ADDING FUEL
WARNING
An adult should fuel this engine. NEVER allow children
to refuel the engine. Gasoline (fuel) vapors are highly
flammable and can explode. Fuel vapors can spread
and be ignited by a spark or flame many feet away from
engine. To prevent injury or death from fuel fires, follow
these instructions:
• DO NOT use leaded fuel.
• Fuel must be fresh and clean. NEVER use fuel left over
from last season or stored for long periods.
• NEVER mix oil with fuel.
• DO NOT use fuel containing Methanol (Wood Alcohol).
• Fill fuel tank outdoors or in well ventilated area.
NOTE: Before refueling, allow engine to cool for at least 5
minutes.
1. Clean area around the fuel fill cap and remove the fuel cap.
2. Use an approved red GASOLINE container, add fuel slowly,
being careful to avoid spilling. DO NOT overfill fuel tank.
3. Fill tank to full as indicated by the fuel level indicator inside
the fuel tank if equipped or to no more than 1/2 inch below
the bottom of the fill neck to allow space for fuel expansion.
4. Replace the fuel cap and tighten securely. Wipe up spilled fuel
before starting engine. If fuel is spilled DO NOT start engine.
Move machine away from area of spillage. Avoid creating any
source of ignition until fuel vapors are gone.
5. Be sure fuel shut-off valve, if present, is in the “ON” position.

7
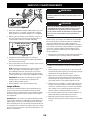
OPERATION
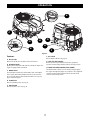
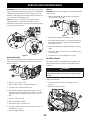
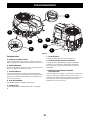
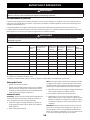
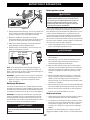
Features
A. OIL FILL CAP
Remove the oil fill cap to check the oil level and add oil
B. OIL DRAIN VALVE
Opening the oil drain valve will drain the oil from the engine. The
engine is equipped with a side drain.
C. MODEL PLATE
The model plate provides the model number and serial number
of the engine. Record this information in the area provided on
the cover of this manual. This information will be necessary for
proper technical support.
D. SPARK PLUG
Refer to Spark Plug Service on page 11.
E. AIR CLEANER
Refer to Air Filter Service on page 10.
F
E
H
C
B
D
A
D
Figure 3
F. OIL FILTER
Refer to Replace Oil Filter on page 10.
G. FUEL CAP (NOT SHOWN)
Remove the fuel cap to add fuel. Refer to the equipment
operator’s manual shipped with product for fuel cap location.
H. THROTTLE/CHOKE CONTROL (NOT SHOWN)
The throttle/choke control is used to aid in starting/stopping
the engine and adjusting engine speeds. Refer to the equipment
operator’s manual shipped with product for throttle/choke
control location and operation.

8
OPERATION
Pre-Operation Check
The engine is shipped without gasoline and with oil in the
engine. See the Set-Up Section of this manual for instructions on
adding gasoline and checking oil.
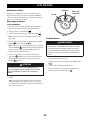
Starting Engine
Turn-Key Ignition
1. Insert the tractor key into the ignition module.
2. Place the PTO/Blade Engage lever to OFF position.
3. Engage the tractor’s parking brake .
4. Push the choke control (if equipped) upward into the choke
on position.
Note: If the engine is warmed up, it may not be necessary to
place the choke control in the choke position.
5. Move the throttle control lever to midway between the FAST
and SLOW positions.
Note: When operating the tractor be certain that the throttle
lever is always in the FAST (rabbit) position. Operating
with the throttle at less than full throttle may lead to
shortened battery life.
6. Turn the ignition key clockwise to the START position
(Figure 4). After the engine starts, release the key. It will
return to the NORMAL MOWING position.
CAUTION
Do NOT hold the key in the START position for longer
than ten seconds at a time. Doing so may cause damage
to your engine’s electric starter.
7. After the engine starts, deactivate the choke control (if
equipped).
Note: Do NOT leave the choke control (if equipped) on while
operating the tractor. Doing so will result in a “rich” fuel
mixture and cause the engine to run poorly.
Stop
Position Start
Position
Run
Position
Figure 4
Stopping Engine
WARNING
If you strike a foreign object, stop the engine and
disconnect the spark plug wire(s). Thoroughly inspect
the machine for any damage. Repair the damage before
restarting and operating.
1. If the blades are ENGAGED (ON), place the PTO in the
DISENGAGED (OFF) position.
2. Place the throttle near the SLOW position.
3. Engage the parking brake.
4. Turn the ignition key counterclockwise to the STOP
position.

9
SERVICE AND MAINTENANCE
WARNING
Shut off the engine before performing any maintenance. To prevent accidental start-up, remove safety key (if equipped),
disconnect the spark plug wire and ground against the engine.
WARNING
If the engine has been running, the muffler will be very hot. Allow engine and muffler to cool before performing any
maintenance.
General Recommendations
If engine must be tipped to transport equipment, inspect and remove grass, keep spark plug side of engine up. Transporting or tipping
engine spark plug down may cause smoking, hard starting, spark plug fouling, or oil saturation of air cleaner.
Periodic inspection and adjustment of the engine is essential to maintaining engine performance and service life.
Required service intervals and maintenance are described in the table below. Follow the hourly or calendar intervals as listed. More
frequent service is required when operating in adverse conditions.
Maintenance Schedule
Service After First 5
Hours
Each use or
Every 5-10 rs.
Every Season
or 25 Hours
Every season
or 100 Hours Service Dates
Check Engine Oil Level P
Change Engine Oil ** P P
Change Engine Oil FIlter ** P
Check Air Cleaner P
Service Air Cleaner * P
Check Spark Plug P
Replace Spark Plug P
Clean Cooling Fins P
Replace Fuel Filter P
Clean Finger Guard and around Muffler P
* Every season or 25 hours if operating under heavy load or high ambient temperature.
** Service more frequently when used in dusty areas.
Oil Service
• Check oil level regularly.
• Be sure correct oil level is maintained. Check every five to ten
hours before starting engine. See oil checking procedure in
the Set-Up section.
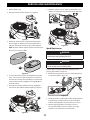
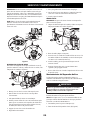
OIL DRAIN
IMPORTANT: Be sure to check engine on a level surface with the
engine stopped. Drain the oil while the engine is still warm to
assure rapid and complete draining.
1. Locate the oil drain valve (a) and place a suitable container
below the plug (Figure 2).
2. Remove the drain cap (b).
NOTE: If necessary, push the oil drain hose (if provided) onto
the oil drain valve. Route the opposite end of the hose into an
appropriate oil collection container with at least a 2.5 quart
capacity, to collect the used oil.
3. Turn the drain plug valve 1/4 turn counterclockwise while
gently pulling the valve away from the engine to open the
oil drain valve.
4. Allow oil to drain into a suitable container.
5. Reverse STEPS 4-3 to close the oil drain valve and reinstall
the drain cap.

10
SERVICE AND MAINTENANCE
ADD OIL
IMPORTANT: Be sure to check engine on a level surface with the
engine stopped.
1. Wipe around dipstick cap and tube with a clean cloth to
remove any debris (Figure 4).
Figure 7
2. Remove dipstick and wipe clean with a cloth.
3. Pour oil into the dipstick tube. Do not over fill. With an oil
filter change the high level amount of oil for this engine is
1900 ml (64.25 fl. oz.).
4. Install dipstick and turn to locked position before starting
engine.
5. Start engine. Allow to run for a few seconds and then shut
down the engine.
6. Check the oil level. See Checking Oil Level section.
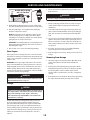
Air Filter Service
Paper filters cannot be cleaned and should be replaced every
100 operating hours; more often if used in extremely dusty
conditions.
WARNING
Never use gasoline or low flash point solvents for
cleaning the air filter element. A fire or explosion could
result.
IMPORTANT: Never run the engine without the air filter. Rapid
engine wear will result.
1. Unscrew a 1/4 turn and remove the thumb screws (a)
(Figure 5).
2. Remove the air filter cover (b).
a
b
1
2
Figure 8
IMPORTANT: Used motor oil may cause skin cancer if repeatedly
left in contact with the skin for prolonged periods. Although this
is unlikely unless you handle used oil on a daily basis, it is still
advisable to thoroughly wash your hands with soap and water as
soon as possible after handling used oil.
NOTE: Please dispose of used motor oil in a manner that is
compatible with the environment. Check with your local
municipality for proper disposal procedure. Do not throw it in the
trash or pour it on the ground.
a
a
a
b
1
2
3
Figure 5
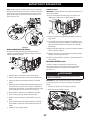
REPLACE OIL FILTER
This engine is equipped with a spin-on oil filter (a) that should be
replaced each time an oil change is performed, every season or
50 hours. (Figure 3).
a
Figure 6
1. Drain oil. See oil drain section.
2. Remove oil filter. Dispose of old oil filter properly.
3. Lube gasket of new oil filter with clean oil.
4. Install and turn oil filter by hand until the gasket comes in
contact with the sealing surface of the crankcase cover, then
tighten the oil filter, 10-12 Nm (88.5-106.2 in-lb), 1/2-3/4
turn.
5. Add oil. See add oil section.
6. Make sure dipstick is installed.
7. Start and run engine. Check for leaks.
8. Stop engine. Wait a few minutes and check the oil level. See
checking oil level section.
9. Install and tighten dipstick.

11
SERVICE AND MAINTENANCE
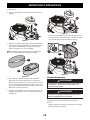
8. Attach the air filter cover (f). (Figure 9). Turn thumb screws
clockwise a 1/4 turn until snug. Check for any misalignment.
f
1
2
Figure 12
Spark Plug Service
WARNING
DO NOT check for spark with spark plug removed. DO NOT
crank engine with spark plug removed.
WARNING
If the engine has been running, the muffler will be very
hot. Be careful not to touch the muffler.
To ensure proper engine operation, the spark plug must be
properly gapped and free of deposits.
1. Remove the spark plug boot (a) and use a spark plug wrench
to remove the plug (b). (Figure 10).
a
b
Figure 13
2. Visually inspect the spark plug. Discard the spark plug if there
is apparent wear, or if the insulator is cracked or chipped.
Clean the spark plug with a wire brush if it is to be reused.
3. Measure the plug gap with a feeler gauge. Correct as
necessary by bending electrode (c) (Figure 11). The gap
should be set to 0.024-0.031 in (0.61-0.78 mm).
3. Remove thumb screw.
4. Pull up and remove air filter and base seal. (Figure 6).
1
2
Figure 9
5. Remove the foam pre-filter (c) from around the paper air
filter.(d) (Figure 7). Replace paper element when dirty or
damaged. Clean foam element or replace when damaged.
NOTE: The foam element cannot be purchased separately. Air
filter is only sold as an assembly.
c
d
Figure 10
6. To clean foam element, wash in a mild liquid detergent and
water. Squeeze or press the foam element to rinse out dirt
and water. Do not twist; this could damage or tear the foam
element. Allow to dry thoroughly before using. DO NOT oil
the foam element.
7. Attach the new air filter with foam element, aligning the
hole in the air filter with the intake manifold (e). (Figure 8).
e
Figure 11

12
SERVICE AND MAINTENANCE
0.024-0.031 pulg.
0.61-0.78 mm
c
Figure 14
4. Check that the spark plug washer is in good condition and
thread the spark plug in by hand to prevent cross-threading.
5. After the spark plug is seated, tighten with a spark plug
wrench to compress the washer.
NOTE: When installing a new spark plug, tighten 1/2 turn
after the spark plug seats to compress the washer. When
reinstalling a used spark plug, tighten 1/8-1/4 turn after the
spark plug seats to compress the washer.
IMPORTANT: The spark plug must be securely tightened. An
improperly tightened spark plug can become very hot and
may damage the engine.
6. Repeat STEPS 1-5 to service the remaining spark plug.
Clean Engine
If the engine has been running, allow it to cool for at least half
an hour before cleaning. Periodically remove dirt build-up from
engine. Clean cooling fins every 25 hours. Clean with a brush or
compressed air.
IMPORTANT: Do not spray engine with water to clean because
water could contaminate fuel. Using a garden hose or pressure
washing equipment can also force water into the air cleaner or
muffler opening. Water in the air cleaner will soak the paper
element, and water that passes through the element or muffler
can enter the cylinder, causing damage.
WARNING
Accumulation of debris around muffler could cause a fire.
Inspect and clean before every use.
Storage
CAUTION
Failure to use a fuel stabilizing additive or completely run
the engine until it’s out of fuel before off-season storage
may result in damage to your engine’s carburetor.
Subsequent damage would not be covered under the
manufacturer’s warranty.
Gasoline that will be stored longer than 30 days needs to be
pre-treated upon purchase with fuel stabilizer to prevent
gum and varnish from forming in the engines fuel and intake
system. Improper fuel storage can result in hard starting, no
starting, stalling and poor performance. If the gasoline in your
engine deteriorates during storage, you may need to have the
carburetor, and other fuel system components, serviced or
replaced.
1. Remove all fuel from tank by running engine until it stops
from lack of fuel.
WARNING
Never leave engine unattended while running.
2. Change oil. See Oil Change section.
3. Remove spark plug and pour about 1/2 an ounce of engine
oil into cylinder. Replace spark plug and crank slowly to
distribute oil.
4. Clean debris from around engine, under finger guard, and
under, around and behind muffler. Touch up any damaged
paint, and coat other areas that may rust with a light film
of oil.
5. Store in a clean, dry and well ventilated area away from any
appliance that operates with a flame or pilot light, such as a
furnace, water heater, or clothes dryer. Also avoid any area
with a spark producing electric motor, or where power tools
are operated.
6. If possible, also avoid storage areas with high humidity,
because that promotes rust and corrosion.
7. Keep the engine level in storage. Tilting can cause fuel or oil
leakage.
Removing From Storage
1. Check your engine as described in the Pre-Operation Check
section of this manual. Check for debris under blower
housing.
2. If the fuel was drained during storage preparation, fill the
tank with fresh gasoline. If you keep a container of gasoline
for refueling, make certain it contains only fresh fuel.
Gasoline oxidizes and deteriorates over time, causing hard
starting.
3. If the cylinder was coated with oil during storage preparation,
the engine will smoke briefly at startup. This is normal.

13
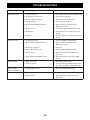
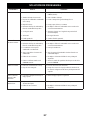
TROUBLESHOOTING
Problem Cause Remedy
Engine Fails to start 1. Choke not activated.
2. Spark plug boot disconnected.
3. Fuel tank empty or stale fuel.
4. Faulty spark plug.
5. Reduced fuel flow/Blocked fuel filter.
6. Engine flooded.
7. Dead battery.
8. Blown fuse.
1. Place throttle/choke control in CHOKE position.
2. Connect wire to spark boot.
3. Fill tank with clean, fresh gasoline.
4. Clean, adjust gap, or replace.
5. Replace fuel filter as instructed in the
Maintenance section.
6. Crank engine with throttle in FAST position.
7. Recharge battery. See equipment operator’s
manual.
8. Replace blown fuse. See equipment operator’s
manual.
Engine runs erratic 1. Spark plug boot loose.
2. Reduced fuel flow/Blocked fuel filter.
3. Vent in gas cap plugged.
4. Water or dirt in fuel system.
5. Dirty air cleaner.
6. Engine running with CHOKE activated.
1. Connect and tighten spark plug boot.
2. Replace fuel filter as instructed in the
Maintenance section.
3. Clear vent.
4. Drain fuel tank. Refill with fresh fuel.
5. Replace air cleaner element and/or clean
pre-cleaner.
6. Move throttle/choke control out of CHOKE
position.
Engine overheats 1. Engine oil level low.
2. Air flow restricted.
1. Fill crankcase with proper oil.
2. Clean grass clippings and debris from around
the engine’s cooling fins and blower housing.
Occasional skips
(hesitates) at high speed
1. Spark plug gap too close. 1. Remove spark plug and adjust gap.
Idles poorly 1. Spark plug fouled, faulty, or gap too wide.
2. Dirty air cleaner.
1. Reset gap or replace spark plug.
2. Replace air cleaner element and/or clean
pre-cleaner.

14
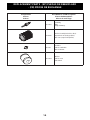
REPLACEMENT PARTS · (SP) PLEZAS DE REEMPLAZO
· (FR) PIÈCES DE RECHANGE
Component
Plezas
Pièces
Part Number and Description
Plezas de Reemplazo
Pièces de rechange
951-10292
Spark Plug
Bujía
bougie d’allumage
937-05066
Air Filter Assembly (Includes Pre-Filter)
Depurador de aire (incluye prefiltro)
filtre à aire (comprend un préfiltre)
951-3013
Fuel Filter
Filtro de combustible
filtre à carburant
951-12690
Oil Filter
Filtro de aceite
Filtre d’huile

Prácticas de Operación Seguras • Configuración • Funcionamiento • Servicio y Mantenimiento •
Solución de Problemas • Repuestos
Manual del OperadOr
Moteurs de 679 cm3 à arbre vertical
NOTA: Este Manual del Operador corresponde a varios modelos. Las características pueden variar según los modelos. No todas las
características que se incluyen en este manual se aplican a todos los modelos y el modelo que se ilustra aquí puede diferir del suyo.
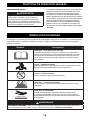
ADVERTENCIA
Lea y cumpla todas las reglas e instrucciones de seguridad de este manual antes de intentar operar esta máquina.
Si no sigue estas instrucciones, se pueden provocar lesiones personales - GUARDE ESTAS INSTRUCCIONES.
ADVERTENCIA
PROPOSICIÓN 65 DE CALIFORNIA
El escape del motor, algunos de sus elementos y ciertos componentes del vehículo contienen o emiten productos
químicos que el estado de California considera que pueden producir cáncer, defectos de nacimiento y otros
problemas reproductivos.
Registro de Información del Producto
Antes de configurar y hacer funcionar su nuevo
motor, por favor localice la placa de modelo
y registre la información en el espacio de la
derecha. Podrá localizar la placa de modelo
desde la posición del operador mirando la
parte posterior o el lado derecho del motor.
Necesitará esta información si tiene que solicitar
soporte técnico a través de nuestro sitio web, el
Departamento de Atención al Cliente, o de un
distribuidor local de servicio autorizado.
Número de modelo
Número de serie
Inglés (English) ...................................................................................................................... Página 2
Spanish (Español) .................................................................................................................Página 15
French (Français) ...................................................................................................................Página 28
Plezas de Reemplazo ............................................................................................................Página 14

16
PRÁCTICAS DE OPERACIÓN SEGURAS
CAPACITACIÓN
1. Lea, entienda y cumpla todas las advertencias e instrucciones
incluidas en el motor y el equipo, y en los manuales del operador
antes de intentar instalarlo y/o utilizarlo. Guarde este manual en
un lugar seguro para consultas futuras y periódicas, así como para
solicitar repuestos.
2. Familiarícese con todos los controles y su correcto funcionamiento.
Sepa cómo detener el motor y desactivar los controles rápidamente.
3. No permita nunca que los niños menores de 14 años hagan funcionar
el equipo. Los niños de 14 años en adelante deben leer y entender
las advertencias e instrucciones que figuran tanto sobre el producto
como en los manuales, y deben ser entrenados y supervisados por
un adulto.
4. Nunca permita que los adultos operen el equipo sin recibir antes la
instrucción apropiada.
5. Mantenga el área de operación despejada de personas,
especialmente niños pequeños y mascotas. Detenga el motor si
alguien entra en la zona.
PREPARATIVOS
1. Utilice zapatos de trabajo resistentes, de suela fuerte, así como
pantalones y camisas ajustados. Las prendas sueltas y las alhajas se
pueden enganchar en las piezas móviles. Nunca haga funcionar el
equipo estando descalzo o con sandalias.
2. Desengrane todas las palancas de control de embrague y transmisión
del equipo antes de encender el motor.
3. Nunca deje el motor en marcha sin vigilancia.
4. Nunca intente realizar ajustes mientras el motor está en marcha,
excepto en los casos específicamente recomendados en el manual
del operador.
MANEJO SEGURO DE LA GASOLINA:
Para evitar lesiones personales o daños materiales sea sumamente
cuidadoso al manipular la gasolina. La gasolina es sumamente inflamable
y sus vapores son explosivos. Si se derrama gasolina encima y/o sobre
la ropa se puede lesionar gravemente ya que se puede prender fuego.
Lávese la piel y cámbiese de ropa de inmediato.
1. Cuando agregue combustible, APAGUE el motor y déjelo enfriar por lo
menos 5 minutos antes de sacar la tapa del combustible.
2. Llene el tanque de combustible al aire libre o en un área bien
ventilada.
3. Utilice solo un recipiente para combustible autorizado.
4. Nunca llene los recipientes en el interior de un vehículo o sobre un
camión o caja de remolque con un recubrimiento plástico. Siempre
ubique los recipientes en el piso, lejos del vehículo antes de llenarlos.
5. Si es posible, retire el equipo del camión o remolque y llénelo en el
suelo. Si esto no es posible, recargue combustible sobre un remolque
con un recipiente portátil, en lugar de una boquilla dosificadora de
bomba de combustible.
6. En todo momento, mantenga el pico en contacto con el borde del
depósito de combustible o con la boca del recipiente, hasta terminar
la carga. No utilice un dispositivo de bloqueo/apertura de boquilla.
7. No llene en exceso el depósito de combustible. Llene el depósito
hasta la marca del indicador de nivel de combustible que está dentro
del depósito de combustible para dejar espacio para la expansión
del combustible. Algunos modelos podrían NO tener un indicador de
nivel de combustible; en este caso, llene el depósito no más de 1/2
pulgada por debajo de la base del cuello de llenado para dejar lugar
para la expansión del combustible.
8. Vuelva a colocar la tapa del combustible y ajústela bien.
9. Limpie el combustible que se pueda haber derramado sobre el motor
y el equipo. Traslade el equipo a otro lugar y espere 5 minutos antes
de encender el motor.
10. Para evitar peligros de incendio, mantenga el motor y el equipo libres
de césped, hojas u otras acumulaciones de residuos. Limpie cualquier
derrame de aceite o combustible y retire lo que haya quedado
empapado de combustible.
11. Mantenga el combustible alejado de chispas, llamas expuestas,
llamas piloto, calor, y otras fuentes de ignición.
12. Nunca cargue combustible al equipo en interiores porque se
acumularán vapores inflamables en el área.
13. Apague todos los cigarrillos, cigarros, pipas y otras fuentes de
ignición.
14. Verifique frecuentemente la línea de combustible, el depósito, el
tapón y los accesorios para ver si hay rajaduras o pérdidas. Reemplace
cuando sea necesario.
ADVERTENCIA
Este símbolo indica instrucciones de seguridad importantes que, de no seguirse, pueden poner en peligro su
seguridad personal y/o material y la de otras personas. Lea y cumpla todas las instrucciones de este manual
antes de intentar hacer funcionar este producto. Si no sigue estas instrucciones, se pueden provocar lesiones
personales. Cuando vea este símbolo, ¡PRESTE ATENCIÓN A LA ADVERTENCIA!
PELIGRO
Este motor está diseñado para ser utilizado respetando las prácticas de operación seguras contenidas en este manual. Al
igual que con cualquier tipo de equipo motorizado, un descuido o error por parte del operador puede producir lesiones
graves. De no respetar las instrucciones de seguridad siguientes, se pueden ocasionar lesiones graves o la muerte.

17
PRÁCTICAS DE OPERACIÓN SEGURAS
FUNCIONAMIENTO
1. Al arrancar el motor, asegúrese de que la bujía, el silenciador y la tapa
del combustible están en su lugar.
2. No dé arranque al motor si no está la bujía de encendido.
3. Limpie el combustible que se pueda haber derramado sobre el motor
y el equipo. Traslade el equipo a otro lugar y espere 5 minutos antes
de encender el motor.
4. Deje que el motor y el silenciador se enfríen antes de tocarlos.
5. Mantenga a los niños pequeños alejados de motores calientes o en
funcionamiento. Ellos no son conscientes de los peligros y podrían
sufrir quemaduras por contacto con el motor y silenciador.
6. Extraiga los desperdicios acumulados en el cilindro del motor y
silenciador.
7. Haga funcionar el equipo con todos los protectores colocados.
8. Mantenga las manos y los pies alejados de las piezas giratorias.
9. Utilice zapatos de trabajo resistentes, de suela fuerte, y
pantalones y camisas ajustados. Las ropas sueltas, las alhajas y
el cabello largo pueden engancharse en las piezas móviles. Se
recomienda vestir camisas y pantalones que cubran brazos y
piernas y usar zapatos con puntera de acero.
10. Cuando encienda el motor con el arrancador de retroceso, tire de
la manija lentamente hasta que sienta resistencia, y luego tire
rápidamente; repita si fuera necesario.
11. Antes de arrancar el motor, retire todas las cargas que pueda
haber sobre el motor/equipo.
12. Los componentes del equipo acoplados directamente, tales como
por ejemplo, cuchillas, rotores, poleas, ruedas dentadas, etc.,
deben estar firmemente conectados.
MANTENIMIENTO Y ALMACENAMIENTO
1. Mantenga el motor y el equipo en condiciones seguras de
funcionamiento.
2. Deje que motor se enfríe por lo menos 5 minutos antes de
almacenar el equipo. Nunca intente alterar los dispositivos
de seguridad. Compruebe regularmente que funcionen
correctamente.
3. Controle frecuentemente que todos los pernos y tornillos estén bien
ajustados para mantener el motor y el equipo en condiciones seguras
de funcionamiento. Inspecciónelos visualmente para determinar si
hay daños.
4. Antes de limpiar, reparar o revisar el motor, deténgalo y asegúrese
que todas las partes móviles se hayan detenido. Desconecte el cable
de la bujía y póngalo haciendo masa contra el motor para evitar que
se encienda accidentalmente.
5. No cambie la configuración del regulador del motor ni acelere
demasiado el motor. El regulador del motor controla la velocidad
máxima de funcionamiento seguro del motor.
6. Mantenga o reemplace las etiquetas de seguridad e instrucciones
según sea necesario.
7. Consulte siempre el manual del operador para conocer información
importante relativa al almacenamiento del equipo durante un plazo
prolongado.
8. Si el tanque de combustible debe drenarse, hágalo al aire libre.
9. Respete las normas y reglamentaciones sobre la manera correcta de
eliminar combustible, aceite, etc. para proteger el medio ambiente.
NO MODIFIQUE EL MOTOR
Para evitar lesiones graves o la muerte, no modifique el
motor de ninguna manera. La manipulación del ajuste del
regulador puede modificar la regulación del motor y hacer
que éste funcione a velocidades inseguras. Nunca modifique
el ajuste de fábrica del regulador del motor.
AVISO SOBRE LAS EMISIONES DEL MOTOR
Los motores tienen la certificación de cumplimiento de
las reglamentaciones sobre emisiones de EPA federales y
de California para SORE (equipo pequeño para uso fuera
de carreteras), funcionan con gasolina normal sin plomo
y pueden incluir los siguientes sistemas de control de
emisiones: Modificación de motor (EM), catalizador oxidante
(OC), inyección de aire secundaria (SAI) y catalizador de tres
vías (TWC) si están instalados.
USO PREVISTO:
Los modelos de motor que figuran en la tapa de este
manual están específicamente diseñados y previstos
para usar únicamente en equipos eléctricos para
exteriores.Los modelos de motor indicados también han
sido aprobados para usarlos como motores de repuesto
para productos tales como cortadoras, bordeadoras y
orilladoras con ruedas.El uso de estos motores en otras
aplicaciones no está aprobado. Los motores usados en
aplicaciones no aprobadas o sujetos a modificaciones o
uso indebido anularán la garantía del motor.
ADVERTENCIA
La omisión de usar un motor de la forma prevista y
de acuerdo con las instrucciones podría causar daños
materiales, lesiones personales o la muerte.
REEMPLAZO DEL MOTOR:
Por favor, consulte las especificaciones de su equipo
donde encontrará información importante específica
del motor, por ejemplo, tamaño del motor (cc), tipo
de eje (horizontal o vertical), dimensiones del árbol
cigüeñal, patrón de montaje de pernos, velocidad del
motor (rpm), capacidad de aceite, tamaño del depósito
de combustible, controles (acelerador/estrangulador),
arrancador (de retroceso o eléctrico), funciones de
detención, necesidades de cableado para accesorios y
otras especificaciones referidas a emisiones.

18
PRÁCTICAS DE OPERACIÓN SEGURAS
SÍMBOLOS DE SEGURIDAD
En esta página, se presentan y describen los símbolos de seguridad que pueden aparecer en el motor. Lea, entienda y cumpla
todas las advertencias e instrucciones incluidas en el motor y el equipo, y en los manuales del operador antes de intentar
instalarlo y/o utilizarlo.
Símbolo Descripción
ADVERTENCIA – LEA LOS MANUALES DEL OPERADOR
Lea, comprenda y siga todas las normas y las instrucciones de seguridad que se
incluyen en el manual y sobre el equipo antes de intentar utilizarlo. Si no cumple
con lo que indica esta información, se pueden provocar lesiones personales o la
muerte. Conserve este manual en un lugar seguro para usarlo como referencia
futura habitual.
PELIGRO — MONÓXIDO DE CARBONO
Nunca haga funcionar un motor en interiores o en un área mal ventilada. El escape
del motor contiene monóxido de carbono, un gas inodoro y letal.
PELIGRO — DESCARGAS ELÉCTRICAS
No use el arrancador eléctrico del motor bajo la lluvia.
ADVERTENCIA—LA GASOLINA ES INFLAMABLE
Deje que el motor se enfríe por lo menos cinco minutos antes de volver a cargar
combustible.
ADVERTENCIA - EVITE QUEMADURAS
El silenciador y el motor están a temperatura muy alta y pueden provocar
lesiones graves por quemaduras. No los toque. Deje que se enfríe el equipo al
menos durante cinco minutos antes de almacenarlo o intentar cualquier tarea de
mantenimiento.
ADVERTENCIA
Su Responsabilidad—Limite el uso del equipo a las personas que lean, comprendan y respeten todas las advertencias e
instrucciones que figuran en sobre el motor y el equipo, y en los manuales del operador. - ¡GUARDE ESTAS INSTRUCCIONES!
AMORTIGUADOR DE CHISPAS
ADVERTENCIA
Cualquier equipo que tenga un motor de combustión
interna no debe ser utilizado en o cerca de un terreno
agreste cubierto por bosque, malezas o hierba excepto
que el sistema de escape del motor esté equipado con un
amortiguador de chispas que cumpla con las leyes locales o
estatales correspondientes (en caso de existir).
Si se utiliza un amortiguador de chispas, el operador lo debe
mantener en condiciones de uso adecuadas. En el Estado
de California, las medidas anteriormente mencionadas
son exigidas por ley (Artículo 4442 del Código de Recursos
Públicos de California). Es posible que existan leyes similares
en otros estados. Las leyes federales se aplican en territorios
federales. Puede conseguir el amortiguador de chispas
para el silenciador a través de su distribuidor autorizado
de motores más cercano o poniéndose en contacto con el
departamento de servicios, P.O. Box 361131, Cleveland, Ohio
44136-0019.

19
CONFIGURACIÓN
Combustible y Aceite
NOTA: El motor se despacha sin combustible ni aceite en el
motor. Si se hace funcionar el motor sin suficiente aceite puede
dañarse gravemente y se anula la garantía.
ADVERTENCIA
Siempre mantenga las manos y los pies alejados de las piezas
móviles del equipo. No utilice fluidos comprimidos para arrancar.
Los vapores son inflamables.
RECOMENDACIONES SOBRE EL ACEITE
Antes de encender el motor, llene con aceite para motor; la
capacidad es de 1900 ml/64.25 oz. Consulte la tabla de viscosidad
en la Figura 1 para las recomendaciones relacionadas con el
aceite. No llene excesivamente. Use un aceite para motor de
cuatro tiempos, o un aceite detergente de calidad premium
equivalente con certificado que cubra o exceda las exigencias
de los fabricantes de automóviles americanos respecto de la
clasificación de servicio de un nivel mínimo SJ (se aceptan
clasificaciones de letras superiores como grados SL y SM). El
aceite para motor tendrá esta designación en el envase.
Se recomienda SAE 10W-30 para uso general, a todas las
temperaturas. Si utiliza aceite con viscosidad monogrado,
seleccione en la tabla que aparece a continuación la viscosidad
adecuada para la temperatura media de su zona.
-30º -20º -10º 0º
0º 20º 40º 60º 80º 100º
10º 20º 30º 40º
-20º
(ºC)
(ºF)
10w30
30
Sintético 5W-30
10W-30
5W-30
Figura 1
PRECAUCIÓN
No utilice aceites sin detergente ni aceite para motor de
dos tiempos. Podría reducirse la vida útil del motor.
NOTA: Se puede usar un aceite sintético 5w30 para mejorar el
encendido cuando el clima está frío (temperaturas inferiores a
los 40°F).
VERIFICACIÓN DEL NIVEL DE ACEITE/CARGA DE ACEITE
IMPORTANTE: Asegúrese de comprobar el aceite sobre una
superficie nivelada y con el motor apagado.
Para evitar que el motor resulte dañado, es importante que:
• Controle el nivel de aceite antes de cada uso y cada 5
horas de funcionamiento cuando el motor está tibio.
Controle el nivel de aceite con mayor frecuencia durante el
período de funcionamiento inicial del motor.
• Mantenga el aceite en el límite superior de la varilla de
nivel de aceite (Figura 2 recuadro).
• Cuando realice el control, compruebe que el tapón de
llenado de aceite esté bien ajustado.
1. Retire el tapón de llenado de aceite y limpie la varilla de nivel
de aceite(Figura 2).
2. Inserte el tapón de llenado de aceite en el cuello de llenado
de aceite y ajuste bien.
3. Afloje y retire el tapón de llenado de aceite del cuello de
llenado de aceite. Tome nota del nivel de aceite, si la lectura
de aceite en la varilla de nivel de aceite está por debajo del
límite superior, agregue aceite lentamente hasta alcanzar el
límite superior (Figura 2 recuadro).
4. Vuelva a colocar el tapón de llenado de aceite en el cuello de
llenado de aceite y ajuste bien antes de encender el motor.
NOTA: No lo llene en exceso. El exceso de aceite puede causar
ahumado, problemas de arranque, suciedad en la bujía o
saturación de aceite en el purificador de aire.
NOTA: Para cambiar el aceite de su motor, consulte Cambio de
aceite on page 23.
Límite
Superior
Figura 2

20
CONFIGURACIÓN
REQUISITOS DE COMBUSTIBLE
PRECAUCIÓN
Si se opera el motor con combustible E15 o E85, una mezcla de
aceite/gasolina, gasolina sucia o gasolina con más de 30
días de uso que no se haya estabilizado con un aditivo de
combustible, se puede dañar el carburador del motor. A los daños
subsiguientes no los cubre la garantía del fabricante.
Utilice gasolina para automóviles (sin plomo o con bajo
contenido de plomo para minimizar los depósitos en la cámara
de combustión) con un mínimo de 87 octanos. Se puede usar
gasolina con hasta un 10% de etanol (E10) o un 15% de MTBE
(éter metílico terciario-butílico). Nunca use una mezcla de aceite
y gasolina ni gasolina sucia. Evite que se introduzca suciedad,
polvo o agua en el depósito de combustible. NO utilice
gasolina E15 ni E85.
ADVERTENCIA
La gasolina es sumamente inflamable y bajo determinadas
condiciones es explosiva.
• Recargue en un área bien ventilada con el motor apagado y
deje enfriar. No fume ni permita llamas o chispas en el lugar
donde se carga combustible o se almacena la gasolina.
• No llene en exceso el depósito de combustible. Después de
cargar combustible, asegúrese de que el tapón del depósito
esté bien cerrado y ajustado.
• Limpie el combustible que se pueda haber derramado sobre
el motor y el equipo. Traslade el equipo a otro lugar y espere 5
minutos antes de encender el motor.
• Evite el contacto repetido o prolongado con la piel y la
inhalación de vapores.
CARGA DE COMBUSTIBLE
ADVERTENCIA
El combustible debe cargarlo un adulto. NUNCA permita que
un niño recargue combustible en el motor. Los vapores de la
gasolina (el combustible) son sumamente inflamables y pueden
explotar. Los vapores del combustible se pueden esparcir y
encenderse por una chispa o llama que esté a mucha distancia
del motor. Para evitar lesiones o muertes por incendios de
combustible, siga estas instrucciones:
• NO use combustible con plomo.
• El combustible debe ser nuevo y estar limpio. NUNCA use
el combustible que queda desde la última temporada o
que quedó almacenado durante períodos prolongados.
• NUNCA mezcle aceite con combustible.
• NO use combustible que contenga metanol (alcohol de
madera).
• Llene el tanque de combustible al aire libre o en un área
bien ventilada.
NOTA: Antes de cargar combustible, deje que el motor se enfríe
al menos 5 minutos.
1. Limpie el área que está alrededor del tapón de llenado de
combustible y quite dicho tapón.
2. Use un recipiente rojo para GASOLINA aprobado y agregue el
combustible lentamente, tomando la precaución de evitar
derrames. NO llene en exceso el depósito de combustible.
3. Llene el depósito hasta el indicador de nivel de combustible
que está adentro del depósito de combustible si existiera, o
bien hasta no más de 1/2 pulgada por debajo de la base del
cuello de llenado para dejar espacio para la expansión del
combustible.
4. Vuelva a colocar el tapón del combustible y ajústelo
bien. Antes de poner en marcha el motor, debe limpiar
el combustible que se haya derramado. Si se derrama
combustible NO ponga en marcha el motor. Mueva la
máquina para alejarla de la zona del derrame. Evite
generar una fuente de encendido hasta que los vapores del
combustible hayan desaparecido.
5. Compruebe que la válvula de paso del combustible, si está
presente, esté en la posición “ON”.
La page est en cours de chargement...
La page est en cours de chargement...
La page est en cours de chargement...
La page est en cours de chargement...
La page est en cours de chargement...
La page est en cours de chargement...
La page est en cours de chargement...
La page est en cours de chargement...
La page est en cours de chargement...
La page est en cours de chargement...
La page est en cours de chargement...
La page est en cours de chargement...
La page est en cours de chargement...
La page est en cours de chargement...
La page est en cours de chargement...
La page est en cours de chargement...
La page est en cours de chargement...
La page est en cours de chargement...
La page est en cours de chargement...
La page est en cours de chargement...
-
 1
1
-
 2
2
-
 3
3
-
 4
4
-
 5
5
-
 6
6
-
 7
7
-
 8
8
-
 9
9
-
 10
10
-
 11
11
-
 12
12
-
 13
13
-
 14
14
-
 15
15
-
 16
16
-
 17
17
-
 18
18
-
 19
19
-
 20
20
-
 21
21
-
 22
22
-
 23
23
-
 24
24
-
 25
25
-
 26
26
-
 27
27
-
 28
28
-
 29
29
-
 30
30
-
 31
31
-
 32
32
-
 33
33
-
 34
34
-
 35
35
-
 36
36
-
 37
37
-
 38
38
-
 39
39
-
 40
40


dans d''autres langues
- English: Mustang 679 cc OHV User manual
- español: Mustang 679 cc OHV Manual de usuario
Autres documents
-
MTD 420cc Le manuel du propriétaire
-
Troy-Bilt 12AN2M7563 Le manuel du propriétaire
-
Bolens 11A-A2S5565 Le manuel du propriétaire
-
Bolens 31AM2P5B565 Le manuel du propriétaire
-
Bolens 31AH54Q4563 Le manuel du propriétaire
-
MTD 139 cc OHV Manuel utilisateur
-
Bolens 11A-02M2565 Manuel utilisateur
-
Troy-Bilt 31BH5DR7563 Le manuel du propriétaire
-