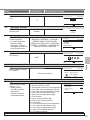
Panasonic CZRD517C Mode d'emploi
- Catégorie
- Climatiseurs split-system
- Taper
- Mode d'emploi

ACXF55-33861
Operating Instructions
Wired Remote Controller
Model No. CZ-RD517C
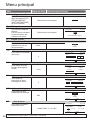
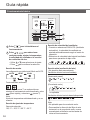
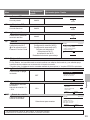
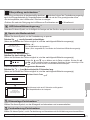
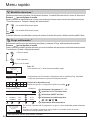
12:00,Mon
SET TEMP.
FAN SPEED
25.0
FLAP
AUTO
AUTO
MODE
AUTO
Operating Instructions Wired Remote Controller 2-15
English
Before operating the unit, please read these operating instructions thoroughly and keep them for future
reference. Before installation, the installer should: Read the Installation Instructions, then request the customer
keep them for future reference.
Comment utiliser l’appareil Télécommande fi laire 16-29
Français
Avant d’utiliser l’appareil, veuillez lire ce mode d’emploi dans son intégralité et conservez-le pour toute
référence ultérieure. Avant de commencer l’installation, l’installateur doit: Lire les instructions d’installation, puis
demander au client de les conserver pour plus tard.
Instrucciones de funcionamiento
Mando a distancia con cable 30-43
Español
Antes de utilizar la unidad, sírvase leer atentamente estas instrucciones de funcionamiento y conservarlas
para futuras consultas. Antes de la instalación, el instalador debe: Lea las Instrucciones de instalación y pida
al cliente que las conserve para futuras consultas.
Bedienungsanleitung Kabelfernbedienung 44-57
Deutsch
Bevor Sie das Gerät in Betrieb nehmen, lesen Sie bitte diese Bedienungsanleitung aufmerksam durch und
bewahren Sie sie als künftige Referenz auf. Vor der Installation sollte der Installateur Folgendes tun:
Die Installationsanleitung lesen und den Kunden bitten, diese als künftige Referenz aufzubewahren.
Istruzioni di funzionamento Telecomando con fi lo 58-71
Italiano
Prima di utilizzare l’unità, leggere attentamente le istruzioni e conservare questo opuscolo per potervi fare
riferimento in futuro. Prima dell’installazione, l’installatore deve: Leggere le istruzioni d’installazione, quindi
richiedere al cliente di conservarle per riferimento futuro.

2
Table of Contents
Safety Precautions ……………………………………………………………………………… 2-3
Remote Controller buttons and display ………………………………………………………… 4
Initialization ………………………………………………………………………………………… 5
Quick Guide ………………………………………………………………………………………… 6
Quick Menu ……………………………………………………………………………………… 7-9
Main Menu …………………………………………………………………………………… 10-13
Troubleshooting …………………………………………………………………………………… 14
Information ………………………………………………………………………………………… 15
Thank you for purchasing Panasonic product.
Any translation into other language shall be deemed as reference and English version shall prevail in any case.
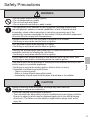
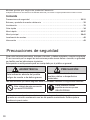
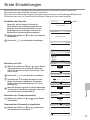
Safety Precautions
WARNING
This sign warns of death or serious injury.
CAUTION
This sign warns of injury or damage to
property.
To prevent personal injury, injury to others or property damage, please comply with the
following:
Incorrect operation due to failure to follow instructions below may cause harm or damage, the
seriousness of which is classifi ed as below:
This appliances is not intended for accessibility by the general public.
The instructions to be followed are classifi ed by the following symbols:
This symbol denotes an action
that is PROHIBITED. These symbols denote actions
COMPULSORY.
The illustrations in this manual are for explanation purposes only and may differ from the
actual unit. They are subject to change without notice.

3
English
Safety Precautions
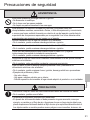
WARNING
This can cause electric shock or ignition.
• Do not disassemble or modify.
• Do not touch with wet hands.
• Do not wipe with wet cloths or wash in water.
This application is not intended for use by persons (including children) with
reduced physical, sensory or mental capabilities, or lack of experience and
knowledge, unless under supervision or instruction concerning use of the
appliance by a person responsible for their safety. Children should be supervised
to ensure they do not play with the appliances.
Request installation only from the place of purchase or an installer.
• Not doing so may cause electric shock or ignition.
Shut off power supply when installing CNT cable.
• Not doing so may cause electric shock or ignition.
Use only the specifi ed parts when installing CNT cable and perform the
installation correctly by following the instructions.
• Not doing so may cause electric shock or ignition.
Ensure cables are installed properly so that external forces cannot aff ect them.
• Not doing so may lead to overheating which can lead to ignition.
Stop use as soon as any problems or malfunctions are detected and shut off the
electric supply to connected appliances.
• Not doing so may cause smoke, ignition, electric shock, or burns.
• Examples of problems and malfunctions:
- There is a burning smell
- Water or foreign objects have gotten inside
- Immediately request repair from the place of purchase or the installer.
CAUTION
Before connecting wires and cables, discharge any static electricity.
• Not doing so may cause malfunction.
Check the following requirements in advance:
• There should be no abnormality in the air conditioner such as change of airfl ow.
Ensure no object(s) which may be displaced easily due to the airfl ow blowing
directly at it. The fallen or moved object(s) might lead to danger such as fi re,
injury etc.

4
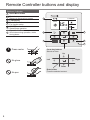
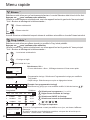
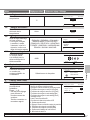
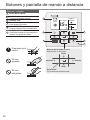
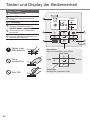
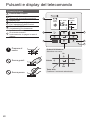
Remote Controller buttons and display
Buttons / Indicator
1Quick Menu button
2Back button
Returns to the previous screen
3LCD Display
4Main Menu button
For function setup
5ON/OFF button
Starts/Stops operation
6
Operation indicator
Illuminates during operation, blinks
during alarm.
Press centre
No glove
No pen
2
3
1
4
5
6
Cross key buttons
Selects an item.
Enter button
Fixes the selected content.
Up
Down
Left Right
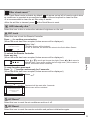
12:00,Mon
SET TEMP.
FAN SPEED
25.0
FLAP
AUTO
AUTO
MODE
AUTO

5
English
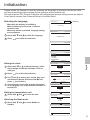
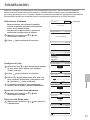
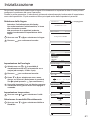
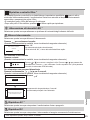
Initialization
Please initiate the Remote Control by selecting the language of operation and set the date
and time accordingly before setting up the operation menu preferences.
During fi rst power ON, Remote Controller will automatically prompt setting screen as default.
It can also be access from Personal Setup in the Main Menu.
Blinking
12:00,Mon
Initialization
Initializing
12:00,Mon
Default data
EEPROM setup
12:00,Mon
Start
12:00,Mon
Language
Select Confirm
ENGLISH
ESPAÑOL
ITALIANO
NEDERLANDS
12:00,Mon
Clock format
Select Confirm
24h
am/pm
12:00,Mon
Date & Time
Year/Month/Day Hour : Min
12 : 00 pm
/ 01 / 01
Select Confirm
2021
12:00,Mon
Set temp. unit
Select Confirm
˚C
˚F
12:00,Mon
Heat mode
Select Confirm
Enable
Disable
12:00,Mon
Start
Selecting the language
Wait while the display is initializing.
When initializing screen ends, it turns to
normal screen.
When any button is pressed, language setting
screen appears.
1 Scroll with and to select the language.
2Press to confi rm the selection.
Setting the clock
1 Select with or to display the time, either
24h or am/pm format (for example, 15:00 or
3:00 pm).
2Press to confi rm the selection.
3Use and to select year, month, day, hour
and minutes. (Select and move with and
press to confi rm.)
4Once the time is set, time and day will appear
on the display even if the Remote Controller is
turned OFF.
Setting the temperature unit
1Scroll with and to select the unit.
Selecting the Heat mode
1Scroll with and to select Enable or
Disable.

6
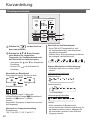
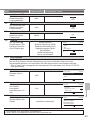
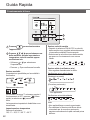
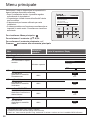
Quick Guide
1 Press to start/stop the
operation.
2 Press to select either
mode, set temperature, fan speed or
air swing section.
• Use or to select setting.
• Press to confi rm the selection.
Mode section
Default setting for Mode is Auto.
AUTO HEAT COOL
DRYFAN
Stand-alone operation.
To access nanoe™ stand-alone while operation
is OFF, press (Quick Menu) and select
(nanoe™).
Note:
Set temperature is disabled and not displayed.
Set temperature section
Selection range:
16.0 °C ~ 30.0 °C / 60 °F ~ 86 °F.
Fan speed section
• When FAN AUTO is selected, the fan
speed is adjusted automatically according
to the operation mode.
• Select the lowest fan speed to have a low
noise operation.
AUTO
Flap (Air swing) section
• Do not adjust the fl ap by hand.
Up/Down Air Swing
(Wall Mounted)
(Floor Console)
*not applicable
Left/Right Air Swing
Note:
• Not applicable for Floor Console.
• To change the horizontal airfl ow direction
for Floor Console, move the vertical vane
manually before starting operation.
Basic operation
12:00,Mon
SET TEMP.
FAN SPEED
25
.0
FLAP
AUTO
AUTO
MODE
AUTO
1
2

7
English
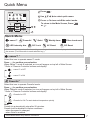
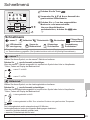
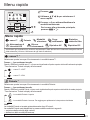
Quick Menu
1 Press .
2 Use to select quick menu.
3 Press to turn on/off the select mode.
To return to the Main Screen, Press
or .
Select each setting and confi rm the setting according to the instructions displayed at the bottom of
the screen. (The icons refer to each selection key.)
Quick Menu
nanoe™ Powerful Quiet Weekly timer Filter check reset
LED intensity dim R/C Lock AC Reset RC Reset
nanoe™ *1
Select this icon to operate nanoe™ mode.
Press to confi rm your selection.
When nanoe™ mode is selected, an icon will appear on top left of Main Screen.
* Refer to "Remote Controller buttons and display"
• nanoe™ is OFF
• nanoe™ is ON
Powerful *1
Select this icon to operate Powerful mode.
Press to confi rm your selection.
When Powerful mode is selected, an icon will appear on top left of Main Screen.
* Refer to "Remote Controller buttons and display"
• Powerful is OFF
• Powerful is ON: To reach desired temperature quickly
Note:
Powerful is automatically stop after 20 minutes.
Powerful will be disabled in below conditions:-
• when fan speed is changed,
• when Quiet is enabled.
2 3
1
SetSelect
*1Not available when 'Duty rotation' is turned on.

8
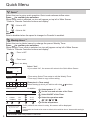
Quiet *1
Select this icon to enjoy quiet operation. Quiet mode reduces airfl ow noise.
Press to confi rm your selection.
When Quiet mode is selected, an icon will appear on top left of Main Screen.
* Refer to "Remote Controller buttons and display"
• Quiet is OFF
• Quiet is ON
Note:
Quiet is disabled when fan speed is changed or Powerful is enabled.
Weekly timer *1
Select this icon to delete (cancel) or change the pre-set Weekly Timer.
Press to confi rm your selection.
When Weekly Timer mode is selected, an icon will appear on top left of Main Screen.
* Refer to "Remote Controller buttons and display"
• Timer is OFF.
• Timer is set.
After 1 sec delay.
Yes No
Do you want to edit
Weekly timer pattern?
Select “Yes”.
• If you select “No”, the screen will return to the Quick Menu Screen.
Timer setup
Timer copy
• Timer setup: Select Timer setup to edit the Weekly Timer.
• Timer copy: Select to copy a timer setting.
Sun Mon Tue Wed Thu Fri Sat [Example of a Timer setup]
Select the day(s) which you wish to edit using buttons.
Sun
1. 6:00am ON 25.0˚C
2. 8:00am ON 25.0˚C
3. 10:00am ON 25.0˚C
Mon Tue Wed Thu Fri Sat
12 3 4 5
12:00,Mon
Weekly timer 1Select pattern “1” ~ “6”.
2Set the hour and minutes of the Timer.
3Select ON/OFF of the Timer.
4Select the operation mode.
/ / / /
5Set the temperature.
All 6 patterns are not set!
Do you want to edit?
Yes No
If all 6 patterns are not set in a day, this screen will be displayed.
Note:
If all entries are found to be reset to default, this could be due to 'Heat mode' setting is
disable.
Quick Menu
*1Not available when 'Duty rotation' is turned on.

9
English
Filter check reset *1
Filter Check Reset mode is disable by default. will appear on top left of remote control when
air conditioner is operated at accumulated operation time and required to clean the fi lter.
• It is recommended to clean the air fi lter every 6 weeks.
• After the air fi lter is cleaned, press
at the Quick Menu to reset.
LED intensity dim *1
Select this icon to dim or restore the indicators’ brightness on the unit.
R/C Lock
Select this icon to lock the Remote Controller.
Press to confi rm your selection.
(When the mode has been accepted, below screen will be displayed.)
Yes No
Do you want to
lock remote control?
Select “Yes”.
(The Main Screen will be locked.)
• If “No” is selected, the screen will return to the Quick Menu Screen.
To unlock the Remote Controller
Press any key.
(When the mode has been accepted, below screen will be displayed.)
Press or to scroll and choose the digits. Press or to move to
adjacent digit. Press to confi rm the four-digit code. (if the number is
correct, the screen will be unlocked).
To reset forgotten password
Press , and continuously for 5 seconds.
(When the mode has been accepted, below screen will be displayed.)
12:00,Mon
Reset password
Confirm
Request
Press .
12:00,Mon
Reset password
Confirm
Request
Password is reset to 0000
and remote control
unlocked
Password will be reset after 3 seconds.
Main screen will be unlocked.
AC Reset *1
Select this icon to reset the air conditioner and turn it off .
RC Reset
Select this icon to reset the remote controller and perform initialization again.
*1Not available when 'Duty rotation' is turned on.

10
Main Menu
Select menus and determine settings according to
the system available in the household.
• After initial installation, you may manually adjust
the settings.
• The initial setting remains active until the user
changes it.
• The Remote Controller can be used for multiple
installations.
• The system may not work properly if set wrongly.
Please consult an authorised dealer.
To display <Main menu>:
To select content:
To confi rm the selected content:
Press to return to main screen
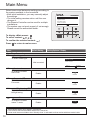
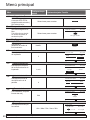
Menu Default Setting Setting Options / Display
1 Function setup
1.1 Model type *1 / *2
To select model type.
Wall mounted
12:00,Mon
Model type
Select Confirm
Wall mounted
Floor console
1.2 Heat mode *1 / *2 / *3
To enable or disable
heat mode. Enable Enable
Disable
1.3 Fan mode *1 / *2
To enable or disable
Fan mode. Enable Enable
Disable
1.4 Left/Right swing *1 / *2
To enable or disable
left/right swing. Enable Enable
Disable
1.5 nanoe™ *1 / *2
To enable or disable
nanoe™ mode. Enable Enable
Disable
12:00,Mon
Main menu
Select Confirm
Function setup
System check
Personal setup
Service contact
*1Not available when 'Duty rotation' is turned on.
*2This function will become hidden when unit is turned on.
*3'Heat mode' becomes hidden when 'Weekly timer' is activated and has entries with heat mode inside.

11
English
*1Not available when 'Duty rotation' is turned on.
*2This function will become hidden when unit is turned on.
1.6 Powerful *1 / *2
To enable or disable
powerful mode. Enable Enable
Disable
1.7 Quiet *1 / *2
To enable or disable
quiet mode. Enable Enable
Disable
1.8 Filter check *1
To enable or disable
fi lter check. Disable Enable
Disable
1.9 WLAN *1
To apply the WLAN
settings in Panasonic
Comfort Cloud phone
app.
WLAN ON/OFF
Easy Setting (WPS)
Advance setting (AP)
Device registration
WLAN strength
WLAN initialization
Learning reset
12:00,Mon
WLAN
Select Confirm
WLAN ON/OFF
Easy setting (WPS)
Advance setting (AP)
Device registration
Request
1.10 Duty rotation
(Selected model only)
In Duty Rotation, air-conditioning is managed by a running unit and backup unit which rotates
between two units after rotation interval has elapsed.
* Only applicable if 2 indoor units are connected through optional part, Part No. CZ-RCC5 or
equivalent.
1.10.1
Rotation ON/OFF
To set the rotation ON
or OFF.
OFF
12:00,Mon
Duty rotation
Select Confirm
Rotation ON/OFF
Rotation interval
Rotation status
1.10.2
Rotation interval
To set the rotation
interval range.
Interval range: 1h ~ 23h 12h
12:00,Mon
Rotation
Interval
Range: (1h~23h)
Step: ±1h
Select Confirm
12
1.10.3
Rotation status
To view the rotation
status of unit.
Select and retrieve
12:00,Mon
Status
Main unit comm. :
Sub unit comm. :
Main unit :
Sub unit :
Page 2 Close
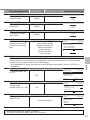
Menu Default Setting Setting Options / Display

12
Menu Default Setting Setting Options / Display
1.11 Diagnosis *1
To enable operations in
the indoor unit AUTO
OFF/ON switch.
Select and retrieve Request
2 System check
To perform failure
diagnosis.
If the Error code
matches with the error
encountered, you will
hear a beeping sound.
Select and retrieve
12:00,Mon
System check
No memory of failure
H00
3 Personal setup
3.1 Touch sound
To enable or disable the
operation sound. Enable Enable
Disable
3.2 LCD contrast
To set the screen
contrast.
3
12:00,Mon
LCD contrast
Select Con rm
Low High
3.3 Backlight
To set the duration of
screen backlight.
1 min
12:00,Mon
Backlight
Select Confirm
OFF
15 secs
1 min
5 mins
10 mins
3.4 Backlight intensity
To set the screen
backlight brightness.
4
12:00,Mon
Backlight intensity
Select Confirm
Dark Bright
3.5 Clock format
To set the type of clock
display format.
24h
12:00,Mon
Clock format
Select Confirm
24h
am/pm
3.6 Date & Time
To set the present date
and time.
Year / Month / Day / Hour / Min
12:00,Mon
Date & Time
Year/Month/Day Hour : Min
12 : 00 pm
Select Con rm
/ 01 / 01
2021
Main Menu
*1Not available when 'Duty rotation' is turned on.

13
English
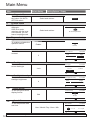
3.7 Set temp. unit
To set the temperature
unit.
˚C
12:00,Mon
Set temp. unit
Select Confirm
˚C
˚F
3.8 Set temp. decimal
To set the temperature
decimal unit. Enable Enable
Disable
3.9 Language
Sets the display language
for the top screen.
•
For Greek, Bulgarian,
Mandarin, Malay,
Indonesian, Thai and
Vietnamese, please refer
to the English version
ENGLISH / ESPAÑOL / ITALIANO /
NEDERLANDS / PORTUGUÊS /
FRANÇAIS / DEUTSCH / HRVATSKI /
TÜRKÇE / SWEDISH / NORWEGIAN /
DANISH / SUOMI / MAGYAR
12:00,Mon
Language
Select Confirm
ENGLISH
ESPAÑOL
ITALIANO
NEDERLANDS
3.
10 Unlock password
4 digit password for all
the settings.
0000
12:00,Mon
Unlock password
Select Con rm
4 Service contact *1
4.1 Contact 1 / Contact 2
Preset contact number
for installer.
Select and retrieve
12:00,Mon
Service contact
Contact 1
Contact 2 Edit
: Bryan Adams
: 08812345678
Name
5 Custom setup *1
5.1 Custom No.
Preset custom setup.
Range: 1~15
* Wrong setting
can aff ect system
operations.
Please consult an
authorised dealer.
Custom No Range Descriptions
1 : Remote controller number
2 : Solar radiation sensitivity level adjustment
3 : Cool & Dry mode set temperature [Low]
4 : Cool & Dry mode set temperature [High]
5 : Heat mode set temperature [Low]
6 : Heat mode set temperature [High]
7 : Filter cleaning
8 : nanoe / nanoe-G default ON
9 : Dust sensor monitoring & LED
10 : Auto restart
11 : Dust sensor sensitivity level adjustment
12 : Auto mode set temperature [Low]
13 : Auto mode set temperature [High]
14 : Indoor unit installation position
15 : Eco status memorize
12:00,Mon
Custom setup
Custom No.
Range: (1~15)
Step: ±1
Select Confirm
1
Menu Default Setting Setting Options / Display
*1Not available when 'Duty rotation' is turned on.

14
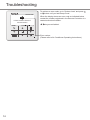
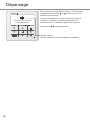
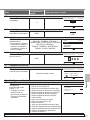
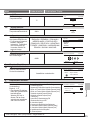
Troubleshooting
12:00,Mon
SET TEMP.
FAN SPEED
25
.0
FLAP
AUTO
AUTO
MODE
AUTO H11
Indoor/outdoor abnormal
communication
Error number
(Please refer to Air Conditioner Operating Instructions)
To retrieve an error code, go to 'System check' and press
or button until you hear beep sound.
When the display shows an error code as indicated below,
contact the number registered in the Remote Controller or a
nearest authorised installer.
keys are disabled.

15
English
Information
Information for Users on Collection and Disposal of Old Equipment
This symbol on the products, packaging, and/or accompanying documents
means that used electrical and electronic products must not be mixed with
general household waste.
For proper treatment, recovery and recycling of old products, please take them
to applicable collection points in accordance with your national legislation.
By disposing of them correctly, you will help to save valuable resources and
prevent any potential negative eff ects on human health and the environment.
For more information about collection and recycling, please contact your local
authority.
Penalties may be applicable for incorrect disposal of this waste, in accordance
with national legislation.
For Business users in the European Union and some other European
countries
If you wish to discard electrical and electronic equipment, please contact your
dealer or supplier for further information.
[Information on Disposal in other Countries outside the European Union]
These symbols are only valid in the European Union. If you wish to discard
these items, please contact your local authority or dealer and ask for the
correct method of disposal.

16
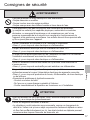
Consignes de sécurité
AVERTISSEMENT
Ce symbole signale la présence d’un
danger pouvant provoquer des blessures
graves ou mortelles.
ATTENTION
Ce symbole signale la présence d’un
danger pouvant provoquer des blessures
corporelles ou des dégâts matériels.
Les instructions à respecter sont classées d’après les symboles suivants :
Ce symbole désigne une action
INTERDITE.
Ces symboles désignent des
actions OBLIGATOIRES.
Pour éviter des blessures corporelles sur vous-même et sur les autres ou des dégâts
matériels, respectez les instructions ci-dessous :
Tout dysfonctionnement dû au non-respect des instructions peut occasionner des nuisances
ou des dégâts dont la gravité est classée comme décrit ci-après :
Ces appareils ne sont pas conçus pour être accessibles du grand public.
Les illustrations de ce mode d’emploi sont fournies à titre d’exemple uniquement et peuvent
présenter des diff érences par rapport à l’appareil proprement dit. Celui-ci peut être modifi é
sans préavis.
Table des matières
Consignes de sécurité ……………………………………………………………………… 16-17
Boutons et affi chage de la télécommande ……………………………………………………… 18
Initialisation ………………………………………………………………………………………… 19
Guide Rapide ……………………………………………………………………………………… 20
Menu rapide …………………………………………………………………………………… 21-23
Menu principal ………………………………………………………………………………… 24-27
Dépannage ………………………………………………………………………………………… 28
Informations ………………………………………………………………………………………… 29
Nous vous remercions d’avoir porté votre choix sur ce produit Panasonic.
Toute traduction dans une autre langue sera considérée comme une référence et la version anglaise prévaudra dans
tous les cas.

17
Français
Consignes de sécurité
AVERTISSEMENT
Cela peut entraîner un choc électrique ou une infl ammation.
• Ne pas démonter ou modifi er.
• Ne pas toucher avec des mains mouillées.
• Ne pas essuyer avec des chiff ons humides ni laver dans de l’eau.
Cette application n’est pas conçue pour être utilisée par des personnes
(y compris les enfants) aux capacités physiques, sensorielles ou mentales
diminuées, ou manquant d’expérience ou de connaissances, sauf si une
personne responsable de leur sécurité leur a expliqué le fonctionnement de
l’appareil et les garde sous surveillance. Les enfants doivent être supervisés afi n
qu’ils ne jouent pas avec l’appareil.
Confi er l’installation au fournisseur ou à l’installateur uniquement.
• Sinon, il y a un risque de choc électrique ou d’infl ammation.
Couper l’alimentation électrique lors de l’installation du câble CNT.
• Sinon, il y a un risque de choc électrique ou d’infl ammation.
N’utiliser que les pièces spécifi ées lors de l’installation du câble CNT et eff ectuer
l’installation correctement en suivant les instructions.
• Sinon, il y a un risque de choc électrique ou d’infl ammation.
Veiller à l’installation correcte des câbles afi n qu’aucune force extérieure ne
s’exerce sur eux.
• Sinon, il y a un risque de surchauff e pouvant entraîner une infl ammation.
Stopper l’utilisation dès l’apparition d’un quelconque problème ou
dysfonctionnement et couper l’alimentation électrique des appareils connectés.
• Sinon, il y a un risque de production de fumée, d’infl ammation, de choc électrique
ou de brûlures.
• Exemples de problèmes et dysfonctionnements :
- On sent une odeur de brûlé
- De l’eau ou un corps étranger a pénétré à l’intérieur
- Confi er immédiatement la réparation au fournisseur ou à l’installateur.
ATTENTION
Avant de raccorder les fi ls et les câbles, toute l’électricité statique doit être dissipée.
• Sinon, il y a un risque de dysfonctionnement.
Vérifi er les exigences suivantes à l’avance :
• Le climatiseur ne doit présenter aucune anomalie, comme un changement de
débit d’air. Veillez à ce qu’aucun objet ne puisse être facilement déplacé en raison
du fl ux d’air souffl ant directement sur lui. Les objets tombés ou déplacés peuvent
occasionner des risques d’incendie, de blessures, etc.

18
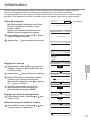
Boutons et affi chage de la télécommande
Touches / Voyant
1Touche du menu rapide
2Touche Retour
Revient à l’écran précédent
3Écran LCD
4Touche du menu principal
Pour le paramétrage des fonctions
5Touche ON/OFF
Met l’unité en marche/arrêt
6
Voyant de fonctionnement
Allumé fi xe pendant le
fonctionnement, clignote en cas
d’alarme.
Appuyez au
centre
Sans gant
Sans stylo
2
3
1
4
5
6
Touches directionnelles en croix
Sélectionne un élément.
Touche Entrée
Confi rme le contenu sélectionné.
Haut
Bas
Gauche
Droite
12:00,Lun
T°CONSIG.
V. VENT.
25.0
PAN
AUTO
AUTO
MODE
AUTO
SET TEMP.
FAN SPEED
25
.0
FLAP
AUTO
AUTO
MODE
AUTO

19
Français
Initialisation
Veuillez initier la télécommande en sélectionnant la langue de fonctionnement et régler la date et
l’heure en conséquence avant de confi gurer les préférences du menu de fonctionnement.
Lors de la première mise sous tension, la télécommande affi che automatiquement l’écran de réglage
par défaut. Il est également possible d’y accéder à partir des param. perso dans le menu principal.
Clignotement
12:00,Lun
Initialisation
Initialisation en cours
12:00,Lun
Données par défaut
Param. EEPROM
12:00,Lun
Démar.
12:00,Lun
Langue
Sélect. Conf.
FRANÇAIS
DEUTSCH
HRVATSKI
TÜRKÇE
12:00,Lun
Format Horloge
Sélect. Conf.
24H
am/pm
12:00,Lun
Date & Heure
AAAA/MM/JJ H: Min
12 : 00 pm
/ 01 / 01
Sélect. Conf.
2021
12:00,Lun
Régler unité de t°
Sélect. Conf.
˚C
˚F
12:00,Lun
Mode chaud
Sélect. Conf.
Autor.
Désact.
12:00,Lun
Démar.
Choix de la langue
Patientez pendant l’initialisation de l’écran.
Une fois l’initialisation terminée, l’écran
normal s’affi che.
Appuyez sur n’importe quel bouton pour
affi cher l’écran de réglage de la langue.
1 Faites défi ler l’écran à l’aide de et pour
choisir la langue souhaitée.
2Appuyez sur pour confi rmer la sélection.
Réglage de l’horloge
1 Sélectionnez à l’aide de ou la manière
d’affi cher l’heure, tel que le format 24 h (par
ex.15:00 or 3:00).
2Appuyez sur pour confi rmer la sélection.
3Utilisez et pour sélectionner l’année,
le mois, le jour, l’heure et les minutes.
(Sélectionnez et déplacez avec et appuyez
sur pour confi rmer.)
4Une fois l’heure réglée, l’heure et la
date apparaîtront à l’écran même si la
télécommande est mise en ARRÊT.
Réglage de l’unité de la température
1Faites défi ler l’écran à l’aide de et pour
choisir l’unité.
Sélectionnement du mode de chaleur
1Faites défi ler l’écran à l’aide de et pour
choisir la activer ou désactiver.

20
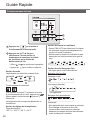
Guide Rapide
1
Appuyez sur pour mettre le
fonctionnement en marche/arrêt.
2
Appuyez sur pour
sélectionner l’un des modes, la
température de consigne, la vitesse
du ventilateur ou la section de
balancement de l’air.
•
Utilisez ou pour sélectionner le paramètre.
•
Appuyez sur pour confi rmer la sélection.
Section du mode
Le paramètre par défaut du mode est Auto.
AUTO HEAT COOL
DRYFAN
Fonctionnement autonome.
Pour accéder au nanoe™ autonome alors que
le fonctionnement est à l’arrêt, appuyez sur
(Menu rapide) et sélectionnez (nanoe™).
Remarque :
La température de consigne est désactivée et
non affi chée.
Section du réglage de la température
Plage de sélection :
16,0 °C ~ 30,0 °C / 60 °F ~ 86 °F.
Section de vitesse du ventilateur
• Quand FAN AUTO est sélectionné, la vitesse
du ventilateur s’ajuste automatiquement en
fonction du mode d’opération.
• Sélectionnez la vitesse du ventilateur la plus
basse pour un fonctionnement avec peu de
bruit.
AUTO
Section de volet (balayage d'air)
• Ne réglez pas le volet manuellement.
Balayage d’air haut/bas
(Montage mural)
(Console au plancher)
*non applicable
Balayage d’air gauche/droite
Remarque :
• Non applicable pour une console au plancher.
• Pour changer la direction du fl ux d’air
horizontal pour une console au plancher,
déplacez la soupape verticale manuellement
avant de démarrer l’opération.
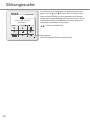
Fonctionnement de base
12:00,Lun
T°CONSIG.
V. VENT.
25
.0
PAN
AUTO
AUTO
MODE
AUTO
1
2
SET TEMP.
FAN SPEED
25.0
FLAP
AUTO
AUTO
MODE
AUTO
La page charge ...
La page charge ...
La page charge ...
La page charge ...
La page charge ...
La page charge ...
La page charge ...
La page charge ...
La page charge ...
La page charge ...
La page charge ...
La page charge ...
La page charge ...
La page charge ...
La page charge ...
La page charge ...
La page charge ...
La page charge ...
La page charge ...
La page charge ...
La page charge ...
La page charge ...
La page charge ...
La page charge ...
La page charge ...
La page charge ...
La page charge ...
La page charge ...
La page charge ...
La page charge ...
La page charge ...
La page charge ...
La page charge ...
La page charge ...
La page charge ...
La page charge ...
La page charge ...
La page charge ...
La page charge ...
La page charge ...
La page charge ...
La page charge ...
La page charge ...
La page charge ...
La page charge ...
La page charge ...
La page charge ...
La page charge ...
La page charge ...
La page charge ...
La page charge ...
La page charge ...
-
 1
1
-
 2
2
-
 3
3
-
 4
4
-
 5
5
-
 6
6
-
 7
7
-
 8
8
-
 9
9
-
 10
10
-
 11
11
-
 12
12
-
 13
13
-
 14
14
-
 15
15
-
 16
16
-
 17
17
-
 18
18
-
 19
19
-
 20
20
-
 21
21
-
 22
22
-
 23
23
-
 24
24
-
 25
25
-
 26
26
-
 27
27
-
 28
28
-
 29
29
-
 30
30
-
 31
31
-
 32
32
-
 33
33
-
 34
34
-
 35
35
-
 36
36
-
 37
37
-
 38
38
-
 39
39
-
 40
40
-
 41
41
-
 42
42
-
 43
43
-
 44
44
-
 45
45
-
 46
46
-
 47
47
-
 48
48
-
 49
49
-
 50
50
-
 51
51
-
 52
52
-
 53
53
-
 54
54
-
 55
55
-
 56
56
-
 57
57
-
 58
58
-
 59
59
-
 60
60
-
 61
61
-
 62
62
-
 63
63
-
 64
64
-
 65
65
-
 66
66
-
 67
67
-
 68
68
-
 69
69
-
 70
70
-
 71
71
-
 72
72


Panasonic CZRD517C Mode d'emploi
- Catégorie
- Climatiseurs split-system
- Taper
- Mode d'emploi
dans d''autres langues
Documents connexes
-
Panasonic CSZ50XKEW Mode d'emploi
-
Panasonic CSXZ35VKEW Le manuel du propriétaire
-
Panasonic CUE28PKE Mode d'emploi
-
Panasonic CUE7QKE Le manuel du propriétaire
-
-
Panasonic CU2E15PBE Le manuel du propriétaire
-
-
Panasonic CSVZ12SKE Le manuel du propriétaire
-