
EN
FR
ES

12
1 2 3
4 5 6
7a 7b 8
9 10 11
or
b
e
a
c
h
m
k
o
q
j
g
i
l
n
p
f
d

12
1 2 3
4 5 6
7a 7b 8
9 10 11
or
b
e
a
c
h
m
k
o
q
j
g
i
l
n
p
f
d

12
12
17 fl.
OZ
(0.5 L)
12 13 14
15
16b 17b17a16a
18 19 20
OR

5
EN
12
12
17 fl.
OZ
(0.5 L)
12 13 14
15
16b 17b17a16a
18 19 20
IMPORTANT SAFEGUARDS
When using electrical appliances, basic safety
precautions should always be followed to reduce
the risk of fire, electric shock, and/or injury to
persons including the following:
• Read all instructions.
• Do not touch hot surfaces. Use handles or knobs.
• To protect against fire, electric shock and injury to
persons, do not immerse cord, plugs or machine in
water or other liquid. Close supervision is necessary
when any appliance is used by or near children.
• Unplug from outlet when either the appliance or
display clock is not in use and before cleaning.
Allow to cool before putting on or taking off
parts, and before cleaning the appliance.
• Do not operate any appliance with a damaged
cord or plug or after the appliance malfunctions,
or has been damaged in any manner. Return
appliance to the nearest authorized service
facility for examination, repair or adjustment.
• The use of accessory attachments not
recommended by the appliance manufacturer
may result in fire, electric shock or injury to persons.
• Do not use outdoors.
• Do not let cord hang over edge of table or counter,

6
or touch hot surfaces.
• Do not place on or near a hot gas or electric
burner, or in a heated oven.
• To disconnect, remove plug from wall outlet.
• Do not use appliance for other than intended use.
• The carafe is designed for use with this appliance.
It must never be used on a range top.
• Do not place a hot carafe on a wet or cold surface.
• Do not use a cracked carafe or a carafe having a
loose or weakened handle.
• Do not clean carafe with cleansers, steel wool
pads, or other abrasive material.
• Scalding may occur if the lid is removed during
the brewing cycles.
• The coffee-maker shall not be placed in a cabinet
when in use.
• The heating element surface is subject to residual
heat after use.
SAVE THESE INSTRUCTIONS
CAUTION
This machine is intended for household use
only. Any servicing other than cleaning and
user maintenance should be performed by your
respective country’s Consumer Service department
for the service center nearest you, or contact your
respective country’s Consumer Service department.

7
EN
To reduce the risk of fire or electric shock, do not
attempt to disassemble the machine.
Repair should be done by an authorized Service
Center only.
SHORT CORD INSTRUCTIONS
A. Short power cord or a detachable power cord is
provided to reduce the risks of becoming entangled
in or tripping over a longer cord accidentally.
B. Longer detachable power cords or extension
cords are available and may be used if care is
exercised in their use.
C. If a long detachable power cord or an extension
cord is used:
1. The marked electrical rating of the detachable
power cord or extension cord should be at least
as great as the electrical rating of the appliance.
2. If the appliance is of the grounded type, the
extension cord should be a grounding type
3-wire cord.
3. The longer cord should be arranged so that
it will not drape over the counter where it
can be pulled on by children or tripped over
accidentally.
4. The appliance have a polarized plug (one
blade is wider than the other). To reduce the

8
risk of electric shock, this plug is intended
to fit into a polarized outlet only one way.
If the plug does not fit fully into the outlet,
reverse the plug. If it still does not fit, contact
a qualified electrician. Do not attempt to
modify the plug in any way.
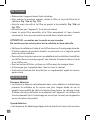
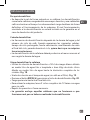
ADDITIONAL SAFETY INSTRUCTIONS
• This appliance is not intented for used by person
(including children) with reduced physical, sensory
or mental capabilities, or lack of experience
and knowledge, unless they have been given
supervision or instruction concerning use of the
appliance by a person responsible for their safety.
• Burns can occur from touching hot plate, hot
water or steam. Exercise caution.
• All machines are subject to stringent quality
control. Practical tests using machines taken at
random are conducted and this may explain any
slight marks or coffee residue showing prior to use.
• Do not pour liquids other than water and
descaling solutions specified in this manual into
the water tank.
• Protect the machine against humidity and freezing.
• Do not pour water into the appliance if it is still hot.

9
EN
• Always place your coffee maker on a flat, stable,
heat resistant work surface away from water
splashes and any external sources of heat.
• Never place your carafe or your insulated pot in a
microwave oven or on a stove top.
• Never put your hand inside the insulated pot.
• Do not use the carafe or the insulated pot without
the lid.
• Do not use the thermal carafe if the glass inner
part inside is broken. If the glass inner part of the
carafe is broken, pieces of glass can transfer to
your cup.
• In the interest of improving products, SEB reserves
the right to change specifications without prior
notice.
• A short power supply cord is provided to reduce
the hazards resulting from becoming entangled
in or tripping over a long cord.
• This appliance is not intended for use by persons
(including children) with reduced physical, sensory
or mental capabilities, or lack of experience
and knowledge, unless they have been given
supervision or instruction concerning use of the
appliance by a person responsible for their safety.
• Children should be supervised to ensure that they
do not play with the appliance.

10
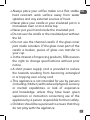
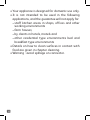
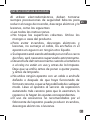
• Your appliance is designed for domestic use only.
• It is not intended to be used in the following
applications, and the guarantee will not apply for:
– staff kitchen areas in shops, offices and other
working environments
– farm houses;
– by clients in hotels, motels and
– other residential type environments bed and
breakfast type environments
• Details on how to clean surfaces in contact with
food are given in chapter cleaning.
• Warning : avoid spillage on connector.

11
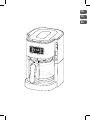
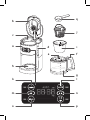
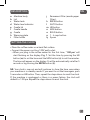
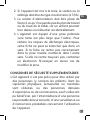
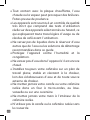
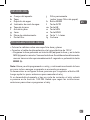
ENDESCRIPTION
SETTING THE CLOCK
a Machine body
b Lid
c Water tank
d Water level indicator
e Carafe lid
f Carafe handle
g Carafe
h Warming plate
i Filter holder
j Permanent filter (avoids paper
filters)
k BREW button
l AUTO button
m HR button
n MIN button
o BOLD button
p 1 - 4 cups button
q Spoon
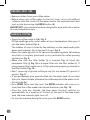
• Place the coffee maker on a hard flat surface.
• Connect the power cord to a 120V wall socket.
–When you plug in the coffee maker for the first time, “1:00 pm” will
start flashing on the display. Fig. 1. Set the time by pressing the HR
button (m) to set the hour and the MIN button (n) to set the minutes.
The time will appear on the display. It will be automatically set after 5
seconds or by pressing the BREW button (k).
NB: Your clock is now set and will continue to show the time, even when
your machine is in standby mode. If you want to set the time again, push
5 secondes on HR button. Then, repeat the steps above to reset the clock.
If the machine is unplugged or there is a power failure, the clock will
default to 1:00 pm. Repeat the steps above to reset the clock.

12
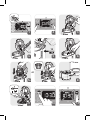
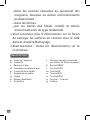
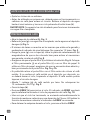
BEFORE FIRST USE
MAKING COFFEE
• Remove stickers from your coffee maker.
• Before using your coffee maker for the first time, run a cycle without
coffee to rinse the circuit. Fill the water tank to the maximum level and
start a cycle by pressing the BREW button (k).
IMPORTANT: your machine has been designed to work with cold or water
at room temperature only.
• Open the coffee maker lid (b). Fig. 3.
Fill the carafe (g) with cold or water at room temperature, then pour it
into the water tank (c) Fig. 4.
The number of cups is shown by the markings on the carafe and by the
water level indicator. Do not exceed 12 cups. Fig. 5.
• Place the carafe (g) with its lid (e) onto the warming plate (h) making
sure that it is properly positioned so as to activate the coffee pouring
mechanism. Fig. 8.
• Make sure that the filter holder (i) is inserted. Fig. 6. Insert the
permanent filter (j) Fig. 7a or a paper filter into the filter holder (i). If
using a paper filter, make sure it is fully open and properly positioned in
the filter holder. Fig. 7b.
• Add 1 spoon (q) of ground coffee per cup. Do not exceed 12 spoons (2
ounces). Fig. 9.
• If you accidentally pour ground coffee into the water tank, do not start
the cycle. Clean the tank, otherwise the coffee may block the water circuit.
• Close the lid (b).
• Press BREW (k) to start the cycle. The BREW indicator will come on to
show that the coffee maker has started the brew cycle. Fig. 10.
• Once the cycle has finished, the keep warm function switches on
automatically for a duration of 2 hours. Atthe end of the keep warm
time, the brew indicator light turns off.
• To stop the machine during the cycle, press the BREW button.

13
EN
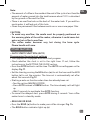
Note:
• The amount of coffee in the carafe at the end of the cycle is less than the
amount of water poured into the tank because about 10% is absorbed
by the ground coffee and the filter.
• There is an overflow hole on the back of the water tank. If you add too
much water, it will leak out of this hole.
• Clean the permanent filter between each use or use a new paper filter.
CAUTION:
• To avoid any overflow, the carafe must be properly positioned on
the warming plate of the coffee maker, otherwise it could cause hot
water or hot coffee to overflow.
• The coffee maker becomes very hot during the brew cycle.
Pleasehandle with care.
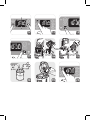
OTHER FEATURES
– AUTO START FUNCTION (AUTO)
Programming the auto-start settings
• Your appliance is equipped with auto-start program.
• Check whether the clock is set to the right time. If not, follow the
instructions in the SETTING THE CLOCK section.
• Press the AUTO button to set the time. The AUTO icon will appear on the
display. Fig 11.
• Set the time by pressing the HR button (m) to set the hour and the MIN
button (n) to set the minutes. The time set is automatically set after
about five seconds. Fig 12.
• Starting a auto-on function when time has already been set.
–See the section MAKING COFFEE.
–Press AUTO instead of BREW button. The time already sett will light
up.
–Wait 5 seconds to reactivate the AUTO function.
• To cancel the delayed start, press AUTO during 5 seconds. Your coffee
maker turns to stand-by mode.
– REGULAR OR BOLD
• Press the BOLD (o) button to make your coffee stronger. Fig. 14.
• The BOLD button indicator lights up (o).

14
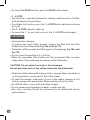
• To cancel the BOLD function, press the BOLD button again.
– 1 - 4 CUPS
• This function is specially designed for making small amounts of coffee,
with optimal aroma and flavor.
• To activate this function, press the 1 - 4 CUPS button (p) before starting
the cycle.
• The 1 - 4 CUPS indicator lights up.
• To cancel the 1 - 4 cups function, press the 1 - 4 CUPS button again.
CLEANING
• Unplug before cleaning.
• To remove the used coffee grounds, remove the filter and the filter
holder from the coffee maker. Fig 16a. and Fig 17a.
• Throw the coffee grounds and filter paper in the garbage. Fig 16b. and
Fig 17b.
• Do not clean the machine if it is still hot.
• Wash the removable filter holder and the permanent filter in warm
soapy water. The carafe may be cleaned in the dishwasher.
CAUTION: Do not place the carafe in the microwave.
Do not put other parts of the coffee maker into the dishwasher.
• Clean the coffee maker with a damp cloth or sponge. Never use abrasive
or strong products on any part of the coffee maker.
• To clean the stainless steel parts of your coffee maker, dampen a soft
cloth or sponge with warm water. Wipe carefully with a dry cloth.
• For difficult stains, use a cloth with white vinegar.
• Do not immerse the appliance in water or under the tap.
• Any other servicing should be performed by an authorized service
representative.

15
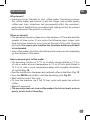
ENDESCALING
Why descale?
• Limestone forms naturally in your coffee maker. Descaling preserves
the coffee maker and ensures it will last longer and provide quality
coffee over time. Limestone can permanently affect the machine’s
performance. Malfunctions associated with scaling will not be covered
by the warranty if the product is returned.
When to descale?
• The descaling frequency depends on the hardness of the water and the
number of brew cycles. If you notice the following signs: longer cycle
time, excessive steaming, more noise at the end of the cycle, stopping
mid-cycle, this means your machine has limestone build up and needs
to be descaled.
• Your coffee maker should be descaled around once a month depending
on the hardness of the water.
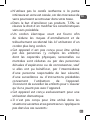
How to descale your coffee maker
• Use descaling solution or 17 fl. oz of white vinegar diluted in 17 fl.oz
of cold or water at room temperature or 1.5 oz of citric acid diluted in
17fl. oz of cold or room temperature water until complete dissolution
of crystals. Fig. 18.
• Pour the solution into the water tank (without coffee in the filter). Fig. 19.
• Press the BREW button (k) to start the descaling cycle. Fig. 20.
• Wait until the end of the cycle.
• To rinse the machine, run 2 full 12 cups cycles with water but without
coffee.
• Repeat if necessary.
• The warranty does not cover coffee makers that do not work, or do so
poorly, due to lack of descaling.

16
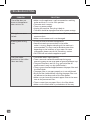
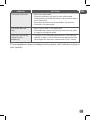
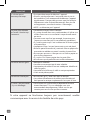
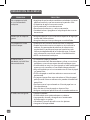
PROBLEM SOLUTION
The coffee does not
brew or the appliance
does not turn on.
• Make sure the appliance is well connected to a working
outlet and that it is in the «ON» position.
• The water tank is empty.
• There is a power outage.
• Unplug the machine, then plug it back in.
• The clock should be reprogrammed after a power outage.
The appliance seems
to leak.
• Make sure the water tank has not been filled beyond the
maximum limit.
• Make sure the water tank is not damaged.
Brewing takes a long
time.
• It may be time to descale the appliance.
• Several minerals can accumulate in the coffee
maker’s circuitry. Regular descaling of the machine is
recommended. This may need to be done more often
depending on the hardness of your water. For more
information, please consult the «Descaling» section.
• CAUTION: do not take the appliance apart.
The filter holder
overflows or the coffee
flows too slowly.
• The coffee maker needs cleaning.
• There is too much coffee. We recommend using one
measuring spoon or one soup spoon of ground coffee per cup.
• The ground coffee is too fine (e.g., ground coffee for
espresso won’t work in a drip coffee maker).
• There is ground coffee lodged between the paper filter and
the filter holder.
• The paper filter is not open properly or is not well placed.
• Rinse the filter holder before inserting the paper filter so it
will adhere to the damp walls of the filter basket.
• Make sure you have not inserted a paper filter at the same
time as the permanent filter.
• There is more than one paper filter in the filter holder.
• Make sure the filter holder is pushed down all the way.
TROUBLESHOOTING

17
EN
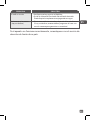
PROBLEM SOLUTION
The coffee tastes bad. • Clean the coffee maker.
• The ground coffee is not right for your coffee maker.
• The proportion of coffee and water is not sufficient. Adjust
to suit your taste.
• The quality and freshness of the coffee is not the best.
• The water is of poor quality.
The coffee does not
flow.
• See if there is water in the water tank.
• The coffee flow system may be obstructed. You may clean
it simply by rinsing with water.
The time is not correct
(there is a time
difference).
• The timer is synchronized and depends on your electrical
network. If there is a time difference, we recommend that
you program the time once a week to be sure it is correct.
If your appliance does not always work properly, call customer service in
your country.

18
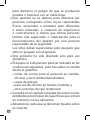
CONSIGNES DE SÉCURITÉ IMPORTANTES
Lorsque vous utilisez un appareil électrique,
des consignes de sécurité élémentaires doivent
toujours être observées pour réduire les risques
de feu, de décharge électrique et de blessures, y
compris les suivantes :
• Lire le mode d’emploi entier.
• Ne pas toucher aux surfaces chaudes; utiliser les
poignées ou les boutons.
• Pour prévenir les incendies, les décharges
électriques et les blessures, ne pas immerger la
machine dans l’eau ni dans tout autre liquide.
• Il est important de surveiller étroitement les
enfants lorsqu’ils utilisent l’appareil ou si celui-ci
est utilisé en leur présence.
• Débrancher l’appareil de la prise murale lorsque
l’appareil ou l’affichage de l’horloge n’est pas
utilisé ou pour le nettoyer. Laisser l’appareil refroidir
avant d’ajouter ou d’enlever des pièces.
• Ne pas utiliser un appareil électrique dont la prise ou
le cordon d’alimentation est endommagé, quand
l’appareil fonctionne mal, ou s’il a été endommagé
de quelque manière que ce soit. Retourner tout
appareil défectueux au centre de service agréé le
plus près afin qu’il soit examiné, ajusté ou réparé.

19
FR
• L’utilisation d’accessoires non recommandés ni
vendus par le fabricant peut causer des feux, des
décharges électriques ou des blessures.
• Ne pas utiliser à l’extérieur.
• Le cordon ne doit pas pendre de la table ou du
comptoir, ni toucher à des surfaces chaudes.
• Ne pas placer l’appareil sur ou près d’un brûleur
au gaz ou électrique, ni dans un four chaud.
• Pour débrancher, retirer la fiche de la prise murale.
• Ne pas utiliser l’appareil pour une autre fonction
que celle pour laquelle il a été conçu.
• La carafe est conçue pour être utilisée avec cet
appareil; ne jamais l’utiliser sur une cuisinière.
• Ne pas déposer une carafe chaude sur une surface
froide ou humide.
• Ne pas utiliser un récipient fêlé ou dont la poignée
est endommagée.
• Ne pas nettoyer la carafe avec des nettoyants,
des éponges métalliques ni avec tout autre
produit abrasif.
• Le retrait du couvercle pendant les cycles
d’infusion peut causer des blessures.
• L’appareil ne doit pas être placé à l’intérieur d’un
meuble lorsqu’il est en cours d’utilisation.
• La surface de l’élément chauffant peut conserver
de la chaleur résiduelle après l’utilisation.

20
CONSERVER CES INSTRUCTIONS
ATTENTION
Cet appareil est conçu pour une utilisation
exclusivement domestique. Toute procédure autre
que le nettoyage et l’entretien doit être effectuée
par service à la clientèle de votre pays dans le
centre d’entretien le plus proche de chez vous ou
contactez le service à la clientèle de votre pays.
Afin de réduire les risques de feu et de décharge
électrique, ne démontez pas la base de l’appareil.
Toute réparation doit être effectuée par un centre
de service agréé de T-FAL uniquement.
INSTRUCTIONS POUR LE CORDON COURT
A. Un cordon d’alimentation court ou amovible est
fourni avec l’appareil pour éviter qu’il ne s’emmêle
ou ne fasse trébucher quelqu’un.
B. Des rallonges et des cordons plus longs peuvent être
utilisés, auquel cas il faut prendre les précautions
nécessaires.
C. Si vous utilisez une rallonge ou un cordon
d’alimentation plus long, procédez aux
vérifications suivantes:
1. Le calibre spécifié sur le cordon ou la rallonge doit
être égal ou supérieur à celui indiqué sur l’appareil.
La page charge ...
La page charge ...
La page charge ...
La page charge ...
La page charge ...
La page charge ...
La page charge ...
La page charge ...
La page charge ...
La page charge ...
La page charge ...
La page charge ...
La page charge ...
La page charge ...
La page charge ...
La page charge ...
La page charge ...
La page charge ...
La page charge ...
La page charge ...
La page charge ...
La page charge ...
La page charge ...
La page charge ...
-
 1
1
-
 2
2
-
 3
3
-
 4
4
-
 5
5
-
 6
6
-
 7
7
-
 8
8
-
 9
9
-
 10
10
-
 11
11
-
 12
12
-
 13
13
-
 14
14
-
 15
15
-
 16
16
-
 17
17
-
 18
18
-
 19
19
-
 20
20
-
 21
21
-
 22
22
-
 23
23
-
 24
24
-
 25
25
-
 26
26
-
 27
27
-
 28
28
-
 29
29
-
 30
30
-
 31
31
-
 32
32
-
 33
33
-
 34
34
-
 35
35
-
 36
36
-
 37
37
-
 38
38
-
 39
39
-
 40
40
-
 41
41
-
 42
42
-
 43
43
-
 44
44


T-Fal CM121657 Le manuel du propriétaire
- Catégorie
- Cafetières
- Taper
- Le manuel du propriétaire
dans d''autres langues
- English: T-Fal CM121657 Owner's manual
- español: T-Fal CM121657 El manual del propietario
Autres documents
-
Tefal CM482GMX Manuel utilisateur
-
Krups EC321050 Manuel utilisateur
-
-
-
-
-
-
-
 Brentwood TS114 Mode d'emploi
-
Schumacher SA899SA899 Le manuel du propriétaire
