LG BSNQ0964NA0 Le manuel du propriétaire
- Catégorie
- Climatiseurs mobiles
- Taper
- Le manuel du propriétaire
Ce manuel convient également à

P/NO : MFL68301205
*MFL68301205*
Rev : 01
Date : 03.2014
OWNER’S MANUAL
AIR CONDITIONER
Please read this manual carefully before operating
your set and retain it for future reference.
www.lg.com
TYPE : WALL MOUNTED

2
TIPS FOR SAVING ENERGY
TIPS FOR SAVING ENERGY
Here are some tips that will help you minimize the power consumption when you use the air
below:
• Do not cool excessively indoors. This may be harmful for your health and may consume more
electricity.
• Block sunlight with blinds or curtains while you are operating the air conditioner.
• Keep doors or windows closed tightly while you are operating the air conditioner.
y to circulate indoor air.
• Speed up the fan to cool or warm indoor air quickly, in a short period of time.
• Open windows regularly for ventilation as the indoor air quality may deteriorate if the air con-
ditioner is used for many hours.
For your records
Staple your receipt to this page in case you need it to prove the date of purchase or for warranty
purposes. Write the model number and the serial number here:
Model number :
Serial number :
Dealer’s name :
Date of purchase :

SAFETY PRECAUTIONS
IMPORTANT SAFETY INSTRUCTIONS
READ ALL INSTRUCTIONS BEFORE USING THE APPLIANCE.
Always comply with the following precautions to avoid dangerous situations and ensure peak
performance of your product
WARNING
It can result in serious injury or death when the directions are ignored
CAUTION
It can result in minor injury or product damage when the directions are ignored
WARNING
in hazards to you and others.
• Installation MUST conform with local building codes or, in the absence of local codes, with
the Nation Electrical Code NFPA 70/ANSI C1-1003 or current edition and Canadian Electrical
Code Part1 CSA C.22.1.
• The information contained in the manual is intended for use b
familiar with safety procedures and equipped with the proper tools and test instruments.
• Failure to carefully read and follow all instructions in this manual can result in equipment mal-
function, property damage, personal injury and/or death.
Installation
• Use a standard circuit breaker and fuse conforming with the rating of the air conditioner. Fail-
ure to do so may result in electric shock or product failure.
• Contact an authorized service center when you install or relocate the air conditioner. Failure to
do so may result in serious injury or product failure.
• Always use a power plug and socket with a ground terminal.Failure to do so may result in
electric shock or product failure
• Install the panel and the cover of the control box safely. Failure to do so may result in explo-
• Install a dedicated electric outlet and circuit breaker before you use the air conditioner. Failure
to do so may result in electric shock or product failure.
• Use a standard circuit breaker and fuse conforming with the rating of the air conditioner. Fail-
ure to do so may result in electric shock or product failure.
• Do not modify or extend the power cable. If the power cable or cord has scratches or skin
peeled off or deteriorated then it must be replaced. It may resu
• Be cautious when you unpack or install the air conditioner. Failure to do so may result in seri-
ous injury or product failure.
• Do not install the air conditioner on an unstable surface or where there may be a danger of it
falling. It may result in death, serious injury, or product failure.
!
!
!
3
Rev : 01
Date : 03.2014

4
SAFETY PRECAUTIONS
Operation
• Do not let the air conditioner run for a long time when the humidity is very high or when a door or
window has been left open. Failure to do so may result in product failure.
• Make sure that the power cord is not pulled or damaged while the air conditioner is operating. Fail-
ure.
• Do not place any objects on the power cord. It may result in electric shock or product failure.
• Do not turn on or off the air conditioner by plugging in or unplugging the power plug. It may result in
• Do not touch, operate or repair the air conditioner with wet hands. It may result in electric shock or
product failure.
• Do not place a heater or other heating appliances near the po
shock, or product failure.
• Do not allow water to run into the air conditioner. It may re
d thinner near the air conditioner.
• Do not use the air conditioner for an extended period of time in a small place without ventilation.
Ventilate the place regularly. Failure to do so may result in e
• When there is a gas leak, ventilate sufficiently before using the air conditioner again. Failure to do so
• Unplug the power plug if there is a noise, smell or smoke coming from the air conditioner. Failure to
• Stop operating and close the window in strom or hurricane.If possible remove the product from the
window before hurricane arrives
grille. Failure to do so may result in elec-
tric shock or product failure.
• Contact an authorized service center when the air conditioner
• Be cautious water could not enter the product
• Make sure to ventilate sufficiently when this air conditioner and a heating appliance such as a heater
rious injury, or product failure.
• Turn the main power off and unplug the power plug when you clean or repair the air conditioner.
Failure to do so may result in death, serious injury, or product failure.
• Unplug the power plug when the air conditioner is not used for an extended period of time. Failure
to do so may result in product failure.
• For inner cleaning, contact an Authorized Service Center or a dealer.
Do not use harsh detergent that causes corrosion or damage on the unit.
tronic shock.
Rev : 01
Date : 03.2014

SAFETY PRECAUTIONS
CAUTION
Installation
• Make sure to check if there is a refrigerant leak after you install or repair the air conditioner. Failure
to do so may result in product failure.
• Install the drain hose properly for smooth drainage of condensed water. Failure to do so may result
in product failure.
• Keep level even when installing the product.
• Install the air conditioner where the noise from the outdoor unit or the exhaust gas will not incon-
between neighbors.
• When transporting the equipment, there should be at least 2 or more people, or a forklift. It may re-
sult in serious injury.
• Do not install the air conditioner where it will be exposed to sea wind (salt spray) directly. It may re-
sult in product failure.
Operation
• Do not expose people, animals or plants to the cold or hot wind from the air conditioner. It may re-
sult in serious injury.
• Do not use the product for special purposes, such as preserving foods, works of art, etc. It is a con-
sumer air conditioner, not a precision refrigeration system. It
shock.
explosion or product failure.
• Do not use strong cleaning agents or solvents when you clean the air conditioner, or spray water.
Use a smooth cloth. It may result in serious injury or product failure.
• Never touch the metal parts of the air conditioner when you r
rious injury or product failure.
• Do not place any objects on the air conditioner. It may result in product failure.
ter every two weeks or more often if
necessary.
• Do not insert hands or other objects through the air inlet or outlet while the air conditioner is operat-
ing. It may result in electric shock.
• Do not drink the water drained from the air conditioner. It may result in serious health complications.
• Use a sturdy stool or ladder when you clean, maintain or repair the air conditioner at a height. Failure
to do so may result in serious injury or product failure.
• Do not mix the batteries for the remote control with other types of batteries or mix new batteries
with used batteries. Failure to do so may result in product failure.
• Do not recharge or disassemble the batteries. Failure to do s
injury.
. If your cloth or skin is exposed to the
to do so may result in serious injury.
ide of your mouth thoroughly and then
consult a doctor. Failure to do so may result in serious health complications.
!
5

TABLE OF CONTENTS
2 TIPS FOR SAVING
3 IMPORTANT SAFETY
INSTRUCTIONS
10 BASIC FUNCTIONS
10 Cooling your room
10 Removing humidity
10 Airing your room
10 Adjusting the fan speed
11 Adjusting the air flow direction
11 Setting the timer
12 ADVANCED FUNCTIONS
12 Changing room temperature quickly
12
14 MAINTENANCE
15 Cleaning the air filter
16 TROUBLESHOOTING
16 Self-diagnosis function
16 Before requesting service
TABLE OF CONTENTS
6
7 BEFORE USE
7 Components
8 Inserting batteries
8 Ins
8 Operating method
talling the remote control holder
9 USING THE REMOTE
CONTROL
Generator mode operation
13 Operating the air conditioner without the
remote control
13 Restarting the air conditioner
automatically
ENERGY

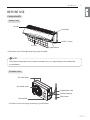
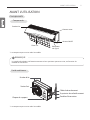
BEFORE USE
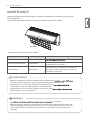
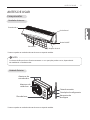
Components
Outdoor unit
Air Inlet
Signal Receiver
ON/OFF Button
Front Panel
Air Filter
NOTE
!
The number of operation lamps and their locations may vary, depending on the model of the
air conditioner.
7
BEFORE USE
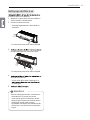
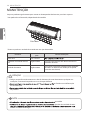
Indoor unit
* The feature can be changed according a type of model.
Air inlet vents
Air outlet vents
Base plate
Coolant piping
Connection wire
Drain hose
* The feature can be changed according a type of model.
Rev : 01
Date : 03.2014

BEFORE USE
8
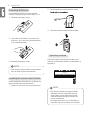
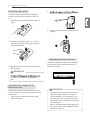
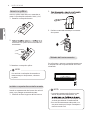
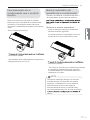
Inserting batteries
Insert batteries before using the remote
control. The battery type used is AAA (1.5 V).
1 Remove the battery cover.
2 Insert the new batteries and make sure
that the + and - terminals of the batteries
are installed correctly.
3 Reattach the battery cover.
Installing the remote control holder
Install the holder where there is no direct sun-
light to protect the remote control.
1 Choose a safe and easily-accessible place.
2 Fix the holder by fastening the 2 screws
3 Slide the remote control into the holder.
Point the remote control towards the signal
receiver at the bottom of the air conditioner to
operate it.
NOTE
!
If the display screen of the remote control
starts to fade, replace the batteries.
NOTE
!
• The remote control may operate other
electronic devices if pointed towards
them. Make sure to point the remote
control towards the signal receiver of
the air conditioner.
• For proper operation, use a soft cloth to
clean the signal transmitter and receiver.
Operating method

9
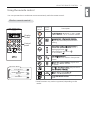
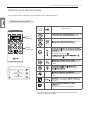
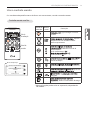
USING THE REMOTE CONTROL
Using the remote control
You can operate the air conditioner more conveniently with the remote control.
Wireless remote control
Cooling Operation
Healthy Dehumidification
Operation
Air Circulation
Operation Mode
* Some functions may not be supported, depending on the
model.
Control
panel
Display
screen
Description
- O
n/Off button:
Temperature adjustment buttons:
Adjusts the room temperature when
cooling.
O
peration mode selection button :
Selects the operation mode.
Cooling operation ( )
Dehumidifying operation ( )
Air circulation ( )
Jet cooling button: Cools down the in-
door temperature within a short period
of time.
Indoor fan speed button: Adjusts the
fan speed.
-
Air flow direction button: Adjusts the air
Timer :
-
Display
screen
Control
panel
Generator mode button:
input.
Reduce power

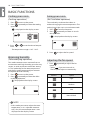
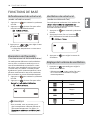
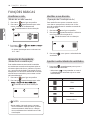
Cooling your room
(Cool ing operation)
1 Press to turn on the power.
2 Press repeatedly to select the cooling
operation.
- is displayed on the display screen.
3 Press or to set the desired temper-
ature.
- The temperature range is 18°C - 30°C.
Removing humidity
(Dehumidifying operation)
This mode removes excess moisture from an
environment with high humidity or in the rainy
season, in order to prevent mold from setting
in. This mode adjusts the room temperature
and the fan speed automatically to maintain
the optimal level of humidity.
1 Press to turn on the power.
2 Press repeatedly to select the dehu-
midifying operation.
- is displayed on the display screen.
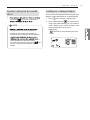
Airing your room
(Air Circulation operation)
This mode only circulates the indoor air
without changing the room temperature. The
cooling lamp lights up in air circulation mode.
1 Press to turn on the power.
2 Press repeatedly to select air circula-
tion operation.
- is displayed on the display screen.
3 Press to adjust the fan speed.
Adjusting the fan speed
1 Press repeatedly to adjust the fan
speed.
- Select if you want natural air.
The fan speed adjusts automatically.
NOTE
!
• In this mode you cannot adjust the room
temperature, as it is adjusted automati-
cally. Also, the room temperature is not
displayed on the display screen.
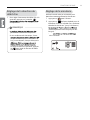
BASIC FUNCTIONS
10
Remark Speed
High
Medium
Low
Natural Wind
BASIC FUNCTIONS

11
BASIC FUNCTIONS
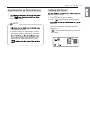
Adjusting the air flow direction
1
cally,
tion automatically.
Setting the timer
ditioner automatically.
1 Press to turn on the power.
2 Press repeatedly to select the hour
24 hours)
(The hour increases automatically with
long press.)
- is displayed on the display screen in
this mode.
NOTE
!
cause product failure.
• If you restart the air conditioner, it starts
to operate with the previously set direc-
not match the icon displayed on the re-
mote control. When this occurs, press
again.

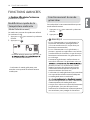
ADVANCED FUNCTIONS
12
vanced functions.
Changing room temperature
quickly (Jet Cool)
This mode allows you to cool indoor air
quickly in summer.
1 Press to turn on the power.
2 Press .
- In jet cooling mode, strong air blows out
at a temperature of 18°C for 30 minutes.
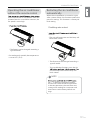
ADVANCED FUNCTIONS
Generator mode operation
(Gen Mode)
This mode reduces power input during
the cooling mode.
1 Press to turn on the power.
2
Press
.
NOTE
!
•
When using Generator Power Supply,
air-conditioner must use ‘Gen Mode’.(It may not
operate properly in Normal Mode)
•
When using Generator Power Supply, If there
are many applications being used together,
air-conditioner may not operate properly for
overload on Generator
•
Generator should be maintained properly
according to Manufacture’s Manual.
Non-properly maintained Generator may cause
(Engine Oil, Fuel Level and continuous usage
time should be in Manufacture’ recommended
condition )
•
Due to ‘Gen Mode’, inadequate cooling capacity
may occur.
•
‘Gen Mode’ is memorized.
•
When using Generator Power Source, Outdoor Unit
may operate the outdoor fan Automatically for
protecting the Air-Conditioner
Ex) In case of restarting the Air-Conditioner
during ‘Gen Mode’. It operates ‘Gen Mode’
automatically

13
Operating the air conditioner
without the remote control
unit to operate the air conditioner when the
remote control is unavailable. However, the
fan speed is set to high.
Restarting the air conditioner
automatically
When the air conditioner is turned on again
after a power failure, this function restores the
previous settings. This function is a factory de-
fault setting.
-
seconds.
- The unit will beep twice and the lamp will
blink twice 4 times.
Disabling auto restart
- For cooling-only models, the temperature
is set to 22°C (72°F).
* The feature can be changed according a
type of model.
- To re-enable the function, press the On/
unit will beep twice and the lamp will
blink 4 times.
NOTE
!
for 3 – 5 seconds instead of 6 seconds,
the unit will switch to the test operation.
In the test operation, the unit blows out
strong air for cooling for 18 minutes and
then returns to the factory default set-
tings.
* The feature can be changed according a
type of model.
-
ADVANCED FUNCTIONS
Rev : 01
Date : 03.2014

14
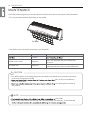
MAINTENANCE
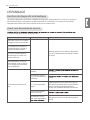
MAINTENANCE
Clean the product regularly to maintain optimal performance and to prevent possible breakdown.
* This may not be provided, depending on the model.
Item Cleaning interval Cleaning method
2 weeks
Indoor unit surface Regularly
Use a soft, dry cloth. Do not use bleach or
abrasives.
Outdoor unit Regularly
Use steam to clean the heat exchanger coils
and the panel vents (consult with technician).
Air filter
CAUTION
• Turn off the power and unplug the power cord before you perform any maintenance; other-
wise it may cause electric shock.
lters. It may cause deforma-
tion or discoloration.
may damage the surface of
the product.
!
NOTE
!
the model.
• Make sure to clean the heat exchanger coils of the outdoor unit regularly, as dirt collected
* The feature can be changed according a type of model.

15
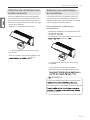
MAINTENANCE
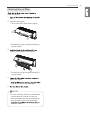
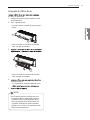
Cleaning the air filter
more if necessary.
1
cord.
2 Open the front grille.
- Lift up both sides of the cover slightly.
3
slightly and remove it from the unit.
4
with warm water.
in lukewarm water with detergent.
5
* The feature can be changed according a
type of model.
* The feature can be changed according a
type of model.
NOTE
!
• For inner cleaning, contact an Authorized
Service center or a dealer. Do not use
harsh detergent that causes corrosion or
damage on the unit. Harsh detergent
electronic shock.

16
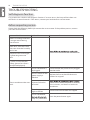
TROUBLESHOOTING
Self-diagnosis function
This product has a built-in self-diagnosis function. If an error occurs, the lamp of the indoor unit
will blink in 2 second intervals. If this occurs, contact your local dealer or service center.
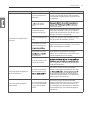
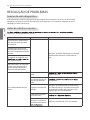
Before requesting service
Please check the following before you contact the service center. If the problem persists, contact
your local service center.
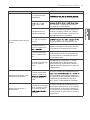
Problem Possible causes Corrective action
There is a burning smell and
a strange sound coming
from the unit.
-
power cord and contact the service center.
Water leaks from the indoor
unit even when the humidity
level is low.
The power cord is damaged
or generating excessive
heat.
A switch, a circuit breaker
(safety, ground) or a fuse is
not operated properly.
The air conditioner does not
work.
The air conditioner is
unplugged.
Check whether the power cord is plugged
into the outlet.
A fuse is blown or the
power supply is
blocked.
Replace the fuse or check if the circuit
breaker has tripped.
A power failure has
occurred.
failure occurs. When the power is restored,
wait 3 minutes, and then turn on the air
conditioner.
The voltage is too
high or too low.
Check if the circuit breaker has tripped.
The air conditioner
cally at a preset time.
Press the power button again.
TROUBLESHOOTING

17
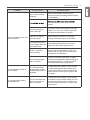
TROUBLESHOOTING
Problem Possible causes Corrective action
The air conditioner does not
generate cool air.
Air is not circulating
properly.
Make sure that there are no curtains,
blinds or furniture blocking the front of the
air conditioner.
See “Cleaning Air Filter” for more infor-
mation.
The room tempera-
ture is too high.
In summer, it may take some time to cool
indoor air. In this case, select the jet cool
operation to cool indoor air quickly.
Cold air is escaping
from the room.
Make sure that no cold air is escaping
through ventilation points in the room.
The desired tempera-
ture is higher than the
set temperature.
Set the desired temperature to a level
lower than the current temperature.
There is a heating
source nearby.
Avoid using a heat generator such as an
electric oven or a gas burner while the air
conditioner is in operation.
Air circulation opera-
tion is selected.
In the air circulation operation, air blows
from the air conditioner without cooling or
heating the indoor air. Switch the opera-
tion mode to the cooling operation.
It is not possible to adjust
the fan speed.
The auto operation,
jet operation or dehu-
midifying operation is
selected.
In some operation modes, such as the jet
or dehumidifying operation modes, you
cannot adjust the fan speed. Select an op-
eration mode in which you can adjust the
fan speed.
It is not possible to adjust
the temperature.
The air circulation op-
eration or jet opera-
tion is selected.
In some operation modes, such as the air
circulation or jet operation mode, you can-
not adjust the temperature. Select an op-
eration mode in which you can adjust the
temperature.

www.lg.com
TYPE : MURAL
MANUEL D’UTILISATION
CLIMATISEUR
Veuillez lire attentivement ce manuel avant d’utiliser
votre appareil, et le conserver pour toute consultation ultérieure.

2
ASTUCES POUR ECONOMISER L’ENERGIE
ASTUCES POUR ECONOMISER L’ENERGIE
Nous vous donnons ici quelques astuces qui vous permettront de minimiser la consommation
d’énergie lorsque vous utilisez le climatiseur. Vous pouvez utiliser un climatiseur de manière plus
• Evitez un refroidissement excessif des unités intérieures. Une telle application pourrait repré-
senter un danger pour votre santé et entraîner une plus grande consommation de courant.
• Evitez d'exposer le climatiseur aux rayons solaires à l’aide des rideaux ou des persiennes lors-
qu’il est en marche.
• Maintenez les portes et les fenêtres complètement fermées lorsque vous utilisez le climati-
seur.
• Ajustez le sens du débit d’air verticalement ou horizontalement pour permettre la circulation
de l’air intérieur.
• Accélérez le ventilateur pour refroidir ou réchauffer rapidement l’air intérieur en peu de temps.
• Ouvrez régulièrement des fenêtres pour des besoins d’aération étant donné que la qualité de
l'air intérieur peut se détériorer si vous utilisez le climatiseur pendant plusieurs heures.
• Ouvrez régulièrement des fenêtres pour des besoins d’aération étant donné que la qualité de
l'air intérieur peut se détériorer si vous utilisez le climatiseur pendant plusieurs heures.
Pour vos archives
Agrafez votre reçu sur cette page dans le cas où vous en avez besoin pour prouver la date d’achat ou
pour des besoins de garantie. Ecrivez le numéro du modèle et le numéro de série ici:
Numéro du modèle:
Numéro de série:
Ces numéros sont disponibles sur l’étiquette de chaque côté du climatiseur.
Nom du distributeur:
Date d’achat:

CONSIGNES DE SECURITE IMPORTANTES
CONSIGNES DE SECURITE IMPORTANTES
LISEZ ENTIEREMENT LES INSTRUCTIONS AVANT D’UTILISER L’APPAREIL.
Respectez toujours les consignes suivantes pour éviter des situations dangereuses et garantir
une performance optimale de votre produit.
ATTENTION
Le non respect de ces consignes peut être fatal ou provoquer des blessures graves.
AVERTISSEMENT
Le non respect de ces consignes peut provoquer des blessures légères ou endommager le pro-
duit.
ATTENTION
• Les travaux d’installation ou de dépannage effectués par des p
poser aux risques en même temps que les autres personnes.
• L’installation DOIT être conforme aux codes de construction locaux, et dans le cas où il n’en existe pas,
au Code National de l’Electricité NFPA 70/ANSI C1-1003 ou à l’édition actuelle et au Code Canadien de
l’Electricité, Partie 1 CSA C.22.1.
• Les informations contenues dans ce manuel sont destinées à un
maîtrise les consignes de sécurité et dispose d’outils et d’instruments de test appropriés.
• Le fait de ne pas lire attentivement et de ne pas respecter les instructions de ce manuel peut provoquer
un dysfonctionnement de l’équipement, des dégâts matériels, des blessures individuelles et/ou la mort.
Installation
• Utilisez un disjoncteur et un fusible standard en conformité aux estimations du climatiseur. Le fait de ne
pas prendre ces mesures peut provoquer un choc électrique ou une défaillance du produit.
• Contactez un centre de service agréé lorsque vous installez le climatiseur ou lorsque vous le réinstallez
ailleurs. Le fait de ne pas prendre ces mesures peut provoquer des blessures graves ou une défaillance
du produit.
ne prise de terre. Le fait de ne pas prendre
ces mesures peut provoquer un choc électrique ou une défaillance du produit.
• Installez le panneau et le couvercle de la boîte de commande de façon sécurisée. Une mauvaise installa-
tion peut provoquer une explosion ou un incendie.
• Installez une sortie électrique et un disjoncteur dédiés avant d'utiliser le climatiseur. Le fait de ne pas
prendre ces mesures peut provoquer un choc électrique ou une défaillance du produit.
• Utilisez un disjoncteur et un fusible standard en conformité aux estimations du climatiseur. Le fait de ne
pas prendre ces mesures peut provoquer un choc électrique ou une défaillance du produit.
i le câble ou le cordon d’alimentation a des
égratignures, s'il est usé ou endommagé, il doit être remplacé. Il peut provoquer un incendie ou un choc
électrique.
• Faites attention lorsque vous déballez et installez le climatiseur. Le fait de ne pas prendre ces mesures
peut provoquer des blessures graves ou une défaillance du produit.
• N’installez pas le climatiseur sur une surface instable où dans un endroit où il peut tomber. Cela peut
provoquer la mort, des blessures graves ou la défaillance du produit.
!
!
!
3
Rev : 01
Date : 03.2014
La page charge ...
La page charge ...
La page charge ...
La page charge ...
La page charge ...
La page charge ...
La page charge ...
La page charge ...
La page charge ...
La page charge ...
La page charge ...
La page charge ...
La page charge ...
La page charge ...
La page charge ...
La page charge ...
La page charge ...
La page charge ...
La page charge ...
La page charge ...
La page charge ...
La page charge ...
La page charge ...
La page charge ...
La page charge ...
La page charge ...
La page charge ...
La page charge ...
La page charge ...
La page charge ...
La page charge ...
La page charge ...
-
 1
1
-
 2
2
-
 3
3
-
 4
4
-
 5
5
-
 6
6
-
 7
7
-
 8
8
-
 9
9
-
 10
10
-
 11
11
-
 12
12
-
 13
13
-
 14
14
-
 15
15
-
 16
16
-
 17
17
-
 18
18
-
 19
19
-
 20
20
-
 21
21
-
 22
22
-
 23
23
-
 24
24
-
 25
25
-
 26
26
-
 27
27
-
 28
28
-
 29
29
-
 30
30
-
 31
31
-
 32
32
-
 33
33
-
 34
34
-
 35
35
-
 36
36
-
 37
37
-
 38
38
-
 39
39
-
 40
40
-
 41
41
-
 42
42
-
 43
43
-
 44
44
-
 45
45
-
 46
46
-
 47
47
-
 48
48
-
 49
49
-
 50
50
-
 51
51
-
 52
52


LG BSNQ0964NA0 Le manuel du propriétaire
- Catégorie
- Climatiseurs mobiles
- Taper
- Le manuel du propriétaire
- Ce manuel convient également à
dans d''autres langues
- English: LG BSNQ0964NA0 Owner's manual
- português: LG BSNQ0964NA0 Manual do proprietário
Documents connexes
-
LG HSNC1264NN5 Le manuel du propriétaire
-
LG BSNQ1865NA0 Le manuel du propriétaire
-
-
-
-
-
-