LG LGH915 Le manuel du propriétaire
- Catégorie
- Téléphones portables
- Taper
- Le manuel du propriétaire
Ce manuel convient également à

FRANÇAISENGLISH
MFL70799801 (1.0) www.lg.com/ca
USER GUIDE
LG-H915

1
About this user guide
Thank you for choosing this LG product. Please carefully read this user
guide before using the device for the first time to ensure safe and proper
use.
• Always use genuine LG accessories. The supplied items are designed
only for this device and may not be compatible with other devices.
• This device is not suitable for people who have a visual impairment due
to the touchscreen keyboard.
• Descriptions are based on the device default settings.
• Default apps on the device are subject to updates, and support for
these apps may be withdrawn without prior notice. If you have any
questions about an app provided with the device, please contact an
LG Service Centre. For user-installed apps, please contact the relevant
service provider.
• Modifying the device’s operating system or installing software from
unofficial sources may damage the device and lead to data corruption
or data loss. Such actions will violate your LG licence agreement and
void your warranty.
• Some content and illustrations may differ from your device, depending
on the area, service provider, software version, or OS version, and are
subject to change without prior notice.
• Software, audio, wallpaper, images, and other media supplied with
your device are licenced for limited use. If you extract and use these
materials for commercial or other purposes, you may be infringing
copyright laws. As a user, you are fully responsible for the illegal use of
media.
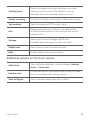
• Additional charges may incur for data services, such as messaging,
uploading,downloading, auto-syncing and location services. To void
additional charges, select a data plan suitable to your needs. Contact
your service provider to obtain additional details.
ENGLISH

2About this user guide
Instructional notices
WARNING: Situations that could cause injury to the user and third
parties.
CAUTION: Situations that may cause minor injury or damage to the
device.
NOTE: Notices or additional information.

3
Table of contents
01
Custom-designed
Features
6 Second screen
8 Video recording features
11 Audio recording features
14 Multi-tasking feature
15 Fingerprint recognition
19 quick share
20 Quick Help
02
Basic Functions
22 Product components and
accessories
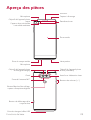
23 Parts overview
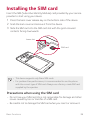
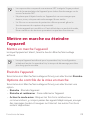
25 Turning the power on or off
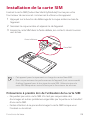
26 Installing the SIM card
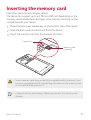
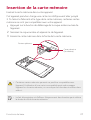
27 Inserting the memory card
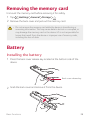
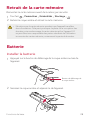
28 Removing the memory card
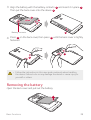
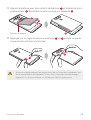
28 Battery
32 Touch screen
35 Home screen
42 Screen lock
45 Memory card encryption
46 Taking screenshots
46 Entering text
52 Content sharing
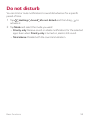
55 Do not disturb
03
Useful Apps
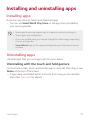
57 Installing and uninstalling apps
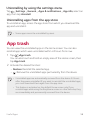
58 App trash
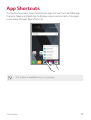
59 App Shortcuts
60 Phone
64 Messaging
65 Camera
82 Gallery
86 Music
87 E-mail
88 Calendar
90 QuickMemo+

4Table of contents
92 Calculator
93 Clock
94 Downloads
94 File Manager
94 FM Radio
95 Contacts
97 LG Health
98 QuickRemote
100 LG SmartWorld
100 Tasks
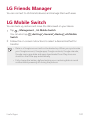
101 LG Friends Manager
101 LG Mobile Switch
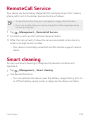
102 RemoteCall Service
102 Smart cleaning
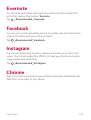
103 Evernote
103 Facebook
103 Instagram
103 Chrome
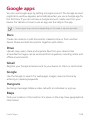
104 Google apps
105 In Apps
04
Phone Settings
107 Settings
107 Network
119 Sound
120 Display
121 General
05
Appendix
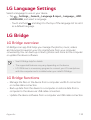
132 LG Language Settings
132 LG Bridge
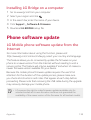
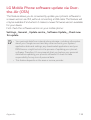
133 Phone software update
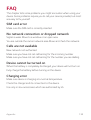
135 FAQ
139 Anti-Theft Guide
140 More information
06
For Your Safety
07
Safety Guidelines
168 LIMITED WARRANTY
STATEMENT

Custom-designed
Features
01

Custom-designed Features 6
Second screen
Second screen overview
Second screen lets you open apps and see urgent info without searching
for it on the main screen. Customize the screen with apps and info you
need.
You can set it to be enabled when the screen is on and off.
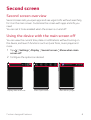
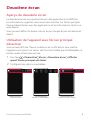
Using the device with the main screen off
You can view the current time, date or notifications without turning on
the device, and launch functions such as Quick Tools, music player and
more.
1
Tap Settings Display Second screen Show when main
screen off.
2
Configure the options as desired.
Display date and time Start Quick tools Start Music player

Custom-designed Features 7
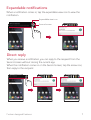
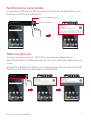
Expandable notifications
When a notification comes in, tap the expandable view icon to view the
notification.
Second screen
Expandable view icon
Direct reply
When you receive a notification, you can reply to the recipient from the
Second screen without closing the current app.
When the notification comes in on the Second screen, tap the arrow icon,
then reply to the recipient.

Custom-designed Features 8
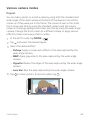
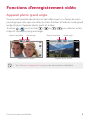
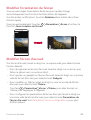
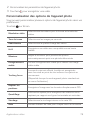
Video recording features
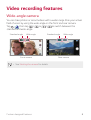
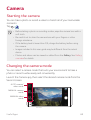
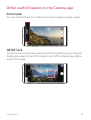
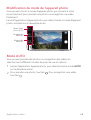
Wide-angle camera
You can take photos or record videos with a wider range than your actual
field of vision by using the wide-angle on the front and rear camera.
Tap
, then tap / or / to switch between the
standard and wide-angle.
Front camera Rear camera
Wide-angle
Standard angle
Wide-angle
Standard angle
• See
Starting the camera
for details.

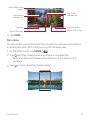
Custom-designed Features 9
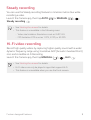
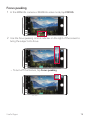
Steady recording
You can use the Steady recording feature to minimize motion blur while
recording a video.
Launch the Camera app, then tap AUTO (
A
) or MANUAL ( )
Steady recording
.
• See
Starting the camera
for details.
• This feature is unavailable in the following cases:
- Video size limitation: Resolution is set as UHD 16:9.
- FPS limitation: FPS is set as 1 FPS, 2 FPS, or 60 FPS.
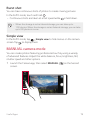
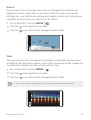
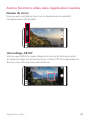
Hi-Fi video recording
Record high quality videos by capturing higher quality sound with a wider
dynamic frequency range using 3 sensitive AOP (Acoustic Overload Point)
mics and incredible Hi-Fi Recording.
Launch the Camera app, then tap MANUAL (
) Hi-Fi .
• See
Starting the camera
for details.
• Hi-Fi videos can only be played in apps that support Hi-Fi.
• This feature is unavailable when you use the front camera.

Custom-designed Features 10
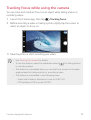
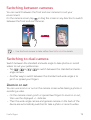
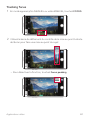
Tracking focus while using the camera
You can track and maintain focus on an object while taking photos or
recording videos.
1
Launch the Camera app, then tap Tracking focus.
2
Before recording a video or taking a photo, lightly tap the screen to
select an object to focus on.
3
Take the photo or start recording your video.
• See
Starting the camera
for details.
• To use this feature, select the standard camera (
) for taking photos
or recording videos.
• This feature is unavailable when you use the front camera or the wide-
angle camera for taking a photo or recording a video.
• This feature is unavailable in the following cases:
- Video size limitation: Resolution is set as UHD 16:9.
- FPS limitation: FPS is set as 60 FPS.

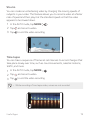
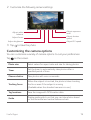
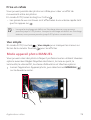
Custom-designed Features 11
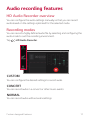
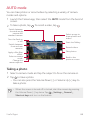
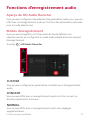
Audio recording features
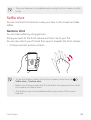
HD Audio Recorder overview
You can configure the audio settings manually so that you can record
audio based on the settings optimized for the selected mode.
Recording modes
You can record a highly defined audio file by selecting and configuring the
audio mode to suit the recording environment.
Tap
HD Audio Recorder.
CUSTOM
You can configure the desired settings to record audio.
CONCERT
You can record audio in a concert or other music events.
NORMAL
You can record audio without extra settings.

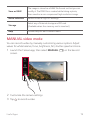
Custom-designed Features 12
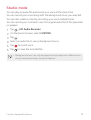
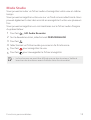
Studio mode
You can play an audio file and record your voice at the same time.
You can record your voice along with the background music you selected.
You can also create a chord by recording your voice multiple times.
You can record your comments over the original audio file of the presenter
or speaker.
1
Tap HD Audio Recorder.
2
On the Second screen, select CUSTOM.
3
Tap .
4
Select an audio file to use as background music.
5
Tap to record voice.
6
Tap to save the recorded file.
• Background music can only be played through earphones. Make sure to
plug in earphones before using this feature.

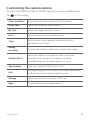
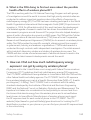
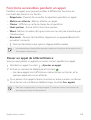
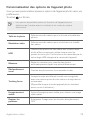
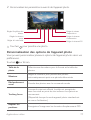
Custom-designed Features 13
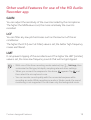
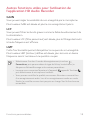
Other useful features for use of the HD Audio
Recorder app
GAIN
You can adjust the sensitivity of the sound recorded by the microphone.
The higher the GAIN value is set, the more sensitively the sound is
recorded.
LCF
You can filter any low-pitched noises such as the low hum of the air
conditioner.
The higher the LCF (Low Cut Filter) value is set, the better high-frequency
noises are filtered.
LMT
It can prevent clipping of the recorded sound. The higher the LMT (Limiter)
value is set, the more low frequency sounds that will not get clipped.
• With one of the three recording modes selected, tap Settings, then
customize the file type, bit depth, sampling rate and other settings.
• When you connect the earpiece to the device,
appears. Tap and
then select the microphone to use.
• You can monitor sound quality with the connected earpiece while
recording an audio. While recording an audio in Studio mode, the sound
monitoring is not supported. You can hear only the background music.

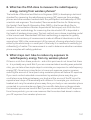
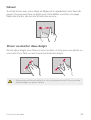
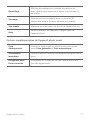
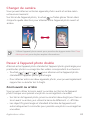
Custom-designed Features 14
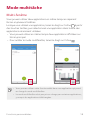
Multi-tasking feature
Multi-Window
You can use two apps at the same time by separating the screen into the
multiple windows.
While using an app, touch and hold
from the Home touch buttons,
then select an app from the recently used apps list.
• You can use two apps displayed on the main screen at the same time.
• To stop the Multi-Window feature, touch and hold
.
• You can use this feature in an app that supports the Multi-Window
feature.
• The Multi-Window feature is not supported by some apps, including
downloaded apps.

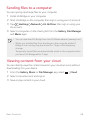
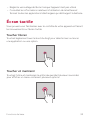
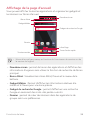
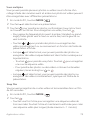
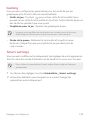
Custom-designed Features 15
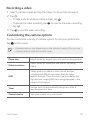
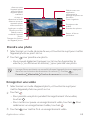
Overview screen
The Overview screen provides a preview of your recently used apps.
To view the list of recently used apps, tap
on the Home, then tap the
displayed app.
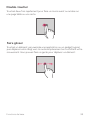
• Touch and hold an app and drag it to the top of the screen to start the
app with the Multi-Window. You can also tap
at the top of each app.
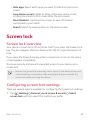
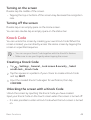
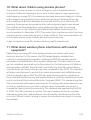
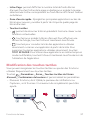
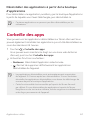
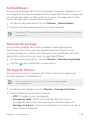
Fingerprint recognition
Fingerprint recognition overview
You must register your fingerprint on your device first before using the
fingerprint recognition function.
You can use the fingerprint recognition function in the following cases:
• To unlock the screen
• To view the locked content in the Gallery or QuickMemo+.
• Confirm a purchase by signing in to an app or identifying yourself with
your fingerprint.
• Your fingerprint can be used by the device for user identification.
Very similar fingerprints from different users may be recognized by
the fingerprint sensor as the same fingerprint. To enhance the device
security, set the screen lock to a pattern, PIN or password.

Custom-designed Features 16
Precautions for fingerprint recognition
Fingerprint recognition accuracy may decrease due to a number of
reasons. To maximize the recognition accuracy, check the following before
using the device.
• The device’s Power/Lock key has a fingerprint sensor. Ensure that the
Power/Lock key is not damaged by a metallic object, such as coin or
key.
• When water, dust or other foreign substance is on the Power/Lock key
or your finger, the fingerprint registration or recognition may not work.
Clean and dry your finger before having the fingerprint recognized.
• A fingerprint may not be recognized properly if the surface of your
finger has a scar or is not smooth due to being soaked in water.
• If you bend your finger or use the fingertip only, your fingerprint may
not be recognized. Make sure that your finger covers the entire surface
of the Power/Lock key.
• Scan only one finger for each registration. Scanning more than one
finger may affect fingerprint registration and recognition.
• The device may generate static electricity if the surrounding air is
dry. If the surrounding air is dry, avoid scanning fingerprints, or touch
a metallic object such as coin or key before scanning fingerprints to
remove static electricity.

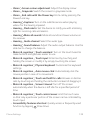
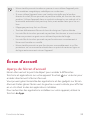
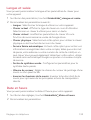
Custom-designed Features 17
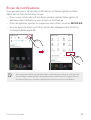
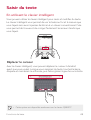
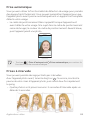
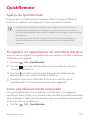
Registering fingerprints
You can register and save your fingerprint on the device to use fingerprint
identification.
1
Tap Settings General Lock screen & security Fingerprints.
• This feature is available when the secured lock is activated.
- Lock the device with Knock Code, Pattern, PIN, Password and more.
• If the screen lock is not active, configure the lock screen by following the
on-screen instructions. See
Configuring screen lock settings
for details.
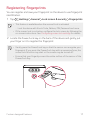
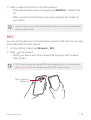
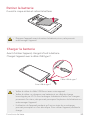
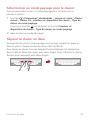
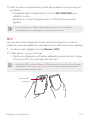
2
Locate the Power/Lock key on the back of the device and gently put
your finger on it to register the fingerprint.
• Gently press the Power/Lock key so that the sensor can recognize your
fingerprint. If you press the Power/Lock key with an excessive force, the
screen lock function may start or the screen may be turned off.
• Ensure that your fingertip covers the entire surface of the sensor of the
Power/Lock key.

Custom-designed Features 18
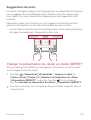
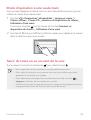
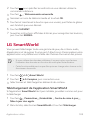
3
Follow the on-screen instructions.
• Repeat scanning the fingerprint by moving your finger little by little
until the fingerprint registers.
4
When the fingerprint registration is done, tap OK.
• Tap ADD MORE to register another fingerprint. If you register
only one fingerprint and the corresponding finger is not in a good
condition, the fingerprint recognition may not work well. As the
preventive measure against this kind of situation, register multiple
fingerprints.
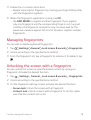
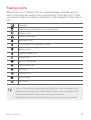
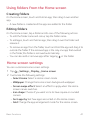
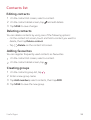
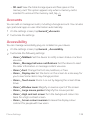
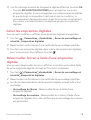
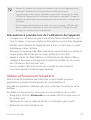
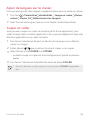
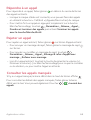
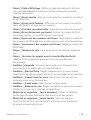
Managing fingerprints
You can edit or delete registered fingerprints.
1
Tap Settings General Lock screen & security Fingerprints.
2
Unlock according to the specified lock method.
3
From the fingerprint list, tap a fingerprint to rename it. To delete it, tap
.
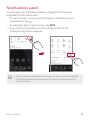
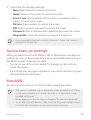
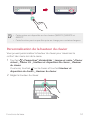
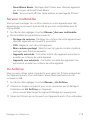
Unlocking the screen with a fingerprint
You can unlock the screen or view the locked content by using your
fingerprint. Activate the desired function:
1
Tap Settings General Lock screen & security Fingerprints.
2
Unlock according to the specified lock method.
3
On the fingerprint settings screen, activate the desired function:
• Screen lock: Unlock the screen with a fingerprint.
• Content lock: Unlock content with a fingerprint. To do this, make
sure that the content lock is set.

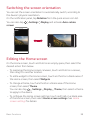
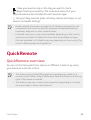
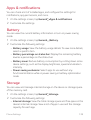
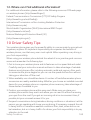
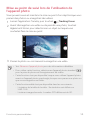
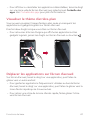
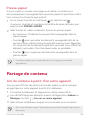
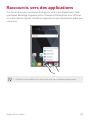
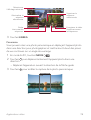
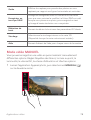
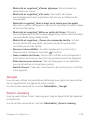
Custom-designed Features 19
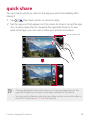
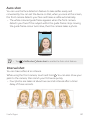
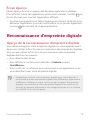
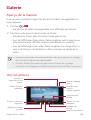
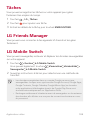
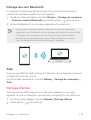
quick share
You can share a photo or video to the app you want immediately after
taking it.
1
Tap , then take a photo or record a video.
2
Tap the app icon that appears on the screen to share it using that app.
You can also swipe the icon towards the opposite direction to see
what other apps you can use to share your photos and videos.
quick share icon
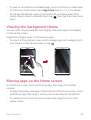
• The app displayed by the quick share icon may vary, depending on the
type and frequency of access to the apps installed on the device.
• You can use this feature only when you take a photo or record a video in
the AUTO mode. See
AUTO mode
for details.
La page charge ...
La page charge ...
La page charge ...
La page charge ...
La page charge ...
La page charge ...
La page charge ...
La page charge ...
La page charge ...
La page charge ...
La page charge ...
La page charge ...
La page charge ...
La page charge ...
La page charge ...
La page charge ...
La page charge ...
La page charge ...
La page charge ...
La page charge ...
La page charge ...
La page charge ...
La page charge ...
La page charge ...
La page charge ...
La page charge ...
La page charge ...
La page charge ...
La page charge ...
La page charge ...
La page charge ...
La page charge ...
La page charge ...
La page charge ...
La page charge ...
La page charge ...
La page charge ...
La page charge ...
La page charge ...
La page charge ...
La page charge ...
La page charge ...
La page charge ...
La page charge ...
La page charge ...
La page charge ...
La page charge ...
La page charge ...
La page charge ...
La page charge ...
La page charge ...
La page charge ...
La page charge ...
La page charge ...
La page charge ...
La page charge ...
La page charge ...
La page charge ...
La page charge ...
La page charge ...
La page charge ...
La page charge ...
La page charge ...
La page charge ...
La page charge ...
La page charge ...
La page charge ...
La page charge ...
La page charge ...
La page charge ...
La page charge ...
La page charge ...
La page charge ...
La page charge ...
La page charge ...
La page charge ...
La page charge ...
La page charge ...
La page charge ...
La page charge ...
La page charge ...
La page charge ...
La page charge ...
La page charge ...
La page charge ...
La page charge ...
La page charge ...
La page charge ...
La page charge ...
La page charge ...
La page charge ...
La page charge ...
La page charge ...
La page charge ...
La page charge ...
La page charge ...
La page charge ...
La page charge ...
La page charge ...
La page charge ...
La page charge ...
La page charge ...
La page charge ...
La page charge ...
La page charge ...
La page charge ...
La page charge ...
La page charge ...
La page charge ...
La page charge ...
La page charge ...
La page charge ...
La page charge ...
La page charge ...
La page charge ...
La page charge ...
La page charge ...
La page charge ...
La page charge ...
La page charge ...
La page charge ...
La page charge ...
La page charge ...
La page charge ...
La page charge ...
La page charge ...
La page charge ...
La page charge ...
La page charge ...
La page charge ...
La page charge ...
La page charge ...
La page charge ...
La page charge ...
La page charge ...
La page charge ...
La page charge ...
La page charge ...
La page charge ...
La page charge ...
La page charge ...
La page charge ...
La page charge ...
La page charge ...
La page charge ...
La page charge ...
La page charge ...
La page charge ...
La page charge ...
La page charge ...
La page charge ...
La page charge ...
La page charge ...
La page charge ...
La page charge ...
La page charge ...
La page charge ...
La page charge ...
La page charge ...
La page charge ...
La page charge ...
La page charge ...
La page charge ...
La page charge ...
La page charge ...
La page charge ...
La page charge ...
La page charge ...
La page charge ...
La page charge ...
La page charge ...
La page charge ...
La page charge ...
La page charge ...
La page charge ...
La page charge ...
La page charge ...
La page charge ...
La page charge ...
La page charge ...
La page charge ...
La page charge ...
La page charge ...
La page charge ...
La page charge ...
La page charge ...
La page charge ...
La page charge ...
La page charge ...
La page charge ...
La page charge ...
La page charge ...
La page charge ...
La page charge ...
La page charge ...
La page charge ...
La page charge ...
La page charge ...
La page charge ...
La page charge ...
La page charge ...
La page charge ...
La page charge ...
La page charge ...
La page charge ...
La page charge ...
La page charge ...
La page charge ...
La page charge ...
La page charge ...
La page charge ...
La page charge ...
La page charge ...
La page charge ...
La page charge ...
La page charge ...
La page charge ...
La page charge ...
La page charge ...
La page charge ...
La page charge ...
La page charge ...
La page charge ...
La page charge ...
La page charge ...
La page charge ...
La page charge ...
La page charge ...
La page charge ...
La page charge ...
La page charge ...
La page charge ...
La page charge ...
La page charge ...
La page charge ...
La page charge ...
La page charge ...
La page charge ...
La page charge ...
La page charge ...
La page charge ...
La page charge ...
La page charge ...
La page charge ...
La page charge ...
La page charge ...
La page charge ...
La page charge ...
La page charge ...
La page charge ...
La page charge ...
La page charge ...
La page charge ...
La page charge ...
La page charge ...
La page charge ...
La page charge ...
La page charge ...
La page charge ...
La page charge ...
La page charge ...
La page charge ...
La page charge ...
La page charge ...
La page charge ...
La page charge ...
La page charge ...
La page charge ...
La page charge ...
La page charge ...
La page charge ...
La page charge ...
La page charge ...
La page charge ...
La page charge ...
La page charge ...
La page charge ...
La page charge ...
La page charge ...
La page charge ...
La page charge ...
La page charge ...
La page charge ...
La page charge ...
La page charge ...
La page charge ...
La page charge ...
La page charge ...
La page charge ...
La page charge ...
La page charge ...
La page charge ...
La page charge ...
La page charge ...
La page charge ...
La page charge ...
La page charge ...
La page charge ...
La page charge ...
La page charge ...
La page charge ...
La page charge ...
La page charge ...
La page charge ...
La page charge ...
La page charge ...
La page charge ...
La page charge ...
La page charge ...
La page charge ...
La page charge ...
La page charge ...
La page charge ...
La page charge ...
La page charge ...
La page charge ...
La page charge ...
La page charge ...
La page charge ...
La page charge ...
La page charge ...
La page charge ...
La page charge ...
La page charge ...
La page charge ...
La page charge ...
La page charge ...
La page charge ...
La page charge ...
La page charge ...
La page charge ...
La page charge ...
La page charge ...
La page charge ...
La page charge ...
La page charge ...
La page charge ...
La page charge ...
-
 1
1
-
 2
2
-
 3
3
-
 4
4
-
 5
5
-
 6
6
-
 7
7
-
 8
8
-
 9
9
-
 10
10
-
 11
11
-
 12
12
-
 13
13
-
 14
14
-
 15
15
-
 16
16
-
 17
17
-
 18
18
-
 19
19
-
 20
20
-
 21
21
-
 22
22
-
 23
23
-
 24
24
-
 25
25
-
 26
26
-
 27
27
-
 28
28
-
 29
29
-
 30
30
-
 31
31
-
 32
32
-
 33
33
-
 34
34
-
 35
35
-
 36
36
-
 37
37
-
 38
38
-
 39
39
-
 40
40
-
 41
41
-
 42
42
-
 43
43
-
 44
44
-
 45
45
-
 46
46
-
 47
47
-
 48
48
-
 49
49
-
 50
50
-
 51
51
-
 52
52
-
 53
53
-
 54
54
-
 55
55
-
 56
56
-
 57
57
-
 58
58
-
 59
59
-
 60
60
-
 61
61
-
 62
62
-
 63
63
-
 64
64
-
 65
65
-
 66
66
-
 67
67
-
 68
68
-
 69
69
-
 70
70
-
 71
71
-
 72
72
-
 73
73
-
 74
74
-
 75
75
-
 76
76
-
 77
77
-
 78
78
-
 79
79
-
 80
80
-
 81
81
-
 82
82
-
 83
83
-
 84
84
-
 85
85
-
 86
86
-
 87
87
-
 88
88
-
 89
89
-
 90
90
-
 91
91
-
 92
92
-
 93
93
-
 94
94
-
 95
95
-
 96
96
-
 97
97
-
 98
98
-
 99
99
-
 100
100
-
 101
101
-
 102
102
-
 103
103
-
 104
104
-
 105
105
-
 106
106
-
 107
107
-
 108
108
-
 109
109
-
 110
110
-
 111
111
-
 112
112
-
 113
113
-
 114
114
-
 115
115
-
 116
116
-
 117
117
-
 118
118
-
 119
119
-
 120
120
-
 121
121
-
 122
122
-
 123
123
-
 124
124
-
 125
125
-
 126
126
-
 127
127
-
 128
128
-
 129
129
-
 130
130
-
 131
131
-
 132
132
-
 133
133
-
 134
134
-
 135
135
-
 136
136
-
 137
137
-
 138
138
-
 139
139
-
 140
140
-
 141
141
-
 142
142
-
 143
143
-
 144
144
-
 145
145
-
 146
146
-
 147
147
-
 148
148
-
 149
149
-
 150
150
-
 151
151
-
 152
152
-
 153
153
-
 154
154
-
 155
155
-
 156
156
-
 157
157
-
 158
158
-
 159
159
-
 160
160
-
 161
161
-
 162
162
-
 163
163
-
 164
164
-
 165
165
-
 166
166
-
 167
167
-
 168
168
-
 169
169
-
 170
170
-
 171
171
-
 172
172
-
 173
173
-
 174
174
-
 175
175
-
 176
176
-
 177
177
-
 178
178
-
 179
179
-
 180
180
-
 181
181
-
 182
182
-
 183
183
-
 184
184
-
 185
185
-
 186
186
-
 187
187
-
 188
188
-
 189
189
-
 190
190
-
 191
191
-
 192
192
-
 193
193
-
 194
194
-
 195
195
-
 196
196
-
 197
197
-
 198
198
-
 199
199
-
 200
200
-
 201
201
-
 202
202
-
 203
203
-
 204
204
-
 205
205
-
 206
206
-
 207
207
-
 208
208
-
 209
209
-
 210
210
-
 211
211
-
 212
212
-
 213
213
-
 214
214
-
 215
215
-
 216
216
-
 217
217
-
 218
218
-
 219
219
-
 220
220
-
 221
221
-
 222
222
-
 223
223
-
 224
224
-
 225
225
-
 226
226
-
 227
227
-
 228
228
-
 229
229
-
 230
230
-
 231
231
-
 232
232
-
 233
233
-
 234
234
-
 235
235
-
 236
236
-
 237
237
-
 238
238
-
 239
239
-
 240
240
-
 241
241
-
 242
242
-
 243
243
-
 244
244
-
 245
245
-
 246
246
-
 247
247
-
 248
248
-
 249
249
-
 250
250
-
 251
251
-
 252
252
-
 253
253
-
 254
254
-
 255
255
-
 256
256
-
 257
257
-
 258
258
-
 259
259
-
 260
260
-
 261
261
-
 262
262
-
 263
263
-
 264
264
-
 265
265
-
 266
266
-
 267
267
-
 268
268
-
 269
269
-
 270
270
-
 271
271
-
 272
272
-
 273
273
-
 274
274
-
 275
275
-
 276
276
-
 277
277
-
 278
278
-
 279
279
-
 280
280
-
 281
281
-
 282
282
-
 283
283
-
 284
284
-
 285
285
-
 286
286
-
 287
287
-
 288
288
-
 289
289
-
 290
290
-
 291
291
-
 292
292
-
 293
293
-
 294
294
-
 295
295
-
 296
296
-
 297
297
-
 298
298
-
 299
299
-
 300
300
-
 301
301
-
 302
302
-
 303
303
-
 304
304
-
 305
305
-
 306
306
-
 307
307
-
 308
308
-
 309
309
-
 310
310
-
 311
311
-
 312
312
-
 313
313
-
 314
314
-
 315
315
-
 316
316
-
 317
317
-
 318
318
-
 319
319
-
 320
320
-
 321
321
-
 322
322
-
 323
323
-
 324
324
-
 325
325
-
 326
326
-
 327
327
-
 328
328
-
 329
329
-
 330
330
-
 331
331
-
 332
332
-
 333
333
-
 334
334
-
 335
335
-
 336
336
-
 337
337
-
 338
338
-
 339
339
-
 340
340
-
 341
341
-
 342
342
-
 343
343
-
 344
344
-
 345
345
-
 346
346
-
 347
347
-
 348
348
-
 349
349
-
 350
350
-
 351
351
-
 352
352
-
 353
353
-
 354
354
-
 355
355
-
 356
356
-
 357
357
-
 358
358


LG LGH915 Le manuel du propriétaire
- Catégorie
- Téléphones portables
- Taper
- Le manuel du propriétaire
- Ce manuel convient également à
dans d''autres langues
- English: LG LGH915 Owner's manual
Documents connexes
-
LG LGH873U Le manuel du propriétaire
-
LG LGH873U Le manuel du propriétaire
-
-
-
-
-
LG LMG710AWM Le manuel du propriétaire
-
-
-
