LECTRON 40 Amp Level 2 Manuel utilisateur
- Taper
- Manuel utilisateur

Lectron 40 Amp Level 2 EV Charger
User Manual
NEMA 14-50 OUTLET

Page 2
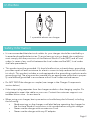
In the Box
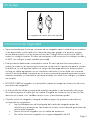
Safety Information
• It is recommended that electrical outlets for your charger should be installed by a
licensed and qualified electrician. To avoid serious injury or death, the installation
must comply with the provisions of the National Electric Code (NEC) and all local
codes. In cases of any conflict between the local codes and the NEC, local codes
shall take precedence.
• This product must be grounded. If it should malfunction or break down, grounding
provides a path of least resistance for electric current to help reduce the risk of elec-
tric shock. This product includes a cord equipped with a grounding conductor and a
grounding plug. The plug must be inserted into an appropriate outlet that is proper-
ly installed and grounded in accordance with all local codes and ordinances.
• Do NOT DROP the charger or coupler (see image in the Charger Components
section below).
• If the output plug separates from the charger module or the charging coupler. Do
not attempt to repair the cable on your own. Contact the customer support: con-
tact@ev-lectron.com - for assistance.
• When using your charger, basic precautions should always be followed, including
the following:
• Read warnings on the charger cord label before operating the charger for
the first time. Read all instructions in this guide before using this charger.
• Never use the charger with an extension cord.
• Never use the charger with any AC adapter.
1 x portable electric car charger

Page 3
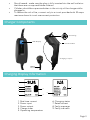
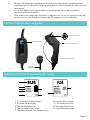
Charger Components
• Shock hazard – make sure the plug is fully inserted into the wall outlet so
that there are no exposed blade surfaces.
• Children should be supervised when in the vicinity of the charger while
plugged in.
• To reduce the risk of fire, connect only to a circuit provided with 30 amps
maximum branch circuit overcurrent protection.
LED Display
NEMA
14-50 Plug
Charging Coupler
Release Button
Charging Display Information
1. Real-time current
2. Power input
3. Power output
4. Charge timer
5. Operating temperature
6. Charging status
7. Rated current
8. Faulty message
9. Faulty indicator
8
9
2
3
4
5
1
6
7
J1772 Plug

Page 4
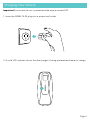
Charging Your Vehicle
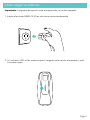
1. Insert the NEMA 14-50 plug into a proper wall outlet.
Important:Ensure that the car is parked and the engine turned OFF.
2. A solid LED indicator shows that the charger is being powered and ready to charge.

Page 5
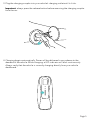
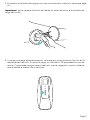
3. Plug the charging coupler into your vehicle’s charging outlet until it clicks.
Important: always press the release button before removing the charging coupler
from the car.
4. Charging begins automatically. Power will be delivered in accordance to the
demand of the vehicle. While charging, a LED indicator will blink continuously.
Always verify that the vehicle is correctly charging directly from your vehicle
dashboard.

Page 6
Note:
240 VAC Operation: the charger requires either a 240 VAC split phase, or a 208 VAC
two phase dedicated circuit. It draws a maximum of 40 amps continuous current.
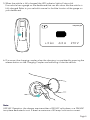
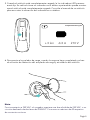
5. When the vehicle is fully charged, the LED indicator light will stay solid.
Your vehicle has a gauge on the dashboard that can also show that the vehicle is
fully charged. Refer to your vehicle’s manual to find the location of the gauge on
your dashboard.
Fully Charged
210 V6/6 A+ 0 km
6. Disconnect the charging coupler when the charging is completed by pressing the
release button on the Charging Coupler and removing it from the vehicle.

Page 7
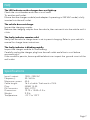
FAQ
The LED Indicator on the charger does not light up.
Check the circuit breaker and other circuit loads.
Try another wall outlet.
Ensure that the charger module (and adapter if operating in 240 VAC mode) is fully
inserted into the wall outlet.
The vehicle does not charge.
Inspect the charging coupler.
Remove the charging coupler from the vehicle, then reinsert it into the vehicle until it
clicks.
The faulty indicator remains solid.
Verify that the vehicle charge timer is set to permit charging. Refer to your vehicle’s
manual for charge timer instructions.
The faulty indicator is blinking rapidly.
Inspect the charger module for overheating.
Carefully unplug the charger plug from the wall outlet and allow to cool before
reconnecting it.
If the condition persists, have a qualified electrician inspect the ground circuit of the
wall outlet.
Specif i cations
Input / output:
Frequency:
Maximum current:
Cable length:
Plug:
EV connector:
Dimensions:
Weight:
Temperature:
100V - 250V AC
50 / 60 Hz
40 A
16 ft of cable. Total reach of 18 ft
NEMA 14-50
SAE-J1772
19.75 x 15.85 x 3.5 in
9.9 lb
-22 °F to 122°F

Tesla Charger is not included.
Lectron is not affiliated with Tesla Inc.
Lectron is a trademark of Dropcases Ltd.
Tesla Charger is a trademark of Tesla Inc.
Scan the QR code below or email us at: contact@ev-lectron.com.
Get more Support
www.ev-lectron.com
Made in China

Cargador Lectron 40 Amp Nivel 2 EV
Manual del usuario
NEMA 14-50 OUTLET

Page 2
En la caja
Información de Seguridad
• Se recomienda que los toma corriente de su cargador sean instalados por un electr-
icista autorizado y calificado. A fin de evitar lesiones graves o la muerte, la insta-
lación debe cumplir con las disposiciones del Código Eléctrico Nacional (NEC) y
todos los códigos locales. En caso de cualquier conflicto entre los códigos locales y
el NEC, los códigos locales tendrán prioridad.
• Este producto debe estar conectado a tierra. En caso de mal funcionamiento o
avería, la conexión a tierra proporciona una vía de menor resistencia para la corrien-
te eléctrica, lo cual ayuda a reducir el riesgo de descarga eléctrica. Este producto
incluye un cable equipado con un conductor de tierra y un enchufe con toma de
tierra. El enchufe debe insertarse en un toma corriente apropiado que esté correct-
amente instalado y conectado a tierra de acuerdo con todos los códigos y ordenan-
zas locales.
• NO DEJE CAER el cargador o el acoplador (véase la imagen en la sección de com-
ponentes del cargador).
• Si el enchufe de salida se separa del módulo cargador o del acoplador de carga.
No intente reparar el cable por su cuenta. Póngase en contacto con el servicio de
atención al cliente: con- tact@ev-lectron.com - para obtener ayuda.
• Cuando utilice su cargador, siempre se deben seguir las precauciones básicas,
incluyendo las siguientes:
• Lea las advertencias de la etiqueta del cable del cargador antes de
utilizarlo por primera vez. Lea todas las instrucciones de esta guía antes de
utilizar este cargador.
• Nunca utilice el cargador con un cable de extensión.
• No utilice nunca el cargador con ningún adaptador de CA.
1 x cargador de coche eléctrico portátil

Page 3
Componentes del cargador
• Peligro de descarga: asegúrese de que el enchufe esté completamente
insertado en el toma de corriente para que no haya superficies de cuchillas
expuestas.
• Los niños deben ser supervisados cuando estén cerca del cargador
mientras esté enchufado.
• Para reducir el riesgo de incendio, conéctelo sólo a un circuito provisto de
protección contra sobrecorrientes de 30 amperios como máximo.
Pantalla LED
Enchufe
NENA 14-50
Acoplador de carga
Botón de liberación
Información de la pantalla de carga
1. Corriente en tiempo real
2. Entrada de energía
3. Salida de potencia
4. Temporizador de carga
5. Temperatura de funcionamiento
6. Estado de la carga
7. Corriente nominal
8. Mensaje de avería
9. Indicador de avería
8
9
2
3
4
5
1
6
7
Enchufe J1772

Page 4
Cómo cargar su vehículo
1. Inserte el enchufe NEMA 14-50 en una toma corriente adecuado.
Importante: Asegúrese de que el coche está aparcado y el motor apagado.
2. Un indicador LED sólido muestra que el cargador está siendo alimentado y está
listo para cargar.

Page 5
3. Enchufe el acoplador de carga en el toma corriente de su vehículo hasta que haga
clic.
Importante: pulse siempre el botón de liberación antes de retirar el acoplador de
carga del coche.
4. La carga comienza automáticamente. La energía se suministrará en función de la
demanda del vehículo. Durante la carga, un indicador LED parpadeará continua-
mente. Compruebe siempre que el vehículo se está cargando correcta y directa-
mente desde el tablero de su vehículo.

Page 6
Nota:
Funcionamiento a 240 VAC: el cargador requiere una fase dividida de 240 VAC, o un
circuito dedicado de dos fases de 208 VAC. Consume un máximo de 40 amperios
de corriente continua.
5. Cuando el vehículo esté completamente cargado, la luz indicadora LED perman-
ecerá fija. Su vehículo tiene un indicador en el tablero que también puede mostrar
que el vehículo está completamente cargado. Consulte el manual de su vehículo
para encontrar la ubicación del indicador en su tablero.
Completamente Cargado
210 V6/6 A+ 0 km
6. Desconecte el acoplador de carga, cuando la carga se haya completado, pulsan-
do el botón de liberación del acoplador de carga y retirándolo del vehículo.

Page 7
PREGUNTAS FRECUENTES
El indicador LED del cargador no se enciende.
Compruebe el disyuntor y otras cargas del circuito.
Pruebe con otro toma corriente.
Asegúrese de que el módulo cargador (y el adaptador si funciona en modo 240
VAC) está completamente insertado en el toma corriente.
El vehículo no se carga.
Inspeccione el acoplador de carga.
Retire el acoplador de carga del vehículo y vuelva a insertarlo en el vehículo hasta
que haga clic.
El indicador de avería permanece fijo.
Verifique que el temporizador de carga del vehículo esté ajustado para permitir la
carga. Consulte el manual de su vehículo para ver las instrucciones del temporizador
de carga.
El indicador de avería parpadea rápidamente.
Compruebe si el módulo de carga está sobrecalentado.
Desenchufe con cuidado el cargador del toma corriente y deje que se enfríe antes
de volver a conectarlo.
Si el problema persiste, haga que un electricista calificado inspeccione el circuito de
tierra del toma corriente.
Especificaciones
Entrada/salida:
Frecuencia:
Corriente máxima:
Longitud del cable:
Enchufe:
Conector EV:
Dimensiones:
Peso:
Temperatura:
100V - 250V AC
50 / 60 Hz
40 A
4.88 m de cable. Alcance total de 5.50 m
Enchufe NEMA 14-50
SAE-J1772
50 x 40 x 9 cm
4.5 kg
de -30 °C a 50 °C

Escanee el código QR que aparece a continuación o envíenos un correo
electrónico a: [email protected].
Obtenga más ayuda
El Cargador Tesla no está incluido.
Lectron no está afiliado a Tesla Inc.
Lectron es una marca comercial de Dropcases Ltd.
El Cargador Tesla es una marca comercial de Tesla Inc.
www.ev-lectron.com
Fabricado en China

Chargeur EV Lectron 40 Amp Level 2
Manuel d’utilisateur
NEMA 14-50 OUTLET

Page 2
Inclut dans la boîte
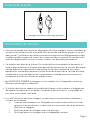
Informations de sécurité
• Il est recommandé que les prises électriques de votre chargeur soient installées par
un électricien professionnel et qualifié. Pour éviter des blessures graves ou un acci-
dent mortel, l’installation doit être conforme aux dispositions Réglementations des
installations électriques et à toutes les normes locales en vigueur. En cas de conflit
entre les réglementations et les normes locales, ces dernières prévaudront.
• Ce produit doit être mis à la terre. En cas de dysfonctionnement ou de panne, la
mise à la terre permet un chemin avec peu de résistance pour le courant électrique
afin de réduire le risque de choc électrique. Ce produit comprend un cordon
équipé d’un conducteur de terre et d’une fiche de mise en terre. La fiche doit être
insérée dans une prise appropriée, correctement installée et mise à la terre con-
formément à toutes les normes et arrêtés locaux.
• Ne FAITES PAS TOMBER le chargeur ou le coupleur (voir l’image dans la section
Éléments du chargeur ci-dessous).
• Si la fiche de sortie se sépare du module de charge ou du coupleur, n’essayez pas
de réparer le câble par vous-même. Contactez le service clients : contact@ev-lec-
tron.com, pour obtenir de l’aide.
• Lors de l’utilisation de votre chargeur, suivez toujours les précautions de base, y
compris les suivantes :
• Lisez les avertissements sur l’étiquette du cordon avant d’utiliser le char
geur pour la première fois. Lisez toutes les instructions de ce guide avant
d’utiliser ce chargeur.
• N’utilisez jamais le chargeur avec une rallonge.
• N’utilisez jamais le chargeur avec un adaptateur secteur.
1 x chargeur de voiture électrique portable

Page 3
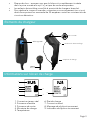
Éléments du chargeur
• Risque de choc – assurez-vous que la fiche soit complètement insérée
dans la prise murale afin qu’il n’y ait pas de surfaces exposées.
• Les enfants doivent être surveillés à proximité du chargeur branché.
• Pour réduire le risque d’incendie, connectez-vous uniquement à un circuit
doté d’une protection maximale de 30 ampères contre les surintensités de
circuit en dérivation.
Affichage LED
NEMA
Prise 14-50
Coupleur de charge
Bouton de déverrouillage
Informations sur l’écran de charge
1. Courant en temps réel
2. Puissance d’entrée
3. Puissance de sortie
4. Minuterie de charge
5. Température
6. État de charge
7. Courant nominal
8. Message de dysfonctionnement
9. Indicateur de dysfonctionnement
8
9
2
3
4
5
1
6
7
Prise J1772

Page 4
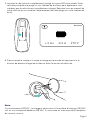
Recharger votre véhicule
1. Insérez la fiche NEMA 14-50 dans une prise murale adéquate.
Important : assurez-vous que la voiture soit garée et que le moteur soit éteint.
2. Le voyant LED stable indique que le chargeur est alimenté et prêt à charger.
La page charge ...
La page charge ...
La page charge ...
La page charge ...
-
 1
1
-
 2
2
-
 3
3
-
 4
4
-
 5
5
-
 6
6
-
 7
7
-
 8
8
-
 9
9
-
 10
10
-
 11
11
-
 12
12
-
 13
13
-
 14
14
-
 15
15
-
 16
16
-
 17
17
-
 18
18
-
 19
19
-
 20
20
-
 21
21
-
 22
22
-
 23
23
-
 24
24


LECTRON 40 Amp Level 2 Manuel utilisateur
- Taper
- Manuel utilisateur
dans d''autres langues
- English: LECTRON 40 Amp Level 2 User manual
- español: LECTRON 40 Amp Level 2 Manual de usuario

