Sport Life VM293 Manuel utilisateur
- Catégorie
- Caméras de sports d'action
- Taper
- Manuel utilisateur

HD ACTION
camera
VM293
MANUALE ISTRUZIONI • INSTRUCTIONS MANUAL
NOTICE DE MONTAGE ET D’EMPLOI • BETRIEBSANLEITUNG
MANUAL DE INSTRUCCIONES

3
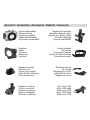
Accessori • Accessories • Accessoires • Zubehör • Accesorios
Supporto da manubrio
Handlebar seatpost mount
Support pour guidon Halter
für Lenker-Montage
Soporte para Manillar
Supporto da casco
Helmet mount
Support pour casque
Halter für Helm-Montage
Soporte para casco
Laccio da casco
Helmet belt
Courroie pour casque
Riemen für Helm-Montage
Correa para el casco
Guscio impermeabile
Waterproof case
Coque imperméable
Wasserfestes Gehäuse
Contenedor impermeable
Copertura
Shield
Couvercle
Abdeckung
Cobertura
Caricatore da auto
Car charge
Chargeur pour voiture
Lade-Gerät fürs Auto
Cargador de coche
Supporto a ventosa
Suction cup mount
Support en ventouse
Halter mit Saugkopf
Soporte con Ventosa
Cavo micro USB
Micro-USB cable
Cable micro USB
Micro-USB-Kabel
Cable micro USB

3
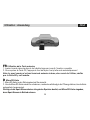
Precauzioni • Warnings
IT-GB
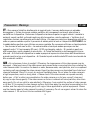
IT • Non esporre l’obiettivo direttamente ai raggi del sole, il sensore della camera si potrebbe
danneggiare. • Evitare che acqua, sabbia, polvere e altri componenti contenenti sale entrino in
contatto con il dispositivo. Conservare il dispositivo lontano da polveri o agenti chimici. Lasciarla in
ambienti, secchi ventilati, evitando luoghi con alte temperature, umidi o polverosi. • Vericare che il
registratore funzioni correttamente prima dell’utilizzo. • Se sporco o macchie si depositano sulla lente,
usare un panno morbido e pulito. In presenza di sabbia pulire la lente e il dispositivo SOFFIANDO via
la sabbia dalla supercie e poi utilizzare un panno morbido. Se necessario utilizzare un liquido pulente.
• Non toccare la lente con le dita. • La memoria della sd card può andare persa per uno dei
seguenti motivi: 1. Uso improprio SD card. - 2. SD card piegata, caduta. - 3. Lasciata in posti con
alte temperature, umidi o esposti al sole diretto. - 4. Campi elettrostatici o elettromagnetici intorno
alla card. - 5. Estratta dal dispositivo in modo improprio o improvvisa interruzione dell’alimentazione
quando inserita nel pc o nel dispositivo. - 6. Quando la parte metallica della SD card viene toccata da
dita o materiali metallici.
GB • Do not expose its lens to sunlight. Otherwise, the image sensor of the video camera may be
damaged. • Take good care of the video camera and prevent water or sand particles from entering the
video camera when it is used on the beach or water, because water, sand particles, dust or component
containing salt may damage the video camera. Keep the video camera contaminated free of dust and
chemical materials. Place it in a cool, dry and well ventilated place. Do not place the video camera in
a high temperature, moist or dusty place. • Please check if the video camera can operate normally
before use. • If dirt or stain is accumulated on the video camera or on its lens, use soft, clean and
dry rag to wipe it away gently. If the video camera or its lens is stained with sand particles, blow them
away gently. Do not use cloth to wipe arbitrarily. Otherwise, it may scratch the surface of video camera
or its lens. If it is required to clean camera surface, rstly blow away the sand dust accumulated on this
surface, and then wipe the camera gently with rag or tissue applicable to optical equipments. Please
use the cleaning agent of video camera for wiping if necessary. Do not use organic solvent to clean the
video camera. • Do not touch the lens surface with ngers.

4
5
• Data may be lost or damaged under the following circumstances: 1. Improper use of the memory
card. 2. The memory card is bent, dropped or collided. 3. Place it under high temperature or moist
environment or expose to sunshine directly. 4.Electrostatic or electromagnetic eld exists around the
memory card. 5. This memory card is taken out or power supply is interrupted when this video camera
or computer is connected to the memory card (i.e. during reading, writing and formatting). 6.Touch the
metal contact surface of the memory card with ngers or metal materials.
Precauzioni • Warnings
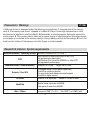
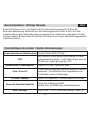
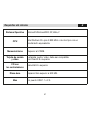
Requisiti di sistema • System requirements
IT-GB
Sistema Operativo / Operating System Microsoft Windows2000, XP, Vista, 7.
CPU
Intel Pentium III o più di 800 MHz o altri CPU
con performance equivalenti.
Intel Pentium III of more than 800MHz or other CPU
with equivalent performance.
Memoria interna / Internal Memory Superiore a 512MB. / Larger than 512MB.
Scheda / Card A/V
La scheda audio e video deve supportare
DirectX8 o versioni superiori.
The sound card and display card shall support
DirectX8 or higher version.
CD Driver Velocità X4 o superiore. / Speed of 4 times or faster.
Hard Disk Spazio libero superiore a 500MB.
Free space of more than 500MB.
Altro / Others Una porta USB 1.1 o 2.0. / One USB1.1 or USB2.0 port.

4
5
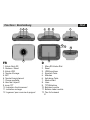
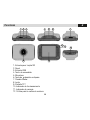
Funzioni • Functions
IT-GB
3 6 7
8 9
12
10 11
1 42 5
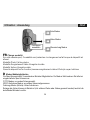
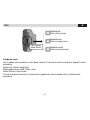
IT 1. Ingresso SD Card
2. Reset
3. Ingresso USB
4. Tasto Accensione
5. MIC
6. Tasto Ripresa
7. Cambio Modalità:
8. Lente
9. Schermo TFT
10. Indicatore funzionamento
11. Indicatore ricarica
12. Asola per laccio da polso
GB 1. Memory card slot
2. Reset
3. USB slot
4. Power button
5. MIC
6. Shutter button
7. Mode Switch
8. Lens
9. LCD TFT
10. Working Indicator Light
11. Indicator Light for charging
12. Wrist strap eyelet

6
7
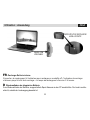
Utilizzo • Usage
IT-GB
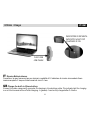
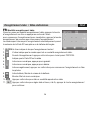
CAVO USB
USB CABLE
INDICATORE DI RICARICA
INDICATOR LIGHT FOR
CHARGING IS ON
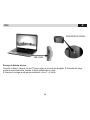
IT Ricarica Batteria interna.
Connettere la sport camera al pc per ricarica in modalità off. L’indicatore di ricarica si accenderà no a
ricarica completa. Il tempo di ricarica sarà di circa 2-4 ore.
GB
Charge the built-in lithium battery
Connect the video camera with computer for charging in the shutdown state. The indicator light for charging
is on at this time and will be off after charging. In general, it can be fully charged after 2-4 hours.

6
7
Utilizzo • Usage
IT-GB
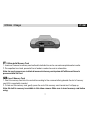
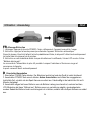
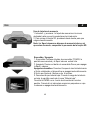
IT Utilizzo della Memory Card
1. Inserire e Premere la memory card nello slot dedicato no a che non sarà completamente inserita.
2. Per espellere la sd card, premerla no in fondo in modo che esca in automatico.
Nota: La sport camera non è dotata di memoria interna, perciò prima dell’utilizzo verificare la
presenza della Sd Card.
GB Use of Memory Card
1. Push the memory card into the card slot according to the concave lettering beside the slot of memory
card till it is completely inserted.
2. To take out the memory card, gently press the end of the memory card inward and it will pop up.
Note: No built-in memory is available in this video camera. Make sure to insert memory card before
using.

8
9
Utilizzo • Usage
IT-GB
IT Accensione/Spegnimento
1. Accensione: Premere il tasto POWER, lo schermo si accenderà e la sport camera sarà pronta.
2. Spegnimento: Premere il tasto power per spegnere la sport camera. Spegnimento automatico: Quando
il tempo di inattività raggiunge il limite pressato il dispositivo si spegnerà automaticamente. Il limite ssato
di fabbrica è di 5 minuti.
3. Spegnimento in caso di batteria bassa: Quando la carica della batteria è insufciente, lo schermo LCD
mostrerà l’icona “batteria scarica”. Connetterlo all’alimentazione il prima possibile. Quando l’indicatore si
illuminerà rosso e comincerà a lampeggiare la sport camera si spegnerà automaticamente.
GB Startup/Shutdown
1. Startup: Press the POWER key, the screen is displayed and the camera is on.
2. Shutdown: Press the POWER key, and the camera will be shut down. Automatic shutdown: when the
idle time of the video camera reaches the time for automatic shutdown, it will be shut down automatically to
save power. The default time of this camera for automatic shutdown is 5 minutes.
3. Shutdown in case of power shortage: when the power of the battery is insufcient, the LCD display screen
will display the low power icon. Please charge it in time. When indicate light turns red and ickering, the
video camera will be shut down automatically.

8
9
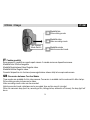
Sel. funzioni
Mode Switch
Modalità video
Video recording mode
Modalità foto
Picture taking mode
Modalità veicolo
Vehicle-mounted mode
Utilizzo • Usage
IT-GB
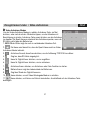
IT Cambio modalità
Sono presenti 3 modalità su questa sport camera. Il cambio avviene a dispositivo acceso.
Modalità Foto: Effettua forograe.
Modalità Registrazione Video: Registra video.
Modalità Veicolo: Registra video.
Quando il dispositivo è in funzione (come registrazione video o foto) la luce spia sarà accesa.
GB Conversion between Function Modes
Three modes are available for this video camera. Conversion is available via the mode switch after startup.
Picture taking mode: pictures can be taken.
Video recording mode: video can be recorded.
Vehicle-mounted mode: videotape can be recorded. (one section every 5 minutes)
When the camera is busy (such as, recording a lm, taking photos, automatic off-screen), the busy light will
be on.

10
11
Scatto foto • Photo shoot
IT-GB
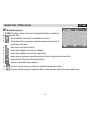
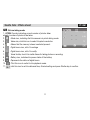
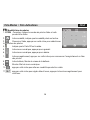
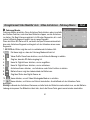
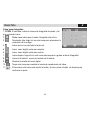
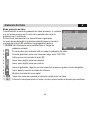
IT Modalità fotografia
1. 0/1234 Contatore, indica il numero di fotograe effettuate e quelle che
possono essere fatte.
2. Icona modalità, indica che la modalità foto è attiva.
3. Dimensione Video, premere su questa icona per selezionare la
risoluzione delle foto.
4. Indica che la sd card è inserita.
5. Icona zoom digitale, premere per allargare.
6. Icona zoom digitale, premere per rimpicciolire.
7. Icona ripresa, premere su questa icona per iniziare la registrazione o fare foto.
8. Icona batteria, Mostra lo stato della batteria.
9. Mostra lo stato dello zoom digitale.
10. Premere questa icona per passare in modalità riproduzione video.
11. Premere questa icona per impostare data e orario, premere tasto ripresa per confermare.

10
11
GB Picture taking mode
1. 0/1234 Counter, indicating current number of photos taken
already /number of photos to be taken.
2. Mode icon, indicating that the camera is in photo taking mode.
3. Video size, click this icon to select the photo resolution.
4. Means that the memory is been inserted at present.
5. Digital zoom icon, click it to enlarge.
6. Digital zoom icon, click it to minify.
7. Visual shutter, touch this visible frame for taking photos or recording.
8. Battery icon, indicates the power status of the battery.
9. Represents the status of digital zoom.
10. Click this icon to switch to the playback mode.
11. click this icon to set the date and time, nished setting and press Shutter key to conrm.
Scatto foto • Photo shoot
IT-GB

12
13
Registrazione video • Video recording
IT-GB
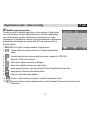
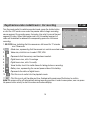
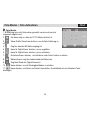
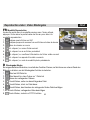
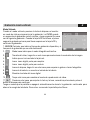
IT Modalità registrazione video
Quando si passa in modalità registrazione video, premere il tasto ripresa
una volta o premere al centro dello schermo per iniziare la registrazione
con visualizzazione, premere il tasto ripresa nuovamente se si vuole
interrompere la registrazione. La sport camera interromperà la registrazione
automaticamente quando la memoria della SD card sarà esaurita o la
batteria scarica.
1. 00:12:18 Il timer indica il tempo rimanente di registrazione.
2. L’icona indica che la sport camera è in modalità registrazione
video.
3. Formato registrazione, premere questa icona per scegliere tra 720P/VGA.
4. Indica che la SD card è inserita.
5. Icona zoom digitale, premere per allargare.
6. Icona zoom digitale, premere per rimpicciolire.
7. Icona ripresa, premere su questa icona per iniziare la registrazione o fare foto.
8. Icona batteria, Mostra lo stato della batteria.
9. Mostra lo stato dello zoom digitale.
10. Premere questa icona per passare in modalità riproduzione video.
11. Premere questa icona per impostare data e orario, quando nito premere tasto ripresa per
confermare.

12
13
Registrazione video • Video recording
IT-GB
GB Video recording mode
When the mode switch is turned to video recording mode, press the
shutter button once or click the LCD center once to begin recording under
previewing state; press the shutter button once again if you want to stop
recording, and the camera will also stop recording, automatically when the
memory card is full or the power is insufcient.
1 00:12:18 Timer means that video recording can still last for 12 minutes
and 18 seconds.
2. mode icon, represents that the video camera is in video recording mode.
3. videoing size, clicks this icon and you can choose 720P/VGA.
4. means that the memory card is inserted at present.
5. digital zoom icon, click it and enlarge it.
6. digital zoom icon, click and minify it.
7. visual shutter, touch this visible frame for taking photos or recording.
8. battery icon, represents the power status of the battery.
9. represents the status of digital zoom.
10. click this icon to switch to the playback mode.
11. click this icon to set the date and time, nished setting and press Shutter key to conrm.

14
15
Registrazione video modalitá auto • Car recording
IT-GB
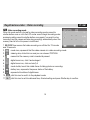
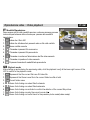
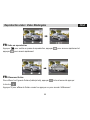
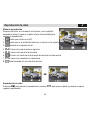
IT Modalità Veicolo
Passare alla modalità veicolo, premere il tasto ripresa o sul monitor in
modalità preview per iniziare la registrazione, la sport camera salva un
segmento di registrazione ogni 5 minuti poi riparte con la registrazione
successiva. Quando la SD Card è piena, il primo segmento di registrazione
viene cancellato per liberare spazio sulla SD CARD e proseguire le
registrazioni.
1. 00:12:18 Il timer indica il tempo rimanente di registrazione.
2. Icona modalità, indica che la modalità foto è attiva.
3. Dimensione video, premere su questa icona per selezionare la risoluzione delle foto.
4. Indica che la sd card è inserita.
5. Icona zoom digitale, premere per allargare.
6. Icona zoom digitale, premere per rimpicciolire.
7. Icona ripresa, premere su questa icona per iniziare la registrazione o fare foto.
8. Icona batteria, Mostra lo stato della batteria.
9. Mostra lo stato dello zoom digitale.
10. Premere questa icona per passare in modalità riproduzione video.
11. Premere questa icona per impostare data e orario, quando nito premere tasto ripresa per
confermare.
Da notare che lo schermo si spegnerà automaticamente durente la ripresa in loop per risparmiare la batteria,
premere il tasto Power per riaccendere lo schermo.
GB Vehicle-mounted mode:

14
15
Registrazione video modalitá auto • Car recording
IT-GB
Turn the mode switch to vehicle-mounted mode, press the shutter button
or click the LCD center once under the preview state to begin recording,
save a segment for recording every 5 minutes, then start to record the next
segment of video. When the storage card is full, the earliest segment of
video will be deleted to release the corresponding space for continuous
recording.
1. 00:12:18 timer, indicating that the camera can still record for 12 minutes
and 18 seconds.
2. Mode icon, representing that the camera is in vehicle-mounted mode.
3. Video size, click this icon to select 720P, VGA.
4. Represents that the memory card has been inserted .
5. Digital zoom icon, click it to enlarge.
6. Digital zoom icon, click it to minify.
7. Visual shutter, touch this visible frame for taking photos or recording.
8. Battery icon, representing the current power status of the battery.
9. Represents the status of digital zoom.
10. Click this icon to switch into the playback mode.
11. Click this icon to set the date and time, nished setting and press Shutter key to conrm.
Note: the screen will be off automatically during recording process in order to save power; user can press
the power button shortly to start the screen and restore display.

Riproduzione video • Video playback
IT-GB
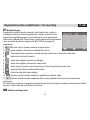
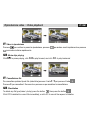
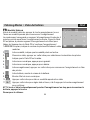
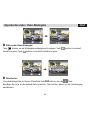
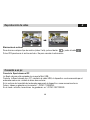
IT Modalità Riproduzione
Dopo essere entrati nella modalità preview a schermo acceso, premere
icona nella parte bassa dello schermo per passare alla modalità
riproduzione:
1. Indica che il le è AVI
2. Indica che attualmente è presente solo un le nella cartella
3. Nome cartella corrente
4. Cliccando si passa al le successivo
5. Cliccando si passa al le precedente
6. Cliccando si conferma l’eliminazione del le video corrente
7. Cliccando si riproduce il video corrente
8. Si passa cliccando all modalità foto precedente
GB Playback mode
After starting up and entering the previewing state, click the playback icon () at the lower right corner of the
LCD to switch to the playback mode:
1. Represents that the current le is an AVI video le.
2. Represents that there is one le in the current folder/one le in total.
3. Current folder name.
4. Means that clicking can select les frontwards.
5. Means that clicking can select les backwards.
6. Means that clicking can activate to conrm the deletion of the current le picture.
7. Means that clicking can play the current movie clips.
8. Means that clicking can switch back to the previous photo mode (video mode).

Riproduzione video • Video playback
IT-GB
IT Video in riproduzione
Premere per mettere in pausa la riproduzione, premere per andare avanti rapidamente e premere
per andare indietro rapidamente.
GB Movie clips playing
Click to pause playing, click to play forward, and click to play backward.
IT Cancellazione file
Per cancellare qualsiasi tipo di le (video/foto) premere il tasto poi premere il tasto .
Premere SI per cancellare il le corrente o premere no per annullare la cancellazione
GB File deletion
To delete any le type (video / photo), press the button then press the button .
Click YES to delete the current le immediately, or click NO to cancel the request of deletion.

18
19
Connessione al Pc • Apply on the Pc
IT-GB
IT Connettere la sport camera al PC
LA sport camera è provvista di una presa e della funzione riproduzione.
Connettere il dispositivo al pc con la linea USB e il dispositivo passerà alla modalità hard disk esterno.
Sullo schermo del PC apparirà la nestra memoria esterna.
Foto e video sono salvati nella cartella I:\DCIM\100MEDIA.
Nella modalità veicolo i le saranno aslvati in I:\DCIM\RECORDER.
GB Connect to personal computer
The camera is provided with the plug and play function. Connect the device to the computer with USB line
under turning-on state, then it will be switched into the movable hard disk mode.
Icon of movable disk will appear on the window of “my computer”. Photos/videos you have taken are saved
in folder I:\DCIM\100MEDIA (I is the movable disk of this device) in the movable disk. Files recorded in
vehicle-mounted mode are saved in I:\DCIM\RECORDER.

18
19
Précautions • Vorsicht
FR-D
FR • Ne pas exposer l’objectif directement aux rayons du soleil, le senseur de la caméra pourrait
s’endommager. • Eviter que de l’eau, du sable, de la poussière et autres matériels contenants du sel
entre en contact avec le dispositif. Conserver le dispositif à l’abri de la poussière ou agents chimiques.
Le laisser dans des lieux secs ventilés, et éviter des lieux avec températures élevées, humides ou
poussiéreux. • Vérier que l’enregistreur fonctionne correctement avant l’utilisation.
• Si la saleté ou les taches se déposent sur le verre de l’objectif, utiliser un tissu doux et propre pour
nettoyer. En présence de sable, nettoyer le verre et le dispositif en y SOUFFLANT et ensuite utiliser
un tissu doux, si nécessaire, utiliser un liquide nettoyant.
• Ne pas toucher le verre de l’objectif. • Pour une des raisons suivantes, on peut perdre la mémoire de
la carte SD: 1. Usage inapproprié de la carte SD. 2. Carte SD pliée, tombée. 3. Carte SD laissée dans
des lieux à température élevée, humide ou exposée directement au soleil. 4. Champs électrostatiques
ou électromagnétiques tout autour de la carte. 5. Enlever dans le dispositif de façon inapproprié ou
interruption brusque de l’alimentation quand elle est insérée dans l’ordinateur ou dans le dispositif.
6. Quand la partie métallique de la Carte SD est touchée par un doigt ou matériels métalliques.
D • Objektiv nicht der direkten Sonnenbestrahlung aussetzen, denn der Sensor der Kamera könnte
dadurch Schaden erleiden.
• Gerät vor Salz-haltigen Mitteln bewahren, z.B. Wasser, Sand, Staub u.s.w. Desweiteren fernhalten
von Staub und Chemikalien. Das Gerät sorgfältig in trockener und belüfteter Umgebung aufbewahren.
Hitze, Feuchtigkeit und Staub sind zu vermeiden.
• Vor der Verwendung, Aufnahme-Gerät auf seine Funktion hin kontrollieren.
• Sollte die Linse beschmutzt oder beeckt sein, ein sauberes und weiches Staubtuch benutzen. Bei
Sand-Spuren, immer erst den Staub wegblasen und dann erst, mit weichem Tuch, Linse und Gerät
abstauben. Falls nötig, Reinigungsmittel verwenden.
• Linse nicht mit den Fingern berühren..
• Die auf der Micro SD-Karte eingespeicherten Dateien könnten bei folgenden Gegebenheiten verloren
gehen: 1. Unzweckmäßige Anwendung der SD-Karte. 2. Beim Fallen oder Knicken der SD-Karte.

20
21
3. Micro SD-Karte der Hitze, Feuchtigkeit oder Sonnenbestrahlung ausgesetzt. 4. Micro SD-
Karte unter Beeinussung elektrostatischer oder elektromagnetischer Felder. 5. Micro SD-Karte
unzweckmäßig aus dem Gerät entfernt oder unerwartete Strom-Unterbrechung während im PC oder
im Gerät eingelegt. 6. Wenn Metall-Teil der Micro SD-Karte mit den Fingern oder Metall-Gegenständen
in Berührung kommt.
Recommandations • Wichtige Hinweise
FR-D
Caracteristiques du systeme • System-Voraussetzungen
Système Opérationnel / Betriebssystem Microsoft Windows2000, XP, Vista, 7.
CPU
Intel Pentium III ou plus de 800 MHz ou autres CPU avec
performances équivalentes. / Intel Pentium III bzw. mehr als
800 MHz bzw. andere gleichwertige CPU.
Mémoire interne / Arbeitsspeicher Supérieur à 512MB. / Mehr als 512MB.
Carte / Karte A/V
La Carte audio et vidéo doit supporter DirectX8 ou versions
supérieures. / Die Grakkarte muss kompatibel sein mit
DirectX8 oder neueren Ausführungen.
CD Driver / Laufwerk Vitesse X4 ou supérieure. / Geschwindigkeit X4 und mehr.
Disque Dur Hard Disk (Festplatte) Espace libre supérieur à 500MB.
Benötigt mehr als 500MB freien Festplattenspeicher.
Autre / Sonstiges Un port USB 1.1 o 2.0. / Eine USB-Öffnung 1.1 oder 2.0.
La page est en cours de chargement...
La page est en cours de chargement...
La page est en cours de chargement...
La page est en cours de chargement...
La page est en cours de chargement...
La page est en cours de chargement...
La page est en cours de chargement...
La page est en cours de chargement...
La page est en cours de chargement...
La page est en cours de chargement...
La page est en cours de chargement...
La page est en cours de chargement...
La page est en cours de chargement...
La page est en cours de chargement...
La page est en cours de chargement...
La page est en cours de chargement...
La page est en cours de chargement...
La page est en cours de chargement...
La page est en cours de chargement...
La page est en cours de chargement...
La page est en cours de chargement...
La page est en cours de chargement...
La page est en cours de chargement...
La page est en cours de chargement...
La page est en cours de chargement...
La page est en cours de chargement...
La page est en cours de chargement...
La page est en cours de chargement...
-
 1
1
-
 2
2
-
 3
3
-
 4
4
-
 5
5
-
 6
6
-
 7
7
-
 8
8
-
 9
9
-
 10
10
-
 11
11
-
 12
12
-
 13
13
-
 14
14
-
 15
15
-
 16
16
-
 17
17
-
 18
18
-
 19
19
-
 20
20
-
 21
21
-
 22
22
-
 23
23
-
 24
24
-
 25
25
-
 26
26
-
 27
27
-
 28
28
-
 29
29
-
 30
30
-
 31
31
-
 32
32
-
 33
33
-
 34
34
-
 35
35
-
 36
36
-
 37
37
-
 38
38
-
 39
39
-
 40
40
-
 41
41
-
 42
42
-
 43
43
-
 44
44
-
 45
45
-
 46
46
-
 47
47
-
 48
48


Sport Life VM293 Manuel utilisateur
- Catégorie
- Caméras de sports d'action
- Taper
- Manuel utilisateur
dans d''autres langues
- italiano: Sport Life VM293 Manuale utente
- español: Sport Life VM293 Manual de usuario
- Deutsch: Sport Life VM293 Benutzerhandbuch
Autres documents
-
MPMan MPCS1 Manuel utilisateur
-
i-Joy Sportcam DVR 75HD Le manuel du propriétaire
-
Polaroid XS7HD Manuel utilisateur
-
AIPTEK AHD-H500 Le manuel du propriétaire
-
Ingo Moshi Monsters MMV002N Mode d'emploi
-
-
 Phonocar COMPLEMENTS Volkswagen Manuel utilisateur
-
Phonocar 05704 Manuel utilisateur
-
Phonocar COMPLEMENTS 05723 Manuel utilisateur
