
C1725 Farmhouse Fire Table NG Conversion Kit
If the information in this manual
is not followed exactly, a fi re or
explosion may result causing
property damage personal injury
or loss of life.
Improper Installation, adjustment,
alteration, service or maintenance
can cause injury or property
damage.
Read the installation, operation
and maintenance instructions
thoroughly before installing or
servicing this equipment.
!
!
IMPORTANT
WARNING
SAVE THESE INSTRUCTIONS
!
DANGER
If you smell gas:
1. Shut o gas to the appliance.
2. Extinguish any open flame.
3. If odor continues, keep away from the appliance and
immediately call your gas supplier or fire department.
USC
For Technical Support Please Contact Real Flame® At: 1-800-654-1704

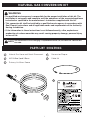
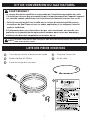
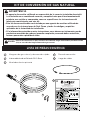
PARTS LIST 00023104G
1
2
3
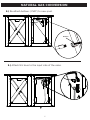
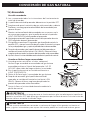
NATURAL GAS CONVERSION KIT
NOTE
This conversion kit is for changing a Liquefied Petroleum (LP) fire table into a Natural Gas
fire table.
!
Natural Gas Hose and Quick Disconnect
NG Orifice Spud 2.9mm
Primary Air Mixer Sleeve
4
4
5
Conversion Plaque
Cable Kit
3
1
2
5
1
WARNING
!
• If the information in these instructions is not followed exactly, a fire, explosion or
production of carbon monoxide may result causing property damage, personal injury
or loss of life.
• The qualified service agency is responsible for the proper installation of this kit. The
installation is not proper and complete until the operations of the converted appliance
is checked as specified in the manufacturer’s instructions supplied with this kit.
• This conversion kit shall be installed by a qualified service agency in accordance with
Real Flame’s instructions and all applicable codes and requirements of the Authority
Having Jurisdiction.
Item #: C11838LP, C1725LP, C11752LP
CSA Model #: C11838 C40-24-01
08-40KNG-V03
NG Orifice # 2.9

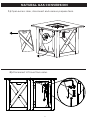
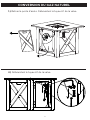
NATURAL GAS CONVERSION
2
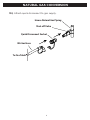
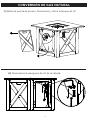
1.) Open access door, disconnect and remove propane tank.
2.) Disconnect LP hose from valve.

NATURAL GAS CONVERSION
3
3.) Disconnect bellows (Corrugated Stainless Steel Tube/CSST)
from burner base.
4.) Remove the existing LP orifice spud.
Bellows
LP Orifice Spud

4
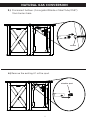
NATURAL GAS CONVERSION
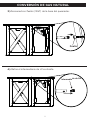
5.) Locate the new NG orifice spud, verify it is the correct number.
The number 2.9mm should be on the end of the orifice spud.
6.) Slip sleeve over primary air opening. See fig. 1
7.) Next, screw the new NG orifice spud into the burner base. See fig. 2
2.9mm
Sleeve
Primary Air
Opening
1
NG Orifice
Spud
2

5
NATURAL GAS CONVERSION
9.) Attach NG hose to the input side of the valve.
8.) Re-attach bellows (CSST) to new spud.
Bellows

6
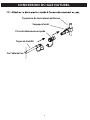
10.) Attach quick disconnect to gas supply.
NATURAL GAS CONVERSION
House Natural Gas Piping
Shut-o Valve
Quick Disconnect Socket
NG Gas Hose
To Fire Table

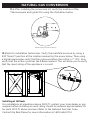
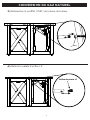
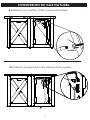
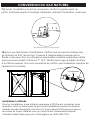
11.) After installing the conversion kit, verify the location of the
Thermocouple and Igniter Pin using the illustration below.
Installing at Altitude
For installations at elevations above 2000 ft. contact your local dealer or gas
supplier before installing as input rating should be reduced approximately 4%
for each 1000 ft. above sea level. Refer to the National Fuel Gas Code.
Contact the Real Flame for more information at 1-800-654-1704
12.) Note to installation technicians. Verify the manifold pressure by using a
3/8” flared T-junction at the location marked by the arrow below. Then using
a digital manometer verify that the pressure before the orifice is 7” W.C. Also
verify that the orifice spud has the 2.9mm marked. This will allow you to verify
that the input rating of the appliance is correct.
NATURAL GAS CONVERSION
7
NOTE: Pilot housing removed for example only.
To Manometer

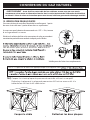
14.) Cut the existing plaques o of the control panel using wire cutters. Re-attach
plaques and NG conversion plaque included with this kit to the fire table using
the included cable kit.
Cut Cable
Re-attach both plaques
NOTE: The proper manifold pressure for this converted appliance is 7” water column.
NOTE: The maximum inlet gas pressure for this unit is 10.5 in wc (2.61 kPa)
The minimum inlet gas pressure for this unit is 3.5 in wc (0.87 kPa)
NATURAL GAS CONVERSION
WARNING Before using this outdoor fire table, make sure you have read, understand and
are following all information provided in the important Safety Information section of this
manual. Failure to follow those instructions can cause death, serious injury or property damage.
!
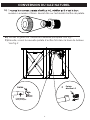
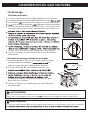
Check for leaks at these locations
13. CHECKING FOR LEAKS
Make a leak check solution by mixing 1 part dishwashing soap
with 3 parts water in a spray bottle.
Make sure the control knob is “OFF.” Then, turn the Natural Gas on
at its source.
Spray leak solution on the valve connections, paying particular
attention to the areas indicated by the arrows.
If any bubbles appear turn the Natural Gas o at its source, recon-
nect and re-test. If you continue to see bubbles after several
attempts, disconnect the Natural Gas Source and Contact Real
Flame
® at 1-800-654-1704 for assistance.
If no bubbles appear after one minute turn the gas
source “OFF”, wipe away solution and proceed.
8
French
NG
FRENCH

Lighting Instructions
9
When using this method to light your fire column use heat resistant gloves and follow the step
by step instructions. Failure to do so could result in severe injury.
If burner flame goes out during operation, immediately turn the control knob OFF and let the
gas clear a minimum of 5 minutes before attempting to re-light the fire table.
!
!
WARNING
WARNING
8-13”
20.3 - 33.0 cm
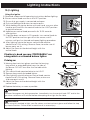
15.) Lighting
1. Read and understand all operating instructions before lighting.
2. Burner control knob must be in the OFF position.
3. Ensure that gas supply is connected and open.
4. Push and hold igniter button to create sparks.
5. While holding the igniter button with one hand, use your other
hand to push and turn the control knob to the LIGHT position
to ignite the burner.
6. Keep burner control knob pressed in for 15-30 seconds
after ignition.
7. If ignition does not occur in 30 seconds, turn control knob to
the OFF position and turn gas o at the source; wait 5
minutes until gas has cleared and repeat lighting procedure.
8. After lighting, rotate the burner control knob counter
clockwise to LOW setting. Observe flame; to make sure all
burner ports are lit.
9. Adjust the flame to the desired height with the
control knob.
1. Wearing heat-resistant gloves, position the burning
long match or extended lighter near the side of
the burner. DO NOT lean over the fire table while
lighting.
2. Turn control knob counterclockwise to LIGHT.
3. Remove long match/extended lighter.
4. After lighting, rotate the burner control knob counter
clockwise to LOW setting. Observe flame; make sure
all burner ports are lit.
5. Adjust the flame to the desired height with the
control knob.
6. Replace the battery as soon as possible.
Using the Igniter
If battery is dead you may TEMPORARILY use
a long match or extended butane lighter
If doing so:
OFF
ON
Push Control
Knob In

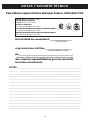
NOTES AND TECHNICAL SUPPORT
Type of Gas / Type de gaz: NG/Natural Gas
Normal Hourly Input/Entrée horaire normal:
40,000 BTU/Hr. (11.72 kW)
Manifold Pressure/Pression d'admission:
7.0” water column (1.74 kPa)
The minimum inlet pressure for this fire table is:
3.5” water column (0.87 kPa)
The maximum inlet pressure for this fire table is:
10.5” water column (2.61 kPa)
®
USC
This appliance was converted on _________________
(DD/MM/YY)
to Natural Gas with Kit No._______________________
(Found on Box)
by___________________________________________,
(Name and address of organization making this conversion)
which accepts the responsibility that this conversion has
been properly made.
For additional technical support call: 1-800-654-1704
Cet appareil a été converti le
en gaz naturel avec le kit no.
par
NOTES: ______________________________________________________
_____________________________________________________________
_____________________________________________________________
_____________________________________________________________
_____________________________________________________________
_____________________________________________________________
_____________________________________________________________
_____________________________________________________________
_____________________________________________________________
_____________________________________________________________
_____________________________________________________________
_____________________________________________________________
_____________________________________________________________
_____________________________________________________________
_____________________________________________________________
10

l’information fournie dans ce
manuel n’est pas suivi à la lettre,
un incendie ou une explosion
entr nant des dommages
corporels ou la perte de vie.
Une mauvaise installation,
d’ajustement, modification,
service ou d’entretien peut
causer des blessures ou des
dommages matériels.
Lisez l’installation, l’opération et
des instructions de maintien à
fond avant stallation ou
entretien de cet équipement.
!
!
IMPORTANT
!
DANGER
immédiatement votre fournisseur de gaz ou le service des incendies.
C SU
our le support technique veuillez contacter ame à
AVERTISSEMENT
CONSERVEZ CES INSTRUCTIONS
Kit de conversion NG de C1725 Farmhouse Table d’incendie

LISTE DES PIECES 00023104G
1
2
3
KIT DE CONVERSION DU GAZ NATUREL
NOTE
Ce kit de conversion est pour changer un table de feu de Pétrole Liquéfié (LP) dans une
table de feu de Gaz naturel.
!
Tuyau de gaz naturel et déconnexion rapide
Patate d’orifice NG 2.9mm
Gaine de mixage d’air principal
4
4
5
Plaque de Conversion
Kit de câble
1
2
5
1
!
AVERTISSEMENT
• Si l’information dans ces instructions n’est pas suivi exactement, un incendie, une
explosion ou la production de monoxyde de carbone peut causer des dommages
matériels, des blessures corporelles ou la pertes de vie.
• Le service d’entretien qualifié est responsable de l’installation appropriée de ce kit.
L’installation n’est pas bon et complet jusqu’à la fonctionnement de l’appareil converti
est contrôlé comme spécifié dans les instructions du fabricant fournies avec ce kit.
• Ce kit de conversion doit être installé par un service d’entretien qualifié con aux
instructions du Real Flame et tous les codes applicables et les exigence l’autorité
ayant la Juridiction.
3
Item #: C11838LP, C1725LP, C11752LP
CSA Model #: C11838 C40-24-01
08-40KNG-V03
NG Orifice # 2.9

CONVERSION DU GAZ NATUREL
2
2.) Débranchez le tuyau LP de la valve.
1.) Retirer la porte d'accès. Débranchez le tuyau LP de la valve.

CONVERSION DU GAZ NATUREL
3.)
4.) Retirez le patate d’orifice LP.
Débrancher le souet (CSST) de la base de brûleur.
Souets
3
Orifice de patate LP

4
CONVERSION DU GAZ NATUREL
6.) Glissez le gaine sur l’ouverture aérienne principale. Voir fig. 1
7.) Ensuite, vissez la nouvelle patate d’orifice NG dans la base de brûleur.
Voir fig. 2
Gaine
L’ouverture
d’air principal
Patate
d’orifice LP
5.)
numéro. Le numéro 2.9mm devrait être sur l’extrémité d’orifice de patate.
2.9mm
1
2

5
CONVERSION DU GAZ NATUREL
8.) Rattachez les souets (CSST) à la nouvelle patate.
9.) Attachez le tuyau NG au côté d’entrée de la soupape.
Souets

6
CONVERSION DU GAZ NATUREL
10.)
Tuyauterie de Gaz naturel de Maison
Soupape d'arrêt
Prise de déconnexion rapide
Tuyau de Gaz NG
Au Table de Feu

7
CONVERSION DU GAZ NATUREL
11.) Après l’installation du kit de conversion, vérifiez l’emplacement du
pilote, le thermocouple et l’épingle d’allumeur utilisant l’illustration ci-dessous.
Installation à Altitude
Pour les installations à une altitude supérieure à 2000 pieds contactez votre
revendeur local ou fournisseur de gaz avant l’installation comme l’évaluation
d’entrée devrait être réduite d’environ 4% pour chaque 1000 pieds au-dessus
du niveau de la mer. Référez-vous au Code de Gaz combustible national.
Contactez Real Flame pour plus d’information au 1-800-654-1704
12.) Avis aux techniciens d’installation. Vérifiez que la pression d’admission
en utilisant un 3/8” raccord en T évasée à l’emplacement marqué par la
flèche ci-dessous. Puis en utilisant un manomètre numétre numérique vérifie
que la pression avant l’orifice est 7” W.C. Vérifiez aussi que la patate d’orifice
a la 2.9mm marqué. Ceci vous permettra de vérifier que l’évaluation d’entrée de
l’appareil est correcte.
NOTE : Boîtier de pilote enlevé par exemple uniquement.
Au manomètre

CONVERSION DU GAZ NATUREL
8
French
NG
FRENCH
Vériez pour des fuites à ces emplacements
13.
VÉRIFICATION POUR LES FUITES
Faire une solution de contrôle d’étanchéité en mélangeant 1 partie
de savon à vaisselle avec 3 parties d'eau dans un vaporisateur.
Assurez-vous que le bouton de commande est « OFF ». Puis, tournez
le sur le gaz naturel à sa source.
Pulvériser la solution de fuite sur les connexions de valve, en accordant
une attention particulière aux endroits indiqués par les èches.
voir des bulles après plusieurs tentatives, débrancher la
! AVERTISSEMENT Avant d’utiliser cette table de feu extérieure, assurez-vous que vous avez lu,
comprenez et suivez toutes les informations fournies dans la section importante de l’information de Sécurité de
ce manuel. L’échec de suivre ces instructions peut causer la mort, la blessure grave ou des dommages matériels.
Mur
NOTE : La pression d’admission appropriée pour cet appareil conv
14.)
Coupez le câble
Rattachez les deux plaques
Coupez l’existante plaque du panneau de contrôle utilisant un coupefil.
Rattachez la plaque et la plaque de conversion NG incluse avec ce kit à la
table de feu utilisant le kit câble inclus.
La page est en cours de chargement...
La page est en cours de chargement...
La page est en cours de chargement...
La page est en cours de chargement...
La page est en cours de chargement...
La page est en cours de chargement...
La page est en cours de chargement...
La page est en cours de chargement...
La page est en cours de chargement...
La page est en cours de chargement...
La page est en cours de chargement...
La page est en cours de chargement...
La page est en cours de chargement...
-
 1
1
-
 2
2
-
 3
3
-
 4
4
-
 5
5
-
 6
6
-
 7
7
-
 8
8
-
 9
9
-
 10
10
-
 11
11
-
 12
12
-
 13
13
-
 14
14
-
 15
15
-
 16
16
-
 17
17
-
 18
18
-
 19
19
-
 20
20
-
 21
21
-
 22
22
-
 23
23
-
 24
24
-
 25
25
-
 26
26
-
 27
27
-
 28
28
-
 29
29
-
 30
30
-
 31
31
-
 32
32
-
 33
33


Real Flame C1725LP Le manuel du propriétaire
- Taper
- Le manuel du propriétaire
- Ce manuel convient également à
dans d''autres langues
Documents connexes
-
Real Flame C1270LP-BK Mode d'emploi
-
-
-
-
-
Real Flame C11813LP-GRY Mode d'emploi
-
-