Pleasant Hearth L-24 Manuel utilisateur
- Catégorie
- Cheminées
- Taper
- Manuel utilisateur

1
ELECTRIC
CRACKLING LOG
MODEL #L-24
C US
INSTALLER: Leave this manual with the appliance.
CONSUMER: Retain this manual for future reference.
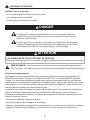
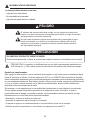
WARNING!
IF THE INFORMATION IN THIS MANUAL IS NOT FOLLOWED EXACTLY,
AN ELECTRICAL SHOCK OR FIRE MAY RESULT
CAUSING PROPERTY DAMAGE, PERSONAL INJURY OR LOSS OF LIFE.
IMPORTANT INSTRUCTIONS
PLEASE READ THIS MANUAL BEFORE INSTALLING AND USING APPLIANCE
Français p. 12
Español p. 23
ATTACH YOUR RECEIPT HERE
Serial Number ________________________________ Purchase Date _________________________________
20-12-105 Rev. 5/14
Questions, problems, missing parts? Before returning to your retailer, call our customer
service department at 1-877-447-4768 8:30 a.m. – 4:30 pm CST, Monday – Friday.

2
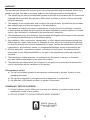
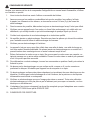
IMPORTANT: Read all instructions and warnings carefully before starting installation.
Failure to follow these instructions may result in a possible electric shock, injury to
persons, re hazard and will void the warranty.
TABLE OF CONTENTS
Safety Information ............................................................................................................................3
Package Contents ............................................................................................................................5
Appliance Dimensions ...................................................................................................................... 6
Preparation .......................................................................................................................................7
Operating Instructions ...................................................................................................................... 8
Care and Maintenance ..................................................................................................................... 8
Electric Wiring Diagram ....................................................................................................................9
Troubleshooting ................................................................................................................................9
Warranty .........................................................................................................................................10
Replacement Parts ......................................................................................................................... 11

3
Please read and understand this entire manual before attempting to assemble, operate or
install the product.
1. Read all instructions before using this appliance.
2. Keep combustible materials such as furniture, pillows, bedding, papers, clothes and curtains, at
least 3 ft (914 mm). from the front of this appliance.
3. If possible always unplug this appliance when not in use.
4. Do not operate any appliance with a damaged cord or plug or after the appliance malfunctions,
has been dropped or damaged in any manner.
5. Any repairs to this appliance should be carried out by a qualied service person.
6. Under no circumstances should this appliance be modied. Parts having to be removed for
servicing must be replaced prior to operating this appliance again.
7. Do not use outdoors.
8. This appliance is not intended for use in bathrooms, laundry areas and similar indoor locations.
Never place this appliance where it may fall into a bathtub or other water container.
9. Do not run cord under carpeting. Do not cover cord with throw rugs, runners or the like.
Arrange cord away from trafc areas and where it will not be tripped over.
10. To disconnect this appliance, turn controls to the off position, then remove plug from outlet.
11. Do not use on soft surfaces, like a bed, where openings may become blocked. Do not place
unit on carpeting or rugs.
12. This appliance has hot and arcing or sparking parts inside. Do not use it in areas where
gasoline, paint or ammable liquids are used or stored.
13. Use this appliance only as described in this manual. Any other use not recommended by the
manufacturer may cause re, electric shock or injury to persons.
14. The adaptor supplied with this unit must only be replaced with adaptor part number ELF21360A
supplied by the GHP GROUP.
15. SAVE THESE INSTRUCTIONS.
SAFETY INFORMATION

4
SAFETY INFORMATION
Electrical outlet wiring must comply with local building codes and other
applicable regulations to reduce the risk of re, electrical shock and injury
to persons.
Do not use this appliance if any part of it has been under water. Immediately
call a qualied service technician to inspect the appliance and replace any part
of the electrical system that has been under water.
DANGER
PRODUCT DAMAGE MAY OCCUR.
Never attempt to disassemble or alter the product in any way not instructed by this manual.
CAUTION: Changes or modications not expressly approved by the manufacturer and
CSA could void user's authority to operate this equipment.
CAUTION
• Out of direct sunlight
• Not susceptible to moisture
• Away from uninsulated outside walls
This equipment has been tested and found to comply with the limits for a Class B digital device,
pursuant to Part 15 of the FCC Rules and Industry Canada ICES-003. These limits are designed to
provide reasonable protection against harmful interference in a residential installation. This equipment
generates, uses, and can radiate radio frequency energy and, if not installed and used in accordance
with the instruction manual, might cause harmful interference to radio communications.
However, there is no guarantee that interference will not occur in a particular installation. If this
equipment does cause harmful interference to radio or television reception, which can be determined
by turning the equipment off and on, the user is encouraged to try to correct the interference by one or
more of the following measures:
• Reorient or relocate the receiving antenna.
• Increase the separation between the equipment and receiver.
• Connect the equipment into an outlet on a circuit different from that to which the receiver is
connected.
• Consult the dealer or an experienced radio/TV technician for help.
The appliance should be located in an area:
Transformer Plug:

5
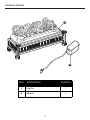
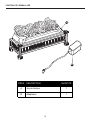
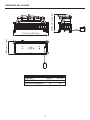
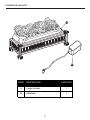
PACKAGE CONTENTS
A
B
PART DESCRIPTION QUANTITY
A Log Set 1
B Adaptor 1

6
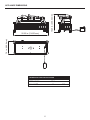
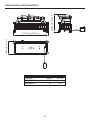
APPLIANCE DIMENSIONS
TECHNICAL SPECIFICATIONS
VOLTAGE 120V AC 12 V DC
FREQUENCY 60 Hz -
MAX. AMPS 1A 7W
20.25 in. (514.35 mm)
7.5 in. (190.5 mm)
10.25 in. (260.34 mm)

7
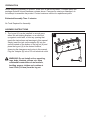
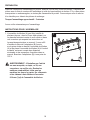
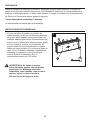
PREPARATION
ASSEMBLY INSTRUCTIONS
1
1. The log set (A) can be installed in several ways,
either into an existing replace, on a solid oor
up against a solid wall, or into any opening that
meets the instructions and warnings in this manual.
Simply insert the jack on the adaptor (B) into the
socket located on the bottom of the log set (A) and
place the log set (A) in the desired location,
observing the clearances and notes in this manual.
Plug the adaptor (B) into a 120-volt electrical outlet.
B
A
Before beginning assembly of product, make sure all parts are present. Compare parts with
package contents list and hardware contents above. If any part is missing or damaged, do
not attempt to assemble the product. Contact customer service for replacement parts.
Estimated Assembly Time: 5 minutes
No Tools Required for Assembly
WARNING: Do not install unit on carpeting,
rugs, beds, blankets, pillows, etc. Keep
combustible materials such as furniture,
bedding, papers, clothes and curtains at
least 3 feet (914 mm) from the log set.

8
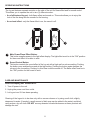
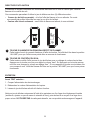
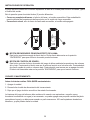
OPERATING INSTRUCTIONS
CARE AND MAINTENANCE
The log set features separate controls on the side of the unit for ame effect and for sound control.
This allows you to operate the unit in two (2) different modes:
• As a full-featured log set - both ame effect and sound on. This mode allows you to enjoy the
look of the re along with the sound of a re burning.
• As a visual effect - only the ame effect is on; the sound is off.
1
2
2
1
Main Power/Flame Effect Button:
This button supplies power to the light effect display. The light effect must be in the "ON" position
for the sound effect to be able to work.
Sound Control Button:
This button controls the sound effect of the log set with a high and low volume setting. Pushing
the button once enables the sound at the high setting. Pushing the button again changes the
volume to the low setting. Pushing it a third time turns the sound off. The ame effect must be in
the "ON" position for the sound to work.
Before attempting ANY maintenance:
1. Turn off power to the unit.
2. Unplug the power cord from outlet.
3. Let log set cool if it has been operating.
Cleaning of the log set is to be done only with a vacuum cleaner or by using a soft cloth, slightly
dampened in water (if needed, a small amount of dish soap can be added to the water) and dried
using a clean, dry soft cloth. DO NOT use any abrasive household cleaners as these products will
damage the unit.

9
Disconnect power before servicing.
Any electrical re-wiring of this appliance must be done by a qualied electrician.
This wiring must be done in accordance with local codes and/or in Canada with
the current CSA Standard C22.2 No 12-1982 (R2004), and for US installations,
the ANSI/UL Standard 153 12
th
Ed.
If repairing or replacing any electrical component or wiring, the original
wire routing, color coding and securing locations must be followed.
DANGER
Any electrical repairs or rewiring of this unit should be carried out by a licensed electrician in
accordance with national and local codes.
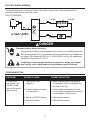
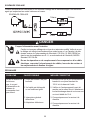
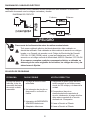
CIRCUIT DIAGRAM
ELECTRIC WIRING DIAGRAM
1 white 2 white
3 black 4 black
TROUBLESHOOTING
PROBLEM POSSIBLE CAUSE CORRECTIVE ACTION
Log set does
not operate; the
ON/OFF power
light on the control
panel is not lit.
1. The log set is not
plugged in.
2. A circuit breaker is tripped
or a fuse blown.
3. Defective ON/OFF switch.
4. Defective adaptor.
1. Make sure the log set is plugged in
to a standard 120-volt outlet and into
the base of the unit.
2. Check additional appliances on the
circuit; ideally the appliance should be
on a dedicated 15-amp circuit.
3. Call customer service.
4. Call customer service.

10
The manufacturer warrants the electric log set is free from manufacturing and material defects for a
period of one year from date of purchase, subject to the following conditions and limitations.
1. This electric log set must be installed and operated at all times in accordance with the instructions
furnished with the product. Any alteration, willful abuse, accident, or misuse of the product shall
nullify this warranty.
2. This warranty is non-transferrable, and is made to the original owner, provided that the purchase
was made through an authorized supplier of the manufacturer.
3. This warranty is limited to the repair or replacement of part(s) found to be defective in material
or workmanship, provided that such part(s) have been subjected to normal conditions of use and
service, after said defect is conrmed by the manufacturer’s inspection.
4. The manufacturer may, at its discretion, fully discharge all obligations with respect to this warranty
by refunding the wholesale price of the defective part(s).
5. Any installation, labor, construction, transportation, or other related costs/expenses arising from
defective part(s), repair, replacement, or otherwise of same, will not be covered by this warranty,
nor shall the manufacturer assume responsibility for same. Further, the manufacturer will not be
responsible for any incidental, indirect, or consequential damages, except as provided by law.
6. All other warranties - expressed or implied - with respect to the product, its components and
accessories, or any obligations/liabilities on the part of the manufacturer are hereby expressly
excluded.
7. The manufacturer neither assumes, nor authorizes any third party to assume, on its behalf,
any other liabilities with respect to the sale of this product.
8. The warranties as outlined within this document do not apply to non-manufacturer accessories
used in conjunction with the installation of this product.
This warranty is void if:
a) The log set has been operated in atmospheres contaminated by chlorine, uorine or other
damaging chemicals.
b) The log set is subjected to prolonged periods of dampness or condensation.
c) Any alteration, willful abuse, accident, or misuse of the product.
IF WARRANTY SERVICE IS NEEDED . . .
1) Contact customer service. Make sure you have your warranty, your sales receipt, and the
model/serial number of your product.
2) DO NOT ATTEMPT TO DO ANY SERVICE WORK YOURSELF.
WARRANTY
6440 W. Howard St.
Niles, IL 60714-3302
877-447-4768

11
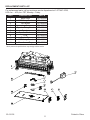
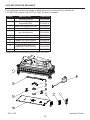
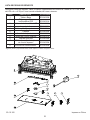
REPLACEMENT PARTS LIST
For replacement parts, call our customer service department at 1-877-447-4768,
8:30 a.m. – 4:30 p.m. CST, Monday – Friday.
PART DESCRIPTION PART #
1 Base Panel EFL24350A
2 LED Fixing Panel EFL24351A
3 LED Board EFL24352A
4 Log Set EFL24353A
5 Speaker Fixing Panel EFL24354A
6 Speaker EFL24355A
7 Speaker Washer EFL24356A
8 PCB EFL24357A
9 Control Box EFL24358A
10 PCB Fixing Panel EFL24359A
11 Transformer Plug EFL24360A
Printed in China
Some parts and specications may change without notice.
20-12-105

12
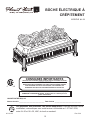
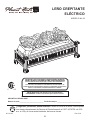
BÛCHE ÉLECTRIQUE À
CRÉPITEMENT
MODÈLE #L-24
REMARQUE À L’INTENTION DE L’INSTALLATEUR : Veuillez laisser ce manuel au propriétaire.
REMARQUE À L’INTENTION DU CLIENT : Veuillez conserver ce manuel pour vous
y référer ultérieurement.
AVERTISSEMENT!
RESPECTEZ SCRUPULEUSEMENT LES DIRECTIVES DU PRÉSENT MANUEL
POUR PRÉVENIR LES CHOCS ÉLECTRIQUES, LES INCENDIES, LES
DOMMAGES AINSI QUE LES BLESSURES GRAVES OU MORTELLES.
CONSIGNES IMPORTANTES
VEUILLEZ LIRE CE MANUEL AVANT D’INSTALLER OU D’UTILISER LE FOYER.
Des questions, des problèmes, des pièces manquantes? Avant de retourner l’article
audétaillant, communiquez avec notre service à la clientèle au 1 877 447 4768,
entre 8 h 30 et 16 h 30, HNC, du lundi au vendredi.
C US
JOIGNEZ VOTRE REÇU ICI
Numéro de série _______________________________ Date d’achat ________________________________
20-12-105 Rev. 5/14

13
IMPORTANT : Lisez attentivement toutes les directives et tous les avertissements avant
de procéder à l’installation. Le non-respect de ces directives peut provoquer un choc
électrique, des blessures et un incendie, et annule la garantie.
TABLE DE MATIÉRES
Consignes de sécurité .................................................................................................................... 14
Contenu de l'emballage .................................................................................................................. 16
Dimensions de l’appareil .................................................................................................................17
Préparation .....................................................................................................................................18
Directives d’utilisation ..................................................................................................................... 19
Entretien .........................................................................................................................................19
Schéma de câblage ........................................................................................................................20
Dépannage .....................................................................................................................................20
Garantie ..........................................................................................................................................21
Liste des pièces de rechange ......................................................................................................... 22

14
Veuillez vous assurer de lire et de comprendre l’intégralité de ce manuel avant d’assembler, d’utiliser
ou d’installer ce produit.
1. Lisez toutes les directives avant d’utiliser ce ensemble de bûches.
2. Assurez-vous que les matières combustibles tels que les meubles, les oreillers, la literie,
le papier, les vêtements et les rideaux, se trouvent au moins 914 mm (3 pi) de l’avant du
electroménager.
3. Dans la mesure du possible, débranchez toujours ce electroménager lorsqu’il n’est pas utilisé.
4. N’utilisez pas un appareil muni d’un cordon ou d’une che endommagé, qui a déjà subi une
défaillance, qui est déjà tombé ou qui a été endommagé de quelque façon que ce soit.
5. Conez toute réparation de ce electroménager à un technicien qualié.
6. Ne modiez jamais ce electroménager. Remettez en place les pièces qui doivent être retirées
pour l’entretien avant d’utiliser le electroménager de nouveau.
7. N’utilisez pas ce electroménager à l’extérieur.
8. Le appareil n’est pas conçu pour être utilisé dans une salle de bains, une salle de lavage ou
tout autre endroit humide semblable. Ne placez jamais ce electroménager en un endroit où il
pourrait tomber dans une baignoire ou un autre contenant rempli d’eau..
9. Évitez d’acheminer le cordon sous un tapis. Ne couvrez pas le cordon avec une carpette, un
tapis de passage ou un autre article semblable. Placez le cordon dans un endroit peu passant
et où il ne pourra pas être accroché.
10. Pour débrancher ce electroménager, tournez les commandes en position d’arrêt, puis retirez la
che de la prise.
11. Ne placez pas le electroménager sur une surface molle, comme un lit, car les ouvertures
pourraient se bloquer. N'installez pas l'appareil sur la moquette ni un tapis.
12. Ce electroménager renferme des pièces chaudes et qui produisent des arcs électriques ou des
étincelles. N’utilisez pas le electroménager là où de l’essence, de la peinture ou des liquides
inammables sont utilisés ou entreposés.
13. N’utilisez ce electroménager que pour l’usage prévu dans ce manuel. Toute autre utilisation
du electroménager qui n’est pas prévue par le fabricant peut provoquer un incendie, un choc
électrique ou des blessures.
14. L'adaptateur fourni avec cet appareil ne devra être remplacé que par l’adaptateur avec numéro
de pièce ELF21360A fourni par le GROUPE GHP.
15. CONSERVEZ CES DIRECTIVES.
CONSIGNES DE SÉCURITÉ

15
• qui n’est pas exposé à la lumière directe du soleil;
• qui n’est pas exposé à l’humidité;
• à l’écart des murs extérieurs non isolés.
Placez le foyer à un endroit :
CONSIGNES DE SÉCURITÉ
Le câblage de la prise électrique doit être conforme aux codes du bâtiment
locaux et à tout autre règlement an de réduire le risque d’incendie, de choc
électrique ou de blessure.
N’utilisez pas ce jeu de bûches si une partie du jeu de bûches a été immergée.
Appelez immédiatement un technicien qualié qui inspectera le jeu de bûches
et remplacera toute partie du circuit électrique qui a été immergée.
DANGER
LES DOMMAGES DE PRODUIT PEUVENT SE PRODUIRE.
N’essayez jamais de démonter ou changer le produit de quelque façon non instruit par ce manuel.
ATTENTION
MISE EN GARDE : Les changements ou modications non expressément approuvés par
GHP Group Inc, et la CSA pourraient annuler l'autorité de l'utilisateur à utiliser cet équipement.
Cet appareil a été testé et déclaré conforme aux limites imposées aux appareils numériques de
classe B, conformément à l’alinéa 15 du règlement de la FCC et à la norme NMB-003 d’Industrie
Canada. Ces limites sont destinées à assurer une protection raisonnable contre les interférences
nuisibles dans un environnement résidentiel. Cet appareil génère, utilise et peut émettre de l’énergie
radiofréquence et, s’il n’est pas installé et utilisé conformément aux directives, risque de provoquer
des interférences nuisibles aux communications radio.
Cependant, tout risque d’interférence ne peut être totalement exclu. S’il constate des interférences
lors de la réception d’émissions de radio ou de télévision (il suft pour le vérier d’allumer et
d’éteindre successivement l’appareil), l’utilisateur devra prendre les mesures nécessaires pour les
éliminer. À cette n, il devra :
• Réorienter ou déplacer l’antenne réceptrice;
• Accroître la distance entre l’appareil et le récepteur;
• Brancher l’appareil dans une prise de courant appartenant à un autre circuit que celui du récepteur;
• Obtenir de l’aide auprès du détaillant ou d’un technicien en radio et télévision expérimenté.
Bouchon de transformateur:

16
CONTENU DE L'EMBALLAGE
PIÈCE DESCRIPTION QUANTITÉ
A Jeu de bûches 1
B Adaptateur 1
A
B

17
DIMENSIONS DE L’APPAREIL
FICHE TECHNIQUE
TENSION 120V AC 12 V DC
FRÉQUENCE 60 Hz -
INTENSITÉ MAXIMALE 1A 7W
514,35 mm (20.25 po)
190,5 mm (7.5 po)
260,34 mm (10.25 po)

18
PRÉPARATION
INSTRUCTIONS POUR L’ASSEMBLAGE
1
1. L’ensemble de bûches (A) peut être installé de
plusieurs façons : dans un foyer déjà existant, sur
un plancher résistant contre un mur solide ou dans
une ouverture qui respecte les instructions et
les avertissements dans ce manuel. Il vous suft
d’installer la che de l’adaptateur (B) fournie
sur la prise située au bas de l’ensemble de bûches
(A) et de placer l’ensemble de bûches (A) à l’endroit
souhaité, en tenant compte des distances
minimales et des remarques formulées dans ce
manuel. Branchez l’adaptateur (B) à une prise de
120 V.
B
A
Avant de commencer l’assemblage du produit, assurez-vous d’avoir toutes les pièces. Comparez les
pièces avec la liste du contenu de l’emballage et celle de la quincaillerie ci-dessus. S’il y a des pièces
manquantes ou endommagées, ne tentez pas d’assembler le produit. Communiquez avec le service
à la clientèle pour obtenir des pièces de rechange.
Temps d’assemblage approximatif : 5 minutes
Aucun outils nécessaires pour l’assemblage
AVERTISSEMENT : N’installez pas l’article
sur une moquette, un tapis, un lit, une
couverture, un oreiller, etc. Gardez les
matières combustibles, telles que les
meubles, les draps, le papier, les vêtements
et les rideaux à une distance d’au moins
914 mm (3 pi) de l’ensemble de bûches.

19
DIRECTIVES D’UTILISATION
L’ensemble de bûches comprend des commandes distinctes sur le côté de l’article pour l’effet de
amme et le contrôle du son.
Ces commandes permettent d’utiliser le jeu de bûches en deux (2) différents modes :
• Comme jeu de bûches complet – à la fois l'effet de amme et le son allumés. Ce mode
vous permet de proter l'allure de feu avec le son d'un feu brûlant.
• Comme effet visuel seulement – seul l'effet de amme est allumé; le son est éteint.
1
2
TOUCHE D’ALIMENTATION PRINCIPALE/EFFET DE FLAMME:
Cette touche fournit du courant électrique à l'effet de lumière. Cet effet doit être dans la position
“ALLUMÉ” pour que l'effet sonore puisse être en mesure de fonctionner.
TOUCHE DE CONTRÔLE DU SON:
Cette touche contrôle l'effet sonore du jeu de bûches avec un réglage de volume haut et bas.
Appuyez sur la touche une fois pour régler le volume “haut”. En appuyant sur la touche encore
une fois vous changez le volume au réglage “bas”. Si vous appuyez la touche une troisième fois
vous coupez le son. L'effet de amme doit être sur la position “ALLUMÉ” pour que le son puisse
fonctionner.
2
1
ENTRETIEN
Avant TOUT entretien :
1. Coupez l’alimentation du electroménager.
2. Débranchez le cordon d’alimentation de la prise.
3. Laissez le jeu de bûches refroidir s’il était en fonction.
Nettoyez jeu de bûches uniquement à l'aide d'un aspirateur ou d'un linge doux légèrement humide
(au besoin, ajoutez un peu de savon à vaisselle à l’eau), puis séchez-le au moyen d’un linge doux,
propre et sec. N’UTILISEZ PAS de nettoyants abrasifs, car ces produits endommageront l'appareil.

20
Coupez l’alimentation avant l’entretien
Conez tout nouveau câblage de ce foyer à un technicien qualié. Veillez à ce que
le câblage soit effectué conformément aux codes locaux ou, au Canada, à la plus
récente version du Code canadien de l’électricité, C22.2 No 12-1982 (R2004) ou,
dans le cas des installations aux É.-U., au code national de l’électricité, ANSI/UL
Standard 153 12th Ed.
En cas de réparation ou de remplacement d’un composant ou d’un câble
électrique, respectez l’acheminement des câbles, les codes de couleur et
les emplacements de xation d’origine.
DANGER
SCHÉMA DE CÂBLAGE
SCHÉMA DE CÂBLAGE
Conez les réparations électriques et tout nouveau câblage de ce electroménager à un électricien
agréé qui respectera les codes nationaux et locaux.
1 blanc 2 blanc
3 noir 4 noir
DÉPANNAGE
PROBLÈME CAUSE POSSIBLE MESURE CORRECTIVE
Le jeu de bûches ne
fonctionne
pas, le voyant
d’alimentation du
tableau de
commande n’est
pas allumé.
1. Le jeu de bûches n’est pas
branché.
2. Un fusible est déclenché
ou un fusible est grillé.
3. Interrupteur général
défectueux.
4. Adaptateur défectueux
1. Assurez-vous que le jeu de bûches est
branché à une prise standard de
120-V et à la base de l'unité.
2. Vériez si d’autres appareils sont ali-
mentés par le même circuit. Idéalement,
le electroménager devrait se trouver sur
un circuit dédié de 15-A.
3. Communiquez avec le service à la
clientèle.
4. Communiquez avec le service à la
clientèle.
La page est en cours de chargement...
La page est en cours de chargement...
La page est en cours de chargement...
La page est en cours de chargement...
La page est en cours de chargement...
La page est en cours de chargement...
La page est en cours de chargement...
La page est en cours de chargement...
La page est en cours de chargement...
La page est en cours de chargement...
La page est en cours de chargement...
La page est en cours de chargement...
La page est en cours de chargement...
-
 1
1
-
 2
2
-
 3
3
-
 4
4
-
 5
5
-
 6
6
-
 7
7
-
 8
8
-
 9
9
-
 10
10
-
 11
11
-
 12
12
-
 13
13
-
 14
14
-
 15
15
-
 16
16
-
 17
17
-
 18
18
-
 19
19
-
 20
20
-
 21
21
-
 22
22
-
 23
23
-
 24
24
-
 25
25
-
 26
26
-
 27
27
-
 28
28
-
 29
29
-
 30
30
-
 31
31
-
 32
32
-
 33
33


Pleasant Hearth L-24 Manuel utilisateur
- Catégorie
- Cheminées
- Taper
- Manuel utilisateur
dans d''autres langues
- English: Pleasant Hearth L-24 User manual
- español: Pleasant Hearth L-24 Manual de usuario
Documents connexes
-
Pleasant Hearth LI-24 Homeowner's Installation And Operating Instructions Manual
-
-
-
-
-
-